This is the tag we use to approve any post (old and being edited etc) through revisions. Once the majority of all existing/old posts have gone through our edit process and have this tag, we will then bulk remove it from them.
English Language Proficiency is the ability of Students to use the English language to make and communicate meaning in spoken and written contexts while completing their program of study.
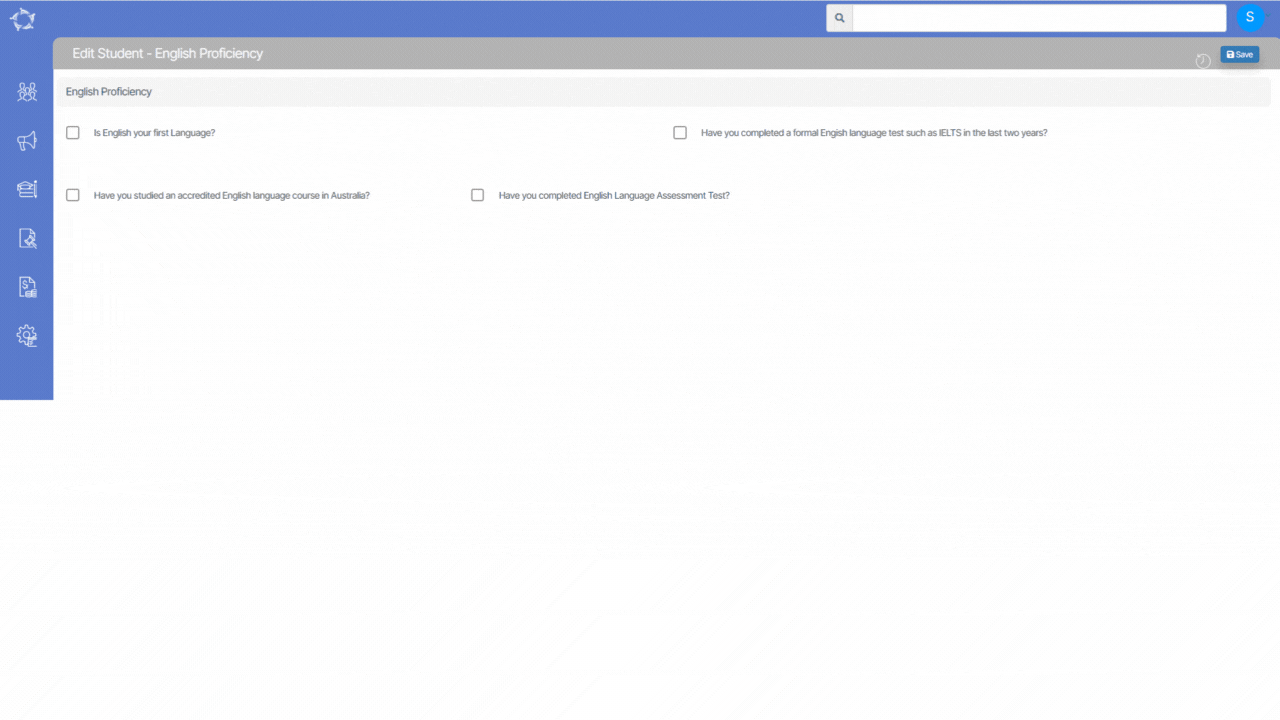
This screen will allow you to update the English Proficiency level of the Applicants/students. You can add English Proficiency from the Applicant Profile Tile and Student Profile Tile.
Note: You cannot edit the English proficiency at the applicant level once it is converted to a student. However, you can edit the English proficiency details at the student level.
Fields
Explanation of Fields
Is English your first Language
If the English language is the birth language of the student, then select this tick box
Have you completed a formal English language test such as IELTS in the last two years
By selecting this tick box the system will show 3 different fields related to the IELTS. You can enter the location where the IELTS test is conducted, enter the bands of the IELTS and enter the IELTS result date here.
Have you studied an accredited English language course in Australia
If the student has studied the English course in Australia, kindly select this tick box and the system will ask for the name of the provider and the course name.
Have you completed English Language Assessment Test
If the student has completed the English Language Assessment Test, then select this tick box and the system will ask for the type of the test. If the test was conducted online, select the online option otherwise select paper based. Also, the system will show two fields that ask for the score of the test and the date of the test conducted.
If you wish to report a student as FEE HELP then you need to set up the student with the FEE HELP settings in TEAMS.
IMPORTANT: The student can over time be set as both VSL and HEd FEE HELP and should be enrolled in a program that has been set up for FEE HELP. However, an enrolment can only be one of the FEE HELP options, it cannot be both.
Also, FEE HELP uses the terminology of the Unit of Study that a student has a loan for. In TEAMS we also use the term for a group/cluster of Subjects that link to a Unit of Subject (UoS). However, if you do not use the TEAMS UoS but Subjects for a program then you need to remember when we discuss a Unit of Study for FEE HELP it is also relating to the Subjects for an application or enrolment.
Note: Before creating the application please make sure that the FEE HELP settings have been updated at the Program level and Subject/UoS level.
For Application and Enrolment
Follow the below steps to enter FEE HELP:
While creating the application in TEAMS for a FEE HELP applicant then you need to tick the FEE HELP tick box option in the New Applicant screen when you are doing a new application.
Once the application has been created then you need to open the Application Dashboard and click on the Fee Help Settings icon from the applicant profile tile. The system will take you to the Fee Help settings screen and you need to enter the data in the field.
Note: There is a tick box called “This is a Fee Help Enrolment” which should be ticked if you want to report this student enrolment as a FEE HELP after approving it.
When the application is approved, all the settings that you have updated on the “Fee Help Setting” while creating the application, the system will carry forward them to the enrolment level FEE HELP Settings.
On Enrolment Dashboard > FEE HELP Settings, all the UoS or Subject level settings will appear on the UoS FH setting tab under the grid. You can edit and update them by clicking on the edit button from the action column.
After, clicking on the edit icon, the system will open a floating window of Edit Fee Help settings from where you can edit and update the settings and then select the SAVE button in the bottom right-hand corner of the screen.
On Enrolment Dashboard > Fee help loan screen, all the UoS/subjects will be visible which are linked with the enrolment. You can edit the Fee help loan by clicking on the edit icon from the Action column.
After clicking on the edit icon, the system will open the floating window from where you can edit and update the settings and then select the SAVE button in the bottom right-hand corner of the screen.
Note: In the above screen, you can see the Unit of studies is visible on the Fee help loan screen/Fee Help setting screen. There is a system setting which is called Loan calculation based on. Under this system setting, you can choose a Subject or Unit of study to calculate the loan amount. On the selection of UoS, the system will show all the linked units of studies with the enrolment on the Fee Help loan screen and Fee Help setting screen. Same as if the subject set is chosen then the system will show the linked subjects with the enrolment on the Fee Help loan screen and fee Help setting screen.
For existing Applicant and Student:
Note: Depending on what stage your student is at in TEAMS i.e. Applicant & Application or Student & Enrolment, determines where you need to go and update FEE HELP information you do not need to do it at both levels if it is a student with an enrolment. Just go to the Student Dashboard and update from there.
If you wish to flag an existing applicant or student as a FEE HELP student then you need to tick the relevant FEE Help option as explained below:
For an Applicant you need to go to Applicant Dashboard > select the FEE HELP icon to open the Edit Applicant details screen. There you can tick the relevant FEE HELP for an applicant and then save the screen.
For a student you need to go to Student Dashboard > select the FEE HELP icon to open the Edit Student details screen. There you can tick the relevant FEE HELP for a student and then save the screen
Also, on the Student Dashboard from the student summary tile, the user needs to click on the edit VSL student to update the TFN #, CHESSN # and other information related to the student and select the Save button.
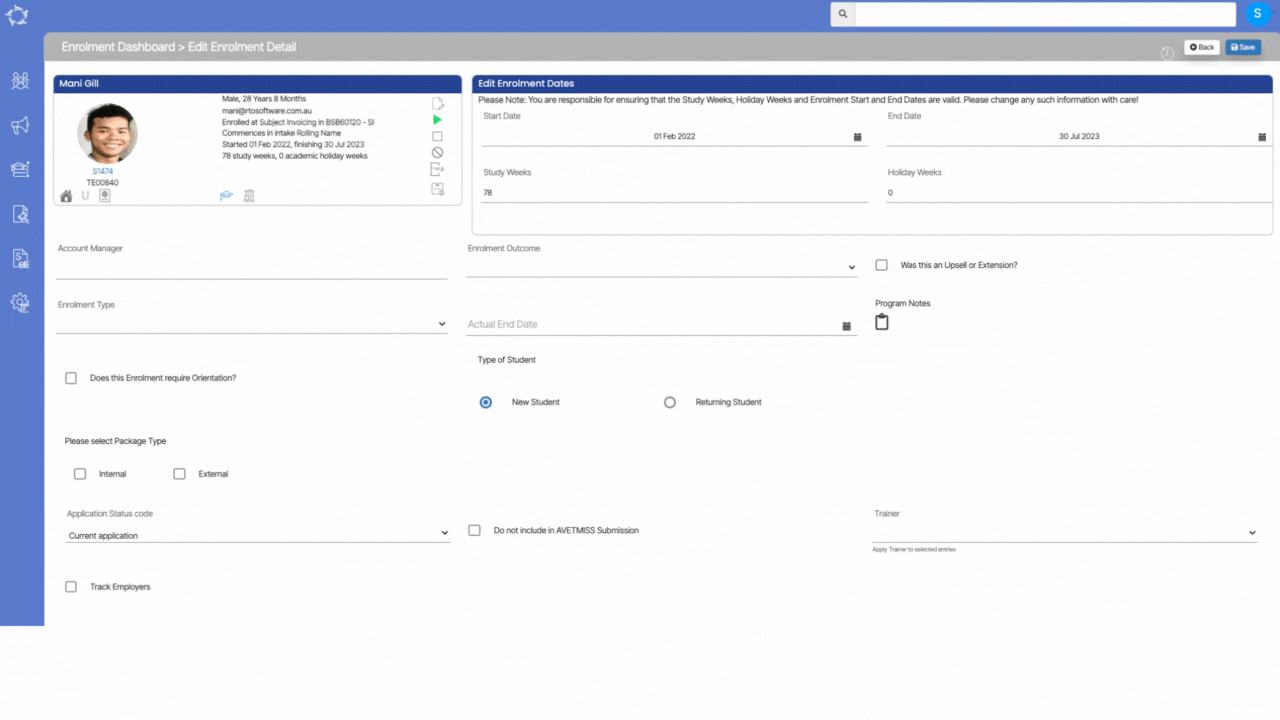
We have added a new field in the system called Actual End Date in the Edit Enrolment screen. The Actual End date is just the data entry field and it is not going to calculate the duration for you for the enrolment. This is just for the purpose to see the date when a student actually finished the study.
So, when you update and save the Actual End date in the edit enrolment screen, it will get populated on the profile section on the Enrolment Dashboard as you can see below:
IMPORTANT: It’s the Enrolment End Date that is being used in the AVETMISS reporting, not the Actual End Date. If you want the system to use the actual end date in AVETMISS reporting, please update the actual end date in the enrolment end date field.
The first thing to know is that AVETMISS stands for the Australian Vocational Education and Training Management Information Statistical Standard. It is the national data standard that ensures consistent and accurate capture and reporting of Vocational Education and Training (VET) information about students.
The below screen allows you to add/edit the AVETMISS information of a applicant. Some of the fields are very important in the AVETMISS submissions. For example, if you do not select the survey contact status, you will get errors in NCVER submissions. We will recommend you to enter all the AVETMISS fields to avoid compliance issues.
IMPORTANT – Once the application is converted from the applicant to a student then you won’t be able to add/edit any details at the applicant level. However, you can do the changes from the Student Profile Tile.
Note – On this screen, you will see dropdowns for the fields and these dropdowns are user codes in TEAMS. Please select here o know more about User Code.
Explanation of the Fields
Column
Explanation
Indigenous
It is a UserCode dropdown field where you can select the indigenous status of the applicant.
Country of Birth
Select the country of an applicant.
Language spoken at home
Select the language that the applicant speaks at home.
Last school level completed
You need to select the last school level completed year.
School completed in year
Select the completed year of the school.
Survey Contact Status
It is a UserCode dropdown field used to update the survey contact status of the applicant.
Client Identifier (Delta No)
In this field, you can enter the Delta number of an applicant.
Learning Unique Identifier (LUI – QLD)
It is a 10 digit learner unique identifier number used to log in learning account.
WAAMS No (WA)
In this field, you can enter the WAAMS number of the applicant
This tile will show you all the application’s financial details under the Student and Agent tabs. You can edit the invoice from the edit icon and you can also print the invoices.
IMPORTANT – You are only allowed to make the changes from this tile if the application is not converted otherwise you can make changes from the Enrolment Dashboard.
Student Tab
On the Student tab, only student-related financials will be visible and you will be able to see the Invoice date, description of the invoice, Total amount and Balanceamount also there will be an action column that includes edit, online payment, and print the invoice.
Columns
Explanations
Invoice Date
This column will show you the invoice dates.
Description
This column will show you the number of instalments for the application. You can also select more… to view the invoice details.
Total
This column displays the total amount of a particular invoice.
Balance
It will show you the balance amount if any deposit due is updated while creating the application after subtracting the deposit due.
Actions
Under the action column, there are 2 actions listed for each invoice the Edit icon and the print icon.
Agent tab
The agent tab will show you the invoice amount related to the agent.
On the agent tab, the system will show you the agent invoice date, description, invoice amount and balance amount.
Edit
This icon will allow you to edit the invoice
Print
This icon will allow you to print application invoice
For example – An IELTS score of 6.0 or equivalent is required for entry into this program. The document(s) must be provided within the X number of days from the date of the offer letter to make this offer valid.
Note: Student condition is a user code and if you want to add student conditions to the system then you need to go to the user codes screen in TEAMS.
IMPORTANT – Once the application is converted to a student then you won’t be able to add/edit any details at the applicant level. However, you can do the changes from the edit student screen.
How to Add Conditions
You can add conditions by selecting the Applicant/Student conditions icon from the Applicant/Student profile tiles as shown below:
Once you selected the icon, the screen will show a popup window and you can select the conditions from the dropdown and select the +Add button.
Upon selecting the +Add button, the condition will show up in the grid on the same window and also you will see a pop message in green on top of the screen (condition is added successfully).
After adding the conditions, the conditions icon will turn in red which will show you a tooltip saying view applicant conditions on the applicant Applicant Profile Tile and view student conditions on the Student Profile Tile.
It is a user code dropdown field. One can create multiple agent types in the system and can use them while creating agents.
Comm. Paid
If the Pay Commission tick box is selected on the agent Entry screen then the report will show you Yes otherwise the report will show you No.
Commission Template
It will show the default commission template selected on the agent entry screen.
Contract Renewal Date
It will show you the Contract Expiry Date selected on the Agents entry screen > Details tab.
login
Agent login is present on the agent entry details tab. This is used as the username in the agent portal.
Agent Password
The agent admin password is present on the agent entry details tab. This is used as the password in the agent portal.
Vendor Code
Vendor Code of the Agent.
Purchase Order Amount
It will show you the Purchase Order Amount selected on the Agents entry screen > Details tab
Active
It will show you Y if the agent is active and N if the agent is inactive.
Campus
If the Agent is linked to more than one campus then this column will show you all linked campuses as comma separated. And if all campuses are linked to the agent then the system will show you “All” in the column.
Pre-deducted Commission
If the Pre-deducted Commission tick is selected for the Agent on the agent entry screen > details screen then it will show you Y otherwise It will show you N.
Charge GST
If the Charge GST tick box is selected on the Agent Entry screen then it will show you Y otherwise it will show you N.
Phone #
Agent’s Phone number.
Mobile #
Agent’s Mobile number.
Fax #
Agent’s Fax number.
Email Address
This column will show all the Email Addresses as comma separated i.e primary email, secondary, and additional email addresses.
Web Address
Website address of the Agent.
Local Address
The local Address of the Agent added on the Agent Entry screen > Local Address Tab.
Mailing Address
The Mailing Address of the Agent added on the Agent Entry screen > Local Address Tab.
Country
Country of the Agent.
Contact
This column will show you the contacts added in the burger menu on the agent entry screen.
Email Address
Email Address of the Agent
ABN
ABN details added on the Agent Entry screen.
Total Students
Total Students linked to the agent.
Total Enrolments
Total Enrolments linked to the agent.
Acct Manager
Account Manager linked to the agent on the agent entry screen.
Below are the filters and their explanation for the Attendance Hours Report.
General Filters
Explanations
Print
This label has three Radio Buttons:
Show All – if you select this radio button the system will show you all the active and inactive agents in the system.
Show Active only – This will show you only the Active agents.
Show Inactive Only – This will show you only the inactive agents.
Print Based on
This label has two radio buttons:
Agent – By default, the Agent radio button is selected and if you want to print the report based on the agent name then you can select the agent name in the magic search field.
Agent Type – If you wish to print the report based on the Agent Type then you can select the agent type from the drop-down. (Agent Type is a user code and you can create the agent type from the User Code screen.
Account Manager Name
This is a magic search field and you can select multiple account managers in this field.
Campus
You can select multiple campuses from the dropdown.
Country
If you select any country or countries from the dropdown then the system will pull out the agents that are linked to the selected country or countries
Exclude Unsubscribe
This filter will exclude all the agents that have unsubscribed tick box selected on the agent entry screen > Contact Information Tab.
Only Display Default Contacts
The system will display all the agents with their primary contacts only. It will exclude all the contacts who are not selected as primary contacts for those agents.
Group By
Group by is used to group the report according to Group by selected for example Country, Agent Type, Commission Paid etc.
Sort By
Sort by is used to sort the report according to Sort by selected for example County, Agent Name, Agent Type etc.
Asc/Dsc
Select the Ascending or Descending radio button.
Select the “Print” Icon to generate the report. After clicking on it, the system will direct you towards the report dashboard screen. You can see the report status over there if it’s generated or not. Once it’s generated, download the report.
Below are the filters and their explanations for the Attendance Hours Report.
General Filters
Explanations
Report Start Date
Select the Start Date from where you want to start calculating the attendance for the enrolment
Report End Date
Select the Date when you want to finish calculating the attendance for the enrolment.
Enrolments to include
It let you choose current enrolments or finished enrolments. (By default both the tick boxes will be ticked). You can select/unselect as you required.
Campus
If you have multiple campuses then this dropdown will show more than one campus. You can select the campus/es as you need.
Program
This is a magic search and multi-select field and you can search for multiple Programs by typing the Program Code.
Sort By
Sort by is used to group students in the report according to the selected option in Sort by for e.g – Student No & Enrolment No, Program and Student Name.
Asc/Desc
Select the Ascending or Descending radio button.
Select the “Print” Icon to generate the report. After selecting it, the system will direct you to the report dashboard screen. You can see the report status over there if it’s generated or not. Once it’s generated, download the report.