Enrolment Dashboard – Link/Edit Agent

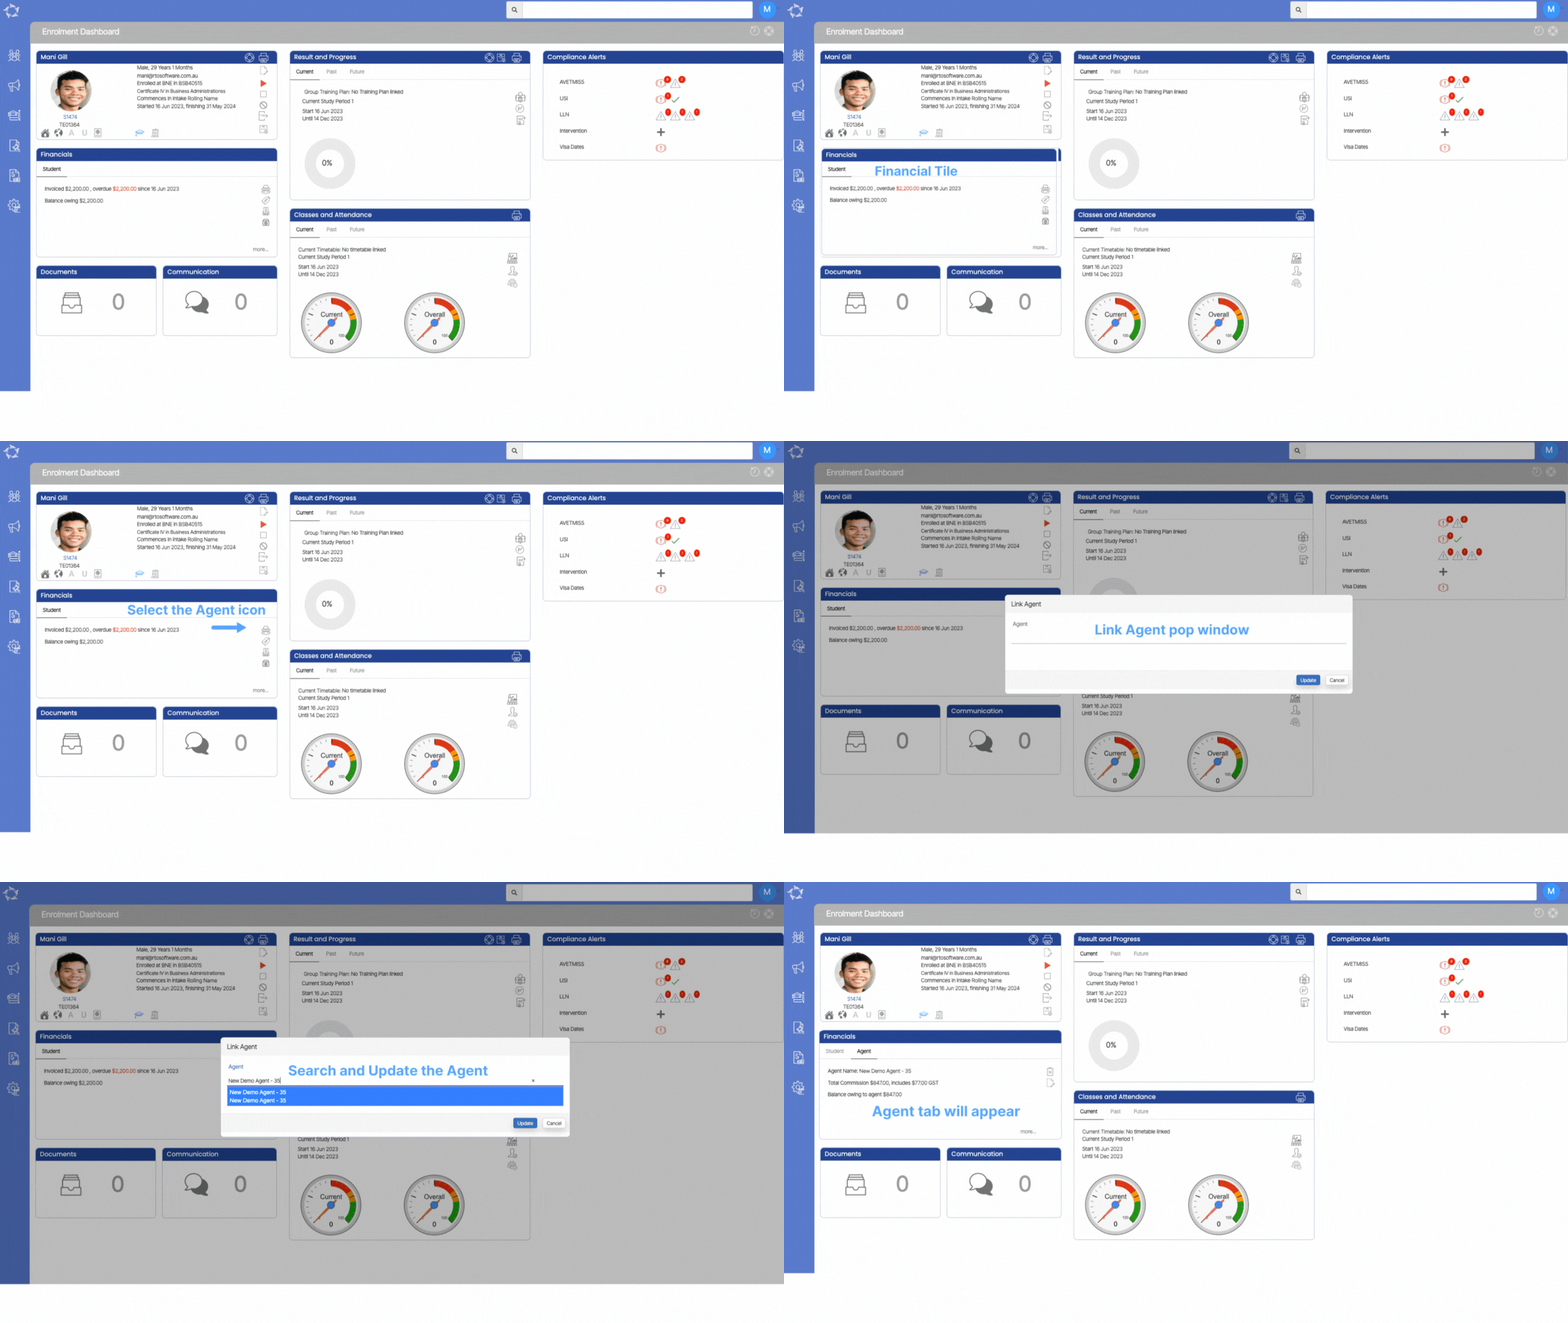
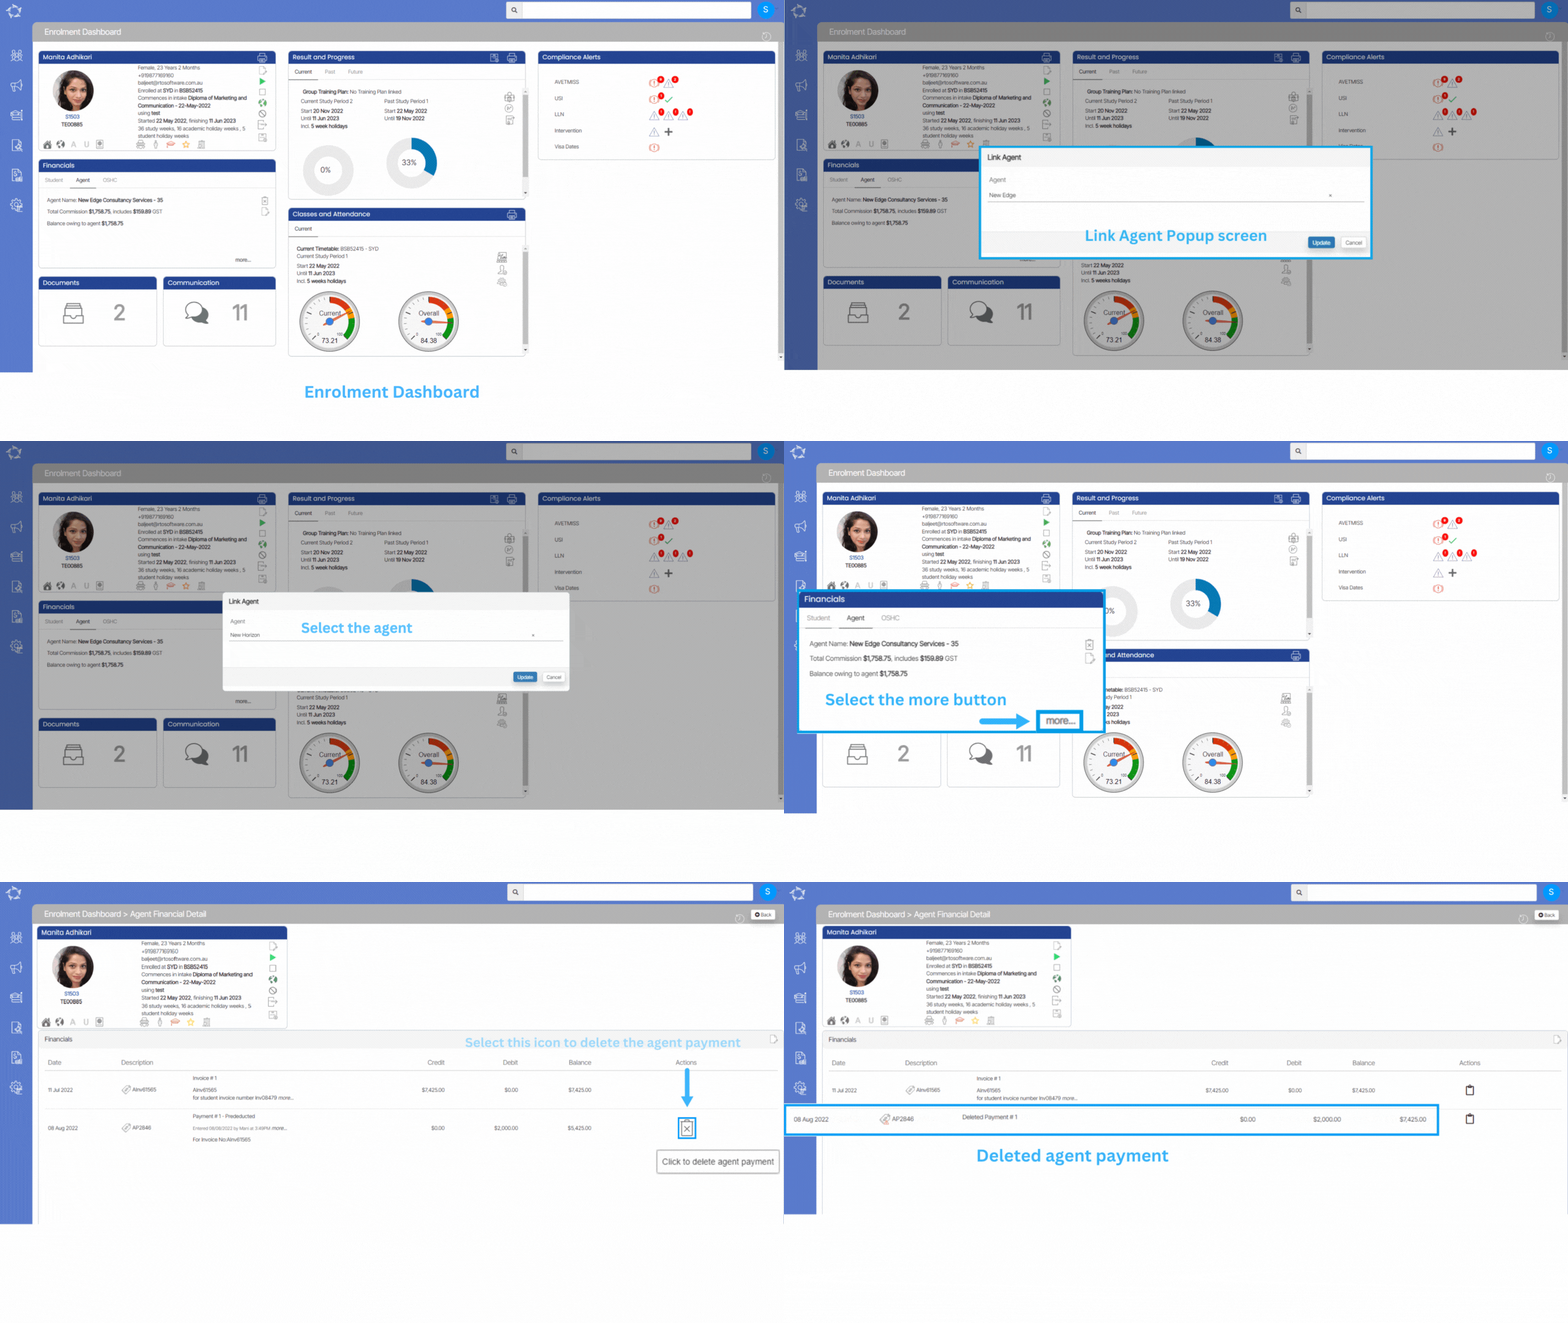
The Enrolment Dashboard features a Financial tile that provides functionality related to linking and editing agents. By accessing the Financial tile, you can link an agent from the Students tab to the enrolment. Once the agent is successfully linked, you can proceed to edit the agent’s details from the Agent tab.

The link agent icon within the Financial tile enables you to search for a specific agent and update their information within the enrolment. This allows for the synchronization of the agent’s data with the enrolment. On the other hand, the edit agent icon offers the capability to replace the currently linked agent with a different agent.

Important – If you want to change/edit the agent then make sure there are no payments that have been made for the agent in this enrolment, if the payments have been made then you have to go to the Agent financial screen and delete the payment via selecting the delete button.

To link the Agent you need to do the following steps

  • Then, you need to select the Agent icon and that will show you a link agent floating window.
  • Search and select the appropriate agent and select the update button.
  • The system will refresh the screen and will show you the Agent tab.
To edit the agent you need to do the following steps:

  • You need to go to the Enrolment Dashboard > Financial Tile > Agent Tab
  • Then, you need to select the edit icon and that will show you a link agent floating window.
  • The linked agent will be visible there, you just need to select the cross icon that is just next to the agent name to remove the current agent.
  • After that, you need to start typing the new agent code/name in the agent field and the system will show you the list of similar agent that matches your search.
  • Once you will select the required agent you need to update the agent, the system will reload the enrolment dashboard and will show the new one again with the new invoices.
NCVER AVETMISS Student Data Submissions – RTO TEAMS Step 4

Qualifications Issued

The Qualification Issued is exported into NAT00130 – Program Completed. This will show you all of your students who completed their enrolments and if you issued them a qualification (Certificate) or statement of attainment (SoA) – it really should match your Qualifications Issued Register.

The very first step you need to do before you do the AVETMISS Export

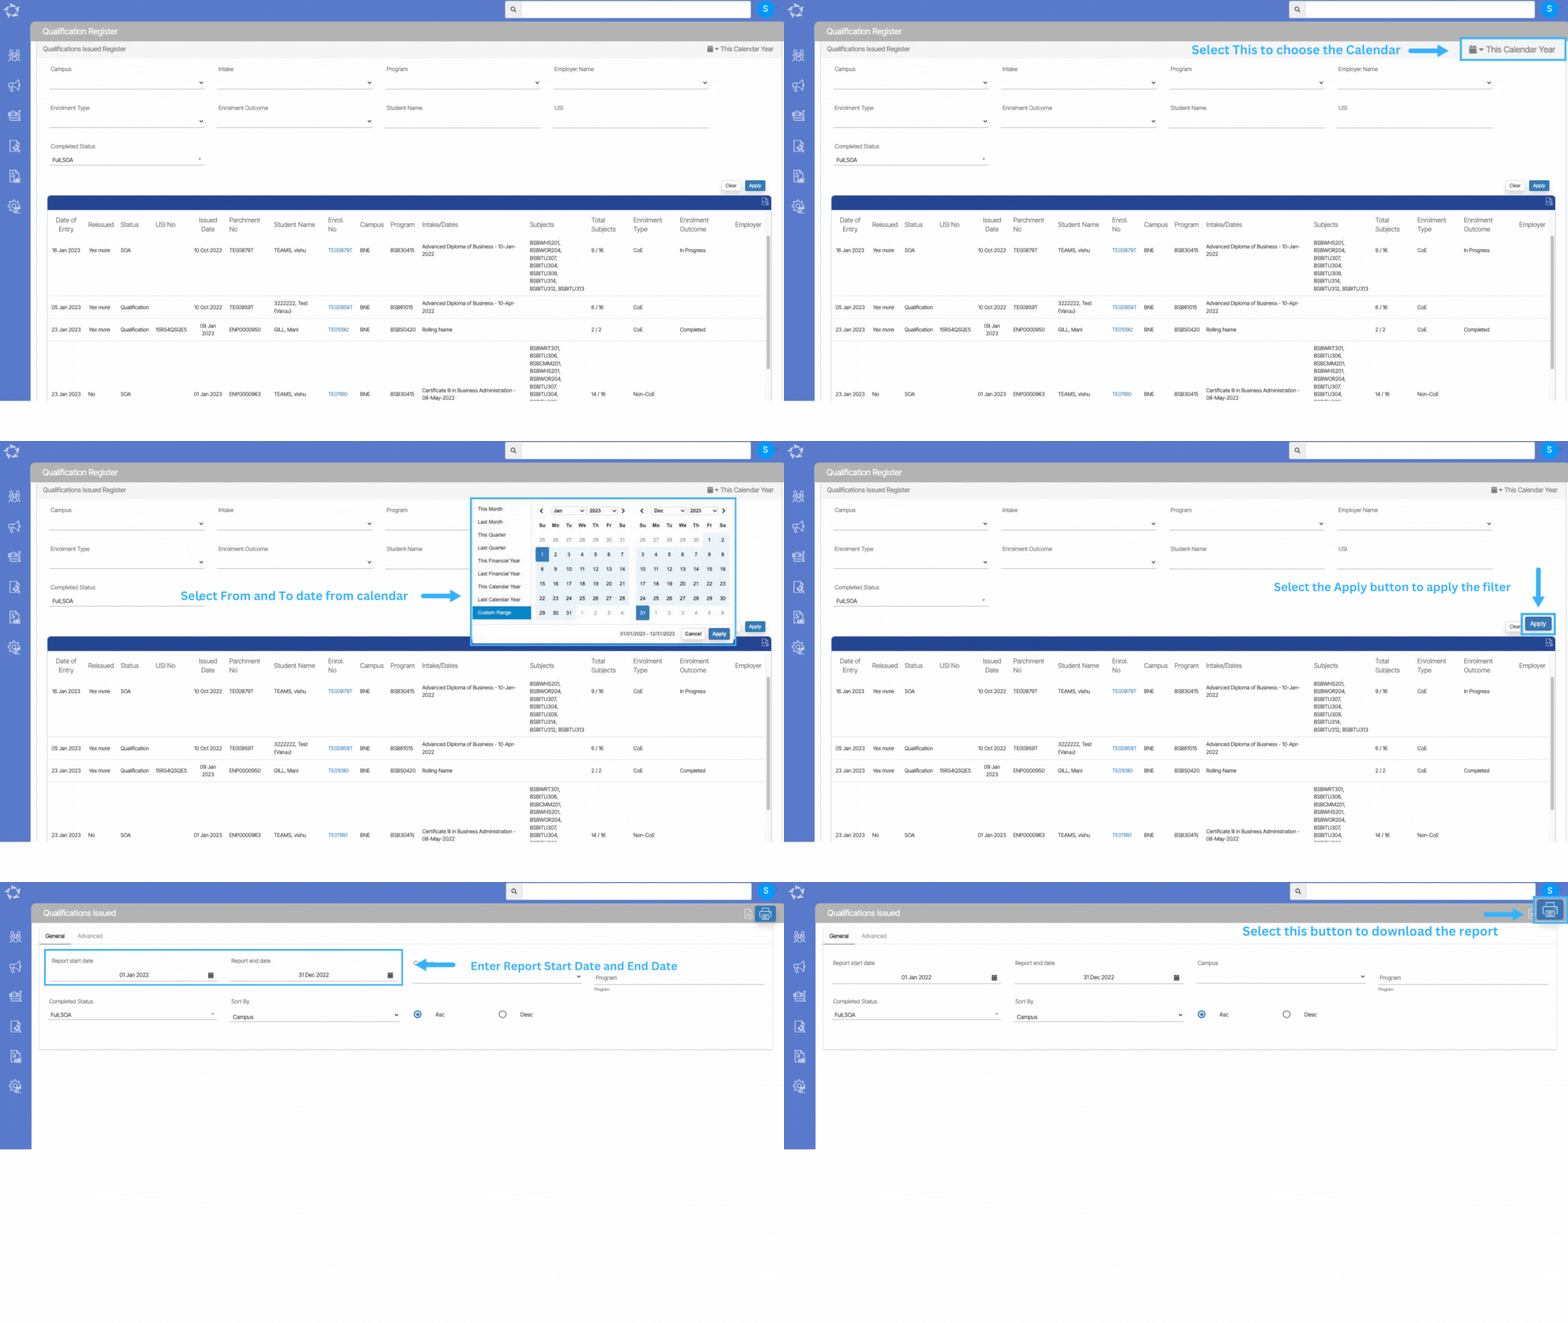
  • You need to go to the Main Dashboard > Compliance > Qualification Registered screen where you need to put the dates from 01/01/2022 to 31/12/2022 and if you have different campuses for the academics then you can leave the field as it is otherwise, you can use the parameters as you require and then select the Apply button. OR
  • You can run the report from Main Dashboard > Compliance > Qualification Issued report with the same parameters and then you can open each enrolment and confirm if the results are there and if not there then you have to run the finishers report for 2022 and see all the finishers and compare it, which enrolment that are in the finishers but is not in the finishers list.

When would you select SOA, FULL and NA

  • FULL – When the student has Successful results of competent. Credit transfer. RPL then all the subjects needed to be issued that qualification.
  • SOA – Where you do not have successful results for all of the subjects (if you are withdrawing) but have some subjects with competent then you issue a Statement of Attainment.
  • NA – This is where you do not have absolutely no results and student has never successfully achieved anything and they withdrew and you want to write the entry to the register to show then you can select NA and results issued.

IMPORTANT – This screen will not show anything if you have not updated the information properly (if you have not selected the Result Issued as Yes and whether you have selected the completed status FULL, SOA or NA) on the Enrolment Dashboard > Training Plan and Result screen > Qualification Information.

It’s our recommendation even if you’re not going to issue a Certificate or Statement of Attainment, all the qualifications to still select this Result issued as Yes have the completion Type as NA (not applicable) because it will show in the registered and to the auditor that you have processed as it was withdrawn or they have overdue fees.

For Example – If you have an enrolment where you have a competent result and a credit transfer, and the students have overdue fees and you’re not going to issue, but they’re finished, and they’ve left. If you don’t write to the register, the qualification issue register that they did, It’s not applicable you issued that you’re not going to do one and the auditor may question you on why aren’t there. Because they have a competent result or a credit transfer? That way. At least there’s an entry in the register that it’s not applicable. You didn’t issue it because they have overdue fees. Or they withdrew.

NOTE – On the Qualification Registered screen, you will only see one entry for one enrolment and if the student has more than one enrolment then you need to select yes more in the reissued column which will show you different entries on the screen, but you will not see multiple entries for the one enrolment in different rows. It will be always kept historically under the yes more section.

Important actions to complete on the Qualification Issued Registered

  • On the same screen, go to Qualification Information Icon > Pop up to select the correct result issued and completed status.
  • Select the appropriate enrolment outcome

Delete Agent

Enrolment Dashboard > Financials Tile > Agent Tab Delete icon

If you want to remove the agent linked with the student enrolment then you can delete it by using the delete button on the agent tab from the Enrolment Dashboard > Financial tile.

IMPORTANT– The system will not allow you to delete the agent if there is any agent payment has been made. You need to delete the agent payment first to delete the agent.

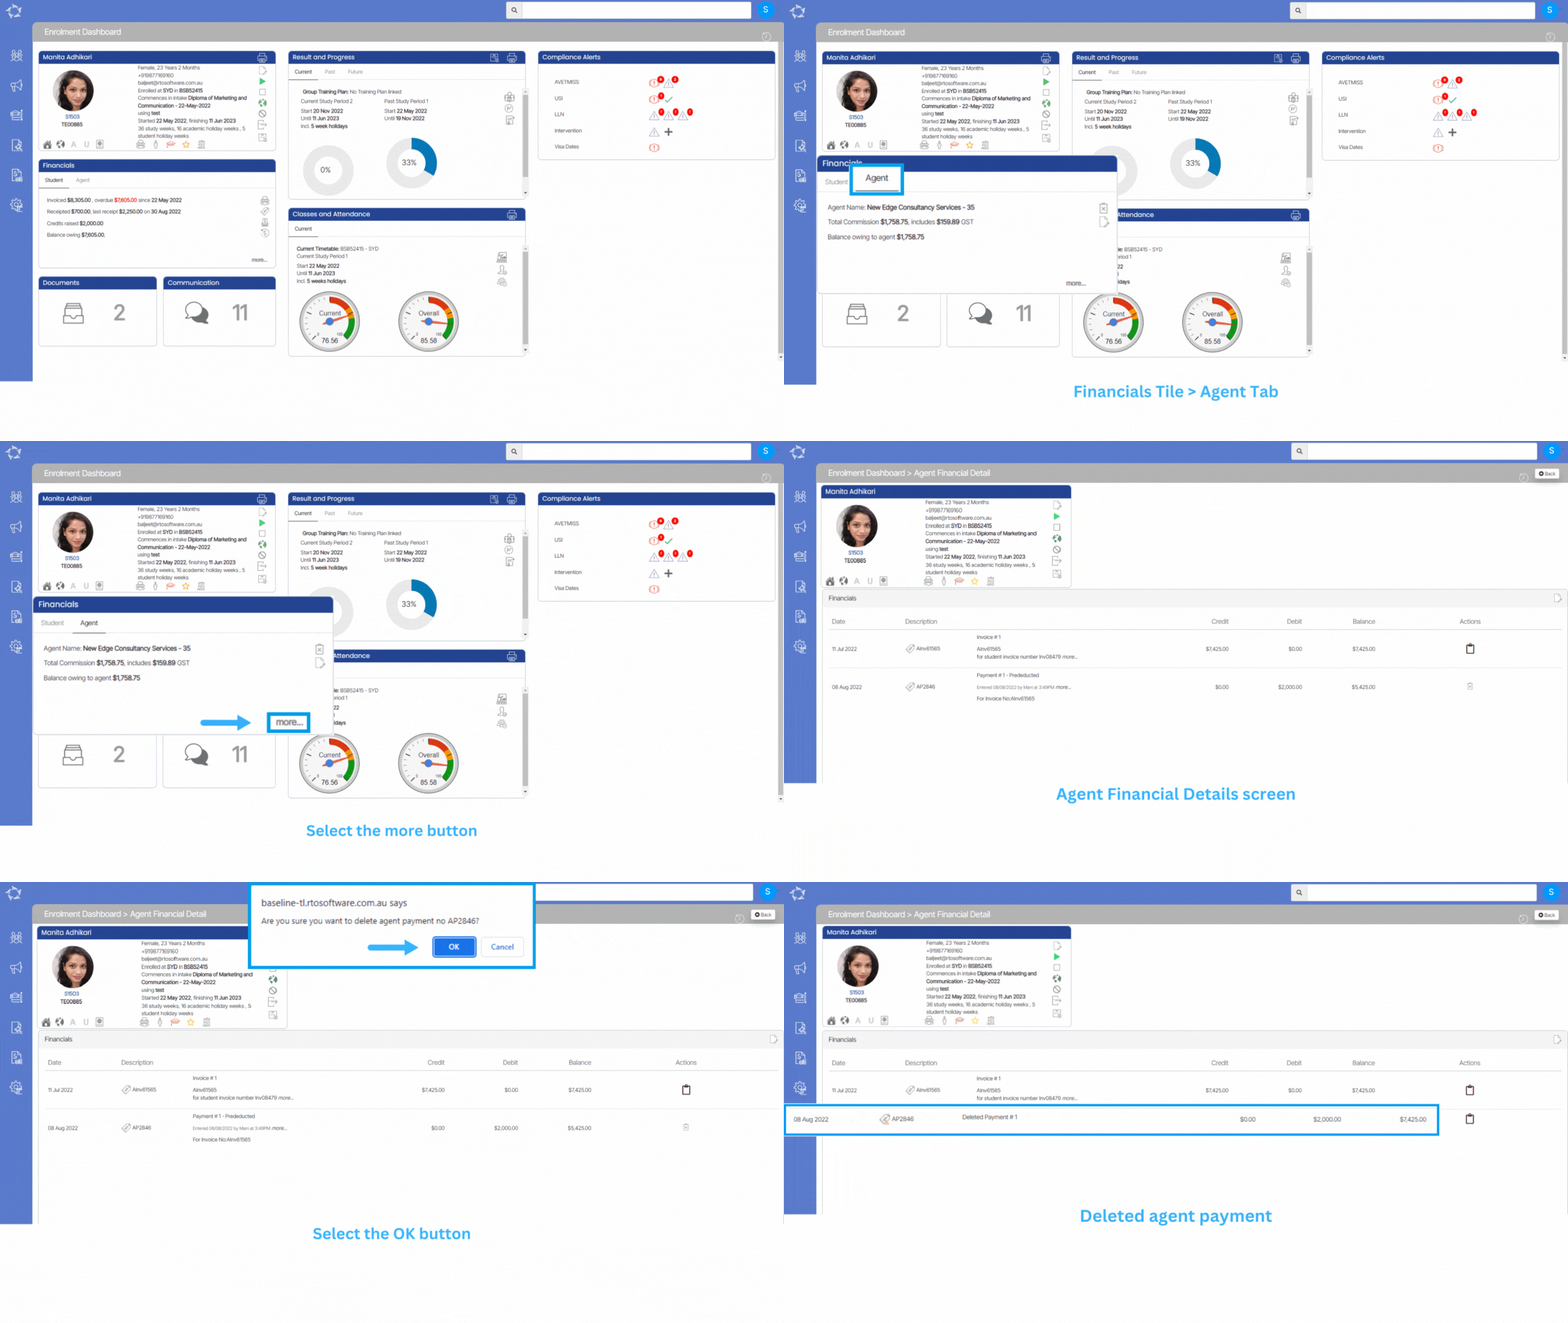
Below are the steps to delete the agent and agent payments.

  • Go to the Enrolment Dashboard > Financial Tile > Agent Tab and then select the more option.
  • Select the delete icon to delete the agent payment.
  • Once you select the delete icon the system will show you the popup message on top of the screen. (Are you sure you want to delete the agent payment #). You can select OK to delete or cancel to leave it as it is.
  • Once the payment has been deleted, you will be able to remove the agent from the enrolment.
  • You need to go back to the enrolment dashboard > Financial Tile > Agent Tab
  • Select the delete icon to delete the agent.
  • The system will reload the screen and the agent will get removed from the enrolment.

Enrolment Financials Tile

Enrolment Dashboard > Financial Tile

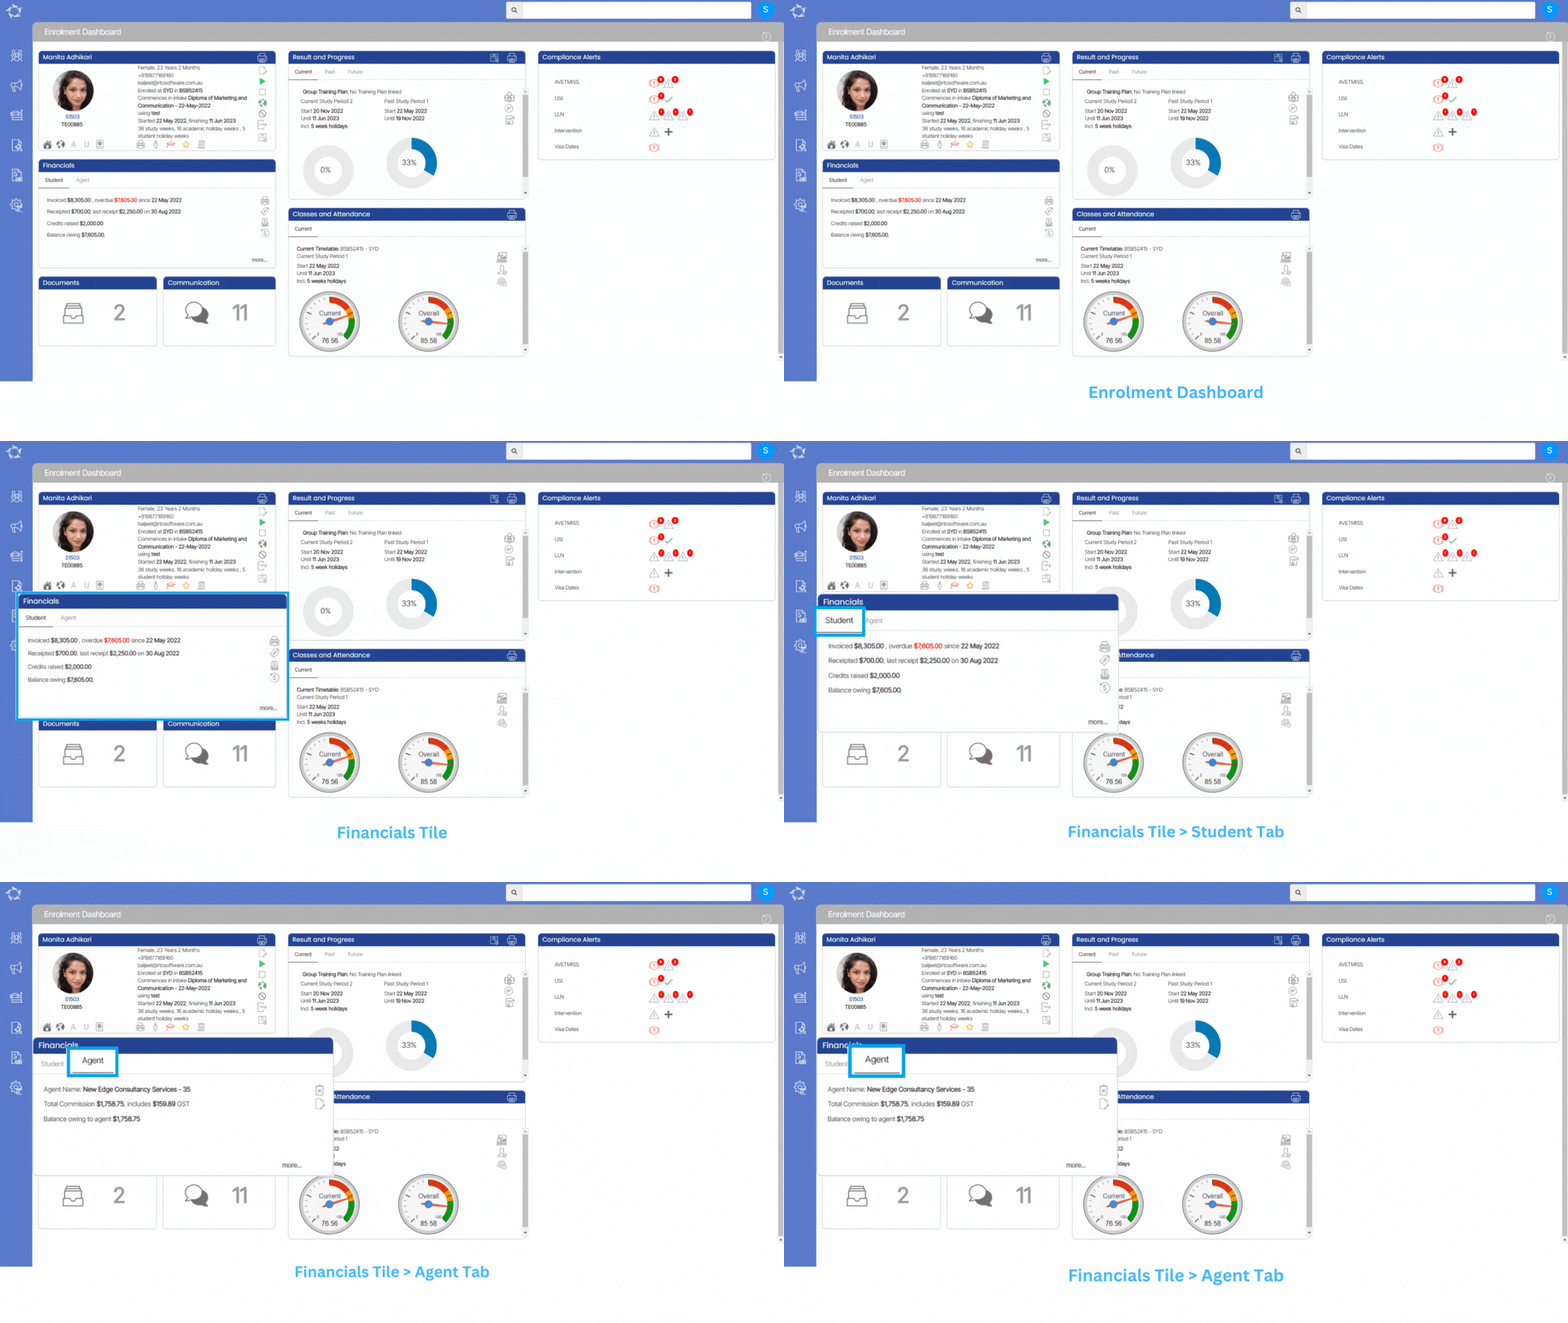
This tile will give you a summary of all the financial transactions of the student and Agent.

Tabs

Student

All the financials related to the student enrolment will be visible under the Student tab. You will be able to see the total invoiced amount, overdue amount, total receipted amount, total overpaid, and the balance owed.

Agent

Under the agent tab, you will be able to see the agent name that is linked to the enrolment, total commission, last paid, and the total balance owing.

Student Vertical Icons

Agent vertical Icons

Enrolment Dashboard – History

Here are some of the latest changes that we have made to the Enrolment Dashboard.

Date UpdatedWhat Screen / Report
12 Jan 2023Cancel Enrolment – UnAllocate Timetable
17 Nov 2022Visa Information – New column Expiry date
20 Oct 2022Changes – Transition Process
01 Sep 2022Intervention Screen
14 Jul 2022Transition of Enrolment
21 July 2022How to Re-Instate an Enrolment in TL?
02 May 2022Edit Enrolment – New Actual End Date Field

Edit Enrolment details

Enrolment Dashboard > Enrolment Profile Tile > Edit Enrolment

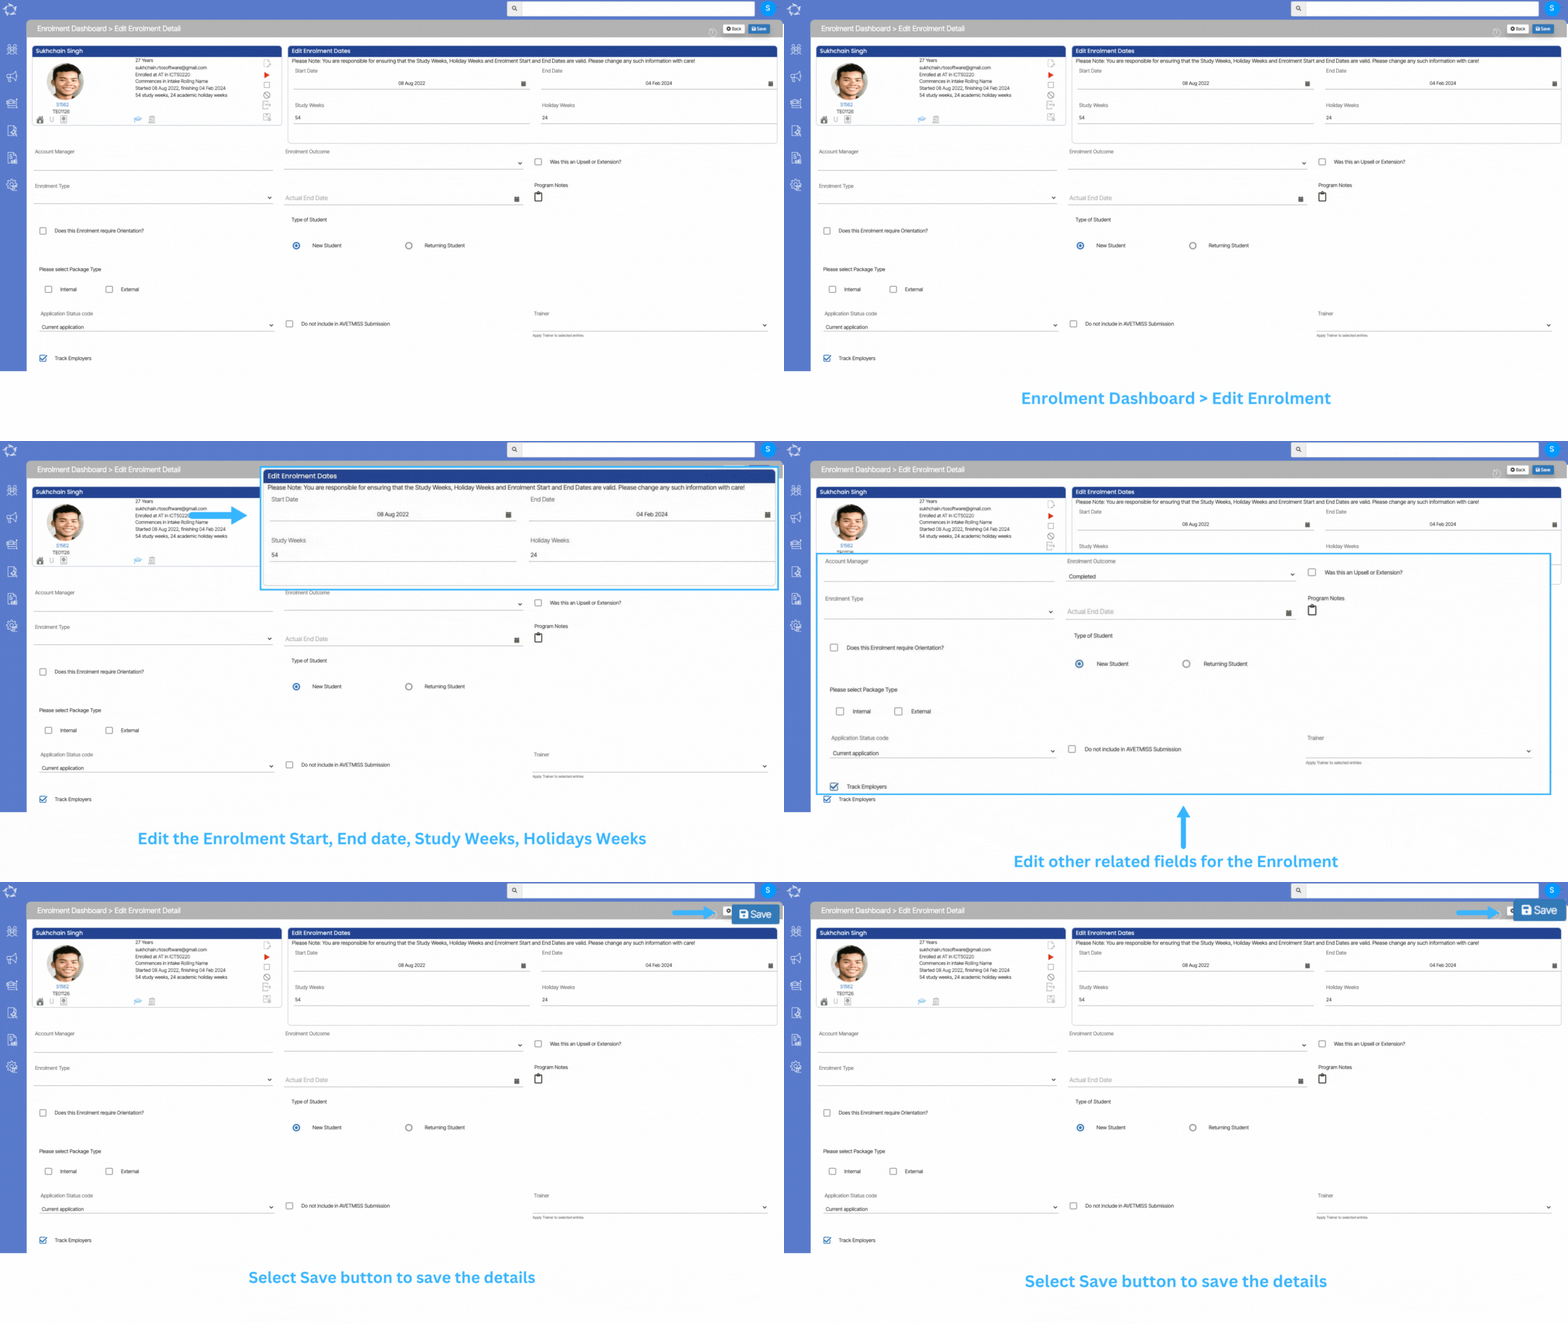
This screen will show two tiles (enrolment summary tile where you can only view the information and edit enrolment dates where you can add and edit specific information for the enrolment such as Enrolment Start and End dates, study weeks and Holiday Weeks) and other fields related to the enrolment.

Note: You are responsible for ensuring that the study weeks, holiday weeks and enrolment dates are valid. Please change any such information with care.

Each field in the screen above is explained in more detail below.

ColumnExplanation
Start DateYou can edit the start date of enrolment.
End DateSelect the new end date of enrolment here if you want to change it.
Study WeeksIf you are editing the enrolment dates then you must change the study weeks as well.
Holiday WeeksYou must change the holiday weeks if you are changing the enrolment dates.
Account ManagerThis is a magic search field and you can search and select the account manager.
Enrolment OutcomeThis is a User Code in TEAMS and one can create an enrolment outcome in TEAMS from the User Code screen.
Was this an Upsell or Extension ?This is a tick box, If the enrolment is upsell or extension then you can select this tick box.
Application TypeThis is a User Code in TEAMS and one can create an enrolment outcome in TEAMS from the User Code screen.
Actual End DateIf a student fails to complete the course by the proposed end date then you can update the actual end date in this field.
Program NotesYou can enter the notes for the program here.
Does this Enrolment require Orientation?If the enrolment has any orientation you can select this option and can add the orientation date in the next field.
Type of StudentYou can select one option here, either the student is a New student or Returning student.
Please select Package TypeThis is a User Code in TEAMS and one can create an enrolment outcome in TEAMS from the User Code screen.
Application status codeThis is a TCSI field. By default, the system will show the current application in this field. You can change it to Application withdrawn by applicant option if needed.
Do not include in AVETMISS SubmissionIf you do not want to include the enrolment in AVETMISS Submission you can select this option.
TrainerYou can select the trainer which you want to link with the enrolment from the dropdown. If there is no trainer linked with the subjects, then the system will link this trainer to all the subjects on the Training Plan and Result screen.
Track EmployersTo track your employer, you can select this option.

Enrolment Profile Tile

Enrolment Dashboard > Enrolment Profile Tile

This tile has three different types of information that are:

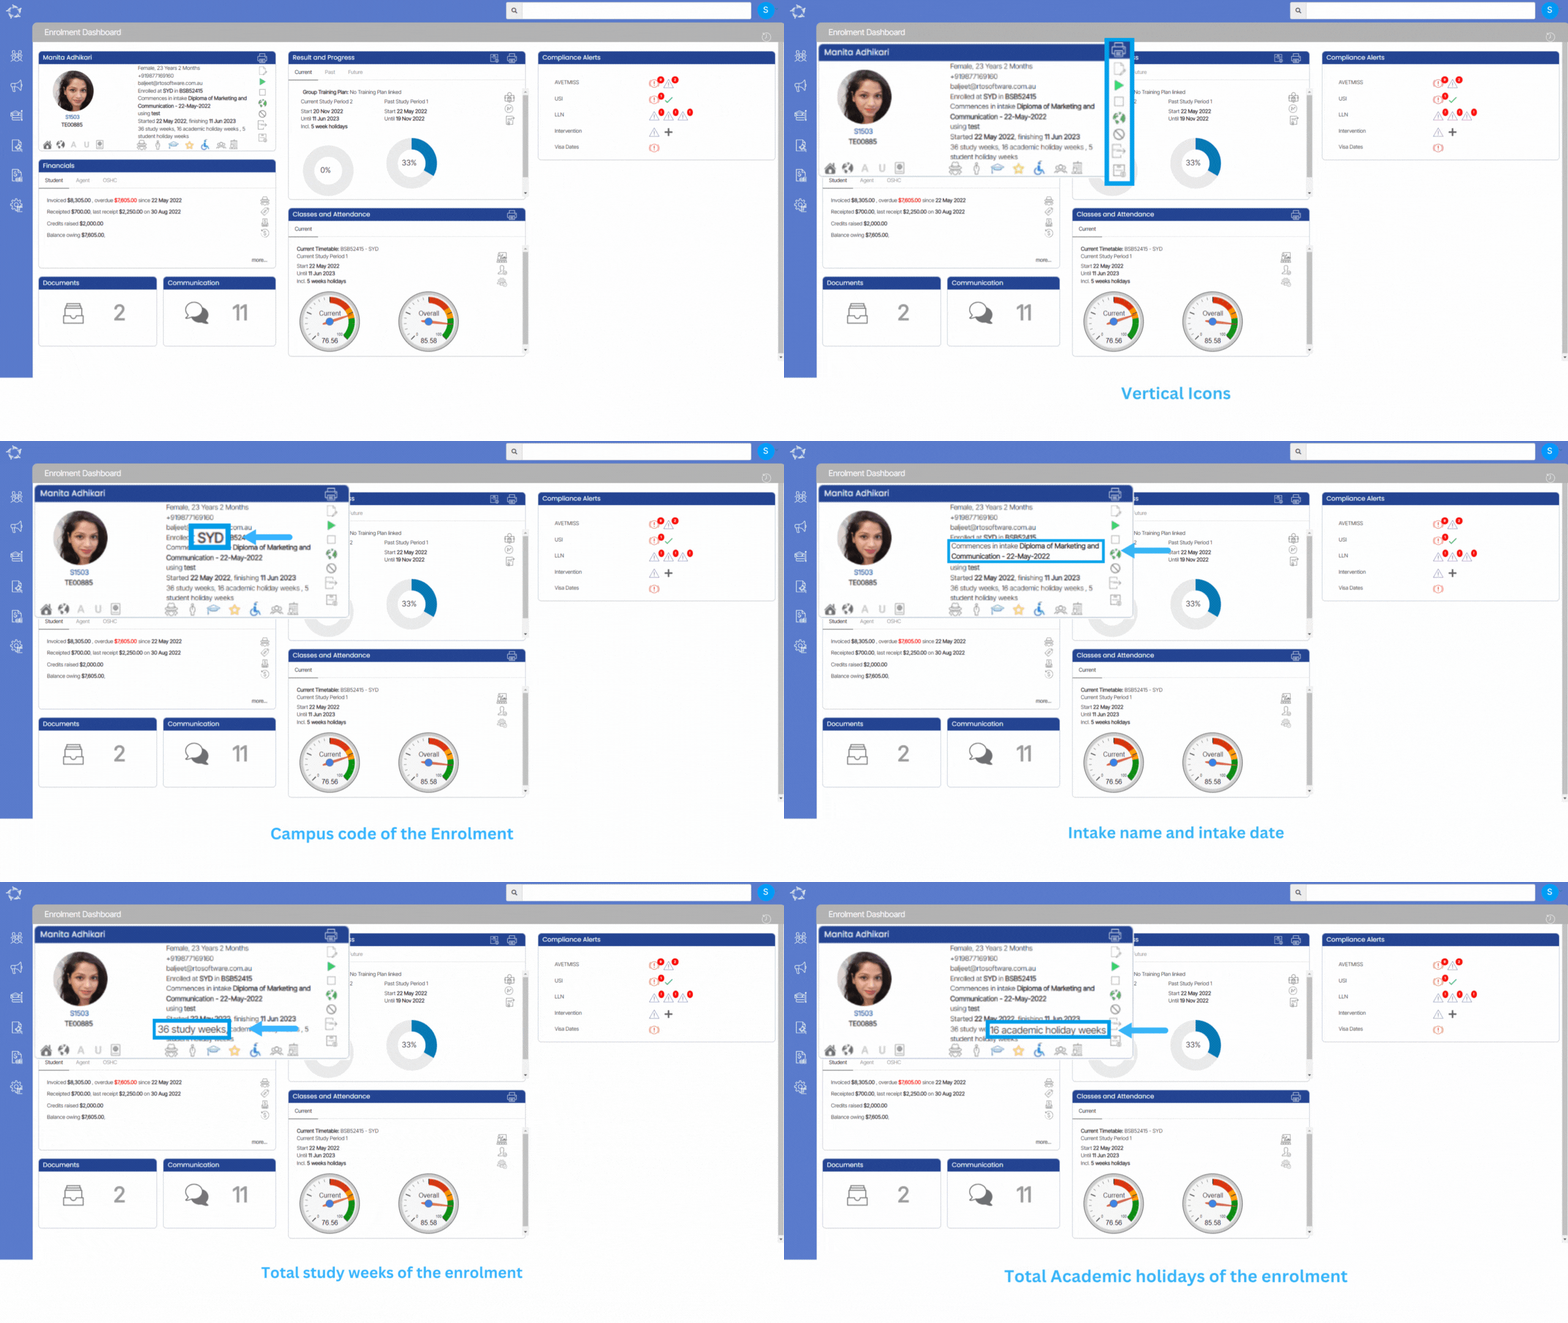
  • Summary information for the enrolment, such as campus, program code, start and end date etc.
  • Vertical icons that allow you to do transactions against the enrolment or navigate to other screens.
  • Horizontal icons that identify specific information linked to the enrolment such as the agent, employer, account manager etc.

Enrolment Summary Information

The summary information you will see in this tile will relate to the student and enrolment. The information specific to the student that is displayed includes:

  • Student number – this is the number directly under the student picture
  • Student picture, if uploaded the picture
  • The student’s gender and age
  • Mobile number
  • Email address – This is the primary email address linked to the student

Vertical Icons

Reports

Horizontal Icons

Address Information

You can put your mouse over the icon and a tooltip will show any address added.

Overseas Information

A tooltip will show the passport number, passport expiry date and the international phone number of the student.

New Student

This flag is a marketing specific one that you can set in the application process or at the Edit Enrolment level. It is used in reports to identify a new student with their first enrolment (new) at your college or a returning one. If the enrolment is set as new it will show the icon in blue and if the enrolment is set as returning the icon will show in red.

AVETMISS Information

If the student is flagged as an AVETMISS student then it will show in grey. If however, the student is not set as an AVETMISS student but has an enrolment that has a VET program or subject in it, it will show in red.

Employer Tracking

It will open the employer tracking screen and will show you the name of the employer if linked. Click on the icon to know more.

Visa or CoE Information

It will open the edit CoE details screen. Click on the icon to know more.

Agent

This icon will display the linked agent’s name in the tooltip.

Account Manager

It will display the name of the account manager linked with the enrolment.

USI

This Icon will display the USI status of the student in the tooltip i.e. whether the student has no USI (black icon) and if the USI is verified( green icon) OR not (red icon).

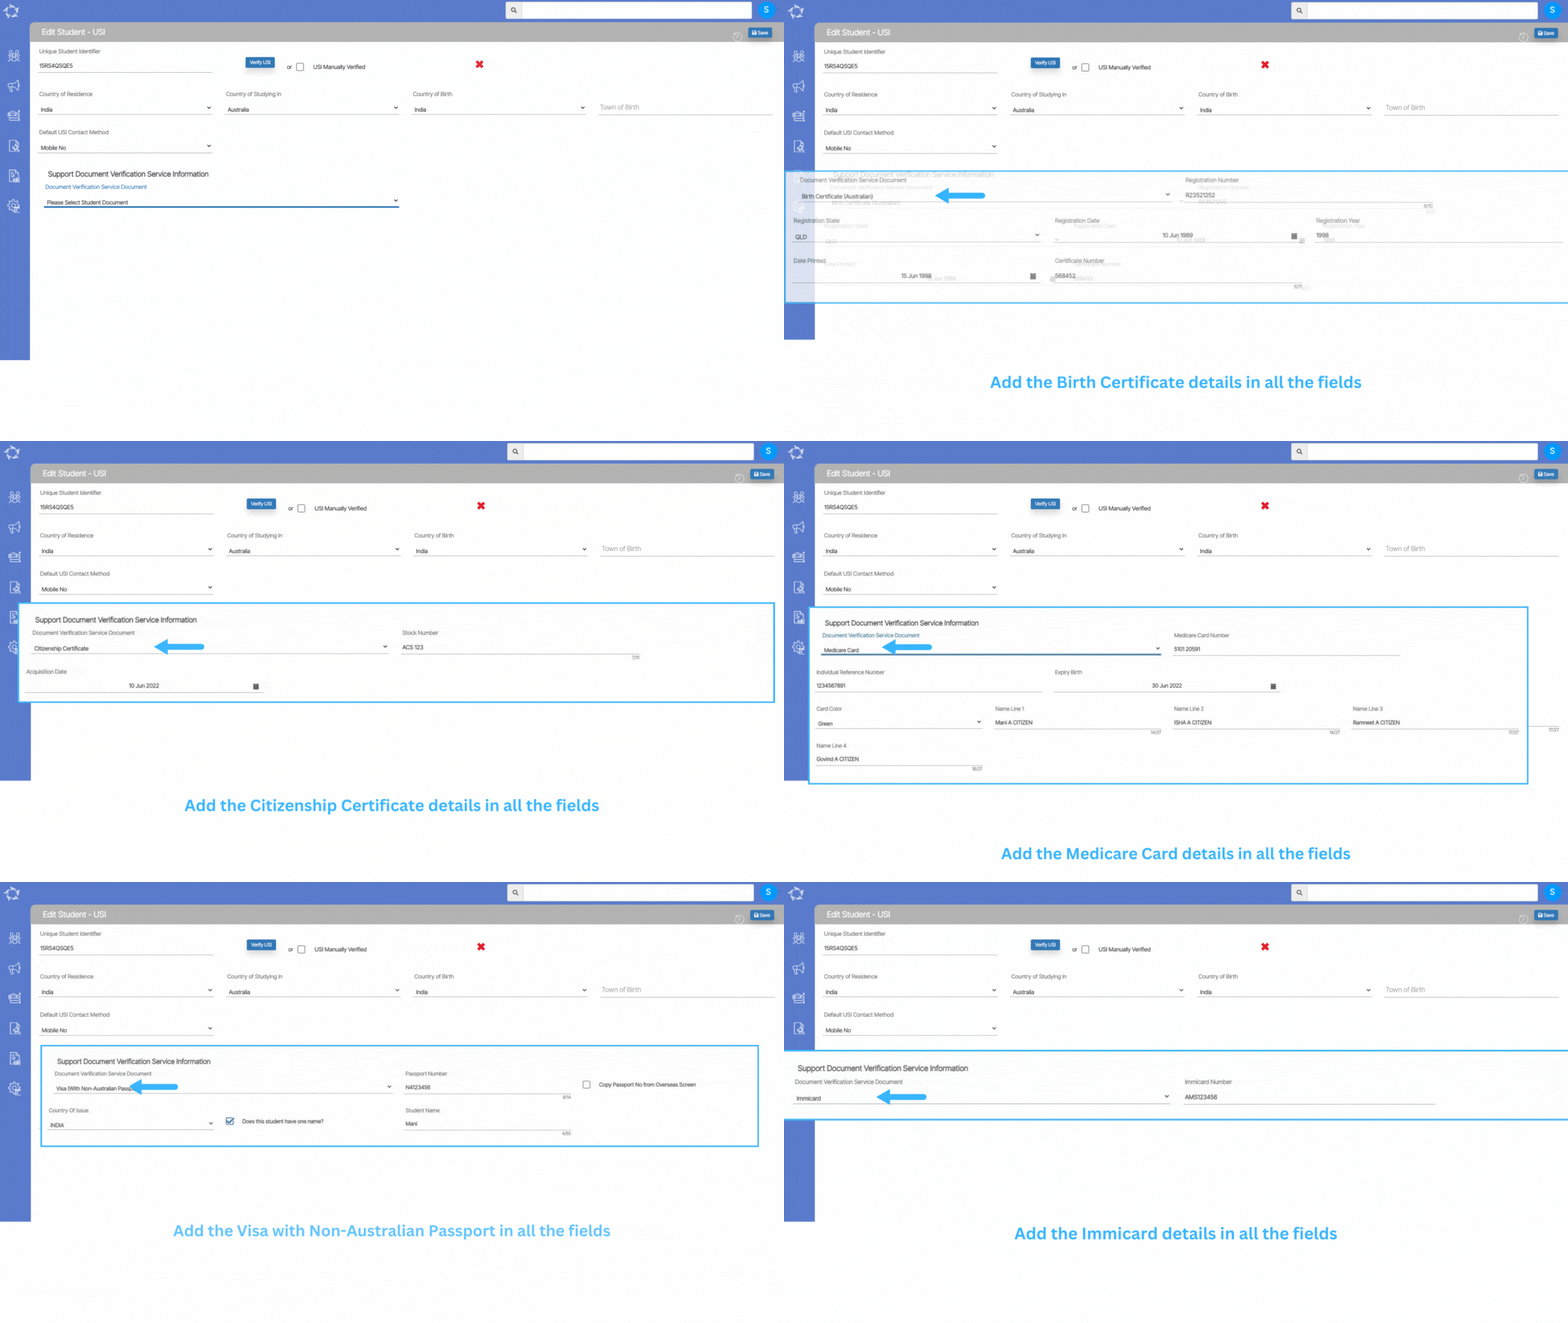
Support Document Verification Service Information

You will see different kinds of support documents that require for the USI verification and when you select any document from the dropdown, it shows you different fields related to the selected document.

To create a Unique Student Identifier (USI) you will need to use a valid form of Australian ID from the list below:

  • Birth Certificate (Australian) – A birth certificate can refer to either an original document or a certified copy issued by an Australian State or Territory. When using a birth certificate as a form of ID in the USI registry system, please be aware that: state refers to the state or territory in which the birth was registered.
  • Certificate of Registration by Descent – A certificate of registration by descent (RD) is issued by the Australian Government to a person who: was born outside Australiahas at least one parent who was an Australian citizen at the time of their birth.
  • Citizenship Certificate – A citizenship certificate is issued by the Australian Government and is proof that someone born outside Australia is an Australian citizen. The Acquisition Date is the date Australian Citizenship was acquired. The stock Number appears on the citizenship certificate.
  • Driver’s Licence – Your driver’s licence must be current, valid and issued by an Australian State or Territory to be used as a form of ID.
  • Medicare Card – Your Medicare Card must be valid and issued by Medicare Australia. Medicare Card Number appears above the name(s) on the Medicare card.
  • Visa (With Non-Australian Passport) – Non-Australian citizens intending to study in Australia require a visa issued by the Australian Government. The visa must be current and valid. If you select Non-Australian Passport (with Australian Visa) as your form of ID, please enter your Non-Australian passport number when creating your Unique Student Identifier.
  • Immicard – An ImmiCard is issued to certain visa holders who don’t have and can’t obtain a passport recognised by the Australian Government. An ImmiCard assists visa holders to provide evidence of their Commencement of Identity (COI) in Australia.

Edit USI

Student Dashboard > Student Profile Tile > USI Icon

A USI is your individual education number for life. It also gives you an online record of your vocational education and training (VET) undertaken in Australia.

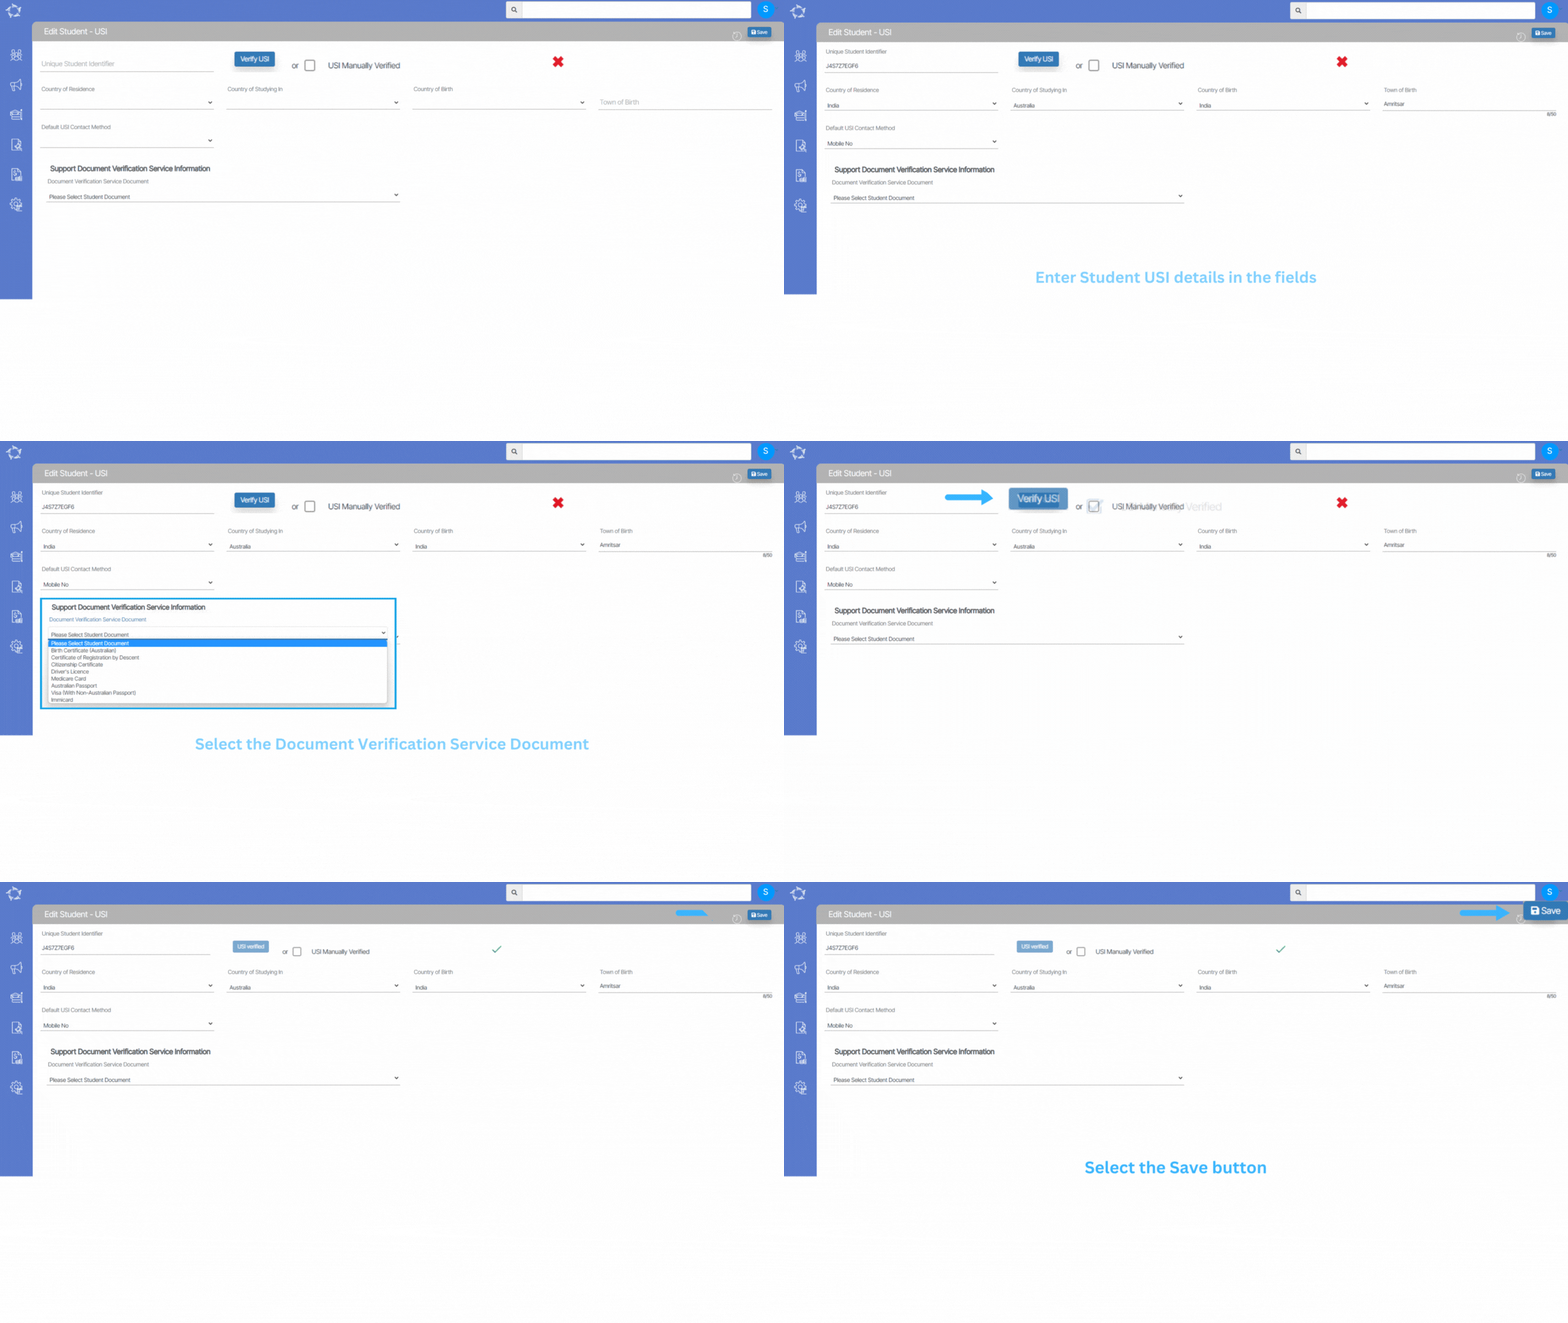
This screen will allow you to log the request to create USI and then verify it.

Note – When you select the Create USI button, the request gets sent to https://www.usi.gov.au/ and you can check the status of the USI on the USI Request screen.

If you already have a USI number then update it in the Unique Student Identifier field, also you need to update all the USI-related fields and then hit the save button. Once you select the Save button, the screen will refresh and will show you Verify button and Use Manually Verified tick box.

Note: Verify USI – When you select this button, the request gets sent to the https://www.usi.gov.au/providers/verify-student-usi site and you can check the status of the USI from the USI request screen in the system.

Use Manually Verified – You can select this tick box if you already have verified the USI from the https://www.usi.gov.au/providers/verify-student-usi site.

Select here to know mandatory details to verify USI.

Once it is verified, the Verify USI button will change to USI verified button and the red cross icon will change into a green tick.