Subjects – Descriptive Code Missing

Compliance Dashboard > AVETMISS Subjects Tile > Descriptive Code Missing

The Subject Descriptive code of the subject is a mandatory field in TEAMS and you can update the correct descriptive code from the TGA site (training.gov.au) and that’s what will print in a record of results. For the Subject Code field on the subject screen, you can have whatever you want as they are internal.

The AVETMISS Subject Tile will show you the Descriptive Code Missing with the total count of the subjects as a link . To update the Subject Descriptive Code, you need to follow the below steps:

  • Select the Calendar year from the Calendar Icon
  • Select the hyperlink next to the Descriptive code missing
  • You will be taken to the Total Subjects no Descriptive Code listing screen.
  • Select the Subject code, which will open the Subject entry screen.
  • On this screen, add the Subject Descriptive Code and Save the screen.

Note – When you have updated the AVETMISS Subject data for the Subject Descriptive Code then on the Compliance Dashboard, you need to refresh the screen to see the count of Descriptive Code missing.

NCVER AVETMISS Student Data Submissions – RTO TEAMS Step 5

Subject Data

The Subject data is exported into NAT00060 file. This lists all the Subjects that are listed in the NAT00120 for the students and what their results are etc in 2022.

IMPORTANT – This is where you can get hundreds, sometimes thousands of errors (based on the number of enrolments in a Subject that are listed in the NAT00120) when you do not setup your Subjects in TEAMS with the correct AVETMISS settings. For each student listed in the NAT00120 with a specific Subject (where there is a setting that is wrong/missing) that is how many times you will get the same error. So once you fix/add the correct setting for the Subject in TEAMS those specific errors will disappear for those hundreds or thousands of rows in your next export and submission. The logic is fix in one spot and it will fix many rows of data in the NAT00120.

For example – You have Subject that has 2 different errors as it is missing 2 different AVETMISS settings in TEAMS. For that Subject in the NAT00120 you have 700 students listed, this means each setting is a different error so you will have 700 rows of errors for one setting and for the 2 settings you will have 1400 rows of errors. BUT once you go to that Subject in TEAMS and add those 2 settings and do your next export and submission all 1400 rows of errors will not be there. This is a general rule but is NOT always the case.

To review and clean up any data for Subjects you need to go to the Main Dashboard > Compliance Menu > Compliance Dashboard.

To Know more about the AVETMISS Subjects data, select the below links.

Subjects Descriptive Code Missing

Subjects Descriptive Name Missing

Subjects Nominal Hours Missing

Subjects Funding Source National Missing

Subjects Predominant Delivery Mode Missing

Agent

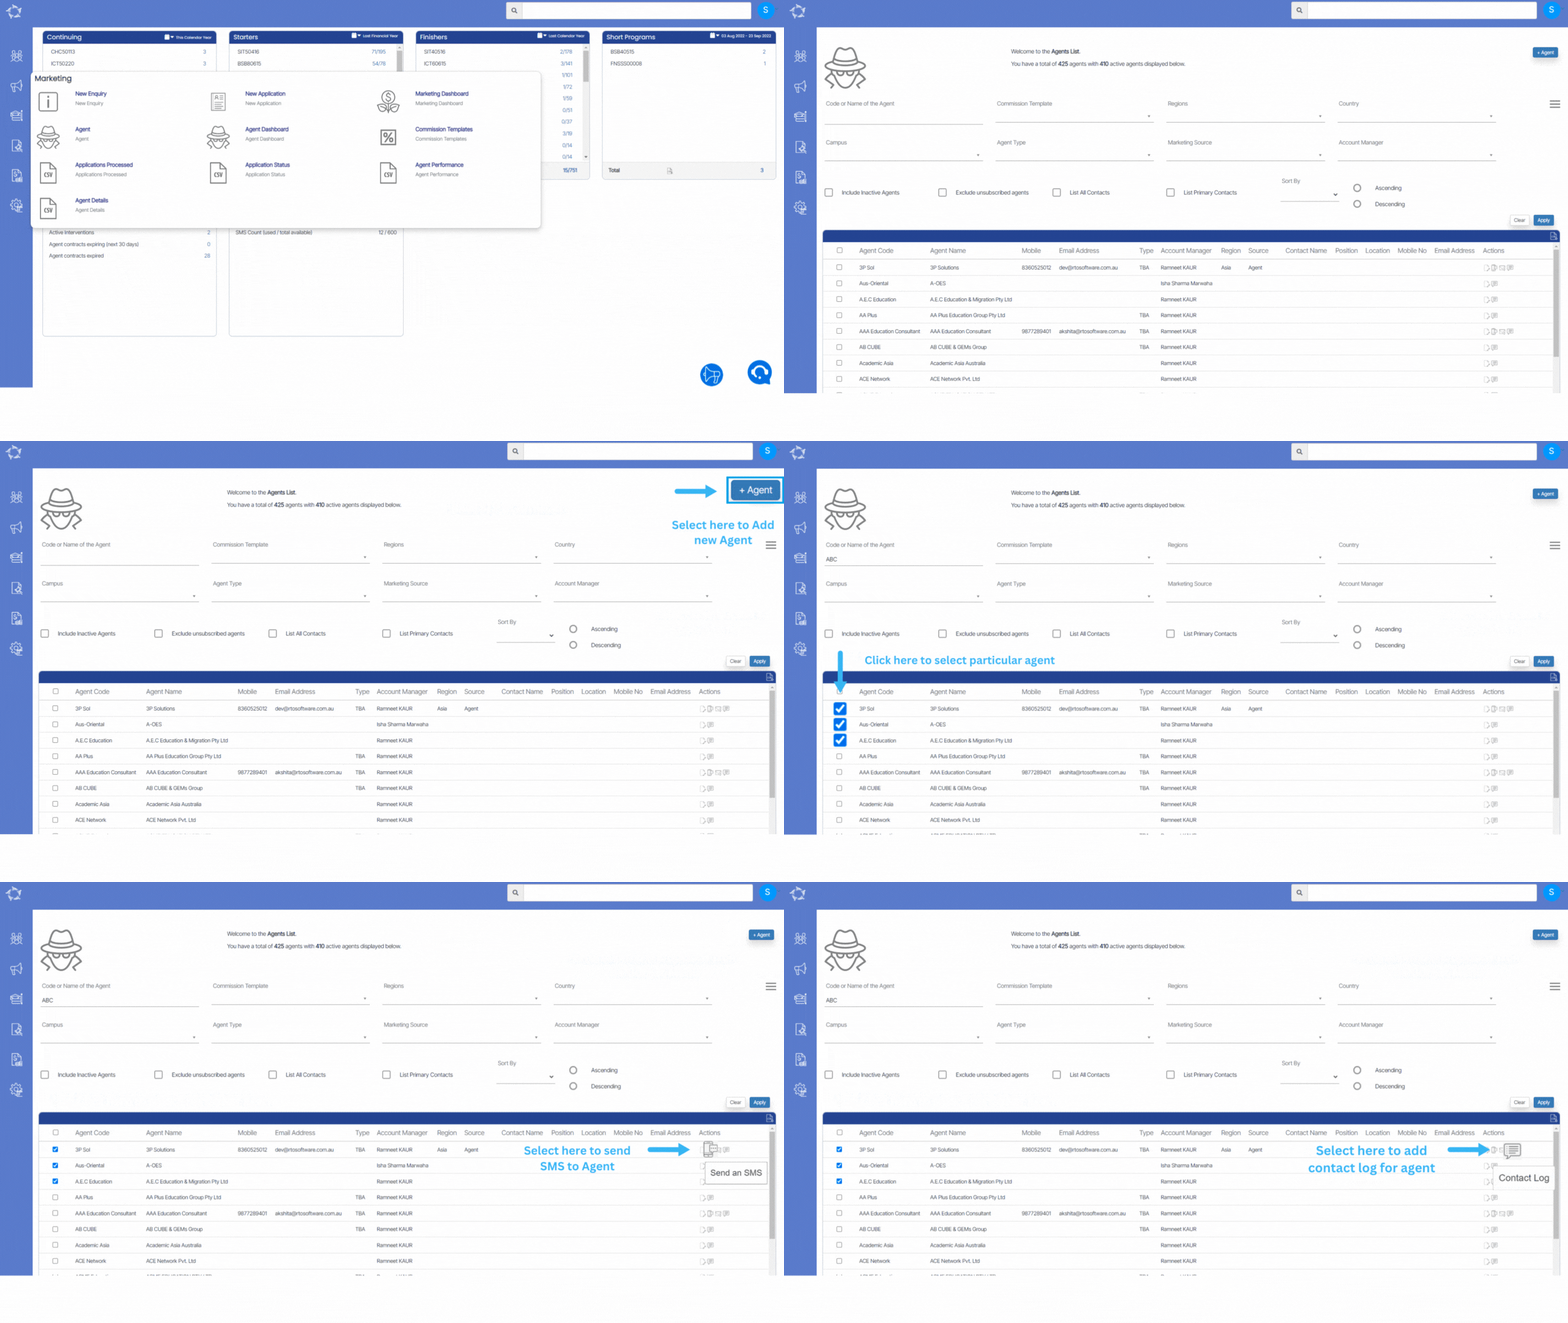
Main Dashboard > Marketing > Agent

Overview

This is the Agent Welcome screen which will show you the list of Agents in the grid that are Active in your system. This screen is divided into two sections:

  • Filters/Parameters
  • Listing Grid

Filters/Parameters

The filters will show you different fields where you can select the data as per your need then select the Apply Button and based on your selection the system will load the list of agents in the grid. You can also see the Total count and the Active count of the Agents.

Listing Grid

In this grid, you can see the list of all Agents. You will see columns such as Agent Code, Agent Name, Type, Region, Account manager, and other Agent contact details in this grid. All of the columns are self-explanatory.

You can select the +Agent button to add a new Agent to the system.

Select here to know more about the Burger Menu

Select here to know more about the Action Column

Send SMS icon is not appearing!
No need to worry if send SMS icon is not appearing under the Actions column. It means Mobile No is missing for that particular agent.

Academics

Main Dashboard > Academics menu

The Academic menu icon provides access to various screens related to student academics. When you select this icon, you will be presented with a list of icons that allow you to navigate to different screens associated with academic information. These screens include setting up the campus, program structures, subjects, and the academic calendar.

Each of these icons represents a specific aspect of the academic system and enables you to manage and configure various academic-related functionalities. Whether it’s defining the campus layout, organising program structures, managing subjects and courses, or planning the academic calendar, these icons provide a convenient way to access and modify academic information within the system.

What’s New – 26th Jan 2023 – Q and A

Here are some recent questions that we get asked and the answers on how to do them in TEAMS.

QuestionsAnswers
1. Withdrawing or Canceling a student in TEAMS?The post will explain you how you can withdraw or cancel a student in TEAMS. To know more select the read more…
2. How do I link an Agent to an enrolment?The post will expaine you, how to link agnet to an enrolment. To know more select the read more…

Student Management

Main Dashboard > Student Management icon

Upon selecting the icons from the main menu for Student Management, a comprehensive list of icons will be displayed, offering easy access to various screens and reports specifically designed for effectively managing your students on a day-to-day basis. These icons serve as shortcuts, providing efficient navigation to different sections where you can oversee and handle various aspects of student management. Whether it involves tracking attendance, managing Results, or generating reports, these icons offer a streamlined approach to efficiently carry out your student management tasks.

New check on Training Plan and Results screen – History

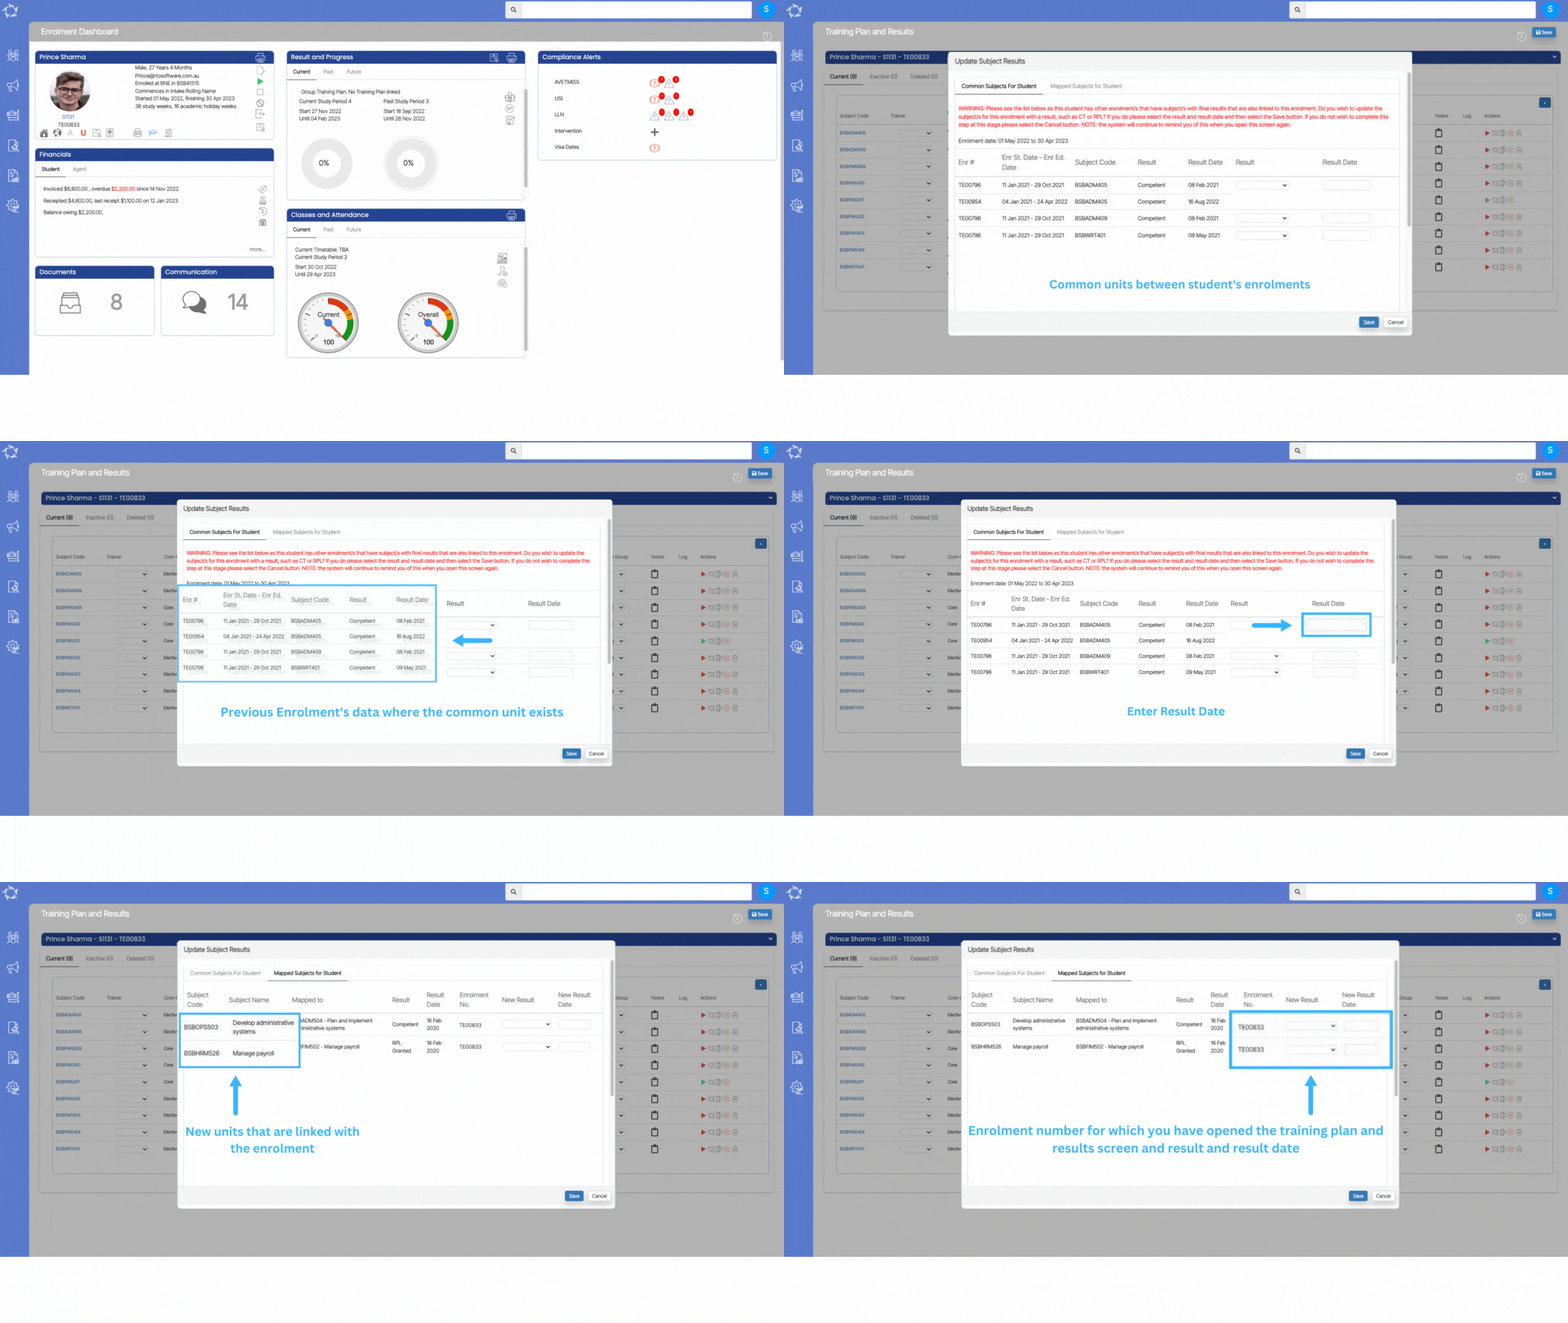
In the Enrolment Dashboard, we have introduced a new check on the training plan and results screen. This check will make it easier for you to mark results when you get a pop window for Common Units and Superseded Units.

Common units: Let’s take an example, a student who is studying more than one program with you and there are some units that are common in both programs. Now that the student has studied and successfully completed the program 1’s all units and when you will open program 2, then the system will give you a popup window to show you all the common units and their results. From that popup itself, you can mark the results for those units such as credit transfer etc in one go. The popup window which will appear every time the, system will find common units between student’s enrolments:

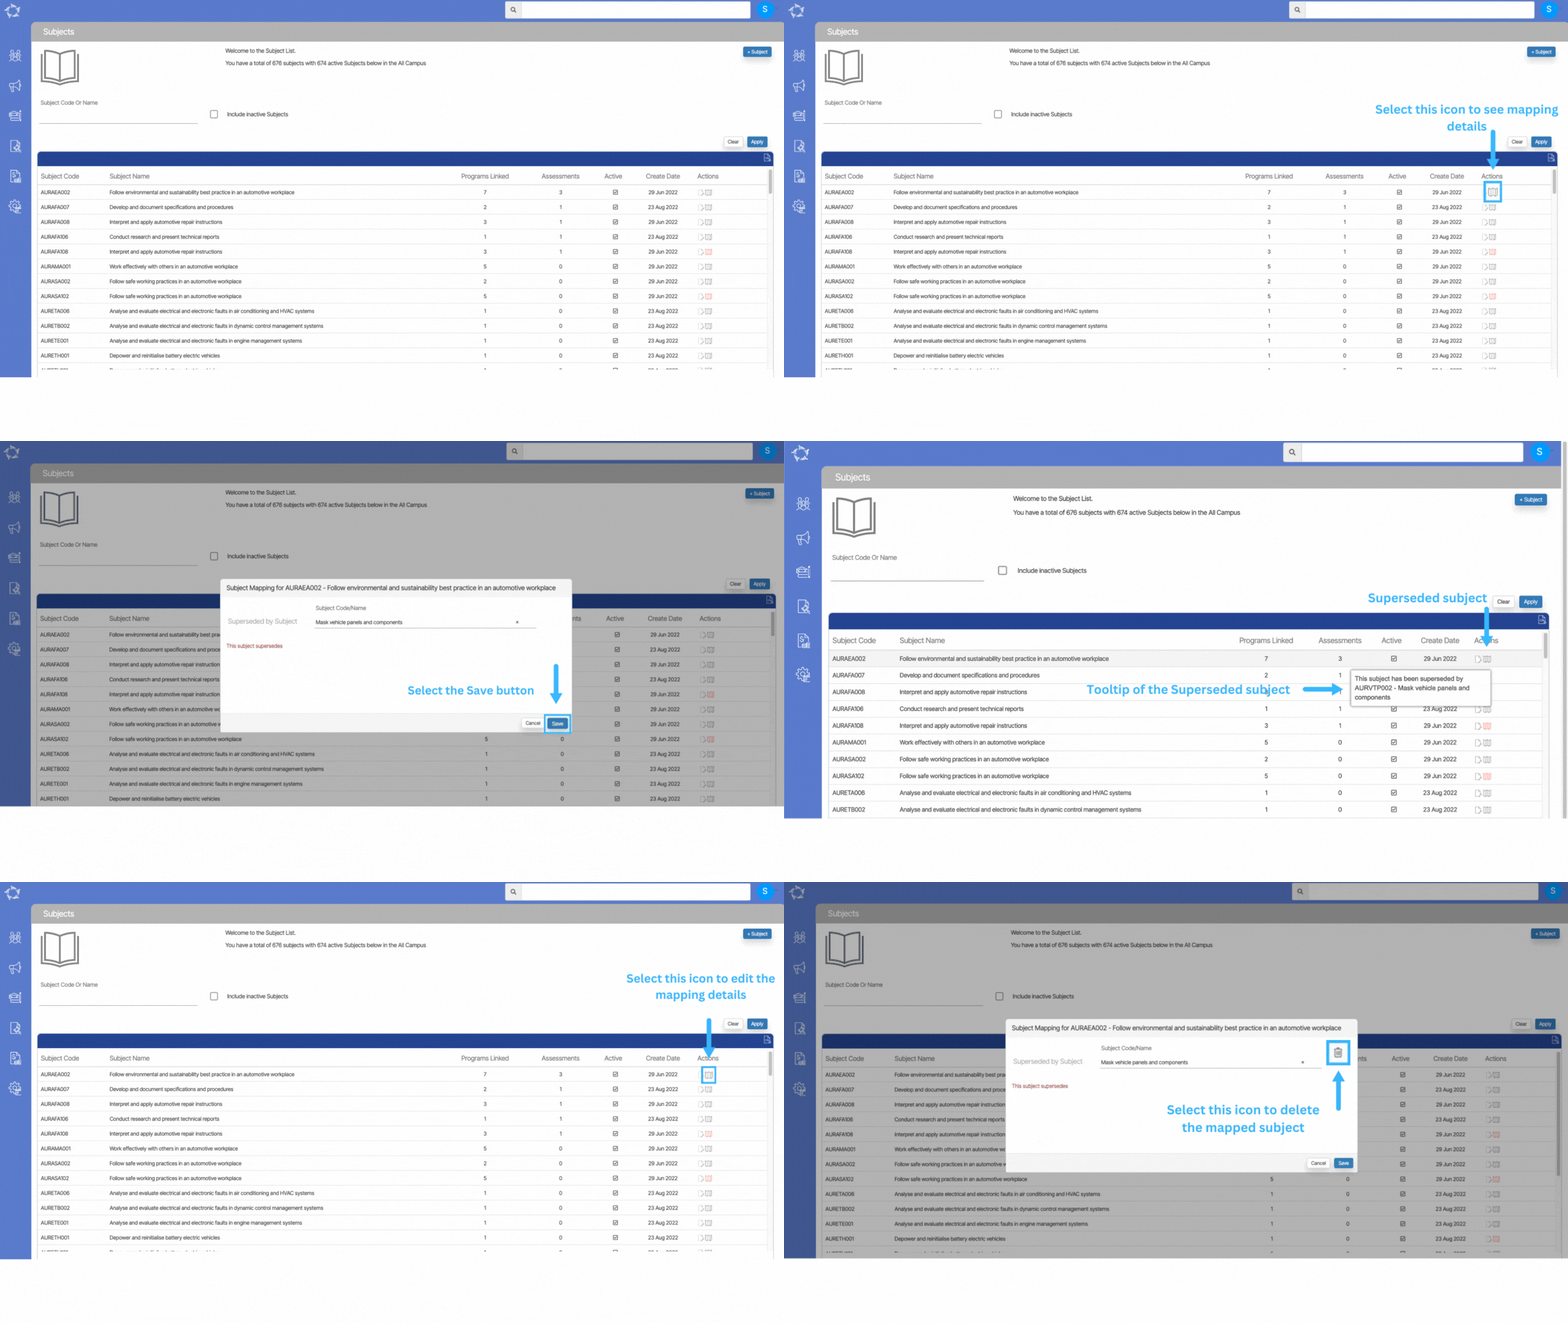
Superseded Units: Other than the common units, there might be some units that are superseded, and now you will be able to see on the training plan and results screen if any unit is superseded. The system will do the mapping for you. we have 2nd tab called “Mapped Subject for student”.

The 2nd check which is for superseded units, will only work if you have updated the subjects at the Subject Welcome Screen. On the subjects screen which you can access from Academics > Subjects, you need to search for the unit which has now been superseded.


History – 26th Jan 2023

We hope you all are having a great start to 2023.

This update is a small update with no main changes to the front end of the system.

For your National AVETMISS 2022 student data submissions, did you know there are only 5 weeks left until the last day to have a successful data submission?

How are you going with your steps for reviewing and cleaning up your data? Please see the AVETMISS countdown section below for more information. If you would like to consider our Virtual Admin (VA) service to assist you with this review and cleanup, please contact our support staff for more information.

We have also introduced a new Q&A section to our What’s New summary. Here we will provide answers to the questions that are most frequently asked about TEAMS.

NCVER Annual Student Data Submission

Have you been maintaining and managing your student data this year in preparation for your annual student data submission? In this post, we walk through the first two steps of what you need to do in TEAMS.

We highly recommend you start these steps now, as these are critical to future steps where the larger volume of data is and where the biggest list of errors comes from.

Q&A

Do you have a TEAMS question?

Make a list of your questions, send them to our support teams and we will send you the answer and add them to our fortnightly update.

Select the read more button as here are some questions we get asked and then answers on how to do them in TEAMS.

Our mission is to build software that helps you do things more efficiently. Your input and engagement are vital in helping us improve our service and offerings for your college. We are always open to listening to your feedback.

Any questions, please feel free to reach out to us. We look forward to serving you to the best of our ability.

Please review the changes and if you would like further clarification, please contact our Support team.

A big thank you to so many of you who have been actively participating in helping us bring these new improvements to life.

Next update is due on Thursday, 9th February 2023

Note: Please alert other team members within your college if the changes outlined above affect their role or department.

Thank you for taking the time to read this post.

NCVER AVETMISS Student Data Submissions – Classic TEAMS Step 4

Qualifications Issued

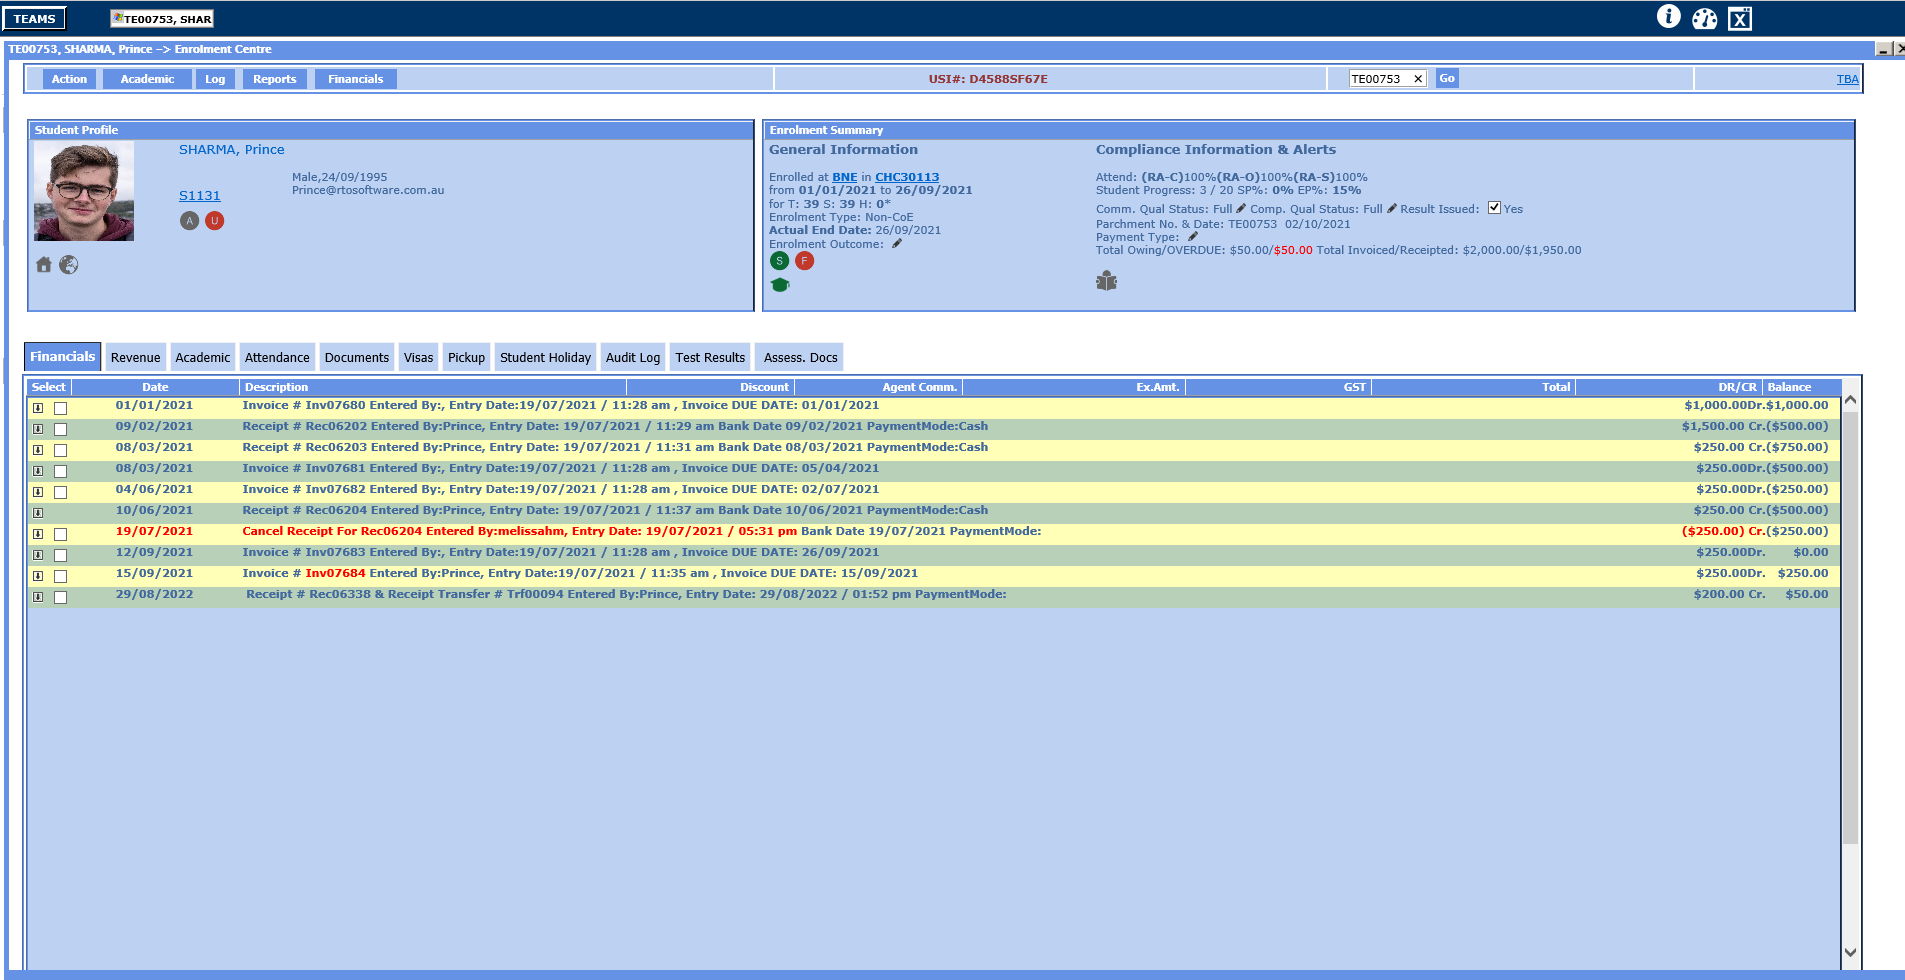
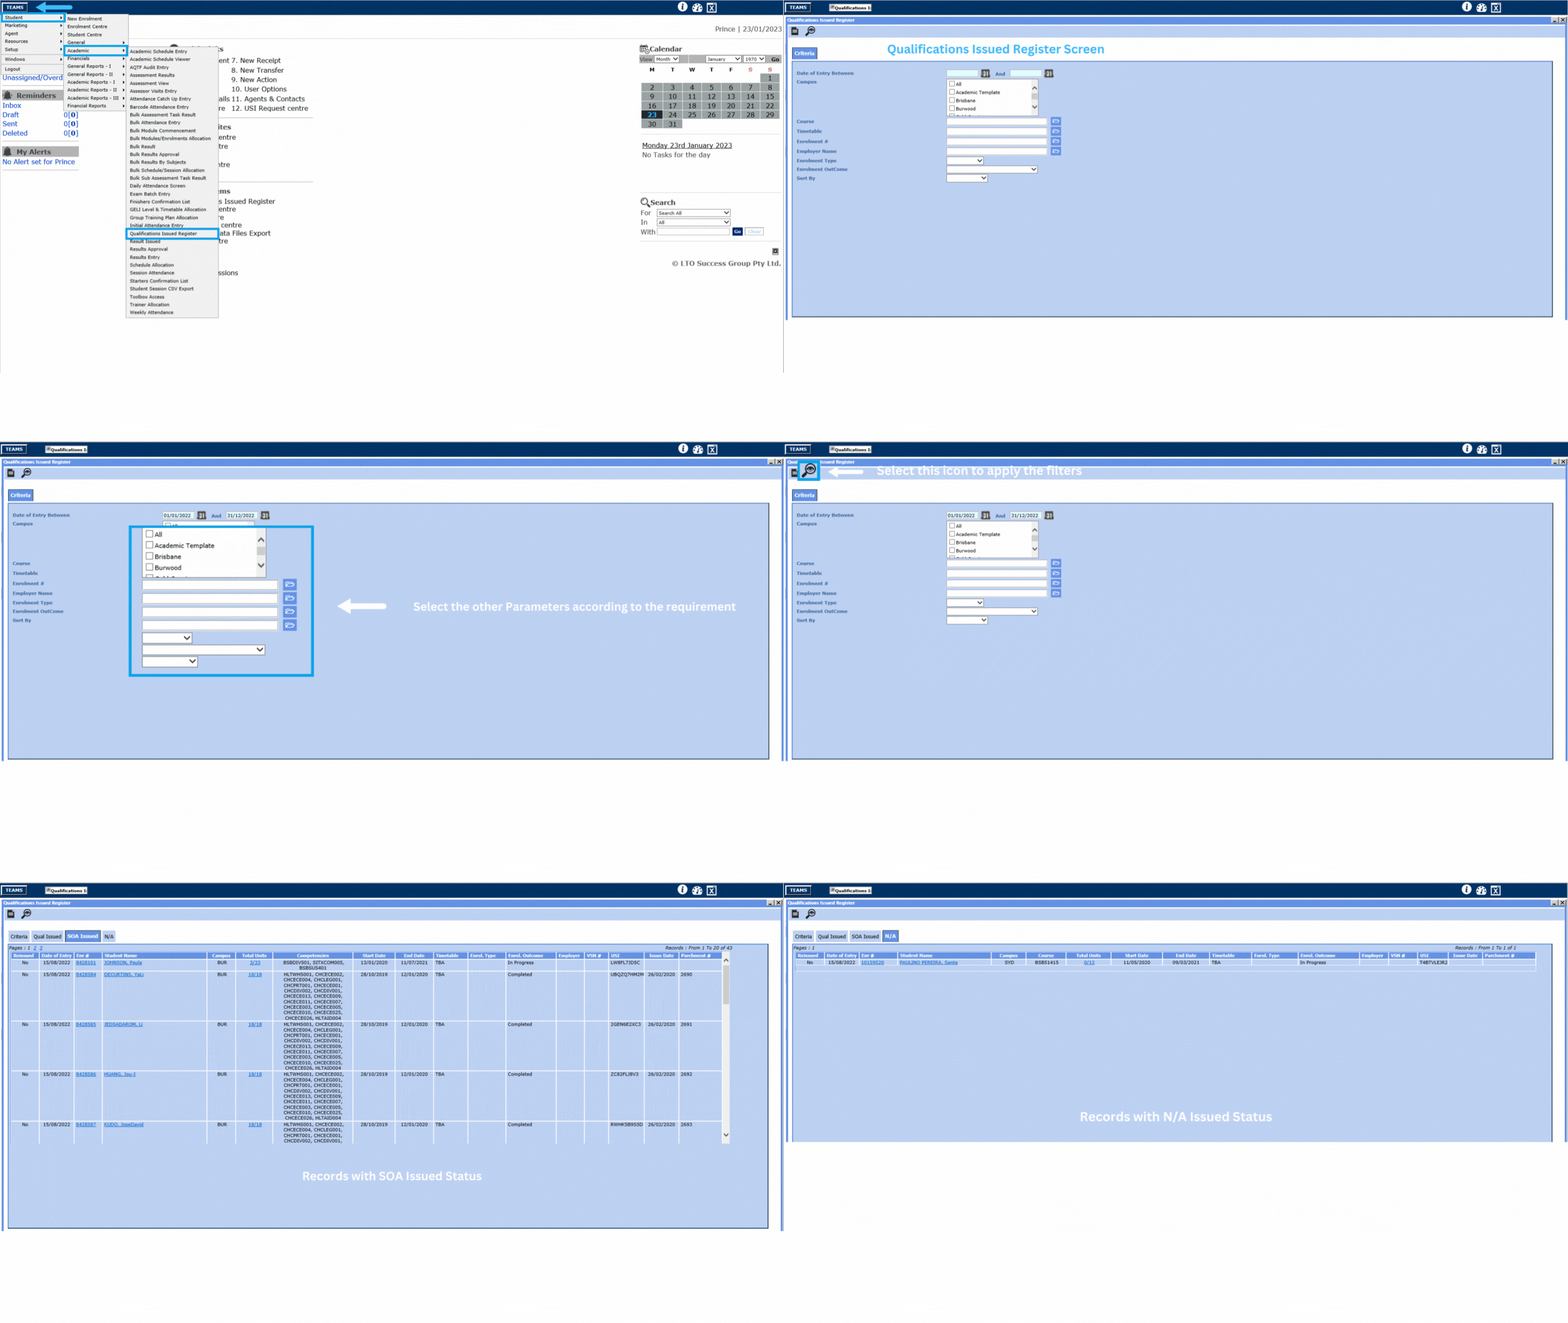
The Qualification Issued is exported into NAT00130 – Program Completed. This will show you all of your students who completed their enrolments and if you issued them a qualification (Certificate) or statement of attainment (SoA) – it really should match your Qualifications Issued Register.

The very first step you need to do before you do the AVETMISS Export

  • You need to go to the TEAMS > Student > Academic > Qualification Issued Register screen where you need to put in the calendar years dates from the first of first to 31st of December of the coming year that you are reviewing your student data. For example 01/01/2022 to 31/12/2022 and if you have different campuses for the academics then you can select Campus as All or, you can select the campus as you require and then select the search button. OR
  • You can run the Qualification Issued report with the same parameters and then you can open each enrolment and confirm if the results are there and if not there then you have to run the finishers report for 2022 and see all the finishers and compare it, which enrolment that are in the finishers but is not in the finishers list.

When would you select SOA, FULL and NA

  • FULL – When the student has Successful results of competent. Credit transfer. RPL then all the subjects needed to be issued that qualification.
  • SOA – Where you do not have successful results for all of the subjects (if you are withdrawing) but have some subjects with competent then you issue a Statement of Attainment.
  • NA – This is where you do not have absolutely no results and student has never successfully achieved anything and they withdrew and you want to write the entry to the register to show then you can select NA and results issued.

It’s our recommendation, even if you’re not issuing a Certificate or statement of attainment, all the qualification to still select this Result issued as Yes have the completion Type as NA (not applicable) because it will show in the registered and to the auditor that you have processed as it was withdrawn or they have overdue fees.

For Example – If you have an enrolment where you have a competent result and a credit transfer, and the students have overdue fees and you’re not going to issue, but they’re finished, and they’ve left. If you don’t write to the register, the qualification issue register that they did, It’s not applicable you issued that you’re not going to do one and the auditor may question you on why aren’t there. Because they have a competent result or a credit transfer? That way. At least there’s an entry in the register that it’s not applicable. You didn’t issue it because they have overdue fees. Or they withdrew.

Important actions to complete on the Qualification Issued Registered

  • Review each enrolment and confirm that all their results and the qualification issued is completed.
  • Status is correct for the results and result Issued tick box is ticked.
  • Completed qual is selected correctly.

Classes Listing Screen

Enrolment Dashboard > Classes and Attendance Tile > Classes icon

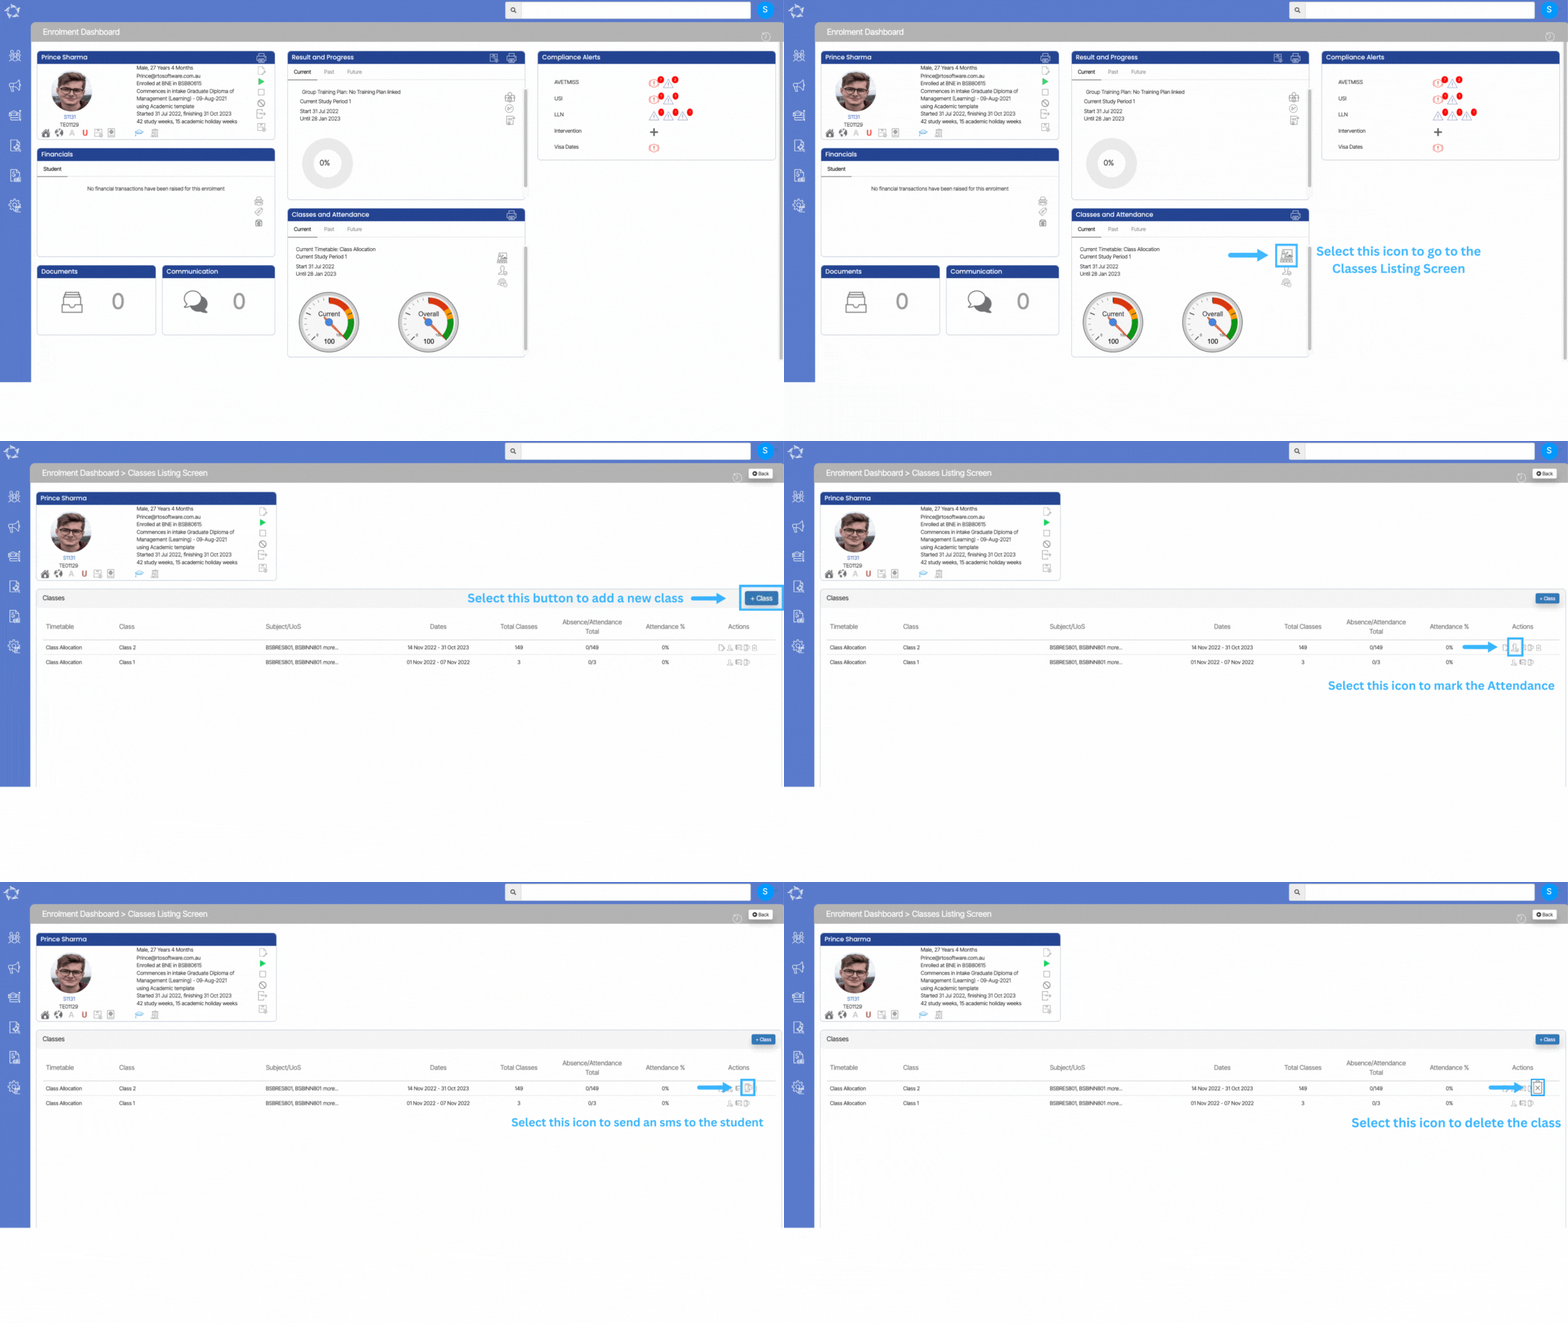
This screen will show you the list of all the classes that are linked to enrolment with their basic details.

A classes listing screen refers to a user interface or a webpage that displays a list of available classes linked to the enrolment. The screen typically provides information such as the Timetable, Class, Subjects, Attendance and any additional details. The purpose of the classes listing screen is to allow you to browse through the available classes and make informed decisions about which classes you would like to enrol in.

In addition to the features mentioned earlier, the classes listing screen may also provide an option to add new classes to the enrolment by selecting a +Class button.

Tiles

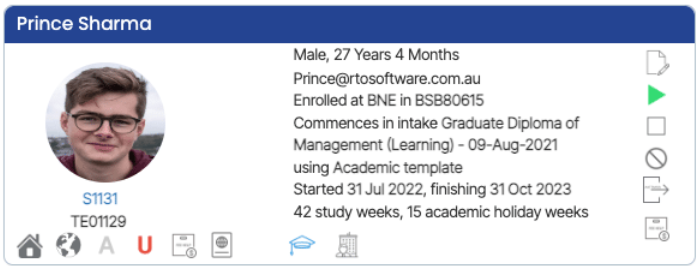
This Tile will show you the basic details of the enrolment and all the icons in this tile are read-only.

This Tile will show you all the classes that are been allocated to the enrolment. You can take other required actions for the classes from the Actions column and add more classes if needed.

Icons under the Actions column

  •  Edit Icon – You can edit the class end date by selecting the edit icon under the actions column and it will open the pop window on the same screen as shown below.
  • Attendance – When you select this icon, it takes you to the attendance listing screen where you can mark attendance for the student.
  • Send Email – You can send an email to a student about the classes.
  • Send SMS – You can send an SMS to a student.
  • Delete Class – You can delete the class by selecting the delete icon.