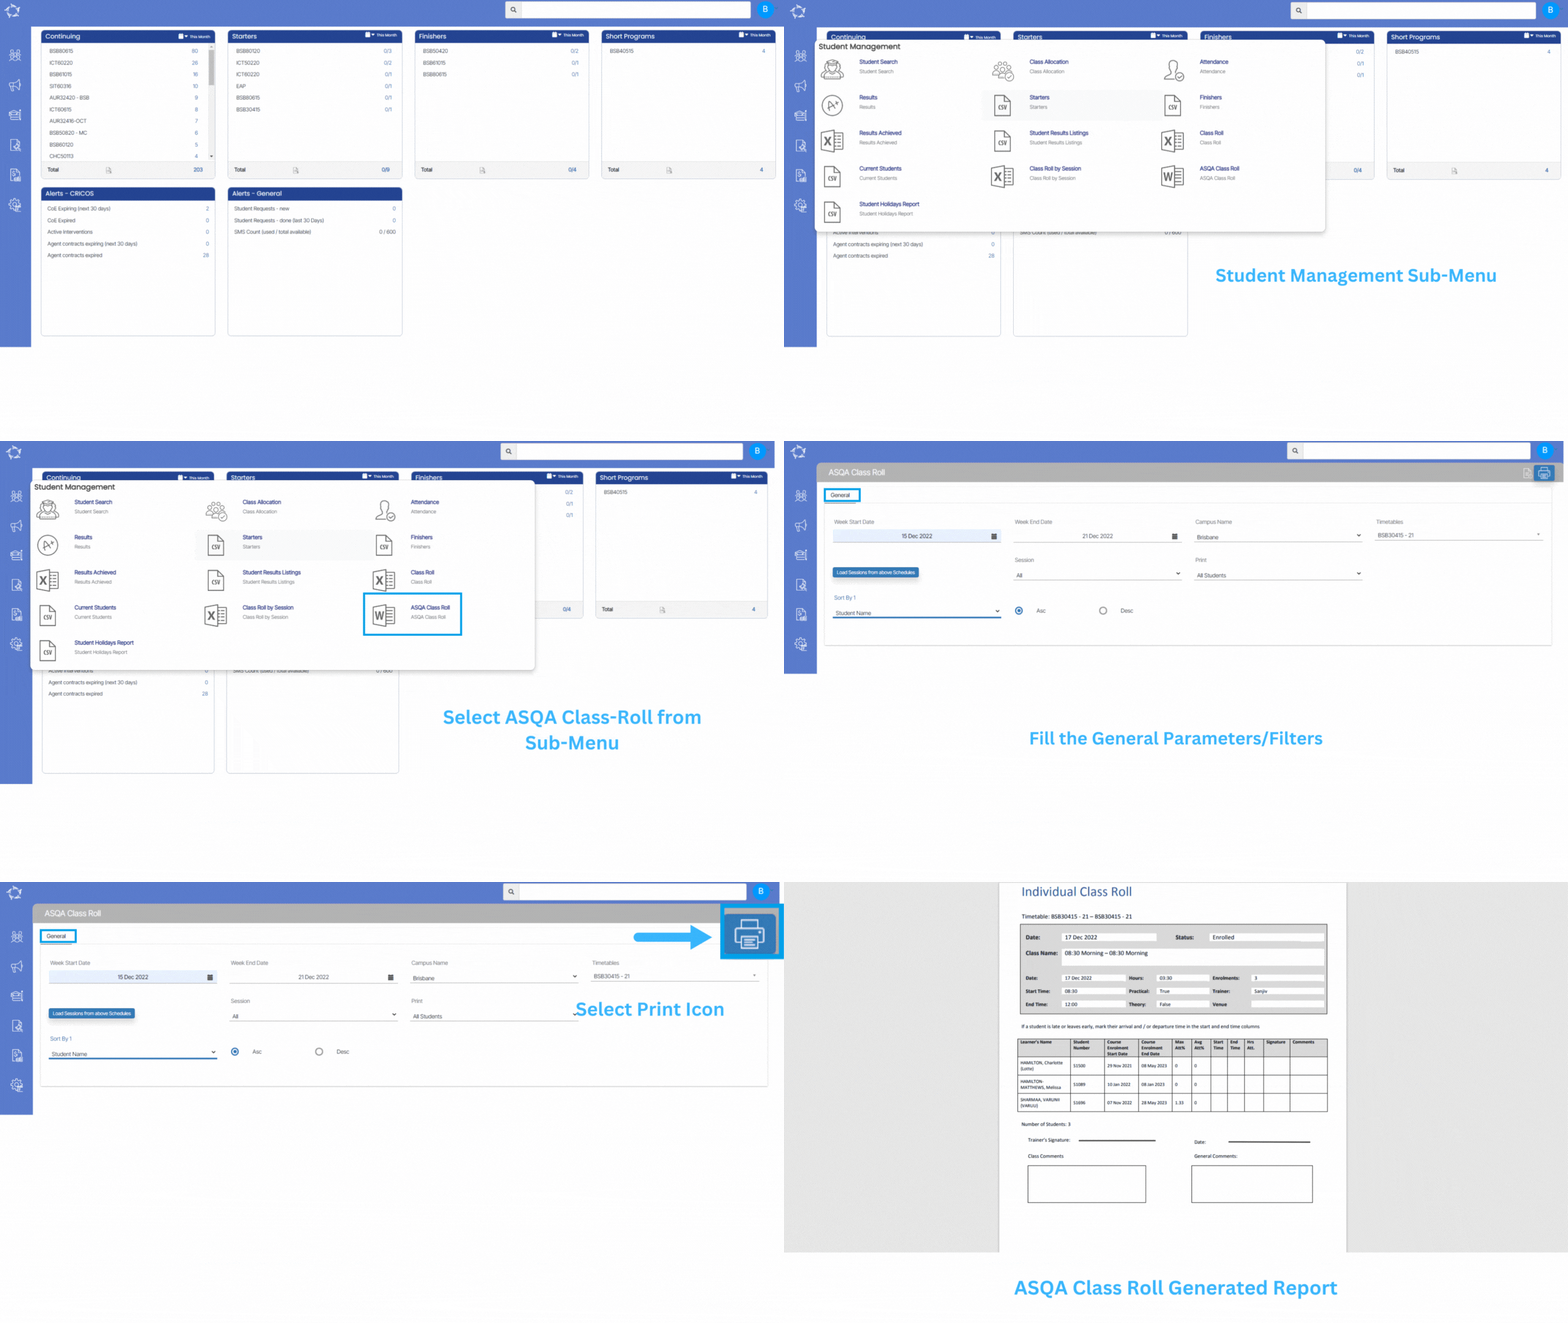
ASQA Class Roll report Data Columns

All the columns and table printed in the report are self explanatory. However, below table can provide you more information about the logics:

Table 1 (This will print a class’s data)

Column NameExplanation
TimetableTo print the timetable code and name
DateClass Date (It will be printed twice in the top table of the report)
StatusThis is always to printed as “Enrolled” because you always generate the class roll report for all the students who are enrolled and currently studying.
Class NameName of the class
HoursHours for the class
EnrolmentsTotal enrolments count which are allocated into the class
Start TimeStart time of the class
End TimeEnd time of the class
TrainerTrainer name who is linked with the class. If there are more than 1 trainer linked with a class, this will print all trainers’ names with comma separated. Example: Ramneet Kaur, Isha Sharma
Practical and TheoryBased on your selection for the class type for a class, the system will print “True” and/or “False” in the ASQA Class roll report.
If you have set your class as Practical only, then in the ASQA Class roll report, the system will print “True” against the Practical column and “False” against the Theory column. 
VenueClassroom name which is linked with the class

Table 2 (This will print all students that are allocated in the class)

ColumnsExplanation
Learner’s NameStudent’s Name
Student NumberStudent Number
Course Enrolment Start DateStart date of the student’s enrolment
Course Enrolment End DateEnd date of the student’s enrolment
Max Att%This is going to print the Overall attendance %.
Avg Att%This is going to print the Current attendance %.
Start TimeIs to be manually entered by the trainer
End TimeIs to be manually entered by the trainer
Hrs AttIs to be manually entered by the trainer
SignatureIs to be manually entered by the trainer
CommentsIs to be manually entered by the trainer

Class Roll by Session Filters

Dashboard > Student Management > Class Roll by Session

Class Roll by Session Report screen has General Filters tab and the below table will show you Filters with their Explanation.

General FiltersExplanation
Week Starting Date This Field shows you the starting date of the Week.
Campus NameThis Field has a magic search option from which you can select any college.
TimetablesTimetable Field shows you active and Inactive timetables,
Student to includeThis label has two radio buttons:
Only Started Student – Select this radio button to to print the report for the started students.
All Students – Select this radio button to print the report for All the students.
Sort ByPlease see TEAMS Basics
Asc or DescPlease see TEAMS Basics

Click on the “Print” Icon to generate the report. After clicking on it, the system will direct you towards the report dashboard screen. You can see the report status over there if it’s generated or not. Once it’s generated, download the report.

Class Roll by Session Data Columns

The below table will show you the explanation of the data columns that will get printed in the report.

ColumnsExplanation
Student NoStudent Number generated by TEAMS
Student NameStudent (First name)(Middle name)(Last name)
GenderStudent’s gender selected at the application or student levels
DOBStudent’s date of birth selected at the application or Student levels
NationalityNationality of the student
Visa TypeIt will show the Visa type selected at the Student and Enrolment level
Enrolment NoEnrolment Number generated by TEAMS
Enrolment TypeThe system will print the enrolment type from Edit Enrolment Details screen
Student TypeNew student or Returning Student selected on Edit Enrolment Detail screen
AgentIt will show the agent name linked with an enrolment
IntakeIntake name selected while processing the application
DatesEnrolment’s Start date and End date
Week NoThis is the number of weeks (if the enrolment has a total duration of 52 weeks and the class session is in week 12 then the system will show you the week no = 12/52

Click on the “Print” Icon  to generate the report. After clicking on it, the system will direct you towards the report dashboard screen. You can see the report status over there if it’s generated or not. Once it’s generated, download the report.

Campus – Contact Log

Campus > Edit Campus > Campus Entry Burger Menu > Contact log

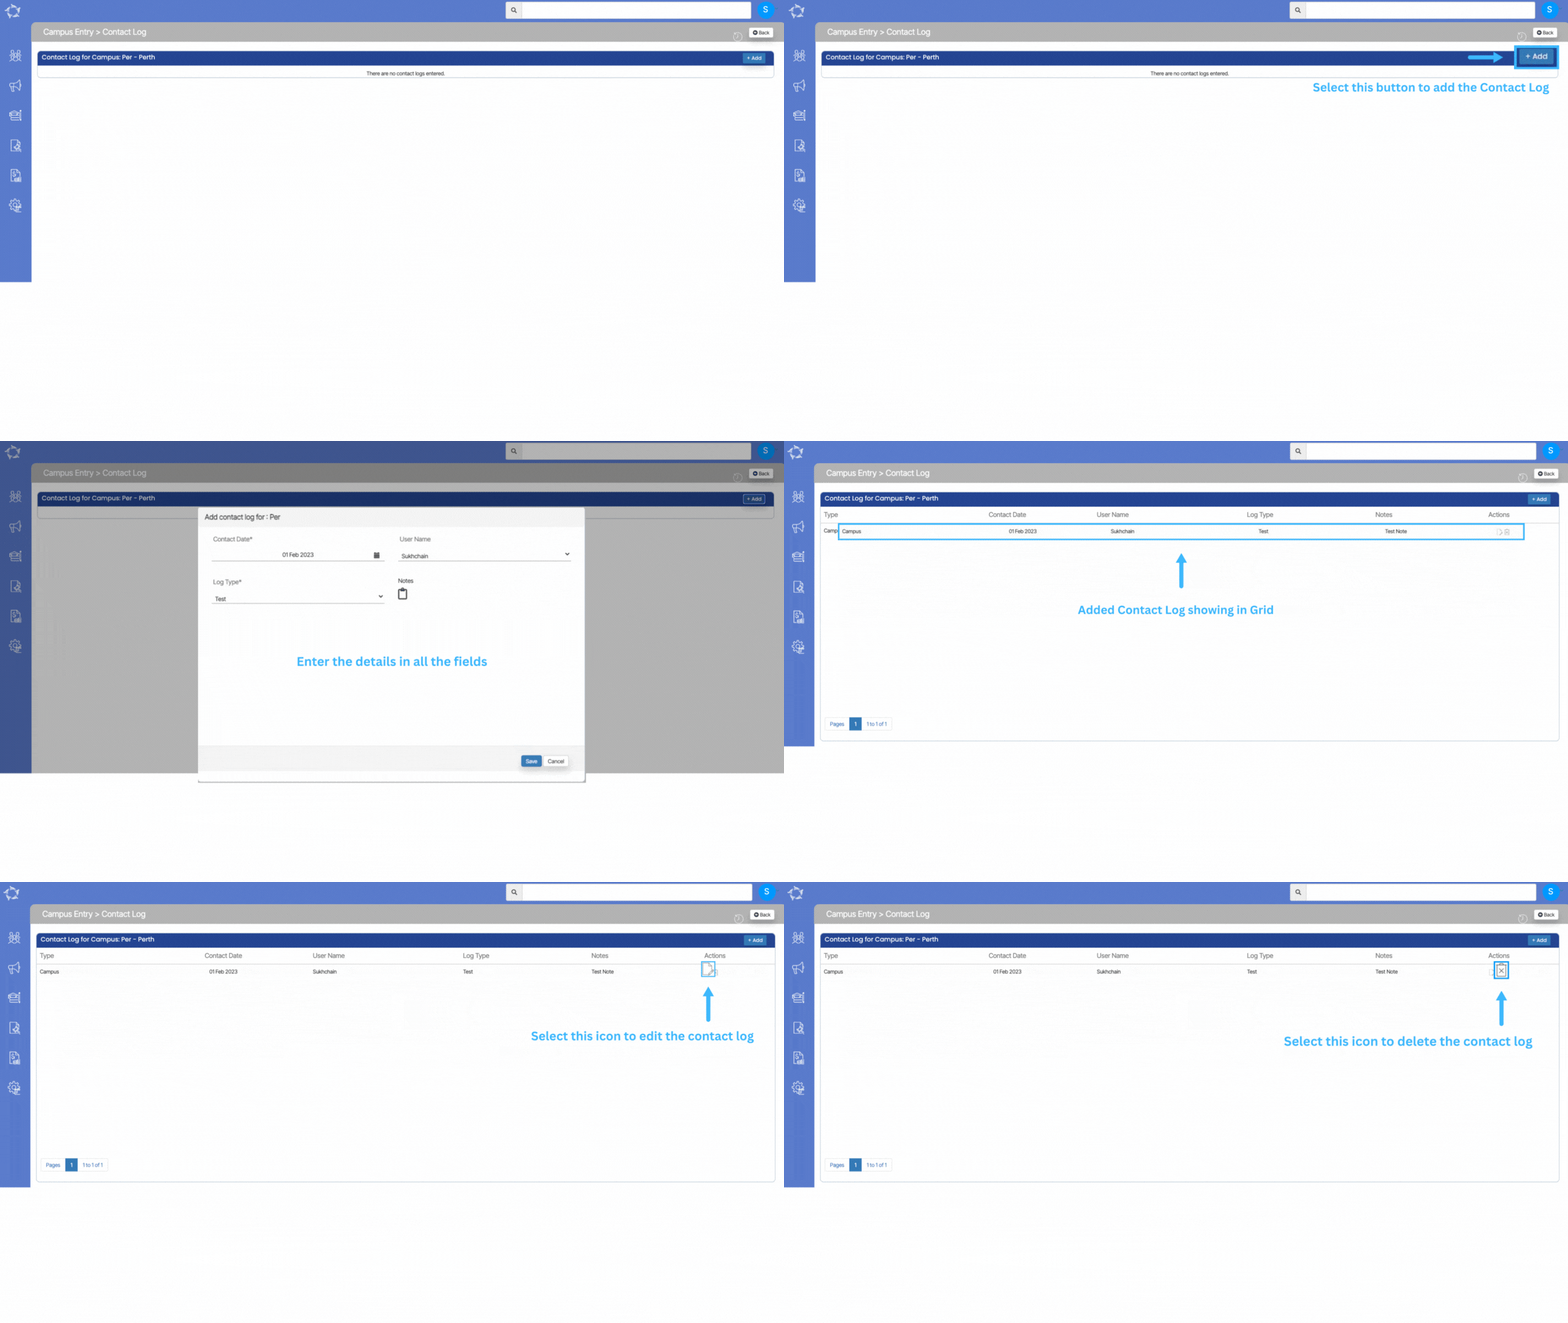
The campus contact log screen will allow you to create the contact log against the campus. You can add contact log details of the campus by selecting the +Add button.

When you select the +Add button, a popup window will appear where you can select the contact log details and once it is updated it will show you the details in the grid.

Explanation of the fields

FieldsExplanation
Contact DateThis is a mandatory field and you can select the contact date from the calendar icon
User NameThe username which you have used to log in to teams will auto-populate here.
Log TypeThis is a mandatory field and it is a user ode in TEAMS. Based on the user code created in TEAMS, you can select the log type
NotesHere you can write the notes for your own reference.

Student Search

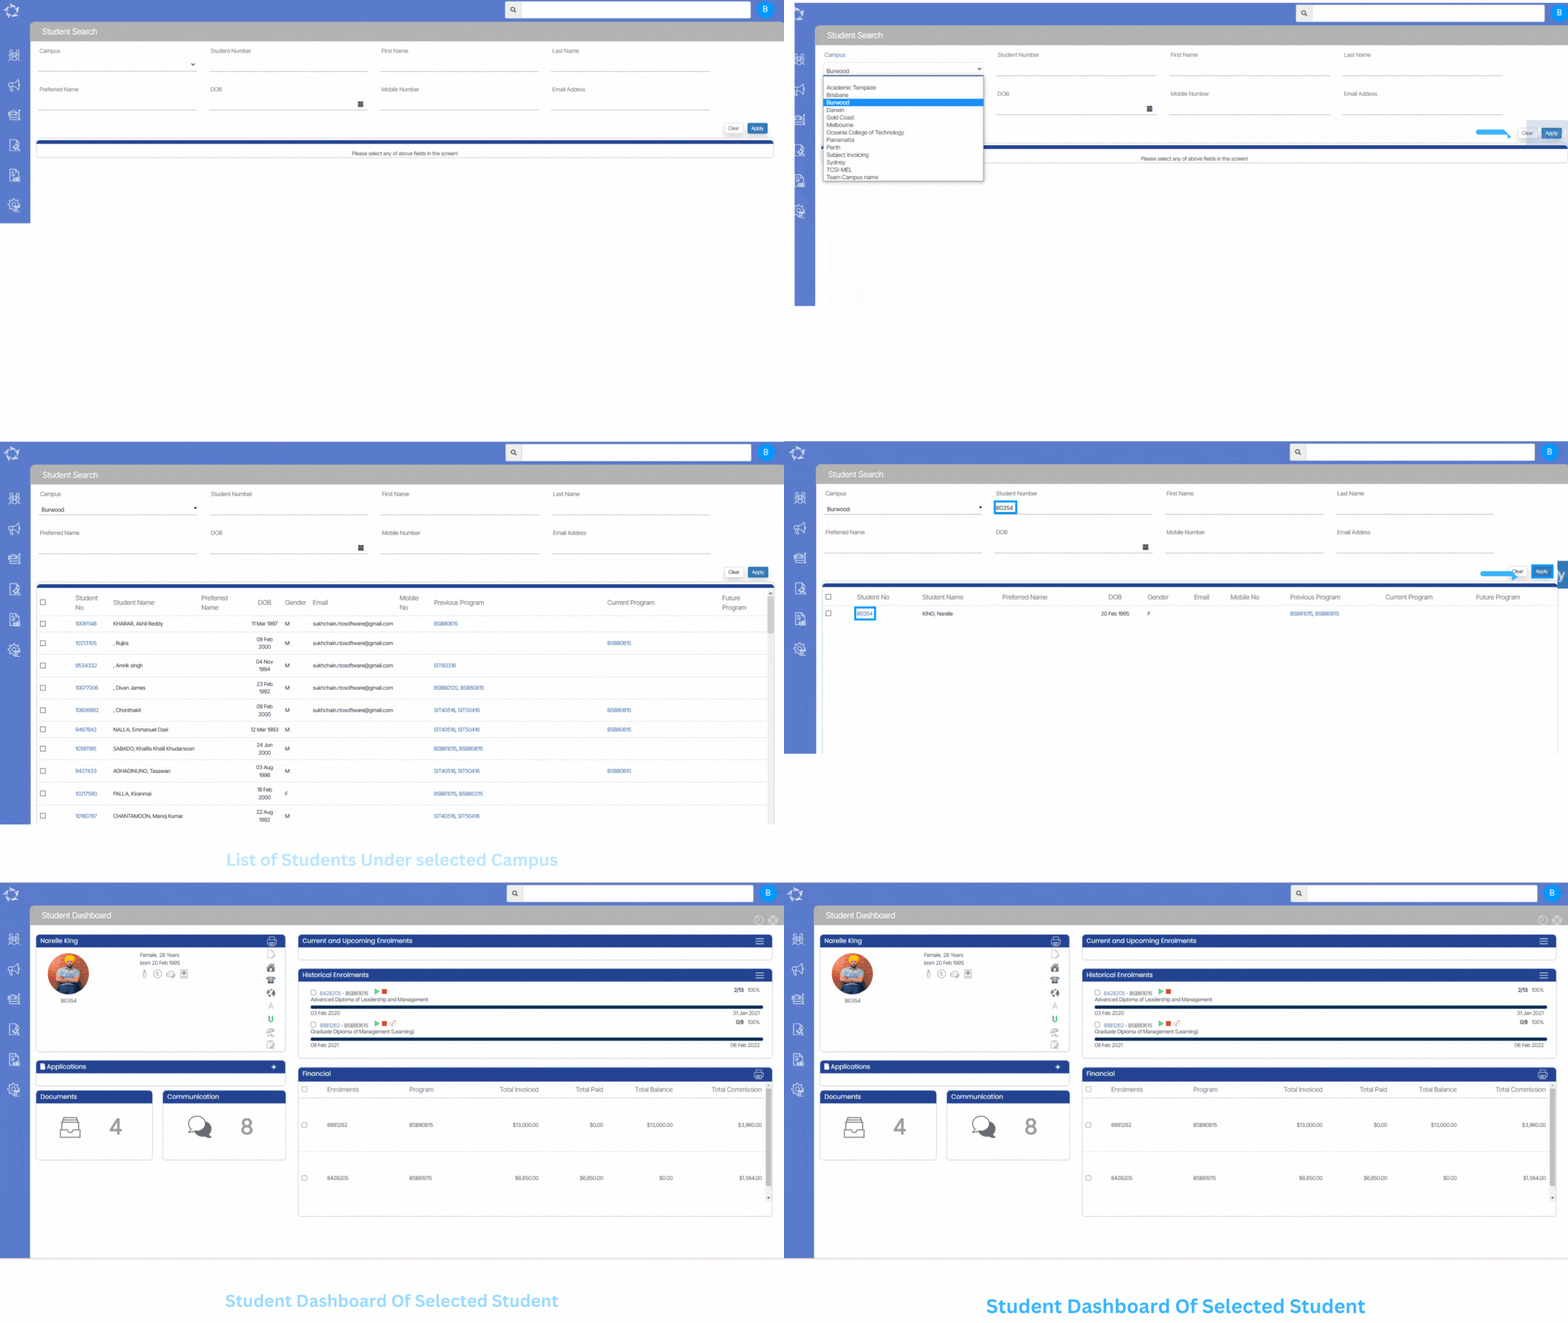
The Student search screen allows you to search for an individual student or multiple student with different parameters.

How do these filters work?

  • Campus – If you want to search multiple students for a specific campus then you can select the desired campus from the Campus drop down and select Apply button and it will load all the students in the grid which are linked with the selected campus.
  • Student Number – If you want to search for a specific student then you can simply add the student’s number in the student’s number field and select the Apply button and it will pull out the student under the grid.
  • First Name and Last Name If you type in the First and Last name of the student in the relevant field, then the system will pull out all the students accordingly in the grid.
  • Preferred Name For this field, if you have updated the student’s preferred name at the student level (student entry screen) then only you can add and search the student’s preferred name in the Preferred Name field.
  • DOB – This field will fetch all the students who have similar Date of Birth.
  • Mobile Number – If you want to search a student with their mobile number then you need to add mobile number in the mobile number field and select Apply button and which will show you the student in the grid
  • Email Address – If you want to search for a specific student with his/her email address then you need to add the student’s email address in the email address field and select Apply button.

Campus – Contact

Campus > Edit Campus > Campus Entry Burger Menu > Contact

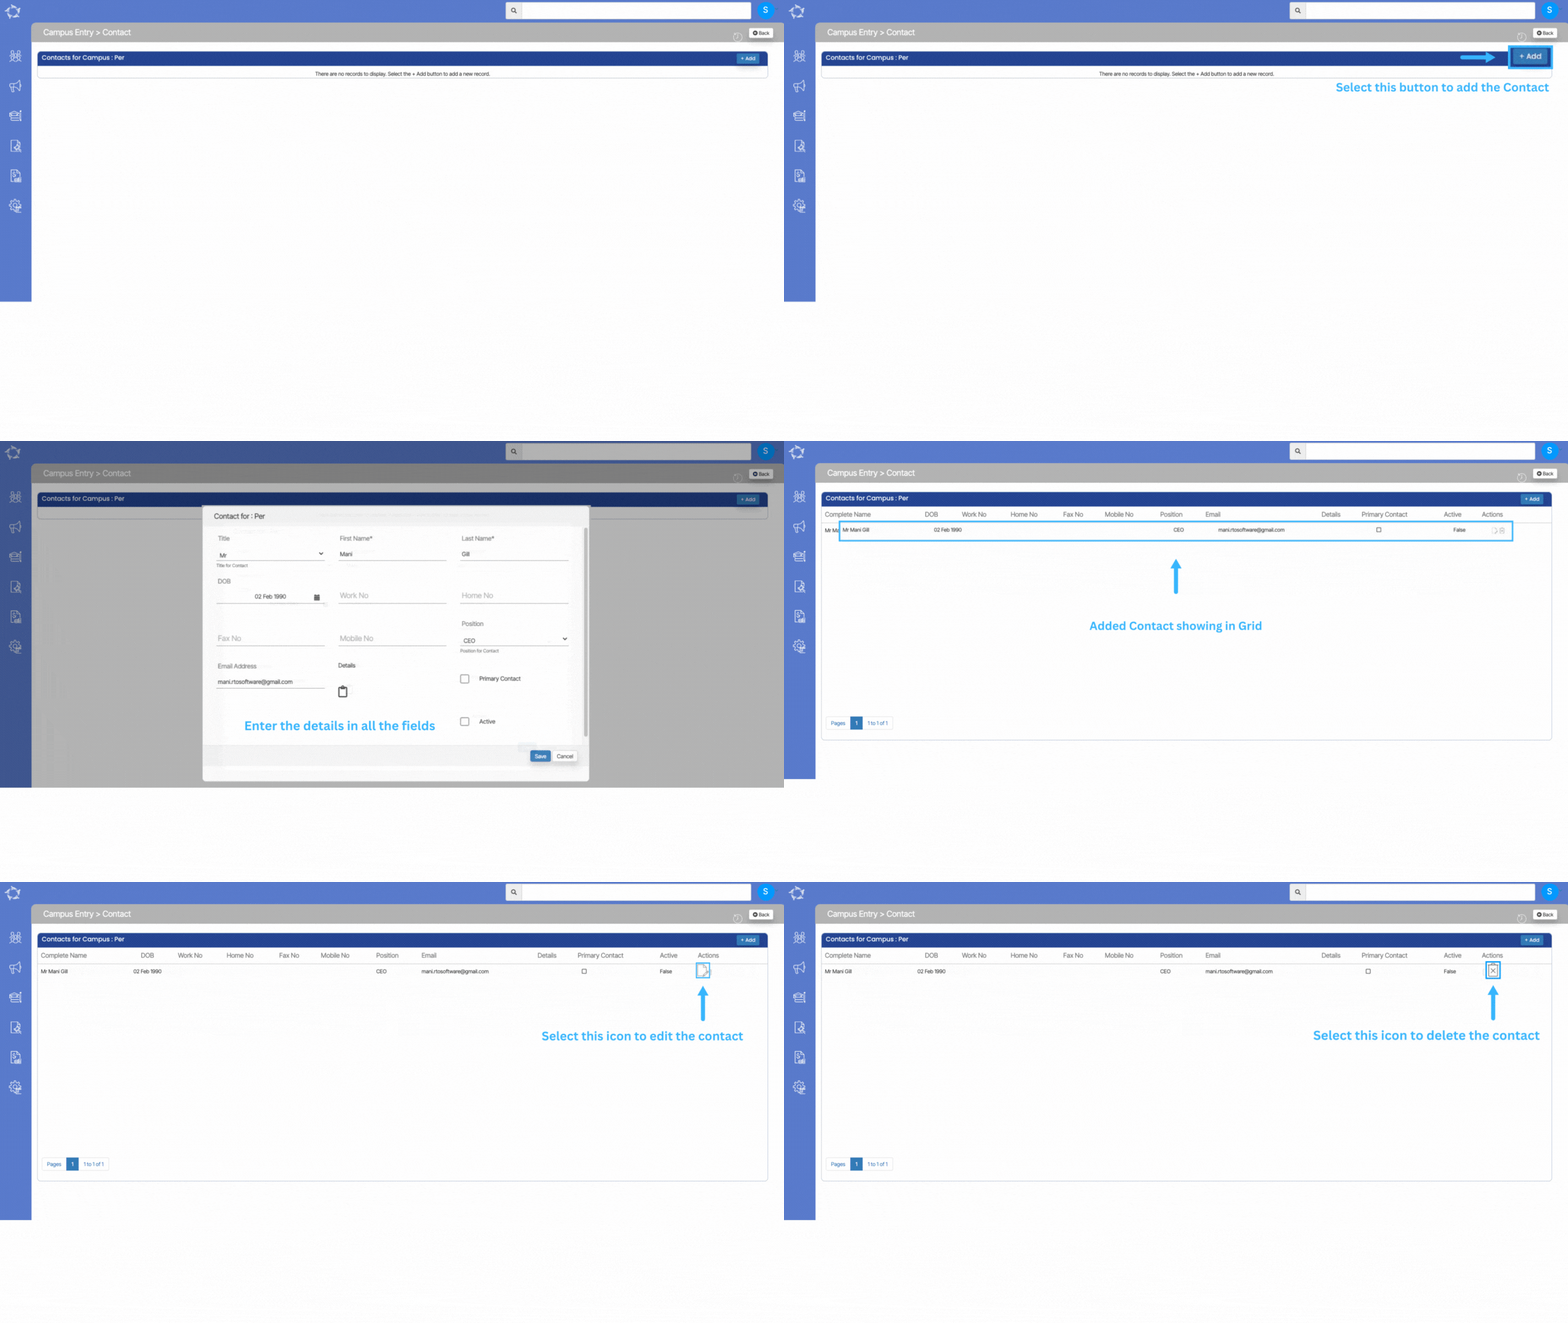
When you select the contact option from the burger menu, you will be taken to the campus entry > contact screen. This screen will allow you to add the others contact details.

Select the +Add button, a popup window will appear where you can add the contact details of the concerned person.

Explanation of the fields below:

FieldsExplanation
TitleYou can select a title (Mr., Miss) etc
First NameFirst name of the contact person
Last NameLast name of the contact person
DOBDOB of the contact person.
Work NoWork number
Home NoHome number
Fax NoFax number
Mobile NoMobile number
PositionSelect the organisational position of the contact person from the dropdown
Email AddressEmail address of the contact person
DetailsYou can write any reference details under the notes.
Primary ContactYou can select this tickbox if the contact person is the primary contact person of the campus.
ActiveSelect the box to make the contact details active.

Campus – Bank Account

Campus > Edit Campus > Campus Entry Burger Menu > Bank Account

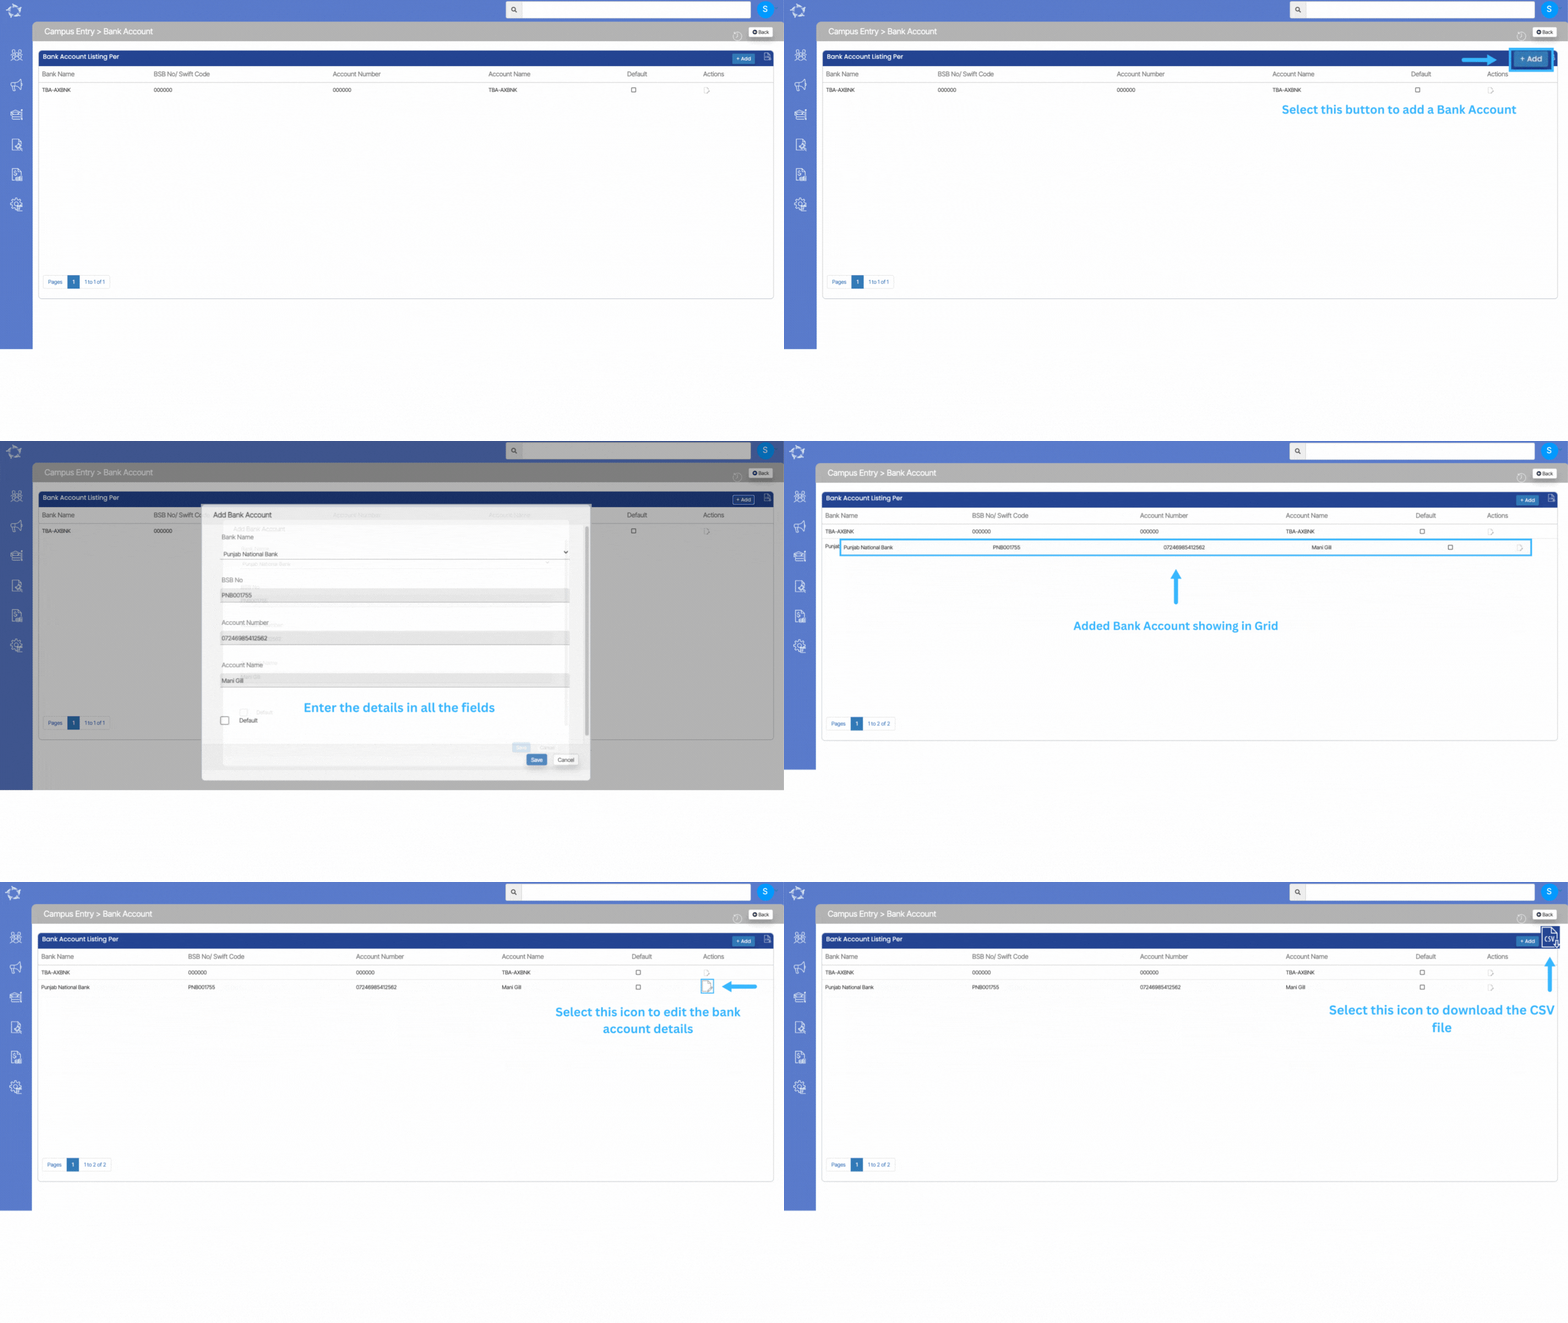
This screen provides you with a grid displaying the bank details associated with the campus. You can easily view the information in an organised manner. If you need to make any changes to the existing bank details, simply locate the respective entry in the grid and select the edit icon available under the actions column. This will enable you to update the information as required.

Additionally, if you wish to add a new bank account for your Campus, you can conveniently do so using the options provided. This screen offers a user-friendly interface to manage and modify bank details, ensuring accurate and up to date information for your campus and RTO.

Marketing Reports

Below is a list of all the reports available under this Marketing menu in the system. You can see the name of the report with either an icon that has the letters CSV in it or an MS Excel icon. Generally, all reports in the system generate a CSV (Comma-separated Values). There will be times when a report generates to Excel, primarily as it requires a page break in it which you can’t do in CSV, however in this menu there are no Excel reports.

Each report listed below is a link to a post where you can understand the report, its parameters and to view an example of the report.

Campus – Linked program

Campus > Campus Entry Burger Menu > Linked Programs

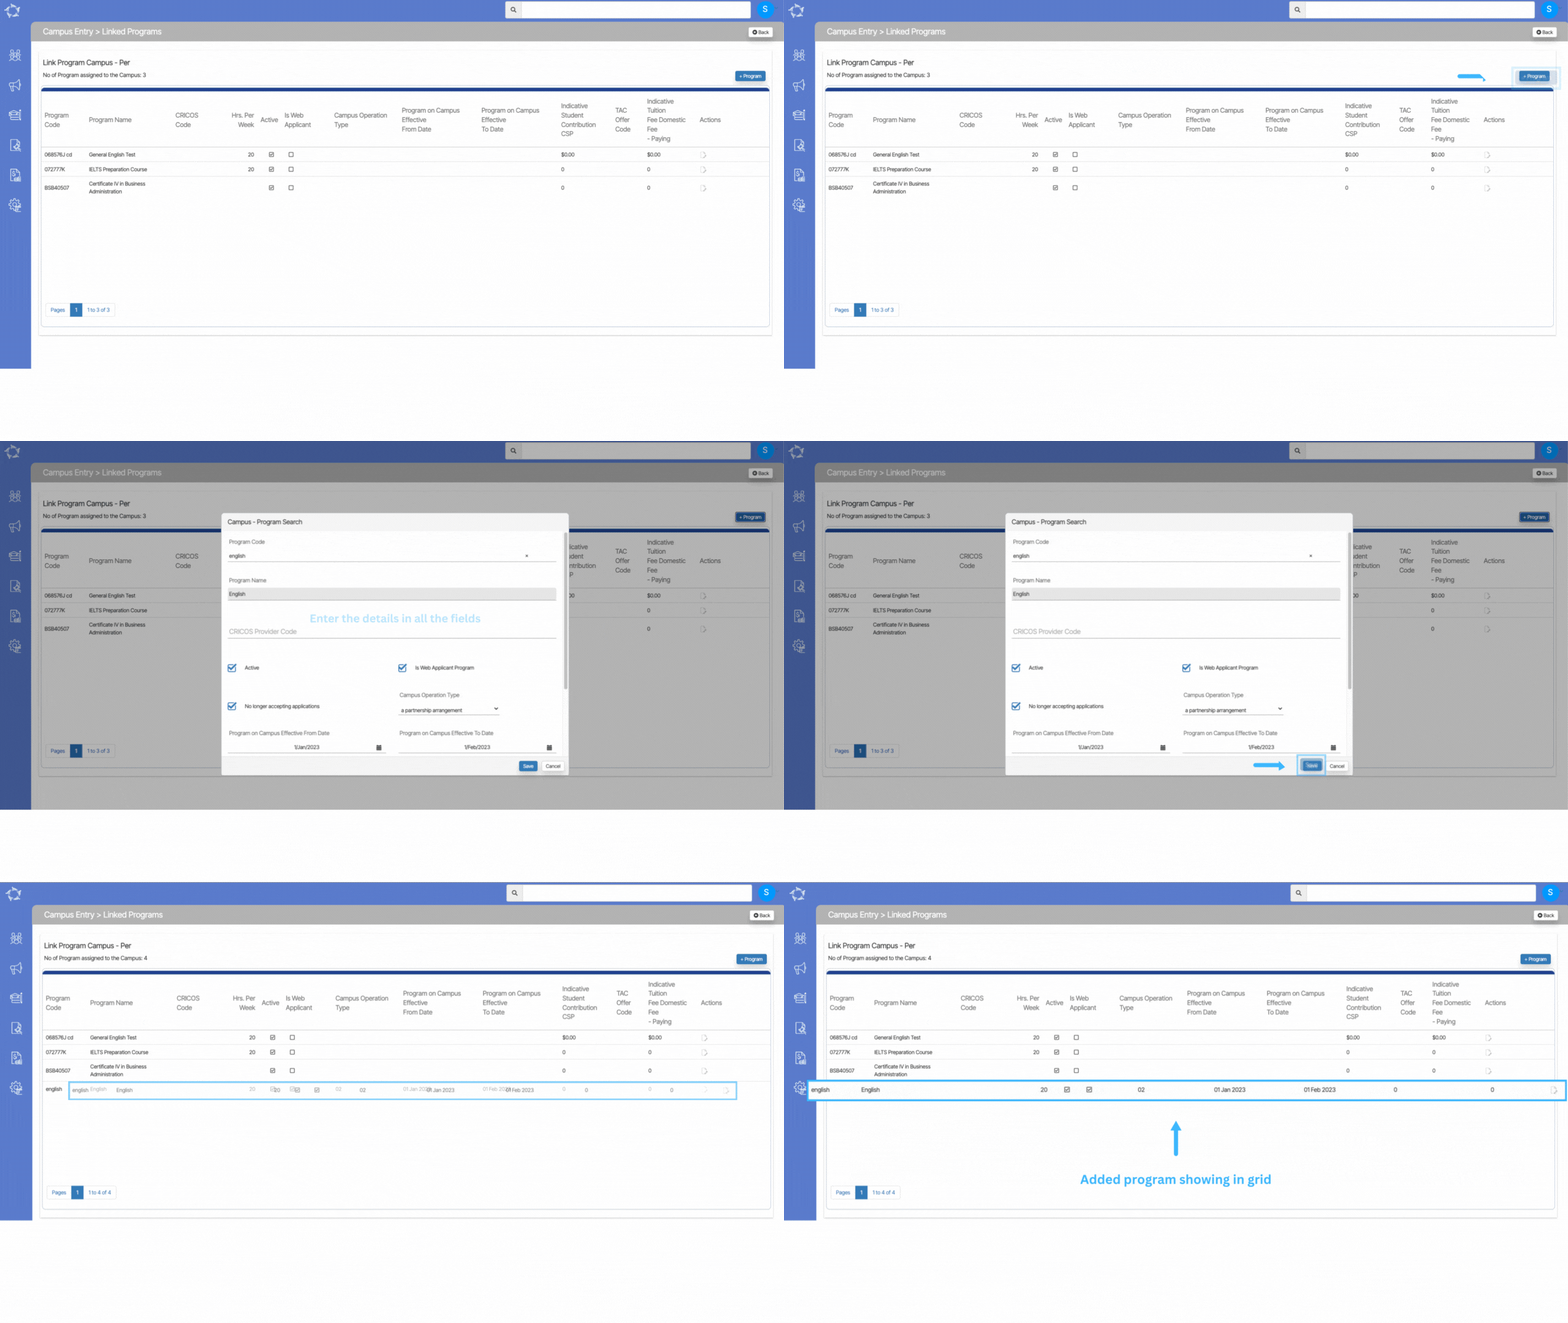
The screen provides an overview of all the programs within the grid that are associated with the campus. To establish a connection between a program and the campus, you can simply click on the +Program button. This action allows you to link the desired program to the campus, enabling easy access and management of the program’s information within the system.

Explanation of the fields below:

FieldsExplanation
Program CodeIt is a magic search field where you have to type the three initials of the program code and it will show you the programs with those initials and you can select the code as per your need.
Program NameIt will be auto-populated when you select the program code.
CRICOS Provider CodeIn this field, you can write the CRICOS Provider code.
ActiveYou need to select the Active tick box to make the Program active.
Is Web Applicant ProgramYou can tick this box if the program is a web applicant program.
No Longer Accepting ApplicationsIf you do not want the program to accept applications then you can select this tick box.
Campus Operation TypeThere are two types of campus operation either you can select a stand-alone arrangement or a partnership arrangement.
Program on Campus effective from dateYou can select the date from when the program is effective on campus.
Program on Campus effective to dateYou can select the date till the program will be effective on campus.
Indicative Student Contribution CSP
TAC offer CodeYou can select the TAC offer code from the dropdown
Indicative Tuition Fee Domestic Fee – Paying