Below is the list of the changes that we have made on the Intake entry screen.
| Update Date | Changes made |
|---|---|
| 5th May 2022 | Intake Entry Screen – Changes |
This is the tag we use to approve any post (old and being edited etc) through revisions. Once the majority of all existing/old posts have gone through our edit process and have this tag, we will then bulk remove it from them.
Below is the list of the changes that we have made on the Intake entry screen.
| Update Date | Changes made |
|---|---|
| 5th May 2022 | Intake Entry Screen – Changes |
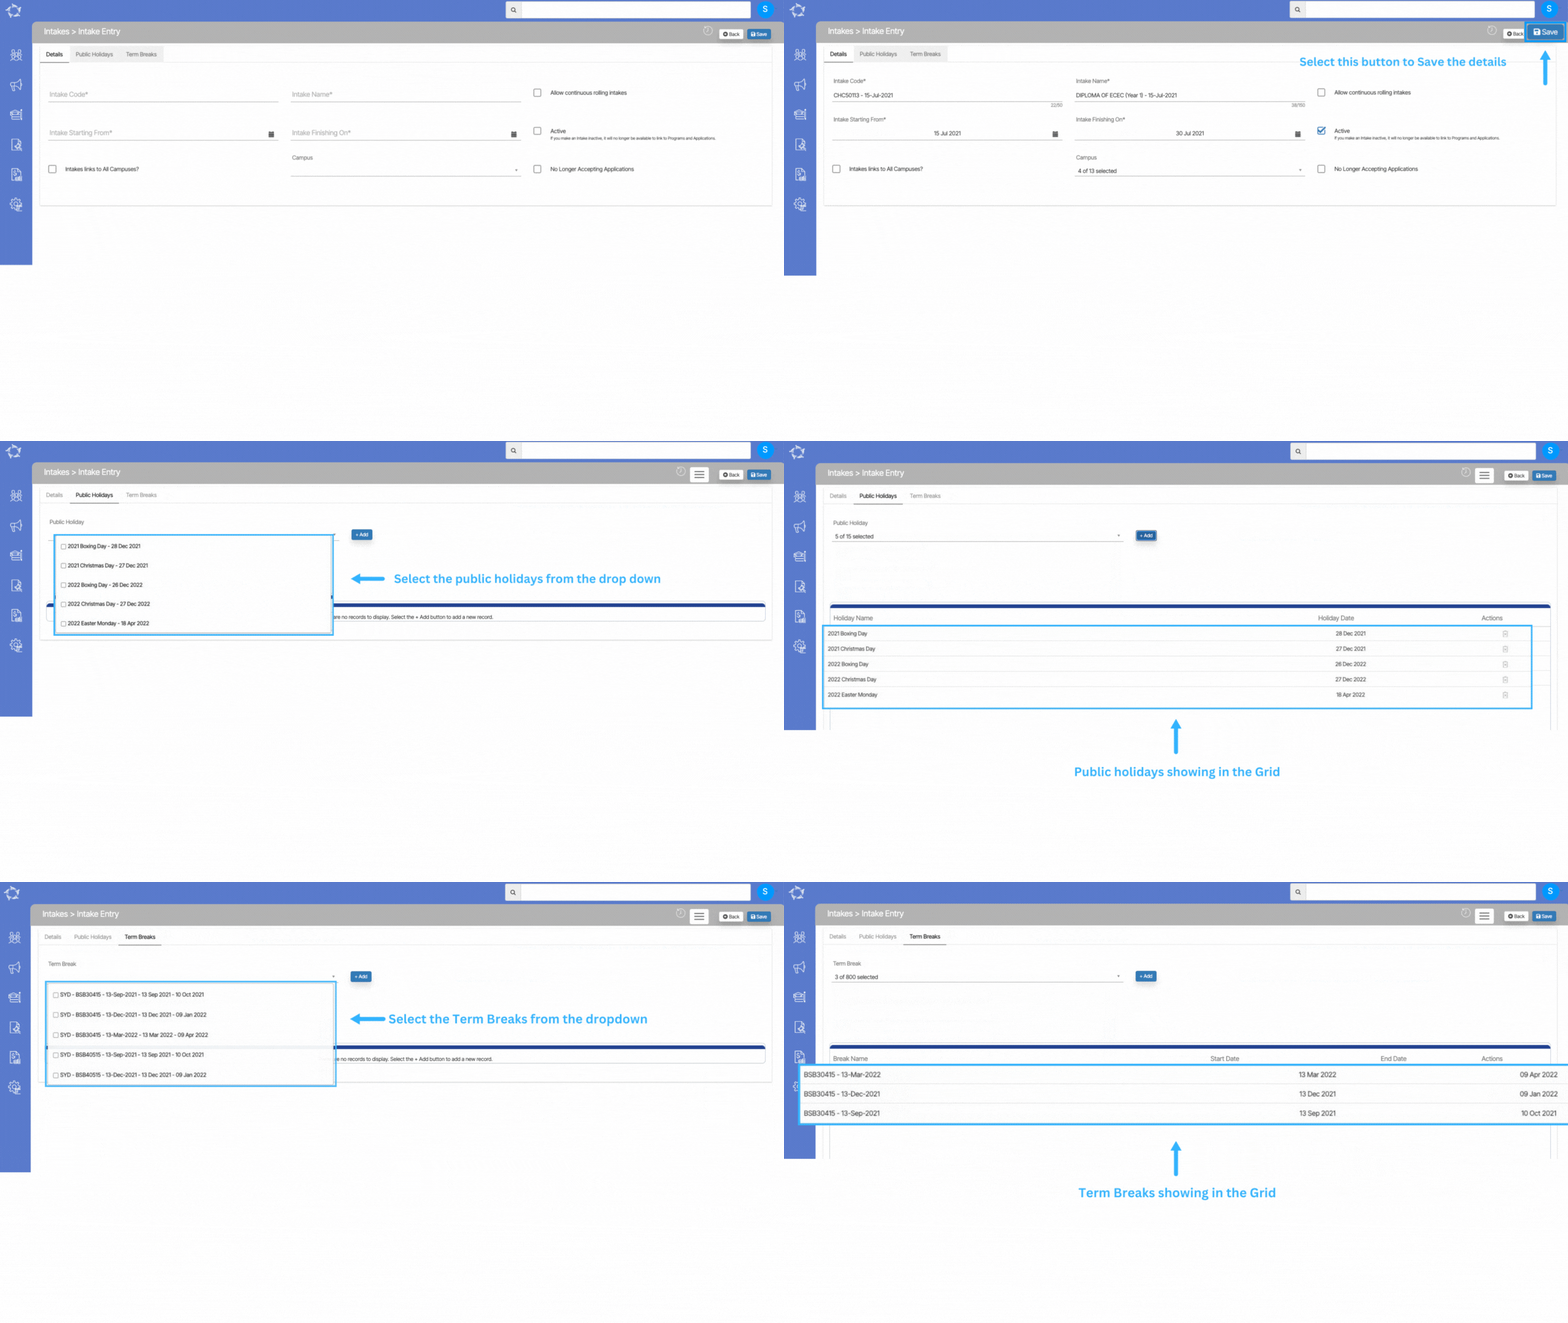
Once you select the + Intake button, you will be taken to the Intake Entry Screen. You will see three tabs and different fields.
Details tab – On this tab, you will be able to add new intake in the system or if you already have an intake then you make changes from this screen.
IMPORTANT – You will only be able to select the Public holidays and Term Breaks tab once you have created and saved the Intake.
Public Holidays Tab – This tab will allow you to link the public holidays with the Intake and to link the holidays you need to select the holidays from the drop-down and then select the +Add button. Please note – if the holidays are not appearing in the dropdown then it means the holiday is not active or it is not in the system. You can create or make the holiday active from the Main Dashboard > System Admin > Public Holidays.
Term Break Tab – This tab will allow you to link the Term Breaks to the Intakes. From the dropdown, you can select the term breaks and then select the +Add button to link the selected term break with intake. Please note – if the term breaks are not appearing in the dropdown then it means the term breaks are not active or it is not in the system. You can create or make the term breaks active from the Main Dashboard > System Admin > Term Breaks.
| Fields | Explanations |
|---|---|
| Intake Code | This is a mandatory field |
| Intake Name | This is a mandatory field |
| Allow Continuous rolling intakes | Select this tick box if you want the use this intake as Continuous rolling intakes |
| Intake Starting From | This is a mandatory field |
| Intake Finishing On | This is a mandatory field |
| Active | Select this box to show the Intake as active |
| Intakes links to all Campuses? | Select this box to link this intake to all the campuses |
| Campuses | You can select a particular campus from the dropdown to link the intake |
| No Longer Accepting Applications | If you select this tick box then the will not show while creating applications |
Subjects > Subjects Entry Burger Menu > AVETMISS Settings
Colleges set up AVETMISS (Australian Vocational Education and Training Management Information Statistical Standard) settings for subjects to ensure compliance with the national data reporting requirements for vocational education and training in Australia. AVETMISS is a standard framework that governs the collection, reporting, and analysis of data related to vocational education and training activities.
By setting up AVETMISS settings for subjects, you can accurately capture and report data on student enrolments, completions, qualifications, and other relevant information.
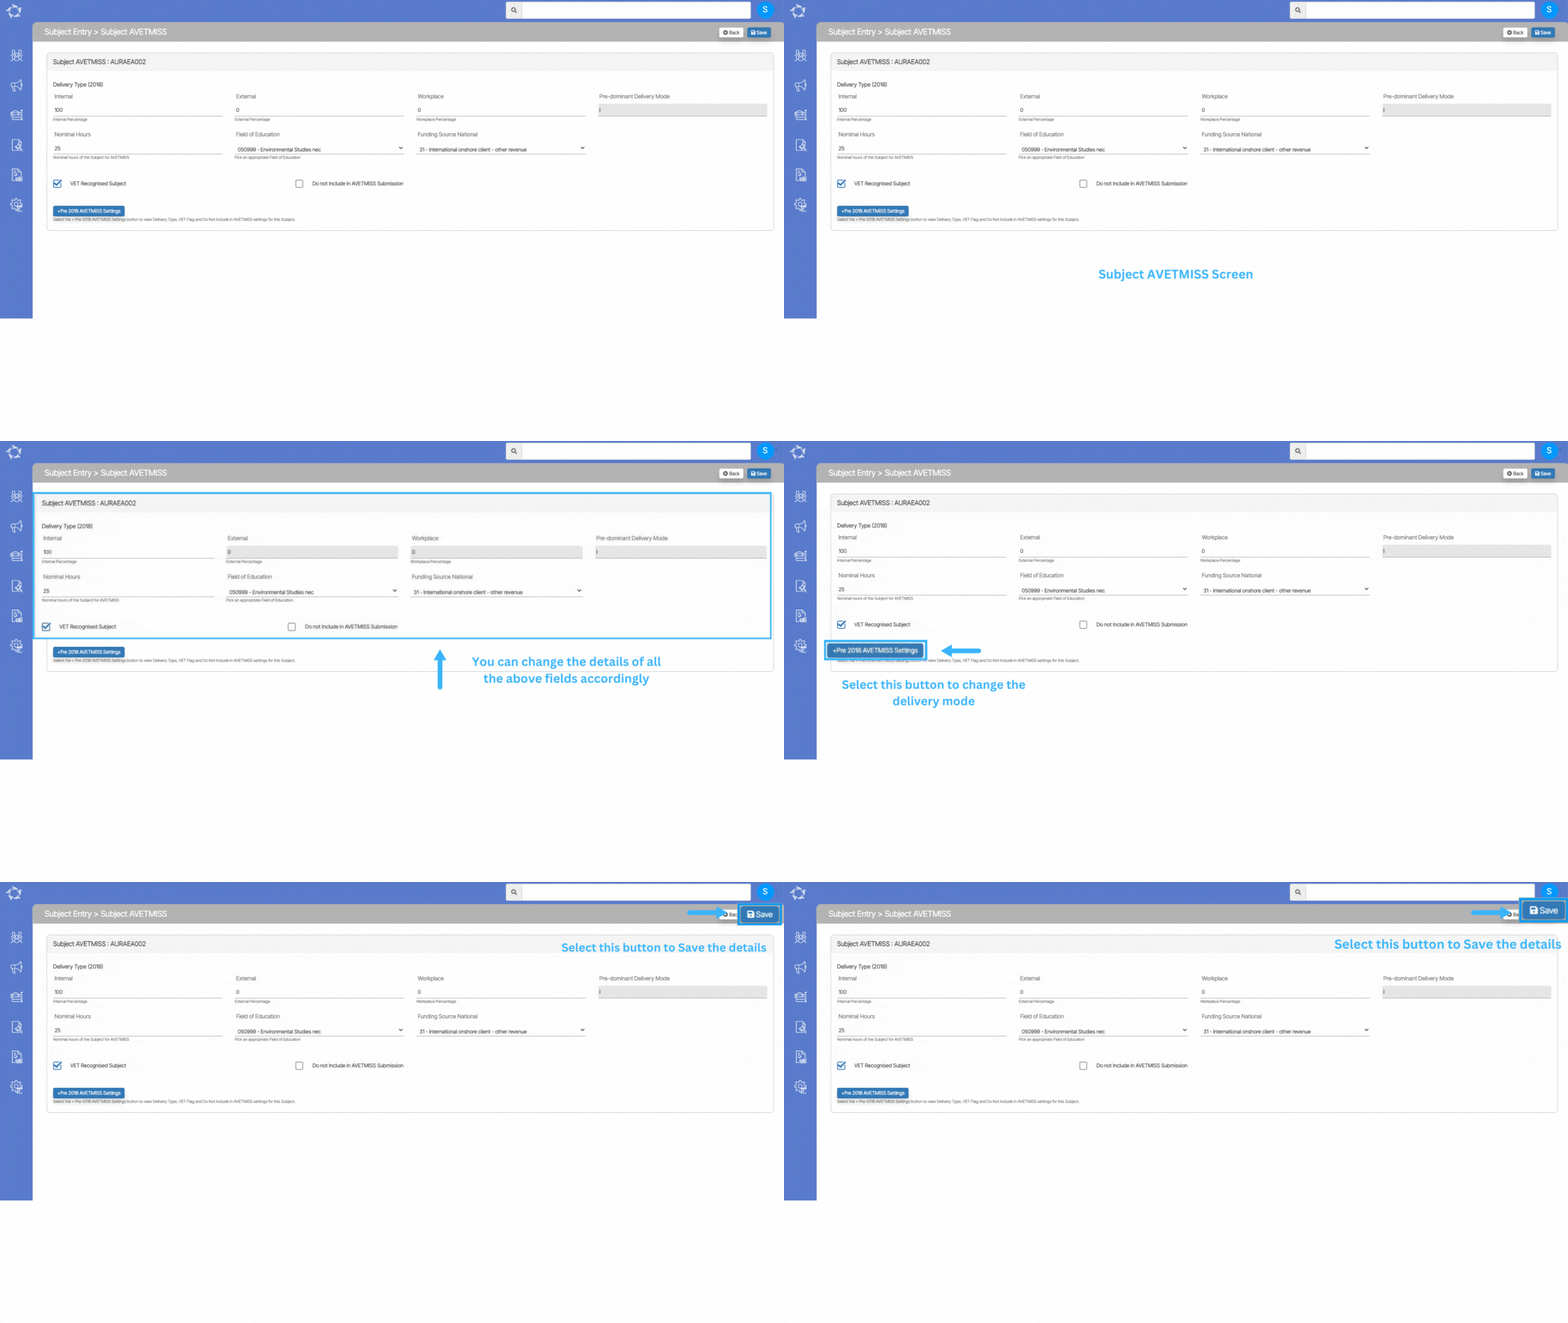
When you access the AVETMISS Settings option, it will open the Subject AVETMISS screen. This screen allows you to input and manage the AVETMISS details for the subjects. Within the Subject AVETMISS screen, you can add the necessary AVETMISS information for each subject individually.
| Fields | Explanations |
|---|---|
| Internal | Write the value as 100 if the subject is taught onshore only. The other two fields automatically have a 0 value. |
| External | Write the value as 100 if the subject is taught offshore only. Then the internal and workplace field automatically have a 0 value. |
| Workplace | Write the value as 100 if the subject is taught at the workplace level only. Then the internal and external fields automatically have a 0 value. |
| Pre-Dominant Delivery Mode | It is a read-only auto-populated field that changes according to the delivery type method selected. |
| Nominal Hours | Here you can add the nationally agreed nominal hours of the subject. |
| Field of Education | You can select the field of education from the dropdown. |
| Funding Source National | If you are 100% CRICOS for your VET subject you would select the funding source national as overseas 31 (International onshore client – other revenue). However, if you deliver offshore for student then you would change it from an Enrolment subject AVETMISS level. |
| VET Recognised Subject | Select this box to make the subject VET recognised. |
| Do not include in AVETMISS Submission | Select this tick box if you do not want to include the subject in the AVETMISS submission. |
Marketing > Agent Dashboard > Search Agent
This screen will allow you to search for an agent. You can simply type the agent name or agent code in the search field and it will show the relevant suggestions where you can select the appropriate agent. Once you have searched and selected the agent then the system will open Agent Dashboard for you.

Assessments > Add Button > Assessment Entry
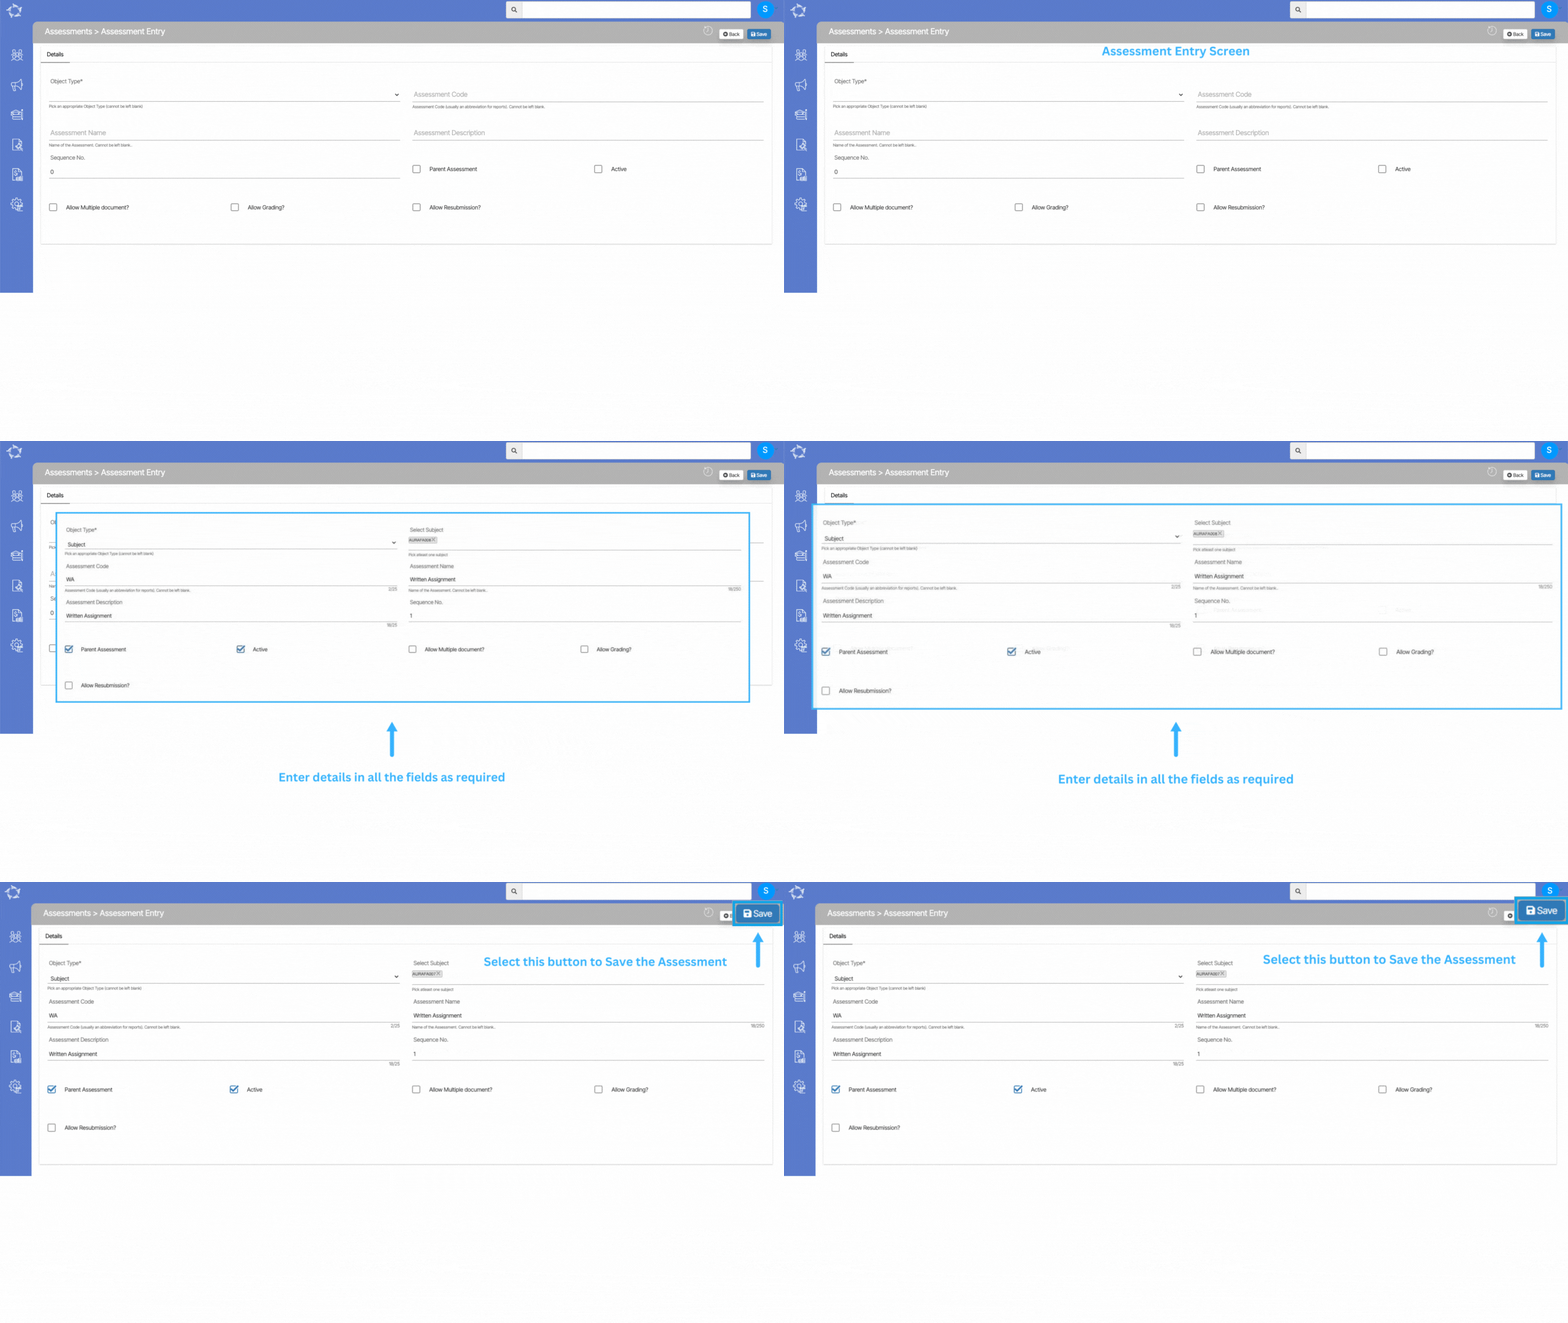
When you select the +Add Button, the system will open the Assessment Entry screen for you. On the Assessment Entry screen, you will see different fields on the Details tab. Enter the details in all the fields and save.
| Fields | Explanation |
|---|---|
| Object Type* | This is a mandatory field and you need to select the object type such as Subject, UoS, etc from the dropdown. Based on the object type selected, the system will show you another field as a select a subject or select UoS. The field will be a magic search field and you can search and select the required field accordingly. |
| Assessment Code | Enter the Assessment Code |
| Assessment Name | Enter the Assessment Name |
| Assessment Description | Enter the Assessment Description in this field. |
| Sequence No | Enter the Sequence no in this field. |
| Parent Assessment | Select this tick box if you want this Assessment as a Parent Assessment. |
| Active | Select this tick box to make the assessment Active. |
| Allow Multiple document? | Select this tick box to Allow Multiple document for the specific assessment |
| Allow Grading? | Select this tick box to Allow Grading for the specific assessment |
| Allow Resubmission | Select this tick box to Allow Resubmission for the specific assessment |
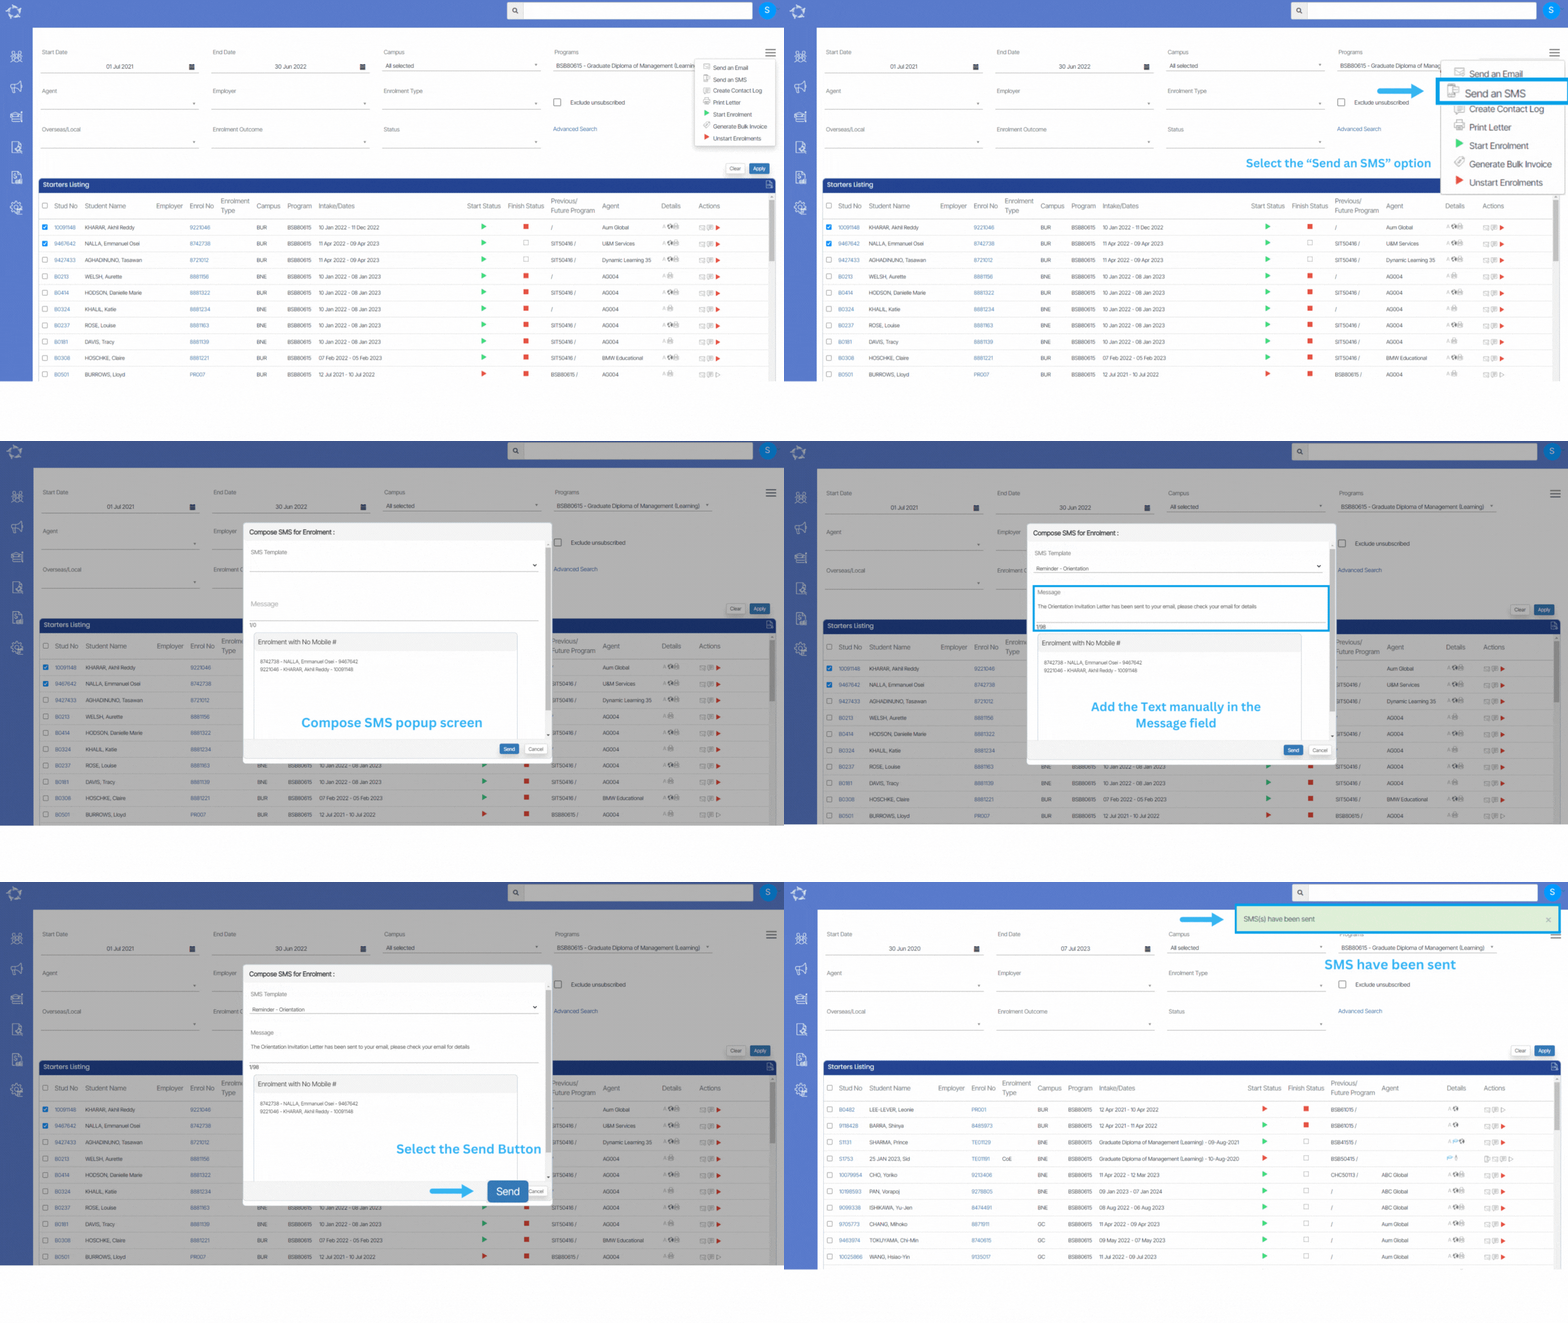
TEAMS gives you the functionality to send out SMS/s to students, employers, and agents. You will see this option on all the listing screens and in the communication tile. You either can send the SMS/s in Bulk by using the listing screens or you can send individual SMS by using the communication tile on different dashboards that we have such Applicant Dashboard, Student Dashboard, Application Dashboard, Enrolment Dashboard, Agent Dashboard, etc. No matter what screen you choose to send out the SMS/s, the steps to use this functionality are the same everywhere. This post will explain to you how you can use the “Send an SMS” option.
These screens will allow you to add/edit the information about the Agent. You can find these screens under:
Agent Dashboard > Agent Profile Tile > Edit Agent Details Icon
Marketing Menu > Agent Listing screen > +Agent Button
Note – When you select the Offshore Agent tick box, the Overseas address tab will get visible and you won’t be able to select the Local Address tab.
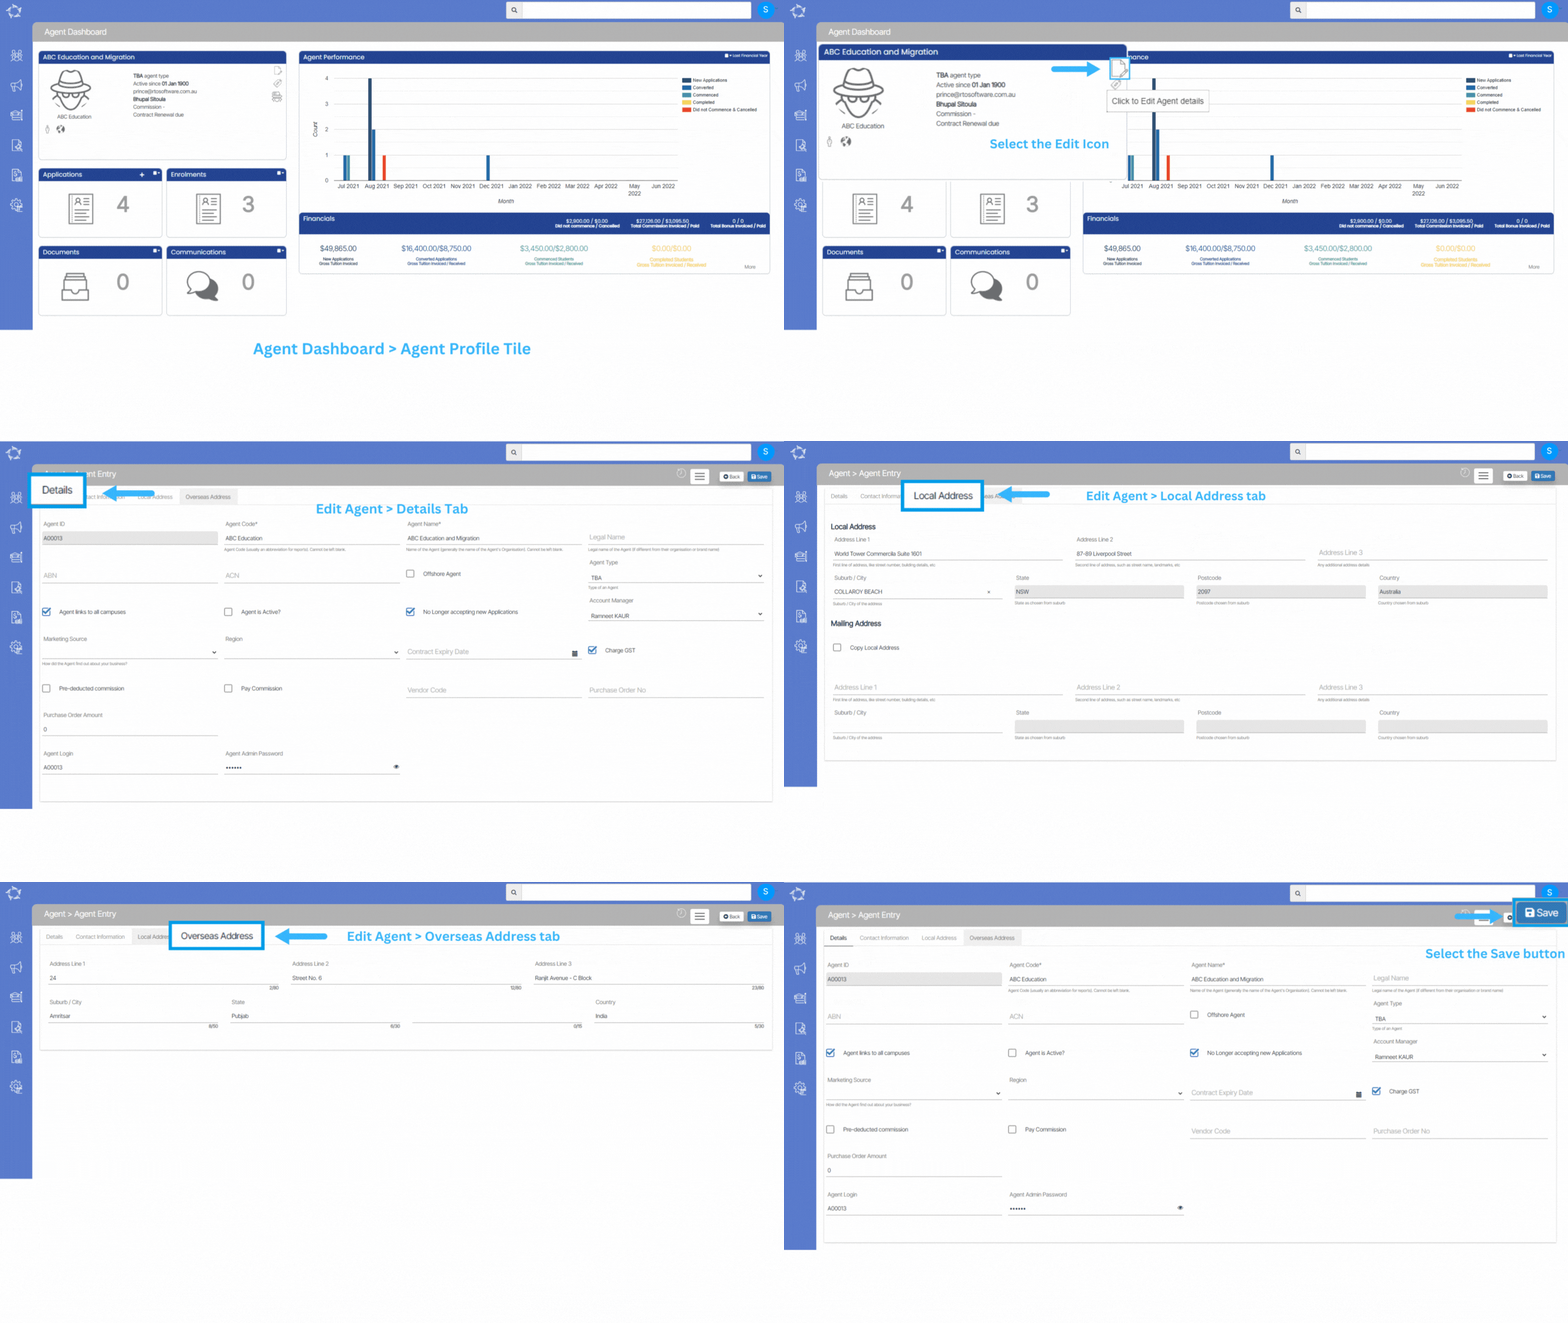
Note – Below tables will give you an explanation of details tab and other tabs(contact information, local address and overseas) are self explanatory tab where you add contact information and agent’s address
| Field | Explanation |
|---|---|
| Agent ID | It is a read-only system-generated field that will automatically populate Agent’s ID. |
| Agent Code | Agent Code (usually an abbreviation for reports). Cannot be left blank. |
| Agent Name | Name of the Agent (generally the name of the Agent’s Organisation). Cannot be left blank. |
| Legal Name | The legal name of the Agent (if different from their organisation or brand name). |
| ABN | You can enter the Australian Business Number in this field. |
| ACN | You can enter the Australian Company Number in this field. |
| Offshore Agent | Select this tick box if the agent is offshore (overseas). |
| Agent Type | This is user code and based on the user code created in TEAMS, you can select the agent type from dropdown. |
| Agent Links to all Campuses | If your RTO has multiple campuses then you can select this tick box. |
| Campus | You can select the specific campus from the dropdown field. This field will be visible if the Agent Links to all campuses check box is un-tick. |
| Agent is Active? | If you do not select this tick then the agent will not appear on the required screens. |
| No Longer accepting new Applications | By select this tick box, the agent will not appear for the new applications. |
| Account Manager | This is user code and based on the user code created in TEAMS, you can select the account manager from dropdown. |
| Marketing Source | This is user code and based on the user code created in TEAMS, you can select the marketing source from dropdown. |
| Region | This is user code and based on the user code created in TEAMS, you can select the region from dropdown. |
| Contract Expiry Date | Agent’s contract expiry date. |
| Charge GST | Select this tick box to charge GST on the agent’s commission. |
| Pre-deducted commission | Select this tick box if you wish to pre deduct the commission while creating the receipts for the students. |
| Pay Commission | If you select this tick box, the system will show different fields related to pay the commission Commission Template – This will be the default commission set for the agent Optional Commission templates – This will show you commission’s list from which you can select any optional commission. |
| Optional Commission Template | You can select optional commission template from the dropdown field |
| Vendor Code | Enter the Vendor code of the agent in this field |
| Purchase Order No | Enter the Purchase order number of the agent in this field |
| Purchase Order Amount | You can enter the Purchase order amount in this field |
| Agent Login | You can enter the Agent Login ID in this field |
| Agent Admin Password | You can enter the Agent Admin password in this field |
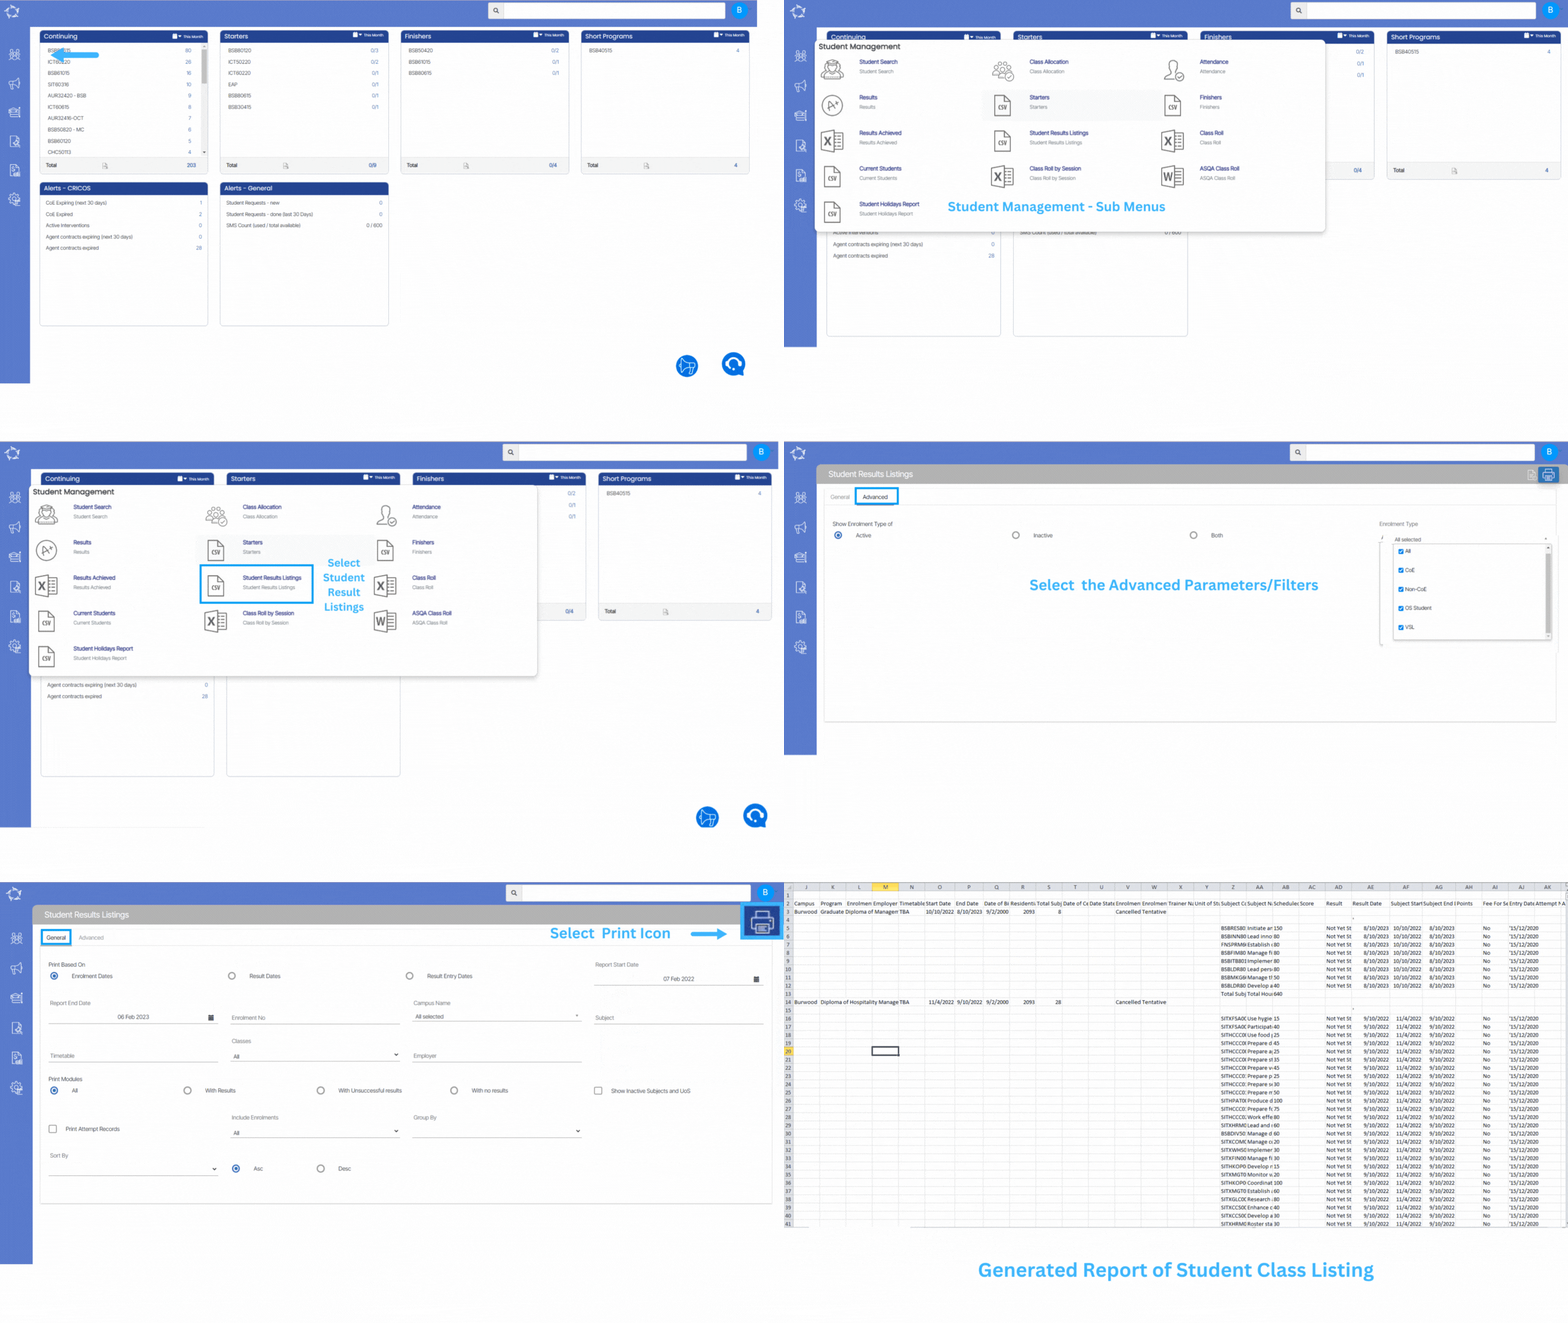
Dashboard > Student Management > Student Results Listing
The Students Results Listing report filters screen has General tab and Advanced tab. The below table will show you filters with their explanation.
| General Filters | Explanations |
|---|---|
| Report based on | This field has three radio buttons (Result Dates, Enrolment Dates, Result Entry Dates). Upon selecting any of these radio button the system will print the report for you accordingly. |
| Report Start Date | Based on the radio buttons selection and when you select the start date the system will print the results within the start date selected. |
| Report End Date | Based on the radio buttons selection and when you select the end date the system will print the results within the end date selected. |
| Enrolment No. | This is magic search field and you select the specific enrolments to generate the report |
| Campus Name | Select the campus from the dropdown. |
| Subjects | This is a magic search field and you cam search multiple subjects in this filed. |
| Timetable | You can select the timetables |
| Classes | You can select the time of class from this button. |
| Employer | This is magic search field and you select the specific employer to generate the report |
| Print modules based on | This field has four radio buttons(All, With Results, With Unsuccessful results, With no Results). You can only select one radio at once to run the report |
| Show Inactive Subjects and UoS | Select this tick box to show inactive subjects and UoS in the report |
| Print Attempt Records | Select this tick box to Print Attempt Records in the report |
| Include Enrolments | You can select (All, Not Yet Started, current or Finished) and based on the enrolment status selected, it will show in the report |
| Group by | Please see TEAMS Basics |
| Sort by | Please see TEAMS Basics |
| Asc and Desc | Please see TEAMS Basics |
| Advanced | Explanations |
|---|---|
| Show Enrolment Type of | This field has three radio buttons(Active, Inactive, both) from which you can select one option and the system will print them accordingly |
| Enrolment Type | This is a user code in TEAMS and based on the user code created for enrolment type, you can select it from the dropdown |
| Report Columns | Explanations |
|---|---|
| Student No. | Student Number |
| Enrolment No. | Enrolment Number |
| Student Name | This column will show student’s first name, middle name and last name |
| Address | There are three columns (Address Line1, Address Line 2 and Address Line 3) and it will show you the student’s address here |
| Suburb | Suburb updated on the on the Student’s address screen |
| State | AVETMISS Export – State Format |
| Post Code | Post code updated on the on the Student’s address screen |
| Campus | it will show you campuses name if you have selected multiple campuses on the filters screen |
| Program | Program Name |
| Enrolment type | This is a user code in TEAMS and based on the User Code created, you can select the enrolment type. |
| Employer | Employer name |
| Timetable | It will show you timetables name selected on the filters screen |
| Start Date | Start Date of the enrolment |
| End Date | End Date of the enrolment |
| Date of birth | Date of Birth of the student |
| Residential Post date | Current residential post code of the student |
| Total Subjects | Total number of subjects linked to the enroments |
| Date of Certificate Issued | This will show you the certificates issued date |
| Date statement of Attainment | This will you the date of the statement of attainment issued |
| Enrolment Status | Enrolment Status (Started, not started, finished, cancelled) |
| Enrolment Outcome | enrolment outcome updated on the Edit Enrolment Details screen |
| Trainer Name | Trainer name |
| Unit of study | It will show you unit code (Unit of study means subject that a student undertakes as a part of a course of study) |
| Subject Code | Subject Code Field shows you the Unique Code of Subject. |
| Subject Name | Subject Name field shows you the particular name of Subject. |
| Scheduled Hours | Hours scheduled for the subject |
| Score | Score |
| Result | This will show you final result of the subjects |
| Result Date | Final result date |
| Subject Start Date | Subject Start Date |
| Subject End Date | Subject End Date |
| Points | Points Achieved |
| Fee for Service | It will show you Yes if the enrolment is FFS and No if its not |
| Entry Date | Processed date |
| Attempt No. | |
| Attempt |

This report allows you to print the results of the subjects linked to the enrolments including the Subjects dates and result dates. There are number of filters which will allow you to print the report accordingly.
Student Result Listing Report Filters
Student Result Listing Report Data Columns
