Measures to Address Cyber Attack

A cyber attack is a malicious attempt to breach or damage networks and digital devices, often with the intent of stealing data, causing harm, or compromising the security and privacy of the organisations. Cyber attacks can take various forms, and they continue to evolve as technology advances. However, we are well aware of these issues and we have accumulated a lot of experience hosting cloud-based services since 2003. We have a number of measures in place to address this.

1. This includes firewalls, getting the latest security patches and limiting access to our front-end servers. The main risk (if you have been following as to why these happened), more often than not the risk comes from compromised passwords and internal security breaches. It’s generally a careless or disgruntled employee that is the biggest risk (for both us and for the organisation). We have very limited server access and people that do have access are long-standing, loyal and happy employees.

2. Also, please note that most hackers are after fame or fortune (or both) and both our organisations are generally not on the hacker’s radar. They go for big names as that helps to ensure headlines as well as the potential for blackmail. In our case, if we were breached or infected with ransomware, we would simply go and activate our backup servers and shut down and format the infected (virtual) machines.

3. We have recently (in the last few months) introduced 2FA authentication as well as strict password complexity and password change requirements at the client’s end. These measures also ensure greater security and reduce risk.

4. We are introducing further measures shortly including having mirror servers in Brisbane as well as already having this in place with our existing hosting provider in Melbourne. We also backup all data and files and maintain multiple copies of them (for up to two weeks) to ensure easy restoration in the event of a breach or server failure.

We will also start keeping data backups for 3-6 months as well as keeping it in multiple locations (including AWS cloud) Please rest assured, in the unlikely event of a breach, we will notify you and keep you updated.

Some steps you can also take at your end to ensure greater security

1. Please check all your current user accounts in TEAMS and remove any old and unused accounts.

2. If you have a fixed IP address (or a set of addresses) that you use to access the internet please inform us and we can show you how to limit access from those IPs only.

3. Make sure that you regularly audit your users as well as their access and permissions so they are not allowed into parts of the system that they don’t need to.

4. If you can please advise on the above points and we will keep you informed from our side.

New Functionality – Cancel Multiple Invoices in Bulk

A new feature has been introduced to enhance the Student Financial Detail screen, streamlining the process of cancelling multiple invoices in bulk. This functionality introduces checkboxes alongside an invoice cancel icon within the grid.

To cancel multiple invoices for a particular enrolment, you can now easily select the checkboxes corresponding to the invoices you wish to cancel. Once the desired invoices are selected, clicking on the cancel invoice icon will initiate the cancellation process. You will then be prompted to provide a cancellation reason, and upon selection and saving, the chosen invoices will be cancelled efficiently.

Enhanced Visa Type Tracking

We have introduced a seamless process for managing visa details in the system. When entering a New Prospect, you can now specify the Visa Type from the Prospect Entry screen. As you progress, these visa type-related details will automatically populate in the ‘Visa Details’ screen of both the ‘Applicant Dashboard’ and ‘Application Dashboard.’

These details will continue to be accessible and editable as applications are approved and converted into enrolments. You have the flexibility to modify these visa details at both the Applicant(before converting) and student levels to suit your specific needs.

What’s New – 19th October 2023

Welcome to the latest update for TEAMS

Some key changes made in this update are:

  • Boost in loading speed of all listing screens
  • Track visa types on applicant, application and enrolment screens
  • New page limit option on all listing screens
  • A new tick box to flag enrolments as overseas in bulk
  • New dropdown (Campus and Training Location) on the training location missing screen

For a full list of what has been done in the system, please see the below list:

Listing Screens Optimisation

We have implemented significant enhancements to all the listing screens within the system. Whether you’re accessing the continuing, starters, finishers, overdue, payment overdue, or payment received screens, you’ll now experience significantly faster loading times.

Enhanced Visa Type Tracking

Now, as you move forward, essential visa-related information will seamlessly populate in the ‘Visa Details’ section of both the ‘Applicant Dashboard’ and the ‘Application Dashboard.’ This enhancement ensures that visa-related data remains readily available and editable even after applications have been approved and transformed into enrolments

Listing Screens – New Page Limit Option

It simplifies the process of selecting and communicating with multiple students simultaneously. With the Page Limit option, you can easily pull up the desired number of students on a single page and efficiently send emails.

Compliance Dashboard – Bulk Flagging of Overseas Enrolments

On the Compliance dashboard, there’s a new feature where you can easily manage enrolments that are not flagged as overseas.

Training Location Missing Screen – New Campus and Training Location Dropdown

This provides you with a convenient way to filter students based on their respective campuses. Moreover, it enables you to efficiently update the training location of multiple students in bulk, offering improved control and flexibility when it comes to handling training location information.

Our mission is to build software that helps you do things more efficiently. Your input and engagement are vital in helping us improve our service and offerings for your college. We are always open to listening to your feedback.

Any questions, please feel free to reach out to us. We look forward to serving you to the best of our ability.

Please review the changes and if you would like further clarification, please contact our Support team.

A big thank you to so many of you who have been actively participating in helping us bring these new improvements to life.

The next update is due on Friday, 3rd November 2023

Note: Please alert other team members within your college if the changes outlined above affect their role or department.

Thank you for taking the time to read this post.

Mandatory details to verify USI

Unique Student Identifier (USI) serves as a lifelong education number for individuals. Not only does it provide a unique identifier, but it also maintains an online record of the vocational education and training (VET) a student has undertaken.

If a student already possesses a USI number, they can simply update it in the Unique Student Identifier field, and then proceed to update all USI-related information before selecting the save button. Upon saving the changes, the screen will refresh, presenting the student with a Verify button and a Use Manually Verified tick box option. This streamlined process ensures that educational records are accurate and easily accessible, benefiting both students and educational institutions alike.

Verify USI – When you select this button, the request gets sent to the https://www.usi.gov.au/providers/verify-student-usi site and you can check the status of the USI from the USI request screen in the system.

Use Manually Verified – You can select this tick box if you already have verified the USI from the https://www.usi.gov.au/providers/verify-student-usi site.

Required information with explanation:

  1. Country of Residence: Here you need to select the country from the dropdown to where the student belongs.
  2. Country of studying in: Here you need to select the country from the dropdown in which the student is studying which is Australia.
  3. Country of Birth: Here you need to select the country of birth of the student from the dropdown.
  4. Town of Birth: Here you need to enter the town of birth of the student.
  5. Default USI contact method: Here you need to select a suitable USI contact method.

Further, you need to select a document from the dropdown to support the USI verification

  1. For instance: If you have selected a Visa (With a Non-Australian Passport) then you must provide the passport number.
  2. You may also select the tickbox “Copy passport no from the overseas screen” if you have updated the correct passport number on that screen.
  3. At last, you need to select the country from the dropdown where the passport is issued.

Note: Select the tickbox “Does this student have one name” if the student has a single name.

Listing Screens – New Page Limit Option

19 Oct 2023

The significant improvements to our system’s listing screens, including Continuing listing, Finishers listing, Starters listing, Applications listing, Overdue, Payment Due, and Payment Received screens. As part of these enhancements, we have added a valuable new feature called Page Limit in the filters section.

This option empowers you to seamlessly send emails to all students directly from any of the listing screens. For instance, if a listing screen has ten pages with a total of 500 students, this new option simplifies the process by allowing you to select all the students from the list, eliminating the need to go through each page individually. This not only streamlines the workflow but also saves valuable time that would otherwise be spent navigating through multiple pages.

Compliance Dashboard – Bulk Flagging of Overseas Enrolments

We have introduced a new tick box to update the Overseas status for multiple enrolments. Now, when you navigate to the Compliance Dashboard and access the Enrolment is not flagged as Overseas listing screen, you’ll notice the Overseas Enrolment tick box next to each student’s number in the grid as well as above the grid.

To update this status in bulk, simply select the desired tick boxes corresponding to the students you want to include, then proceed to the Overseas enrolment tick box located above the grid. After making your selections, select the Update button. The system will promptly display a confirmation message at the top of the screen, asking for your confirmation to save the records. By selecting OK, the system will refresh the screen, and the chosen records will no longer appear in the grid. This signifies that the update has been successfully applied, and the “Overseas” status has been modified for the selected enrolments.

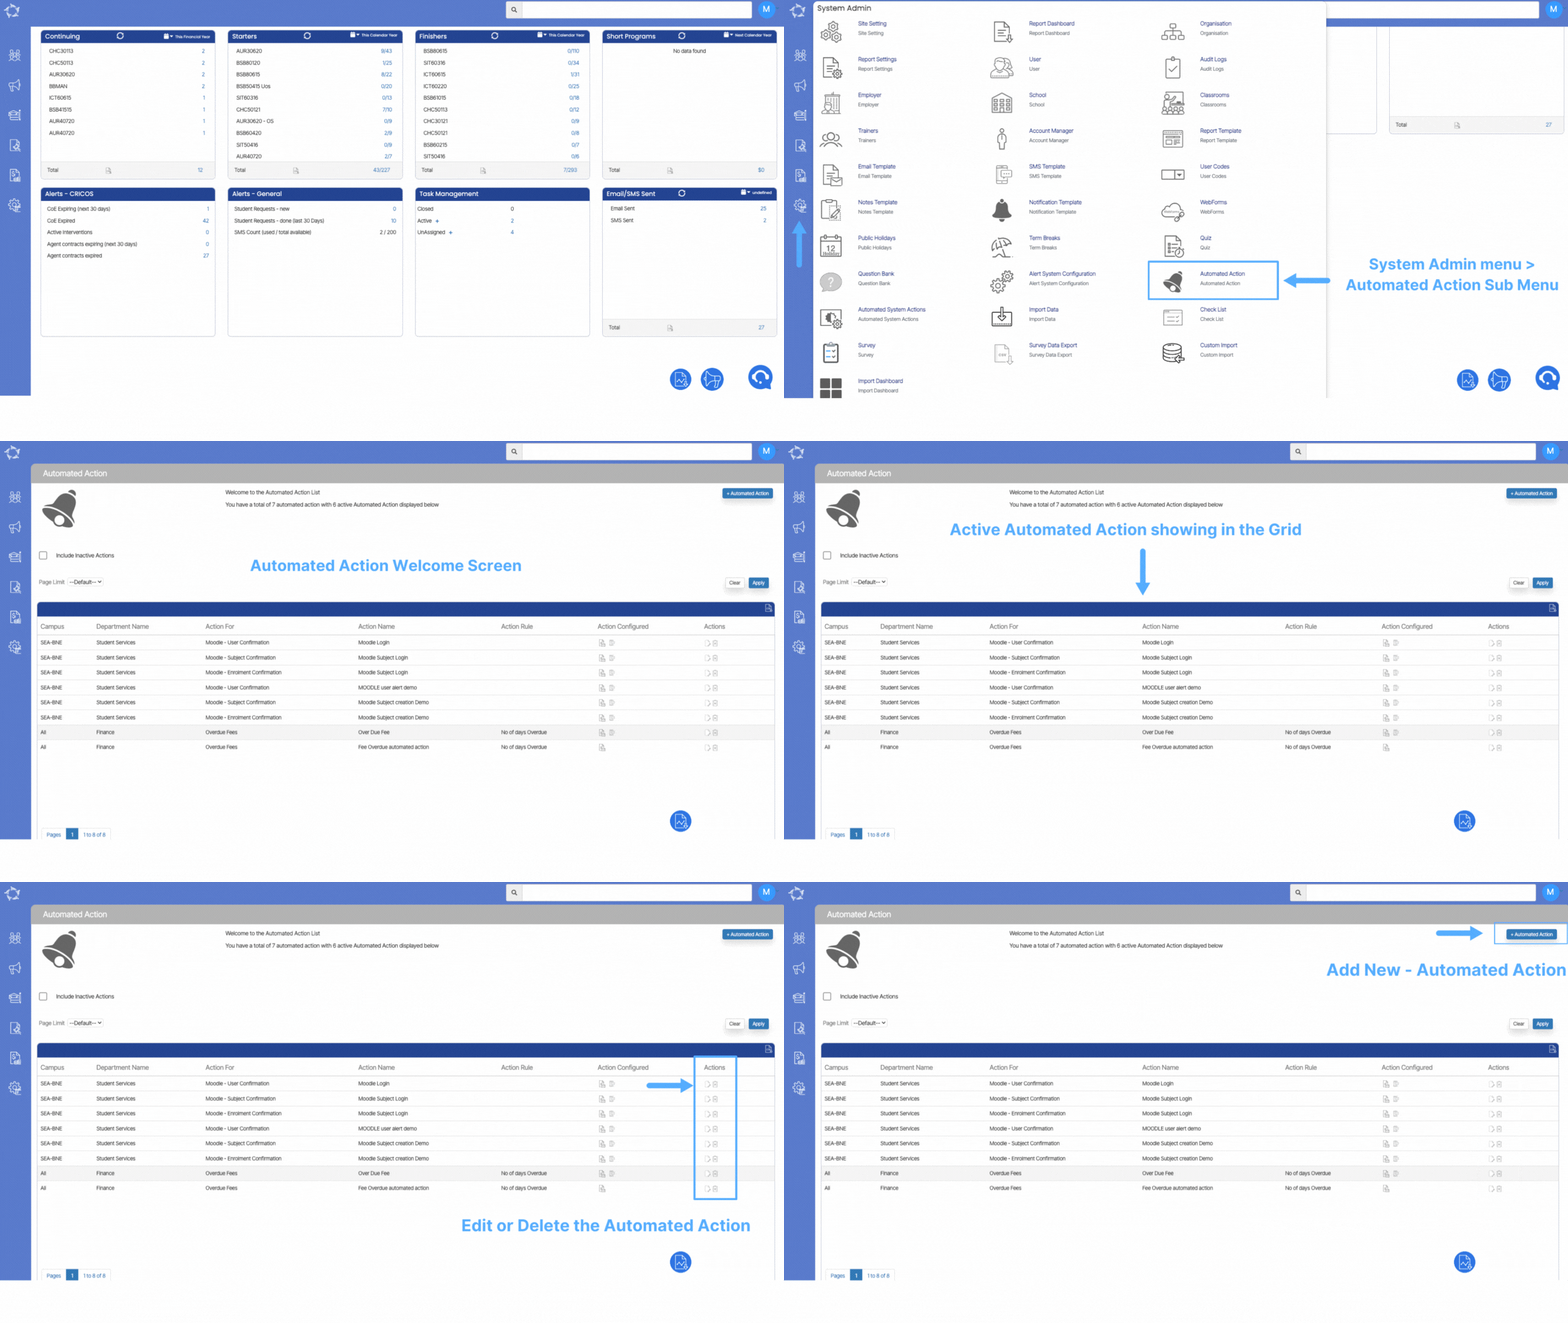
Automated Action Welcome Screen

This screen serves you a platform for both adding new automated actions and editing existing ones. Within this interface, you will find a comprehensive grid displaying all the current automated actions, allowing for efficient management and customisation of these automated processes.

Training location Missing Screen – New Campus and Training Location Dropdown

Now, you will notice the addition of new dropdown menus, specifically Campus and Training Location. These dropdowns offer a convenient way to filter and update training locations in bulk. With these options, you can select both filters simultaneously, streamlining the process of updating training locations.

IMPORTANT – You will notice that initially, only the campus dropdown is visible. Once you have selected your desired campus, the system will dynamically reveal the Training Location dropdown for your convenience. Afterwards, it’s essential to proceed by checking the appropriate tick boxes corresponding to the enrolment numbers and then from the training location dropdown, select the specific training location. Finally, complete the process by hitting the “Update” button.

Edit Instalment Plan

Note: Editing an instalment plan will not impact the enrolments that are already linked to it before editing.

Please follow the below steps to edit the instalment plan:

  • Select the edit icon under the actions column, Instalment plan entry screen will open.
  • You can edit all the fields, turn on/off all tick boxes and make multiple selections from the dropdowns available on the Instalment plan entry screen.
  • After making changes as per your requirement you need to select the next button to edit it further.
  • Instalments can be edited one by one by selecting the edit icon against each instalment.
  • Once you click on the edit icon against the first enrolment, the system will head you to the instalment plan step 2 screen where you can make changes to all the available fields as per your requirement. For example – if you want to add material in specific instalments then you can select it from the additional fees dropdown, after editing the instalment select the update button to save the changes.
  • In this way, you can edit all the instalments as per your requirements and select the finish button to save all the changes.