Enrolment AVETMISS Settings > +Pre2018 AVETMISS settings button changes

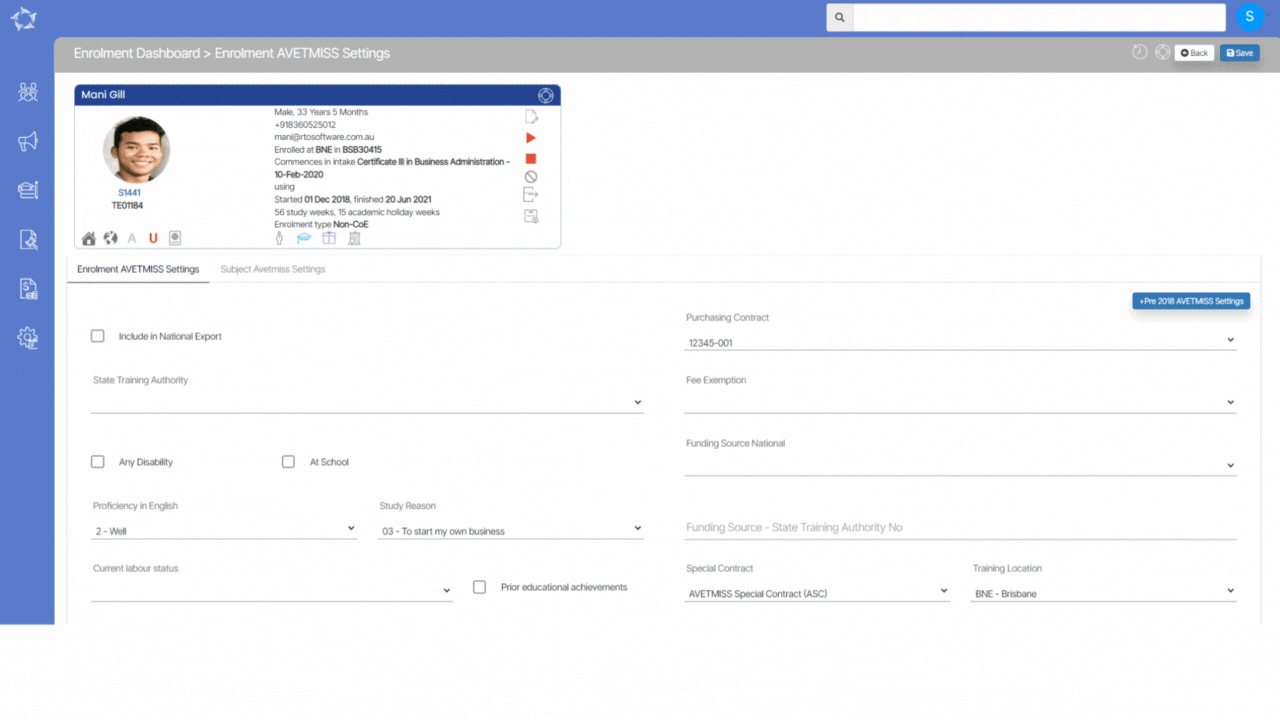
We have made some changes to the +Pre2018 AVETMISS settings button on the Enrolment Avetmiss Settings screen.

The button will now only be visible under specific conditions. Specifically, it will only be displayed if the enrolment start date is earlier or equal to 01/01/2019. On the other hand, if the enrolment start date is after 01/01/2019, the button will not be visible, and it will remain hidden.

IMPORTANT – Our general recommendation is to utilise this button when importing historical data. If you are being able to see this button, we encourage you to contact our support team for assistance.

Application Process – edit/add Discount

In the past, the system used to automatically split discounts among each invoice while doing the application. However, now we have added the ability in the system that allows you to add and edit discounts for each invoice individually.

This feature is available on the New Application – Edit Invoices screen, providing more flexibility and control over the discounting process. By allowing you to apply discounts on a per-invoice basis, it can make it easier to manage and track discounts and ensure that they are accurately applied to each invoice.

Training Plan & Results – Results Colour Coding

Results colour coding will display different colours for each updated result, allowing you to quickly identify the type of result without having to read through each one individually. Please see the below examples that will explain to you how the colour coding works for results.

We have different result types in the system and when you select any result from the dropdown on the Training plan and results screen you will see the result section will get highlighted in its colour.

Please see below how the colour coding will appear.

ResultsColour CodingsResults with Colour Coding
CompetentGreen
Competency not achieved/FailPink
RCC Not GrantedPink
RPL Not GrantedPink
Credit Transfer Blue
RCC GrantedBlue
Gap TrainingBrown
Superseded SubjectBrown
WithdrawnYellow
Recognition of Prior LearningGrey
Did Not StartGrey
Result not available (reported under state requirements)Grey
Interim-Partially Completed CEGrey
Interim-Partially Completed RNAGrey

Training Plan & Results – Subject Dates Colour Coding

This is a new check on the Training Plan and result screen, if the start date and end date of a subject have already passed and there is final outcome for those subjects then subject dates will be displayed in red/pink Colour. This will help you quickly identify subjects that may require attention.

The start date of subjects is showing as 03/06/2022 and the end date as 24/07/2022, but there is no final outcome or result mentioned. Both of these dates are highlighted in a red/pink colour for those subjects.

Training Location Entry Screen

Compliance Menu > Training Location > Add Button

When you select the + Add button on the training location welcome screen, you will be directed to the Training Location Entry Screen. This screen contains various fields that allow you to add a new training location into the system. Additionally, if you already have a training location that you want to modify, you can make changes to it using this screen.

The fields on this screen will likely include information such as the code and name of the training location, the address, contact information, and any other relevant details. By filling out these fields accurately and completely, you can ensure that the training location is properly recorded in the system and that all necessary information is readily available when needed.

Note – The fields on this screen are clear and easy to understand. You can add any additional fields as needed. Simply input the relevant information into each field and the system will process it accordingly.

Training Plan & Results Screen – Colour Codings

A new feature has been introduced on the Training Plan and Results Screen, which involves colour coding for both Results and Subject dates. Please select the below links to know more about the new rules.

Results Colour Coding

The results colour coding has been implemented to make it easier for users to differentiate between different types of updated results. This will display different colours for each updated result, allowing users to quickly identify the type of result without having to read through each one individually.

To know more, select here – Training Plan & Results – Result Colour Coding

Subject Dates colour Coding

This is a new check on the Training Plan and result screen, if the start date and end date of a subject have already passed, but the result is still updated for it, the subject dates will be displayed in red/pink colour. This will help you quickly identify subjects that may require attention.

To know more, select here – Training Plan & Results – Subject Dates Colour Coding

Training Plan & Results – Rules

The Training Plan and Results screen has several rules that are designed to help users better understand how to use the screen effectively.

Student Contact Log Report

Main Dashboard > Student Management > Student Contact Log

In TEAMS, there is a feature called the Communications log screen that can be accessed from various dashboards, including the Applicant DashboardApplication DashboardStudent DashboardEnrolment Dashboard or Agent Dashboard. This screen provides users with the ability to Send Emails and Send SMS, as well as Create a Contact Log for various communication events. This feature is particularly useful for keeping track of all communication that occurs between the user and the student, applicant, or agent, which can help ensure that important information is not lost or forgotten.

A student contact details report contains information about the contact details of a group of students and enrolments. By running this report, you can gain access to past, current, and future contact information for the students, which can be useful for various purposes. Additionally, having access to this report can help you plan for the future and make informed decisions regarding the student’s education.

To know more about the Filter and columns and their explanations, please select the below links.

Student Contact Log Report Filters

Student Contact Log Report Data Columns

Student Contact Log Report Data Columns

The table provided offers an explanation of the different columns that are included in the report.

ColumnsExplanations
Contact DateThis is the contact date that you have added while creating the Student or Enrolment Contcat logs.
Student NoThe column will show you student numbers..
Enrolment NoThe column will display the enrolment numbers.
Student NameIt will display the student’s Name (First Name, Middle Name and Last Name).
Contact Log TypeThis is a user code and based on the User Code created in TEAMS, this column will show you the contact log type.
Contact Log DetailsThis will show you the contact details that you have updated in the notes icon on the contact log screen.
User NameName of the user who has updated the contact logs in the system
Program CodeProgram code
Enrolment TypeThis is a user code and based on the User Code created in TEAMS, this column will show you the enrolment type.
Enrolment Start DateStart Date of the enrolment
Enrolment End DateEnd Date of the enrolment
StartedStatus of the enrolment (Started, Not Yet Started, Finished)
Viewable in SRCYes/No

Student Contact Log Report Filters

The student contact log report contains filters that can be used to refine the data displayed in the report. The below table will give you an explanation of the filters for this report.

General Tab FiltersExplanations
PrintThis label has two radio buttons:
Report Start/End Date – By selecting this option, you can generate a report based on the selected start and end dates.
Enrolment Start/End date – By selecting this option, you can generate a report based on the enrolment’s start and end dates.
Report Start and End datesOnce you have selected one of the radio buttons, you can choose the start and end dates for your report by selecting the calendar icon. Please note – these fields are mandatory and you cannot process further without selecting them.
Student NameTo generate a report for a specific student enrolment, you can search and select the student by entering their student number or name in the designated field.
Campus If you need to generate a report for multiple campuses, you can do so by selecting the relevant campuses from the dropdown menu. Once you have selected the desired campuses,
the report will be generated based on the selected start and end dates and will include data for all the selected campuses.
ProgramYou can search and select the program by entering its program code or name in the designated field.
User NameSelect the user name from the dropdown.
Log TypeThis is a user code and based on the User Code created in TEAMS, you can select the desired log type from the dropdown.
Show Email LogIf you want to include email logs in your report, you can do so by selecting the corresponding tick box.
Show Mail Merge LogIf you want to include Mail Merge logs in your report, you can do so by selecting the corresponding tick box.
Show SMS LogIf you want to include SMS logs in your report, you can do so by selecting the corresponding tick box.
Viewable In SRC
Only Show Enrolment LogsIf you want to generate a report that only includes enrolment logs, you can do so by selecting the corresponding tick box. This will ensure that only enrolment logs are included in the generated report.
Include EnrolmentsOnce you have selected the Only Show Enrolment Logs tick box, you can choose from a range of enrolment options from the dropdown menu. The available options may include All, Current, Finished, and To Start, among others.
Group ByPlease see TEAMS Basics
Sort ByPlease see TEAMS Basics
Asc/DescPlease see TEAMS Basics