This is the tag we use to approve any post (old and being edited etc) through revisions. Once the majority of all existing/old posts have gone through our edit process and have this tag, we will then bulk remove it from them.
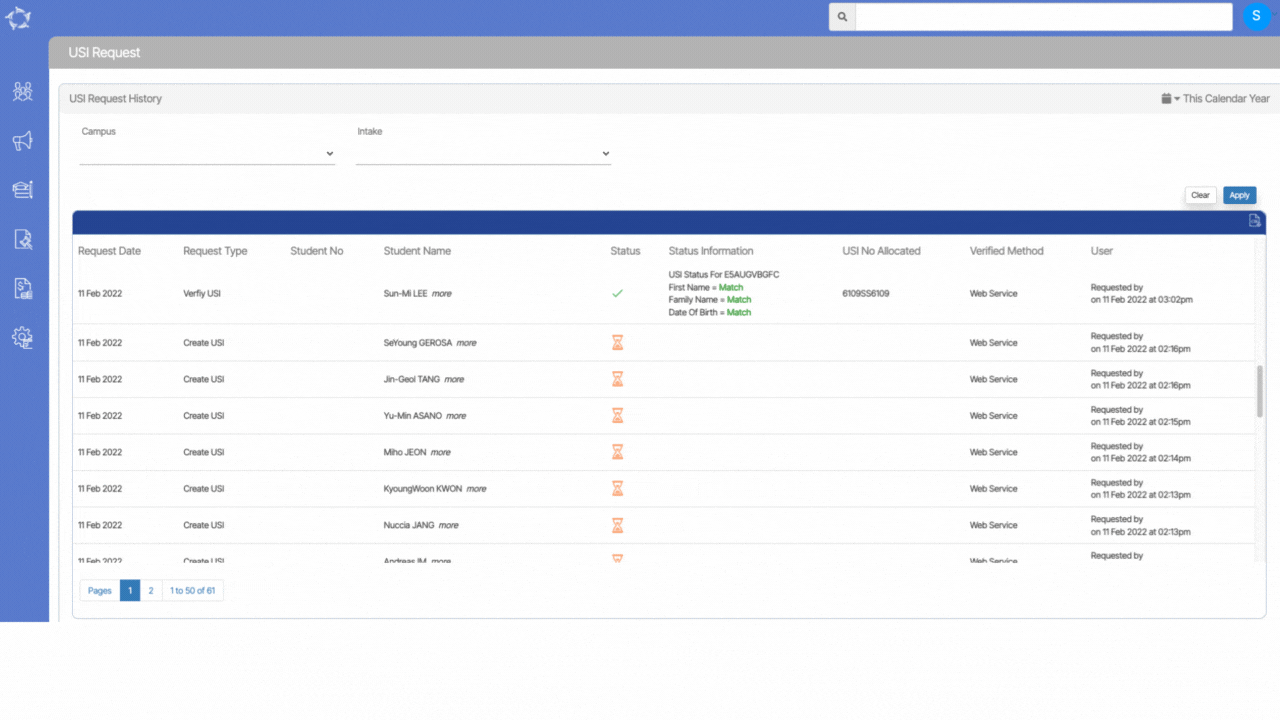
On this screen, you will be able to view the history of your USI requests, including the status and relevant information displayed in a grid format. If you have multiple campuses, you can select the desired one from the dropdown menu.
Additionally, you can select the intake and specify a custom date range using the calendar icon. Once you have applied all the necessary filters, you will need to select the Apply button in order to display the filtered results. This feature allows for efficient tracking and monitoring of USI requests and their associated status updates.
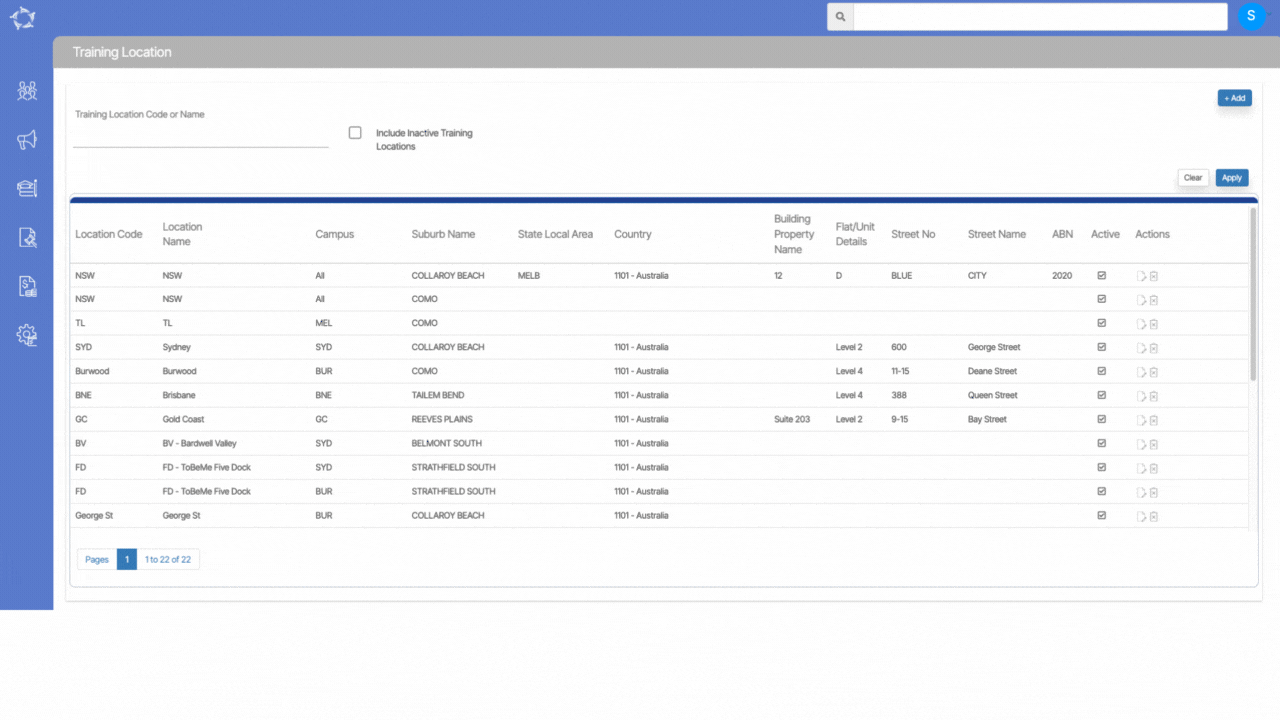
Main Dashboard > Compliance Menu > Training Location
The Training Location Welcome Screen is a feature that displays a list of active training locations that are already in your database. You can easily search for a specific training location by either entering its Location Code or Name in the search field. Additionally, if you need to view any inactive training locations, you can select the Include Inactive Training Locations tick box.
This feature is helpful for you to quickly access information about training locations without having to manually navigate through the database. With the Training Location Welcome Screen, you can easily find the information you need. You can also add a new training location by selecting the +Add button.
The table provided contains a list of columns and their respective explanations that will be included in the report that will be generated.
Columns
Explanations
Student Number
This is the system-generated student number.
Student Name
This is the complete student’s name (First name, Middle name and Last name)
Enrolment Number
This is the system-generated enrolment number.
Enrolment Start Date
This is the start date of the enrolment.
Enrolment End Date
This is the end date of the enrolment.
Enrolment Outcome
This column will show you the enrolment outcome such as in progress, Cancelled etc which is updated on the Edit Enrolment Details screen
Employer
It will display the legal employer’s name.
List of Subjects
It will display all the subjects’ names linked with the program and the system will display the outcome codes in the cells.
NOTE – If the enrolment is cancelled then the system will display a can in each cell and if the subject is deleted from the enrolment then it will show the NA in the cell. The cell will be blank if no result is updated on the Training Plan and Result screen for that subject.
Main Dashboard > Compliance > Student Progress Matrix
Overview
The purpose of this report is to provide a summary of the student’s progress based on their program. Unlike the Student’s Results in the Listing report, which runs down the rows of an excel per enrolment, this report presents a different view known as the Student Progress Matrix. In this report, the subjects for enrolment run horizontally across the columns.
The report aims to give a comprehensive overview of the student’s progress in their program, showcasing their achievements and identifying areas where they may need improvement.
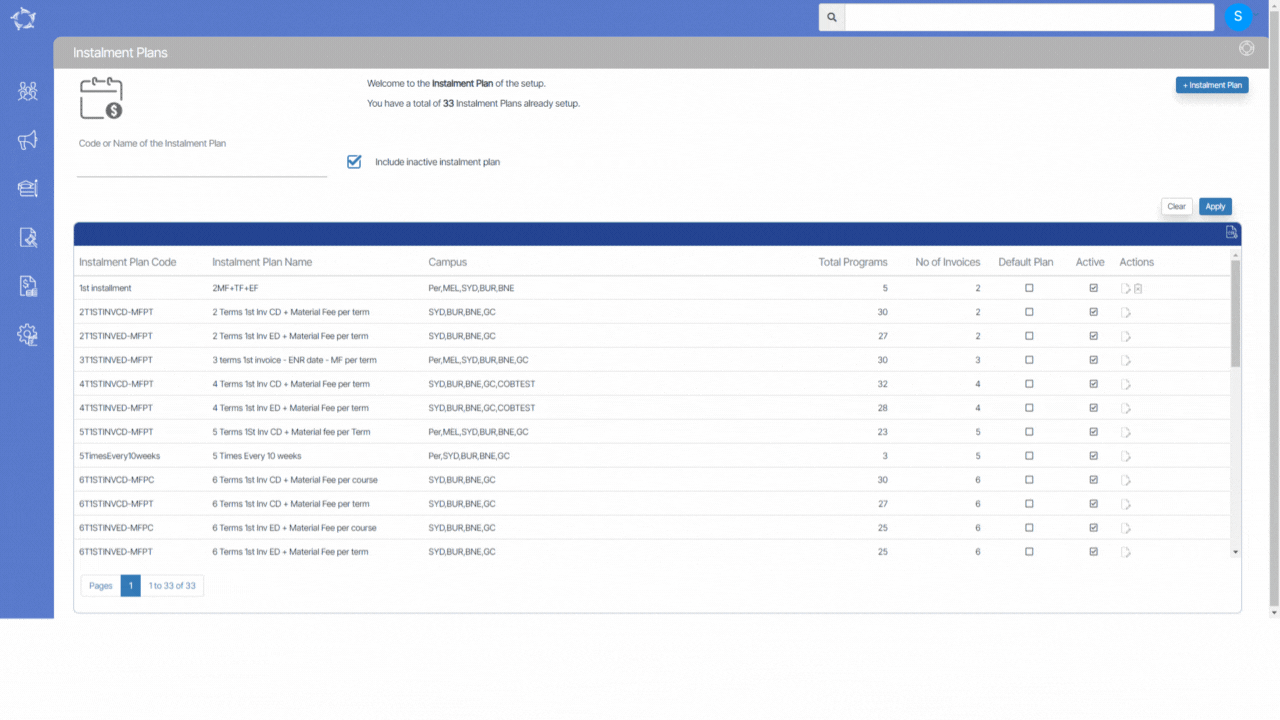
Main Dashboard > Finance > Instalment Plans > + Instalment Plan Entry
Overview
An instalment plan is a financial arrangement that enables students to pay their fees in smaller, more manageable amounts over a specified period of time, instead of paying the entire amount upfront. it can help make education more accessible and affordable for students who may not have the financial means to pay the full amount at once.
The Instalment Plan entry screen enables you to create new instalment plans for programs or if you wish to edit the existing instalment plan, you can select Edit Instalment Plan.
Below is the explanation of the fields:
Fields
Explanation
Instalment Plan Code
This is a mandatory field and it cannot be left blank.
Instalment Plan Name
This is a mandatory field and it cannot be left blank.
Number of Invoices
Add the number of invoices (instalments) for a program.
Split Tuition Equally in instalments
If you wish to split the tuition amount in instalments then you can select this tick box
Instalment Plan Selected By Default
If you wish the instalment to be selected by default, you can select this tick box
Invoice Due Date Calculated automatically
If you have selected this tick box then the invoice due date will be calculated automatically for the program
Campus
Select the Campus/s from the dropdown for which you want to create the instalment plan.
Program
Select the Programs from the dropdown that you want to link to the instalment plan.
Active
By selecting this tick, you will able to see this instalment while creating applications.
Don’t allow two invoices in the same month
By selecting this tick box, the system will not show two invoices in the same month.
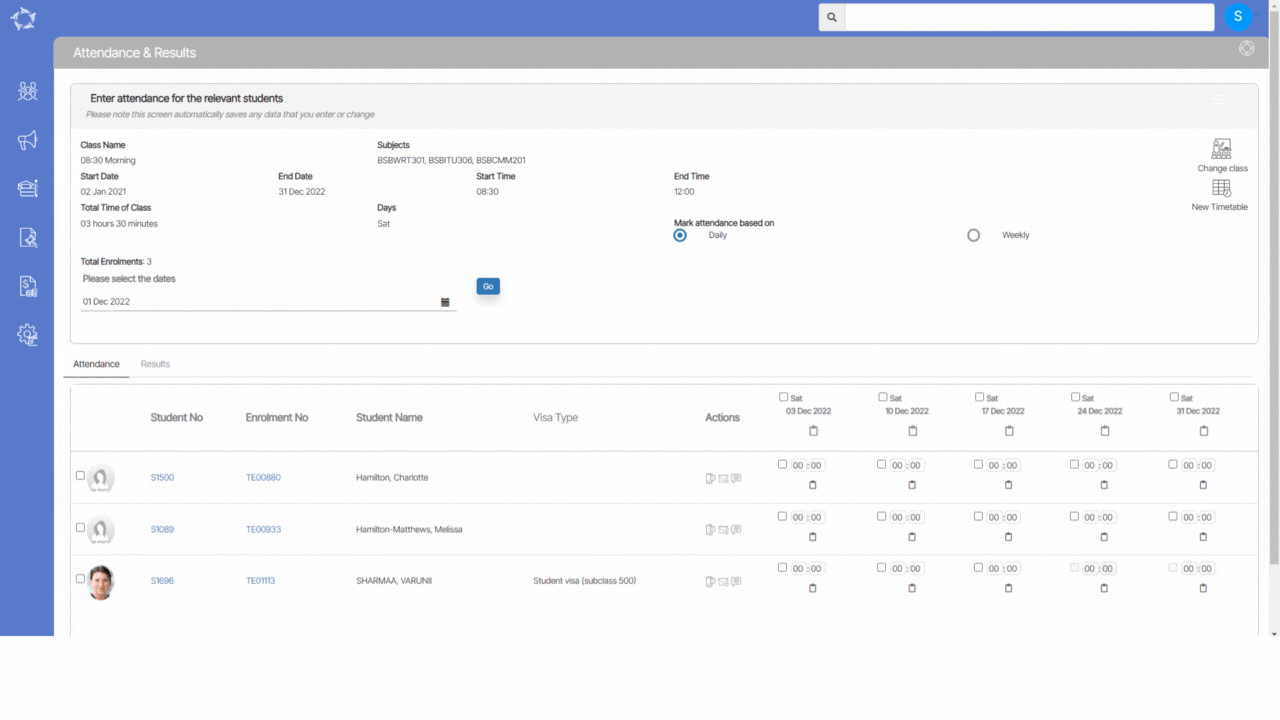
The Attendance and Results screen will show you two sections as follows –
Section 1:
This section displays information about the selected class, including the class name, date range, and timetable. In this section, you can mark attendance or absence for the students on a daily or weekly basis by selecting the appropriate radio button. Additionally, you have the option to modify the dates as per your requirements.
In the Summary section of the class information, two icons have been included for the options of Change Class and New Timetable. This will make it easier for users to access these features and make any necessary changes to their class schedule.
Change Class Icon – The Change Class icon allows users to select a different class to mark attendance for. Selecting this icon will redirect the user to the previous screen, where they can select a new class and continue marking attendance.
New Timetable Icon – The New Timetable icon provides you with the option to select a different timetable and date range for attendance. Selecting this icon will redirect the user to the previous screen, where they can select a new timetable and date range
Section 2:
Allows you to mark attendance or absence for the students under the Attendance or Absence tab. You can also record the student’s results under the Results tab.
Can’t see a SAVE button on the screen?
Unlike other screens in the system, this screen will auto-save when you enter or edit data in it.
Attendance Tab
In the Attendance tab, you can record whether a student is present or absent, depending on how the timetable was set up. To do this, select the checkbox next to each student that you want to mark attendance or absence. Check the box for Attendance if the student is present or Absence if the student is absent.
When you select the checkbox for a student in the Attendance tab, the system will display a number in two boxes next to the checkbox. These boxes are for hours and minutes, and the number displayed will be the total hours and minutes of the class for which you can mark attendance.
If a student attended or was absent for only part of the class, you can modify the numbers in the hours and minutes boxes accordingly. However, the modified values cannot be greater than the original number displayed in the boxes. The system only allows you to mark attendance or absence for the actual amount of time the student was present or absent in the class.
Can’t select the tick box for a student to mark attendance?
If you are unable to select the tick box for a student, it may be because the student has a student holiday entered in the system, and it has been linked to their specific enrolment. In this case, you cannot mark the student as attended or absent for the duration of the holiday period.
Results Tab
In the Results tab, the top section of the screen displays a summary of the subjects or units of study linked to the class. In this section, you can see what subjects or units of study are associated with the class. For each student enrolled in the class, the system displays the subjects or units of study they are linked to, as well as any results that have been recorded for those subjects or units of study.
To mark a result for a particular subject or unit of study for a student, select the Result dropdown for that subject or unit of study. This dropdown will be located next to the student’s name in the Results tab.
Note: There are a few results (Recognition of prior learning, Did not start, etc.) that are in red. You should only see them when you are reviewing historical enrolment results. They are inactive results that you may have linked to a subject and you need to see them so that you can change them where needed. If you do see them in the list, do not use them as they will not be accepted in your National Student data submissions, and you will get errors.
Result date is mandatory and you don’t record dates?
As part of your AVETMISS compliance requirements, your student results require result dates.
To protect your data for AVETMISS data submissions the system will make the result date mandatory where:
1. Any Subject set with Type of Subject is Unit of Competency (UoC) – Nationally Accredited in the Subject entry screen OR
2. Any Unit of Study that has a VET subject linked to it and meets the requirements in point 1 above.
You can mark results for any Subject or Unit of Studies (UoS) linked to a class.
When taking attendance, you will need to indicate whether each student in the class is present (attendance) or absent. The options you select will depend on how the timetable for the class was set up.
In the summary section of Step 2, after selecting the class, the system will display what you are marking – either absence or attendance – so that you can ensure you are recording the correct information.
Follow the below-given steps to mark the Attendance/Absence and Result of the student:
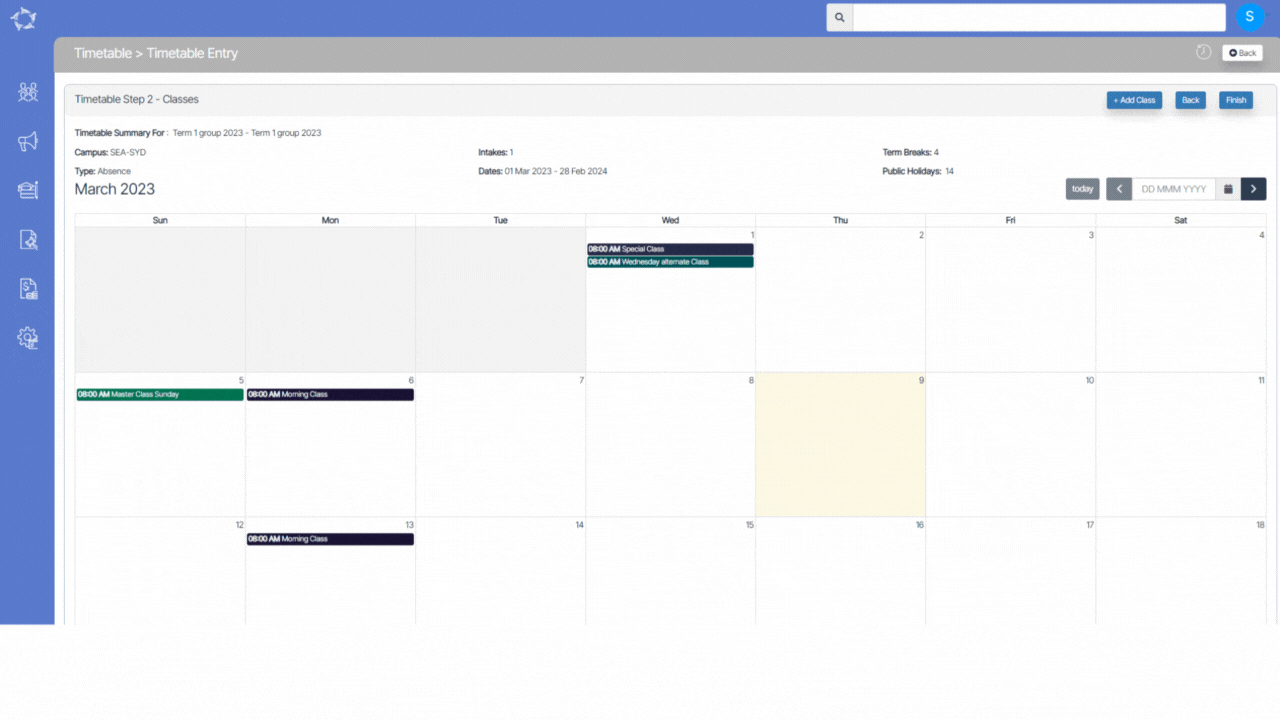
Select the timetable and date range for the attendance records you wish to view or update. This step enables you to filter and select a specific timetable for a particular campus. After selecting a date range (start and end dates) and a timetable, select the Go button to proceed.
Can’t find your Timetable in the Select Timetable dropdown?
You will only see timetables that meet the filters you have chosen for Campus, Attendance Start and End Dates.
Reasons for not finding a particular timetable that you may be looking for can be –
1. There are no classes in that timetable within that date range.
2. You have selected a date range that is incorrect.
Once you select the Go button, a list of classes that you can mark attendance or absence for will be displayed. To view the list of students enrolled in a particular class, select the Class Name link in the first column. This will take you to a new page that shows the list of students for that class.
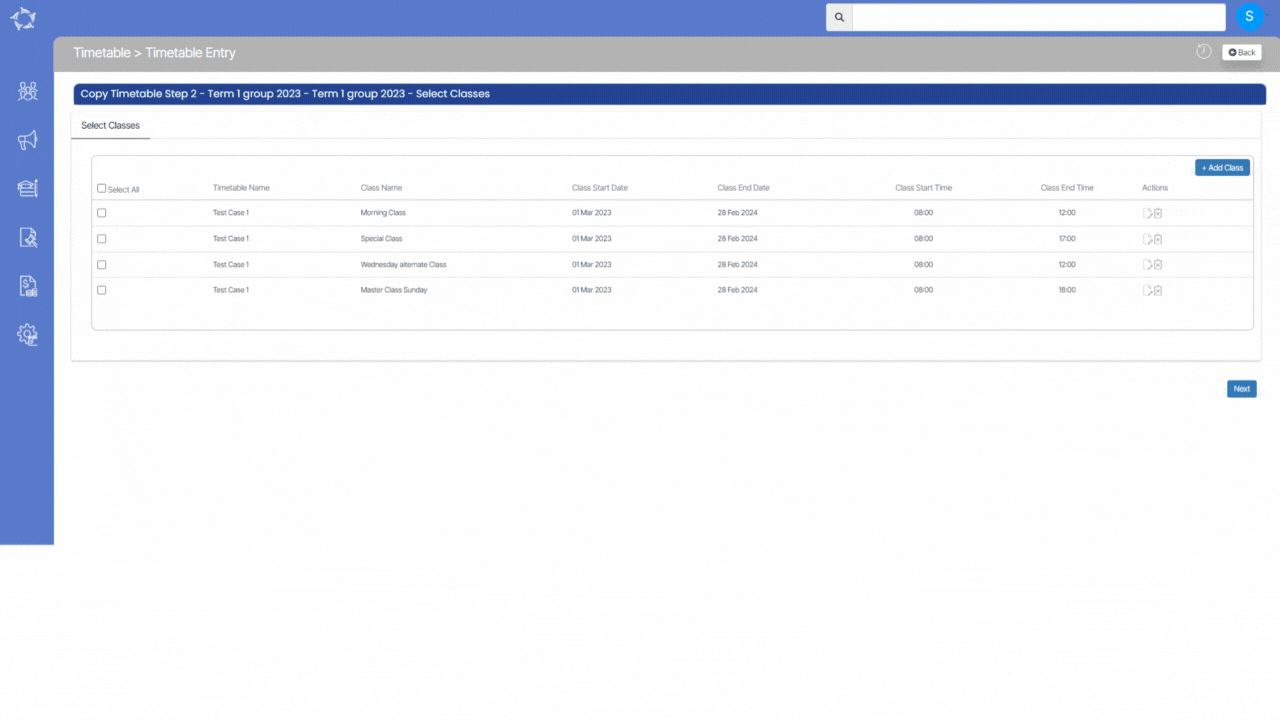
In this step, you will be able to view all the classes that you have created or edited. Once you are satisfied with the changes, you can select the Finish button to complete the process of creating the classes. However, you can still make further edits and add any new class during this step. It’s important to ensure that all the necessary classes are created accurately and efficiently to avoid any issues in the future.
In this step of the process, the system displays all the classes that were linked to the previous timetable. The information for each class remains the same, except for the start and end dates which will now be different. The system will automatically copy over the timetable dates entered in the previous step and apply them to all the classes.
In addition to displaying the previously linked classes, this step also allows you to create new classes and make edits to existing ones. This gives you the flexibility to make any necessary changes or additions to the class. Select all the classes that you wish to copy in this new timetable.