Audit Log

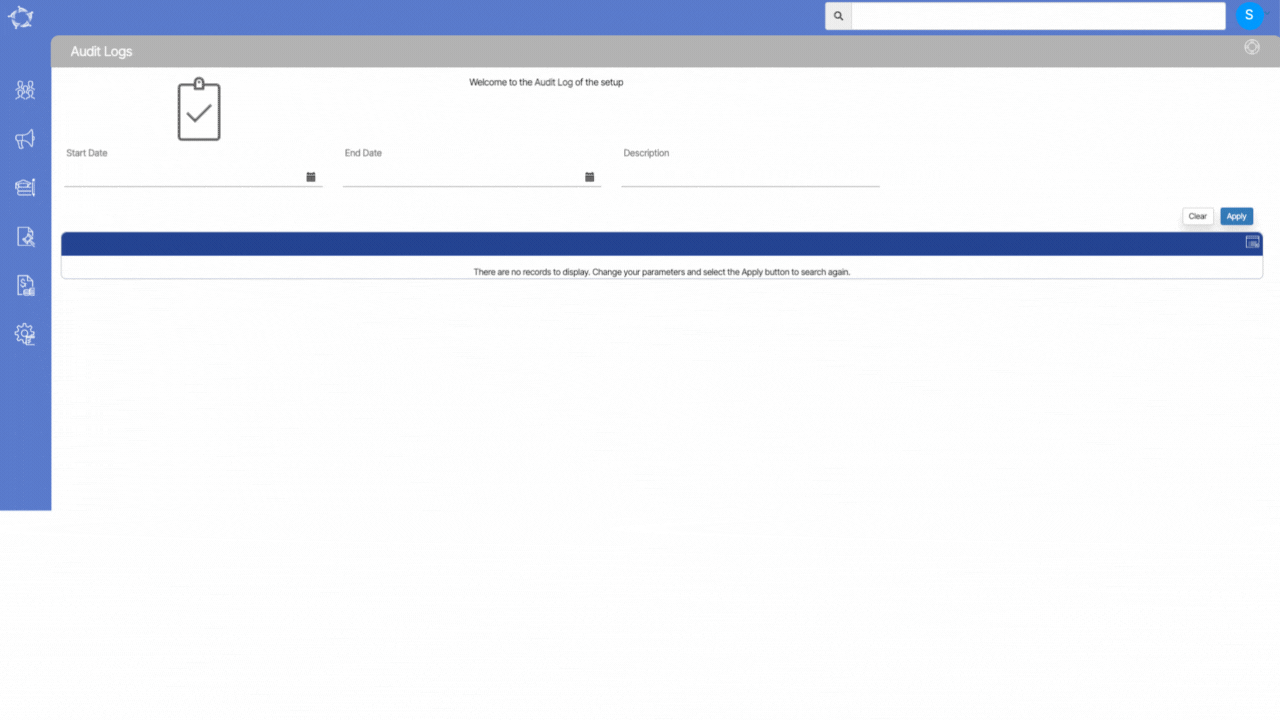
Main Dashboard > System Admin Menu > Audit Logs

An audit log is an essential feature of our software that requires the maintenance of a detailed record of all new entries or changes made. This screen provides a way to track all activities that you perform on a screen, including modifications, additions, and deletions. Audit logs can be critical for a wide range of purposes, such as security, compliance, and troubleshooting.

Where can I see the Audit Log?

The Audit log screen is available on all entry screens of TEAMS where you can enter or modify data. This log can be accessed by selecting the icon located on the top right side of each screen. Once selected, you are directed to the Audit log screen where you can view all the new entries or changes made by yourself. This screen is helpful for tracking all user activity within a system, including additions, modifications, and deletions. You can easily see which user made specific changes, the date the changes were made, and the exact time the changes occurred.

Filters on the screen

There are three filters on the screen.

The Audit log screen provides filters that allow you to search for specific data based on various criteria such as start and end dates and descriptions. The screen is helpful in situations where you need to quickly locate a particular entry or modification made within the system. To use the filters, you simply need to select the desired search criteria and select the Apply button. The system will then display only the data that meet the specified search criteria.

Email Template

Main Dashboard > System Admin menu > Email Template

history of changes

IMPORTANT – We believe that staying informed about the latest developments in our software is vital for optimising your experience and maximising the benefits of using our system. To view the latest updates and modifications on the Email Template Welcome screen and Email Template Entry screen, we kindly request you to navigate to the History icon history of changes showing above. By selecting this icon, you will gain access to a detailed log of all the recent changes made to the software.

The Email Template Welcome screen serves as the hub for crafting email templates tailored for various entities within the system, such as Applicants, Applications, Students, Enrolments, Agents, and more. On this screen, you will encounter a comprehensive list of templates presented in a grid format, showcasing those already existing in your system. For efficient navigation, the search functionality is at your disposal. Should you require a particular email template, you can swiftly locate it by entering either its code or name into the designated search field.

Furthermore, the process of template customisation is seamless. By selecting the edit icon located within the Actions column of the grid, you gain direct access to modify a template as needed. This user-friendly interface empowers you to create, locate, and refine email templates to effectively communicate across various aspects of your system.

Copy Timetable

Creating a timetable from scratch can be a time-consuming and a tedious task, especially if the same pattern of classes and schedule repeats after a certain period of time. However, there is a more efficient way to create a new timetable with the same pattern, and that is by using the copy timetable functionality.

This feature allows you to duplicate an existing timetable and make necessary changes as required. By doing so, you can save time and effort in creating a new timetable from scratch while ensuring that the schedule and class pattern remains consistent with the previous timetable.

How to create a copy of the Timetable?

From the Timetable Welcome screen, you can see a copy timetable icon under the Actions column for each timetable entry in the grid. Select this icon to create a copy of the existing timetable.

Please select the below steps to make changes to the copied timetable.

Copy Timetable Step 1 Information & Resource Selection

Copy Timetable Step 2 Select Classes

Final Step Classes Preview

Student Progress

Main Dashboard > Compliance Menu > Student Progress

Student progress refers to the assessment and measurement of a student’s academic growth and development over a specific period of time. It involves tracking a student’s performance, and interventions over a specific period of time. The Student Progress screen assists you in keeping track of your student’s progress. With this screen, you can easily keep track of the progress of both their Subjects and the Unit of study.

This screen is further divided into two sections:

  • Filters/Parameters
  • Listing Grid

Parameters Grid:

There are different fields available under the grid from which you can filter out the progress of the students as per your own requirement. Further explanation of these fields is provided below:

Field NameExplanation
Monitor at the Subject or UoS level?There are two radio buttons under this field namely Subject and UoS. Based on your requirement you can select one of these radio buttons to monitor student progress.
Subject/UoS Start DateThe system will always look at Subject/UoS start dates only to find enrolments between the date ranges.
Subject/UoS End dateThe system will always look at Subject/UoS end dates only to find enrolments between the date ranges.
Completion % between – FromEnter the minimum completion percentage you want to list in this grid
Completion % between – ToEnter the maximum completion percentage you want to list in this field.
CampusSelect a Campus from the dropdown
ProgramSelect various programs from the dropdown
IntakeSelect Intakes from the dropdown
Group Training PlanSelect the Group Training Plan from the dropdown
Overseas/Local StudentSelect Overseas or local student type or both from the dropdown

Advanced Filters – The advanced filters are non mandatory filters and if you see the relevant information you can select Account Manager, Trainer, Enrolment Type, Timetable and classes from the dropdown.

Listing Grid:

The Listing grid will show you the details related to the student’s progress as per the parameters that you have selected. You can see the student’s progress-related details that are required to help you monitor other basic details of the student.

SMS Template Entry Screen

Main Dashboard > System Admin Menu > SMS Template Screen > + SMS Template Button

An SMS template entry screen allows users to create or edit templates for sending SMS (Short Message Service) messages. It typically provides a text Message input field where you can compose the content of the message template. The screen also enables you to save commonly used or frequently sent messages as templates for quick and easy access.

This screen is accessible from the SMS Template Welcome screen and once you select the +SMS Template button, it will take you to the Email Template entry screen.

Below is the Explanation of the fields on the Email template screen

FieldsExplanation
SMS TitleThis is a mandatory field and this field will be visible in the sent SMS
Template TypeThis field will allow you to decide as to where you want to apply this template i.e students, enrolments, agents etc.
Available FieldsDepending upon the Template Type parameter, this field will show you merge fields accordingly. If you select student as the template type then it will show you the student’s merge fields only.
Marketing SMSSelect this Option to mark this SMS template as a Marketing SMS template
Default SenderYou can select the default sender of this SMS template here
MessageYou can type the SMS message in this field.

Email Template Entry Screen

Main Dashboard > System Admin Menu > Email Template Screen > + Email Template Button

IMPORTANT – We believe that staying informed about the latest developments in our software is vital for optimising your experience and maximising the benefits of using our system. To view the latest updates and modifications on the Email Template Entry screen, we kindly request you to navigate to the History icon history of changes from the Email Template Welcome screen. By selecting this icon, you will gain access to a detailed log of all the recent changes made to the software.

The Email Template Entry screen refers to the screen where you can create or edit email templates. It is typically a part of an email marketing or communication platform that allows you to design and customise pre-designed email templates for various purposes such as newsletters, transactional emails, or student support communications.

It provides a visual editor or a form-based interface where you can modify the content, layout, and styling of the email template. You can also add and format text, insert images or multimedia content, customise colours, fonts etc.

This screen is accessible from the Email Template Welcome screen and Once you select the +Email Template button on the screen, it will take you to the Email Template entry screen.

Below is the explanation of the fields on the Email Template Entry screen

FieldsExplanation
Email TitleEmail Title will only be visible to TEAMS users. Please note, the email title cannot be left blank as it is a mandatory field.
Email SubjectThis is the Subject line of the email which will be visible to the students/enrolments. Please note, the email title cannot be left blank as it is a mandatory field
Template TypeYou will see different objects (such as students, enrolment, agent etc) under the drop down of this field and based on your requirements you select one template at a time to create the email template.
Available FieldsDepending upon the Template Type parameter, this field will show you merge fields in the Available fields accordingly. If you select student as the template type then it will show you the student’s merge fields only.
Add ButtonUpon selecting the merge fields you can select this button to add in the message box. 
Marketing EmailUpon selecting the merge fields you can select this button to add to the message box. 
Default SenderThis field will allow you to add the name of the default sender
Attach FilesIf you wish to attach files to your email template then you can it be selecting the attach files button.

TPS History Screen

Dashboard > Compliance > TPS History

This screen is designed to display a comprehensive list of all TPS reports generated within a selected calendar year. It also allows for the updating of payment information, and uploading of invoices, and payment receipts. Upon loading the screen, all TPS reports generated during the selected date range will be visible.

Once a report has been submitted to the government, an invoice can be generated and uploaded via this screen along with payment details. Additionally, once the invoice has been paid, the receipt can also be uploaded by clicking on the edit icon under the actions column.

For ease of access, the generated report, uploaded invoice, and payment receipt can be downloaded by clicking on the file name under their respective columns (File, Invoice, and Payment Receipt).

Classrooms

Main Dashboard > System Admin menu > Classrooms

On this screen, there is a grid below which displays all the classrooms that have been created. You can search for specific classrooms by entering the classroom code or name in the search bar and selecting the campus from the dropdown menu. Once you have entered your search criteria, click on the apply button and the grid will display the classrooms that match your search.

If you want to add a new classroom, you can simply select the +Classroom button and which will take you to the Classroom Entry Screen. This makes it easy to manage and organise your classrooms in one place.