Attendance Step 2

Main Dashboard > Student Management > Attendance

history of changes

The Attendance and Results screen will show you two sections as follows –

Section 1:

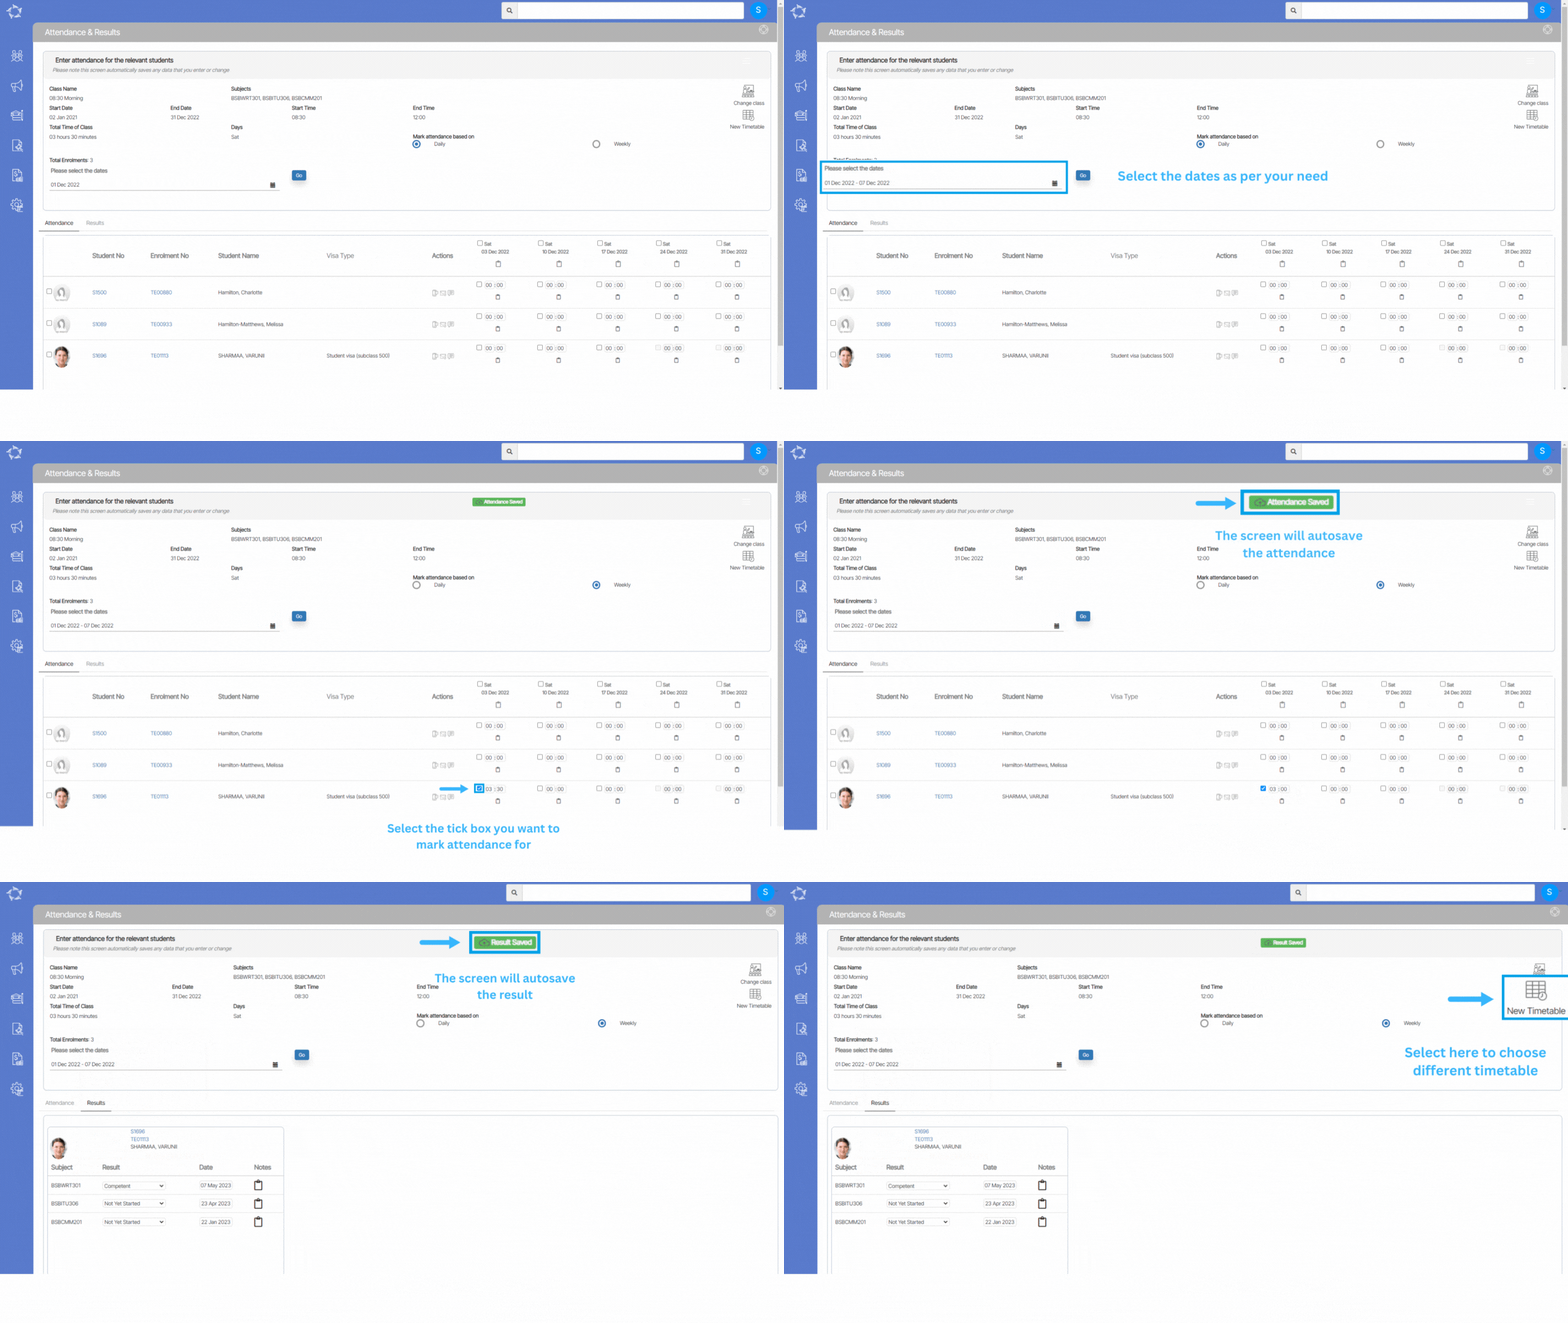
This section displays information about the selected class, including the class name, date range, and timetable. In this section, you can mark attendance or absence for the students on a daily or weekly basis by selecting the appropriate radio button. Additionally, you have the option to modify the dates as per your requirements.

In the Summary section of the class information, two icons have been included for the options of Change Class and New Timetable. This will make it easier for users to access these features and make any necessary changes to their class schedule.

  • Change Class Icon – The Change Class icon allows users to select a different class to mark attendance for. Selecting this icon will redirect the user to the previous screen, where they can select a new class and continue marking attendance.
  • New Timetable IconThe New Timetable icon provides you with the option to select a different timetable and date range for attendance. Selecting this icon will redirect the user to the previous screen, where they can select a new timetable and date range

Section 2:

Allows you to mark attendance or absence for the students under the Attendance or Absence tab. You can also record the student’s results under the Results tab.

Can’t see a SAVE button on the screen?

Unlike other screens in the system, this screen will auto-save when you enter or edit data in it.

Attendance Tab

  • In the Attendance tab, you can record whether a student is present or absent, depending on how the timetable was set up. To do this, select the checkbox next to each student that you want to mark attendance or absence. Check the box for Attendance if the student is present or Absence if the student is absent.
  • When you select the checkbox for a student in the Attendance tab, the system will display a number in two boxes next to the checkbox. These boxes are for hours and minutes, and the number displayed will be the total hours and minutes of the class for which you can mark attendance.
  • If a student attended or was absent for only part of the class, you can modify the numbers in the hours and minutes boxes accordingly. However, the modified values cannot be greater than the original number displayed in the boxes. The system only allows you to mark attendance or absence for the actual amount of time the student was present or absent in the class.

Can’t select the tick box for a student to mark attendance?

If you are unable to select the tick box for a student, it may be because the student has a student holiday entered in the system, and it has been linked to their specific enrolment. In this case, you cannot mark the student as attended or absent for the duration of the holiday period.

Results Tab

  • In the Results tab, the top section of the screen displays a summary of the subjects or units of study linked to the class. In this section, you can see what subjects or units of study are associated with the class. For each student enrolled in the class, the system displays the subjects or units of study they are linked to, as well as any results that have been recorded for those subjects or units of study.
  • To mark a result for a particular subject or unit of study for a student, select the Result dropdown for that subject or unit of study. This dropdown will be located next to the student’s name in the Results tab.

Note: There are a few results (Recognition of prior learning, Did not start, etc.) that are in red. You should only see them when you are reviewing historical enrolment results. They are inactive results that you may have linked to a subject and you need to see them so that you can change them where needed. If you do see them in the list, do not use them as they will not be accepted in your National Student data submissions, and you will get errors.

Result date is mandatory and you don’t record dates?

As part of your AVETMISS compliance requirements, your student results require result dates.

To protect your data for AVETMISS data submissions the system will make the result date mandatory where:

1. Any Subject set with Type of Subject is Unit of Competency (UoC) – Nationally Accredited in the Subject entry screen OR

2. Any Unit of Study that has a VET subject linked to it and meets the requirements in point 1 above.
Test Results

Enrolment Dashboard > Result and Progress tile > Test Result icon

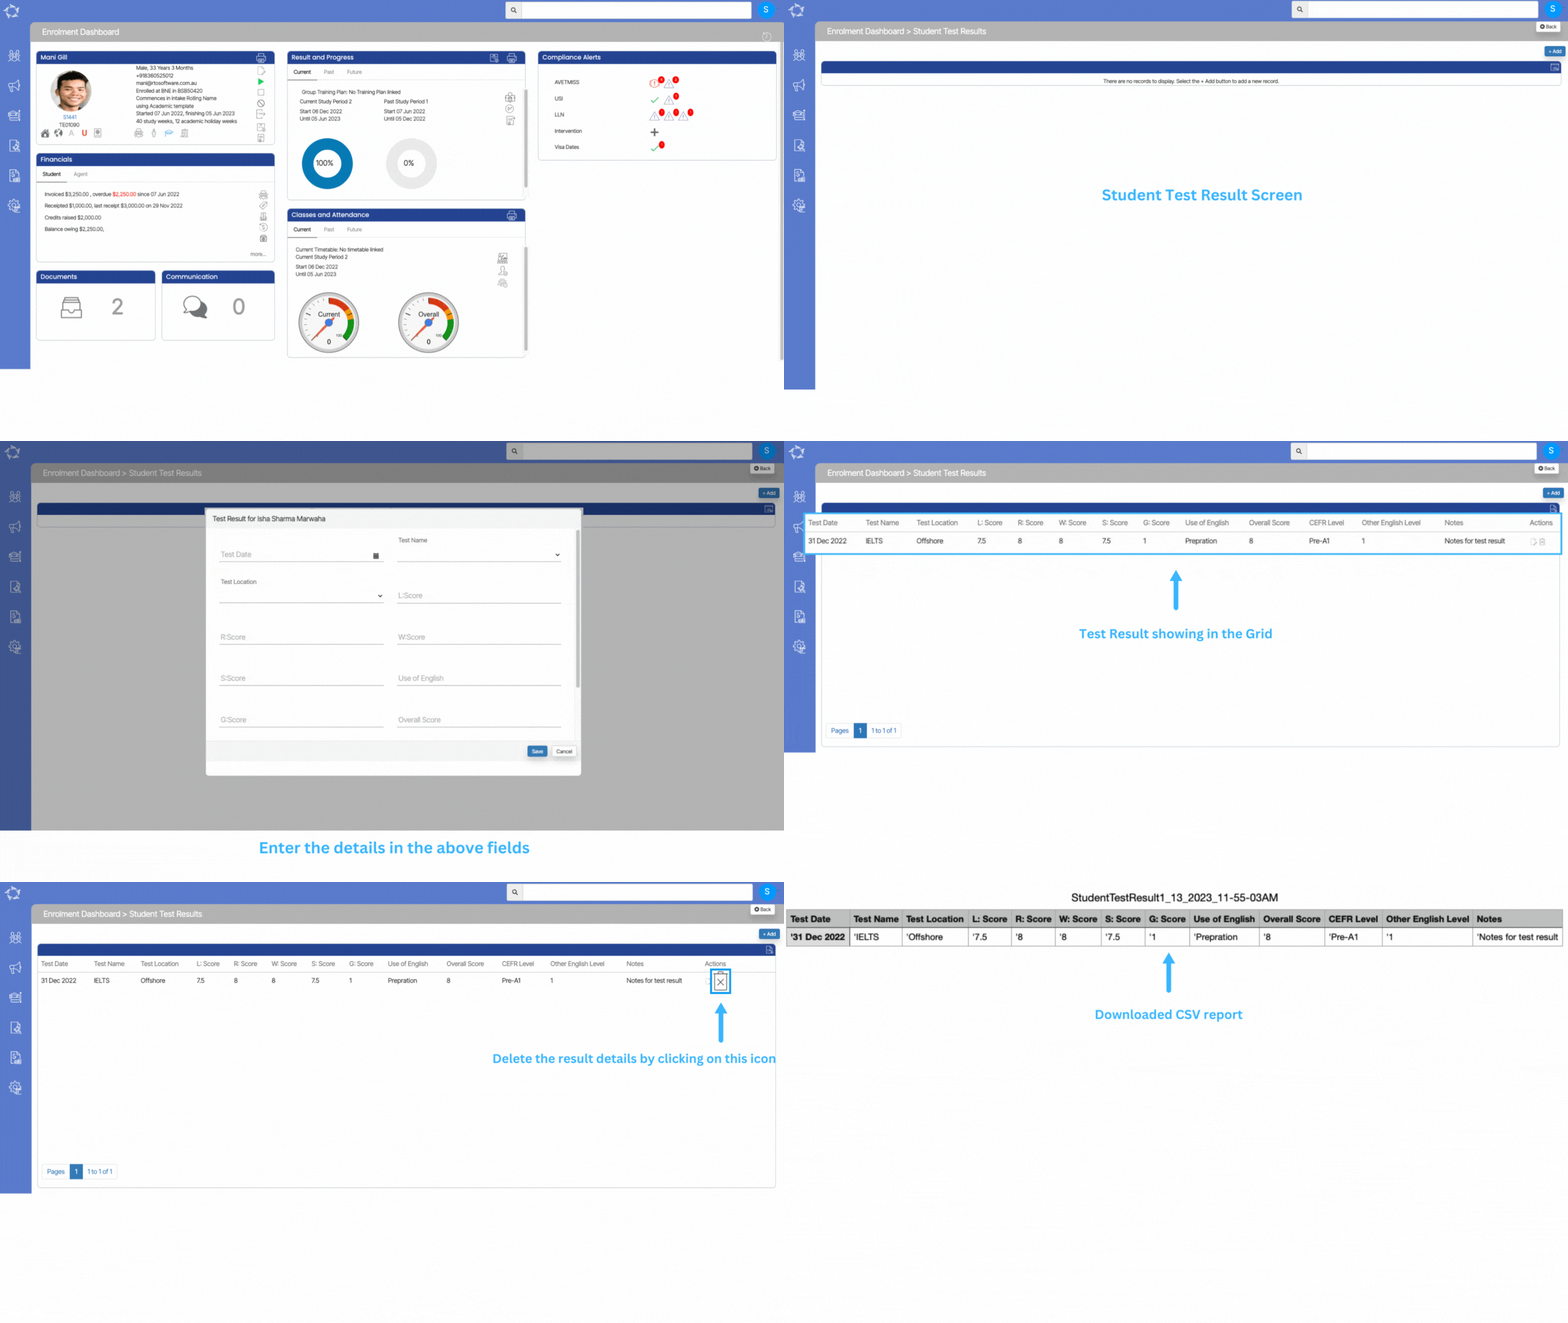
In the system, we do have a screen from where you can enter the IELTS, PTE, TOEFL, and (etc) scores. You can find this screen under Enrolment Dashboard > Result and Progress Tile > Test Results icon.

Once you will select the Test Result screen the system will open the screen in a new tab that will show you the test results that you have entered into the system for that enrolment.

  • To add a new test result, you just need to select the +Add button.
  • By selecting the +Add button the system will open a floating window where you can enter the results.

In the below table all the fields that are on the test result floating window, have been explained:

FieldsExplanation
Test DateIn the Test Date, you can select the date of the test for which you want to enter the scores.
Test NameThe Test name is a dropdown field from where you can select the type of test.
Test LocationThe Test location is a dropdown from where you can select the location of the test. This is a User code screen and you can add other locations also in the dropdown. 
L: ScoreIn the L: Score you can enter the score for the listening.
R: ScoreIn the R: Score you can enter the score for the Reading.
W: ScoreIn the W: Score you can enter the score for the Writing.
S: ScoreIn the S: Score you can enter the score for Speaking.
Use of EnglishPreparation.
G: ScoreIn the G: Score you can enter the score for the Grammar.
Overall ScoreEnter the Overall Score in this field. 
CEFR LevelSelect CEFR Level from the dropdown.
Other English LevelEnter Other English Level in this field.
NotesIn the Notes, you can enter the notes for the test results.

Changes on Training Plan and Results screen – History

The training plan and result screen will give you an overview of the subjects linked to enrolment and their results. We have made some latest new enhancements changes to the Training Plan and Results Screen.

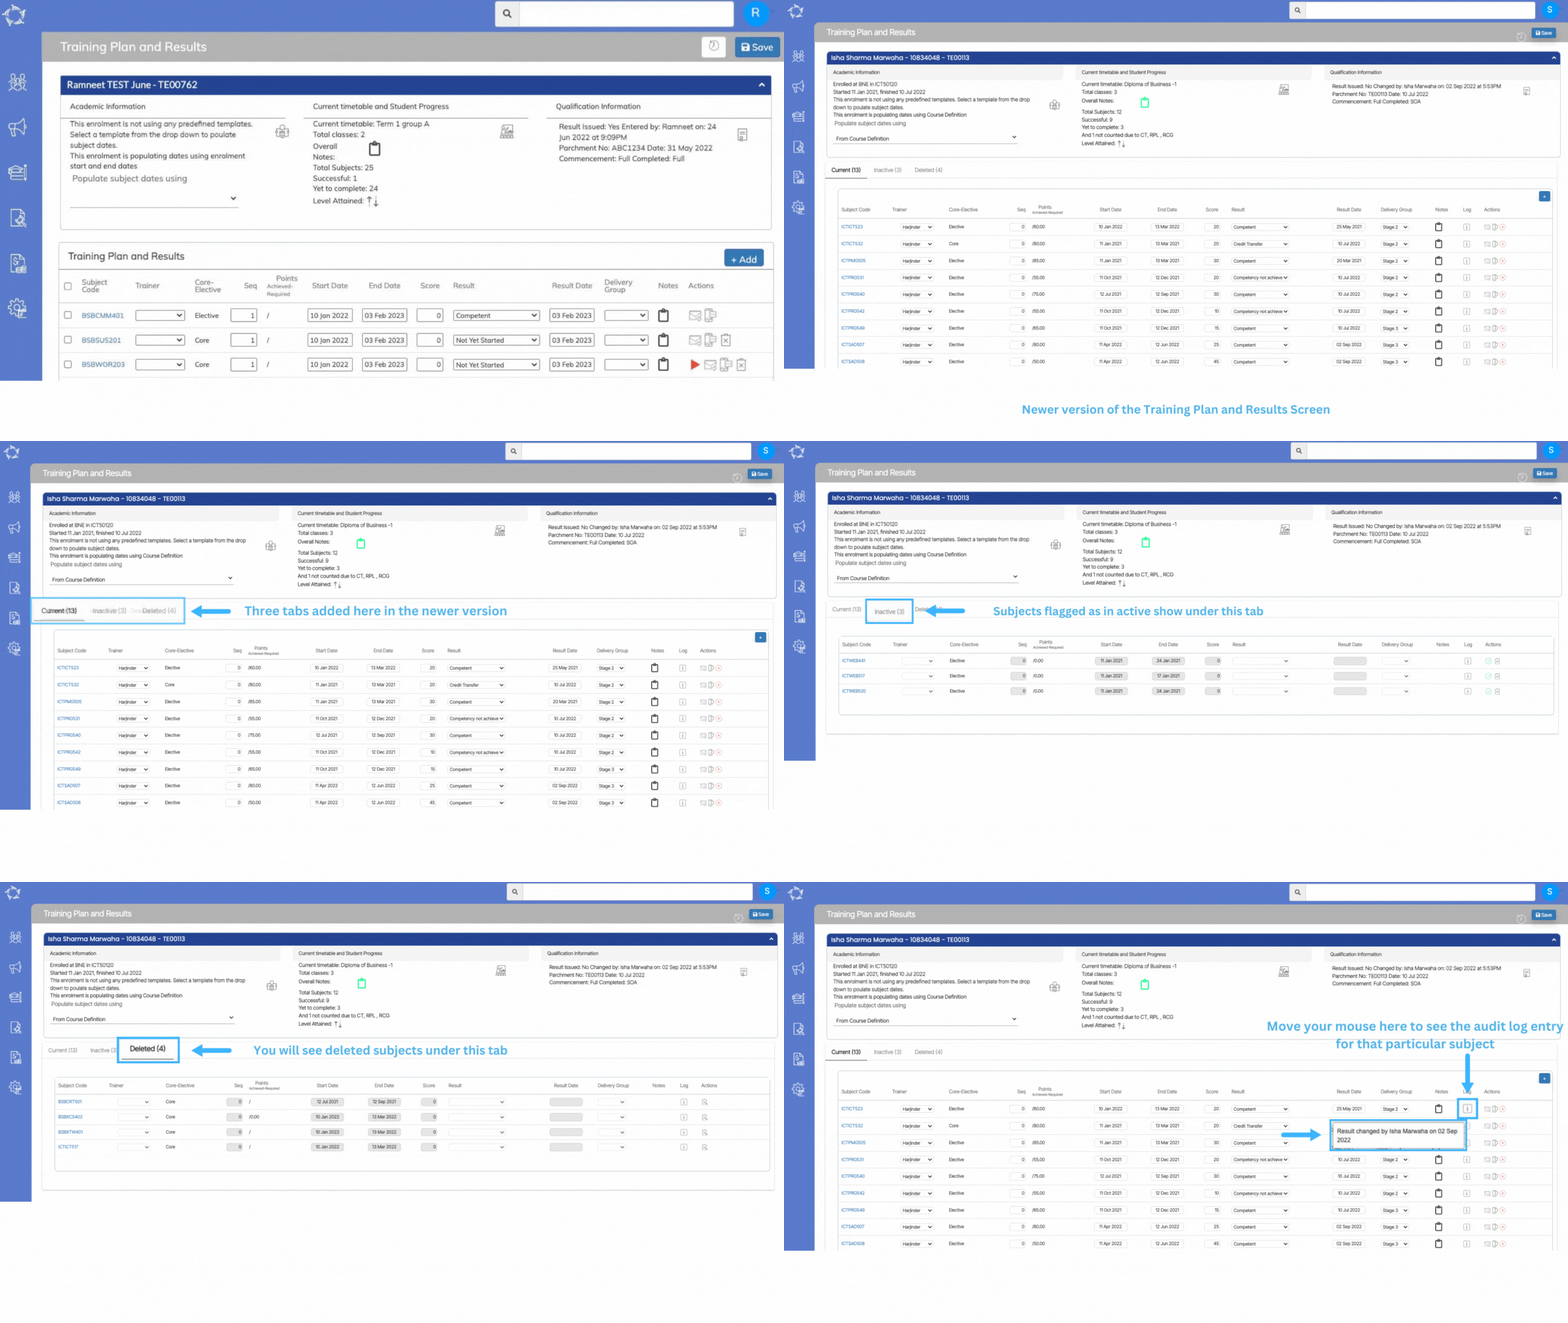
In the new look of the Training Plan and Results screen, You will see three new tabs on the screen above the grid.

Current – Subjects currently linked to the enrolment will be shown under this tab.

Inactive – In this tab, you will see all the subjects flagged as inactive. To make any subject inactive, select this icon  under the actions column in the current tab. And the system will ask for your confirmation and by selecting OK, the system will move the subject from the current tab to the Inactive tab and flag the subject as inactive. To reinstate any inactive subject to active you can select this icon  and again the system will ask for your confirmation. Confirming the same the system will flag the subject active and move it back to the current tab.

Delete – To Delete a subject from the current or inactive tab, select this icon you can see the deleted subject under the deleted tab. You can also restore the deleted subject by selecting this icon  under the actions column. Once you have given the system confirmation, it will restore the subject to the tab from where it was deleted. It can be either inactive or current. Also, If you have added and saved notes for any subjects on this screen the system will show you the notes in green color.
Training Plan and Results Screen > New look – History

We recently visually changed the look of the Training Plan and Results Screen. With this new look of the screen, it is now easy for a user to view all the subjects at once without having to scroll too much.

How the screen looks now:

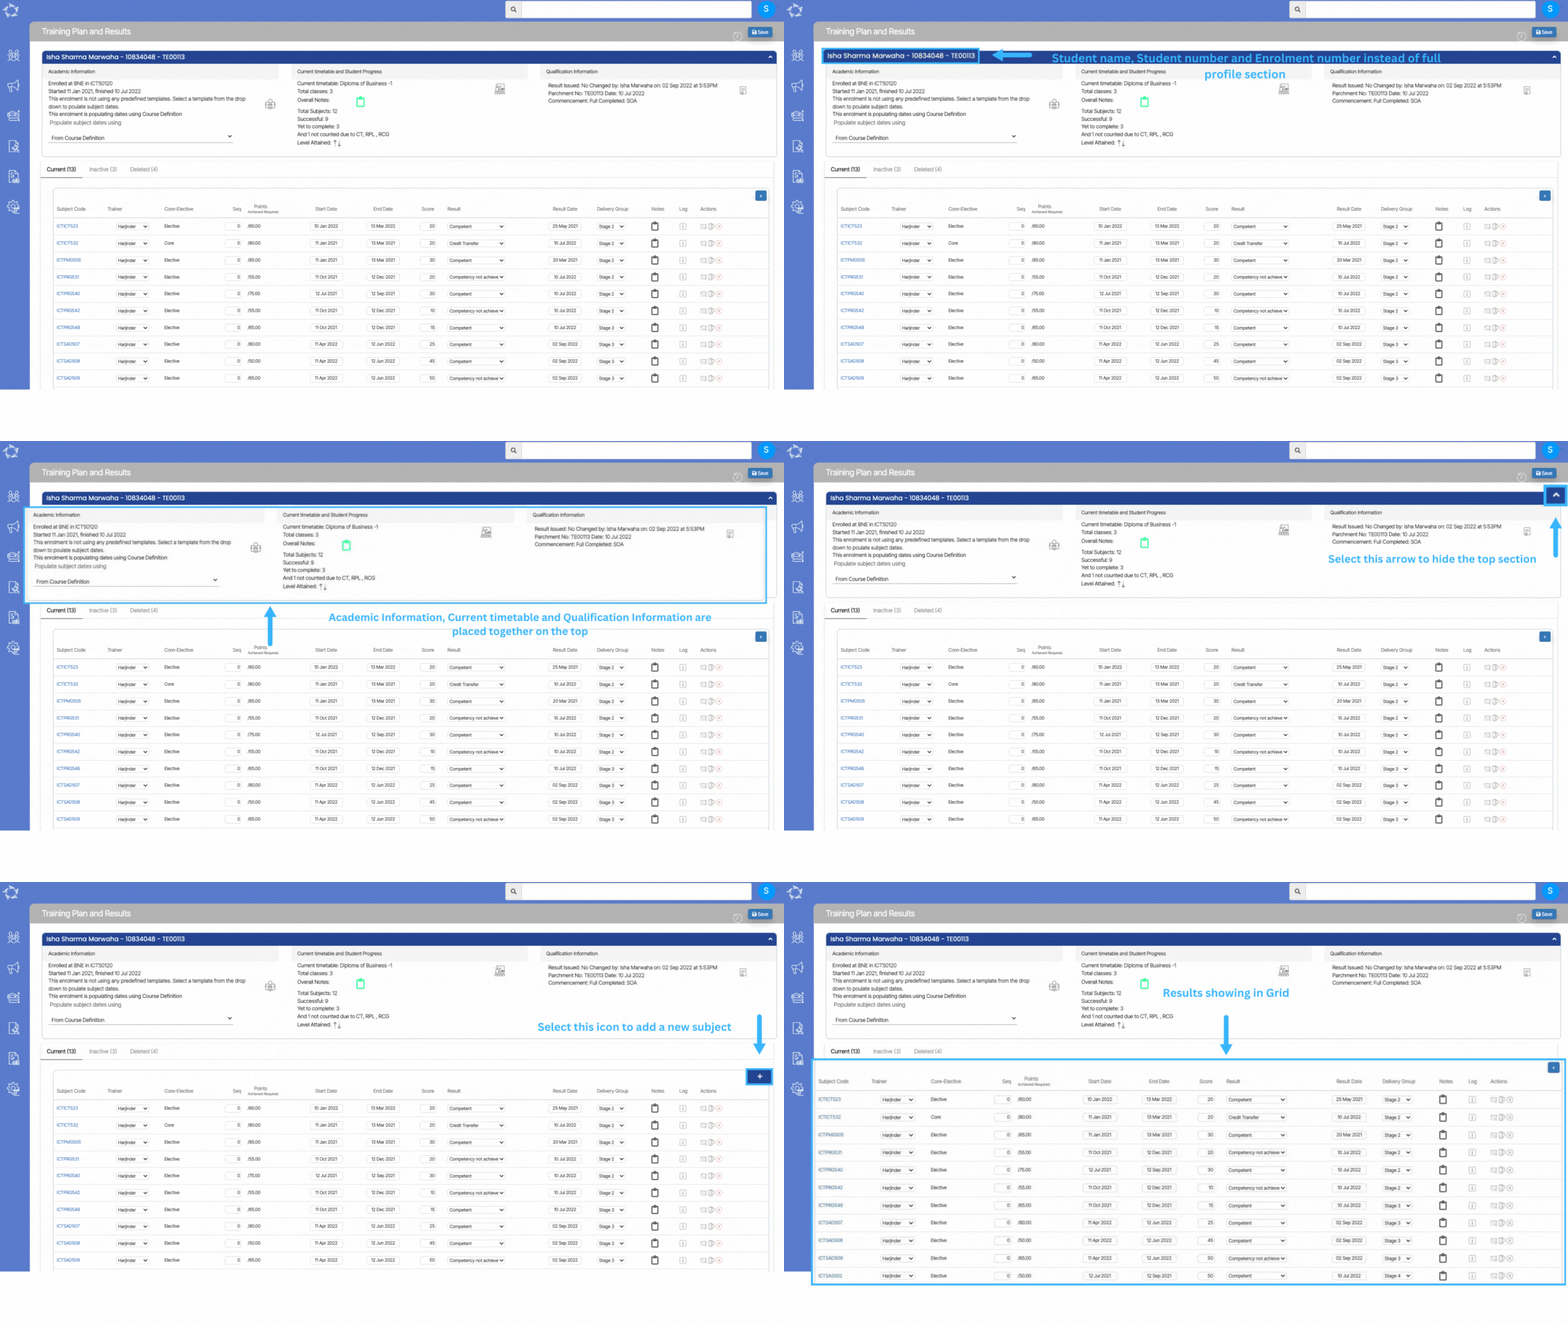
The screen works the same as it used to work, it’s just the visuals that we have changed. You will no longer see the profile section for the student. However, you will be able to see the student’s name and enrolment number in the header.

Other sections such as Academic Template, Current timetable & Student Progress and Qualification Information are placed together on the top section of the screen and more.

Result and Progress Tile

Enrolment Dashboard > Result and Progress Tile

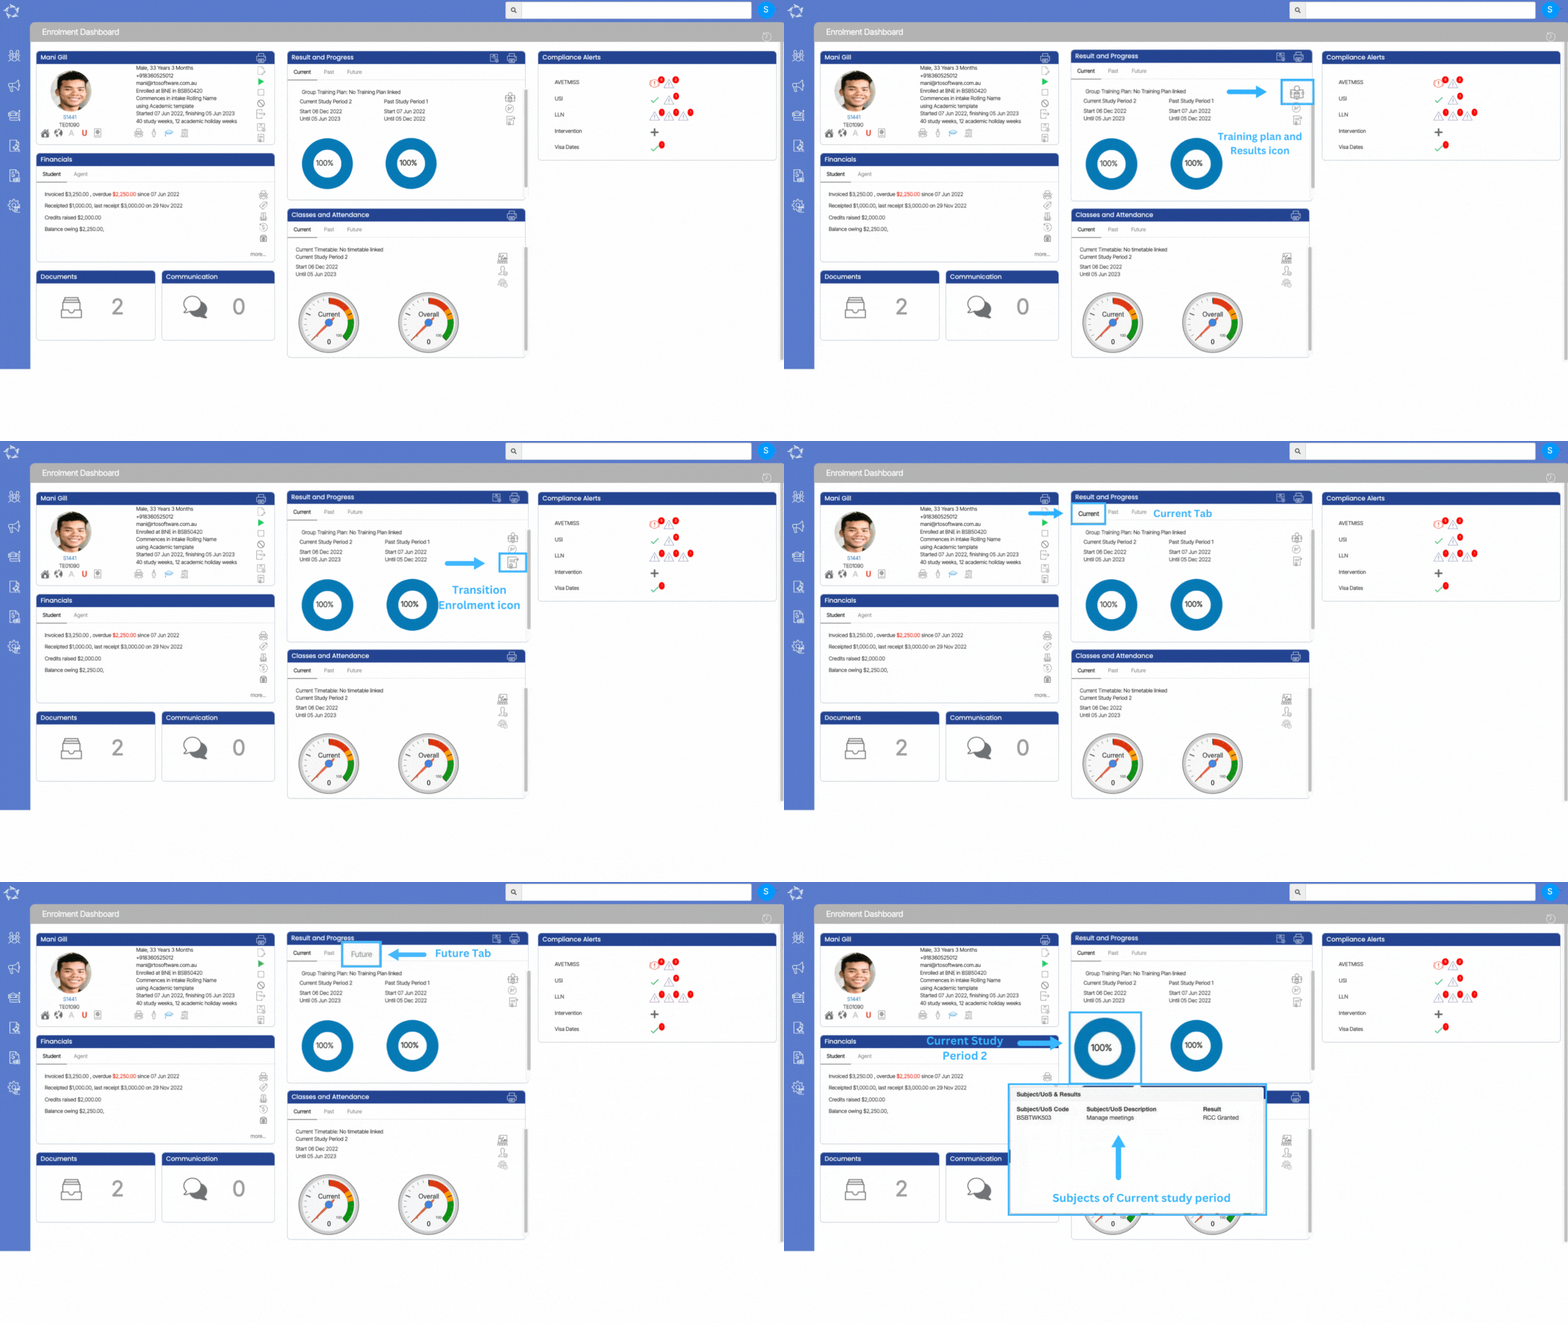
This tile provides an overview of a student’s progress in their course of study, based on their study periods. This tile offers a variety of functionalities, such as navigation to the training plan and result screen, as well as the ability to transition the enrolment to a new program. Additionally, all certificate reports, training plans, and student performance reports are generated from this tile. This allows for a comprehensive view of the student’s progress and achievements, making it easier to monitor their performance and make informed decisions about their future studies.

Tabs

  • Current – This tab provides you with students’ current status in their training plan. It displays the name of the group training plan the student is enrolled in, as well as their current and past study period dates. Additionally, the tab shows the student’s course progress percentage, giving a clear indication of how much of the course they have completed so far.
  • Past – This tab provides information on a student’s completed study periods. It displays the start and end dates of each past study period, allowing for easy reference and tracking of progress over time. Additionally, the tab shows the student’s course progress percentage for each past study period, giving a clear indication of how much of the course they completed during that time frame.
  • Future – This tab provides information on a student’s upcoming study periods. It displays the start and end dates of each future study period


Course Progress Dial

This dial will display the percentage of the course progress of the particular study periods. For example, if there are 4 subjects falling in the date range of the study period and 4 of them have successful results against them. Then the course progress will be calculated as (4/4)*100 i.e. total successful subjects falling in the study period divided by total subjects multiplied by 100.

Vertical Icons

Training Plan and Results

Enrolment Dashboard > Result and Progress Tile > Training Plan and Results icon

history of changes

This screen is all about the subjects linked to the enrolment, their start and end date, results and result date. This screen is visually distributed in 2 sections where you can edit the dates, and results, link the trainers, mark the assessments and many more.

The first section of the screen will show you three different areas where you can see Academic information, Current timetable, Student Progress and Qualification Information.

Academic Information

This section gives you the summary of the enrolment i.e. in which campus and course the student is enrolled. Also, it displays the enrolment start date and end date.

Apart from the summary of the enrolment, this section also gives information related to how the system is populating the subject dates. You can also change the subject’s dates by updating them using enrolment dates, academic templates, group training plans, and course definitions.

Current Timetable and Student Progress

This section will display the information related to the current timetable, and total classes. Also, the total subjects, successful, are yet to be completed and not counted due to CT, RPL, and RCG. Other than you can select Level Attained by selecting the icon next to the text.

Qualification Information

This section will display the information related to the parchment number and parchment date. Also, it will display whether the result is issued and the status of commencement and completion. You can also update the qualification information (such as Parchment number, Completed, etc) by selecting the icon.

In the second section of the screen, it will show you the Subjects, their dates and result dates. You can add new subjects from the + icon, and you can inactive or delete the subject.

Results Section

This section will display everything about the results. where you can edit the dates, and results, link the trainers, mark the assessments, and many more. You can also delete subjects, inactive subjects.

You will be presented with the Current tab, Inactive Tab and Deleted Tab.

Current tab – This tab will show you all the current subjects that are linked to the enrolment.

Inactive tab – This tab will show you all the inactive subjects that you have marked inactive from the current tab. Please note that you have the flexibility to mark the subjects as active from the active icon or you can delete the inactive subject from the delete icon.

Deleted tab – Whether you have deleted the subjects from the inactive tab or the current tab, those subjects will appear in the deleted tab. You can also restore the deleted subjects from the restore icon.

IMPORTANT – If you have removed the subject from the current tab and want to bring it back, restoring it will place it back in the current tab. However, if you have marked a subject as inactive, deleting it from the inactive tab won’t immediately return it to the current tab. Instead, it goes to the inactive tab, and you need to mark it as active again for it to appear in the current tab.

Transition Student Screen – History

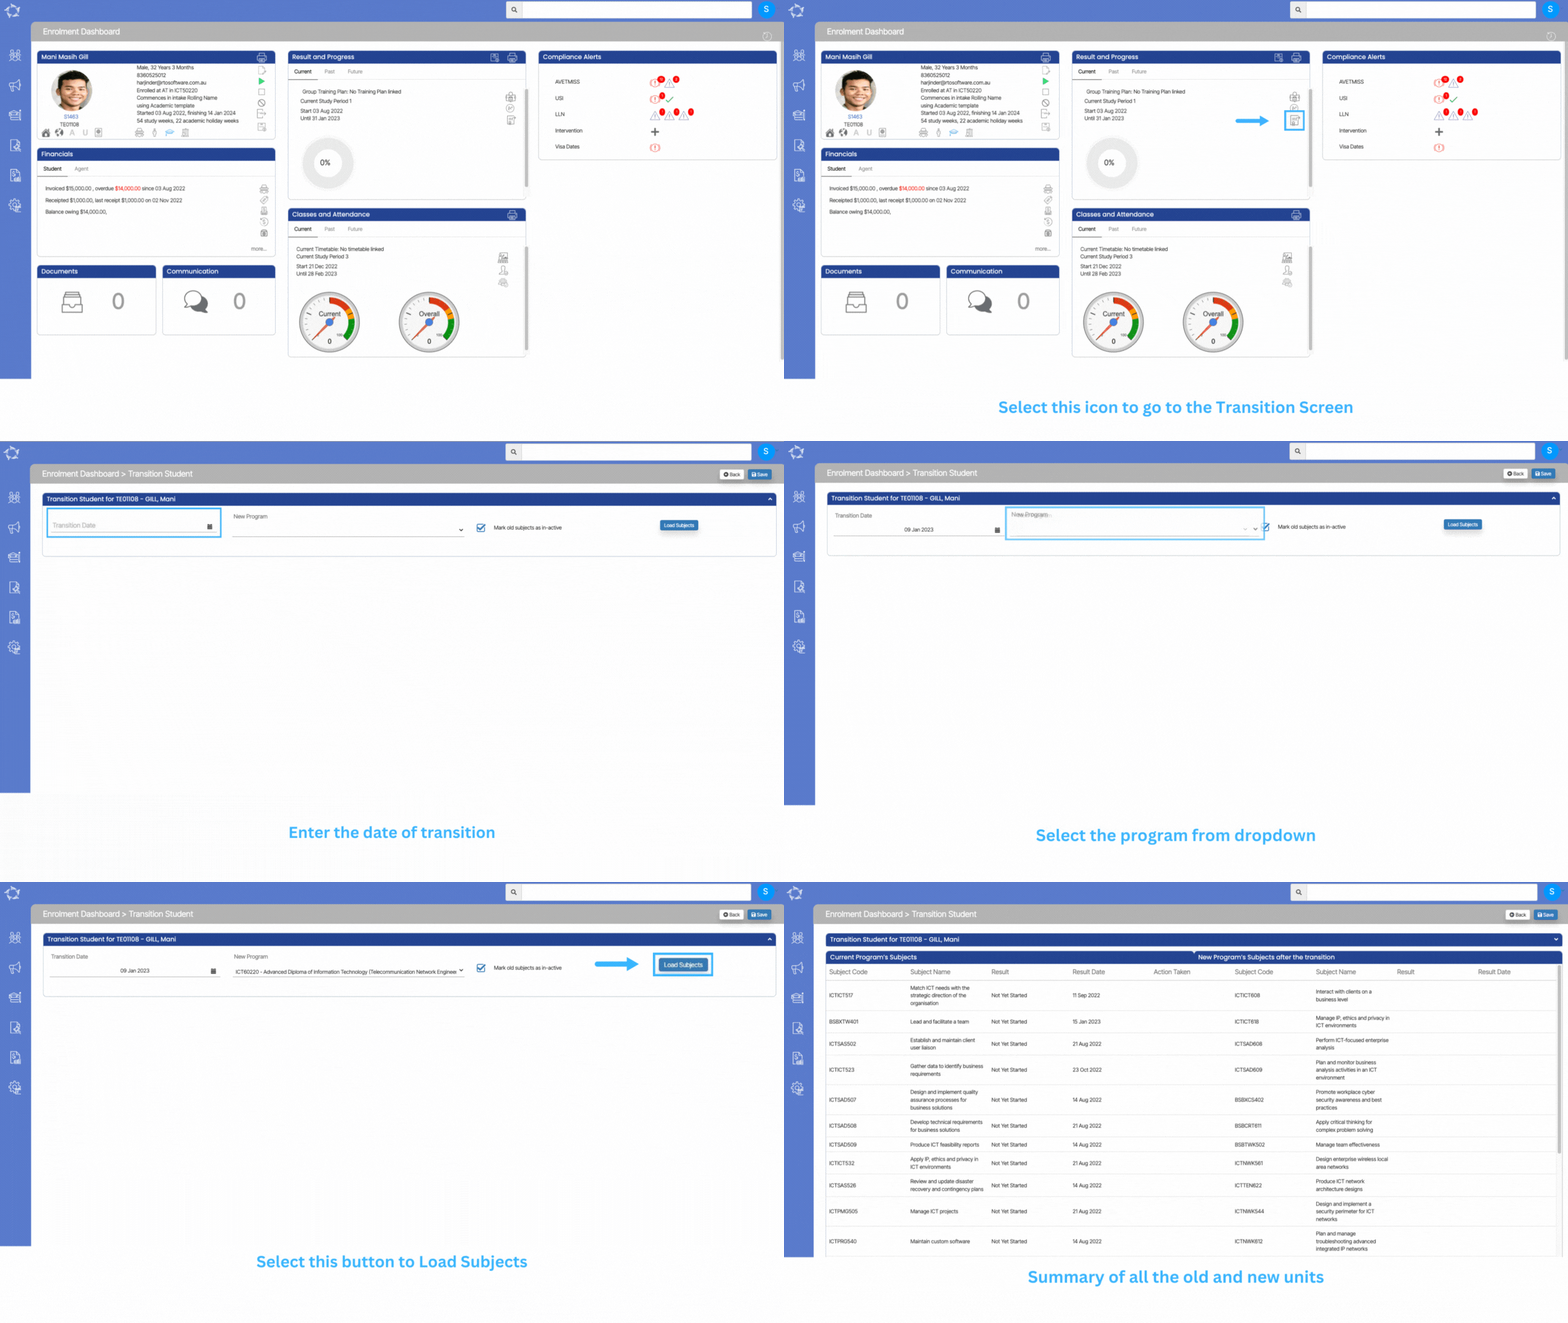
We have made some of the latest changes in the Transition Student Screen. This screen can be found under Enrolment Dashboard > Result and Progress Tile > Transition Enrolment icon.

Below are the steps that you need to follow when you do a Transition.

  • Enter the date of transition. Basically when the transition took place. It can or cannot be the same as the current date.
  • Select the program in which you are going to transit the student’s enrolment.
  • By default, the tick box for Mark old subjects as in-active will be selected. It’s vital that you do not untick this tick box so that the system can link the correct subjects with the enrolment according to the new program code in which you are going to move the student’s enrolment.
  • Select the button for Load Subjects.
  • Upon selecting the button, the system will refresh the screen and give you a summary of all the old and new units.

IMPORTANT – If the transition date for a student is 01 July 2022 and today is 11 July 2022, then update 01 July 2022 as the transition date.

Application Dashboard > Training Plan and Result Screen

Application Dashboard > Application Profile Tile > Training Plan and Results Icon

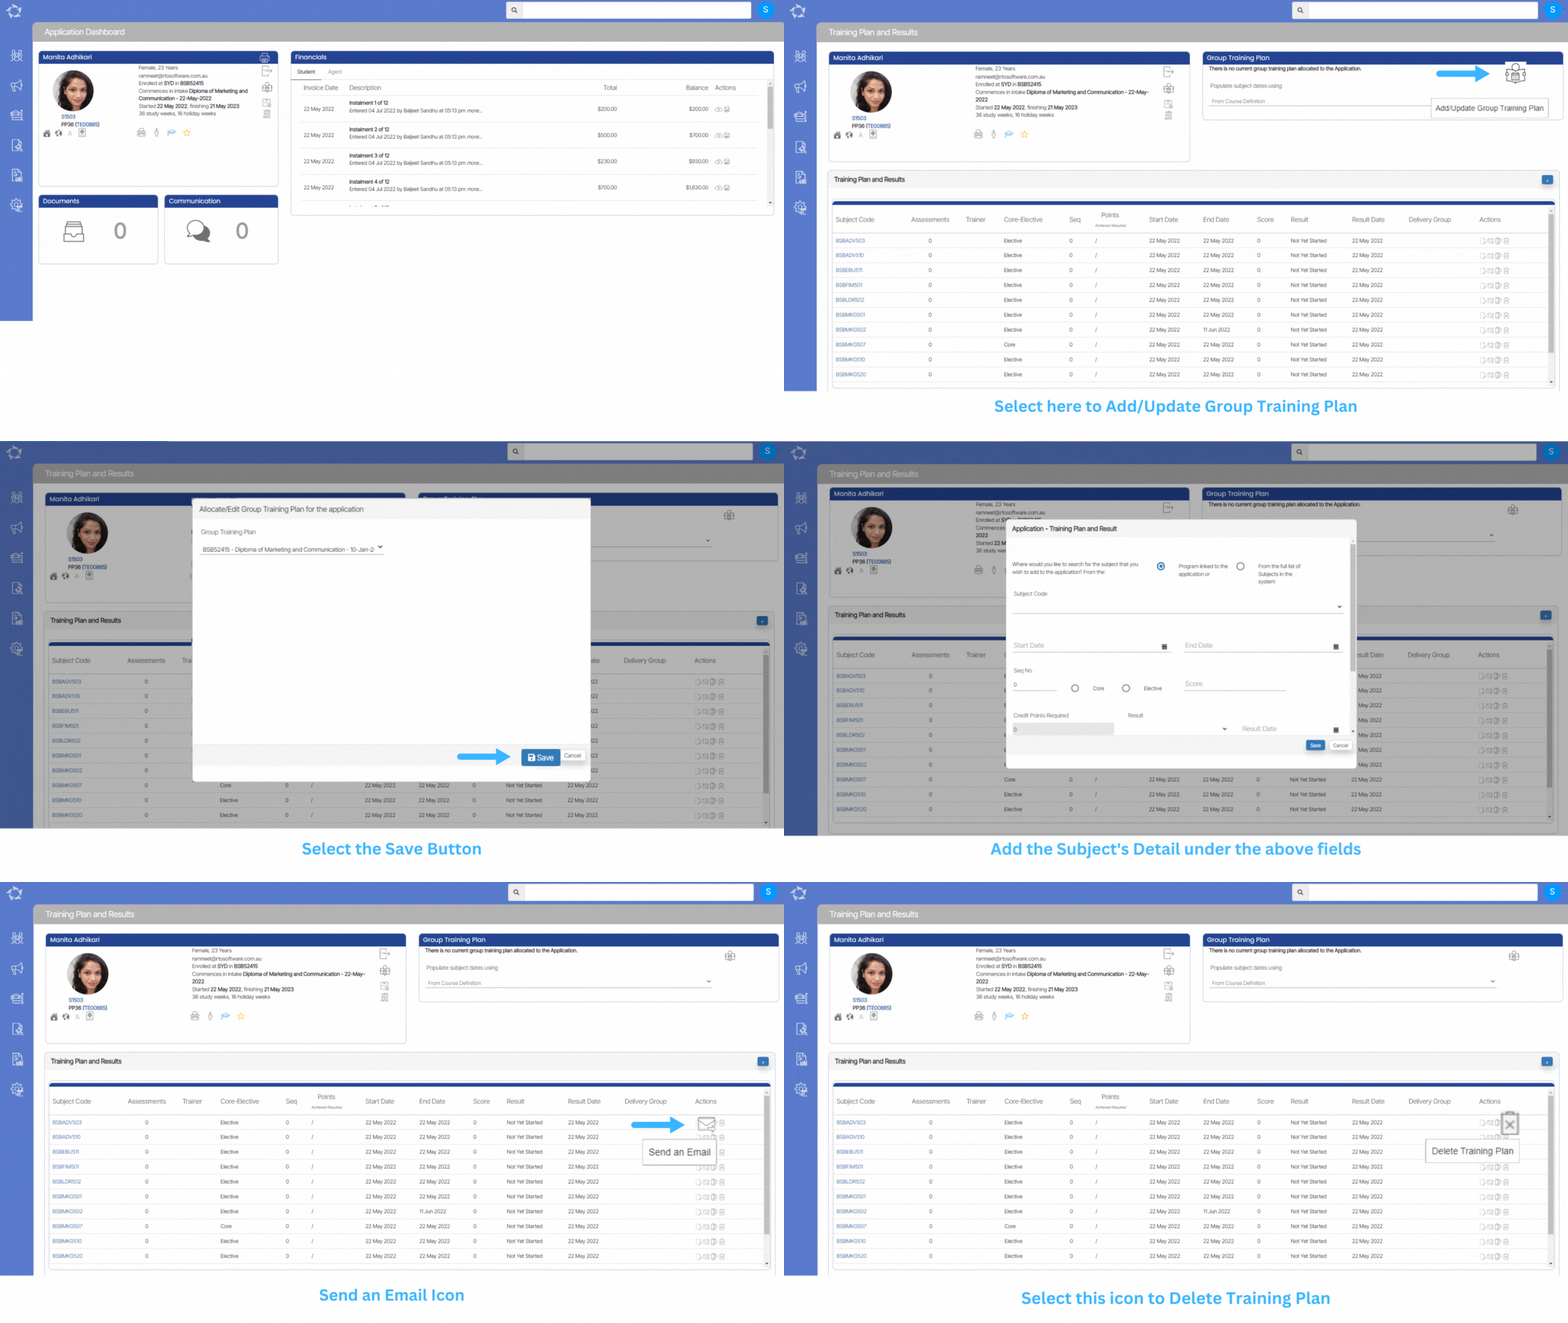
This screen is all about the subjects/modules/units linked to the application, their start and end date, results and results date. It is visually distributed in 3 tiles (Applicant Profile tile, Group Training Plan, and Training Plan and Results tile) for Training Plan and Results tile, you can edit the dates, results, and many more.

Group Training Plan Tile

This tile displays the information related to how the system is populating subject dates. You can also change the subject dates by using one of the given options in this tile. Also, it will allow you to allocate a group training plan to the application.

When selecting the icon , the pop window will appear on the screen and you can select the appropriate GTP from the dropdown and select the SAVE button.

Once you select the save button, the screen will show you the pop message on top of the screen with your site name saying the below-highlighted message. Select OK to continue or Cancel.

Training Plan and Results tile

This tile will show you all the subjects and different columns related to the subjects. You can edit the results and their dates, send emails and SMS from the Actions column.

Note – You can also add new subjects, when you select the + icon, the pop window will appear.

There are two radio buttons and you can select the desired radio button and update the filters accordingly.

  • Program linked to the Application or – You can select this radio button if you want to add the subject that is linked to the program. It will show you drop down for the subject code that is linked with the program
  • From the full list of Subjects in the system – You can select this radio button if you wish to add the subject from the list of subjects in the system. This is a magic search field and you can search for the desired subject.

Please note – Other fields are very basic and self-explanatory and you can update those fields accordingly.

Reasons an enrolment is not in the AVETMISS export files

There are a few rules that will stop an enrolment from being exported in the AVETMISS export files which are listed below.

Firstly, there are two different types of AVETMISS exports in the system that are:

  1. National Export – this is to export files to submit to NCVER
  2. State Export – this allows you to select a specific State and the files will be exported to meet the state level rules for submission to that State


Reason’s that an enrolment will not be in the National Export

  1. The student is not flagged as AVETMISS. How to check this? Go to the student dashboard and select the Edit Student icon and see if the AVETMISS tick box is selected or not?

  2. Enrolment is not flagged as Include in National Export. How to check this? Open the Enrolment Dashboard and go to AVETMISS Settings and see if this is selected.

  3. Result dates for the subjects linked to the enrolment do not fall within the calendar year you selected for the export. How to check this? Open the Enrolment Dashboard > Results & Progress Tile > Training Plan and Results screen. Then look at each subject and its result date, if there are none within the calendar year you selected that is why and you may need to update the result date/s where needed. If you don’t remember or are unsure what calendar year you selected for the export, go to the main menu for Compliance > AVETMISS Export History screen. From the list, look for the last export you did and in the Filters column it will show you the calendar year you selected.

  4. Enrolment is flagged as Do not include in AVETMISS submission. How to check this? Open the Enrolment Dashboard and go to the Edit Enrolment and see if this is selected.

  5. Enrolment is not flagged as started. How to check this? Open the Enrolment Dashboard and in the Enrolment Profile tile see if the icon for Started is green or red? If it is red, then it is not started.

  6. Enrolment is flagged as cancelled. How to check this? Open the Enrolment Dashboard and in the Enrolment Profile tile see if the icon for Cancelled is grey or red? If it is red, then it is cancelled. IMPORTANT: this is the only setting that tells the system that the enrolment is cancelled. If you have an Enrolment Outcome that says cancelled, this is not considered by the system at all as cancelled.

Reason’s that an enrolment will not be in a State Export

  1. The student is not flagged as AVETMISS. How to check this? Go to the student dashboard and select the Edit Student icon and see if the AVETMISS tick box is selected or not?

  2. An incorrect state is selected on the enrolment AVETMISS screen. How to check this? Open the Enrolment Dashboard and go to AVETMISS Settings and see if there is a state selected for the State Training Authority field and is it the correct State?

  3. Result dates don’t fall under the export year parameters. How to check this? Open the Enrolment Dashboard > Results & Progress Tile > Training Plan and Results screen. Then look at each subject and its result date, if there are none within the calendar year you selected that is why and you may need to update the result date/s where needed. If you don’t remember or are unsure what calendar year you selected for the export, go to the main menu for Compliance > AVETMISS Export History screen. From the list, look for the last export you did and in the Filters column it will show you the date range you selected.

  4. Enrolment is flagged as Do not include in AVETMISS submission. How to check this? Open the Enrolment Dashboard and go to the Edit Enrolment and see if this is selected.

  5. Enrolment is not flagged as started. How to check this? Open the Enrolment Dashboard and in the Enrolment Profile tile see if the icon for Started is green or red? If it is red, then it is not started.

  6. Enrolment is flagged as cancelled. How to check this? Open the Enrolment Dashboard and in the Enrolment Profile tile see if the icon for Cancelled is grey or red? If it is red, then it is cancelled. IMPORTANT: this is the only setting that tells the system that the enrolment is cancelled. If you have an Enrolment Outcome that says cancelled, this is not considered by the system at all as cancelled.