Marketing

Main Dashboard > Marketing Menu

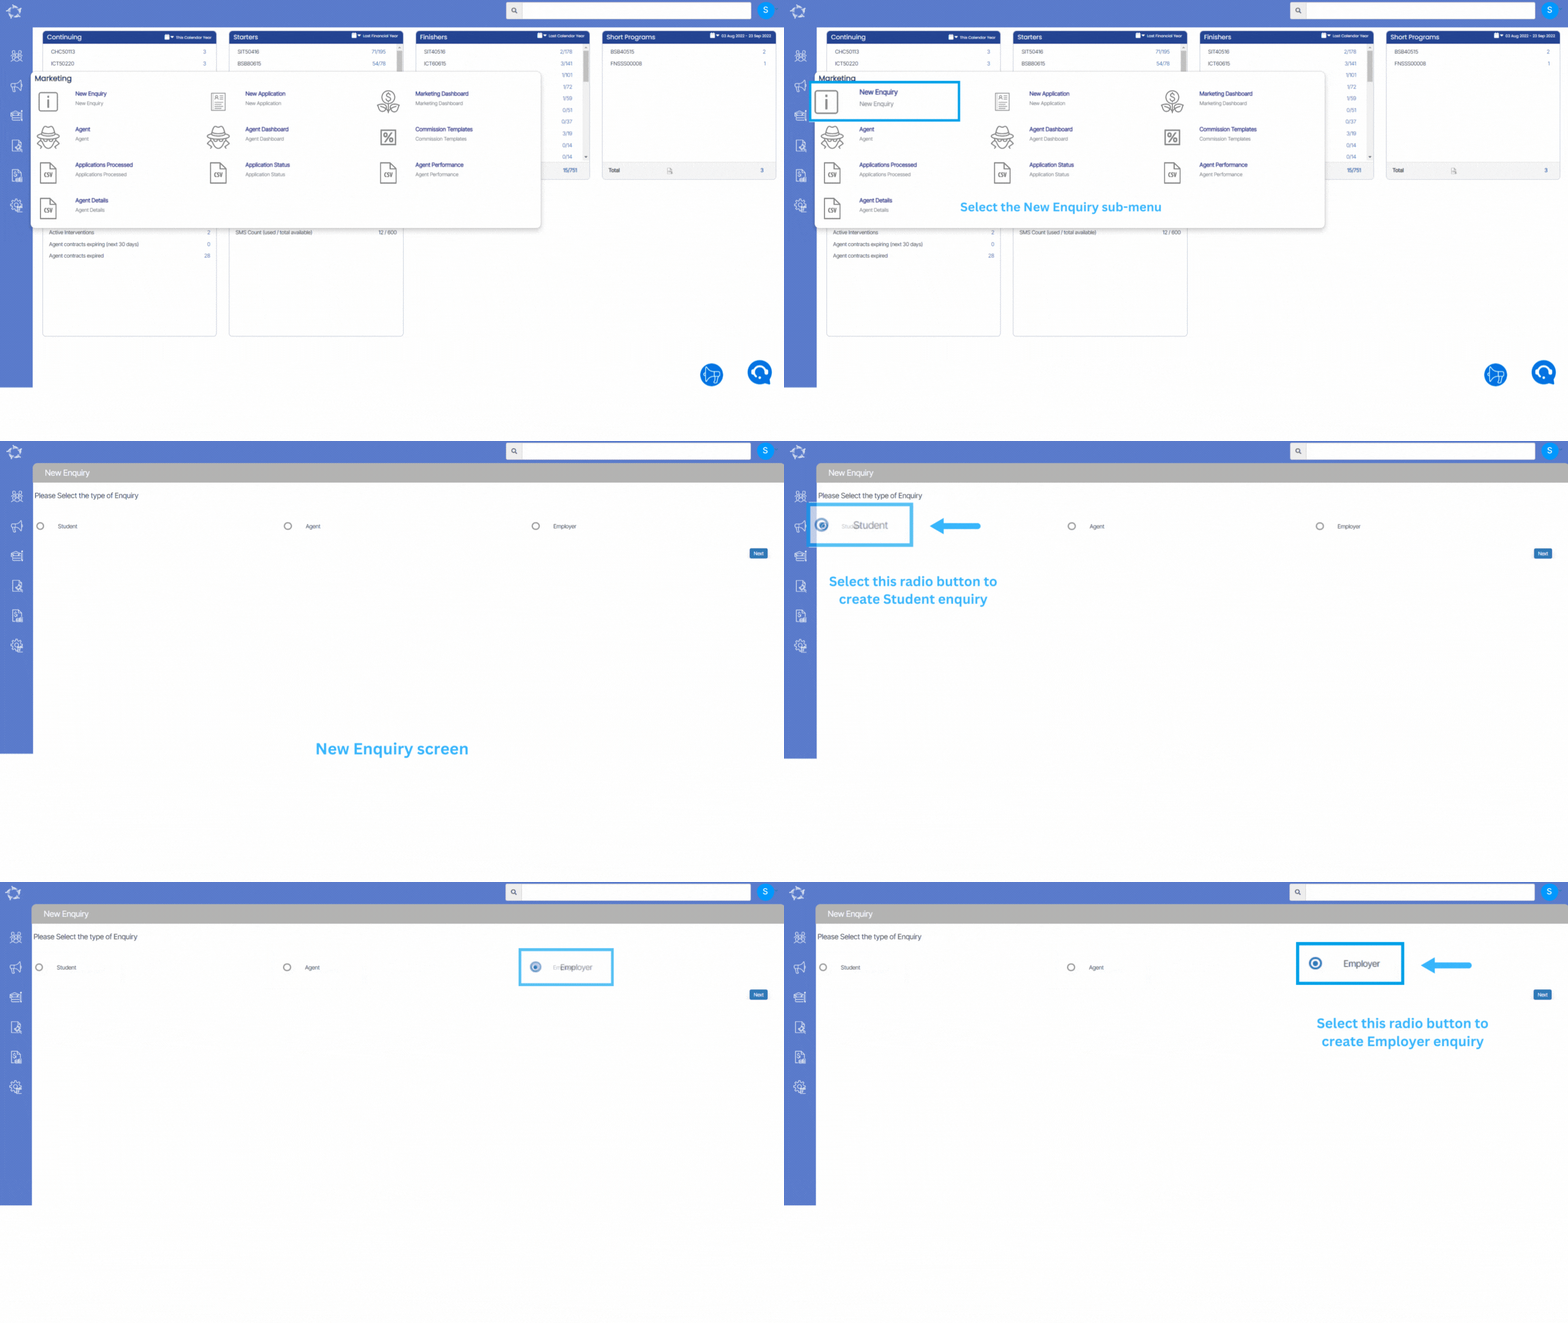
When accessing the Marketing section from the main menu, you will be presented with a selection of icons that serve as shortcuts to various screens and reports related to marketing activities. These icons enable easy navigation to different sections where you can perform tasks such as managing applications, handling inquiries, and processing agent transactions on a daily basis.

Marketing Dashboard

New Enquiry – Employer

Main Dashboard > Student Management > New Enquiry Sub-Menu > Employer Enquiry

Overview

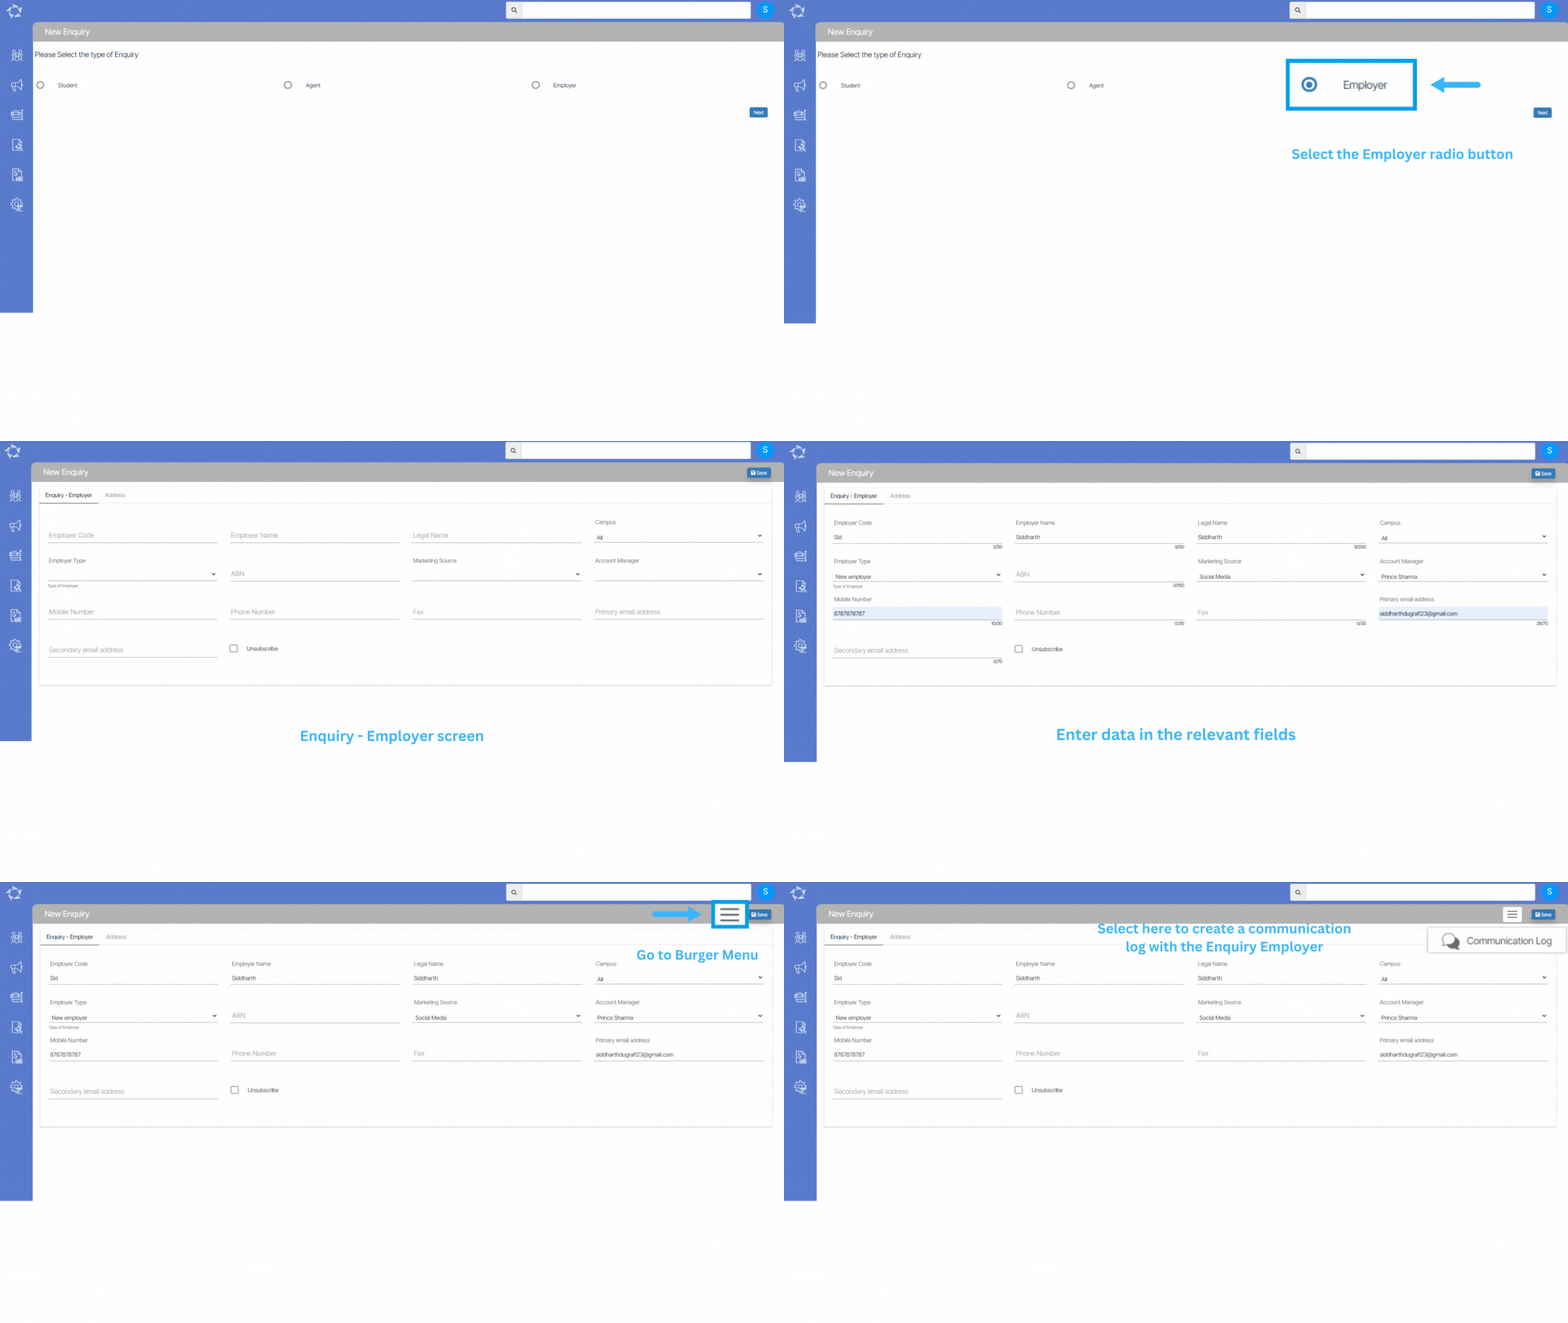
This screen allows you to enter enquiries (new leads) of the Employers, so you can track communication and the progression of discussions with them.

Follow the below steps to create an Enquiry

  • Select the New Enquiry sub-menu.
  • Select the Employer radio button and select the Next button.
  • Enter data into the relevant fields and select the Save button.

Note: On the new enquiry screen when you select the save button, the enquiry will be created and you can see the Burger Menu icon beside the Save button in the top right corner which allows you to perform some important functions for that enquiry.

You can create a Communication Log and New Application from the burger menu.

New Enquiry – Student

Main Dashboard > Student Management > New Enquiry Sub-Menu > Student Enquiry

Overview

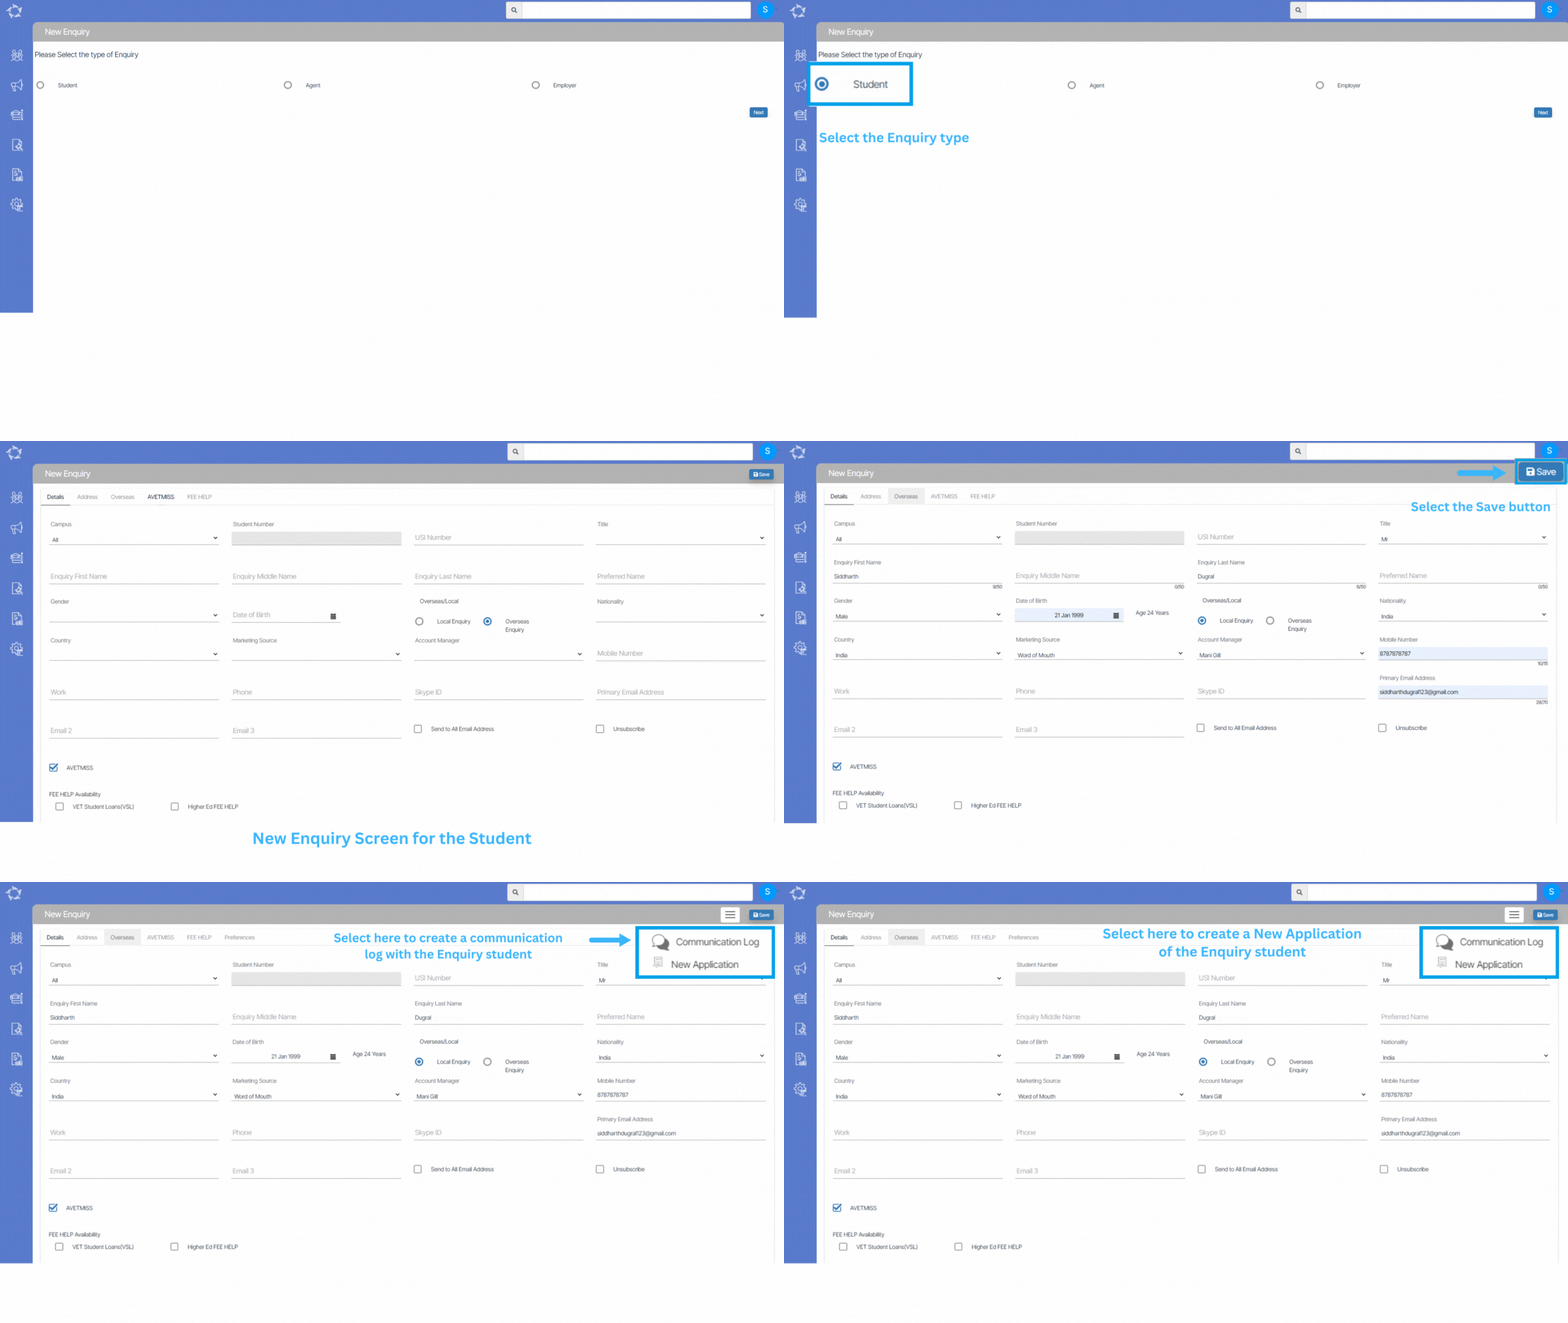
This screen allows you to enter enquiries (new leads) of the students, so you can track communication and the progression of discussions with them.

Follow the below steps to create an Enquiry

  • Select the New Enquiry sub-menu.
  • Select the Student radio button and select the Next button.
  • Enter data into the relevant fields and select the Save button.

Note: On the new enquiry screen when you select the save button, the enquiry will be created and you can see the Burger Menu icon beside the Save button in the top right corner which allows you to perform some important functions for that enquiry.

You can create a Communication Log and New Application from the burger menu.

New Enquiry – Agent

Main Dashboard > Student Management > New Enquiry Sub-Menu > Agent Enquiry

Overview

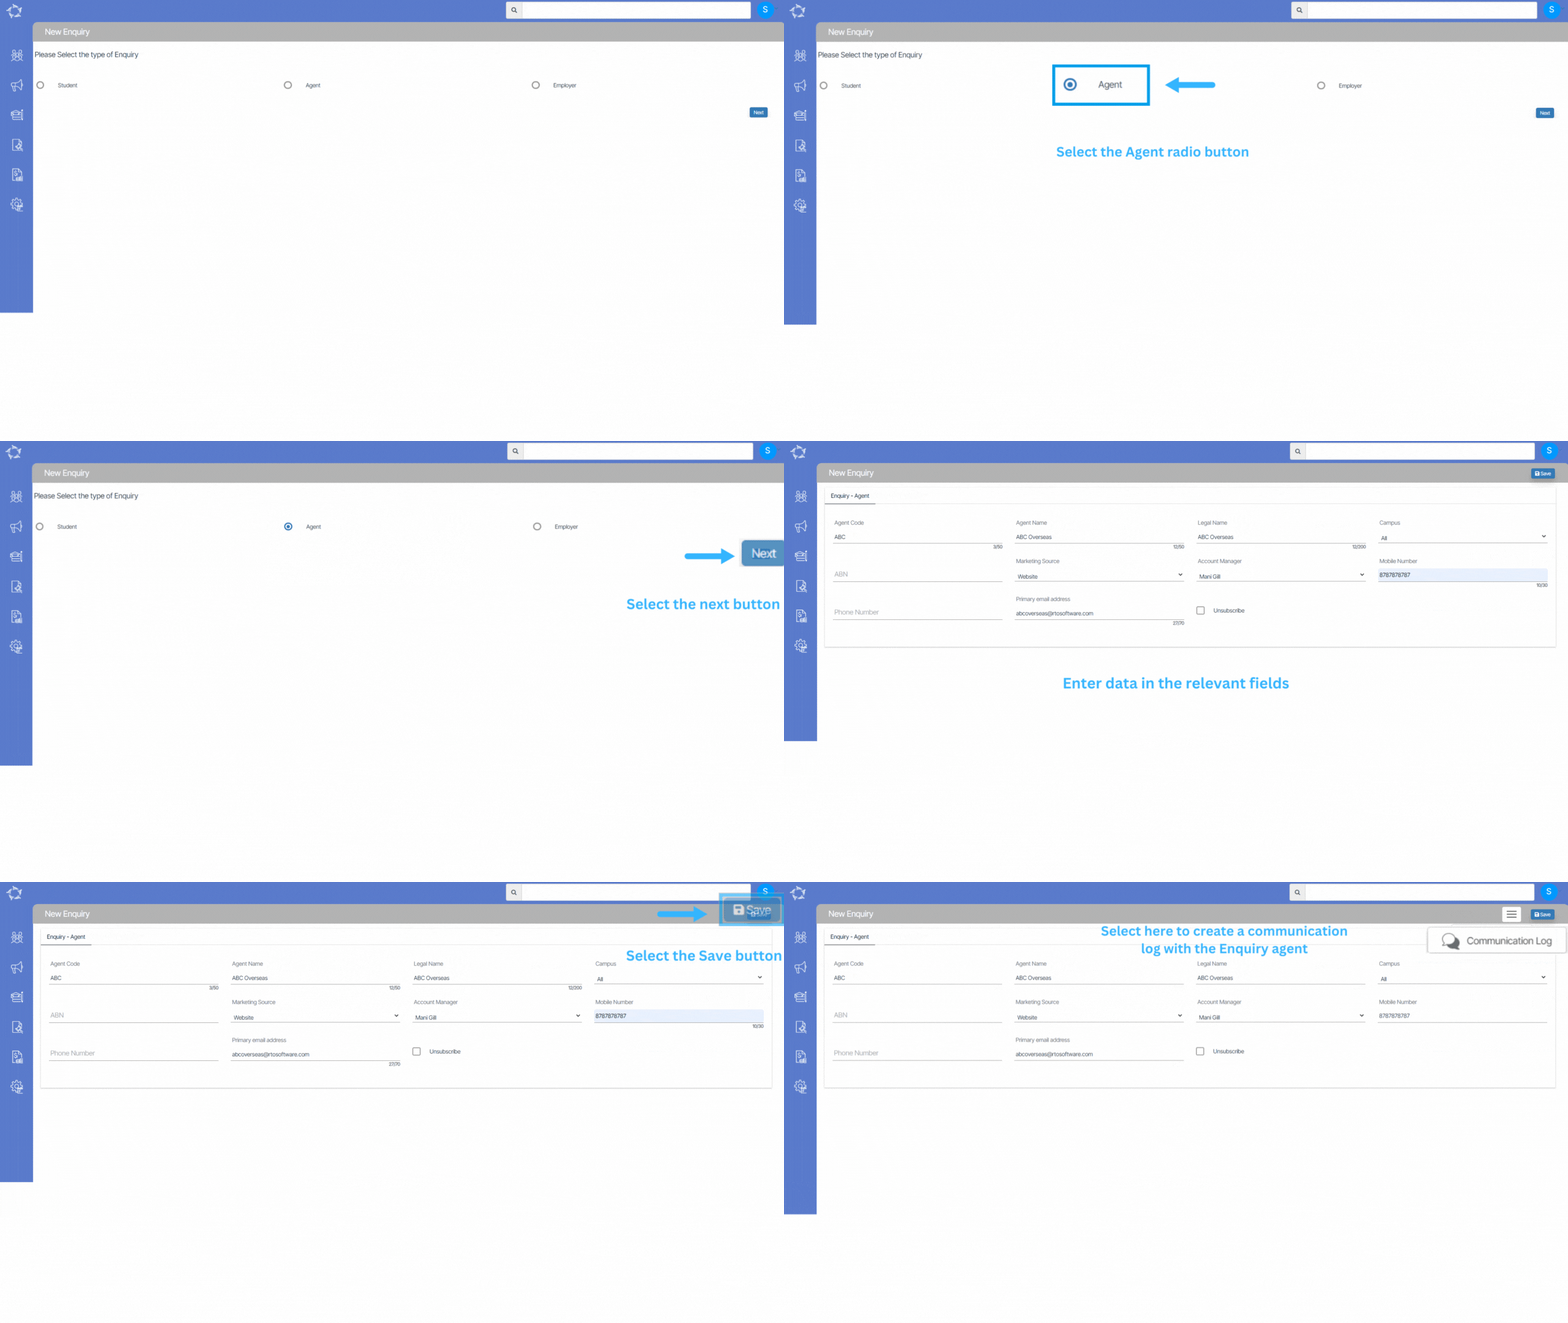
This screen allows you to enter enquiries (new leads) of the agents, so you can track communication and the progression of discussions with them.

Follow the below steps to create an Enquiry

  • Select the New Enquiry sub-menu.
  • Select the Agent radio button and select the Next button.
  • Enter data into the relevant fields and select the Save button.

Note: On the Agent enquiry screen when you select the save button, the enquiry will be created and you can see the Burger Menu icon beside the Save button in the top right corner which allows you to perform some important functions for that enquiry.

You can create a Communication Log and New Application from the burger menu.

New Enquiry

Main Dashboard > Student Management > New Enquiry Sub-Menu

Overview

This screen allows you to enter enquiries (new leads) so you can track communication and the progression of discussions with them. Based on the type of college you will determine what type of enquiry you are entering. There are three enquiry types that are –

  • Student – This option would be used by any college type.
  • Agent – This option is typically used by CRICOS colleges to track their marketing of potential new agents.
  • Employer – This option is typically used by domestic funded or fee-for-service (FFS) colleges, to track their marketing of potential new employers as a source of training their staff.

Applications Processed Report Data Columns

Below is the table that will show the columns and their explanations.

ColumnsExplanation
Student NoStudent number generated by TEAMS
Student NameStudent name entered on the edit student details screen
CampusCampus name in which the student/applicant is enrolled
Enrolment NoEnrolment number generated by TEAMS
Enrolment TypeIt will show you the enrolment type selected on the Edit Enrolment details screen
CRICOS CodeCRICOS code updated for the programs
ProgramProgram name
Start DateStart date of the Enrolment/Application.
Processed DateProcessed date of the Enrolment
StartedThis column will display as Yes if the enrolment is started and No if the enrolment is not started
FinishedThis column will display as Yes if the enrolment is finished and No if the enrolment is not started
End DateEnd date of the Enrolment/Application
Duration WeeksThe total duration of the programs linked to the enrolment in weeks
Study WeeksThe total study weeks of the Enrolment
Account ManagerThe Account Manager linked to the Student/Applicant
AgentThe Agent linked to the enrolment
NationalityThe Nationality of the student/applicant
Visa TypeVisa type of the Student/Applicant selected on the Visa Details screen
Enrolment DateEnrolment processed date
Amount OwingThe Amount Owing by the Student/Applicant.
Tuition FeeTotal Tuition Fee of the Student/Applicant
CountryThe Country of the student/applicant selected in the Edit Student
UserUser name by which the Student/Applicant has been created.
Agent AddressAddress details of the agent linked to the student/applicant.
Marketing SourceThe Marketing Source (Social Media, Word of Mouth etc)
Level of StudentThe Level of student/applicant selected in the Edit Student
Enrolment OutcomeIt will show you the enrolment outcome selected on the Edit Enrolment details screen
RegionRegion of the Student/Applicant
Skype NameSkype name of the student/applicant
EmailEmail address of the student/applicant
MobileMobile number of the student/applicant
PhonePhone number of the student/applicant
International PhoneInternational number of the student/applicant
EmployerThe Employer name linked to the Student/Applicant.
Enrolment StatusThe Enrolment Status (started, not yet started) will display under this column.

Applications Processed Report Filters

Below are the filters and their explanation for the Applications Processed Report.

General Tab FiltersExplanations
Report start dateSelect the report start date from the calendar
Report end dateSelect the report end date from the calendar
CampusSelect specific campus from the dropdown.
ProgramThis is a magic search field and you can search and select the program
Enrolments to includeThis dropdown will show you (current, to start and finished). You can select them as you required
Group ByPlease see TEAMS Basics
Sort byPlease see TEAMS Basics
Asc/DescPlease see TEAMS Basics
Advance Tab Filters
Enrolment TypeYou can select the Enrolment Type from the drop-down

Select the “Print” Icon  to generate the report. After clicking on it, the system will direct you towards the report dashboard screen. You can see the report status over there if it’s generated or not. Once it’s generated, download the report.

Application Status Report Data Columns

The below table will show you the columns and their explanation that will get printed in the report.

ColumnsExplanation
Application Creation DateCreation date of the application
Application NoApplication number generated by the system
Applicant NameApplicant name updated on the Edit applicant details screen
Date of BirthDate of birth of the Applicant
CampusCampus name under which the applicant is enrolled
ProgramProgram name under which the applicant is enrolled
Preference
NationalityNationality of the Applicant
AgentAgent name linked to the applicant
Employer NameEmployer name linked to the applicant
Start DateStart date of the program
DurationDuration (in weeks) of the program
Total FeeThe total fee of the program
UserUser name
Application TypeApplication type (CoE or Non CoE) selected in the system
Application StatusThe current Application status (Current or Converted) will display under this column
Student NoThe student number generated by the system
Marketing SourceThe marketing source of the applicant (Newspaper, agent etc)
Account ManagerThe account manager’s name selected at the Applicant level
Total Tuition FeesThe total tuition fees of the program
Total Other FeesThe total amount of other fees will display under this column
Program NameName of the program
Level of StudentThe Level of the applicant selected in the Edit Student screen
RegionRegion of the Student/Applicant
Phone NoPhone number of the applicant
Mobile NoMobile number of the applicant
Email AddressEmail Address of the applicant
International Phone NoInternational phone number of the applicant
Last ContactThe last contact log that has been made in the system
Agent Email IDEmail address of the agent
SkypeSkype ID of the applicant
Onshore/Offshore StatusOnshore or Offshore status of the applicant
Agent CommissionTotal agent commission

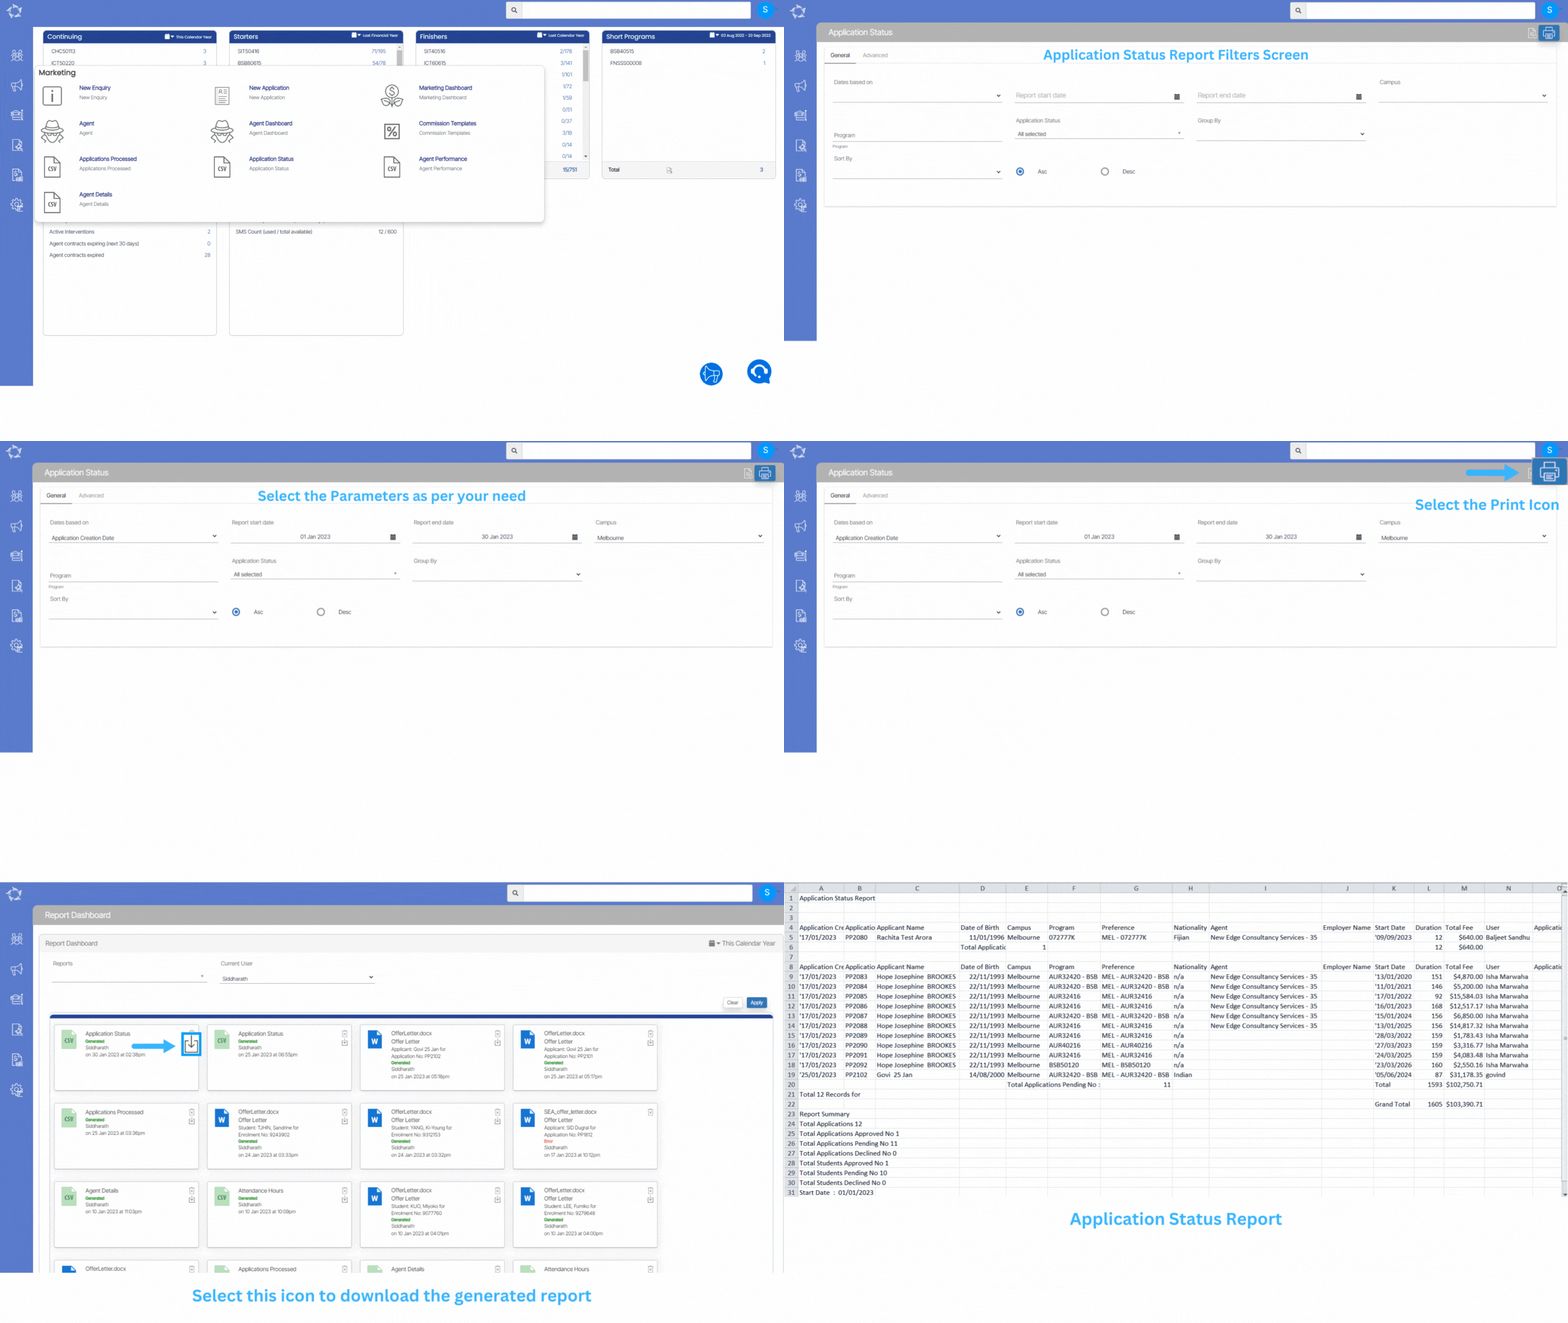
Application Status Report Filters

The Application Status Report Filters screen will show you two different tabs General and Advance. Below tables will show you filters and their explanations.

General FiltersExplanation
Dates based onThe system analyzes Applications by Application Creation Date, Application Start Date, or Converted Date.
Choosing a specific date or date range in the “Report start date” and “Report end date” fields shows the number of applications accordingly.
Report start dateSpecify dates based on the selected option in the “Dates based on” field.
For example, if “Application Creation Date” is chosen and a date range is entered, the system will retrieve applications created within that range.
Report end dateSelect the report end date from the calendar icon
CampusYou can select a specific campus from the dropdown.
ProgramThis is a magic search field and you can search and select multiple programs
Application StatusSelect the Application Status (All, Current and Converted) from the dropdown.
Group ByPlease see TEAMS Basics
Sort ByPlease see TEAMS Basics
Asc/DescPlease see TEAMS Basics
Advance FiltersExplanation
Overseas/Local Student StatusThis dropdown has two different tick boxes overseas or local students. You can select them as you required
Application TypeThe dropdown will show you application type based on what you have added in the system from User Code screen
AgentSelect the specific agent
EmployerSelect multiple Employers from this dropdown field.
Account ManagerSelect multiple Account Managers from this dropdown field.
Marketing SourceSelect multiple Marketing source options from this dropdown field.
Nationality select Nationality from the dropdown field.

Select the “Print” Icon  to generate the report. After clicking on it, the system will direct you towards the report dashboard screen. You can see the report status over there if it’s generated or not. Once it’s generated, download the report.