Application – Standard Training Plan

The Application Standard Training Plan report serves as a comprehensive document that offers students a concise yet comprehensive understanding of the training program. Its primary objective is to provide a clear outline of the program’s structure and anticipated outcomes, benefiting trainees in monitoring progress and facilitating effective training delivery. This report encompasses essential details, including the training mode, specific unit start and end dates, allocated hours, and outcome status, ensuring transparency and facilitating efficient coordination. The unit starts and end dates specifically define the duration of each module or unit within the training, enabling students to plan and manage their learning journey effectively.

Please select the desired template from the dropdown menu and select the Generate button. Once successfully generated, you can easily download the template in either PDF or DOC format from the Report Dashboard.

IMPORTANT – To receive further guidance on customising the report templates according to your requirements, we recommend referring to the instructional post titled Report Templates. This post provides step-by-step instructions on modifying the templates to match your desired format and content.
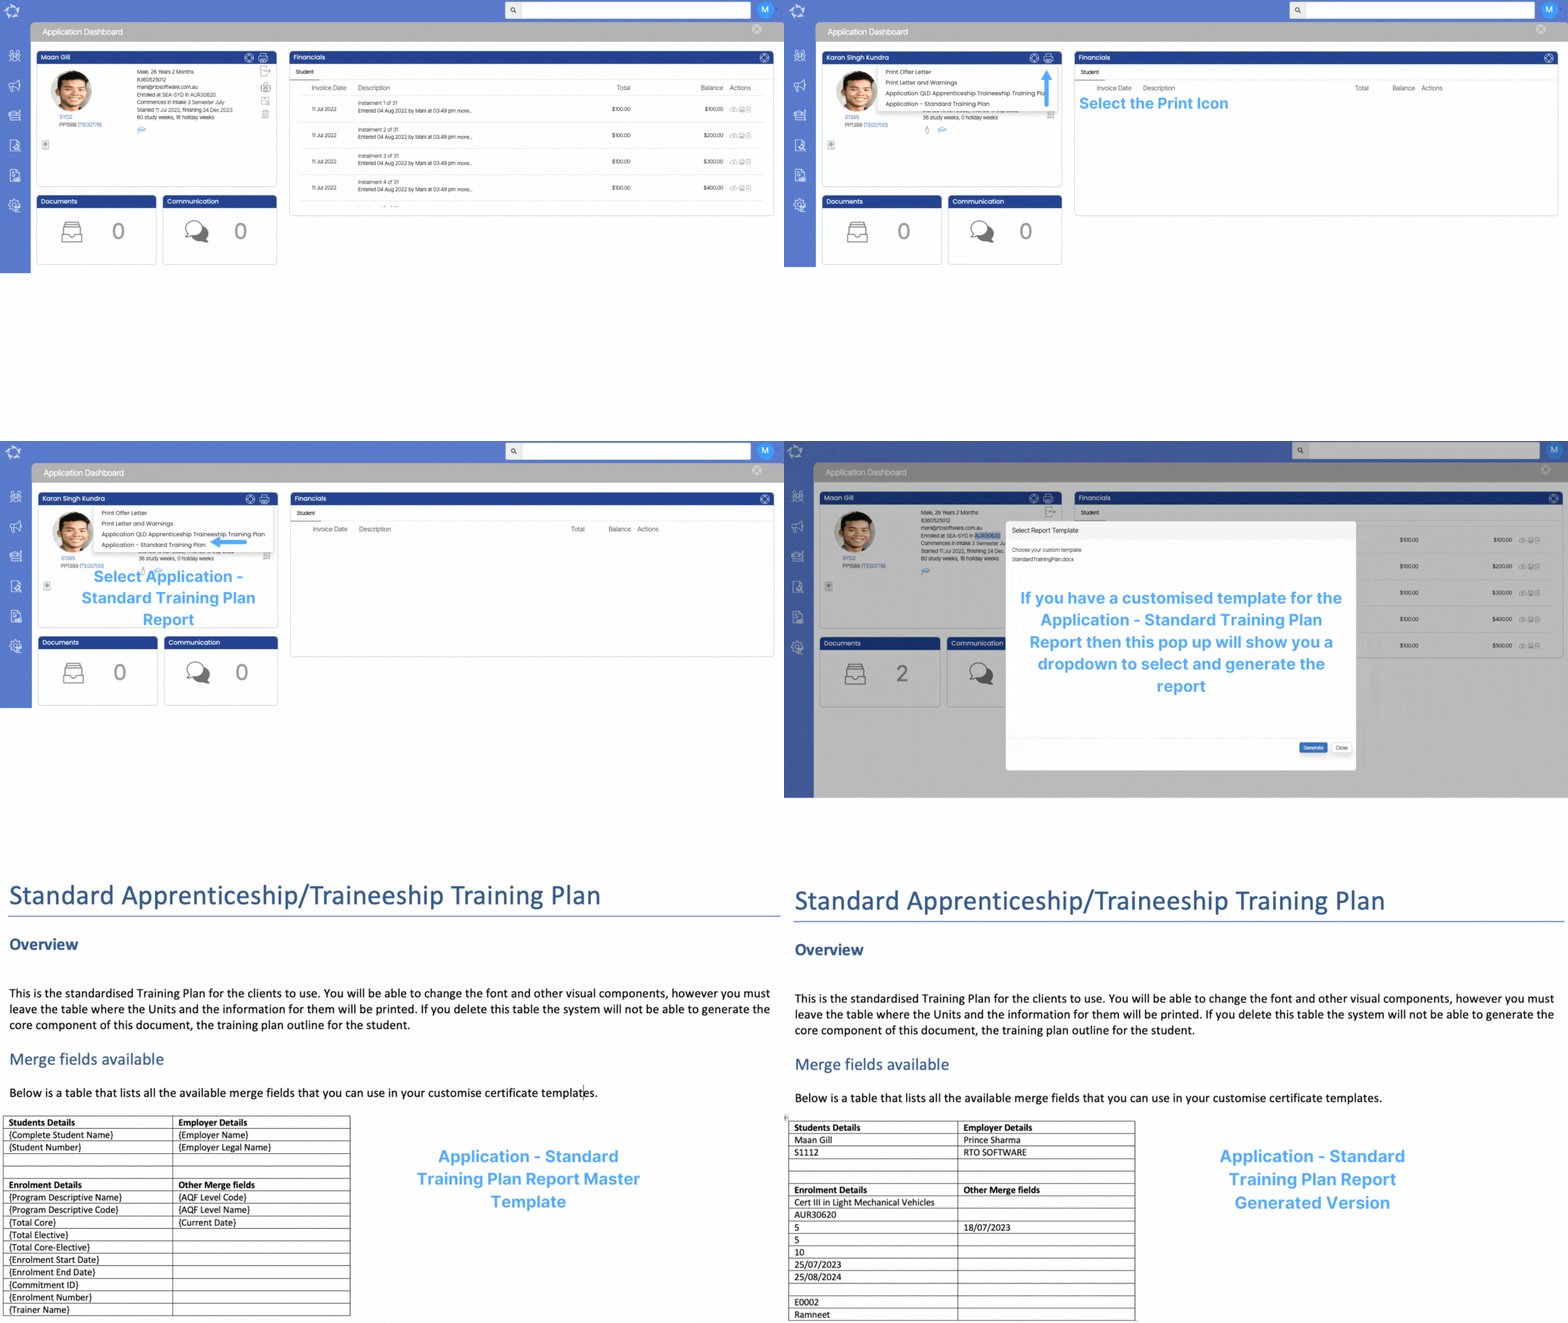
Application – QLD Apprenticeship Traineeship Training Plan Report

The Training Plan is a crucial document that outlines the training program for apprentices or trainees. It specifies the training content and who will provide it, as well as the details of when, where, and how the training will be delivered. The plan also explains the assessment process and when the apprentice/trainee will be deemed competent. Developed collaboratively by the RTO, apprentice/trainee, and employer, the Training Plan is a dynamic document that reflects the current status of the training and is regularly updated. It ensures compliance with standards, clarifies workplace tasks, and serves as a basis for reviewing and evaluating the training program.

In the Training Contract, all parties (apprentice/trainee, employer, and RTO) must fulfil their responsibilities as outlined.

Please select the desired template from the dropdown menu and select the Generate button. Once successfully generated, you can easily download the template in either PDF or DOC format from Report Dashboard.

IMPORTANT – To receive further guidance on customising the report templates according to your requirements, we recommend referring to the instructional post titled Report Templates. This post provides step-by-step instructions on modifying the templates to match your desired format and content.
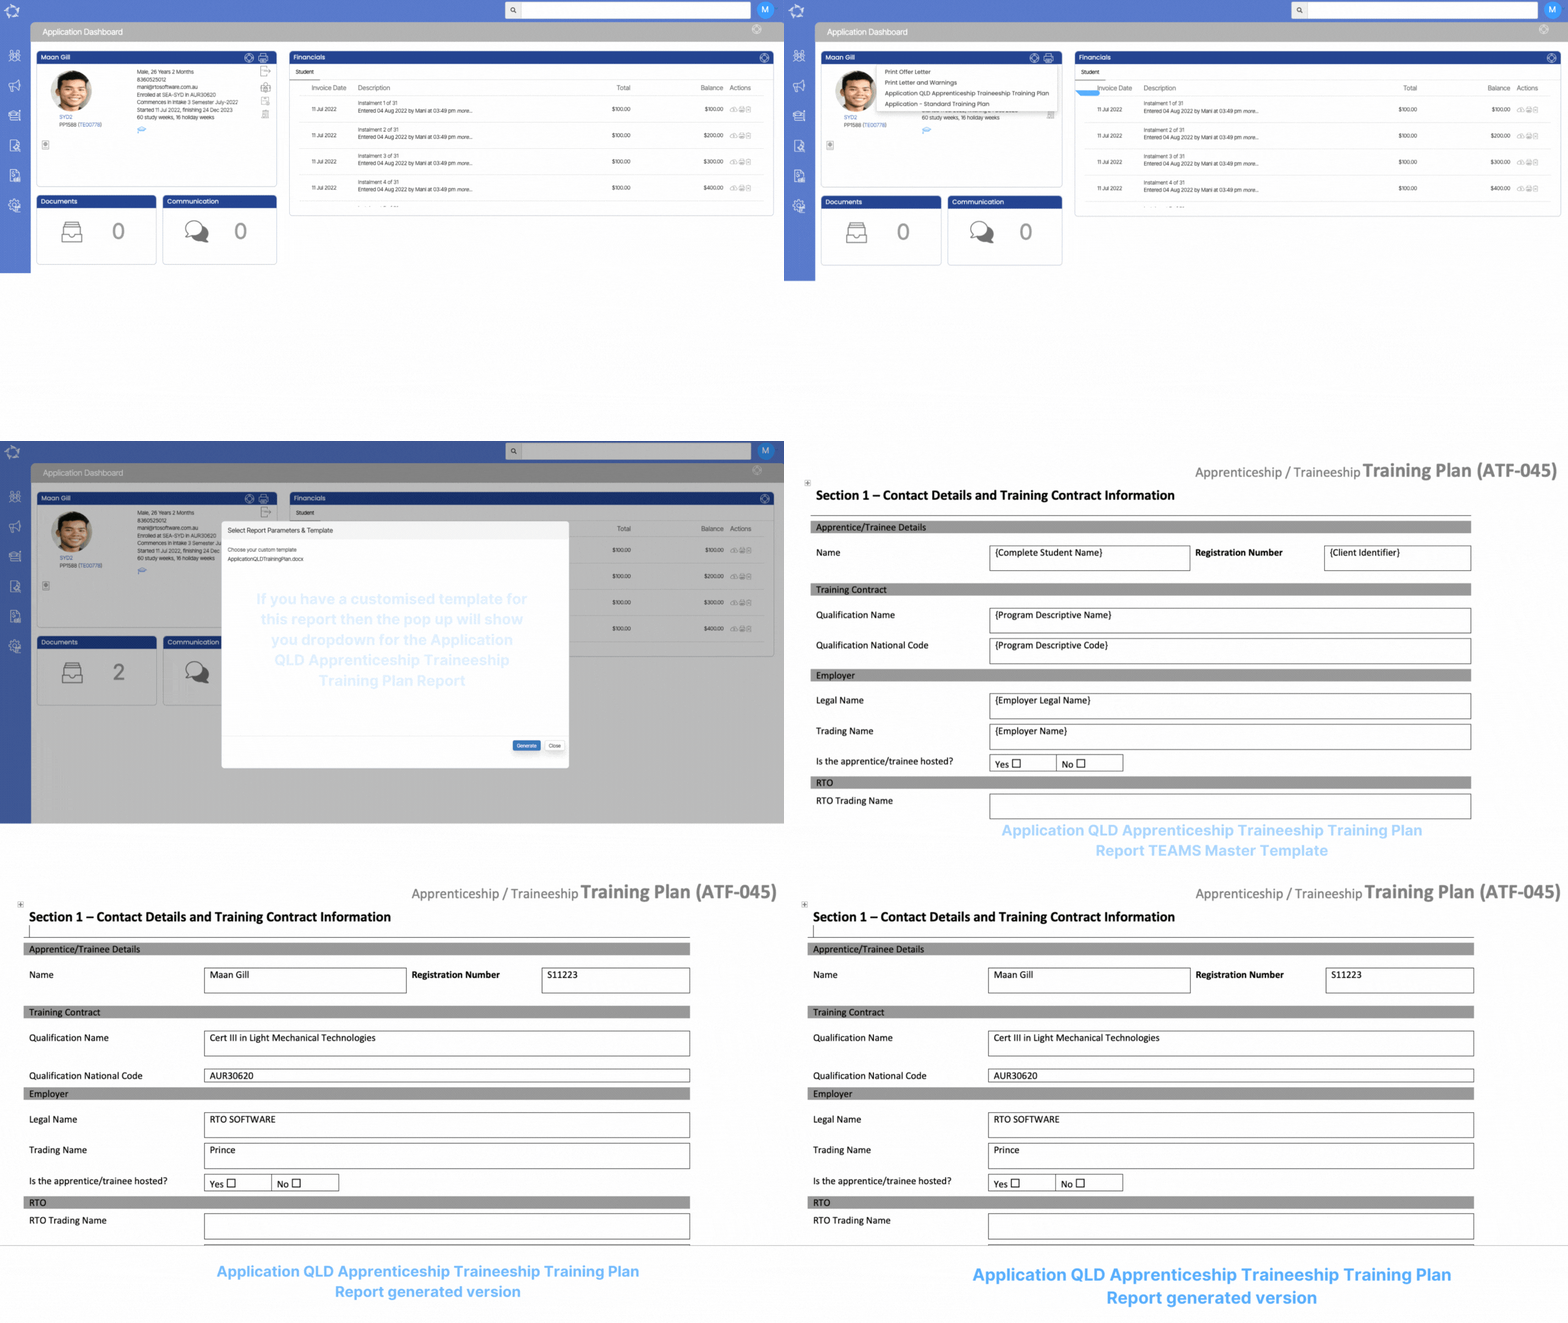
Application Letters & Warnings

Application letter and warnings play a crucial role in formal communication as they are used to convey a person’s acceptance and enrolment into a program, course, or organisation. They provide important information such as program details, start dates, duration, and any specific conditions or requirements the individual needs to full fill.

You can select the template from the dropdown menu and select the Generate button. After a successful generation, you can easily download the report in either PDF or DOC format from the Report Dashboard.

IMPORTANT – It is important to note that this template can be utilised for generating letters and warnings at both the application and enrolment levels. To receive further guidance on customising the report templates according to your requirements, we recommend referring to the instructional post titled Report Templates. This post provides step-by-step instructions on modifying the templates to match your desired format and content.
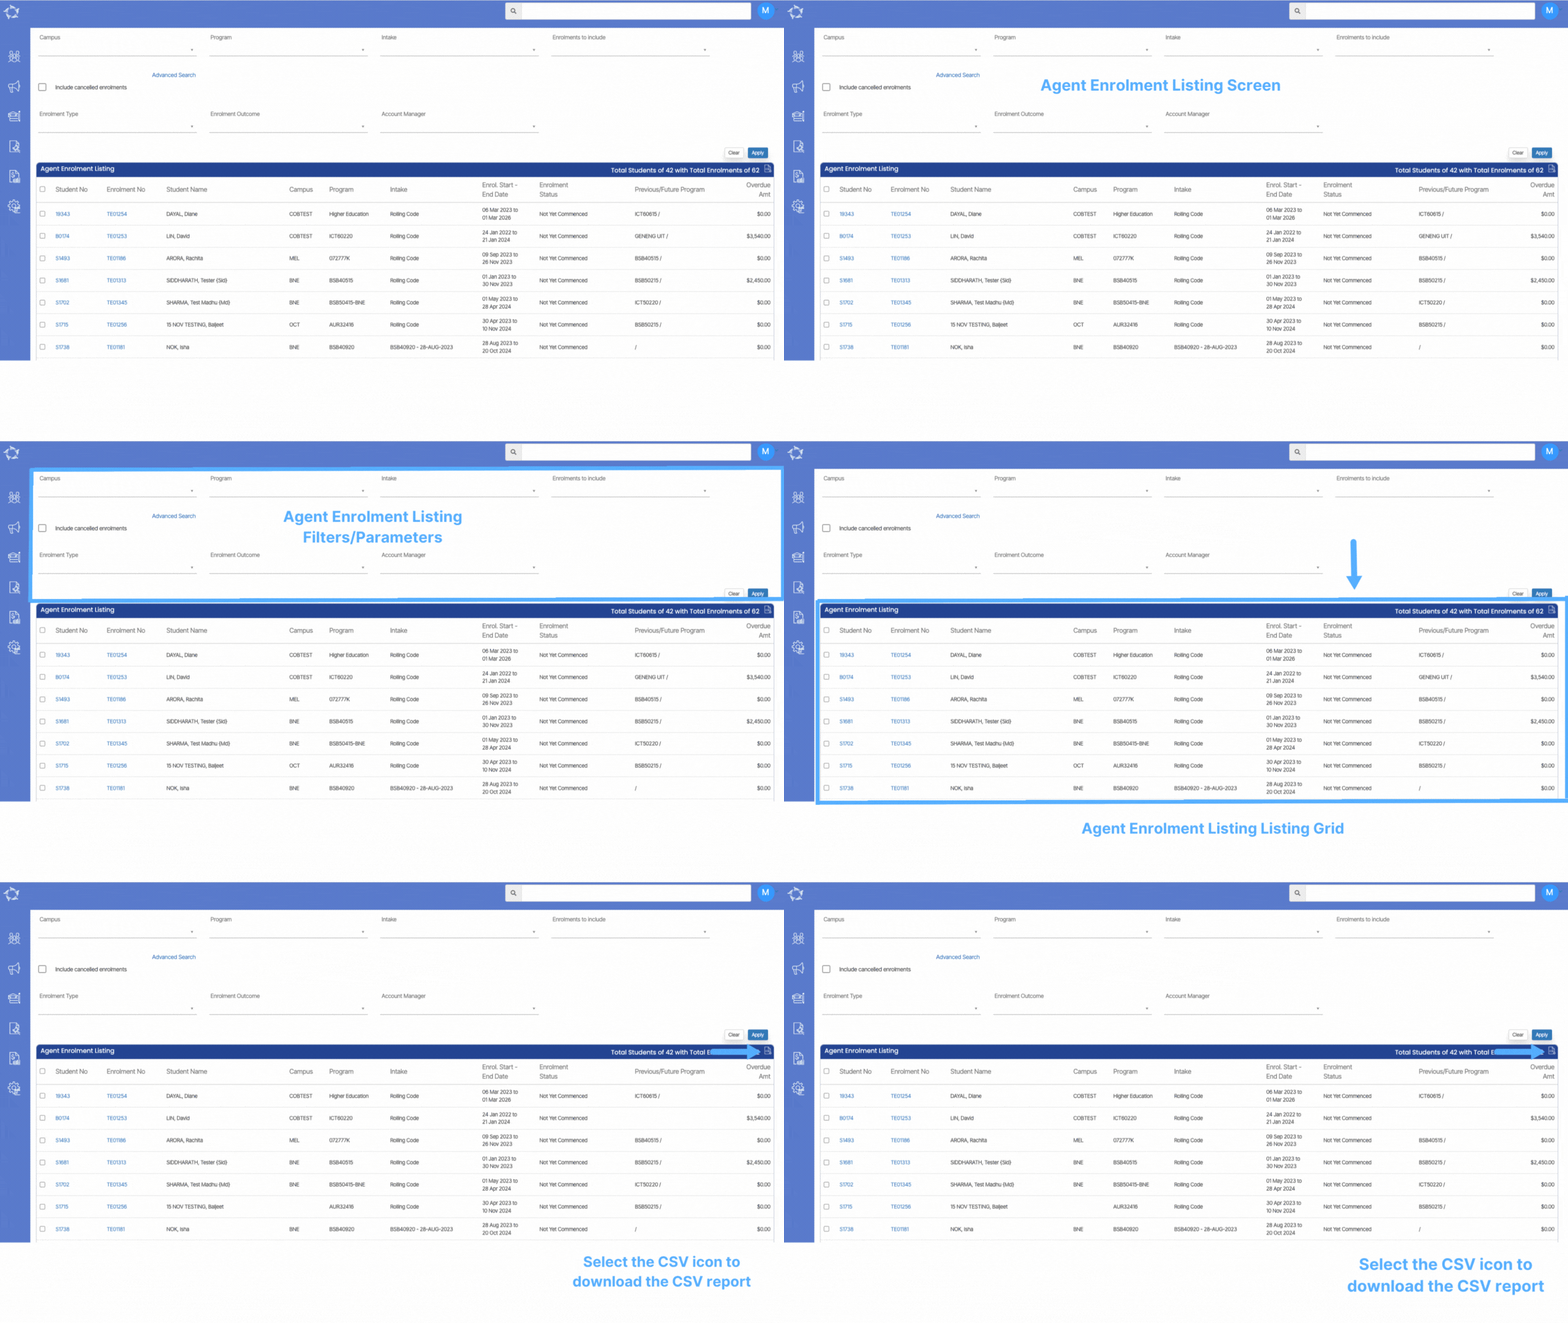
Agent Enrolment Listing Screen

This screen can be accessed from the Agent Dashboard in TEAMS and provides a comprehensive list of both enrolments that are linked to the specific selected Agent. The displayed enrolments are filtered based on the selected parameters of a particular Agent. This screen serves as a centralised hub to track and manage enrolment’s overdue amount. It will also show you Current, Start and Finished enrolments based on the filters selected.

As you can see below, this screen is divided into two sections:

  1. Filters/Parameters
  2. Listing Grid

Filters/Parameters

To open this screen, you would have selected the Enrolments from the Enrolments Tile on the Agent Dashboard. Based on what you selected the system will open the screen and populate the information in this section.

For an explanation of each filter and how the system will use it, please click here for more information.

Listing Grid

The system will show you a summary of information for each enrolment linked to the agent. The information that displays in the columns for this grid is generally standard information. However, please keep an eye out for any What’s New posts for this screen as this is where we would let you know of any new columns or changes to existing ones that we do.

Icons – Click here to learn more about how to use these icons

Burger Menu – Click here to learn more about how to use the burger menu

Applications Listing Screen

history of changes

This screen can be accessed from different locations such as the Agent Dashboard and Marketing Dashboard in TEAMS and provides a comprehensive list of both pending and converted applications. The displayed applications are filtered based on the selected date range and are specific to a particular Agent and Program. This screen serves as a centralised hub to track and manage the progress of applications, offering a convenient overview of the status of each application within the specified criteria.

As you can see below, this screen is divided into two sections:

  1. Filters/Parameters
  2. Listing Grid

Filters/Parameters

To open this screen, you would have selected the link for Applications+ from the Marketing Dashboard or the Applications Tile on the Agent Dashboard. Based on what you selected the system will open the screen and populate the information in this section.

For an explanation of each filter and how the system will use it, please click here for more information.

Listing Grid

The system will show you a summary of information for each pending and converted application. The information that is displayed in the columns for this grid is generally standard. However, please keep an eye out for any What’s New posts for this screen as this is where we would let you know of any new columns or changes to existing ones that we do.

Note – There is a Page Limit dropdown after the filter’s sections which will allow you to specify the number of students you want to view on a single page.

Icons – Click here to learn more about how to use these icons

Burger Menu – Click here to learn more about how to use the burger menu

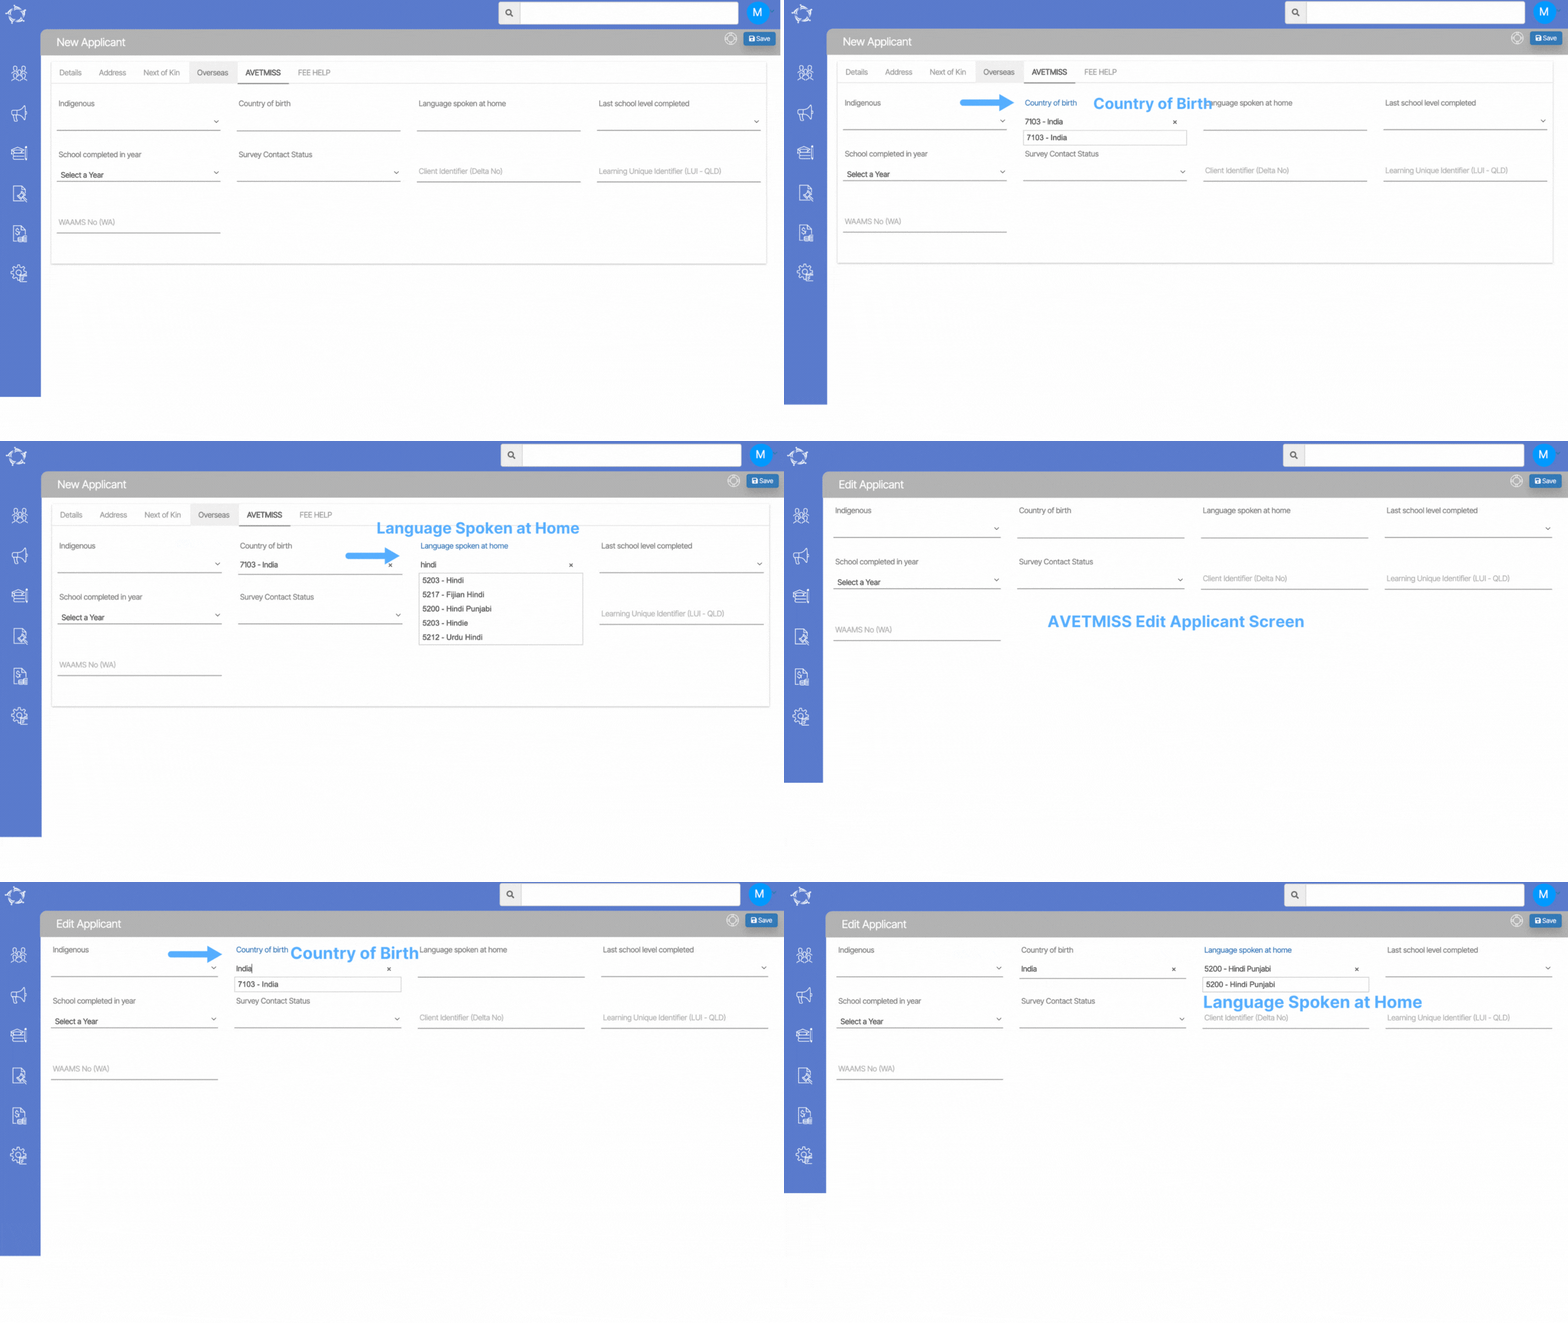
New Applicant – AVETMISS Field Related Changes

In the past, when accessing the AVETMISS tab on the New Applicant/Edit Applicant screen, you would be presented with an extensive list of options for Country of Birth and Language Spoken at Home. We have since made significant improvements in these fields, which are now equipped with a convenient magic search feature that enhances your experience.

Instead of scrolling through a long list of options, you can simply begin typing the name of the desired country or language and the system will give you relevant suggestions that match your input. This streamlined approach makes it quicker and easier to accurately select the appropriate Country of Birth and Language Spoken at Home for each applicant.

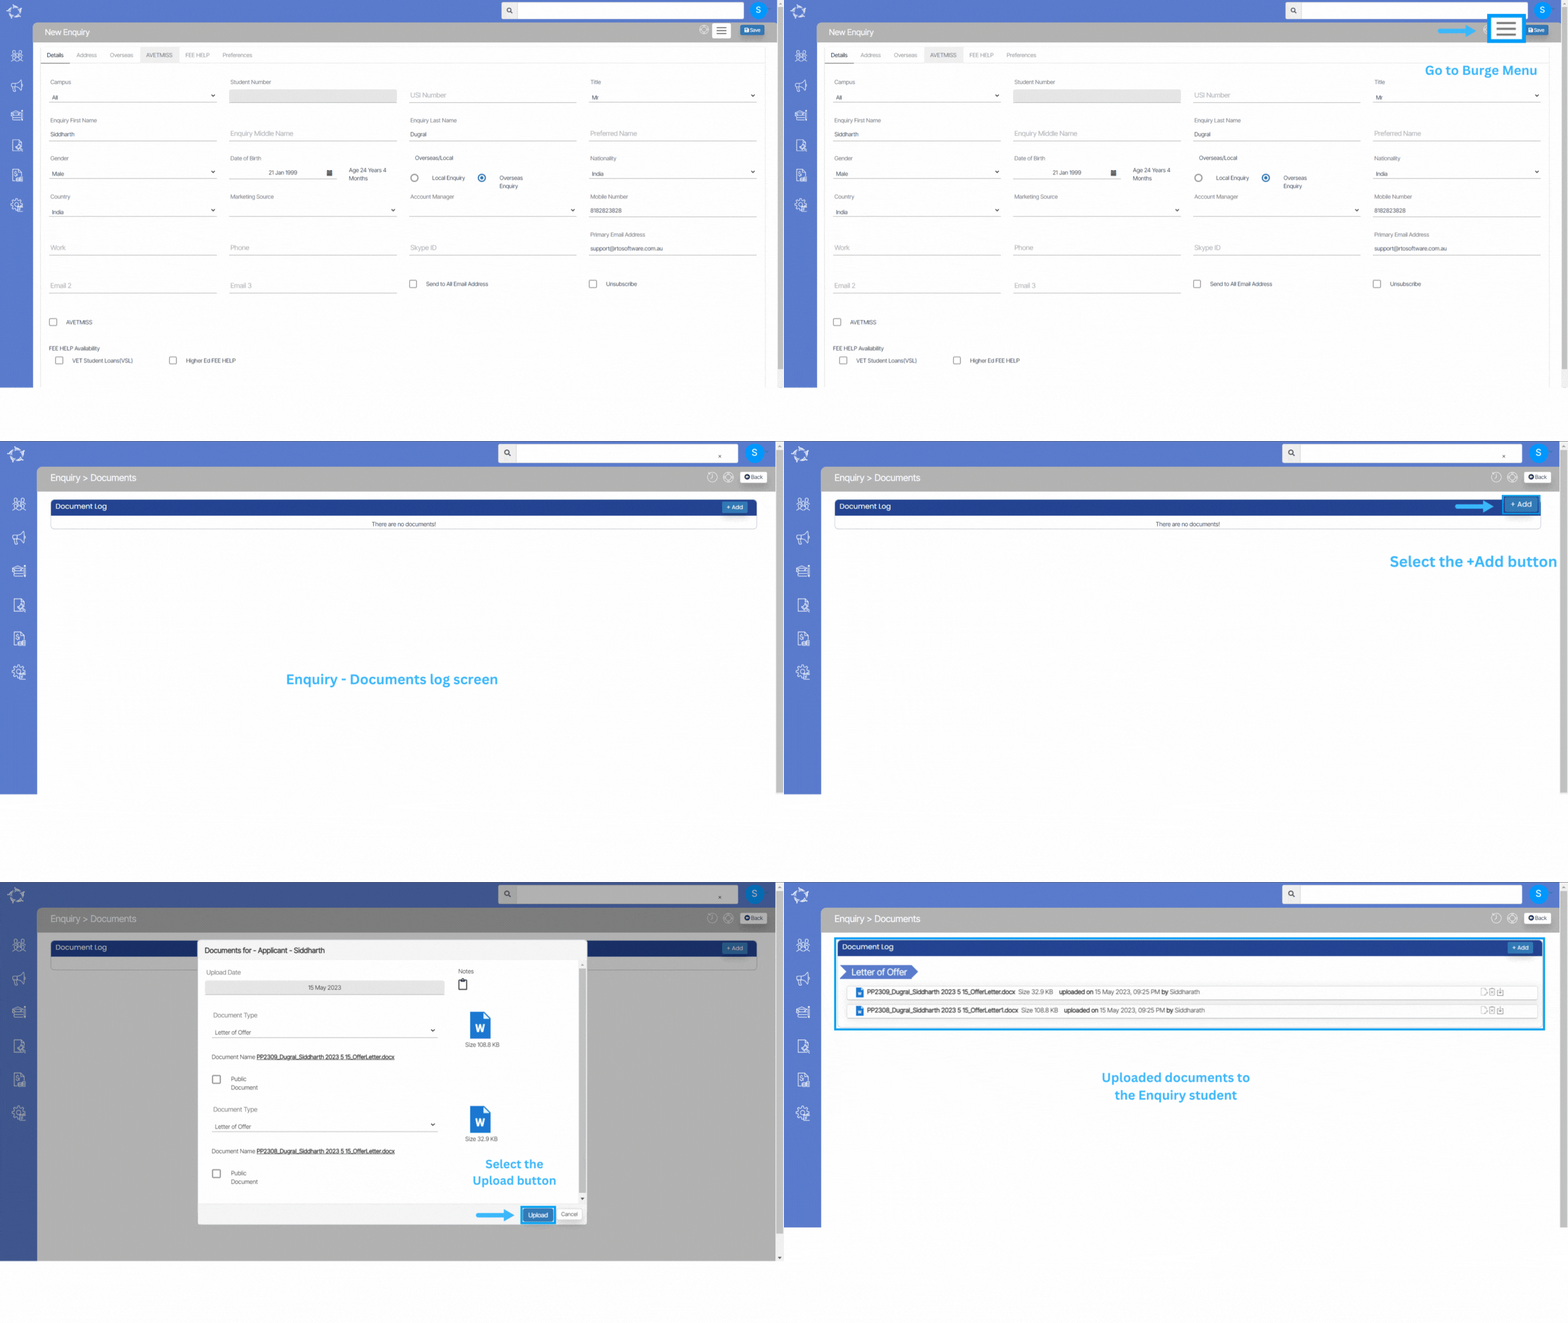
Enquiry – New Document Log screen

We have introduced a new Document Log screen under the Burger Menu of the Prospect Entry screen for students who are still at the enquiry level. This screen aims to assist you in efficiently uploading student documents for those in the enquiry stage.

To upload documents for students at the enquiry level, simply select the +Add button from the Enquiry Document Log screen. By selecting the +Add button, you can easily upload the required documents from your system for each enquiry student

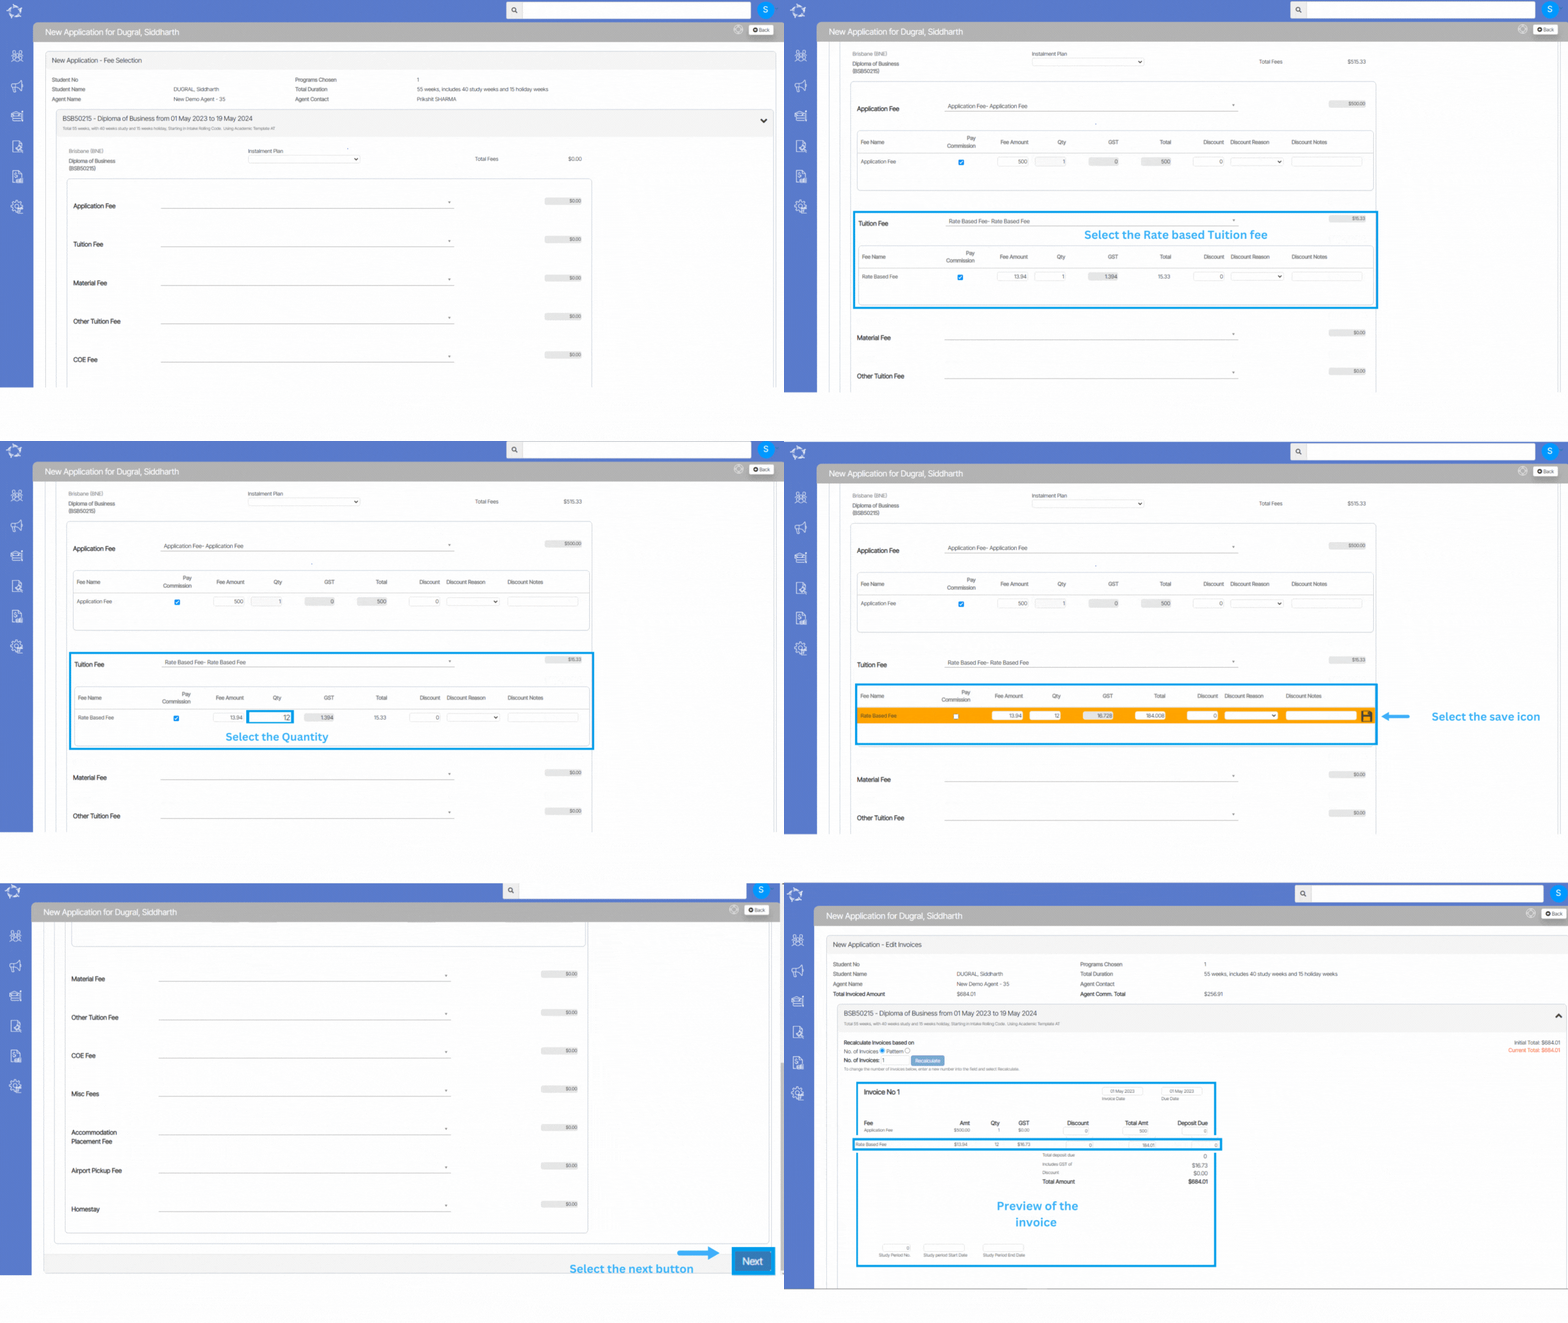
New Application – Edit Invoices/Preview Screen – New Column

A new column called Amount (Amt) has been added to the Application Edit Invoice Screen. This column is specifically for the Rate Based Tuition fee. When selecting the rate based tuition fee and inputting the quantity on the New Application Fee Selection Screen, selecting next button will show you the Amount column, Quantity column. With this new feature, you can easily view the amount you will be charging based on the quantity you have selected for the rate based tuition fee.

For Example – if the rate based tuition fee is $13.94 and a quantity of 12 is selected in the quantity column, the system will calculate the total amount as $184.01 (13.94 x 12 with inclusive of GST amount 16.73) and display it on the New Application Invoice Preview Screen.

An Agent pre-deducts 100% of what student paid them, what do I do?

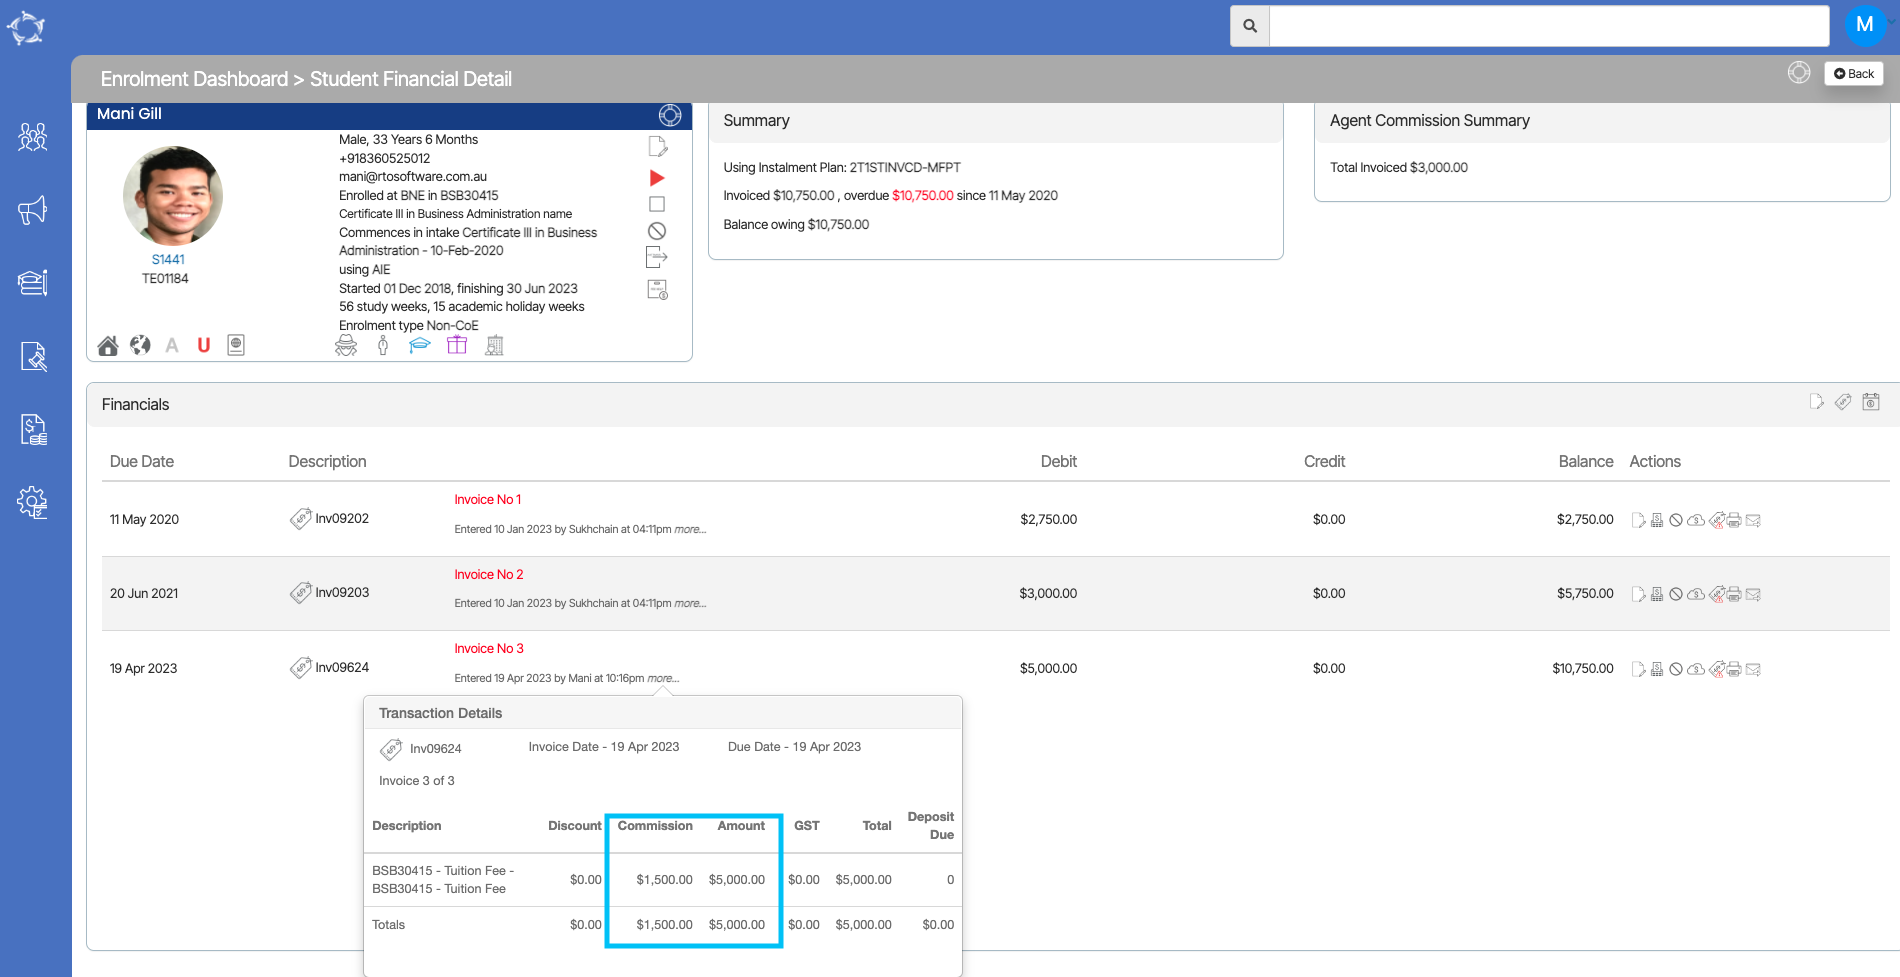
Here’s the scenario that we’re going to answer for you. A student has an invoice worth $5,000 in tuition and the commission on that is $1200. The student gives the agent, the $1200 to pay towards their invoice. But the agent keeps that money that’s full $1200. To pay for their commission amount.

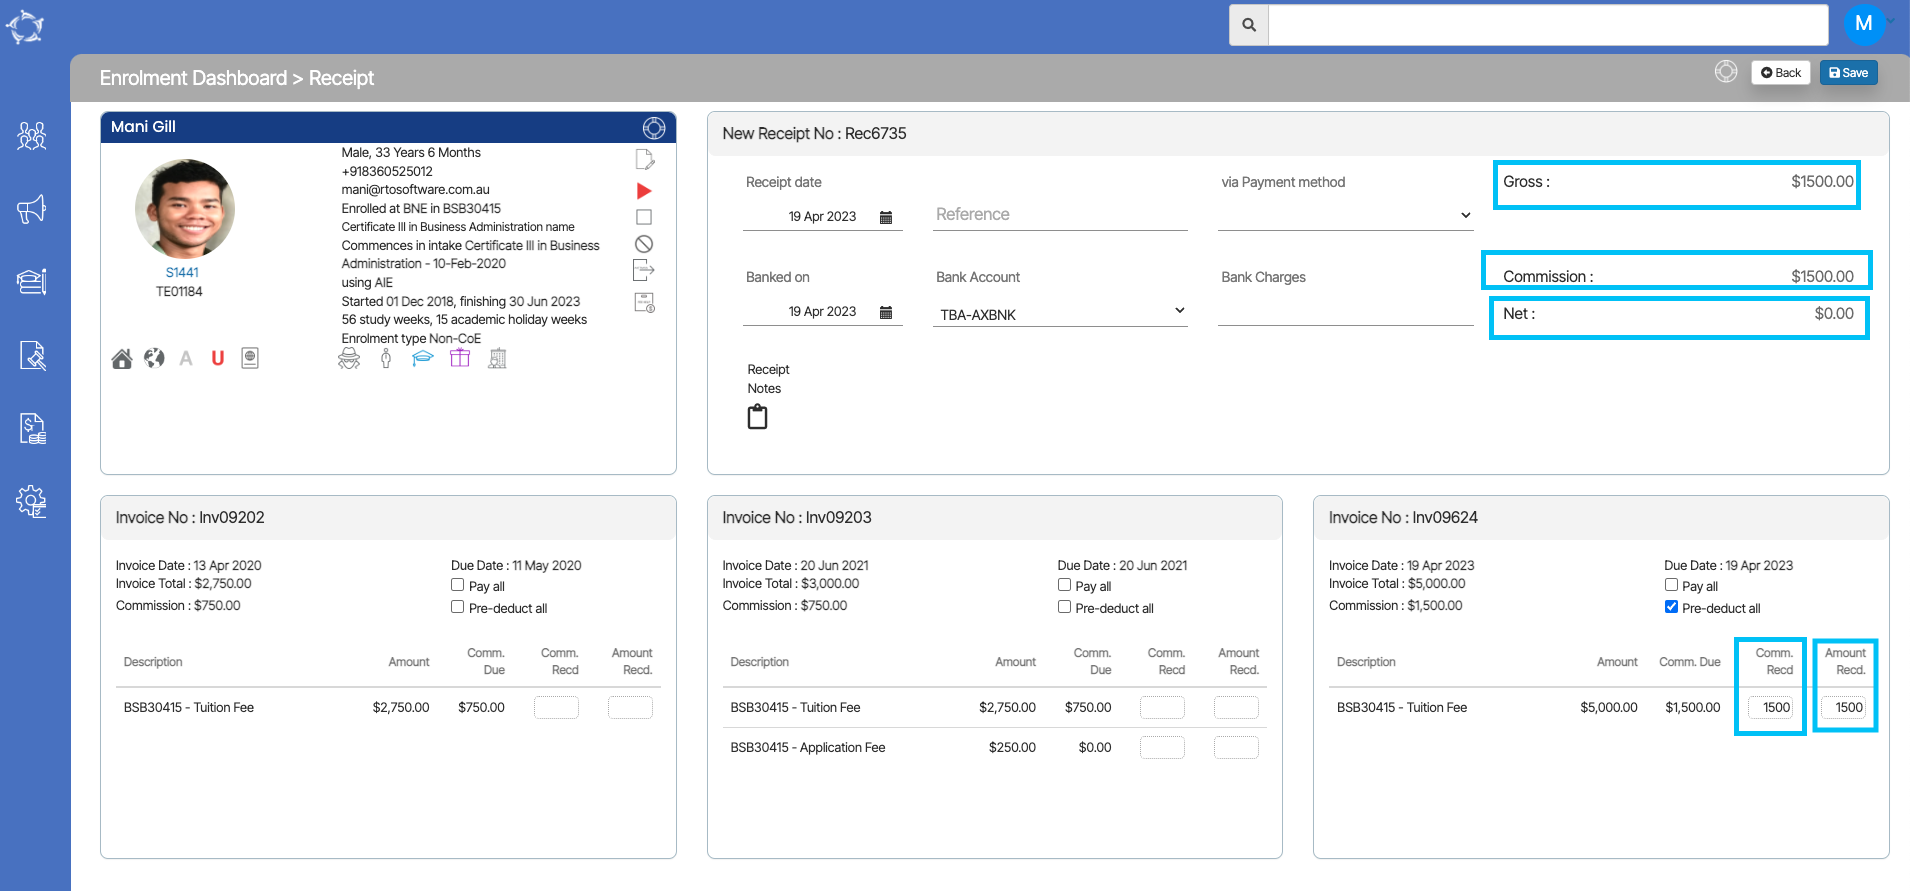
Remember – The student is paying the agent the $1500 to pay to the college. The system knows the gross amount that the student paid $1500 and it knows by the Net amount is $0.00 that the agent kept that money. So it is important for you to d the transaction in TEAMS as shown below.

This is how you would do that. The receipt for the student in teams.

Look for the Invoice and update the commission Received and the Amount Received and the system will tick the pre-deduct tick box for that commission. In the above tile for the receipt, the system will show the gross amount as $1500, the Commission amount as $1500 and the Net amount as $0.00 that college will receive as you can see below in the screenshot.

Why can’t I see any GST amount for an Agent Invoice?

If the system has not calculated a GST amount for the agent invoice, it is most likely because the Charge GST option was not set for an Agent. There could also be the scenario where the agent did have a charge GST set and the system did calculate the GST in many of their commission invoices, however, a user has gone and edited the agent and unselected this setting. When you do this, any new commission invoices the system generates, will not have the GST calculated.

IMPORTANT – it is important to understand that at the time you do a transaction in TEAMS, the system uses the settings for that transaction as they are. If you then change the settings afterwards, the system will NOT retrospectively go backwards and update data. For example, you have an Agent that was not set with Apply GST and you raise the invoices for an agent. You then realise this mistake and go and update the Agent with Charge GST turned on. The system will not go backwards and update all the agent invoices with the fee in it where the GST wasn’t calculated, it will only use the new setting for the new invoices you raise.

If you have this scenario where you want to fix agent commission invoices to show the GST and currently isn’t then there are two sections to fix this problem.

Those sections are as follows:

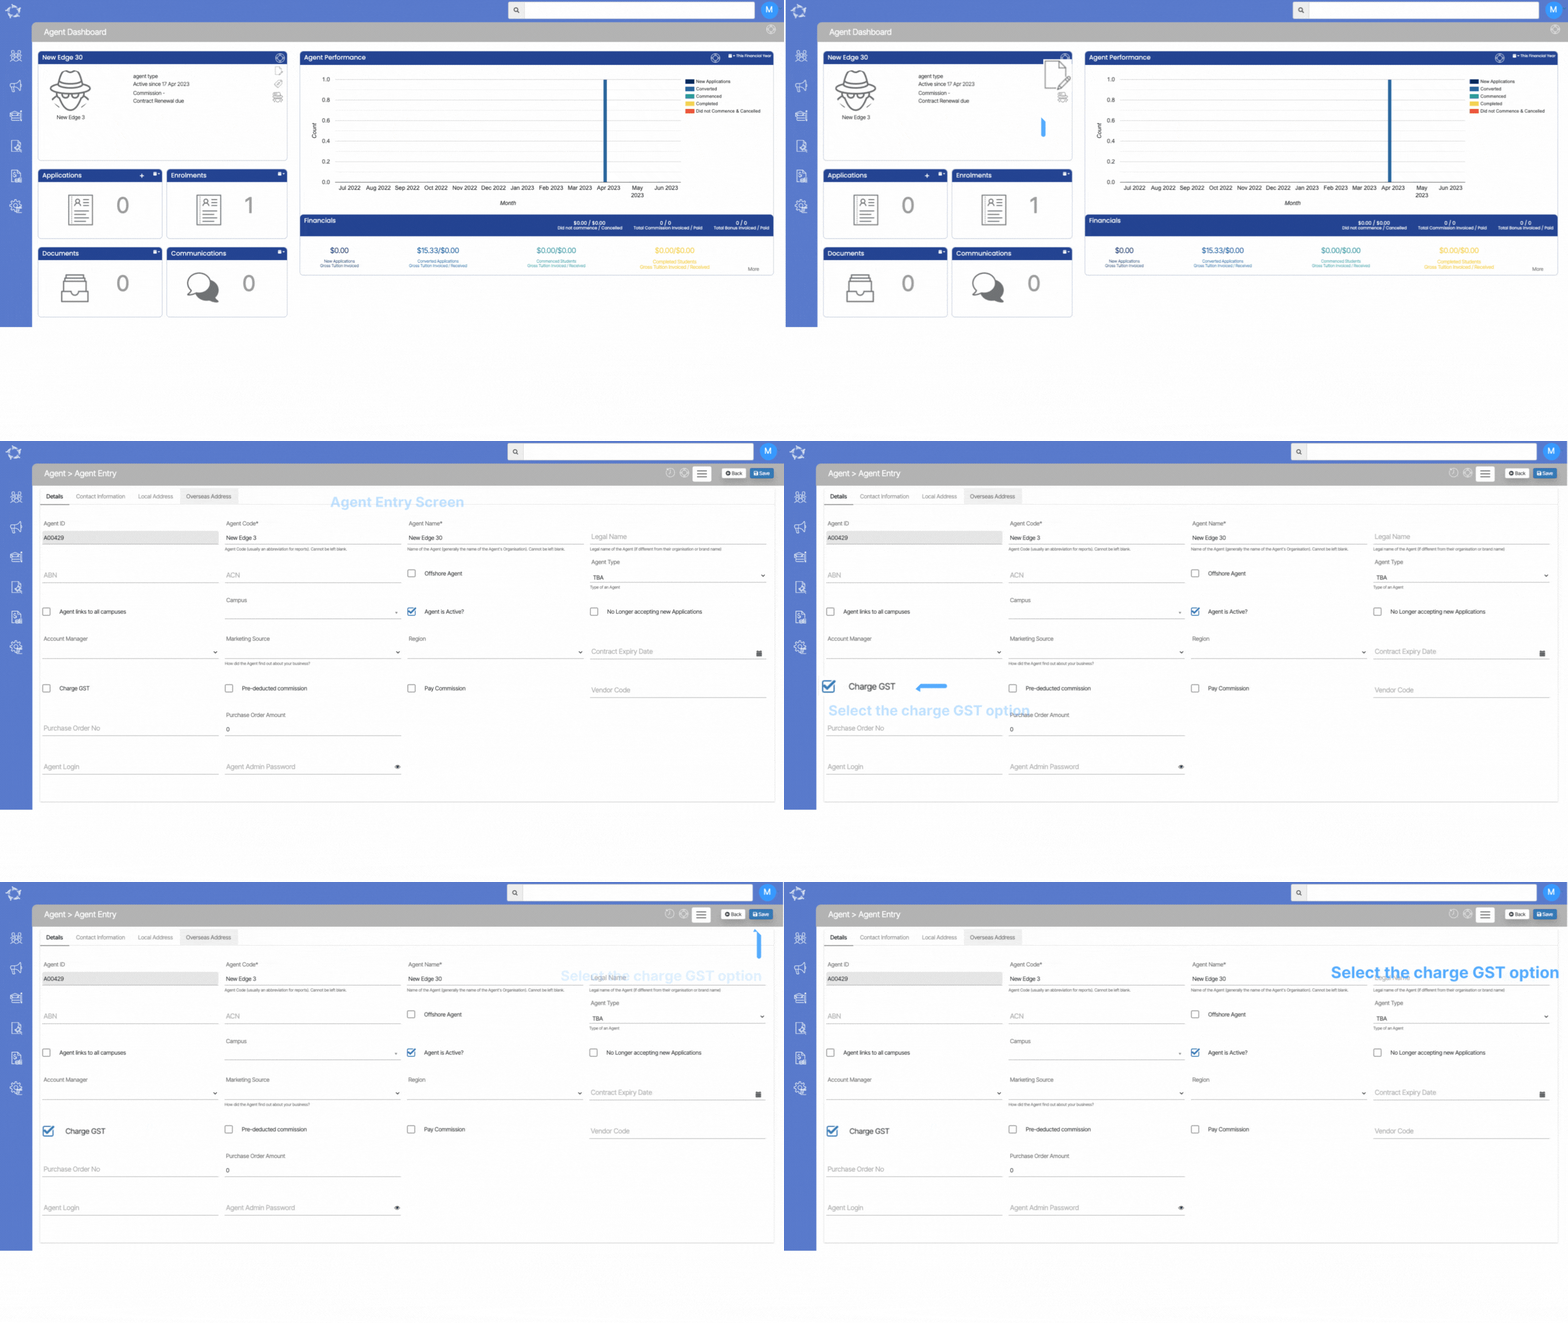
Section 1 – Edit the Agent settings

  • Go to Main Dashboard > Marketing Menu > Agent Dashboard Icon
  • When you are on the Agent Dashboard screen, Select the edit icon from the agent profile tile.
  • The system will take you to the Agent Entry Screen.
  • Select the Charge GST tick box and save the screen.

Section 2 – Edit the Agent Commission Invoice/s

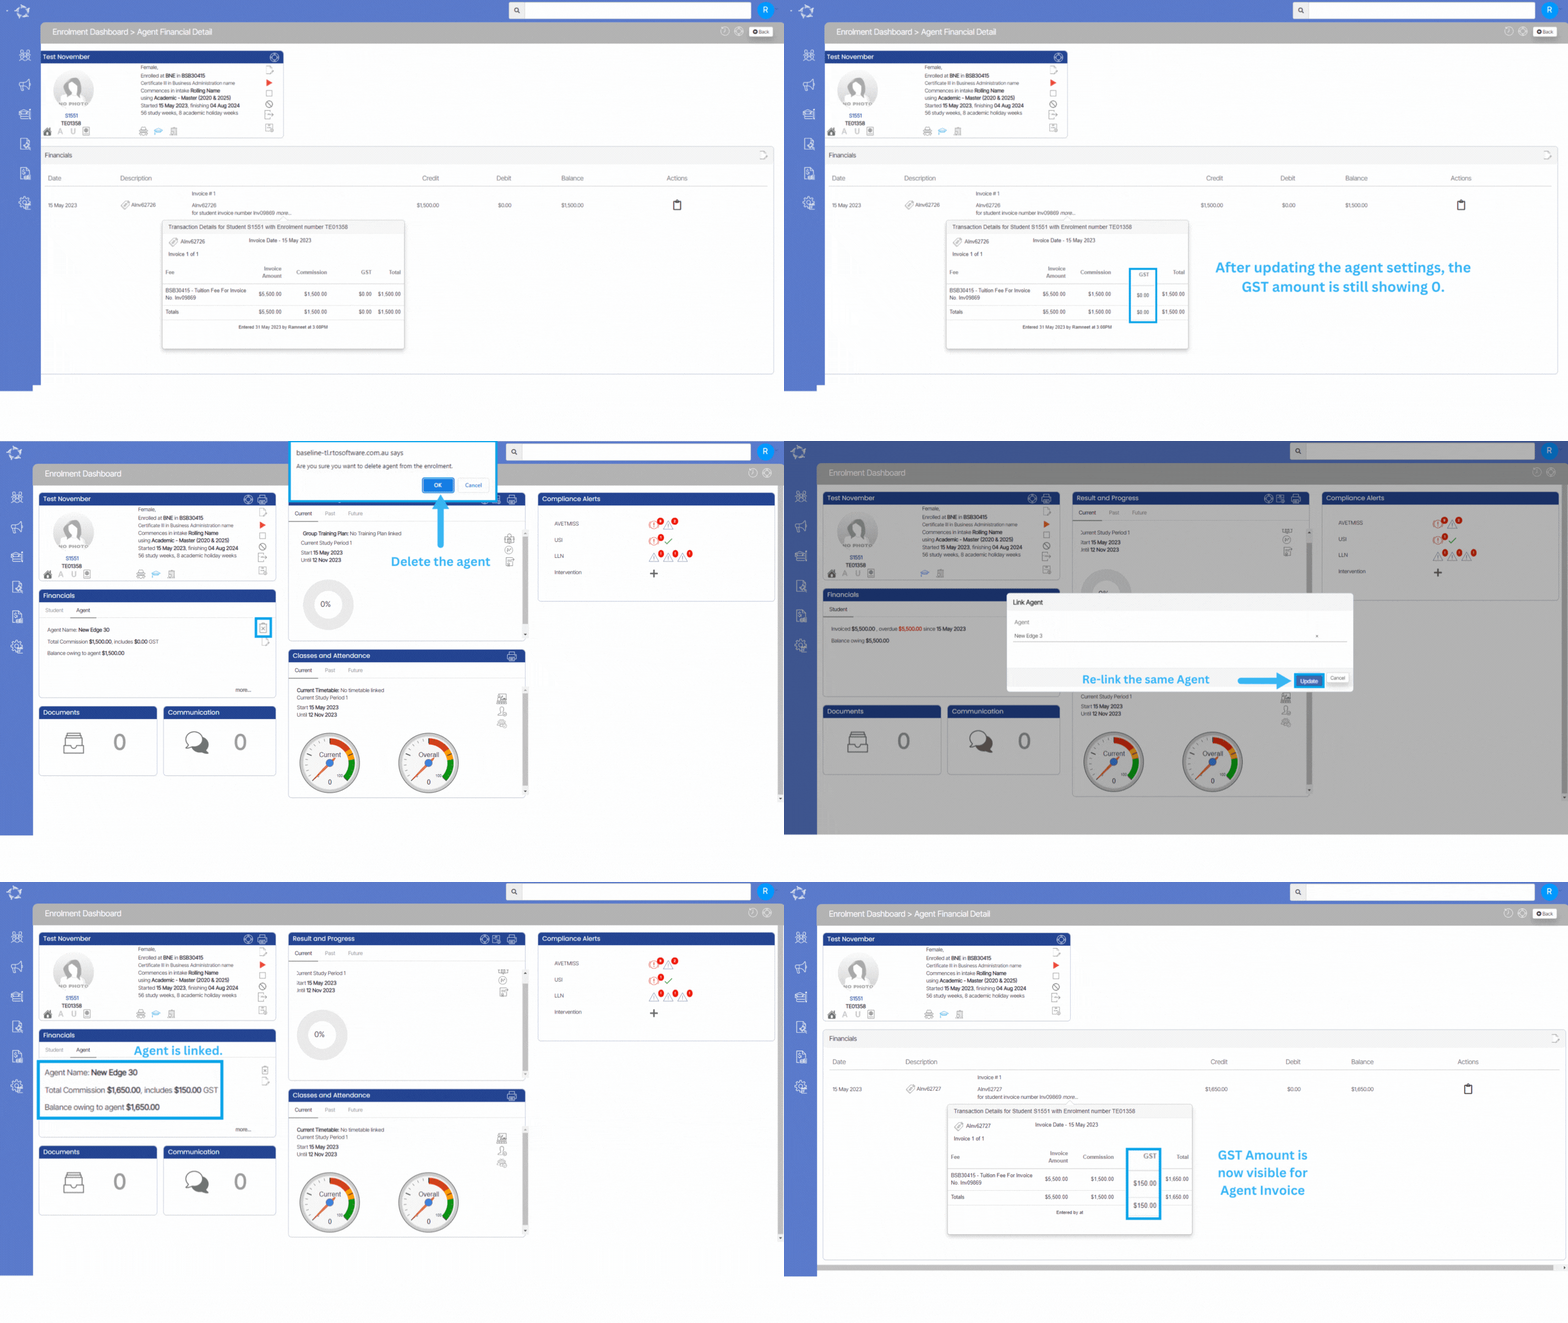
Note – If you haven’t made any payment to the Agent, you have the option to delete the Agent from the enrolment and then relink them. By relinking the Agent, you will establish a new connection that allows you to access and view the GST amount for the Agent’s invoices. This means that once you have successfully relinked the Agent, you will be able to see the specific amount of GST associated with their invoices.

  • In the Finacial Tile, go to the Agent tab and delete the agent from the delete icon. The system will show you a pop on top of the screen (Are you sure, you want to delete Agent), select Ok to continue and or cancel to leave it as it is.
  • Once you have deleted the agent, go back to the student tab in the financial tile and select the Agent Icon.
  • The system will show you a pop on the screen to relink the agent. Select the appropriate agent and update.
  • The system will refresh the screen for you and then you can see the GST amount for the Agent Invoices.