New Column in Payment Report

We have added a new column ” Balance” in the Payment Report. If any of the invoices are partially paid then the balance column will show you the pending fee for that fee line item.

This is how the table will show you the total invoice amount, amount Paid and the outstanding balance of the invoice.

Enrolment Financials – Edit Multiple Invoices

For ease of use, we have now introduced a new screen “Edit Invoices” on Student Financial Detail Screen.

In the past, to edit the invoice dates or their amounts we were editing each invoice individually. But now with this new screen, we can edit multiple invoices at once. Isn’t that easy? Yes, it is and will save a lot of time.

To edit multiple invoices, Just click on the edit icon on the student financial detail screen.

This will open the Edit Invoices screen as shown below. From this screen, we can edit the invoice date, invoice due date, amount, and GST for all the invoices (highlighted in green color). We can also delete any fee line item by ticking the tick box in front of all the line items for each invoice.

Business Rules

A – The system will only update the student invoices from this screen, it will not regenerate the agent commission invoices. So, if needed you have to change them manually from Agent commission screen.

B – If there is any negative invoice, the system will not allow you to edit it. It will show you the negative invoice in red font color as a line item.

C – If there is any financial transaction against any of the invoice, then the system will not allow you to edit that invoice. It will show you the invoice line items but in a read only mode i.e. non editable.

D – If there is only one line item in any invoice then it will make delete tick box as read only because the system will not allow to delete the whole invoice.

E – By ticking the tick box, the system will delete that fee line item after saving the screen.

After editing all the invoices, you can click on the save button to save the changes.

Enrolment Dashboard > Edit Agent Commission Invoices

Sometimes, it happens that agents change the commission rates in between of a student’s enrolment. They might change it from 30% to 35% depending upon agent to agent. And there might be the cases where you have already paid to the agent some of commission as per the initial commission rate and the remaining commission will be paid as per the incremented commission rate. Not just that, there might be some other scenarios, where you have to change the commission amount for a student’s enrolment. Of course, you will be updating the agent commission rate from the agent entry screen, so that all the future applications can be processed with the new commission rate. However, for the existing enrolments where the commission amount is calculated based on the previous commission %, you would need to edit them manually to have proper track of commission amounts.

We didn’t have the facility to edit the commission amount from the enrolment dashboard, however, now we have the edit facility for you to edit the agent commission invoices.

On the Enrolment Dashboard > agent’s financials screen, you will see a new icon.

Once you click on the icon, it will direct you towards the edit agent commission screen where you will be able to edit the amount manually for each agent’s invoice.

To edit any agent’s commission amount, click on the icon to expand the invoice details.

It will show you each invoice’s details as below screenshot, so that you can edit the commission amount.

Change the commission amount from Comm. Excl and GST from Comm. GST columns.

Other fields will be read only fields and you won’t be able to edit anything for those fields. The last column Comm. Amount will be auto calculated by the system based on the commission and GST amount you update.

You can even make the commission notes as well from the notes icon.

Important

You won’t be able to edit the commission amount if there is already a commission payment made against that invoice. Same is the case where you might have created the negative invoice for a student’s invoice. In such cases, the system will not allow you to edit the amount.

If you try to update the commission amount less than what you have paid to the agent for that invoice, the system will throw an error as:

However, you can update the commission amount more than what you have already paid to the agent for that invoice.

After you are done changing all the commission amounts, click on the Save button and your agent commission invoices will be updated.

New option for Receipts Report – report based on Receipts in Advance

Dashboard > Finance menu > Receipt

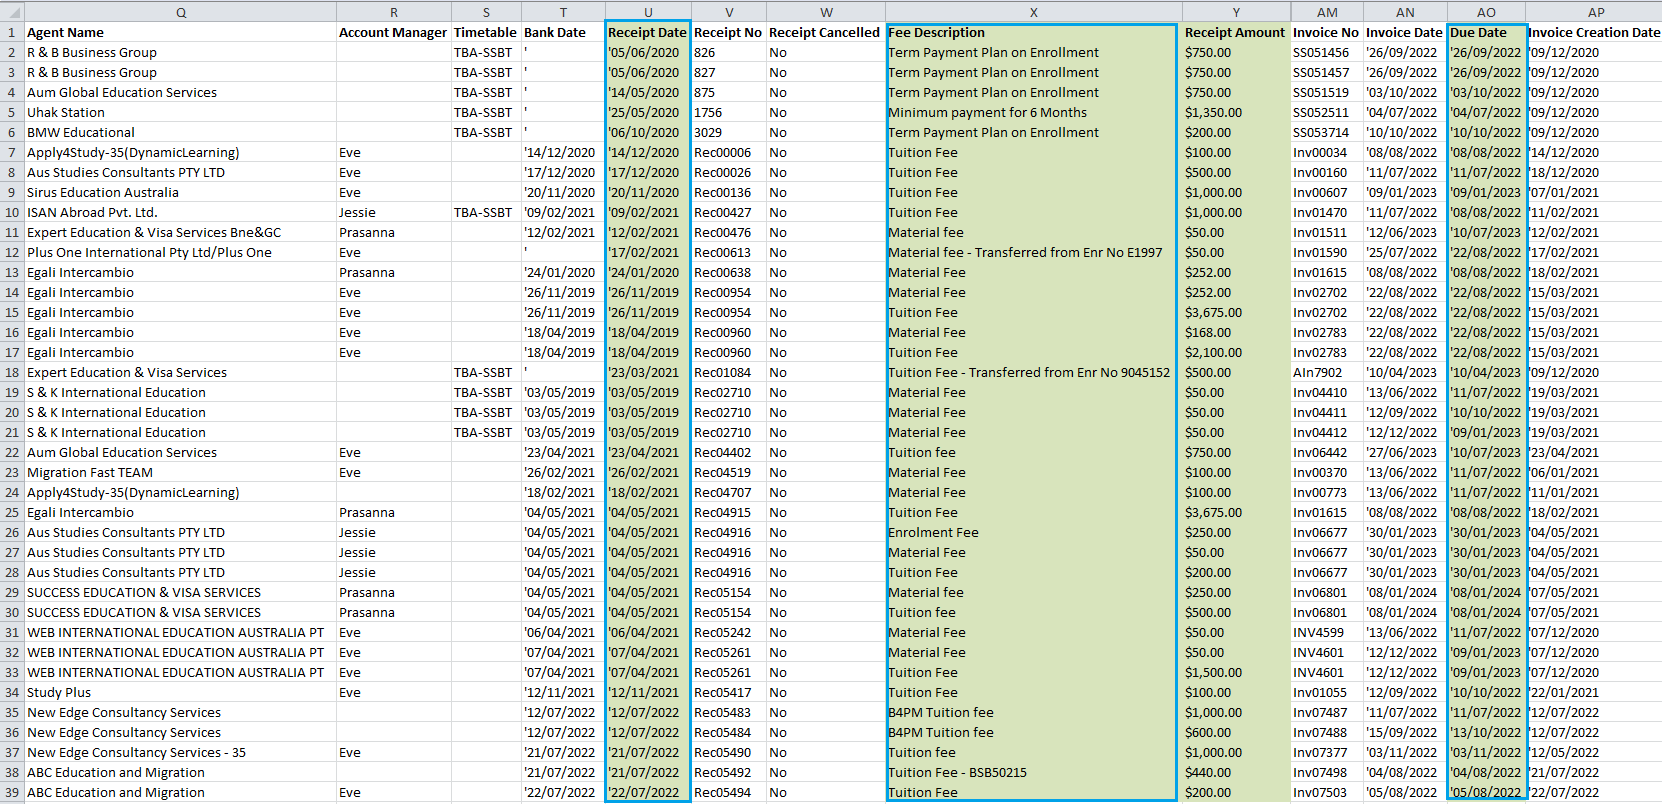
We have introduced a new option for the Receipts report that will allow you to generate the report based on Receipts in Advance. As you can see below, in the section for Report Based On there is a new option for Receipts in Advance – Invoice Due Date.

IMPORTANT: When you select this option you will be asked to enter a date for Invoices Due from. The system needs this date as it will use it to find any invoice that has an invoice due date equal to or greater than the date you have entered in the parameter screen. Once it finds all the invoices that match that parameter it then looks at each invoice and sees if there are any receipts linked to the invoice and if there are, then they are the invoices that will generate in the report. The system will NOT look at receipt dates for this option in the report.

For Example, as you can see below we have entered the Invoice Due from date of 01/07/2022 in the invoice due from date filed. The system will go and find all the invoices (based on other parameters you have selected) and find any that have an invoice due date equal to or greater than 01/07/2022. Then if any of them have receipts entered against them they are the invoices that will show in the report.

By default, the Include Fee line Item will be selected and if you do not want the report to print the fee line item then you can unselect this tick box. This means you can run the report and just see a detailed listing of the invoices where you see fee line items for the invoice and what money was receipted for the fee OR you can unselect this option and it generates a summary style where you just see the invoice in one row with a total amount for the invoice, no fee line items will show.

In the example below, the option for Include Fee Line Item tick box was selected, it has printed the fee description in the report accordingly.

You can also see the generated version of this report below:

TEAMS Icons

This table will show you icons that are available under the Details column, Actions column, and Applicant/Student/Enrolment profile tiles.

Details Column Icons – When you move your mouse on any icon under the details column, it will show a tooltip with the icon showing its information.

Actions Column Icons – These icons will allow you to make an entry for any student data on your TEAMS site and will take you to the relevant screens and you will find these icons on many screens within TEAMS.

Applicant/Student/Enrolment Icons – Icons under these sections will allow you to add/edit the student data from each object’s profile tile. Also, you will be able to view the information by moving your cursor to any icon which will show a tooltip on the enrolment profile tile.

Details Column IconTheir Use
This icon indicates that the enrolment is a New Student
This icon shows that the enrolment is a Returning Student
This icon will show you the name of the Account Manager
This icon will show you the overseas information of the student
This will show you the Agent Name
This icon will show you the overdue amount for the Students/Enrolments
This icon will show you the tooltip as orientation required
Actions Column IconsTheir Use
To edit the data. You will see this icon on many screens for editing.
To approve/convert a pending application to enrolment.
To decline a pending application.
To reverse the declined application.
To send out emails
To send out SMS.
To create contact logs.
To delete an entry.
To print reports.
To cancel reports.
To create New Invoice.
To create Invoice Recreation.
To Edit the receipt.
To Transfer receipted money.
To refund the receipted money.
To send a pay request email for invoices.
Subject Mapping
To start an enrolment.
To finish an enrolment.
To Submission Review.
To download the document.
To Commence Subject.
To Uncommence Subject.
Subject Mark as inactive.
Main Menu’sand Sub Menu’sTheir Use
Complicance main menu.
Finance main menu.
Navigate to Student Search sub menu.
Navigate to Class Allocation sub menu.
Navigate to Attendance sub menu.
Navigate to Results sub menu.
To generate CSV report
To generate report in Excel.
To generate report in word.
Navigate to New Enquiry sub menu.
Navigate to New Application sub menu.
Navigate to Marketing Dashboard sub menu.
Navigate to Agent sub menu.
Navigate to Agent Dashboard sub menu.
Navigate to Commission Templates sub menu.
Navigate to Campus sub menu.
Navigate to Programs sub menu.
Navigate to Unit of Studies sub menu.
Navigate to Subjects sub menu.
Navigate to Academic Template sub menu.
Navigate to Group Training Plans sub menu.
Navigate to Timetable sub menu.
Navigate to Allocate Subjects/UoS sub menu.
Navigate to GTP Allocation sub menu.
Navigate to Intakes sub menu.
Navigate to Submission Review sub menu.
Navigate to Assessments sub menu.
Navigate to Subject Dates sub menu.
Navigate to USI Request sub menu.
Navigate to Compliance Dashboard sub menu.
Navigate to Avetmiss Export sub menu.
Navigate to Avetmiss Export History sub menu.
Navigate to Student Progress sub menu.
Navigate to Attendance Monitoring. sub menu.
Navigate to Training Location sub menu.
Navigate to TPS History sub menu
Navigate to Financial Dashboard sub menu.
Navigate to Agent Transactions sub menu.
Navigate to Instalment Plans sub menu.
Navigate to Fee sub menu.
Navigate to Site Setting sub menu.
Navigate to Report Dashboard sub menu.
Navigate to Organisation sub menu.
Navigate to Report Settings sub menu.
Navigate to User sub menu.
Navigate to Audit Logs sub menu.
Navigate to Employer sub menu.
Navigate to School sub menu.
Navigate to Classrom sub menu.
Navigate to Trainers sub menu.
Navigate  to Account Manager sub menu.
Navigate to Report Template sub menu.
Navigate to Email Template sub menu.
Navigate to SMS Template sub menu.
Navigate to User Codes sub menu.
Navigate to Notes Template sub menu.
Navigate to Notification Template sub menu.
Navigate to WebForms sub menu.
Navigate to Public Holidays sub menu.
Navigate to Term Breaks sub menu.
Navigate to Quiz sub menu.
Navigate to Question Bank sub menu.
Navigate to Alert System Configuration
Navigate to Automated Action sub menu.
Navigate to Automated System Actions sub menu.
Student/Enrolment Dashboard IconsTheir Use
To update student’s AVETMISS, Local and Mailing Addresses.
To update student’s next of kin/emergency contact details.
To show you that it’s an AVETMISS student and has a VET enrolment.
To show you that the student has a VET enrolment but you haven’t set the it as AVETMISS student.
To create/update the USI for a student when it is not updated.
To show you that the USI is there in TEAMS for the student but it is not verified
To show you that the USI is verified.
For you to add student’s holidays.
To show you that there are student’s holidays updated.
To add or edit student’s conditions.
To show that the conditions are updated for the student.
To link/edit the account manager.
To update/view student’s english proficiency.
To update/view student’s visa details or CoE details.
To show you that the visa has been expired for the student.
Application DashboardTheir Use
This icon navigate to edit Avetmiss Settings.
This icon navigate to Training Plan and Results.
This icon navigate to Fee Help Setting.
This icon navigate to Employer Tracking.
This icon navigate to Edit Applicant Visa Details.
This icon will show local address of student when you hover mouse on that icon.

Commission Due Report > A New Column

Dashboard > Finance > Commission Due

We have added a new below column in the commission due report. The column is:

Commission Due to be paid

This column will show the commission which is truly due based on how much Tuition Fee a student has paid for that invoice.

Example: If a student’s invoice for tuition fee is $2,000 and the total commission is $600. And the student just paid $1,000 out of $2,000. In such a case, the newly added column will show you the commission due to be paid on $1,000. This way, it will be easy for everyone to see the commission according to how much tuition fee a student paid instead of doing the calculations manually.

Change – By default Pay Commission tick box is ticked

Dashboard > Marketing > Agent > Agent Entry

Dashboard > Finance > Fee > Fee Entry

Sometimes when creating the new Agent or Tuition Fee in the system, the user forgets to select the Pay commission tick-box on the Agent Entry screen and Fee Entry screen and this results in the disproportion of commissions during the reconciliation of many financial transactions.

In TEAMS, we are showing the Pay Commission tick-box on the two major entry screens i.e. Agent Entry Screen and Fee Entry Screen.

Agent Entry screen

Fee Entry Screen

In the past, the pay commission tick box was not ticked by default but now it will be selected by default on the Agent Entry screen and Fee Entry screen for tuition fees.

Once you have saved the agent or the tuition fee screen with the pay commission tick box ticked. You will not be allowed to edit the tick box again after saving. It will be shown as a read-only tick box.

And If you do not want to select the Pay Commission tick box then untick the tick box before saving and the screen will show you a pop message with your RTO URL saying (Are you sure, you don’t want to tick on the Pay Commission as all the Agent have Pay Commission ticked on) or (Are you sure, you don’t want to tick on the Pay Commission as all the Fee which are Tuition Fee must have Pay Commission ticked on.. You can select Ok to continue or Cancel to select the tick box)

NOTE – If you have saved the agent or tuition fee with the tick box ticked mistakenly or you want to untick it and the system is not allowing you to edit it. Kindly contact our support team.

How do I link commission templates to an agent?

When the “Pay Commission” is turned on but the commission template is not linked with the agent, it can cause issues. This means that the system has enabled the commission calculation but it is not properly set up to assign commissions to specific agents

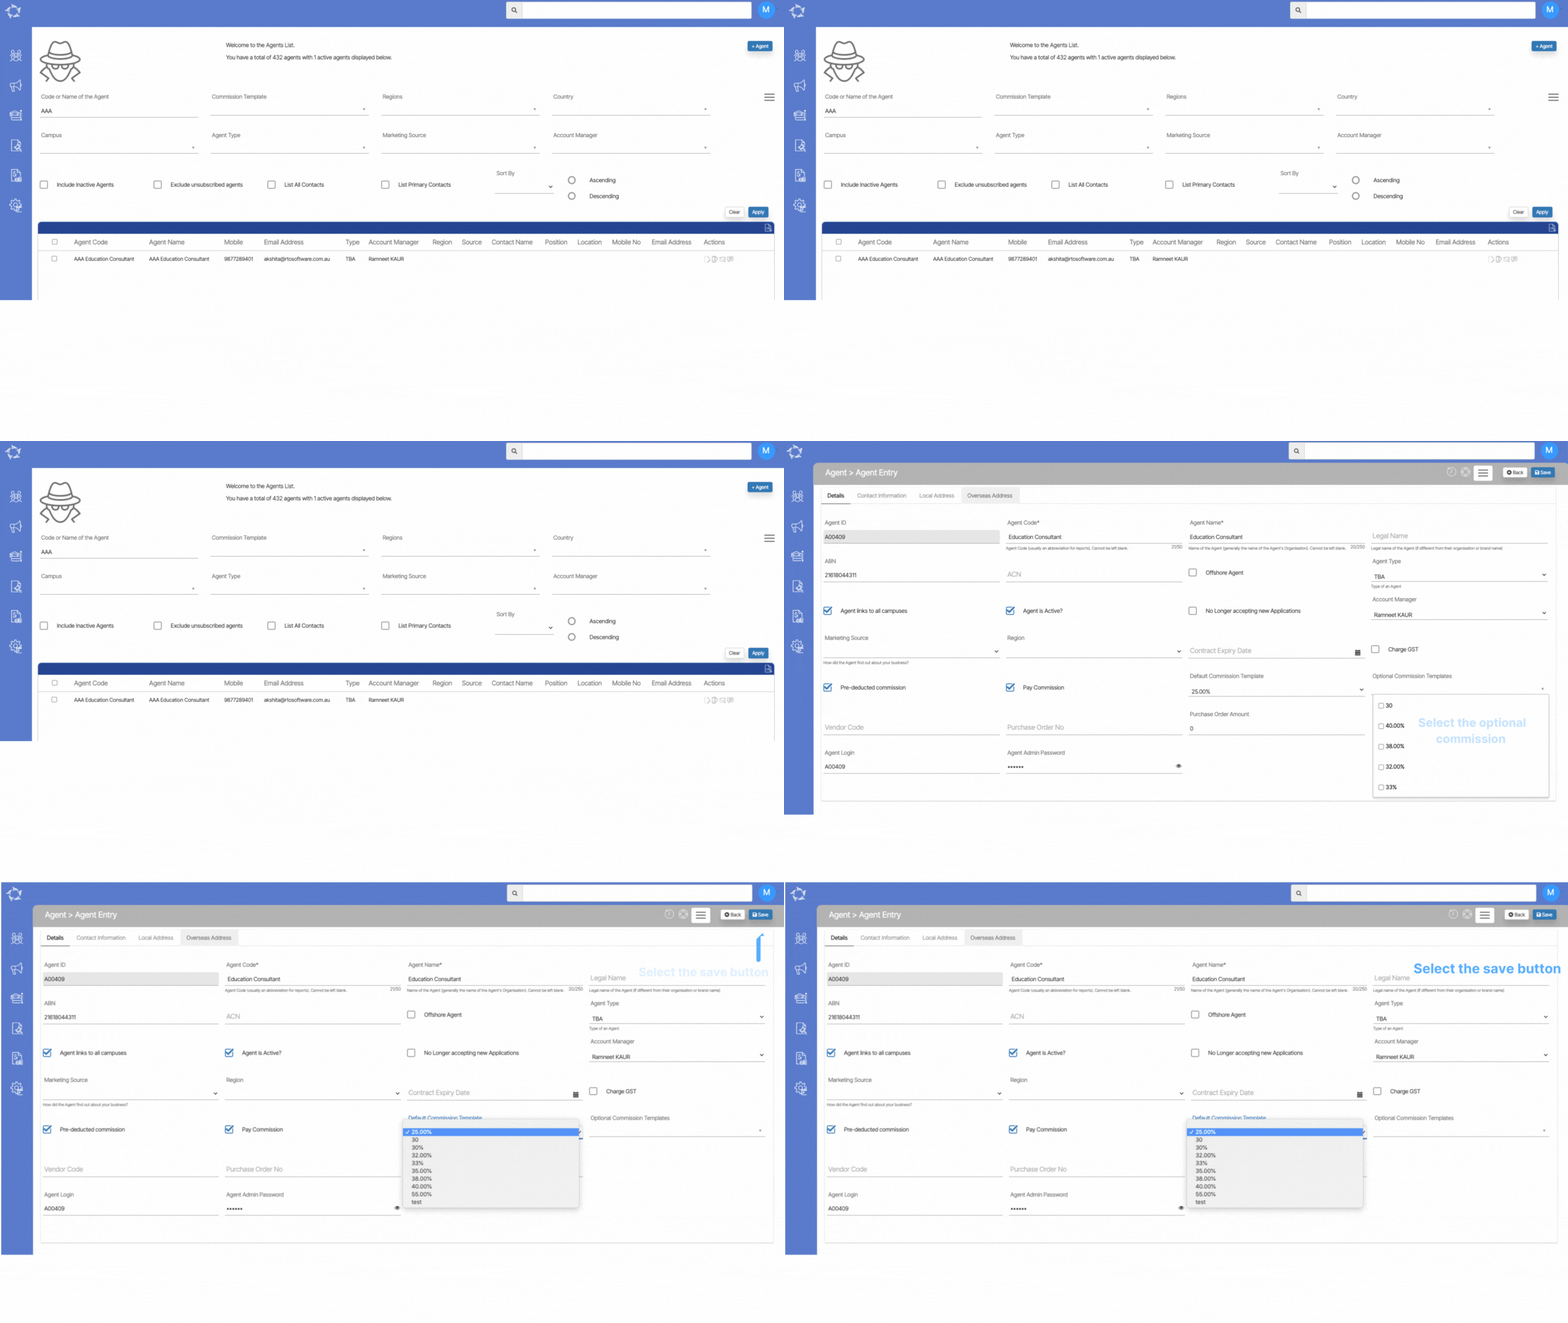
To link the agent commission template and raise the agent invoices, you can follow the following steps:

  • The first step is to select the main menu icon for Marketing, followed by selecting the icon for Agent. This action will direct the user to the Agent Welcome List screen. From there, the user can search for a specific agent by using the search bar or by scrolling through the list of agents displayed.
  • Once the user has accessed the Agent Welcome List screen, the next step is to select the agent by entering their code or name and clicking the Apply button. The system will then search for the agent and display the relevant information on the screen.
  • To edit the agent’s information, the user needs to locate the Edit icon in the Actions column of the agent’s record and select it.
  • When accessing the agent entry screen, it is possible to see whether the pay commission tick box is selected or not. However, it is important to note that the commission templates must also be selected in order for the system to properly calculate and allocate commissions. This can be done by using the “Default Commission Template” dropdown menu.
  • In addition to the “Default Commission Template” dropdown, there is also another dropdown menu available on the agent entry screen that allows the user to select optional commission templates. These templates are typically used when an agent is eligible for commissions based on multiple sales.
  • After selecting the appropriate commission template/s for the agent and making any necessary changes to their information, the next step is to click on the save button to save the changes.

Q&A – Pay commission is not turned on at fees level

Sometimes all the settings are correct but still, the agent commission invoices are not getting raised on the enrolment dashboard, then there is one more reason due to why the sysetm will not raise the agent invoices and that is the pay commission is not turned on at fee level.

To turn on the pay commission you need to follow the following steps:

  • Go to the Finance menu > Fee

  • The system will open the fee screen, from where you need to find out for which tuition fee you want to turn on the pay commission ( you can use the filters to search the fee).

  • Select the edit icon from the action column and the system will take you to the “Fee Entry screen” from where you can make changes.
  • On this screen, you just need to select the pay commission tick box and select the save button.

  • When the screen comes back after saving the changes, you need to go back to the enrolment dashboard and relink the agent by using the edit icon from agent tab.

If you have any queries, please do not hesitate to contact us on 1300 85 05 85 or email us via support@rtosoftware.com.au