New Application – Agent Commission related changes

We have made some changes to allow more flexibility to the Agent commission invoice section of the new application process. Changes we have done include:

  • selecting or unselecting to pay commission on a specific fee that you are raising against the applicant/student’s invoice/s
  • selecting or unselecting whether the system should calculate GST on the agent’s individual commission invoices and
  • raising an agent bonus invoice that will then link to the application

The above options show different steps of the new application process. You can find them as follows:

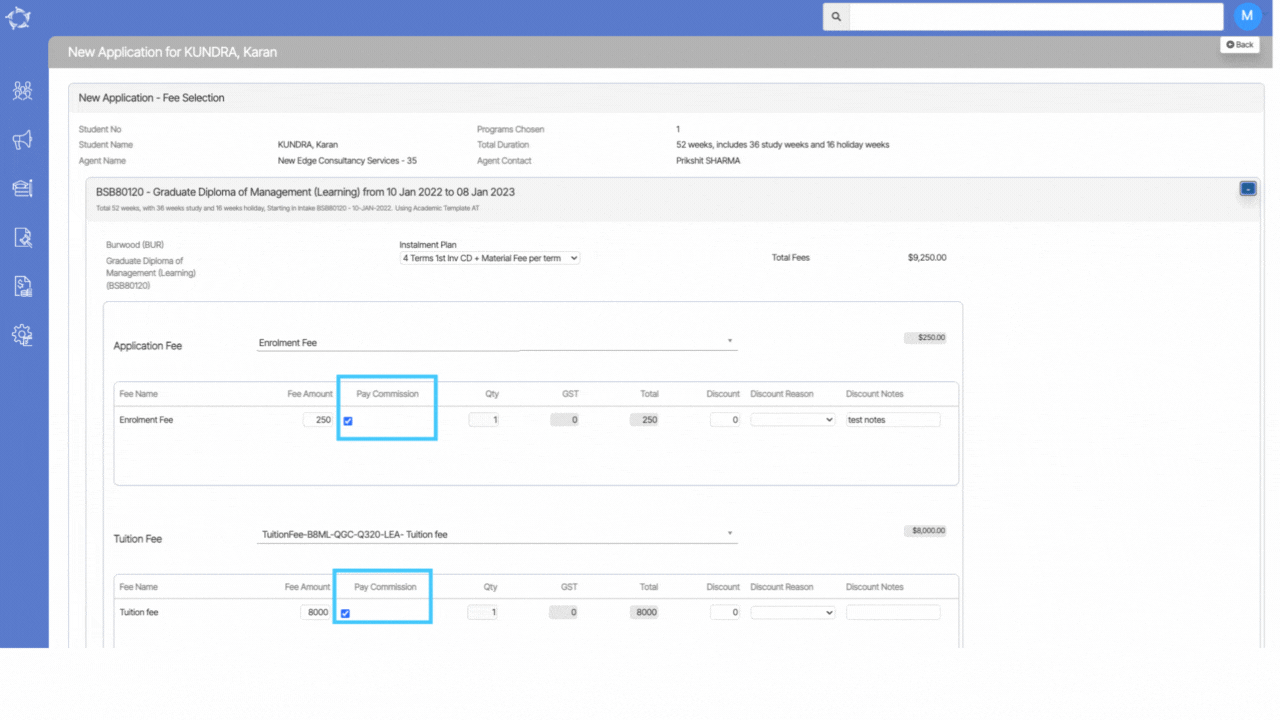
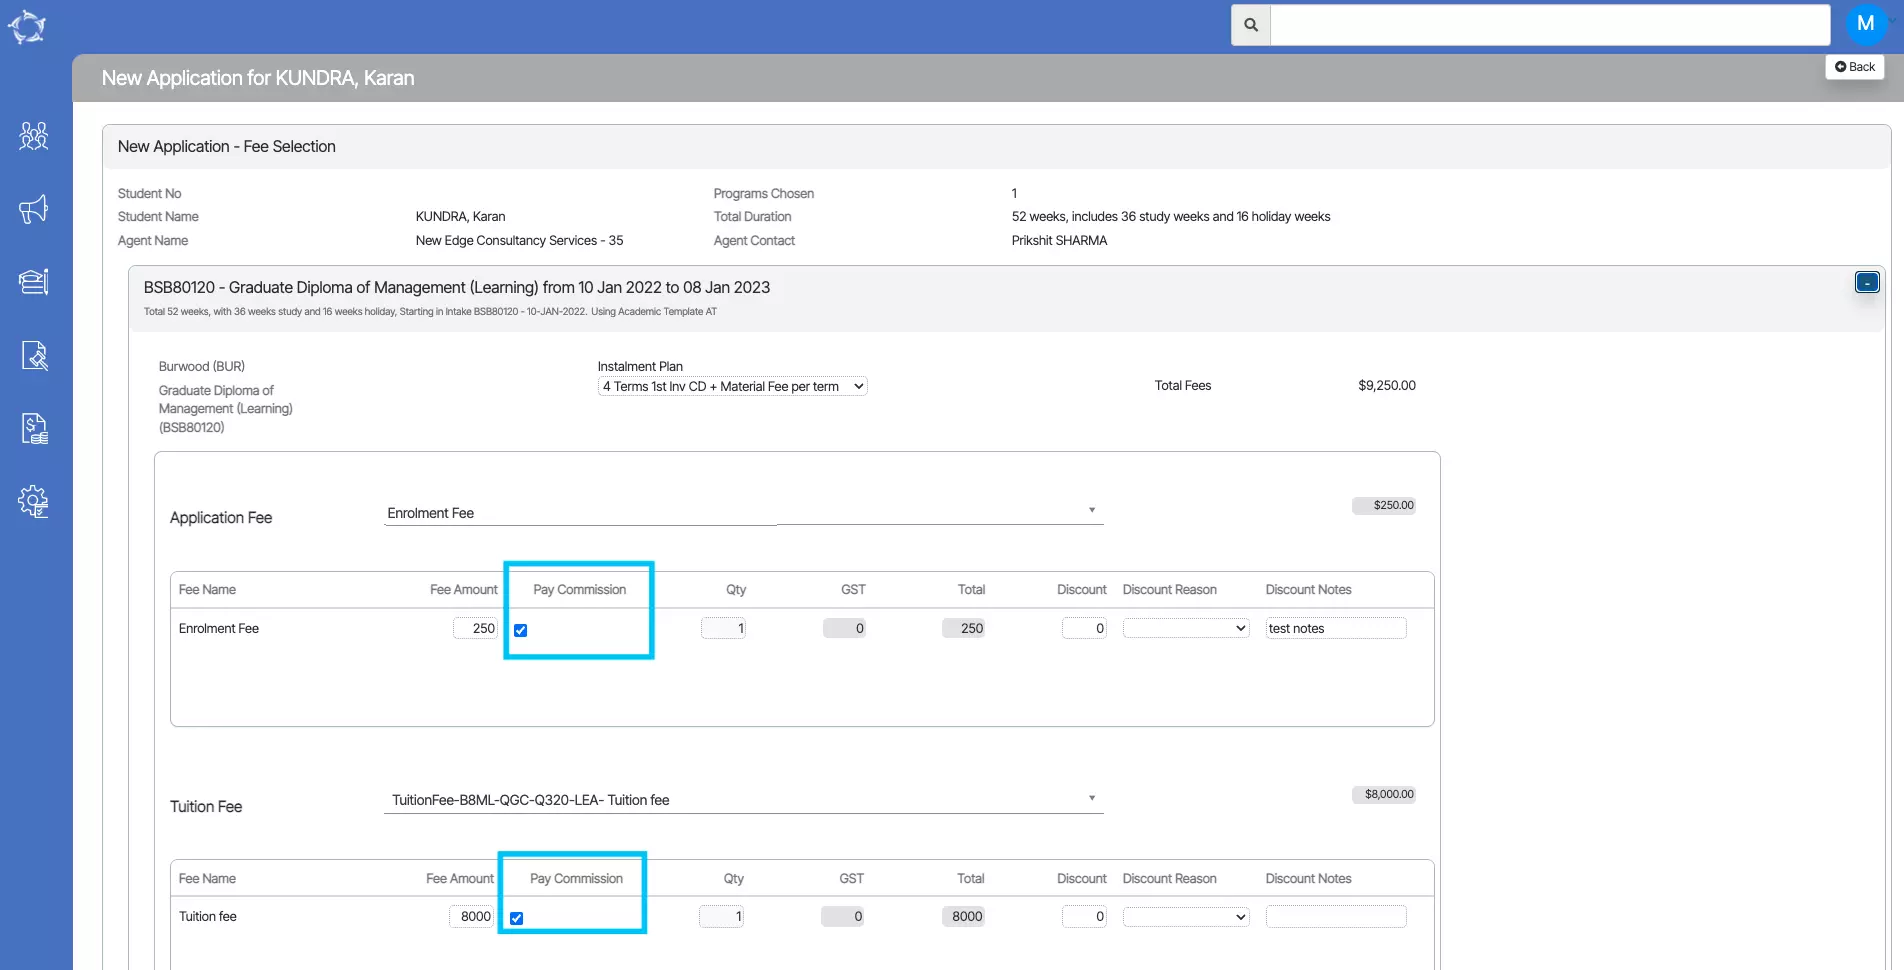
Selecting or unselecting to pay commission on a specific fee that you are raising against the applicant/student’s invoice/s

In the Agent details screen, there is a tick box for Pay Commission. Whether this is selected or not, when an agent is linked to an application, you will have the option to either select or unselect the Pay Commission tick box against a student’s fee that you are raising for the application. If you select it, then the system will calculate the commission on that fee and if you unselect it will NOT calculate the commission for the agent for that fee.

This option is available in the New Application > Fee Selection step as below:

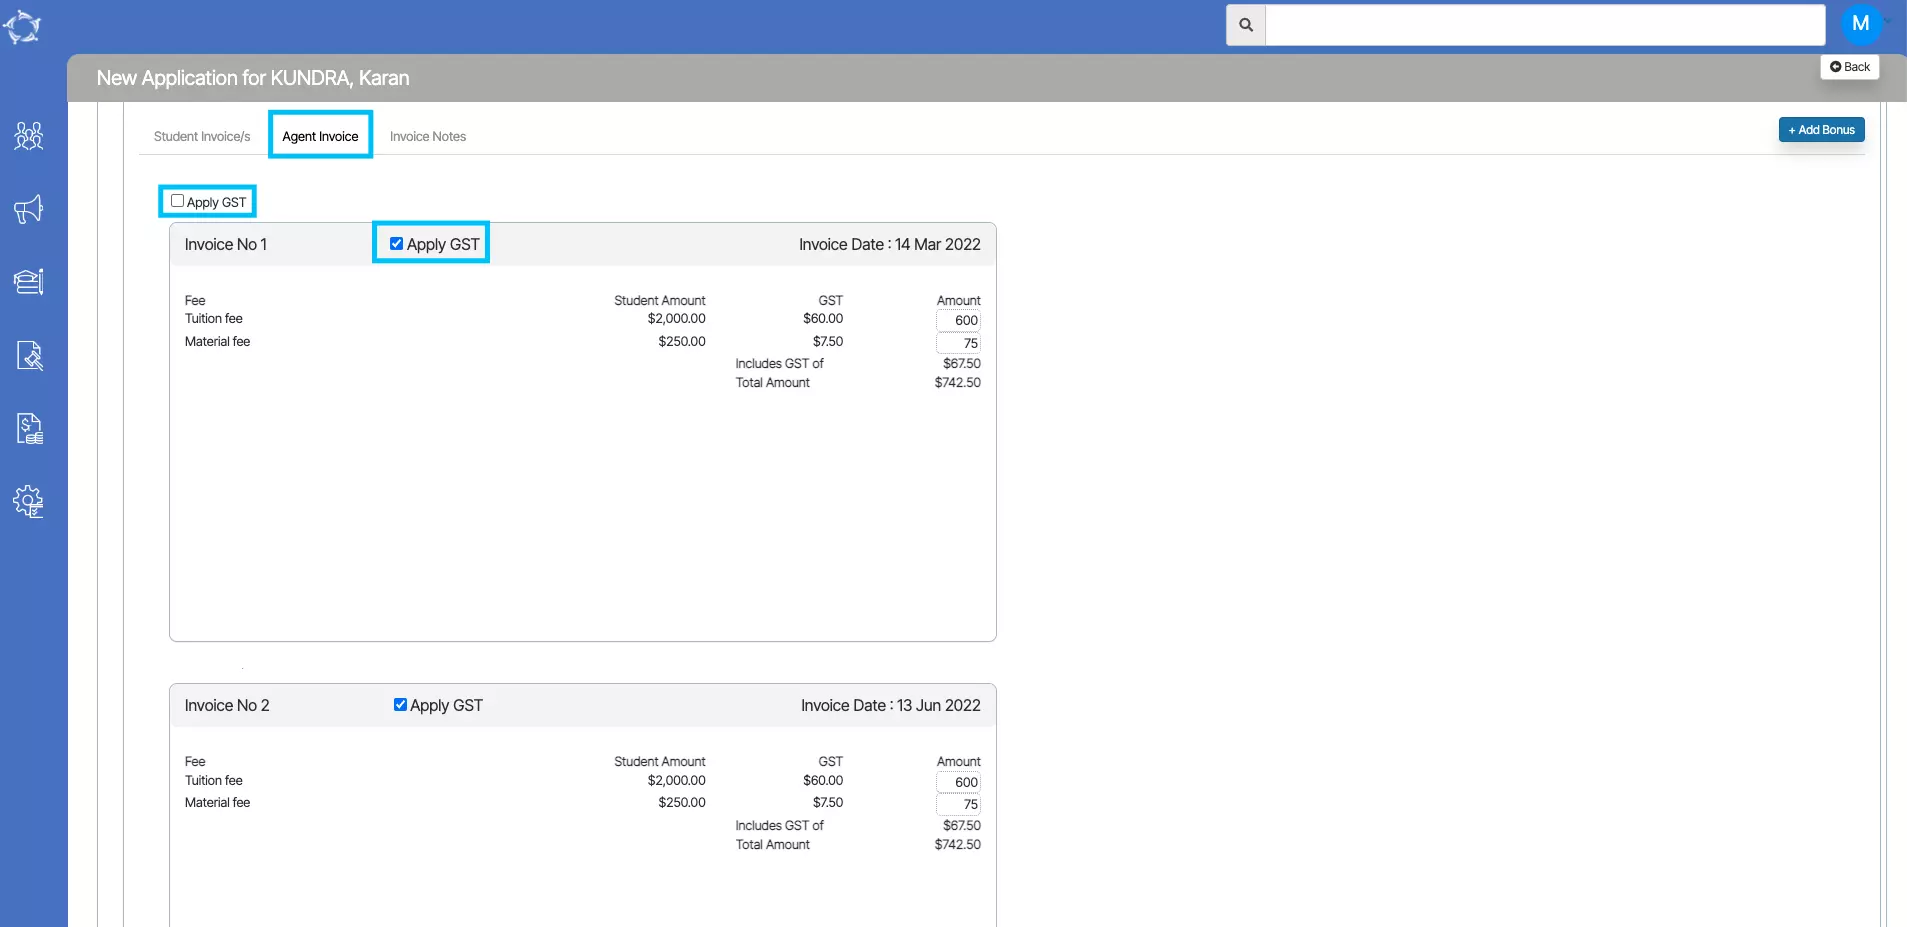
Selecting or unselecting whether the system should calculate GST on the agent’s individual commission invoices

In the Agent details screen, there is a tick box for Apply GST. Whether this is selected or not, when an agent is linked to an application, you will have the option to either select or unselect the Apply GST tick box against all or individual agent commission invoices that the system will raise for you.

This option is available in the New Application > Invoice Preview steps on the Agent Invoice tab as below:

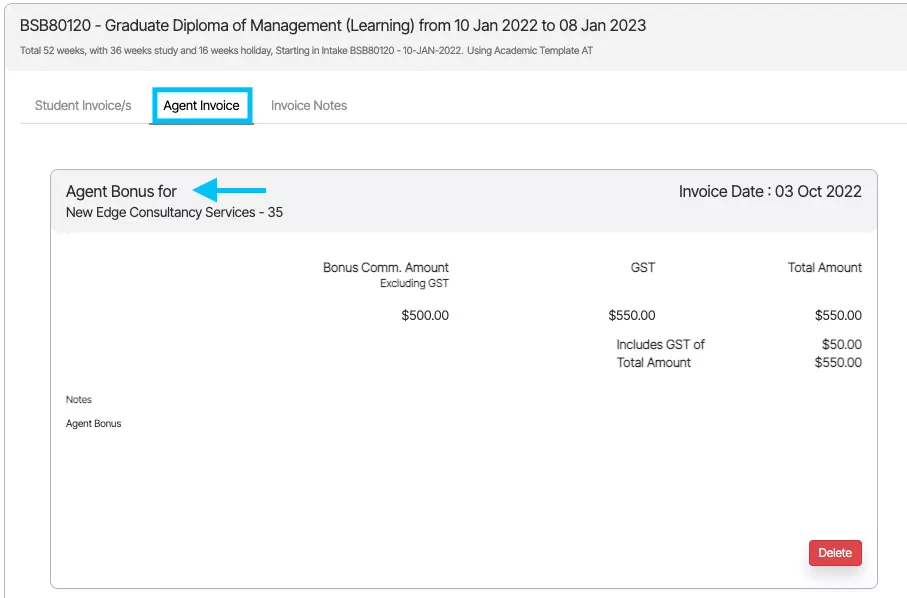
Raising an agent bonus invoice that will then link to the application

If you wanted to raise an agent Bonus Invoice you would do this from the Agent Dashboard > Profile Tile > Bonus Invoice icon. However, we have introduced this option in the New Application > Invoice Preview steps on the Agent Invoice tab as shown below.

IMPORTANT: there is a difference between raising an agent bonus invoice from the Agent Dashboard to raising it in the new application process. From the Agent Dashboard you DO NOT have to link the bonus invoice to one or many enrolments, however from the new application process, the system will automatically link it to the application program that you link the bonus invoice to.

This option is available in the New Application > Invoice Preview steps on the Agent Invoice tab > +Add Bonus button is shown below.

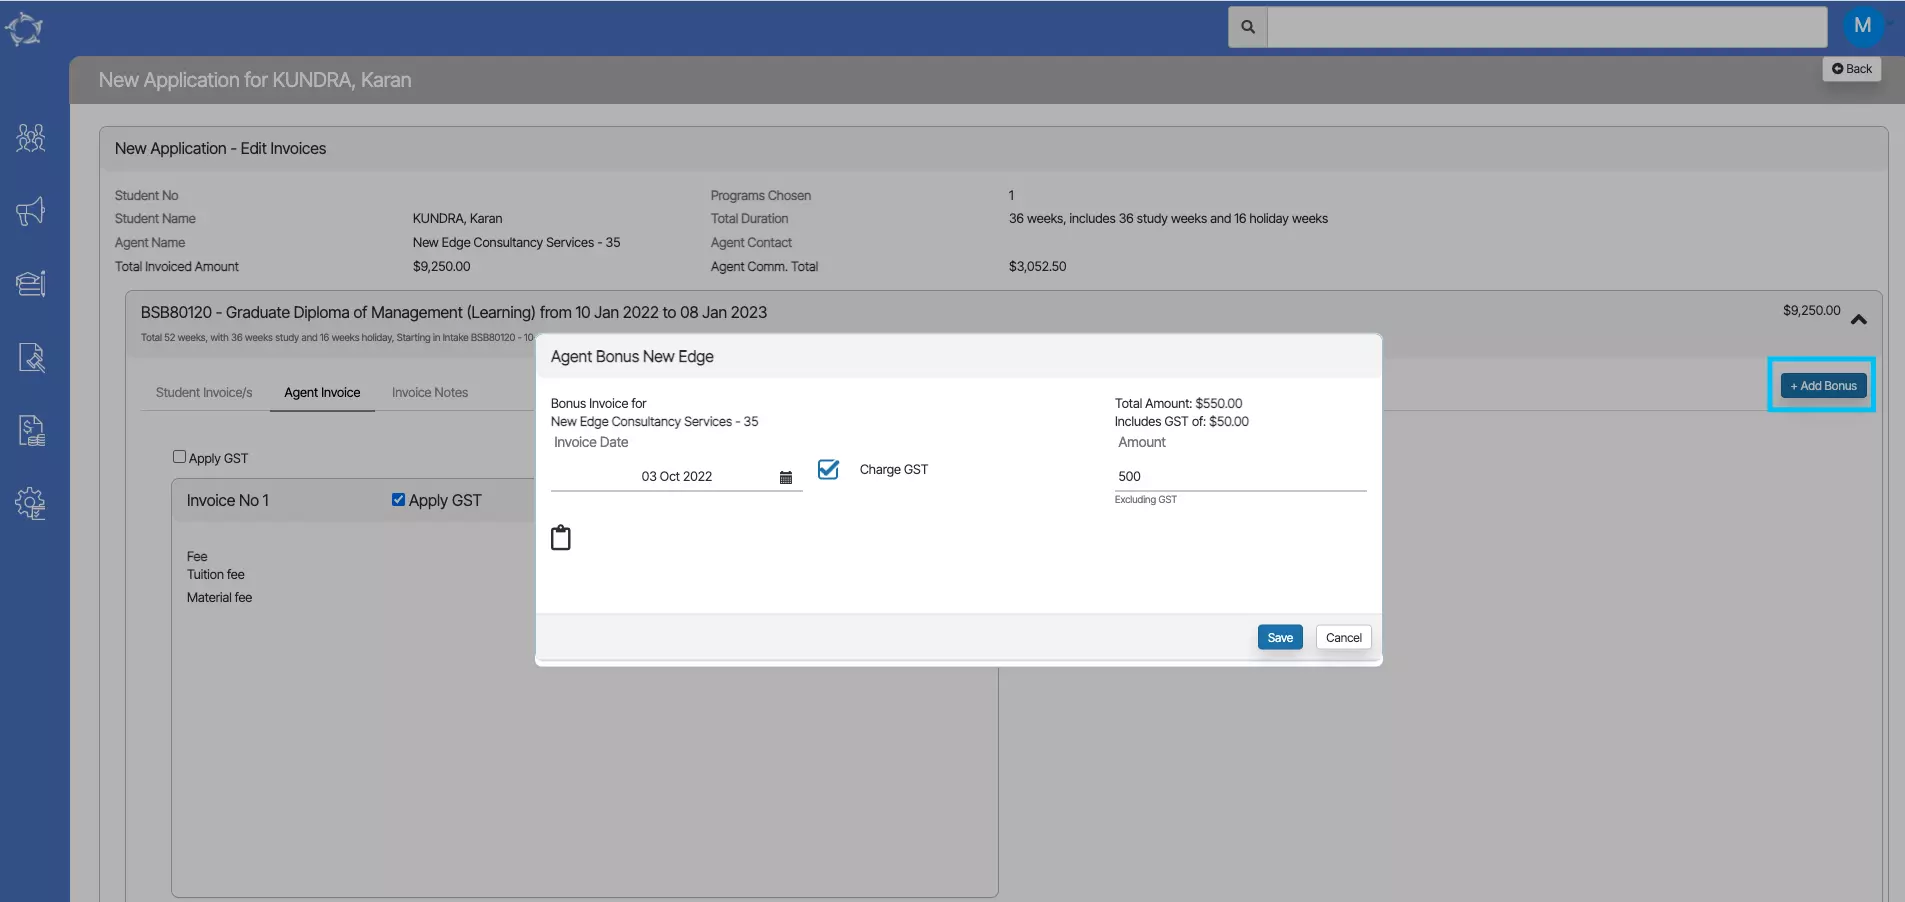
Once you have added the Bonus, the screen will refresh and you will be able to see the Agent Bonus invoice for the agent.

Note – You can delete and recreate the agent bonus from the same screen.

Student Financial Details – History

Here are some of the latest changes that we have made on the Enrolment Financial Details

Edit Multiple Invoices screen changes

We have added three new columns Discount, Discount Reason and Deposit Due for you in the edit invoices grid while editing the multiple invoices.

Note – The discount column will allow you to give a discount on the total amount for a particular invoice, and once you add the discount, the system will calculate the total amount of the invoice accordingly.

Change – Overpayment by Student

We have added a new feature in the system to record a receipt when there is any overpayment by the student. This will allow you to enter the receipt amount more than the invoice amount in the Enrolment Dashboard > Student Financial > Receipt Screen.

Note – Once the receipt is overpaid then the system will show a receipt icon in red.

IMPORTANT – While creating the receipt, the system will not let you enter the overpaid amount if it is not equal to or more than the total pending amount for all the invoices.

For example – if there is $3000 pending for a student’s enrolment with $1000 each invoice and you are going to record a receipt for one invoice and the student has paid you $2000. In such a scenario, the system will not save your overpayment. However, if the paid amount by the student was $3000 which is equal to the student’s total pending balance then the system will save your overpayment and will balance out everything.

Bank Account

Main Dashboard > Finance > Bank Account

The Bank Account screen allows you to manage your linked bank accounts effortlessly. From this screen, you can view your existing bank accounts, add new ones, or make changes to the existing ones.

If you wish to add another bank to the campus then you can select the +Add button.

Once you select the +Add button, a floating window will open on the screen. Fill in the required information in the provided fields, Enter your account holder name, followed by the account number and the associated bank’s name. Ensure the accuracy of the details entered to avoid any transactional issues. Double-check the information before proceeding to the next step. Once all the necessary fields have been completed, click the “save” button to finalize the process.

You can also edit or remove existing bank accounts by clicking on the respective icons next to each account.

Below is the explanation of the fields

FieldsExplanation
Bank NameAdd Bank Name here.
BSB No/Swift CodeAdd your bank BSB No/Swift Code.
Account NumberAdd account number in this field.
Account NameAdd the Bank account holder’s name here.
AddressYou can add your bank address in this field.
ActiveTick this box if you want to active this Bank Account.

Instalment Plans

Main Dashboard > Finance > Instalment Plans

Overview

An instalment plan is a financial arrangement that enables students to pay their tuition fees in smaller, more manageable amounts over a specified period of time, instead of paying the entire amount upfront. it can help make education more accessible and affordable for students who may not have the financial means to pay the full amount at once.

The instalment plans welcome screen is divided into two sections:
1) Filters/Parameters
2) Listing Grids

Filters/Parameters:

The filters/parameters section under the Instalment Plans welcome screen allows you to search for instalment plans using the Instalment Plan Name and Code in the search field. Additionally, you can choose to include inactive instalment plans by selecting the Include Inactive instalment plan tick box. The + Instalment Plan button allows you to add a new instalment plan to the system.

Listing Grid:

The listing grid displays all of the active instalment plans that currently exist in the database. Users can use this information to manage and track existing instalment plans, ensuring that they are being used effectively and efficiently.

Icons – Click here to learn more about how to use these icons

Instalment Plan Step 2

Instalment Plans > + Instalment Plan button

Follow the below steps to add the Instalments to the Instalment Plan:

  • Select the + Instalments button to add the new Instalment Plan to the system.
  • Once the +Instalments button is selected, it will display the Instalment detail screen where you will see different fields.
  • Enter details in the relevant fields and select the Save button.
  • You will see the instalment plan in the grid, you can edit your instalment plan as well.
  • Select Finish to finish to create the instalment plan

Below is the Explanation of the fields:

FieldsExplanation
Instalment No.Select instalment no. from dropdown list.
This is Deposit InvoiceSelect this tick box if it is a deposit invoice.
Number of Days/Weeks/MonthsYou can add a number of days/weeks/months.
Days/Weeks/MonthsYou can select days weeks or months from dropdown list.
Study Period lengthEnter the Study period length
In/Before/AfterYou can select before or after from dropdown
Enrolment date that relate to this instalmentYou can select enrolment date from the dropdown list.
Invoice Due Date no of Days after the Invoice dateYou can add invoice due date no of Days after the Invoice date.
Additional FeesSelect additional fees from dropdown list if any.
Copy these rules to future installmentsTick this box if you want these rules for your future installments. If you tick this box then In/Before/Months field will be selected as On and the Enrolment date that relate to this instalment field will show days in dropdown list

Uploading Invoices in Document Log

We have introduced a new change for uploading Invoices in the Document tile on the Enrolment Dashboard.

When you generate any invoice from the student financial screen and once the invoice gets generated, it will auto upload the generated invoice in the document log.

Student Finacial Details screen

Enrolment Dashboard > Document Screen

If you have any queries, please do not hesitate to contact us on 1300 85 05 85 or email us via support@rtosoftware.com.au