Compliance Menu > Compliance Dashboard > AVETMISS – Students
Student Data
Your student information is exported into a number of different NAT files that include:
NAT00080 – this is the primary student data file that includes name, date of birth, contact details, address information etc.
NAT00085 – this is the full address file for each of the students listed in the NAT00080
IMPORTANT: for every student listed in the NAT00080, there should be one entry for them in the NAT00085 and where required the NAT00130. For the NAT00120, there should be at least one entry, however, there can be multiple entries. To review and clean up any data for students you need to follow the steps below. To review and clean up any data for students you need to go to the new Compliance Dashboard.
To Know more about the AVETMISS Student data, select the below links.
Your student information is exported into a number of different NAT files that include
NAT00080 – this is the primary student data file that includes name, date of birth, contact details, address information etc
NAT00085 – this is the full address file for each of the students listed in the NAT00080
Important: for every student listed in the NAT00080, there should one entry for them in the NAT00085 and where required the NAT00130. For the NAT00120, there should be at least one entry, however there can be multiple entries. To review and clean up any data for students you need to follow the steps below.
To know what student data to look at you have to consider the enrolment data that will be exported. From this you can then find each student linked to enrolments. For any calendar year that you submit to NCVER there are three different types of enrolment data that will be included in the files that are:
Starters – this is all the students that commenced an enrolment, so their enrolment start date is within the calendar year of the export you are planning to do. For example, if you are doing a student data submission to NCVER for 2022, then enrolments with an enrolment start date in 2022 would be considered a starter.
Continuing/current students – this is all the students that commenced their study prior to the calendar year you are doing a data submission for. For example, if you are doing a student data submission to NCVER for 2022, then the enrolment start date would be before 01 Jan 2022.
Finishers – this is all the students that have or will complete their study in the calendar year you are doing a data submission for. For example, if you are doing a student data submission to NCVER for 2022, then the enrolment end date would be between 01 Jan 2022 and 31 Dec 2022.
Based on the above types of enrolments you need to generate the different reports below and then focus on the following mandatory data that needs to be in the NAT00080 and NAT00085 for each student. This data includes:
Student Name – there must be a name in both the First Name and Last Name fields for each student in Class TEAMS.
Gender
DOB
USI No
AVETMISS Student – this means they are flagged as an AVETMISS student in the student entry screen. If a student is enrolled in a VET qualification or competency and the student is NOT flagged as AVETMISS, the system will ignore the enrolment and student for the export.
Student Survey Status
The easiest way to view in bulk and identify what data is missing or needs to be cleaned up is by generating the following reports. Each report will be used to identify if specific data is correct or missing. Once you generate these reports, keep them as they will be used in future steps as well.
Your campus and training location information is exported into the NAT00010 and NAT0020. In this step, you need to review that the information is correct for the calendar year that you are doing your student data submission for.
For example: when you first started using TEAMS you would have had one or many campuses setup and we would have setup and linked to each campus a training location. Where it was identified that you only needed one training location per campus we would have also set that as the default training location so it always updates against each enrolment that you linked to a specific campus. However, if you had to have multiple training locations per campus then it was up to your staff to select the correct training location at the proposal or enrolment. Now in the calendar year that you are submitting data, your circumstances may have changed that you have introduced a new campus and/or new training location and have not considered that this impacts your submissions.
Important: even though this setup and data you are reviewing is related to the NAT00010 and NAT0020 the training location in the NAT00020 also shows in the NAT00120 which is the NAT file with the biggest load of data in it. So, if you do not have a training location linked to an enrolment, for every subject for that enrolment listed in the NAT00120, you will have the same error. This means if an enrolment has 10 subjects listed against it in the NAT00120 without a training location, you will see that error 10 times in your error list. Now repeat this for each enrolment that you haven’t linked the training location to and it can add up to hundreds if not thousands of rows of errors.
Based on what version of TEAMS you are using, will determine how you review your student data to identify missing or messy data that needs to be cleaned up. We have broken the data and steps to be completed in the same fashion for both versions, however the screens and/or reports you will use are different.
Please select the link below for the version of TEAMS you are using to follow the steps to review your student data.
RTO TEAMS is the new version of the system that was released in 2020. If you are still using this version then you need to follow the steps below to manage your annual student data submission to NCVER.
IMPORTANT: the deadline for the national student data submission to NCVER is not until the last business day in February of any given calendar year. It is critical that you work through these steps well before February to make sure you have a successful submission by the deadline. It is recommended that you put a process in place so that on a monthly or quarterly basis throughout the year, that you follow these steps and then do a submission to NCVER to test your data.
Before you even do an AVETMISS export from TEAMS, do all of these steps below
Classic TEAMS is the original version of the system. If you are still using this version then you need to follow the steps below to manage your annual student data submission to NCVER.
Important: the deadline for the national student data submission to NCVER is not until the last business day in February of any given calendar year. It is critical that you work through these steps well before February to make sure you have a successful submission by the deadline. It is recommended that you put a process in place so that on a monthly or quarterly basis throughout the year, that you follow these steps and then do a submission to NCVER to test your data.
Before you even do an AVETMISS export from TEAMS, do all of these steps below
Main Dashboard > Alerts – CRICOS Tile > Active Interventions
Overview
The active intervention alert will show you the count of students who have an Active Intervention linked to their enrolment. It will not matter what the start date of the intervention was, it will just count it because there is no intervention outcome against it that would consider it completed.
Rules: if you have an active intervention, no matter the commencement date of the intervention, it will show in the tile count and list screen. The only way to stop an intervention from being considered active is to set an intervention outcome against it.
When you are in the list screen for this count you can change the dates there to see all the interventions that have a commencement date within a specific date range.
The screen is divided into two sections
Filter/Parameters
Active Intervention Listing
Filters/Parameters
To open this screen, you would have selected the count hyperlink for Active Intervention. Based on what you have selected, the system will open the screen and populate the information in this section. It will show the start date and end date of the Active Intervention. You can change the dates and select the Apply button for the system to refresh the list for you.
Select the Burger icon to learn more about how it works
Notes:If the intervention has an outcome and the outcome date from which you are searching in the filters is outside of that date range, then that intervention will not be there. And if the outcome is after the date range, it is considered active.
Listing Grid
The system will show you a summary of information for each enrolment that has Active Interventions. The information that displays in the columns for this grid is generally standard information. However, please keep an eye out for any What’s New posts for this screen as this is where we would let you know of any new columns or changes to existing ones that we do.
From the Action column, you will be able to do different actions for each agent listed. Please see the TEAMS Icons post for more information on each action and what you can do.
IMPORTANT: If you open an enrolment there would be an intervention either active or completed. If there is an intervention status that means the intervention is still open and that is the date system looks for while you search in the filters.
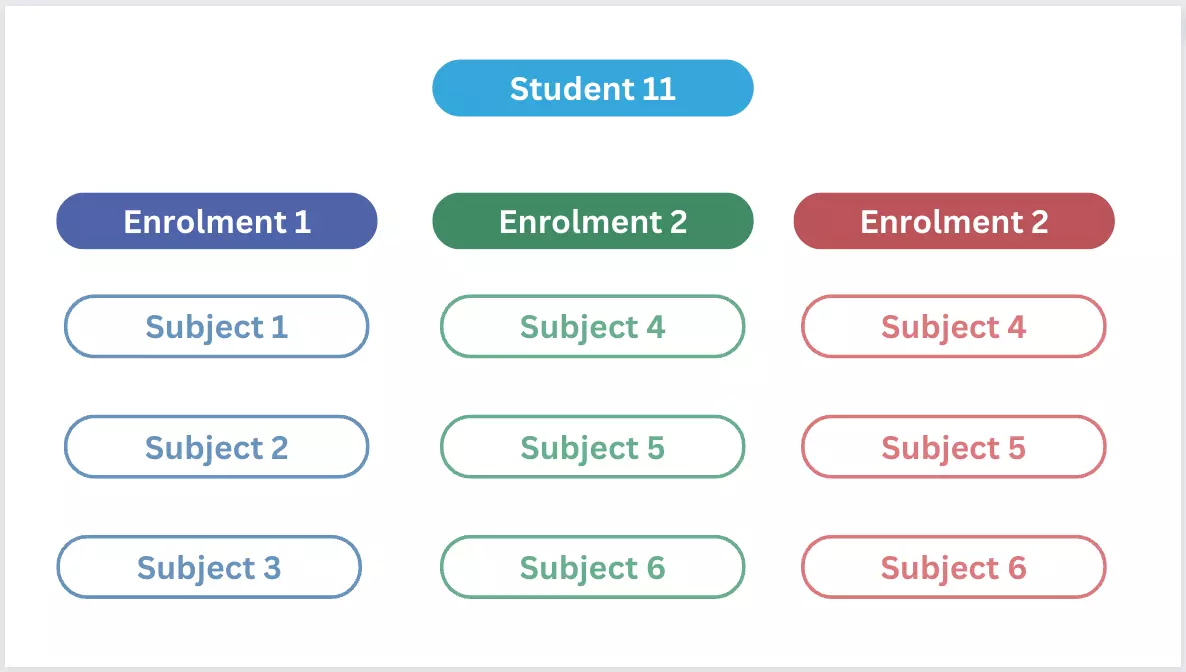
As you all know, students can have multiple enrolments with multiple subjects in the system. However, you may not be aware that for each subject linked to an enrolment you can also have Assessments and mark results at that level instead. This new rule impacts anyone using assessments in the system.
Using the student and enrolment examples above there are two scenarios that will help to explain how the new check works.
Scenario 1
As you can see in the above image, Subject 1 has three assessments and their results have been marked as Successful with result dates for each assessment result. Based on the last assessment result you enter and its result date, the system will take that assessment result date and at the Subject level automatically update the Subject result to Competent and it uses the last assessment result date as the Subject result date. In the example above, you can see that for Assessment 3 its result date has been marked as 02/08/2022 and the system has updated Subject 1 with the final result of Competent and the result date as 02/08/2022.
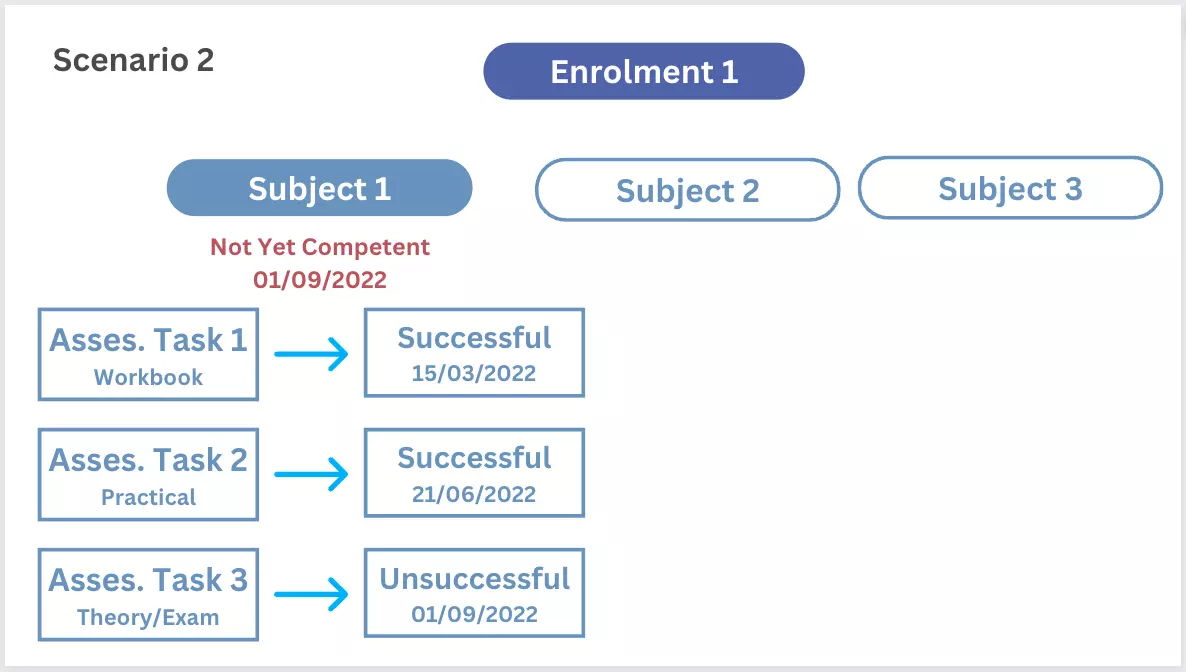
Scenario 2
Another scenario for the same could be that one of the assessments has a result of Unsuccessful, as you can see with Assessment 3 above. Based on all assessment having a result the system has then update Subject 1 with a result of Not Yet Competent and again used the Assessment 3 result date of the 01/09/2022 as the Subject result date.
New Check Explanation
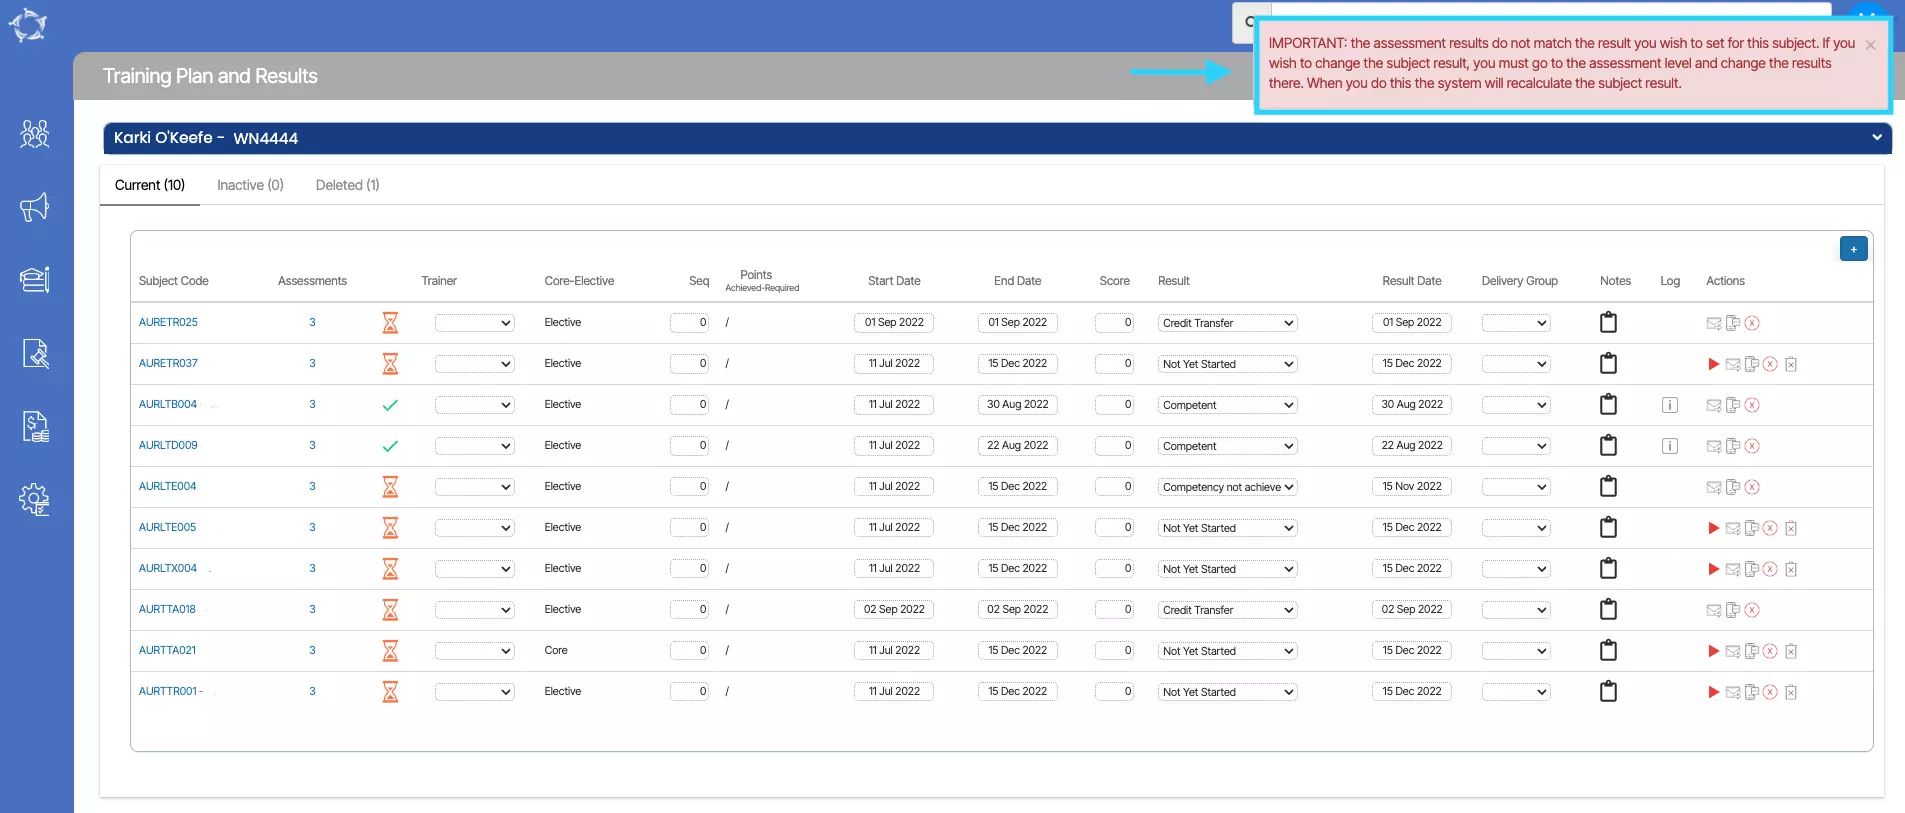
Using either of the above scenarios, it doesn’t matter what the final result is (successful or unsuccessful) if a user goes to the Subject level and tries to change the result so that it clashes with the assessment level results it will stop you from changing the Subject Result.
For example, using Scenario 1 above, if a user went to the Training Plan & Results screen and tried to change the Subject 1 result from Competent to Not Yet Competent or any other result the system would stop you and you would see this message below:
To change the Subject Result you must go to the Enrolment Assessment Results screen and change the relevant assessment result and save and then the system will re-calculate and update the correct result against the Subject.
There are a few rules that will stop an enrolment from being exported in the AVETMISS export files which are listed below.
Firstly, there are two different types of AVETMISS exports in the system that are:
National Export – this is to export files to submit to NCVER
State Export– this allows you to select a specific State and the files will be exported to meet the state level rules for submission to that State
Reason’s that an enrolment will not be in the National Export
The student is not flagged as AVETMISS. How to check this? Go to the student dashboard and select the Edit Student icon and see if the AVETMISS tick box is selected or not?
Enrolment is not flagged as Include in National Export. How to check this? Open the Enrolment Dashboard and go to AVETMISS Settings and see if this is selected.
Result dates for the subjects linked to the enrolment do not fall within the calendar year you selected for the export. How to check this? Open the Enrolment Dashboard > Results & Progress Tile > Training Plan and Results screen. Then look at each subject and its result date, if there are none within the calendar year you selected that is why and you may need to update the result date/s where needed. If you don’t remember or are unsure what calendar year you selected for the export, go to the main menu for Compliance > AVETMISS Export History screen. From the list, look for the last export you did and in the Filters column it will show you the calendar year you selected.
Enrolment is flagged as Do not include in AVETMISS submission. How to check this? Open the Enrolment Dashboard and go to the Edit Enrolment and see if this is selected.
Enrolment is not flagged as started. How to check this? Open the Enrolment Dashboard and in the Enrolment Profile tile see if the icon for Started is green or red? If it is red, then it is not started.
Enrolment is flagged as cancelled. How to check this? Open the Enrolment Dashboard and in the Enrolment Profile tile see if the icon for Cancelled is grey or red? If it is red, then it is cancelled. IMPORTANT: this is the only setting that tells the system that the enrolment is cancelled. If you have an Enrolment Outcome that says cancelled, this is not considered by the system at all as cancelled.
Reason’s that an enrolment will not be in a State Export
The student is not flagged as AVETMISS. How to check this? Go to the student dashboard and select the Edit Student icon and see if the AVETMISS tick box is selected or not?
An incorrect state is selected on the enrolment AVETMISS screen. How to check this? Open the Enrolment Dashboard and go to AVETMISS Settings and see if there is a state selected for the State Training Authority field and is it the correct State?
Result dates don’t fall under the export year parameters. How to check this? Open the Enrolment Dashboard > Results & Progress Tile > Training Plan and Results screen. Then look at each subject and its result date, if there are none within the calendar year you selected that is why and you may need to update the result date/s where needed. If you don’t remember or are unsure what calendar year you selected for the export, go to the main menu for Compliance > AVETMISS Export History screen. From the list, look for the last export you did and in the Filters column it will show you the date rangeyou selected.
Enrolment is flagged as Do not include in AVETMISS submission. How to check this? Open the Enrolment Dashboard and go to the Edit Enrolment and see if this is selected.
Enrolment is not flagged as started. How to check this? Open the Enrolment Dashboard and in the Enrolment Profile tile see if the icon for Started is green or red? If it is red, then it is not started.
Enrolment is flagged as cancelled. How to check this? Open the Enrolment Dashboard and in the Enrolment Profile tile see if the icon for Cancelled is grey or red? If it is red, then it is cancelled. IMPORTANT: this is the only setting that tells the system that the enrolment is cancelled. If you have an Enrolment Outcome that says cancelled, this is not considered by the system at all as cancelled.
AVETMISS Export is the process of extracting AVETMISS data from TEAMS in a format that can be submitted to the relevant State Training Authority (STA) or the National Centre for Vocational Education Research (NCVER) in Australia.
AVETMISS Export involves selecting and extracting the required data fields and formatting them according to the AVETMISS data standard. This process ensures that the AVETMISS data is accurate, complete, and consistent with the data standards, which is essential for meeting the mandatory reporting requirements for your college.
When you are on the AVETMISS Export screen, you can choose between two export options which are State or National.
State – State level AVETMISS submission refers to the process of submitting AVETMISS data to the relevant State Training Authority (STA) in each Australian state.
National – National level AVETMISS submission, on the other hand, refers to the process of submitting AVETMISS data to the National Centre for Vocational Education Research (NCVER), which is the national agency responsible for collecting, managing, and analysing VET data in Australia.
Please choose your preferred option on the screen and then select the Next button. This will allow you to proceed to the next step in the process.