NCVER AVETMISS Student Data Submissions – Classic TEAMS Steps 3

Enrolment Training Plan data

The enrolment information is exported into a number of different NAT files that include:

  • NAT00120Training Activity – This is the student/enrolment file that includes Overduee results, enrolment start date and end date, enrolment flagged as overseas etc.
  • NAT00060 – this lists all the Competencies/Modules that are listed in the NAT00120 for the students and what their results are etc in 2022.
  • NAT00030 – this lists all the Courses/Qualifications that are listed in the NAT00120 for the students studying in 2022

Note: This file is where you will always get large volumes of errors that can be in the 1000’s and will have to do with not setting and following rules for your data in TEAMS correctly.

Before you even do an AVETMISS export from TEAMS do all these steps below

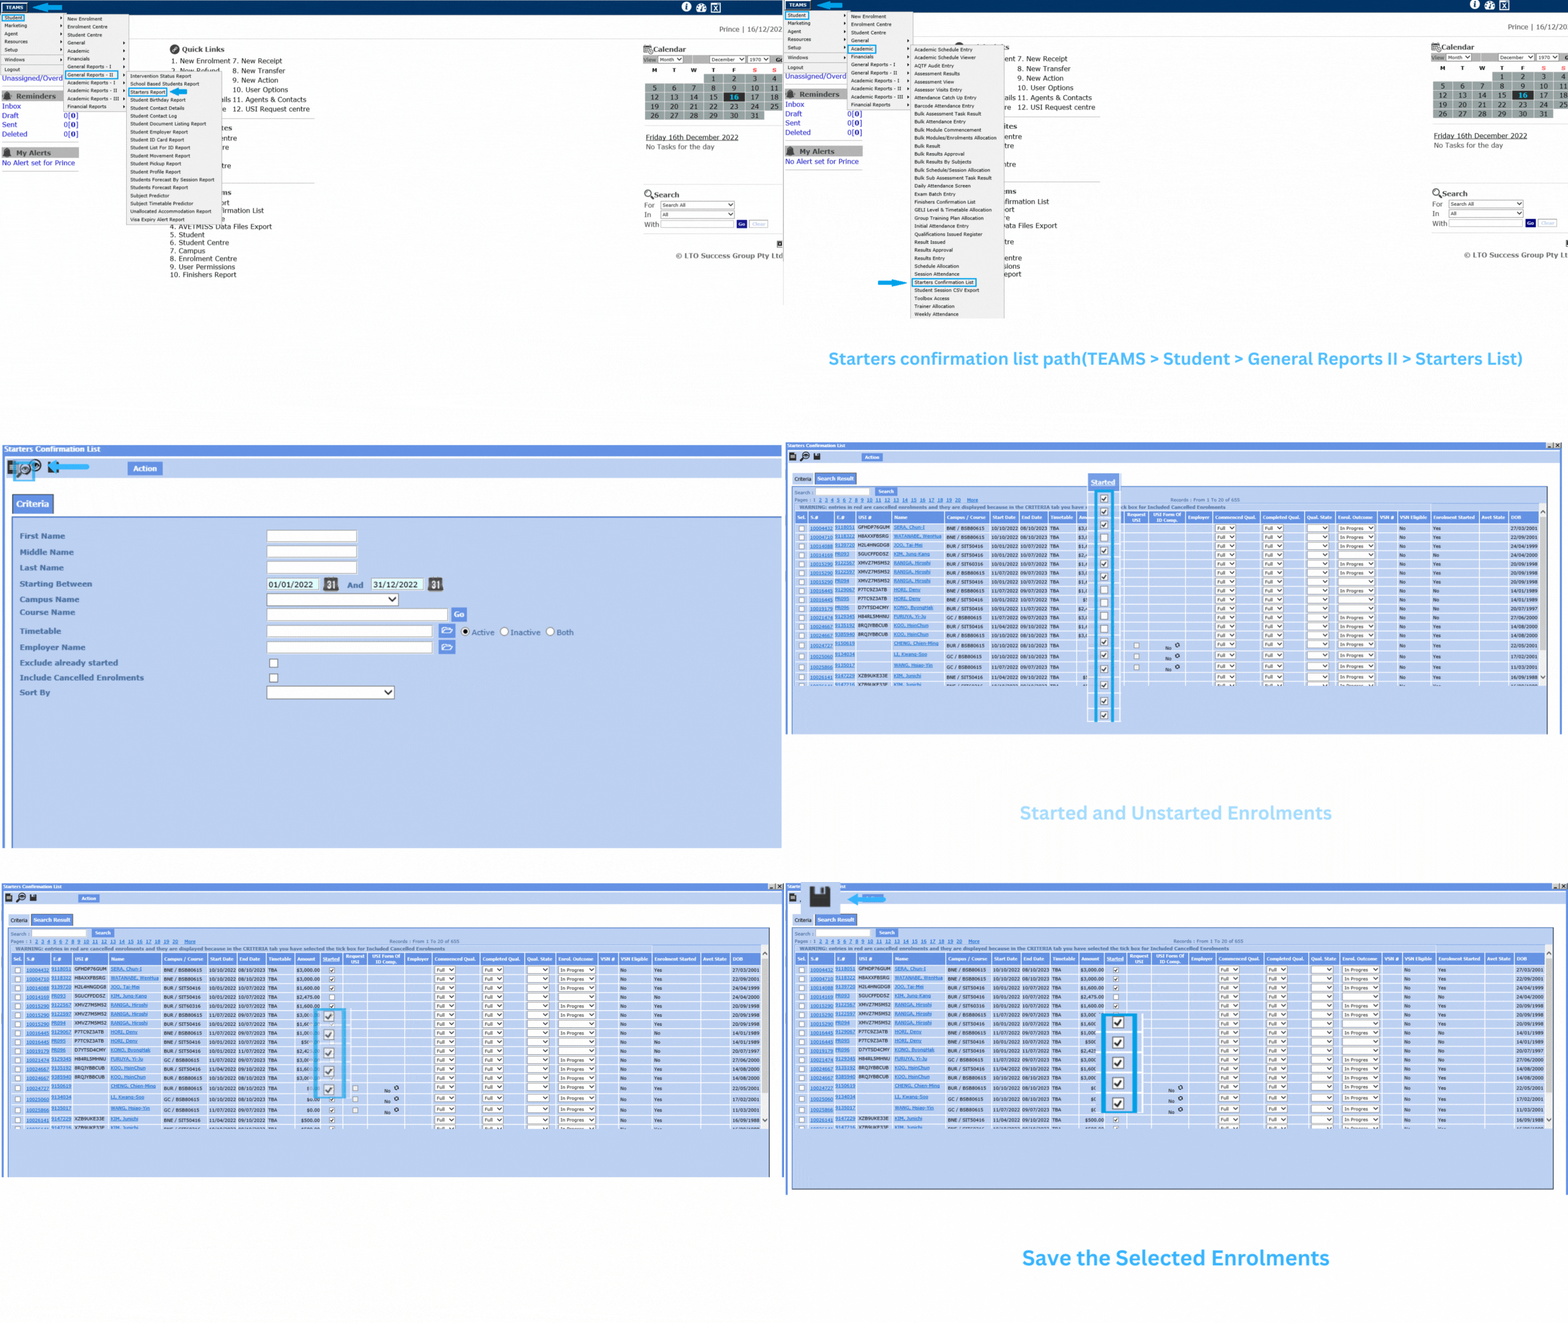
  • Generate your Starters Report from TEAMS > Student > General Reports II > Starters Report by selecting the date range of the whole year (01/01/2022 to 31/12/2022) that you are doing the submission for and look at all your VET Starters and confirm that all that started have been flagged as started in TEAMS. OR
  • You can simply go to TEAMS > Student > Academic > Starters Confirmation List screen to start the enrolments in bulk that has the start and end date within the submission year.
To Know more about the enrolment AVETMISS data, please see below:

Start and End date of the training activity

Overdue Result for the competency/module

Funding Source National ID

Include in National Export

Delivery Mode Identifier

Training Location

AVETMISS Enrolment – Delivery Mode/Pre dominant identifiers missing

Compliance Dashboard > AVETMISS Enrolment > Delivery Mode/Pre dominant identifiers missing

The AVETMISS Enrolments tile will show you the enrolments as a link that has Delivery Mode/Pre dominant identifiers missing for the subjects. To update the Delivery Mode, you need to follow the below steps:

  • Select This Calendar Year (2022) from the calendar icon
  • Select the hyperlink next to the Delivery Mode/Pre dominant identifiers missing
  • You will be taken to the Delivery Mode/Pre dominant identifiers missing listing screen.
  • Select the enrolments for which you wish to update the Delivery Mode
  • It will open the Enrolment Dashboard, you then need to select the AVETMISS settings icon
  • On the AVETMISS settings screen, select the Subject AVETMISS Settings tab
  • Edit the Subject and update the Delivery Mode and save.

Note: When you have updated the Delivery Mode/Pre dominant identifiers for the enrolments, you need to refresh the Compliance dashboard screen to see the count of the enrolments for the Delivery mode.

AVETMISS Enrolments – Training Location Missing

Compliance Dashboard > AVETMISS Enrolments > Training Location Missing

The AVETMISS Enrolments tile will show you the enrolments as a link that has the Training Location missing for them. To update the Training Location, you need to follow the below steps:

  • Select This Calendar Year (2023) from the calendar icon
  • Select the hyperlink next to the Training Location Missing
  • You will be taken to the Training Location Missing listing screen
  • From the filters, select your desired Campus from the dropdown and then click on the Apply Filter button
  • The screen will refresh and show you the Training location dropdown with Update button
  • You need to select the Training Location from the dropdown and then click on the Update button

Note: When you have updated the Training Location for the enrolments, you need to refresh the Compliance Dashboard screen to see the count of the enrolments for the training location

AVETMISS Enrolments – Include in National Export

Compliance Dashboard > AVETMISS Enrolments Tile > Include in National Export

IMPORTANT – If you are reporting the student/enrolment to NCVER, you must select the Include in National Export tick box at the enrolment level AVETMISS Settings otherwise the enrolment will not get reported in the submission and if you doing the submission at the state level then you need to select the State Training Authority on the Enrolment AVETMISS settings screen.

The AVETMISS Enrolments tile will show you the enrolments for which the Include in National Export is not ticked. To select/tick the include in national export, you need to follow the below steps:

  • Select This Calendar Year (2023) from the calendar icon
  • Select the hyperlink count next to the Include in National Export
  • You will be taken to the Include in National Export listing Screen
  • Select the desired tick boxes against the student number that you wish to include in the National Export
  • Then select the Include in national Export tick box above the grid and click on the update button

Note: When you have selected the Include in National Export tick box for the enrolments, you need to refresh the Compliance dashboard screen to see the count of the enrolments for the Include in National Export.

AVETMISS Enrolments – Funding source – National should not be blank

Compliance Dashboard > AVETMISS Enrolments Tile > Funding source – National should not be blank

IMPORTANT – If the enrolment is selected as overseas then the funding source national must not be left blank. to update the funding source national you need to see if your student is studying onshore or offshore.

Funding Source National is a code that defines the mode of study whether it is Online, Classroom based or Training Based etc.

Examples
For Onshore Students – If the student is not in Australia and studying overseas then you need to select the funding source national as (31 – International Onshore Client – Other Revenue)
For Offshore Students – If the student is studying in Australia then you need to select the funding source national as (32 – Internation Offshore Client – Other Revenue)

The AVETMISS Enrolments tile will show you the enrolments as a link that has the funding source national as blank for them. To update the Funding Source National, you need to follow the below steps:

  • Select This Calendar Year (2023) from the calendar icon.
  • Select the hyperlink next to the Funding source – National should not be blank.
  • You will be taken to the Funding source – National should not be blank listing Screen.
  • Select the enrolments that you wish to update the Funding Source National.
  • It will open the Enrolment Dashboard, you then need to select the AVETMISS settings icon.
  • On the AVETMISS settings screen, select the Funding Source National from the dropdown and save.

Note: When you have updated the Funding Source National for the enrolments, you need to refresh the Compliance dashboard screen to see the count of the enrolments for the funding source national.

NCVER AVETMISS Student Data Submissions – RTO TEAMS Step 3

Enrolment Training Plan data

The enrolment information is exported into a number of different NAT files that include:

  • NAT00120Training Activity – This is the student/enrolment file that includes Overduee results, enrolment start date and end date, enrolment flagged as overseas etc.
  • NAT00060 – this lists all the Subjects that are listed in the NAT00120 for the students and what their results are etc in 2022.
  • NAT00030 – this lists all the programs that are listed in the NAT00120 for the students studying in 2022

Note – This file is where you will always get large volumes of errors that can be in the 1000’s and will have to do with not setting and following rules for your data in TEAMS correctly.

The very first step you need to do before you do the AVETMISS Export

  • Generate your Starters Report by selecting the date range of the whole 2022 year that you are doing the submission for and look at all your VET Starters and confirm that all that started have been flagged as started in TEAMS. OR
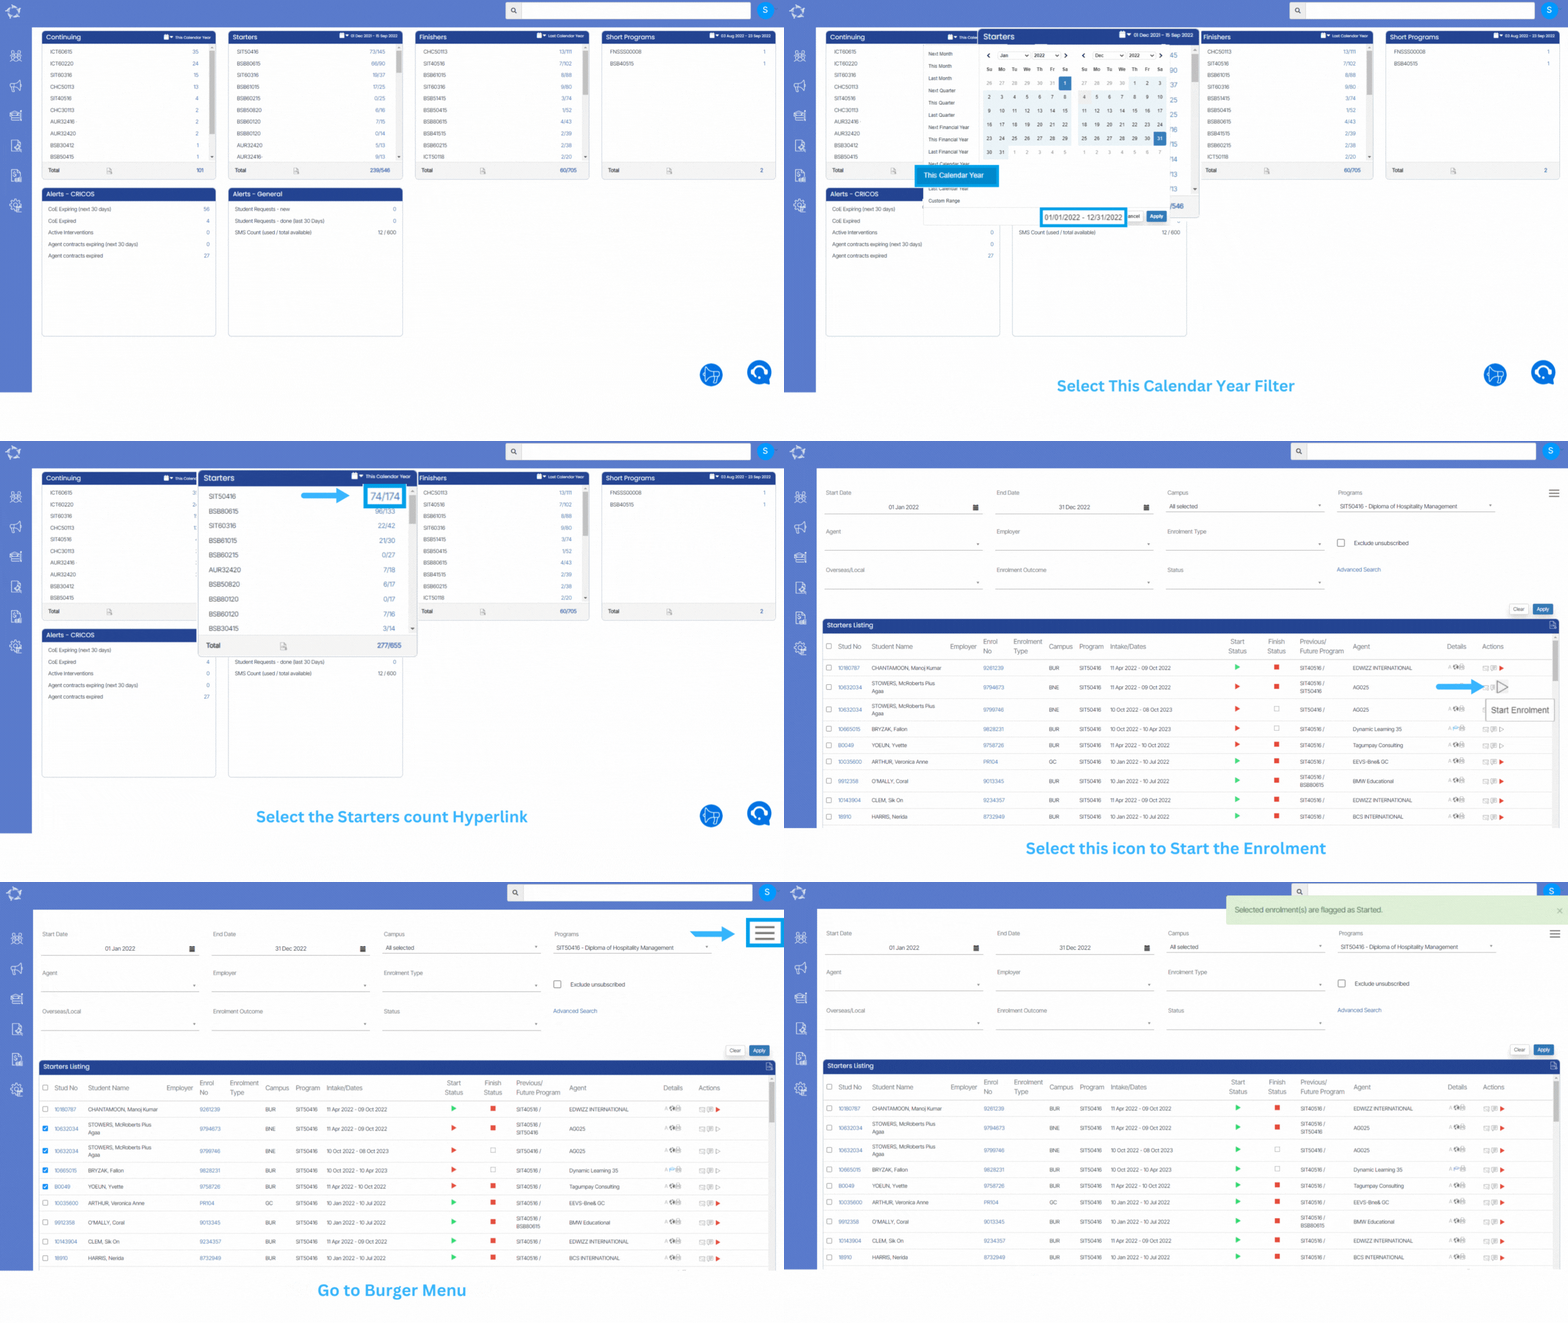
  • You can simply go to the Compliance Dashboard and look for the Starters Tile and then select This Calendar Year which is 2022 to see the enrolments that have not been flagged as starters
  • Select the hyperlink which will take you to the Starters list where you can start enrolments in bulk that have not been flagged as starters

To know more about the AVETMISS Enrolment data, Select the below links.

Overdue Result

Enrolment is not flagged as overseas

Funding source national should not be blank

Include in national export

Training Location Missing

Delivery Mode/Pre Dominant identifiers

AVETMISS Enrolments – Enrolment is not flagged as overseas

Compliance Dashboard > AVETMISS Enrolment Tile > Enrolment is not flagged as overseas

IMPORTANT – if you are a 100% CRICOS VET college then this should say YES for all your students. For every student who is enrolled in a VET Program then you MUST make sure they are set as Overseas in two locations that are: Student Level – Edit Student Screen and Enrolment Level – Edit AVETMISS screen

Note: If the student is overseas then you must select whether the student is studying onshore or offshore on the edit student screen.

The AVETMISS Enrolments tile will show you the enrolments as a link that are not flagged as overseas. To flag the enrolment as overseas you need to follow the below steps:

  • Select This Calendar Year (2023) from the calendar icon
  • Select the hyperlink next to the Enrolment is not flagged as overseas
  • You will be taken to the Enrolment is not flagged as an overseas listing Screen, Check the ‘Overseas Enrolment’ box to fix the error in bulk.
  • You may select all the students at once by selecting the header tickbox.
  • Finally, click on the ‘Update’ button to mark the selected enrolments as overseas.

AVETMISS Enrolments – Overdue Result

Compliance Dashboard > AVETMISS Enrolments Tile > Overdue results

IMPORTANT – if you have enrolments that end in 2023, and they have no final outcome/result such as Competent, Withdrawn, CT etc then you will get errors. You can remove this error by updating the final outcome for each subject or updating the subject end date to 2023.

When there are results (Not Yet Started or Continuing Enrolment) and it has the result date within the calendar year 2023 selected then the system will show you the overdue results for the subjects. You need to select the correct result and result date falling in the submission calendar year.

Note: If you have the NYS and CE results for the subjects and these results don’t have final outcome then you need to update the result date as the future calendar year.

The AVETMISS Enrolments tile will show you the overdue results of the subjects that are without the results of the subject for the enrolments with the total count of the enrolments as a link. To update the results you need to follow the below steps:

  • Select This Calendar Year (2023) from the calendar icon.
  • Select the hyperlink next to the Overdue Result label.
  • You will be taken to the Overdue Result Listing Screen.
  • Select the enrolments that you wish to update the results.
  • It will open the Enrolment Dashboard, you then need to select the Group Training Plan icon.
  • On the Group Training Plan screen, you can update the results and save them.

Note: When you have updated the Overdue Result for the subjects of the enrolments, you need to refresh the Compliance dashboard screen to see the count of the overdue result.

With USIs Not Verified

Compliance Dashboard > AVETMISS Students Tile > WIth USIs Not Verified

The AVETMISS Students Tile will show you the count of students as a link With USIs Not Verified. To verify the USIs, you need to follow the below steps:

  • Select This Calendar year from the Calendar icon.
  • Select the hyperlink next to the WIth USIs Not Verified.
  • You will be taken to the Students – USIs Not Verified listing screen.
  • Select the student number hyperlink under the Student No column.
  • You will be taken to the Edit Student – USI screen.
  • Update the Student’s USI number and select the Save button.

Note: When you have verified the USI number on the Compliance Dashboard, you need to refresh the screen to see the updated count of the With USIs Not Verified.

Missing Gender

Compliance Dashboard > AVETMISS-Students Tile > Missing Gender

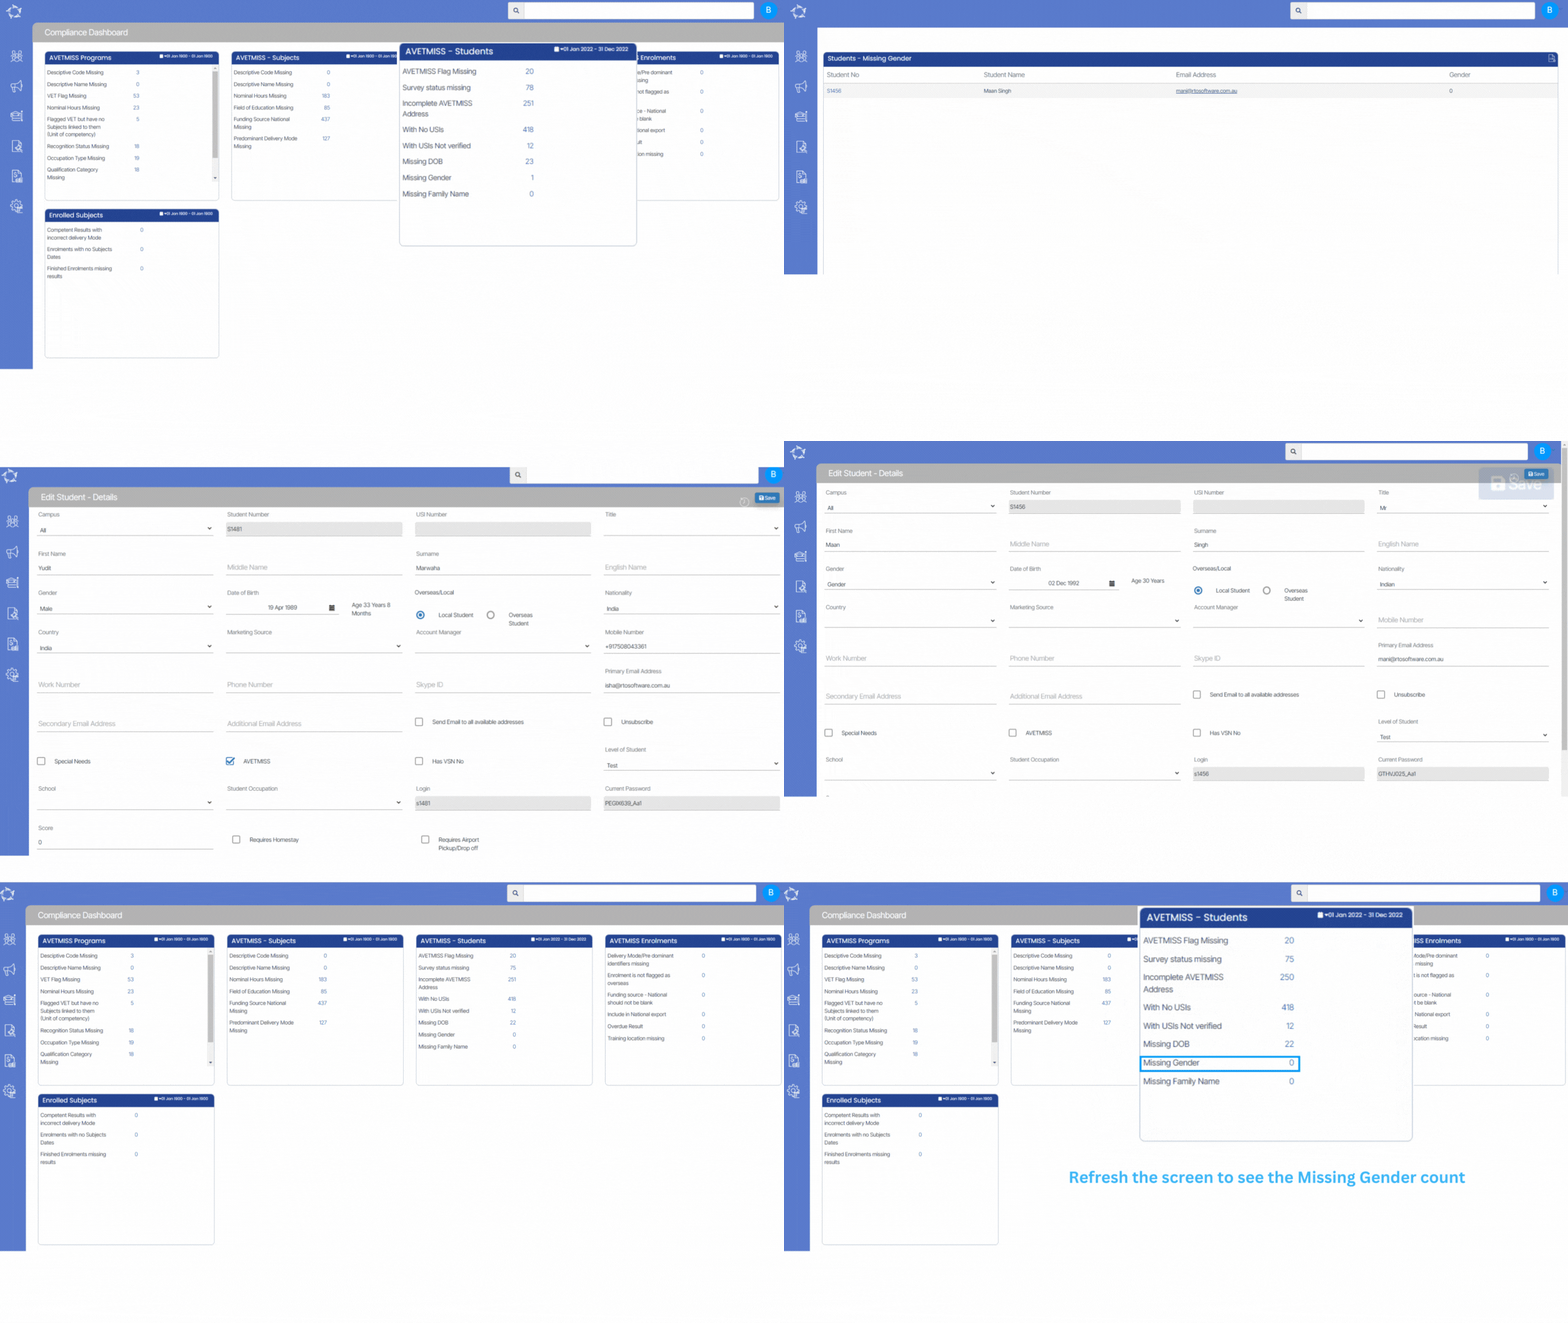
The AVETMISS Student Tile will show you the Missing Gender of the students in the system. To update the missing GENDER, you need to follow the below steps:

  • Select This Calendar year from the Calendar icon
  • Select the hyperlink next to the Missing Gender.
  • You will be taken to the Student-Missing Gender Listing Screen.
  • Select the student number link to update the Missing Gender.
  • On the Edit Student Screen, Update the Gender of the student and Save.

Note: When you have updated the Gender of the students then on the Compliance Dashboard, you need to refresh the screen to the count of the Missing Gender students.