Subjects – Descriptive Code Missing

Compliance Dashboard > AVETMISS Subjects Tile > Descriptive Code Missing

The Subject Descriptive code of the subject is a mandatory field in TEAMS and you can update the correct descriptive code from the TGA site (training.gov.au) and that’s what will print in a record of results. For the Subject Code field on the subject screen, you can have whatever you want as they are internal.

The AVETMISS Subject Tile will show you the Descriptive Code Missing with the total count of the subjects as a link . To update the Subject Descriptive Code, you need to follow the below steps:

  • Select the Calendar year from the Calendar Icon
  • Select the hyperlink next to the Descriptive code missing
  • You will be taken to the Total Subjects no Descriptive Code listing screen.
  • Select the Subject code, which will open the Subject entry screen.
  • On this screen, add the Subject Descriptive Code and Save the screen.

Note – When you have updated the AVETMISS Subject data for the Subject Descriptive Code then on the Compliance Dashboard, you need to refresh the screen to see the count of Descriptive Code missing.

NCVER AVETMISS Student Data Submissions – RTO TEAMS Step 5

Subject Data

The Subject data is exported into NAT00060 file. This lists all the Subjects that are listed in the NAT00120 for the students and what their results are etc in 2022.

IMPORTANT – This is where you can get hundreds, sometimes thousands of errors (based on the number of enrolments in a Subject that are listed in the NAT00120) when you do not setup your Subjects in TEAMS with the correct AVETMISS settings. For each student listed in the NAT00120 with a specific Subject (where there is a setting that is wrong/missing) that is how many times you will get the same error. So once you fix/add the correct setting for the Subject in TEAMS those specific errors will disappear for those hundreds or thousands of rows in your next export and submission. The logic is fix in one spot and it will fix many rows of data in the NAT00120.

For example – You have Subject that has 2 different errors as it is missing 2 different AVETMISS settings in TEAMS. For that Subject in the NAT00120 you have 700 students listed, this means each setting is a different error so you will have 700 rows of errors for one setting and for the 2 settings you will have 1400 rows of errors. BUT once you go to that Subject in TEAMS and add those 2 settings and do your next export and submission all 1400 rows of errors will not be there. This is a general rule but is NOT always the case.

To review and clean up any data for Subjects you need to go to the Main Dashboard > Compliance Menu > Compliance Dashboard.

To Know more about the AVETMISS Subjects data, select the below links.

Subjects Descriptive Code Missing

Subjects Descriptive Name Missing

Subjects Nominal Hours Missing

Subjects Funding Source National Missing

Subjects Predominant Delivery Mode Missing

Compliance Alerts

Enrolment Dashboard > Compliance Alerts Tile

history of changes

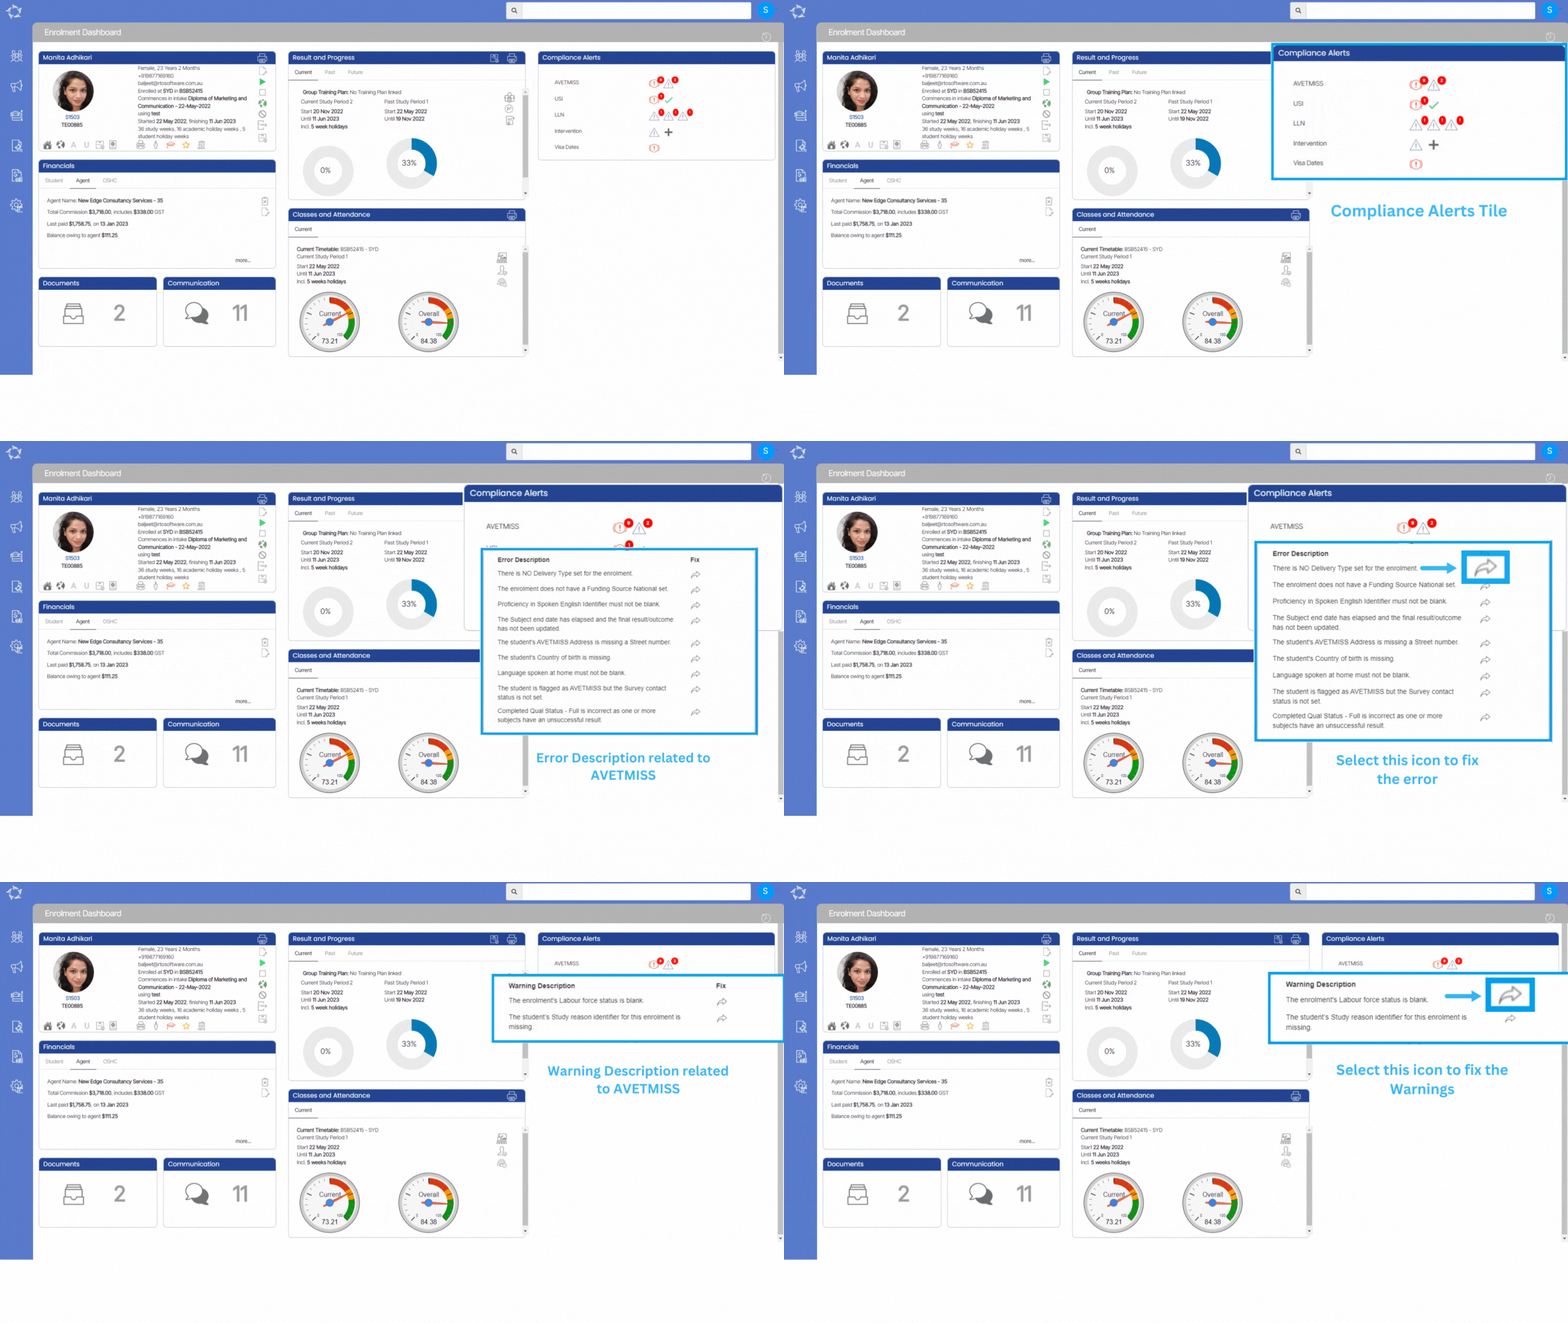
This tile will show you all the Errors and Warnings with their descriptions for enrolment with the red numbers for different objects.

Different icons and their function under the compliance tile are explained below:

  • This icon will show you the number of errors in red and when you select this error icon, it shows the error descriptions as shown below:
  • This icon is called the fix icon and when you select this icon, it will take you to the particular screen where you can fix the error according to the description.
  • This icon will show you the number of warnings in red and when you select this error icon, it shows the warning descriptions as shown below:

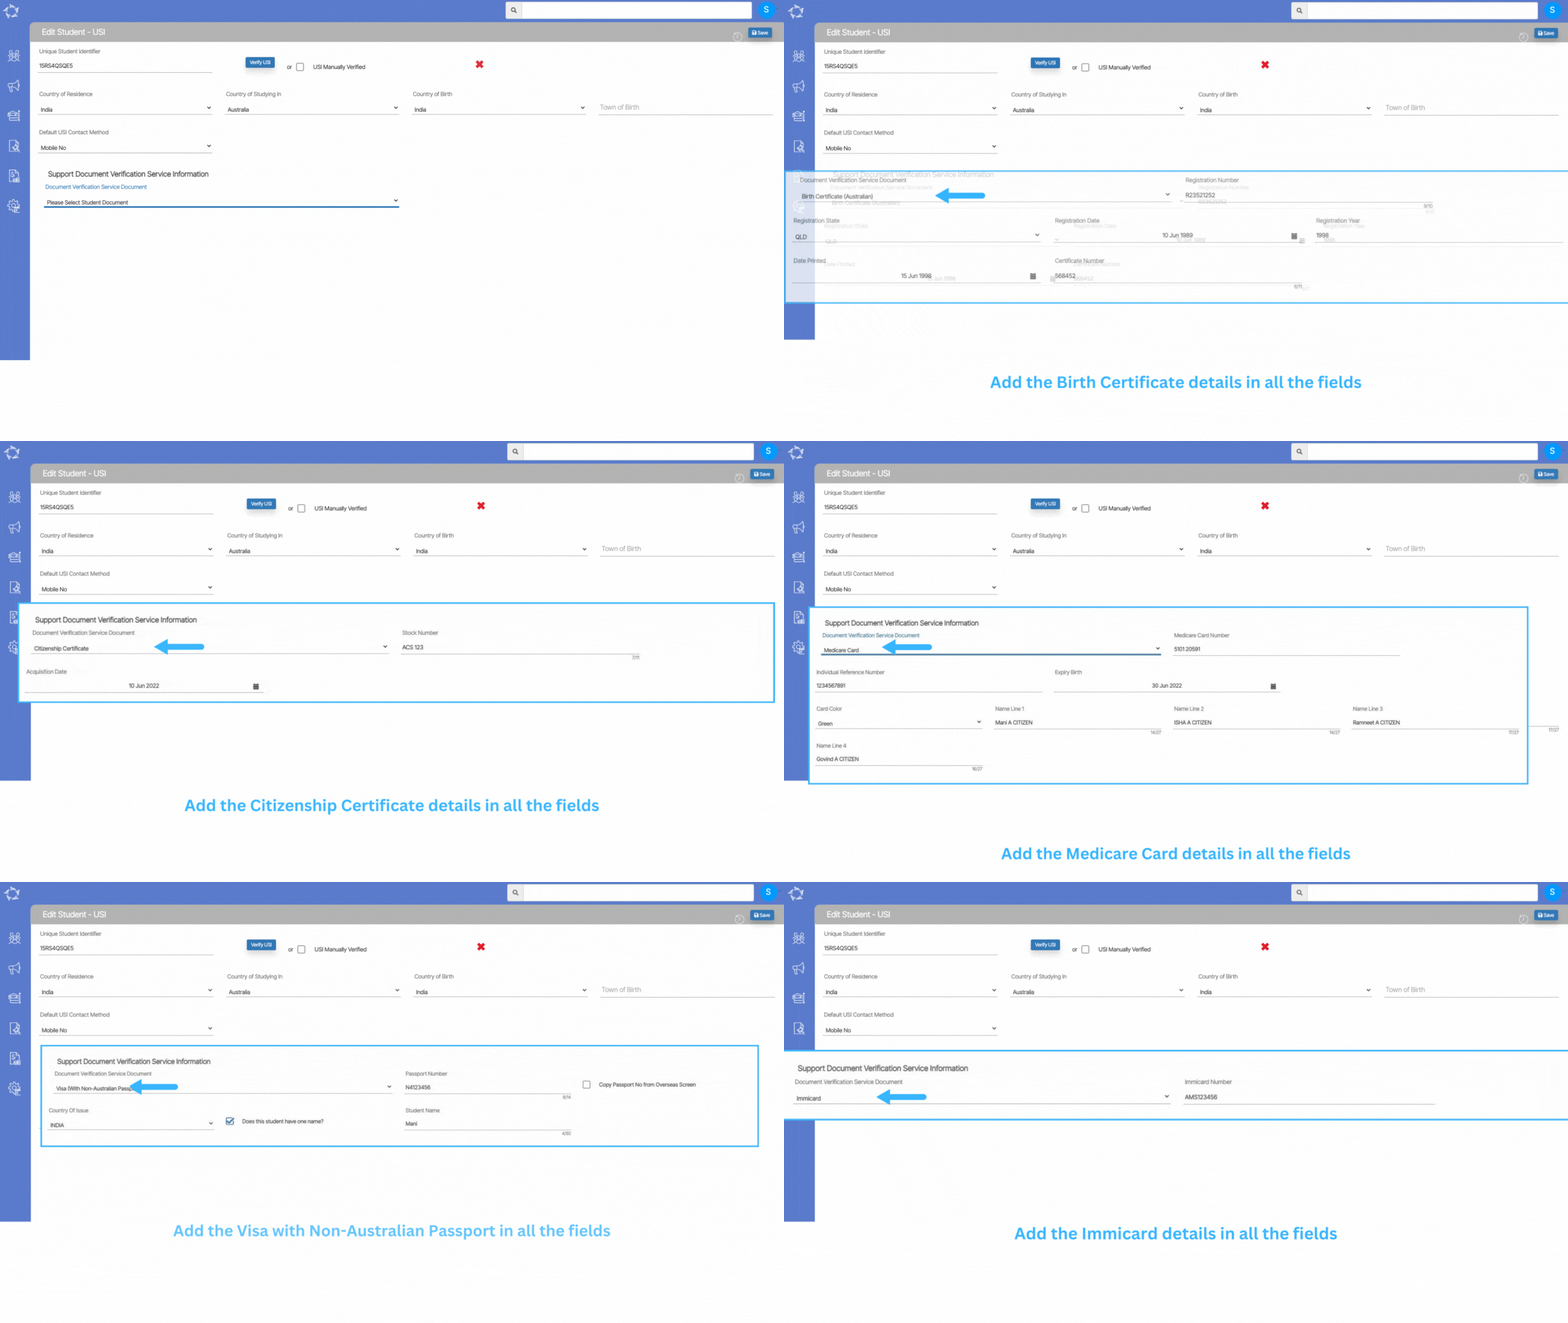
Support Document Verification Service Information

You will see different kinds of support documents that require for the USI verification and when you select any document from the dropdown, it shows you different fields related to the selected document.

To create a Unique Student Identifier (USI) you will need to use a valid form of Australian ID from the list below:

  • Birth Certificate (Australian) – A birth certificate can refer to either an original document or a certified copy issued by an Australian State or Territory. When using a birth certificate as a form of ID in the USI registry system, please be aware that: state refers to the state or territory in which the birth was registered.
  • Certificate of Registration by Descent – A certificate of registration by descent (RD) is issued by the Australian Government to a person who: was born outside Australiahas at least one parent who was an Australian citizen at the time of their birth.
  • Citizenship Certificate – A citizenship certificate is issued by the Australian Government and is proof that someone born outside Australia is an Australian citizen. The Acquisition Date is the date Australian Citizenship was acquired. The stock Number appears on the citizenship certificate.
  • Driver’s Licence – Your driver’s licence must be current, valid and issued by an Australian State or Territory to be used as a form of ID.
  • Medicare Card – Your Medicare Card must be valid and issued by Medicare Australia. Medicare Card Number appears above the name(s) on the Medicare card.
  • Visa (With Non-Australian Passport) – Non-Australian citizens intending to study in Australia require a visa issued by the Australian Government. The visa must be current and valid. If you select Non-Australian Passport (with Australian Visa) as your form of ID, please enter your Non-Australian passport number when creating your Unique Student Identifier.
  • Immicard – An ImmiCard is issued to certain visa holders who don’t have and can’t obtain a passport recognised by the Australian Government. An ImmiCard assists visa holders to provide evidence of their Commencement of Identity (COI) in Australia.

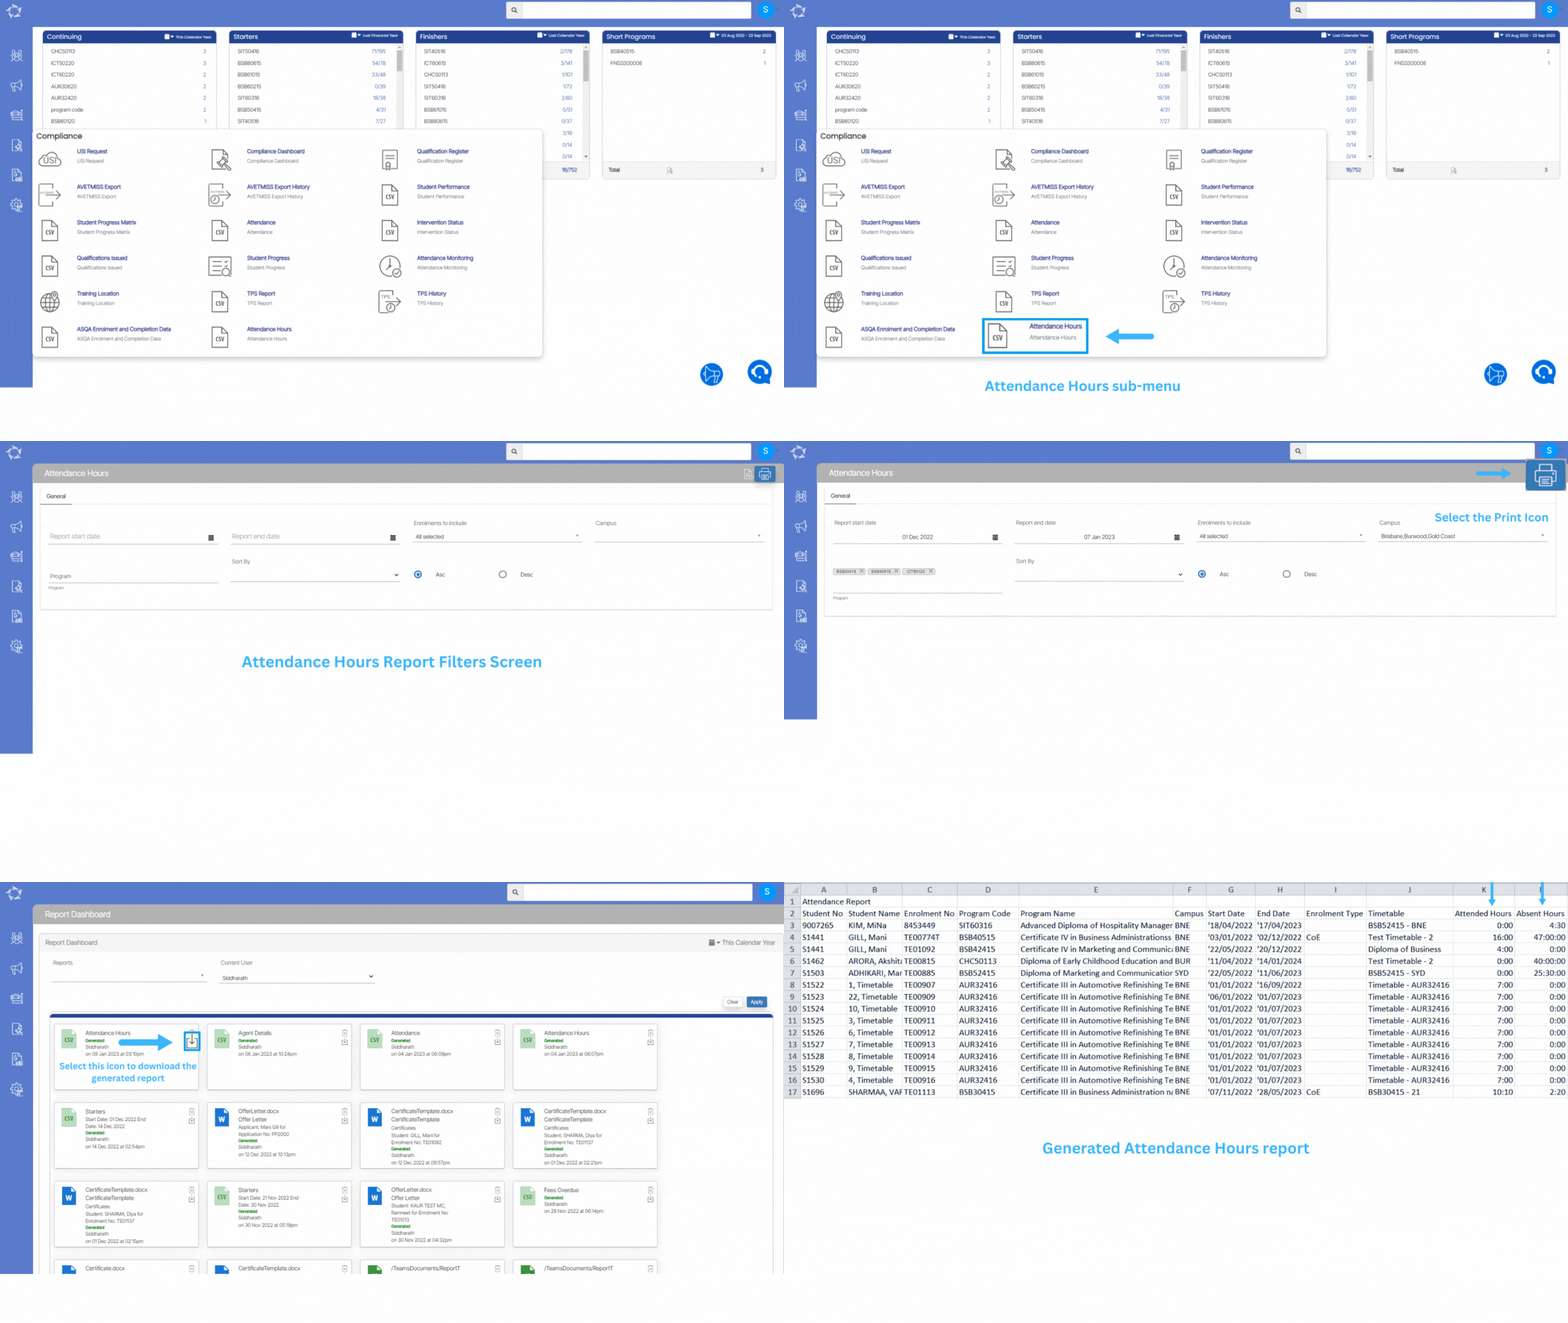
Attendance Hours Report

Main Dashboard > Compliance Menu > Attendance Hours Report

We have added a new report Attendance Hours Report under the Compliance Menu. This report will show you the Attended and Absent hours for each enrolment of the student for a selected period.

To know more about the Filters/Parameters, Columns, and explanations, please select the below links.

Attendance Hours Report Filters

Attendance Hours Report Data Columns

Training Location Classic TEAMS

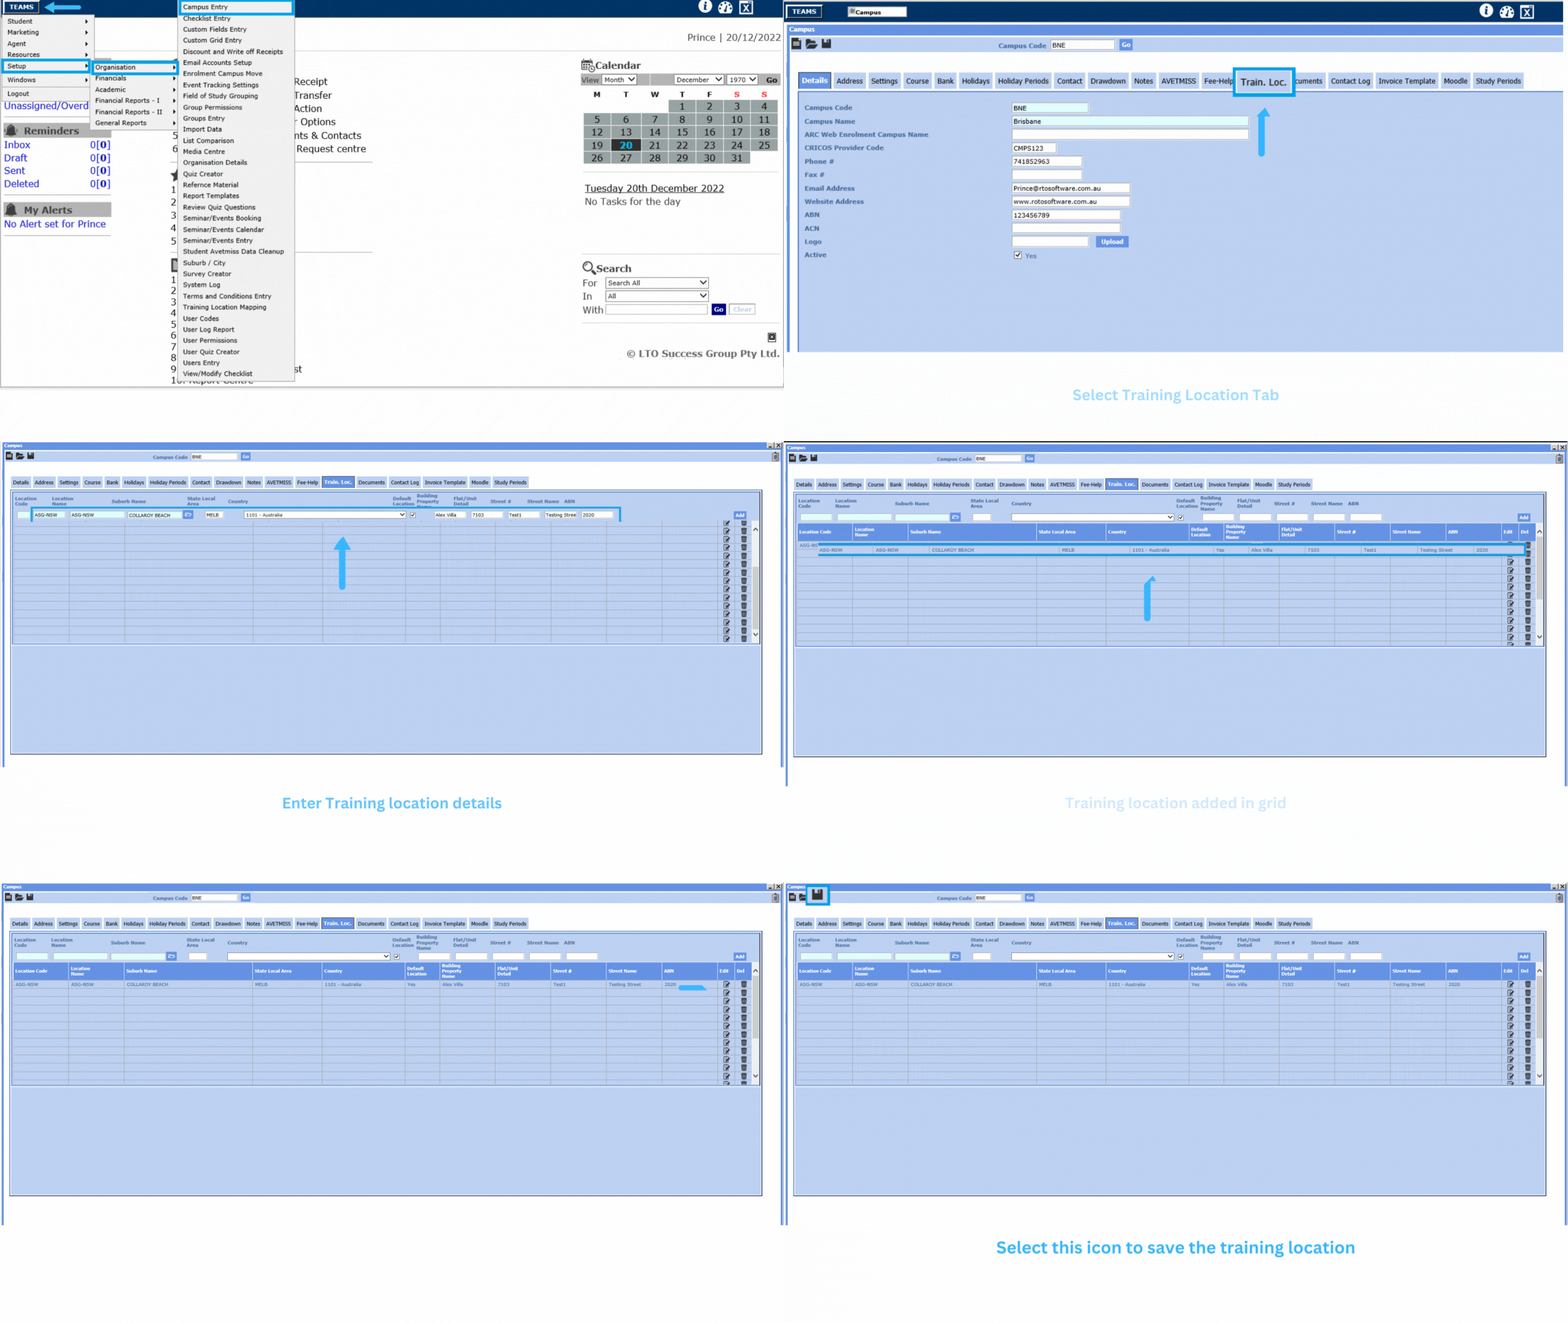
This error occurs when the training location is missing for the enrolments. To add training location in Teams you need to follow the below steps :

  • Go To TEAMS > Setup > Organisation > Campus Entry
  • Enter the training location details in all the columns.
  • Select Add button to add the training location.
  • You can also Edit and Delete the training location.
  • Select the Save button to save the training location.

Delivery Mode/Pre Dominant Identifiers

This screen will show you the enrolments that have Pre-dominant Delivery Mode missing for the subjects. To update the Delivery Mode, you need to follow the below steps:

For updating the Delivery Mode, you need to follow the below steps:

  • Go TEAMS > Enrolment Centre > Academic Tab > Student Result Screen > Delivery Type (2018)
  • Enter the correct number and Pre-dominant delivery mode and Save.

Funding Source National Missing

IMPORTANT – If the enrolment is selected as overseas then the funding source national must not be left blank. to update the funding source national you need to see if your student is studying onshore or offshore.

Funding Source National is a code that defines the mode of study whether it is Online, Classroom based or Training Based etc.
Examples
For Onshore Students – If the student is not in Australia and studying overseas then you need to select the funding source national as (31 – International Onshore Client – Other Revenue)
For Offshore Students – If the student is studying in Australia then you need to select the funding source national as (32 – Internation Offshore Client – Other Revenue)

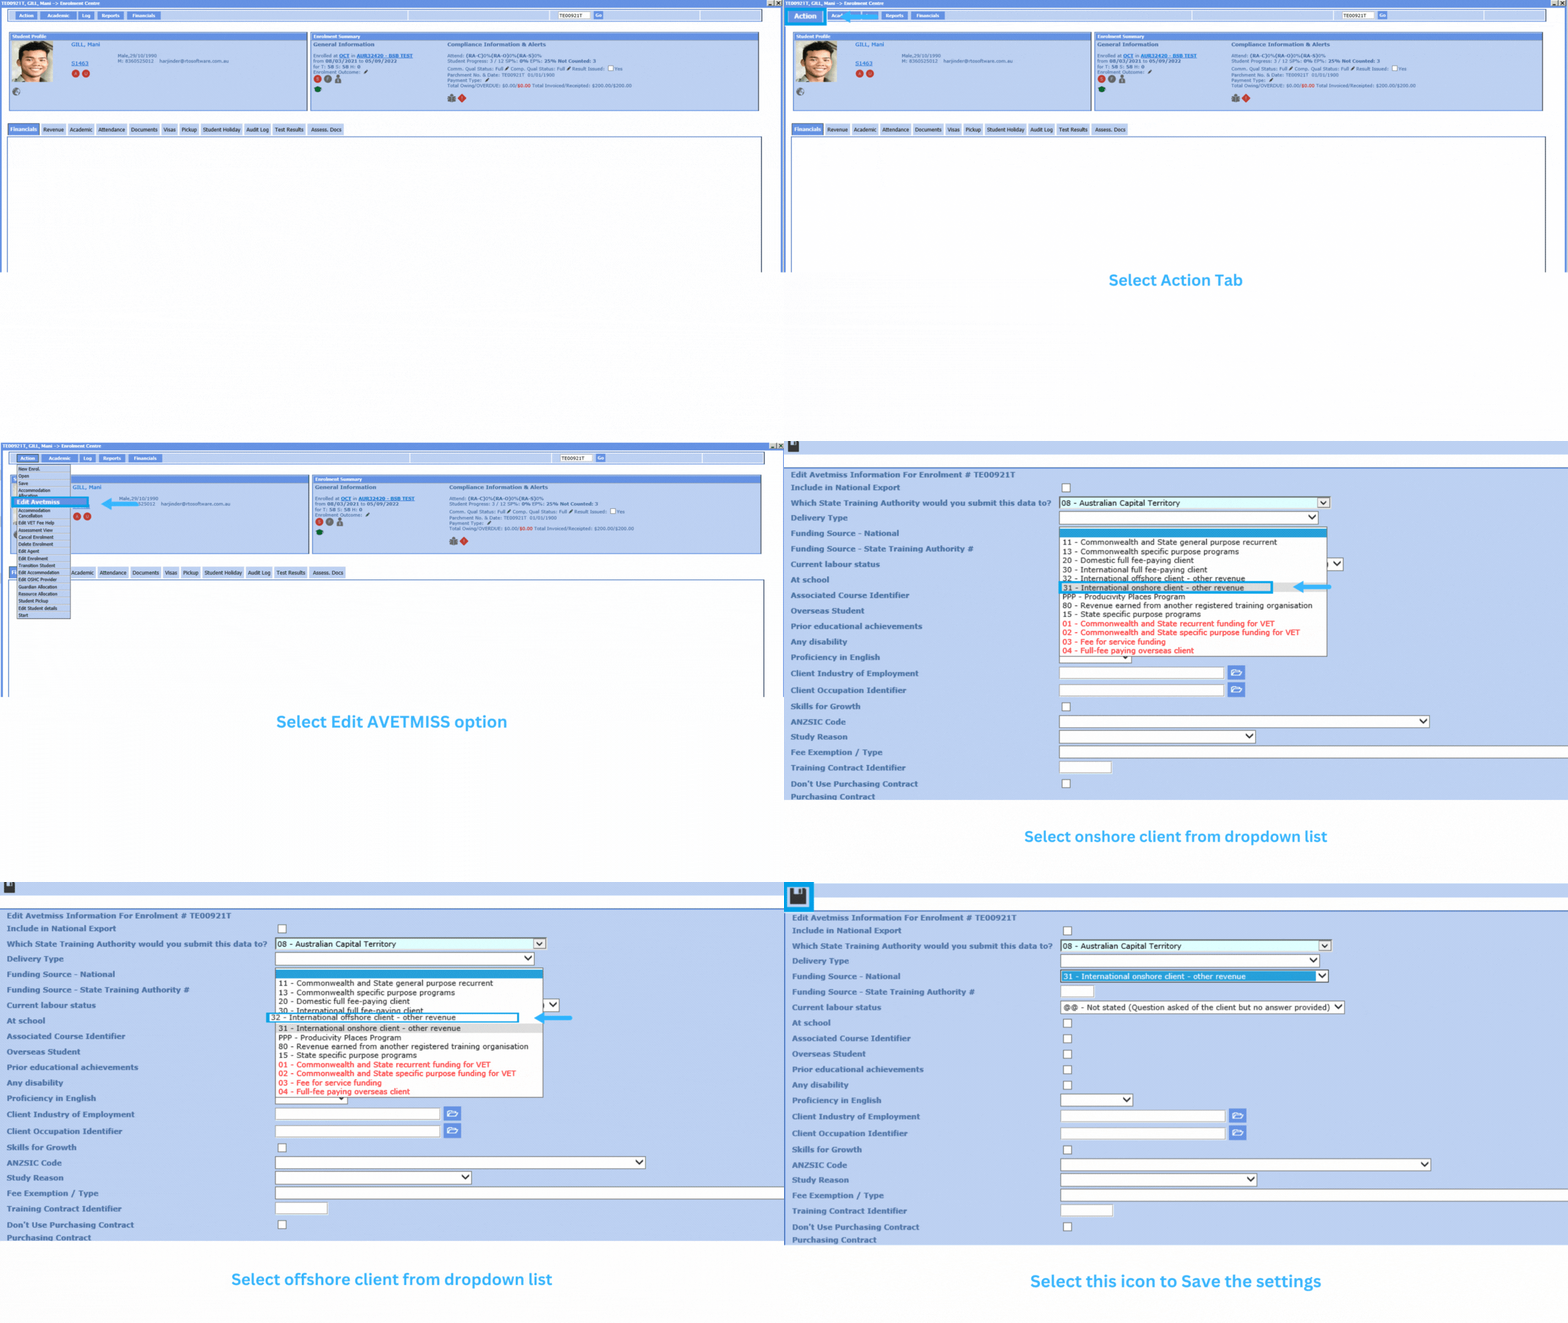
To update the Funding Source National, you need to follow the below steps:

Manually

  • Go To TEAMS > Enrolment Centre > Actions Tab > Edit AVETMISS Screen
  • Select the appropriate funding source national and Save

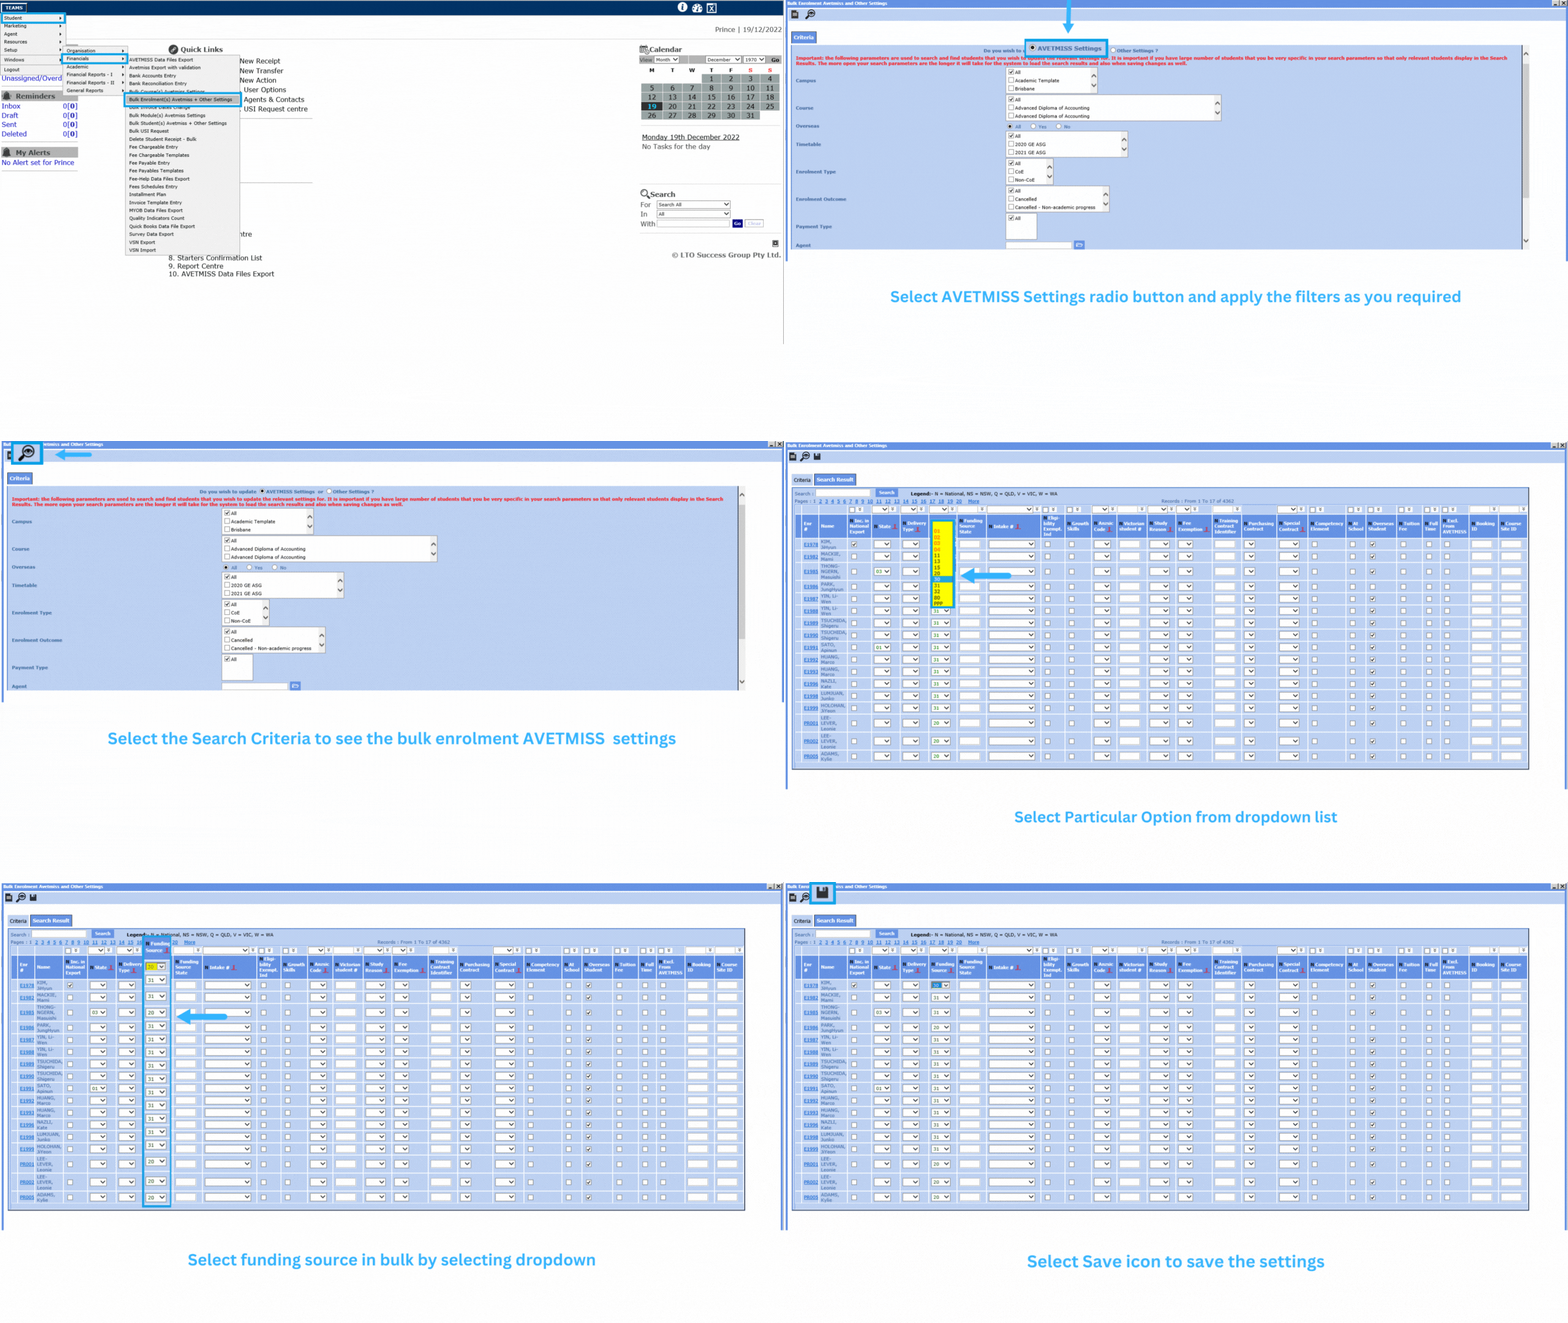
AVETMISS Settings in bulk for Funding Source National

  • Go to TEAMS > Student > Financials > Bulk Enrolment(s) AVETMISS + Other Settings
  • Select the AVETMISS Settings radio button
  • Apply the parameters as you required
  • Select the Search Icon

Overdue Result for the Competency/Module

IMPORTANT – If you have enrolments there with competency/module end dates in 2022 this means they have NO final outcome/result such as Competent, Not Yet Competent, Withdrawn, Credit Transfer, RPL Granted etc and it means you will get errors. This needs to be cleaned up by either:

Updating the final outcome for each competency/module OR Updating the end date of the competency module to a 2023 end date. You can only do this if the enrolment end date is greater than 2022. This must be fully cleaned up as this is one of the reasons you will get 1000’s errors in your submission.

Note – If you have the NYS and CE results for the subjects and these results don’t have final outcome then you need to update the result date as the future calendar year.

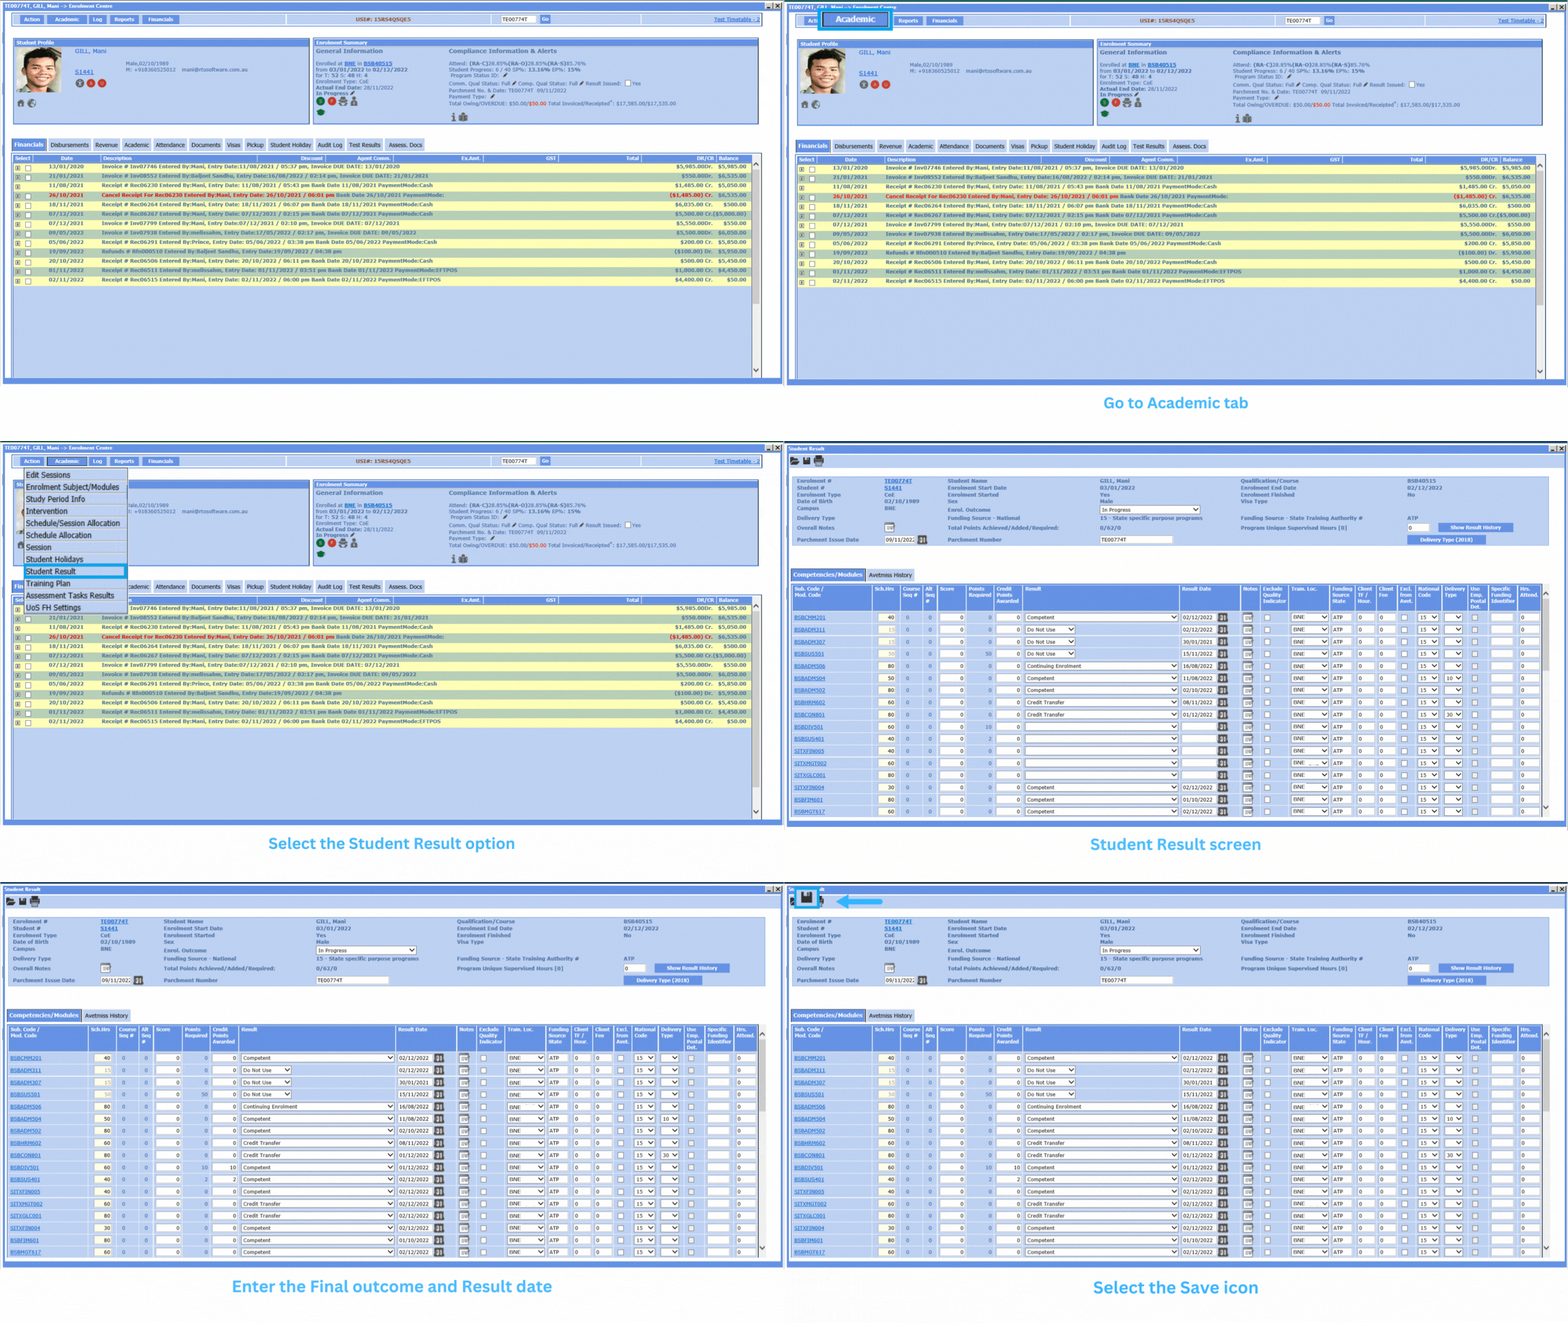
To do this, you need to follow the below steps:

  • Go TEAMS > Enrolment Centre > Academic Tab > Student Result Screen
  • Select the final outcome of the result and its result date and save.

Start and End date of the training activity

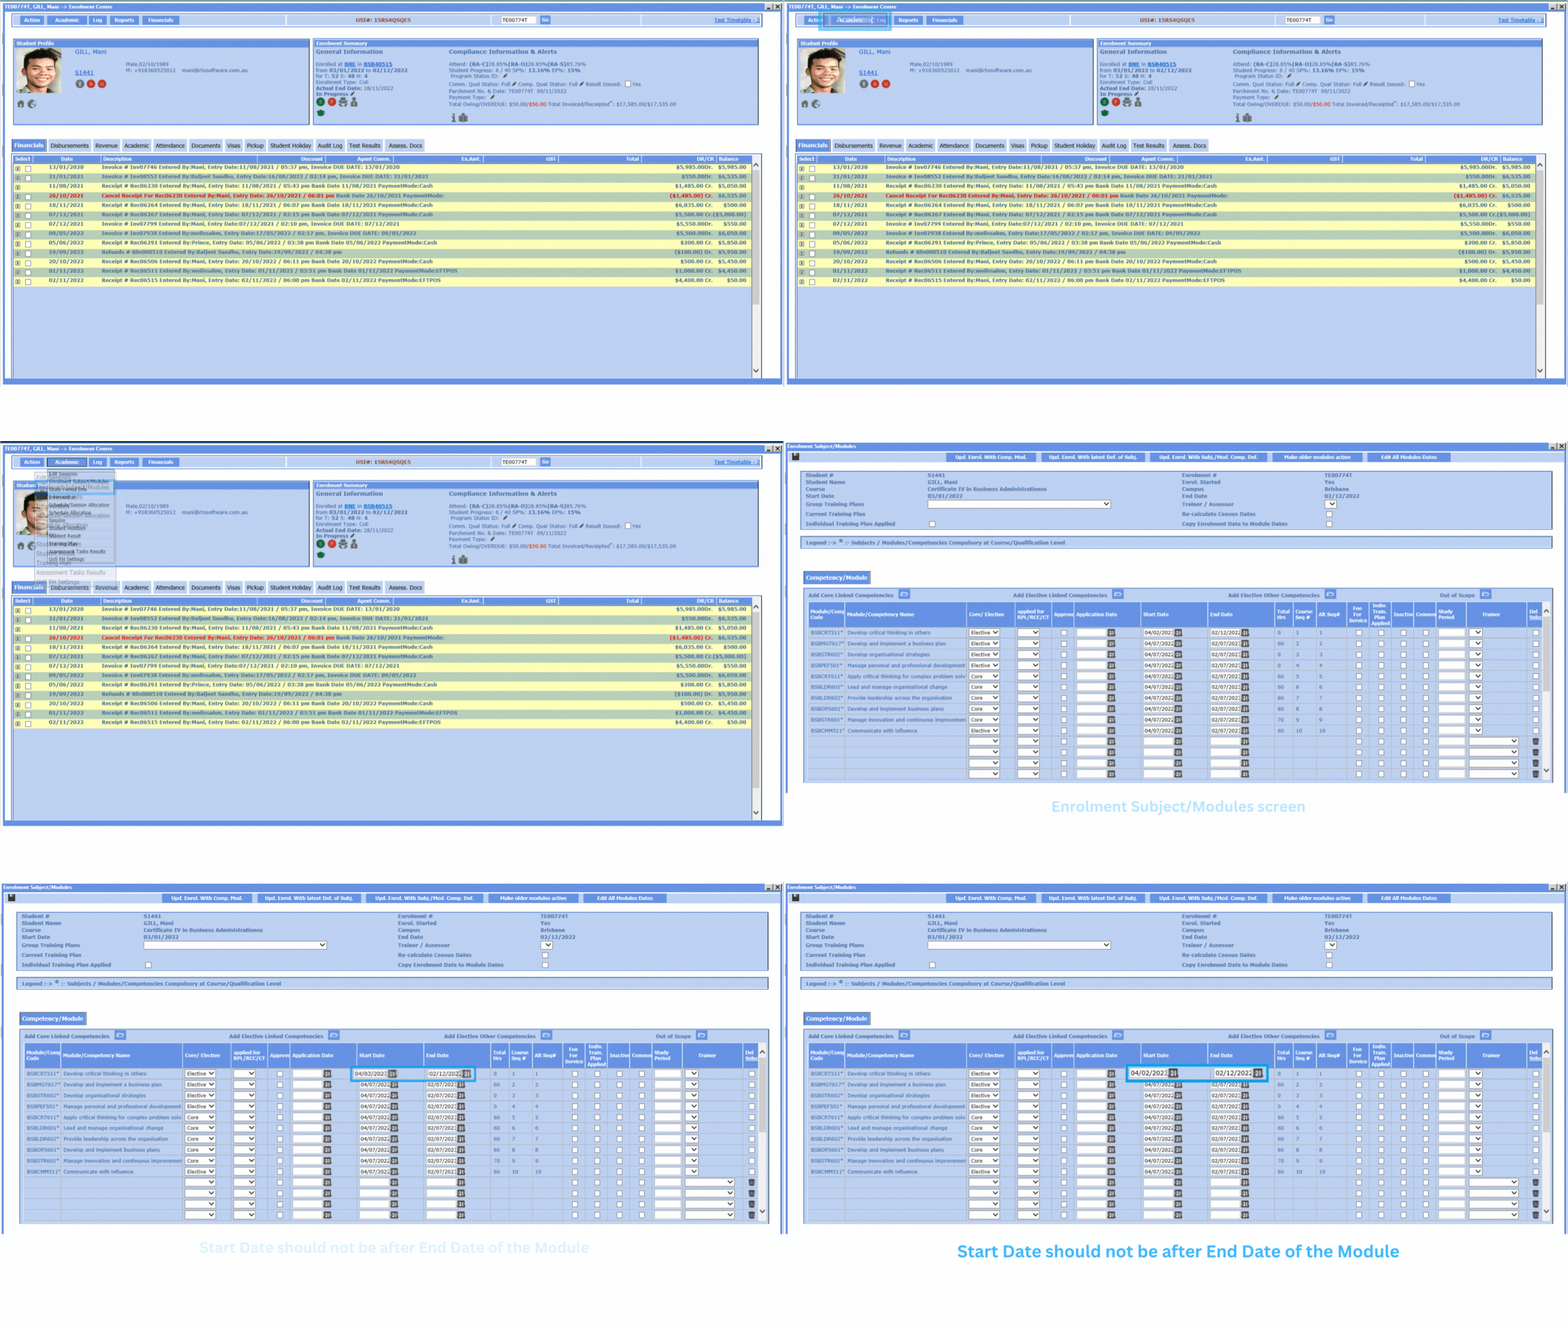
If you are using the Competency/module Code and then the Start and End Date for them that is entered in the Enrolment Centre > Enrolment Subjects/Modules screen then this error occurs when the start date of the subject is greater than the subject’s end date. To resolve the error you need to do the followings:

  • Go to TEAMS > Enrolment centre > Academic Tab > Enrolment Subject/Module screen
  • Check the Module/Competencies Start date and End date
  • Edit the Start Date and End Date of the Subjects (if the start date of the subject is greater than the end date) and then save