Agent Pending Payment Final Confirmation

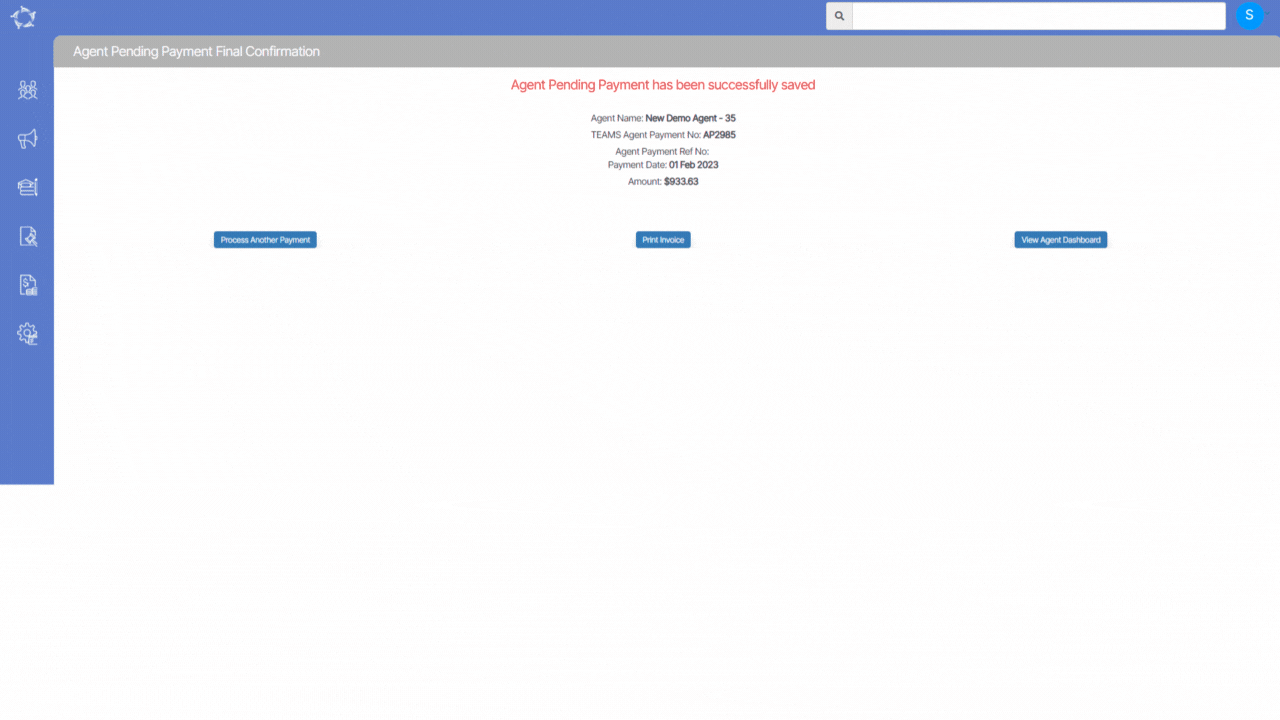
When you finish creating an Agent Pending Payment, the corresponding screen will load to confirm the final details. This is known as the Agent Pending Payment Final Confirmation screen. Essentially, this screen serves as a summary of the information you just entered, allowing you to review and verify all of the details related to the pending payment. By reviewing this information, you can ensure that everything is accurate and correct before submitting the payment for processing.

The Agent Pending Payment Final Confirmation screen displays some buttons which are explained below:

  • Process Another Payment: This button allows you to initiate another payment for the agent, taking them back to the Agent Pending Payment screen where they can create a new payment.
  • Print Invoice: This button allows you to generate an invoice for the pending payment made to the agent. When selected, a pop-up window appears where you can select the invoice template and generate the invoice.
  • View Agent Dashboard: This button takes you directly to the Agent Dashboard, where you can view all the details related to the agent’s account, including their pending payments and transaction history.

Pending Payment Welcome – Commission Payment Step 2

Agent Dashboard > Agent Profile Tile > Pending Payment > +New Payment

On the Agent Pending Payment Step 2 screen, the grid will display all the commission invoices that were selected in step 1. The Pending Payment Details section will replace the filter section on this screen. In the Pending Payment Details section, you must enter the payment details for the selected invoices. This includes information such as the payment date, payment method, and payment reference number. Once this information is entered, you can review the pending payment invoice before finalizing it. The Pending Payment Details section on the Agent Pending Payment Step 2 screen is where you can enter the necessary payment details to create a pending payment invoice.

Note: You are required to enter the Agent Invoice number and Agent Invoice Date for the selected commission invoices in the Pending Payment Details section. Once these details are entered, the system will automatically populate the values in the Inv. No. and Inv. Date columns in the grid for each selected invoice. This automation ensures that the correct information is recorded for each commission invoice, making it easier for you to keep track of payment details. By entering the Agent Invoice number and Agent Invoice Date, users can ensure that the correct information is associated with each commission invoice in the grid.

IMPORTANT – If an agent has not sent any invoice yet, you can leave the Agent Invoice number and Agent Invoice Date fields empty when creating a pending payment invoice on the Agent Pending Payment Step 2 screen. These fields can be edited in the future once the agent provides the necessary information.

The Scheduled Payment Date is the only mandatory field that must be filled in to save the pending payment batch. This field specifies the date on which the payment for the selected commission invoices is scheduled to be made. By leaving the Agent Invoice number and Agent Invoice Date fields empty for agents who have not yet provided this information, you can create pending payment invoices for those agents without delay. Once the agent provides the necessary information, these fields can be updated to ensure that the correct information is recorded for each commission invoice.

Once all the necessary information has been entered in the Pending Payment Details section of the Agent Pending Payment, you can select the Finish button located at the top of the screen and will finalise the pending payment invoice for the selected commission invoices. Before selecting the Finish button, you should review the information entered in the Pending Payment Details section to ensure that it is accurate and complete.

Pending Payment Welcome – Commission Payment Step 1

Agent Dashboard > Agent Profile Tile > Pending Payment > +New Payment

On the Agent Commission Payment screen, you can view commission invoices for agents in a grid format. Additionally, you can also create a new pending payment invoice for these commission invoices. To filter the invoices, you need to select mandatory fields like Campus and Invoices due as at. The Agent Commission Invoices Grid will then display all the commission invoices that match the selected parameters.

IMPORTANT – If the student is not appearing on the commission payment screen then please make sure that the student’s commission due date is falling under Invoice Due As At Date and have selected the correct Campus from the parameters.

To create an agent pending payments invoice, please follow the steps given below:

  • Select the necessary parameters for filtering the commission invoices. The mandatory fields are Campus and Invoices due as at.
  • Once you have selected the parameters, Select the Search button. The Agent Commission Invoices Grid will load all the commission invoices that match the selected filters.
  • Find the column named “TEAMS Agent Inv Date and Look for the tick box that is located right beside this column.
  • Select the box for the commission invoices that you want and then select the Next button on the right hand corner of the screen.

Note: On the Agent Commission Payment screen, the Stud Rec Amount column displays the amount that is received from the student for the outstanding commission invoice. If the student invoice for the outstanding commission invoice is not paid yet, the amount displayed in the Stud Rec Amount column will be in red font. This is a visual cue that the payment for the student invoice is still outstanding and needs to be collected. By checking the Stud Rec Amount column in the Agent Commission Invoices Grid, you can easily identify which commission invoices still require payment from students.

Receipt – Agent Commission pre-deducted amount change

In a similar fashion to how the changes were made in the receipt process for any overpayment by a student, you now will be able to enter a pre-deducted agent commission amount more than what is raised for a specific student invoice.

IMPORTANT: While creating the receipt for the student, the system will only allow you to add an overpaid amount for the agent commission if it is less than or equal to the student invoice amount.

For example, If there is $1925 pending for the agent commission and you are going to record a receipt for one agent where the student invoice is $1000 and you are paying $1200 for the agent commission. In such a scenario, the system will not allow you to save your overpayment. However, if the paid amount by the student is $1000 for the agent commission which is equal to the student’s pending invoice ($1000) then the system will save your overpayment and will balance out the commission accordingly for the other invoices.

Commission Due Report > A New Column

Dashboard > Finance > Commission Due

We have added a new below column in the commission due report. The column is:

Commission Due to be paid

This column will show the commission which is truly due based on how much Tuition Fee a student has paid for that invoice.

Example: If a student’s invoice for tuition fee is $2,000 and the total commission is $600. And the student just paid $1,000 out of $2,000. In such a case, the newly added column will show you the commission due to be paid on $1,000. This way, it will be easy for everyone to see the commission according to how much tuition fee a student paid instead of doing the calculations manually.

Change – By default Pay Commission tick box is ticked

Dashboard > Marketing > Agent > Agent Entry

Dashboard > Finance > Fee > Fee Entry

Sometimes when creating the new Agent or Tuition Fee in the system, the user forgets to select the Pay commission tick-box on the Agent Entry screen and Fee Entry screen and this results in the disproportion of commissions during the reconciliation of many financial transactions.

In TEAMS, we are showing the Pay Commission tick-box on the two major entry screens i.e. Agent Entry Screen and Fee Entry Screen.

Agent Entry screen

Fee Entry Screen

In the past, the pay commission tick box was not ticked by default but now it will be selected by default on the Agent Entry screen and Fee Entry screen for tuition fees.

Once you have saved the agent or the tuition fee screen with the pay commission tick box ticked. You will not be allowed to edit the tick box again after saving. It will be shown as a read-only tick box.

And If you do not want to select the Pay Commission tick box then untick the tick box before saving and the screen will show you a pop message with your RTO URL saying (Are you sure, you don’t want to tick on the Pay Commission as all the Agent have Pay Commission ticked on) or (Are you sure, you don’t want to tick on the Pay Commission as all the Fee which are Tuition Fee must have Pay Commission ticked on.. You can select Ok to continue or Cancel to select the tick box)

NOTE – If you have saved the agent or tuition fee with the tick box ticked mistakenly or you want to untick it and the system is not allowing you to edit it. Kindly contact our support team.

How do I link commission templates to an agent?

When the “Pay Commission” is turned on but the commission template is not linked with the agent, it can cause issues. This means that the system has enabled the commission calculation but it is not properly set up to assign commissions to specific agents

To link the agent commission template and raise the agent invoices, you can follow the following steps:

  • The first step is to select the main menu icon for Marketing, followed by selecting the icon for Agent. This action will direct the user to the Agent Welcome List screen. From there, the user can search for a specific agent by using the search bar or by scrolling through the list of agents displayed.
  • Once the user has accessed the Agent Welcome List screen, the next step is to select the agent by entering their code or name and clicking the Apply button. The system will then search for the agent and display the relevant information on the screen.
  • To edit the agent’s information, the user needs to locate the Edit icon in the Actions column of the agent’s record and select it.
  • When accessing the agent entry screen, it is possible to see whether the pay commission tick box is selected or not. However, it is important to note that the commission templates must also be selected in order for the system to properly calculate and allocate commissions. This can be done by using the “Default Commission Template” dropdown menu.
  • In addition to the “Default Commission Template” dropdown, there is also another dropdown menu available on the agent entry screen that allows the user to select optional commission templates. These templates are typically used when an agent is eligible for commissions based on multiple sales.
  • After selecting the appropriate commission template/s for the agent and making any necessary changes to their information, the next step is to click on the save button to save the changes.

Q&A – Pay commission is not turned on at fees level

Sometimes all the settings are correct but still, the agent commission invoices are not getting raised on the enrolment dashboard, then there is one more reason due to why the sysetm will not raise the agent invoices and that is the pay commission is not turned on at fee level.

To turn on the pay commission you need to follow the following steps:

  • Go to the Finance menu > Fee

  • The system will open the fee screen, from where you need to find out for which tuition fee you want to turn on the pay commission ( you can use the filters to search the fee).

  • Select the edit icon from the action column and the system will take you to the “Fee Entry screen” from where you can make changes.
  • On this screen, you just need to select the pay commission tick box and select the save button.

  • When the screen comes back after saving the changes, you need to go back to the enrolment dashboard and relink the agent by using the edit icon from agent tab.

If you have any queries, please do not hesitate to contact us on 1300 85 05 85 or email us via support@rtosoftware.com.au

The agent is linked but the commission is still not calculating for an enrolment

From the Enrolment Dashboard > Financials Tile > Agent tab it shows that there is no financials for the agent linked to the enrolment, this could be because the Agent is not set with Pay Commission.

To raise the agent commission the Pay Commission should be turned on and at least one commission template should be linked to the agent which is explained below.

  • Select the main menu icon for Marketing and then the icon for Agent. This will take you to the Agent Welcome List screen where you can search to find the Agent.
  • Enter the Agents code or name and select the Apply button. The system will search and display the agent and you then just need to select the Edit icon in the Actions column as highlighted below.
  • On the Agent entry screen select the tick box for Pay Commission as shown below:
  • After selecting the Pay Commission tick box, two new fields with drop downs will show for Default Commission Template and Optional Commission Templates.
  • You must select at least one Default Commission Template from the drop down for the system to calculate commission for the agent. You can only select one Default Commission template.
  • If the agent sometimes receives different commission percentages, you can always select other commission templates in the Optional Commission Template drop down. The system will allow you to select more than one from this list.

Now you need to go back to the enrolment dashboard, select the edit icon from the agent tab as shown below:

In the pop up window select the Update button as shown below. By doing this the system will refresh the screen and will have calculated and created, where relevant, the commission invoices for the enrolment.

Why isn’t the agent commission calculating?

There could be a number of reasons why the system is not calculating an agent’s commission invoices for an enrolment. The following posts will help you identify the reason.