Dropdowns

Dashboard > Marketing > New Application > New applicant icon

In the system you will see dropdowns for fields and filters for reports, such as the one below:

Most of the dropdowns and what you see in the list will be automatically generated by the system. however, there are some that you can customise what you see in the list. For example, using the screenshot above below outlines the different types of dropdowns:

Gender – the options in the dropdown are standardised (hard coded) and you can’t add to them.

Marketing Source – the options in this dropdown you can customise using the User Codes screen.

Account Manager – when you setup Account Managers in the system then that is the list that will show in this dropdown.

If you want something added to a dropdown that you cannot customise in the User Codes screen, you are welcome to send an email to support@rtosoftware.com.au and we will see if it is possible to add the option for you. It will all depend on what dropdown it is and if it is a standardised option that the majority of our clients would/could use or unique to your college.

If you have any queries, please do not hesitate to contact us on 1300 85 05 85 or email us via support@rtosoftware.com.au

How to Upload/Change an applicant/student’s profile picture

To upload or change an applicant profile picture, you need to bring your cursor over the thumbnail of the picture and the system will show two icons as shown below.

To upload the profile picture by clicking the picture using the system camera, click on this icon.
To upload the profile picture by uploading the picture from your computer, click on this icon

After you have selected your picture, click on the save button to save it for the applicant/student.

The system will refresh the screen and your picture will be uploaded.

Note: Make sure you are cropping a picture like a passport size copy before you upload it in TEAMS.

If you have any queries, please do not hesitate to contact us on 1300 85 05 85 or email us via support@rtosoftware.com.au

The unit’s start and end date should be within the enrolment dates

On the Training plan and Results screen, where you can see all the units’ related and other information for a student’s enrolment, we have some set of business rules that you must follow to avoid certain errors/issues. This post will explain to you all those business rules.

1. The unit’s start and end date should be within the enrolment dates. For instance, if an enrolment’s start and end dates are 11 Jan 2021 and 16 Oct 2022 respectively, then all the units linked with that enrolment should have their start and end dates within these dates. The system itself will not allow you to enter the dates out of enrolment dates. The calendar will strikethrough the dates which are outside of enrolment dates. See the below screenshot:

2. A unit’s end date cannot be lesser than its start date. The system will throw an error if any user by mistake have clicked on the end date which is before its start date. And as a result, the end date will be updated the same as the start date of the unit.

3. A unit’s start date cannot be greater than its end date. If any user by mistake has clicked on the start date which is after its end date, the system will update the end date the same as the new start date.

4. Result date cannot be after the enrolment’s end date. If an enrolment’s end date is 16 Oct 2022, then the result date cannot be after this date. However, the result date can be after the unit’s end date.

5. You cannot delete a unit if it has a final outcome such as Competent, Credit Transfer, Competency not achieved/fail etc. The delete icon will disappear under the Actions column for such units.

6. Always update the final outcome for all the units once a student has completed the course to avoid errors in AVETMISS reporting. For instance, if a unit’s result is Continuing Enrolment and the end date has passed, then there will be an error for that unit in the AVETMISS reporting.

7. In case of a superseded unit, always link the new unit with the enrolment and delete the one that is no longer required to avoid errors/warnings.

8. If you are using TEAMS for assessments as well, make sure the final result is updated for the unit after you have marked the result for that unit’s assessments.

9. Update the Qualification Information section very carefully after a student has completed a course, so that the enrolment can be reported correctly.

10. All the units will display in a seq, based on the seq no. updated at the program > subject screen.

Note: If the seq no. is not updated, then the units will display in the ascending alphabetical order based on the unit code.

If you have any queries, please do not hesitate to contact us on 1300 85 05 85 or email us via support@rtosoftware.com.au

Buttons

In TEAMS, we have many buttons on different screens for you to work effortlessly. This post will explain to you all the buttons that we have and their purpose.

Buttons

Their use

To save a screen or popup window

To cancel/close the screen without saving

To apply the filters

To clear the applied filters

To close a popup window or screen

To generate word reports.

To go back to the previous screen

To go to the next step

To add data in the grid

To add a user from the User screen (System Admin > User) and please note that not every user can add another user in TEAMS. You might have to contact our support team to add new users in TEAMS.

To add an employer in TEAMS from the employer screen (System Admin > Employer). If you cannot see this screen, it means you do not have permission.

To add a school in TEAMS from the school screen (System Admin > School). If you cannot see this screen, it means you do not have permission.

To add a classroom in TEAMS from the classrooms screen (System Admin > Classrooms). If you cannot see this screen, it means you do not have permission.

To add a trainer in TEAMS from the trainers screen (System Admin > Trainers). If you cannot see this screen, it means you do not have permission.

To add an account manager in TEAMS from the account manager screen (System Admin > Account Manager). If you cannot see this screen, it means you do not have permission.

To add an email template in TEAMS from the email template screen (System Admin > Email Template). If you cannot see this screen, it means you do not have permission.

To add an SMS template in TEAMS from the SMS template screen (System Admin > SMS Template). If you cannot see this screen, it means you do not have permission.

To add a user code in TEAMS from the user code screen (System Admin > SMS Template). If you cannot see this screen, it means you do not have permission.

To add a notification template in TEAMS from the notification template screen (System Admin > Notification Template). If you cannot see this screen, it means you do not have permission.

To create a quiz in TEAMS from the quiz screen (System Admin > Quiz). If you cannot see this screen, it means you do not have permission.

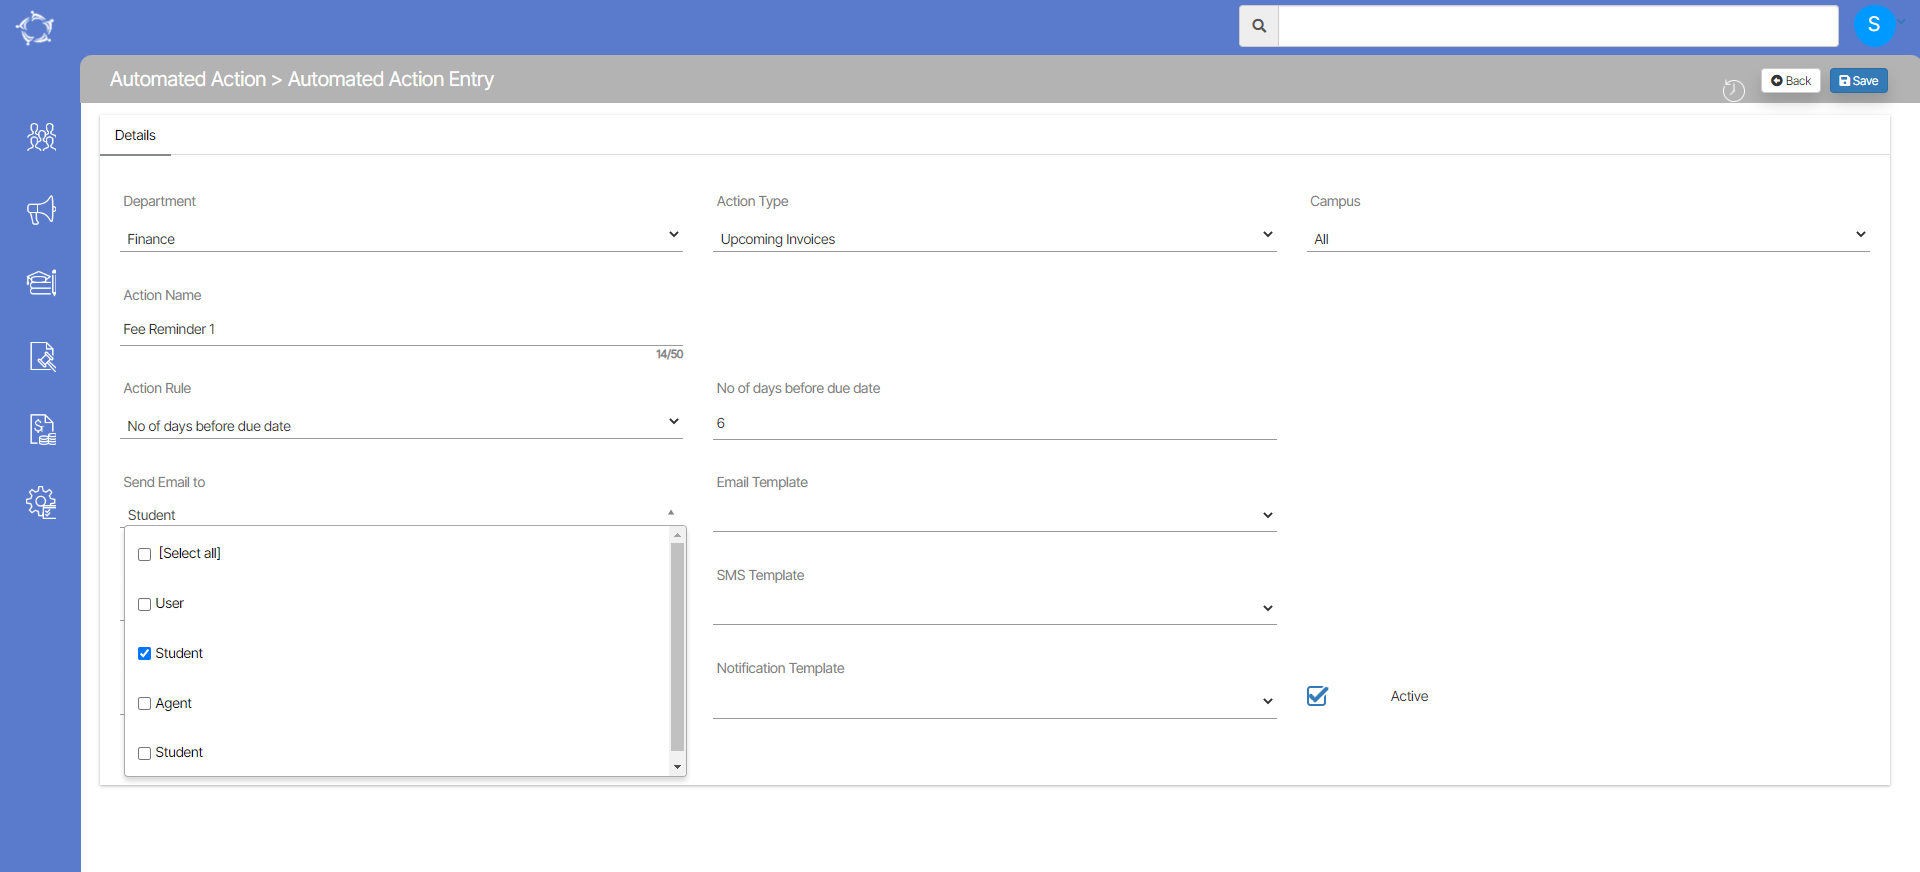
To create some automations in TEAMS from the automated action screen (System Admin > Automated Action). If you cannot see this screen, it means you do not have permission.

To create other automations in TEAMS from the automated system actions screen (System Admin > Automated System Actions). If you cannot see this screen, it means you do not have permission.

To create instalment plans in TEAMS from the instalment plan screen (Finance > Instalment Plan). If you cannot see this screen, it means you do not have permission.

To add a new campus in TEAMS from the campus screen (Academic > Campus). If you cannot see this screen, it means you do not have permission.

To add a new program in TEAMS from the program screen (Academic > Program). If you cannot see this screen, it means you do not have permission.

To add a new UoS in TEAMS from the unit of studies screen (Academic > Unit of Studies). If you cannot see this screen, it means you do not have permission.

To add a new subject in TEAMS from the subject screen (Academic > Subjects). If you cannot see this screen, it means you do not have permission.

To add academic calendar in TEAMS from the academic template screen (Academic > Academic Template). If you cannot see this screen, it means you do not have permission.

To add a GTP in TEAMS from the group training plan screen (Academic > Group Training Plan). If you cannot see this screen, it means you do not have permission.

To add a timetable in TEAMS from the timetable screen (Academic > Timetable). If you cannot see this screen, it means you do not have permission.

To create a class for a timetable from the timetable step 2 screen.

To finish a process in TEAMS. For instance, class allocation process, timetable creation process etc.

To delete a class for a timetable.

To delete the current and onwards classes for a timetable.

To add an intake in TEAMS from the intake screen (Academic > Intake). If you cannot see this screen, it means you do not have permission.

To have a list of all the enrolments after updating the filters on screens like Subject Dates (Academic > Subject Dates), Results (Student Management > Results) etc. and these screens are permission based.

To create a new application.

To attach documents from TEAMS's document log while sending email/s.

To attach documents from your computer/network while sending email/s.

To send emails/SMS from TEAMS.

To add a new enquiry in TEAMS.

To add a new agent in TEAMS from the agent welcome screen (Marketing > Agent). If you cannot see this screen, it means you do not have permission.

To open another screen for financial items depending upon the screen you are on.

To add a new pending commission payment for an agent. This is based on the system setting for your RTO. If you cannot see this, it means, the system setting is not turned on for your RTO. This is accessible from Marketing > Agent Dashboard > Profile section.

To create a new commission rate template for an agent from Commission Templates screen (Marketing > Commission Templates). If you cannot see this screen, it means you do not have permission.

To have the list of classes for a timetable from the attendance step 1 screen if there is more than one class for a timetable. This is also used to have a list of enrolments to mark the attendance after updating the date range on the Attendance & Results screen. This is visible from Student Management > Attendance.

This is to load classes for the selected timetables on the filters/parameters screen for ASQA class roll report (Student Management > ASQA Class Roll).

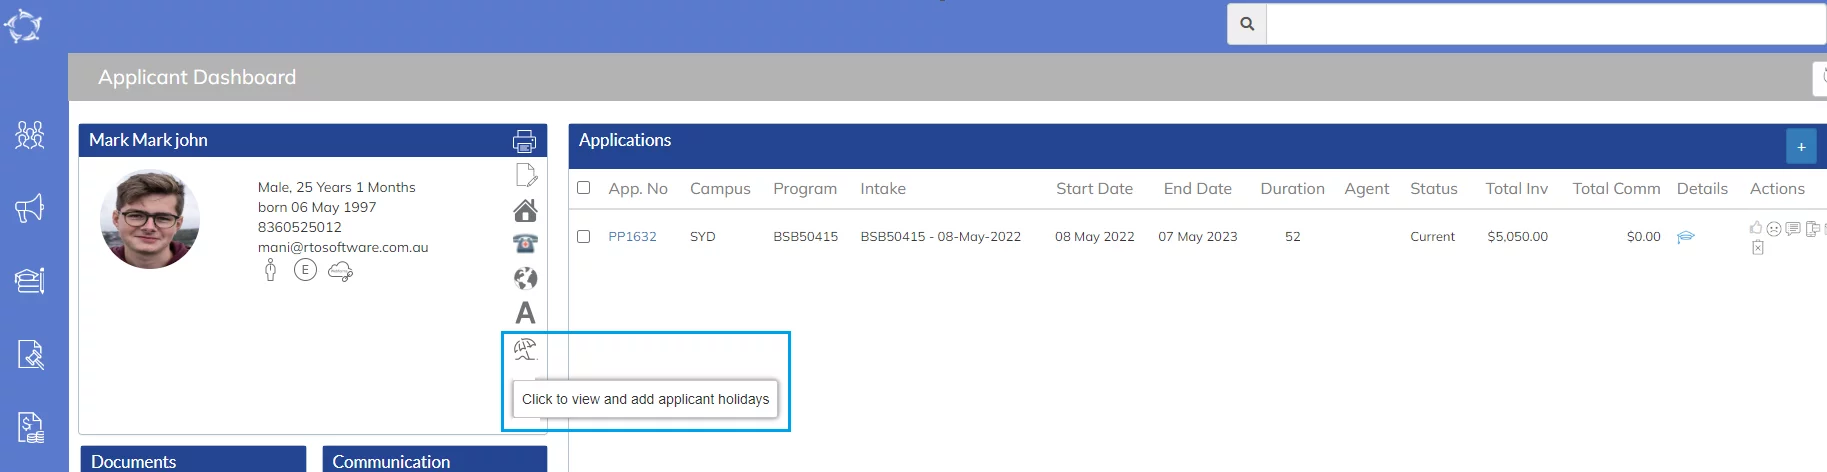
To add holidays for a student.

To create a USI for a student.

To verify a USI for a student.

To cancel an enrolment.

To update some of the mandatory AVETMISS settings in bulk for students, enrolments, subjects and programs.

To see/view old AVETMISS fileds settings that are no longer used from Enrolment Dashboard > AVETMISS settings.

To load subjects while transitioning a student's enrolment from one program to another program.

To allocate a student into a class from Enrolment Dashboard.

To load classes to allocate for a student's enrolment within the selected date range from Enrolment Dashboard > Class Allocation Screen.
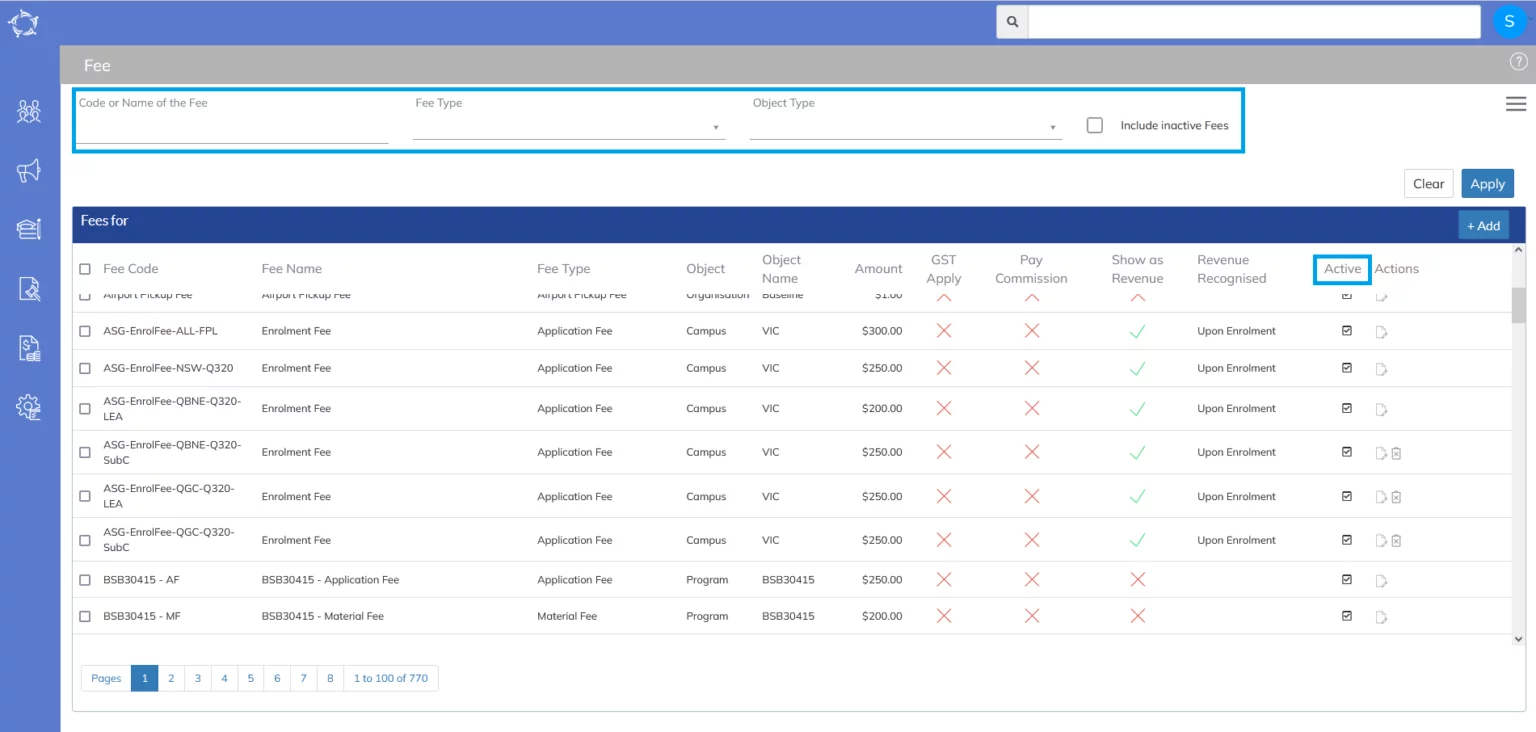
Grids

In the system, where you need to view multiple rows of similar data it will be displayed in grids. There are two types of grids that you will see in the system that are as follows:

Type 1: Read only Grids

Read only grids allow you to view data and do transactions but you cannot directly edit the entry from the grid. You will find these types of grids in our listing screens such as the one below for the Continuing Listing screen that shows you a list of your current students at the college.

Type 2: Editable Grids

This type of grid allows you to edit the data directly from the rows in the grid or select the Edit Icon in the action column for the row and the system will display a popup screen for you to edit the information and save the changes.

Below is a screenshot of the grid in the Training Plan and Results screen. This grid allows you to edit the data in the grid itself, however, you must remember to select the Save button at the top of the screen once you have finished editing the data in the grid.

Below is an example of the editable grid where you edit the row and the system displays a popup window as shown in the example screenshot below for the Intervention Process screen.

For both grid types, there will be specific columns in them based on what screen and type of data you are looking at. The columns are Details and Actions.

Details Column in grids

This column will generally be seen in List screens such as the Starters Listing screen where you will see a list of students and their enrolments as shown below.

Application Process > Subject Invoicing

Dashboard > Marketing > New Application > Subject Delivery Dates

While creating the application when you are on the New Application – Subject Delivery Dates screen, you will see the default amount for each of the subjects under the Amount Column. The system has fetched the amount either from the Program Subject or Subject level where the user has already set up the fee. A user can also edit the amount if he wishes to enter a different amount other than fetched by the system.

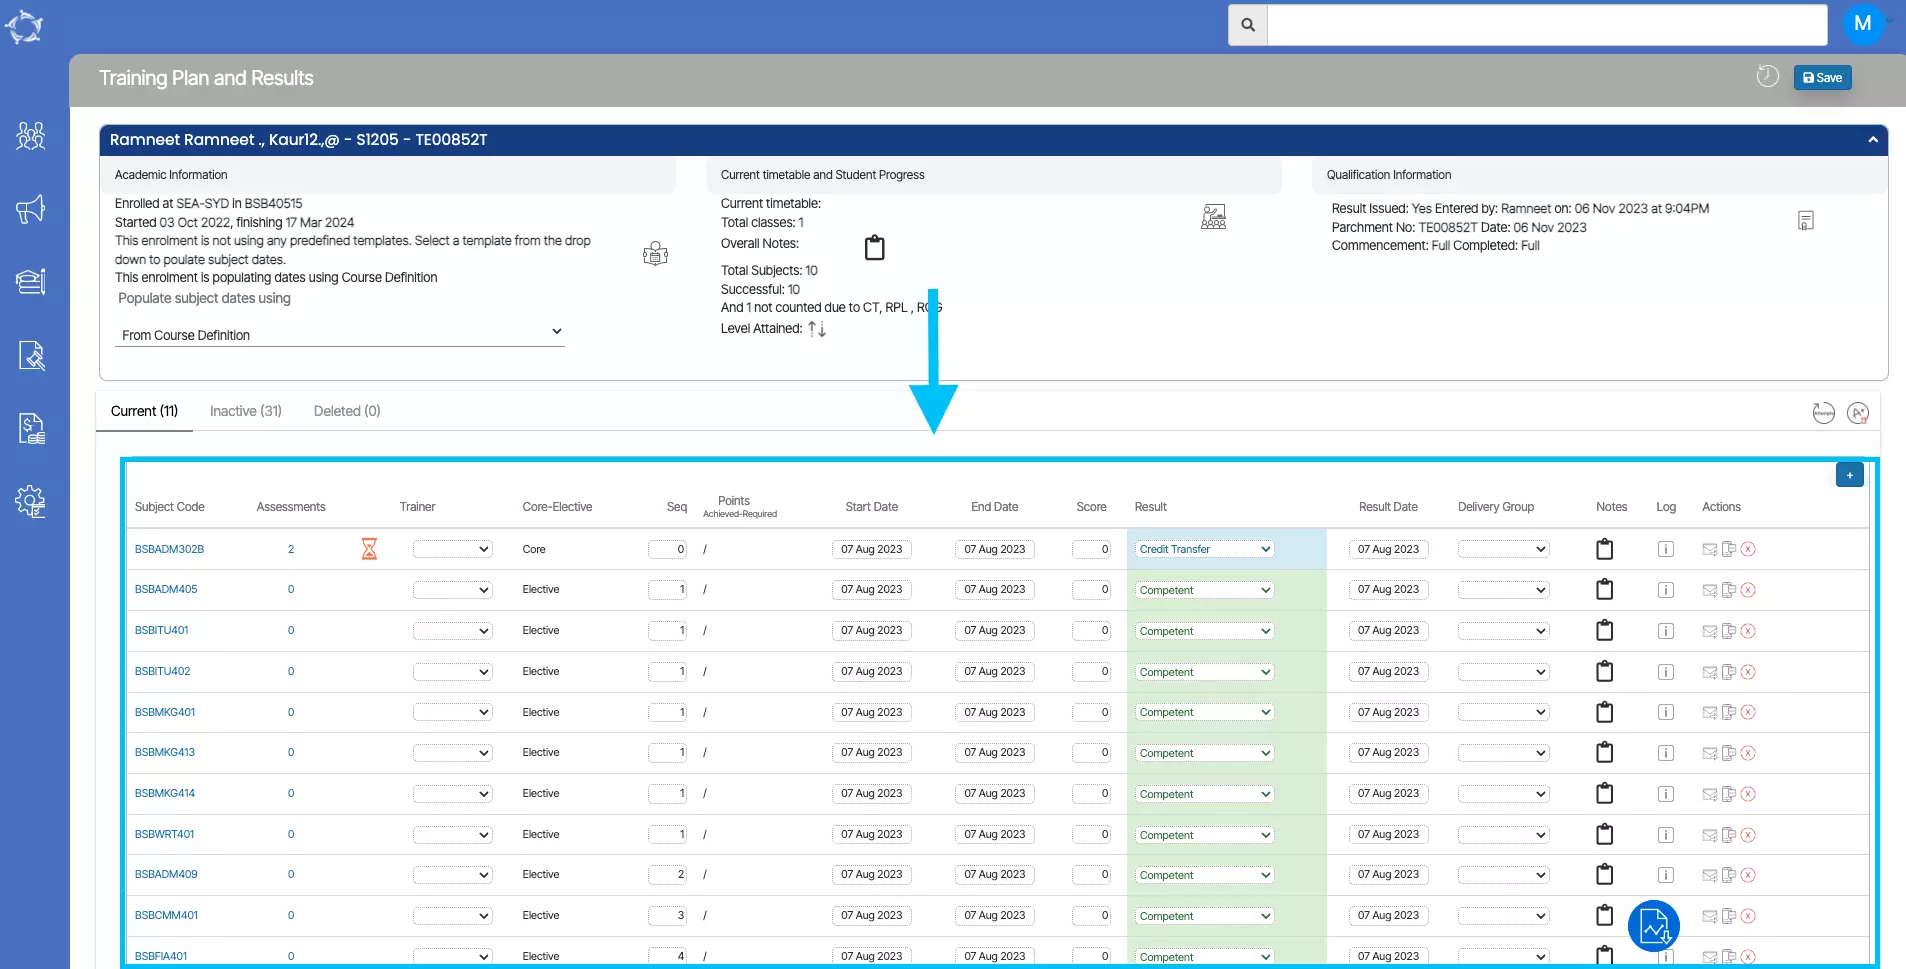
Not sure how to set up the subject fee. Kindly, read the post How to set up Subject Fees > Program and Subject levels?

IMPORTANT – The system will always fetch the fee amount from the program level and if it can not find any fee set up at the program subject level then it will fetch it from the subject level.

On the Application – Invoice Preview screen, the system will generate the invoices for the Subjects as shown below:

Note: The invoice date will always be the Subject’s Start date and by default, the invoice due date is also the same. If you wish to change the invoice due date, kindly contact our support team.

After the application is created, the user can check the financials on the Applicant Dashboard.

If you have any queries, please do not hesitate to contact us on 1300 85 05 85 or email us via support@rtosoftware.com.au

Important Links

How to edit Subject Invoices?

Application Level

To edit the subject’s invoices, you need to go to the Application Dashboard > Financials Tile > Actions column > Edit icon as shown below in the screenshot:

  • Once you have selected the edit icon, the system will take you to the Application Dashboard – Edit Invoice screen, where you can edit the subject’s invoice by selecting the edit icon from the Invoice details tile as shown below:
  • By selecting the edit option, you can edit the fees in the Fee Selection tile and then select Add button and Save as highlighted below:

Enrolment Level

  • The user can also edit the subject’s invoice from the edit icon on the Enrolment Dashboard > Student Financial Details screen as shown below:
  • By selecting the edit icon, the system will take you to the Enrolment Dashboard > Edit Invoice screen and there you can edit the invoice and Save it as shown below:

If you have any queries, please do not hesitate to contact us on 1300 85 05 85 or email us via support@rtosoftware.com.au

Email Deliverability Issues?

Having difficulty with your emails being delivered to your students?

The fix is easy, you need a SPF record for your college’s domain (website)

What is SPF?

Sender Policy Framework (SPF) is used to authenticate the sender of an email. With an SPF record in place, Internet Service Providers can verify that a mail server is authorized to send email for a specific domain. An SPF record is a DNS TXT record containing a list of the IP addresses that are allowed to send email on behalf of your domain.

https://dmarcian.com/what-is-spf/

Still confused about SPF?

Please find below an excellent video explainer from YouTube
(if you would like a deep dive on the subject)


So what do you have to do?
Add an SPF record with our IP Addresses for your college’s website.

What are the steps to do that?

Please get in touch with your domain host.
Contact them via their ticketing system or email them.
Simply ask them to add a TXT entry below to your website’s DNS records.

v=spf1 ip4:221.121.139.60 ip4:27.50.74.67 ip4:27.50.74.68 ip4:118.127.57.139 ip4:118.127.57.141 ip4:43.250.204.60 ip4:43.242.69.134 ip4:43.242.69.132 ip4:43.242.69.131 -all

Important: If you already have an SPF record entry on your domain, you will have to add our IP addresses to the end of your existing TXT entry and make sure there is only one -all at the end of the entry.

VERY IMPORTANT: You MUST ONLY have one SPF entry per domain. Do not make a second entry as this will fail and will not be validated by the external email handlers.


Still having issues?

Have you already added an SPF record and it is still not working?!

the devil is in the detail… Please check the following –
  1. Double check the list of IP Addresses above. Make sure that all the IP addresses above are included. We have a number of servers that host our software and if you do not have all of them added, it could still fail.


  2. Very important: Notice in the SPF entry above the last bit of text in the entry is -all.
    It needs to be -all not ~all. If you have a ~ (tilde) instead of – (hyphen) your emails will still fail to be delivered and quite possibly go into SPAM.

    Why? Using a hyphen means you are specifying a hard fail SPF record and using a tilde means a soft fail SPF record. Here’s a great article on the subject (if you are nerdy or curious enough to read it).

    I will repeat: If your email is still not being delivered and going to the SPAM folder (which is as good as not being delivered), you need to use a hyphen instead of a tilde. Please get your old / existing SPF record edited to make sure that you are using a hyphen in the last part.

    We used to recommend using tilde many years ago (sorry about that!) but times have changed on the internet and only a hard fail SPF record is the best way to go nowadays.

  3. Only one SPF entry per domain. This has already been mentioned in this post but it cannot be reiterated enough. It is crucial that you DO NOT add a new SPF entry if you already have an existing one. Edit the existing one to include all our IP Addresses that have been listed in our entry example above.

Ok it’s done! We got the SPF record entered in our domain, now what? (I hear you ask)

Once it is done, you can check and make sure that the entry is visible on the internet by using this SPF validator tool.

example SPF record check entry

Just type your college’s domain name and click on SPF record lookup button.
If you see an entry with all our IP Addresses added in the SPF record then you are good to go.
All going well, your emails should now start getting delivered to your students and not bounce back nor go into SPAM. Hooray! Happy days!!!

Final Note: When you have the SPF entry done by your domain hosting provider, it may still take at least 8 to 48 hours for these entries to take effect and propagate across the Internet. If you want it done sooner, you can request your ISP to reduce the TTL (time to live) value temporarily to something ridiculous like 600 (which means 10 minutes) instead of the default of 28800 (which is 8 hours in seconds). After about a day or so, it wouldn’t matter what your TTL value is and it can be made as high as 86400 (which is how many seconds there are in a day). Sorry if this is too much information but we have encountered clients at times who need to get this done in an emergency and don’t have the luxury to wait 8 to 24 hours. This is an emergency workaround which may help in that situation.

Hope this helps and you are able to resolve your email sending issues.
Please feel free to contact our support team if you require further assistance and the issue is still not resolved.
Thank you and all the best!

Program-settings screen-Study Sequence for this Program Changes

Dashboard > Academics > Programs > Program Entry settings Screen

Earlier on the Programs > Settings screen, we used to show a tick box for Allow Flexible Study Sequence but now we have changed the tick box and label name from “Allow Flexible Study Sequence” to “Study Sequence for this Program” and introduced two radio buttons Fixed and Rolling next to the Study Sequence for this Program.

If you have any queries, please do not hesitate to contact us on 1300 85 05 85 or email us via support@rtosoftware.com.au

How to setup FEE HELP in TEAMS

FEE HELP is a loan scheme that helps eligible students enrolled in a fee paying place to pay their tuition fees. There are two versions of FEE HELP that are:

VSL – VET Student Loans

HED – Higher Education Loan Program

No matter what version of FEE HELP you wish to manage in TEAMS; you may wish to manage both, there are a number of steps you must complete for the system to know that you wish to manage FEE HELP. These steps are as follows:

To setup FEE HELP in TEAMS you need to complete the following steps:

  • Typically if you have notified TEAMS support that you wish to use FEE HELP in TEAMS, they will have turned this on for you. If you do not see options in screens such as Programs, Subjects, UoS (Unit of Studies), Applicant, Application, Student & Enrolment for FEE HELP then it may not have been turned on. To do this you need to go to the Site Settings screen under the main menu of System Admin > Organisation > Site setting. If you do not have access to this, you must speak to someone at your college that does.

  • On the site setting screen there is a tick box called “Is Fee help Approved” which should be selected.
  • Once you turn on the Fee Help approved tick box, you then need to select what version you want to use and report on from TEAMS. The options are VET student loan or HigherED or select both if relevant.
  • Once you have selected SAVE, all the fields related to the FEE HELP version you selected will be visible on their respective screens.

    Once the above steps are completed you need to setup FEE HELP settings in the following screens:
  • Programs
  • Subjects OR
  • Unit of Studies (only if you are using them for a program that is for FEE HELP)

    A . Program

    From the main menu select the Academic Menu icon and then select the Programs icon where you will be taken to the list of Programs in TEAMS. Search and select the edit icon in the Action column for the program that you wish to setup and it will take you to the Program screen. In the Setting tab will be a field for FEE HELP Availability and there are radio buttons for:
  • VET Student loan (VSL)
  • Higher Ed FEE HELP
  • Neither

    As shown below:

IMPORTANT: A program can only be one of the FEE HELP options it cannot be both.

By default, the option of neither will be selected, select the option that you want and then SAVE the change.

After doing the above step you then need to update the FEE HELP settings for the program by following these steps:

  • Click on the burger menu and select the FEE HELP option.
  • The system will open a dialogue box (floating window) for FEE HELP Program settings as shown below:

You need to set the settings for the program and then select the SAVE button in the bottom right-hand corner of the screen.

That is all the settings you need to do for each of your FEE HELP programs, you then need to move on to setting up your Subjects and/or Unit of Studies, based on how you have setup your programs. Please speak to support for further assistance if you are unsure what level to set up.

B . Subjects

From the main menu select the Academic Menu icon and then select the Subject icon where you will be taken to the list of Subjects in TEAMS. Search and select the edit icon in the Action column for the Subject that you wish to set up and it will take you to the Subject screen. In the Details tab, there will be a field for FEE HELP Availability and there are radio buttons for:

  • VET Student loan (VSL)
  • Higher Ed FEE HELP
  • Neither

As shown below:

IMPORTANT: A subject can only be one of the FEE HELP options it cannot be both.

By default, the option of neither will be selected, select the option that you want and then SAVE the change.

After doing the above step you then need to update the FEE HELP settings for the Subject by following these steps:

  • . Click on the burger menu and select the FEE HELP option.
  • The system will open a dialogue box (floating window) for FEE HELP Subject settings as shown below:

You need to set the settings for the Subject and then select the SAVE button in the bottom right-hand corner of the screen.

  • Then go to the burger menu again to select the Funding Fee setup for the subject.

The system will take you to the Subject Funding fee setup screen. On the funding fee setup screen you can add multiple entries with the different combinations of Enrolment type/funding source code/state/delivery type by clicking on the Add button.

  • The system will open a dialogue box (floating window) for Subject Funding Fee setup settings as shown below:

You need to set the settings for the Subject and then click on SAVE button in the bottom right-hand corner of the screen.

C. Unit of studies

From the main menu select the Academic Menu icon and then select the Unit of Studies icon where you will be taken to the list of Unit of Studies in TEAMS. Search and select the edit icon in the Action column for the Unit of Studies that you wish to set up and it will take you to the Unit of Studies screen. In the Details tab, there will be a field for FEE HELP Availability and there are radio buttons for:

  • VET Student loan (VSL)
  • Higher Ed FEE HELP
  • Neither

As shown below:

IMPORTANT: A Unit of Studies can only be one of the FEE HELP options it cannot be both.

By default, the option of neither will be selected, select the option that you want and then SAVE the change.

After doing the above step you then need to update the FEE HELP settings for the Unit of Studies by following these steps:

  • Click on the burger menu and select the FEE HELP option.
  • The system will open a dialogue box (floating window) for FEE HELP Subject settings as shown below:

You need to set the settings for the unit of Studies and then select the SAVE button in the bottom right-hand corner of the screen.

  • Then go to the burger menu again and select the Funding Fee setup for the Unit of Studies.

The system will take you to the UoS Funding fee setup screen. On the funding fee setup screen you can add multiple entries with the different combinations of Enrolment type/funding source code/state/delivery type by clicking on the Add button.

  • . The system will open a dialogue box (floating window) for UoS Funding Fee setup settings as shown below:

You need to set the settings for the UoS Funding Fee Setup and then select the SAVE button in the bottom right-hand corner of the screen.

That is all the settings you need to do for each of your FEE HELP Programs, Subjects and Unit of Studies.

If you still have any queries, please do not hesitate to contact us via support@rtosoftware.com.au or 1300 85 05 85.

Important Links