Enrolment Dashboard – Link/Edit Agent

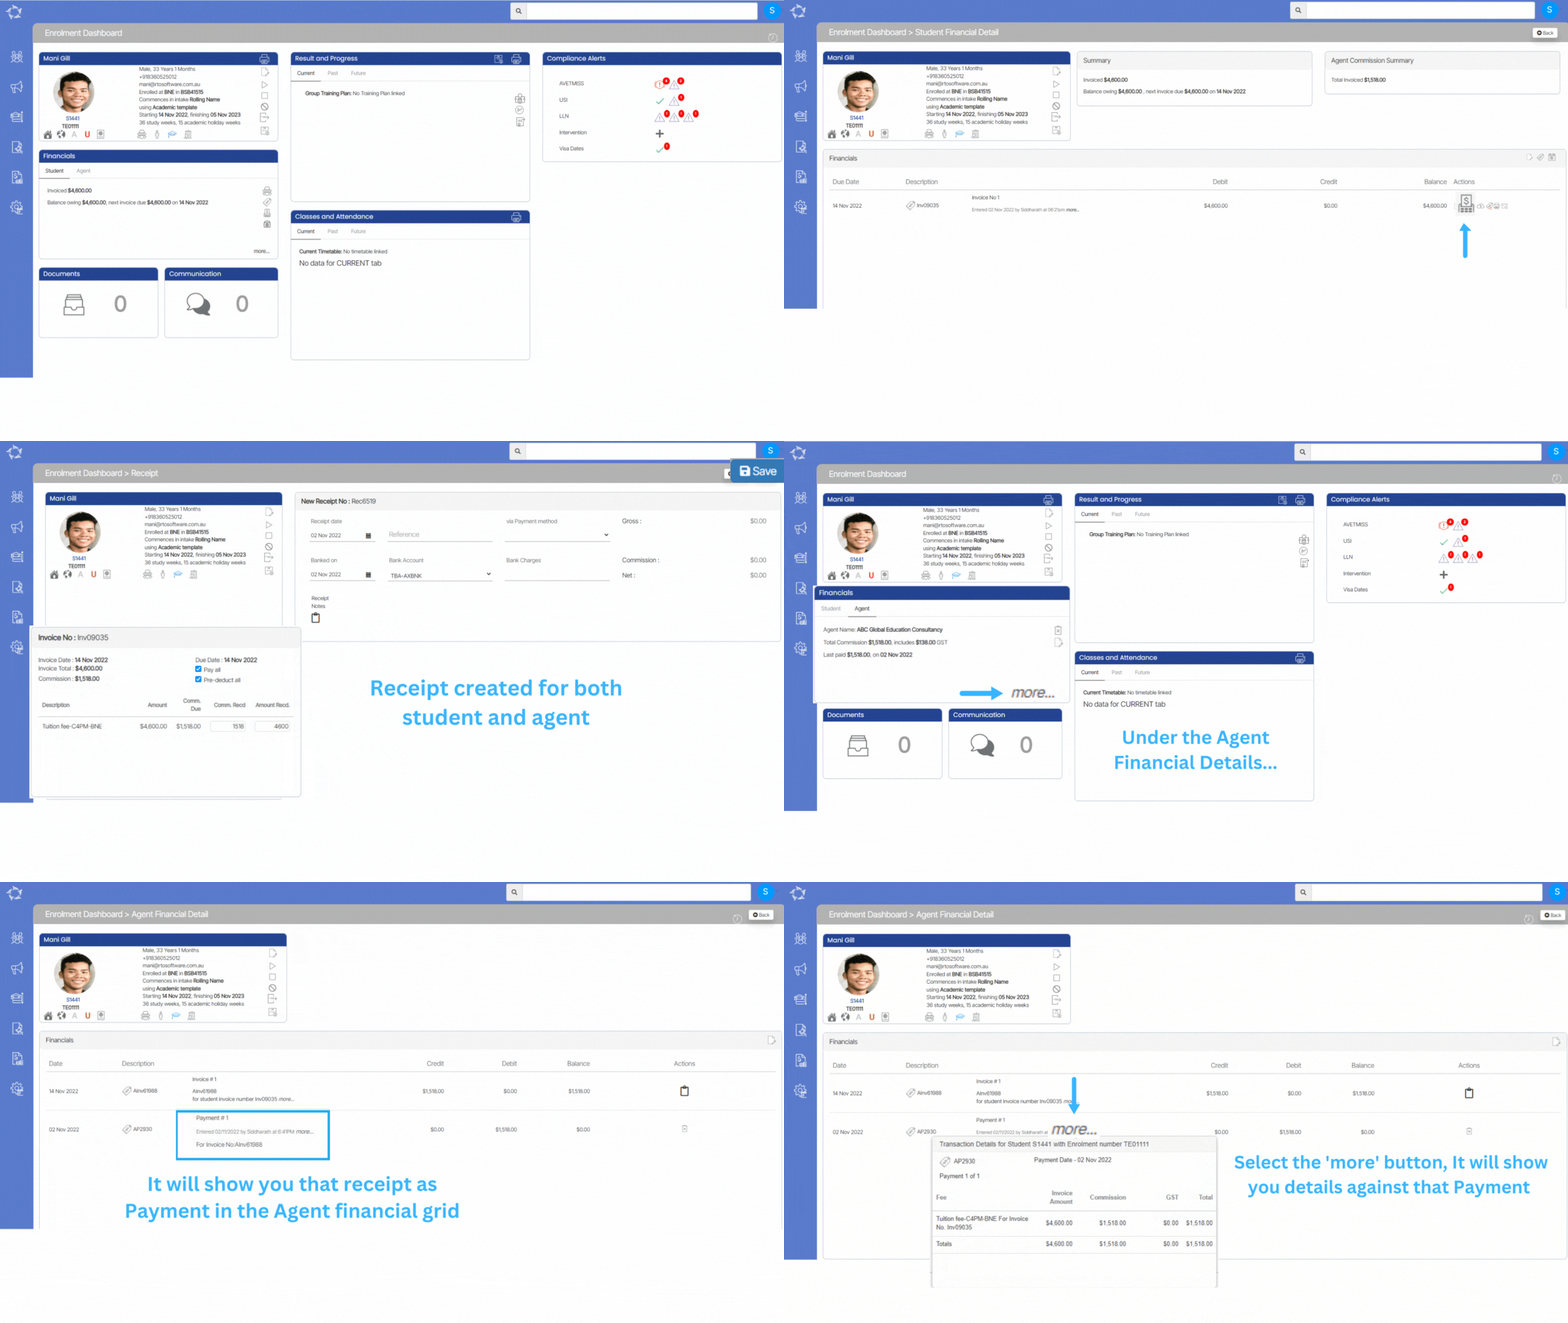
The Enrolment Dashboard features a Financial tile that provides functionality related to linking and editing agents. By accessing the Financial tile, you can link an agent from the Students tab to the enrolment. Once the agent is successfully linked, you can proceed to edit the agent’s details from the Agent tab.

The link agent icon within the Financial tile enables you to search for a specific agent and update their information within the enrolment. This allows for the synchronization of the agent’s data with the enrolment. On the other hand, the edit agent icon offers the capability to replace the currently linked agent with a different agent.

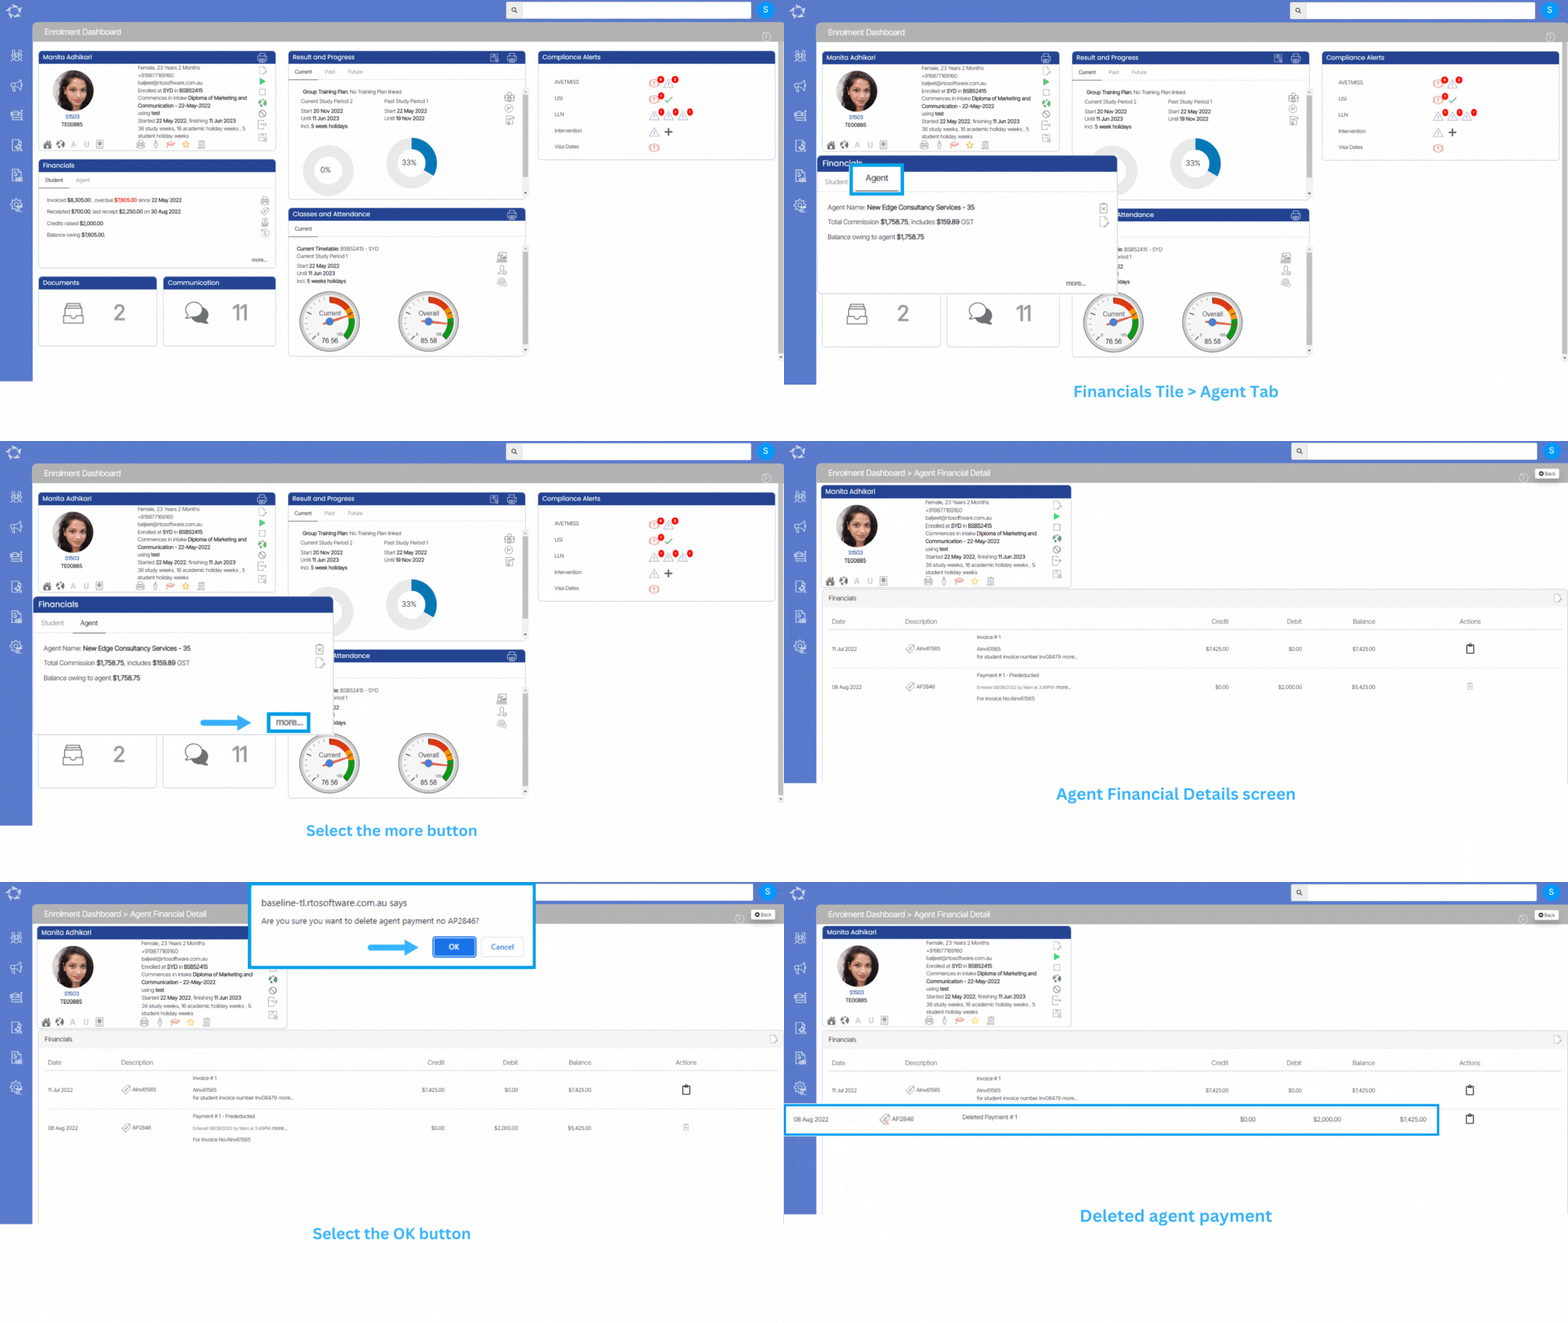
Important – If you want to change/edit the agent then make sure there are no payments that have been made for the agent in this enrolment, if the payments have been made then you have to go to the Agent financial screen and delete the payment via selecting the delete button.

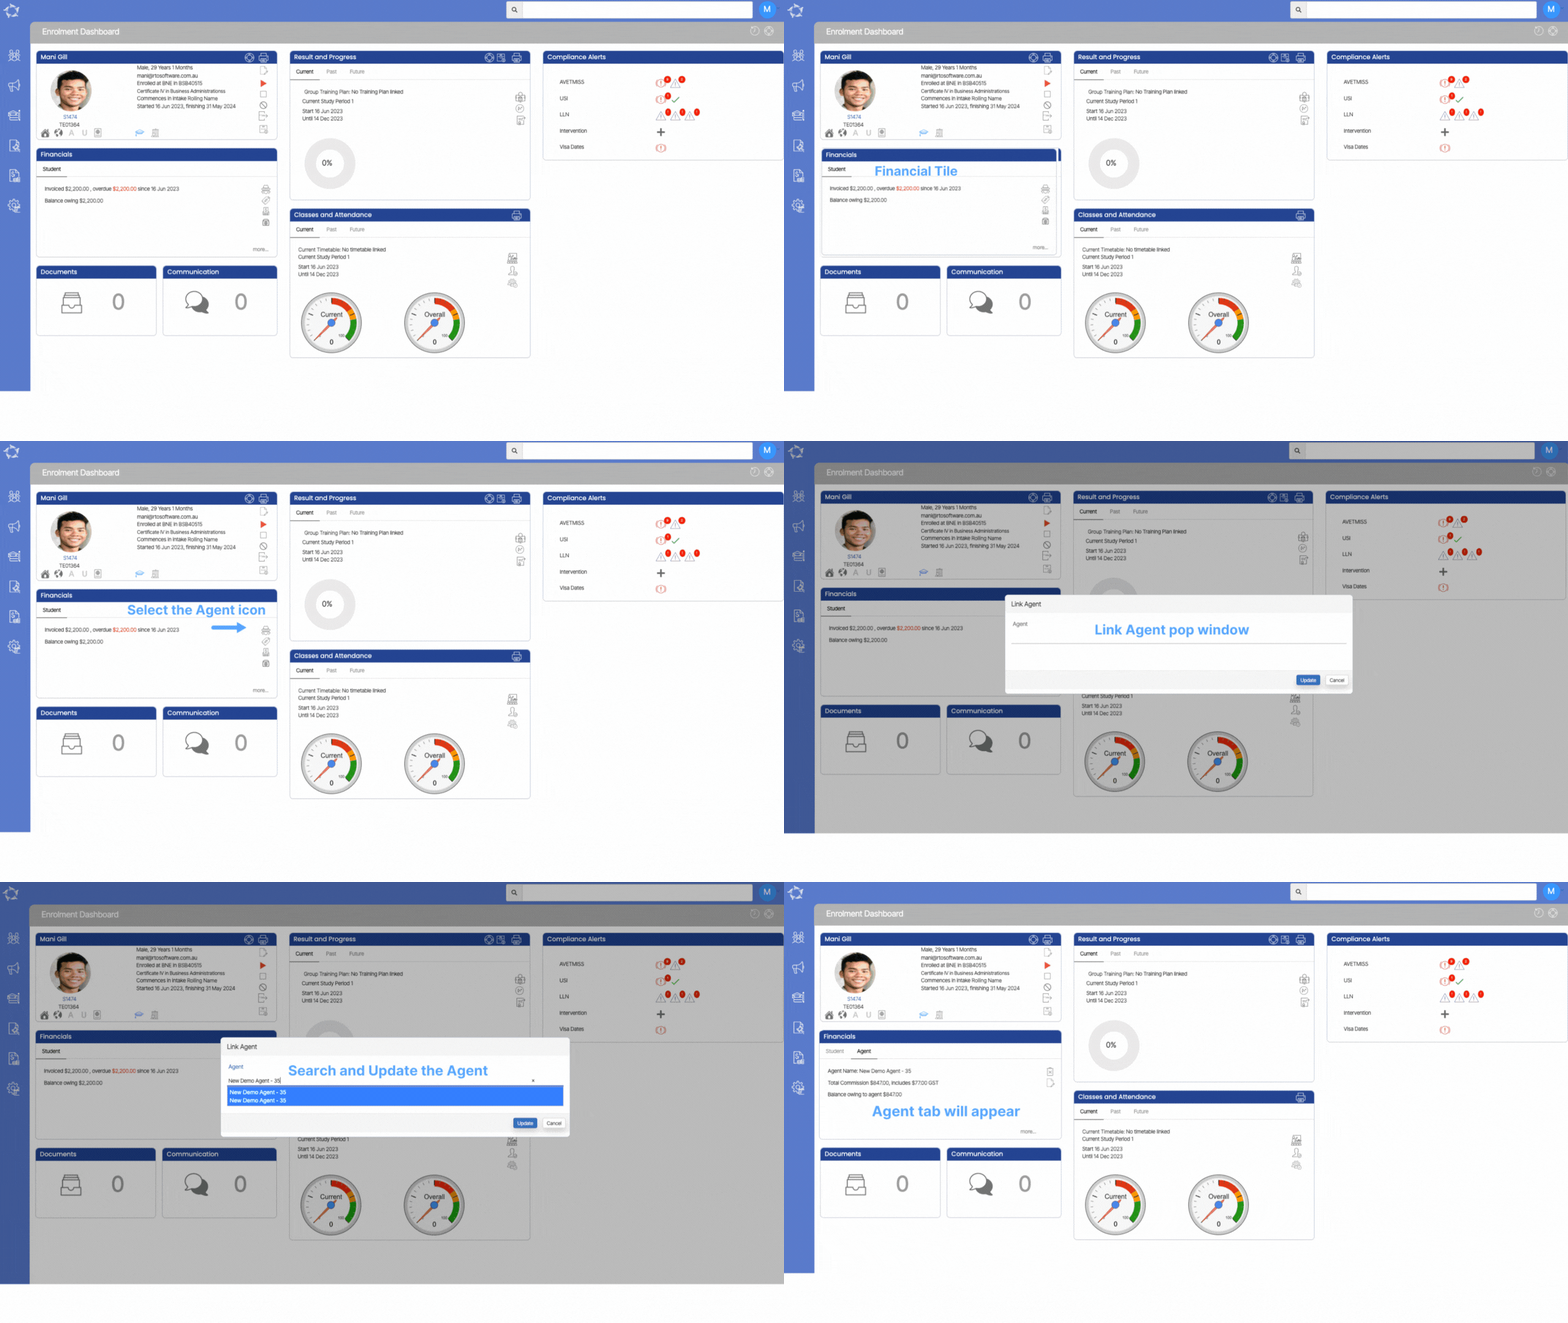
To link the Agent you need to do the following steps

  • Then, you need to select the Agent icon and that will show you a link agent floating window.
  • Search and select the appropriate agent and select the update button.
  • The system will refresh the screen and will show you the Agent tab.
To edit the agent you need to do the following steps:

  • You need to go to the Enrolment Dashboard > Financial Tile > Agent Tab
  • Then, you need to select the edit icon and that will show you a link agent floating window.
  • The linked agent will be visible there, you just need to select the cross icon that is just next to the agent name to remove the current agent.
  • After that, you need to start typing the new agent code/name in the agent field and the system will show you the list of similar agent that matches your search.
  • Once you will select the required agent you need to update the agent, the system will reload the enrolment dashboard and will show the new one again with the new invoices.
Delete Agent

Enrolment Dashboard > Financials Tile > Agent Tab Delete icon

If you want to remove the agent linked with the student enrolment then you can delete it by using the delete button on the agent tab from the Enrolment Dashboard > Financial tile.

IMPORTANT– The system will not allow you to delete the agent if there is any agent payment has been made. You need to delete the agent payment first to delete the agent.

Below are the steps to delete the agent and agent payments.

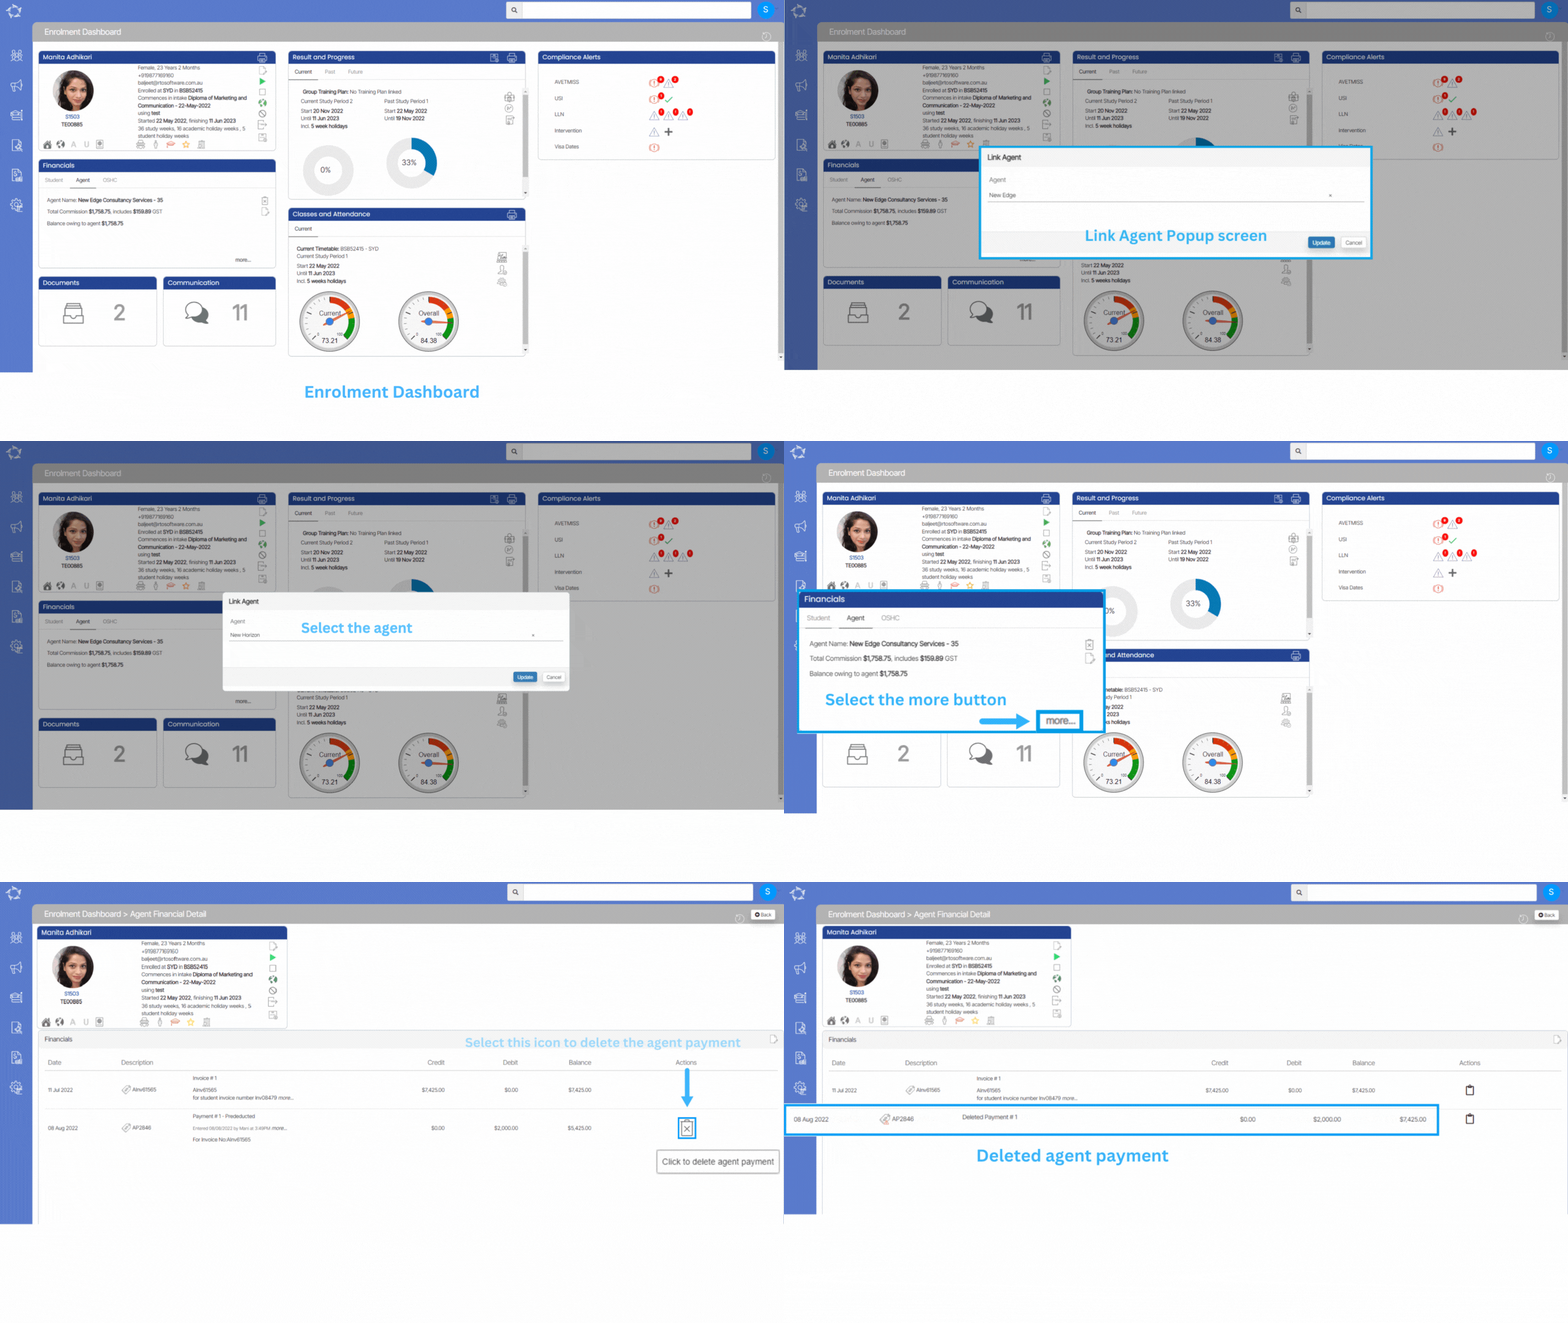
  • Go to the Enrolment Dashboard > Financial Tile > Agent Tab and then select the more option.
  • Select the delete icon to delete the agent payment.
  • Once you select the delete icon the system will show you the popup message on top of the screen. (Are you sure you want to delete the agent payment #). You can select OK to delete or cancel to leave it as it is.
  • Once the payment has been deleted, you will be able to remove the agent from the enrolment.
  • You need to go back to the enrolment dashboard > Financial Tile > Agent Tab
  • Select the delete icon to delete the agent.
  • The system will reload the screen and the agent will get removed from the enrolment.

Agent Details Report Filters

Below are the filters and their explanation for the Attendance Hours Report.

General FiltersExplanations
PrintThis label has three Radio Buttons:

Show All – if you select this radio button the system will show you all the active and inactive agents in the system.

Show Active only – This will show you only the Active agents.

Show Inactive Only – This will show you only the inactive agents.
Print Based onThis label has two radio buttons:

Agent – By default, the Agent radio button is selected and if you want to print the report based on the agent name then you can select the agent name in the magic search field.

Agent Type – If you wish to print the report based on the Agent Type then you can select the agent type from the drop-down. (Agent Type is a user code and you can create the agent type from the User Code screen.
Account Manager NameThis is a magic search field and you can select multiple account managers in this field.
CampusYou can select multiple campuses from the dropdown.
CountryIf you select any country or countries from the dropdown then the system will pull out the agents that are linked to the selected country or countries
Exclude UnsubscribeThis filter will exclude all the agents that have unsubscribed tick box selected on the agent entry screen > Contact Information Tab.
Only Display Default ContactsThe system will display all the agents with their primary contacts only. It will exclude all the contacts who are not selected as primary contacts for those agents.
Group ByGroup by is used to group the report according to Group by selected for example Country, Agent Type, Commission Paid etc.
Sort BySort by is used to sort the report according to Sort by selected for example County, Agent Name, Agent Type etc.
Asc/DscSelect the Ascending or Descending radio button.

Select the “Print” Icon  to generate the report. After clicking on it, the system will direct you towards the report dashboard screen. You can see the report status over there if it’s generated or not. Once it’s generated, download the report.

Agent contracts expired

Main Dashboard > Alerts – CRICOS Tile > Agent contracts expired

Overview:

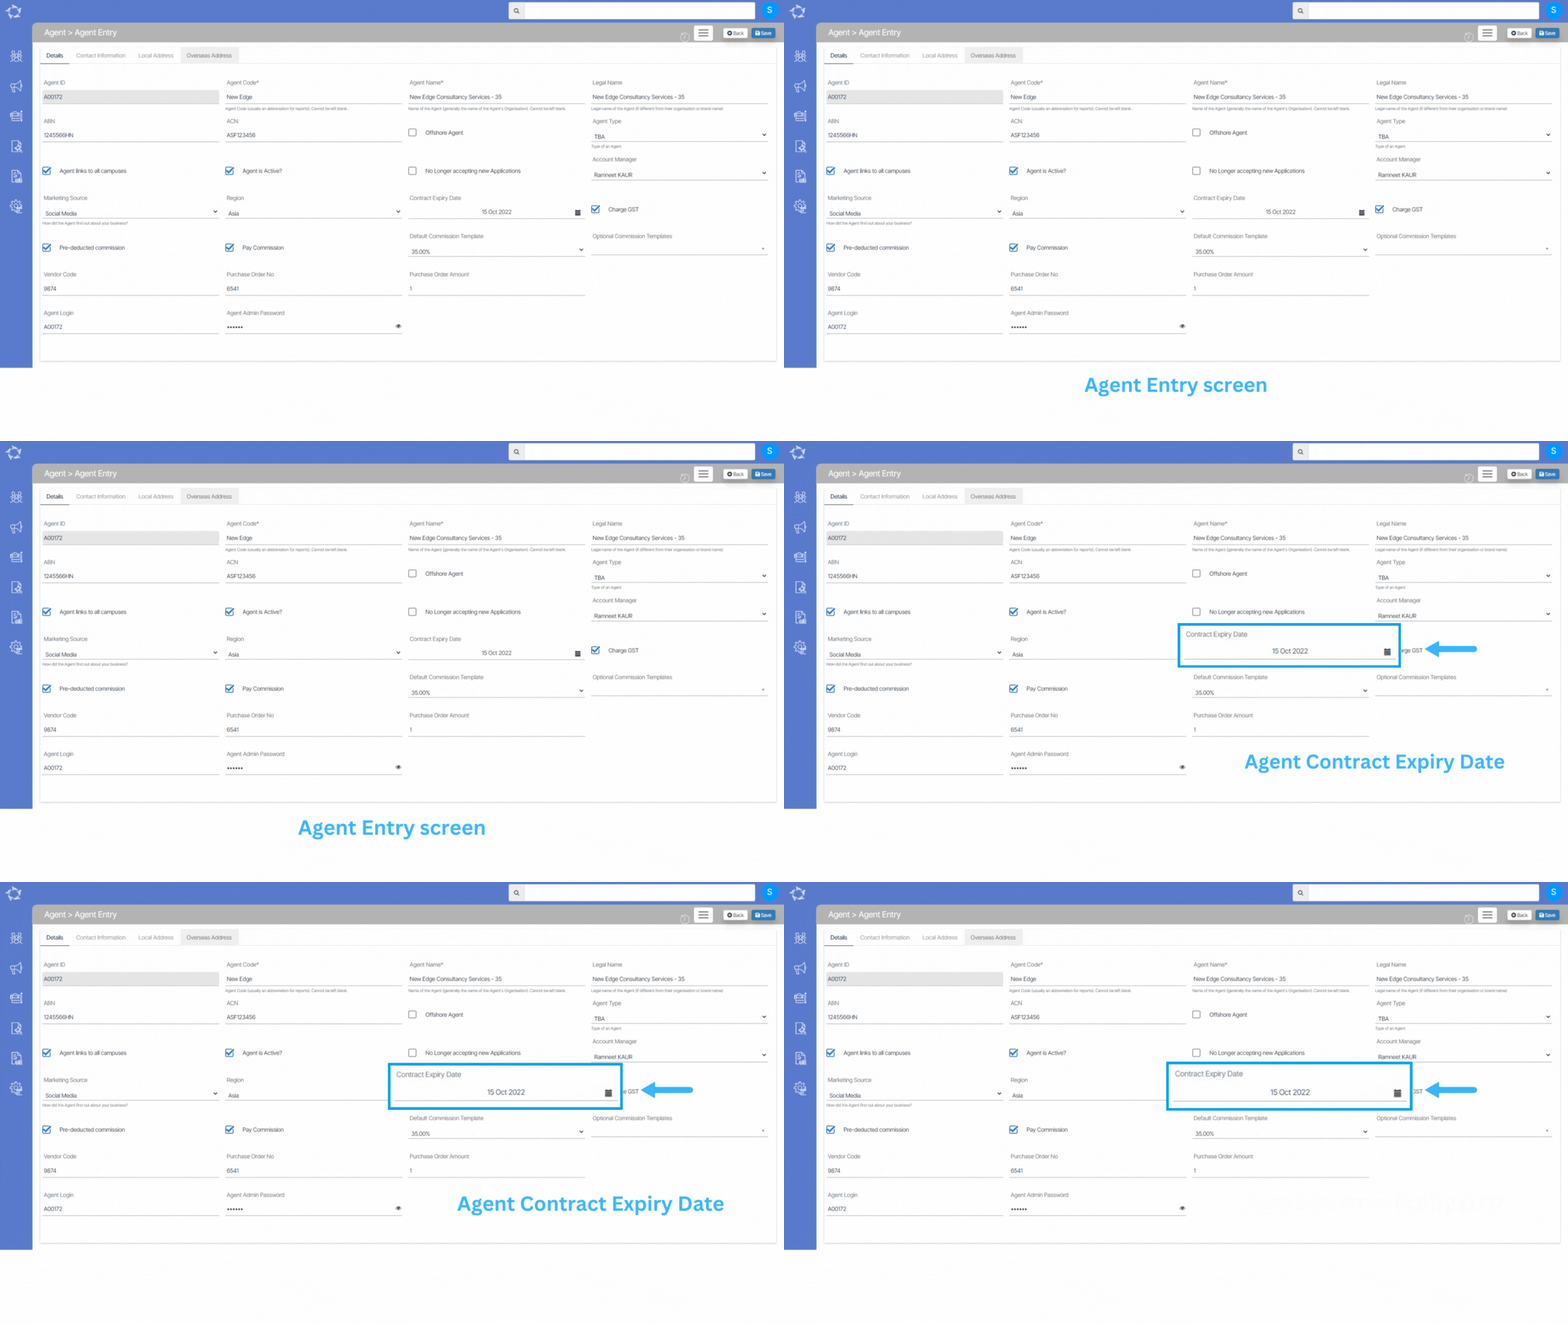
The agent contracts expired screen will show the count of those agent contracts whose agent contract expiry date has expired. This screen will only show you the agent contracts expired if the Contract Expiry date has been set up on the agent entry screen.

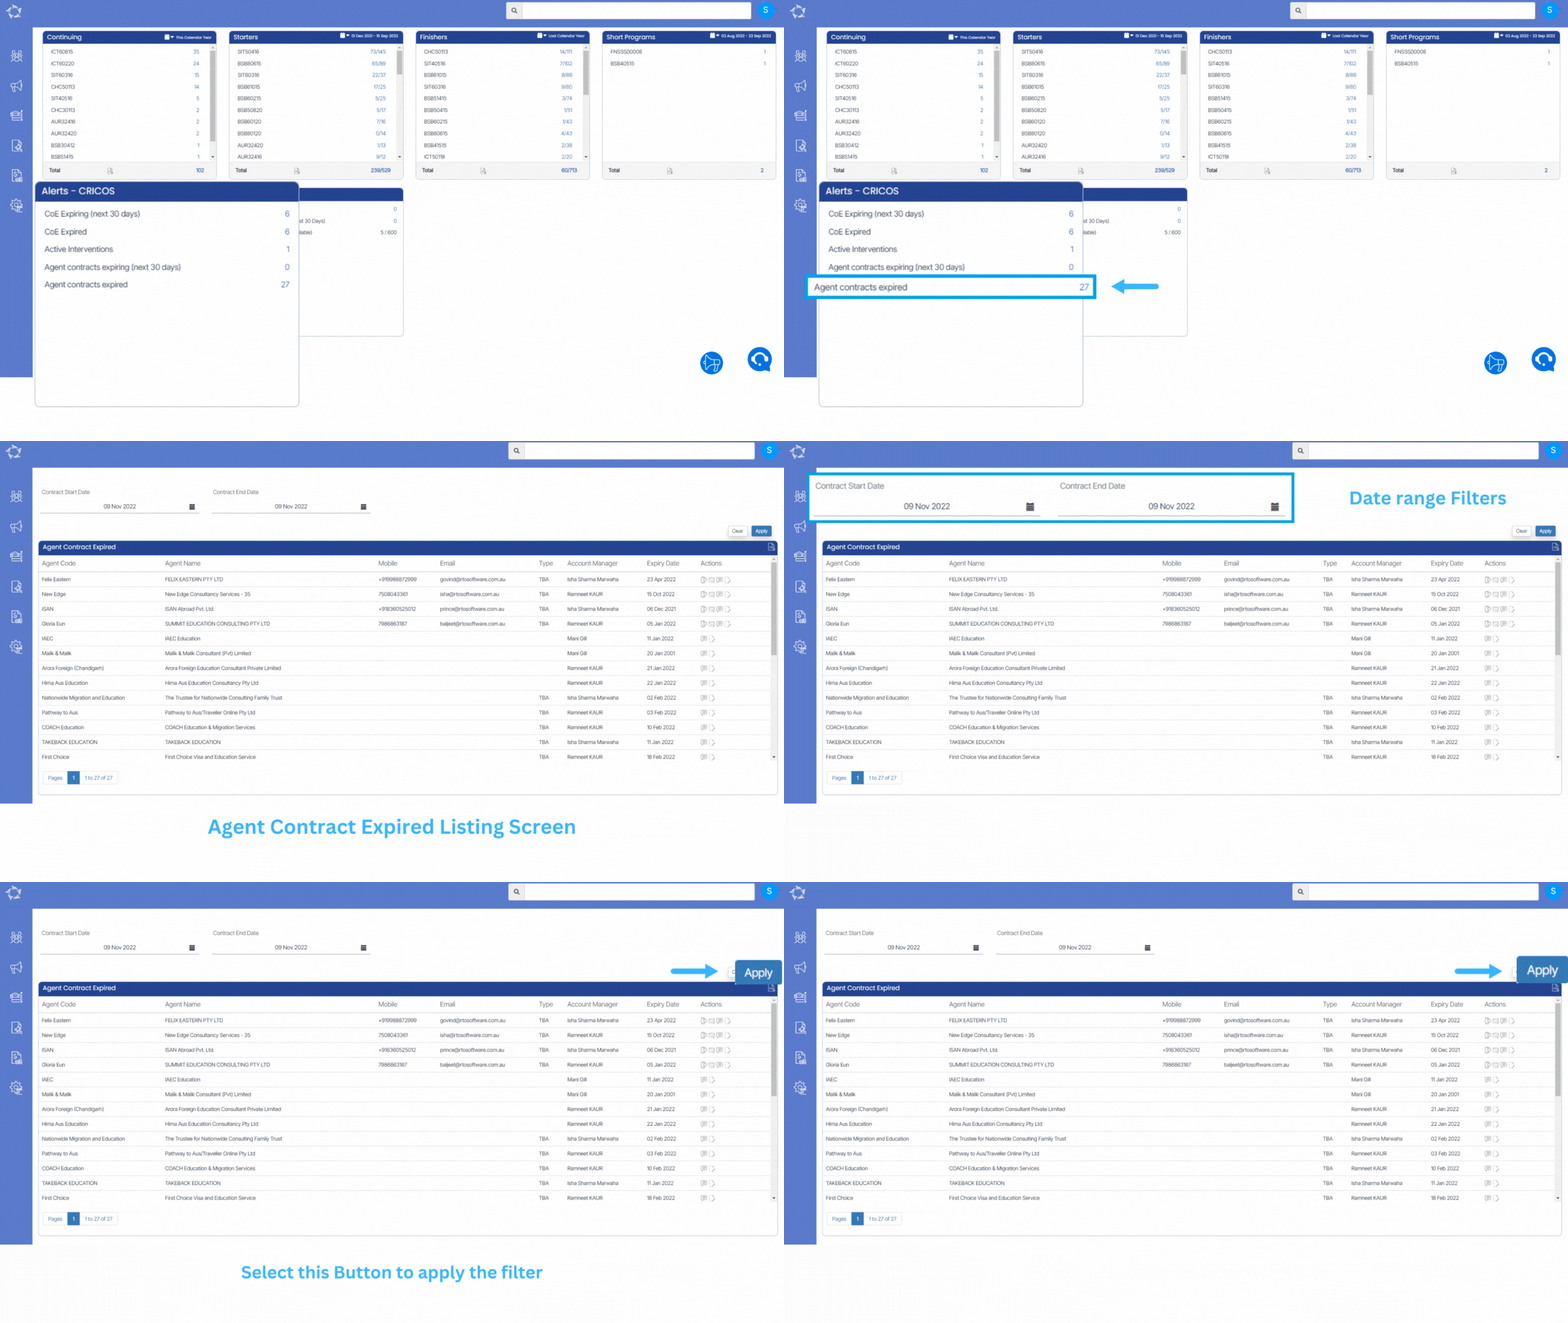
To check the list of agents whose contracts have expired, you just need to select the count which is a hyperlink to the Agent Contract Expired alert.

As you can see, the screen is divided into two sections:

  1. Filter/Parameters
  2. Agent Contract Expired listing Grid

Filters/Parameters:

To open this screen, you would have selected the count hyperlink for the Agent Contract Expired alert. Based on what you have selected, the system will open the screen and populate the information in this section. It will show the contract start date and contract end date. When you are on this screen you can change the dates and select the Apply button for the system to refresh the list for you.

Listing Grid

The system will show you a summary of information for each Agent whose contracts have expired. The information that displays in the columns for this grid is generally standard information. However, please keep an eye out for any What’s New posts for this screen as this is where we would let you know of any new columns or changes to existing ones that we do.

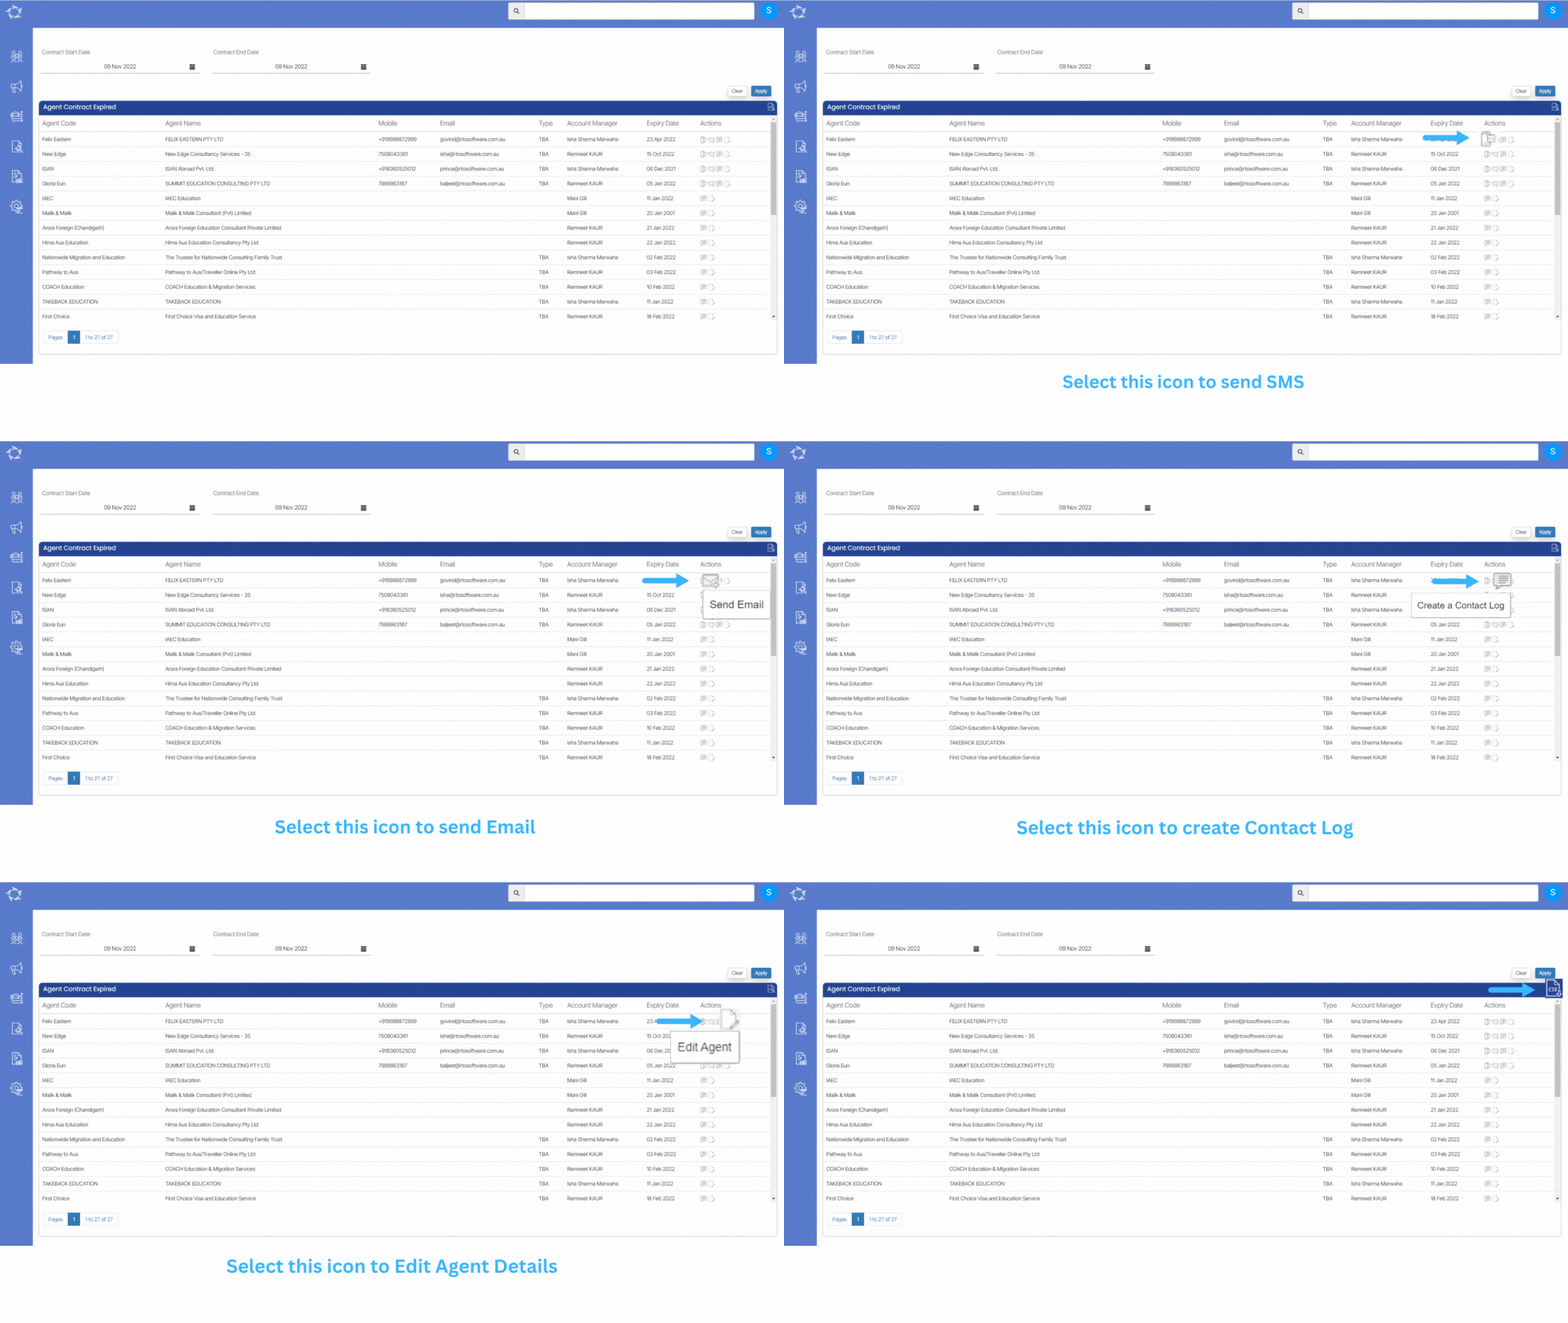
This listing screen also allows you to download the list of agents in the grid in a CSV format. To do this select the CSV icon in the top right-hand corner of the screen.

Select here to know more about the icons under the Actions Column.

Agent – new fields for Agent Portal

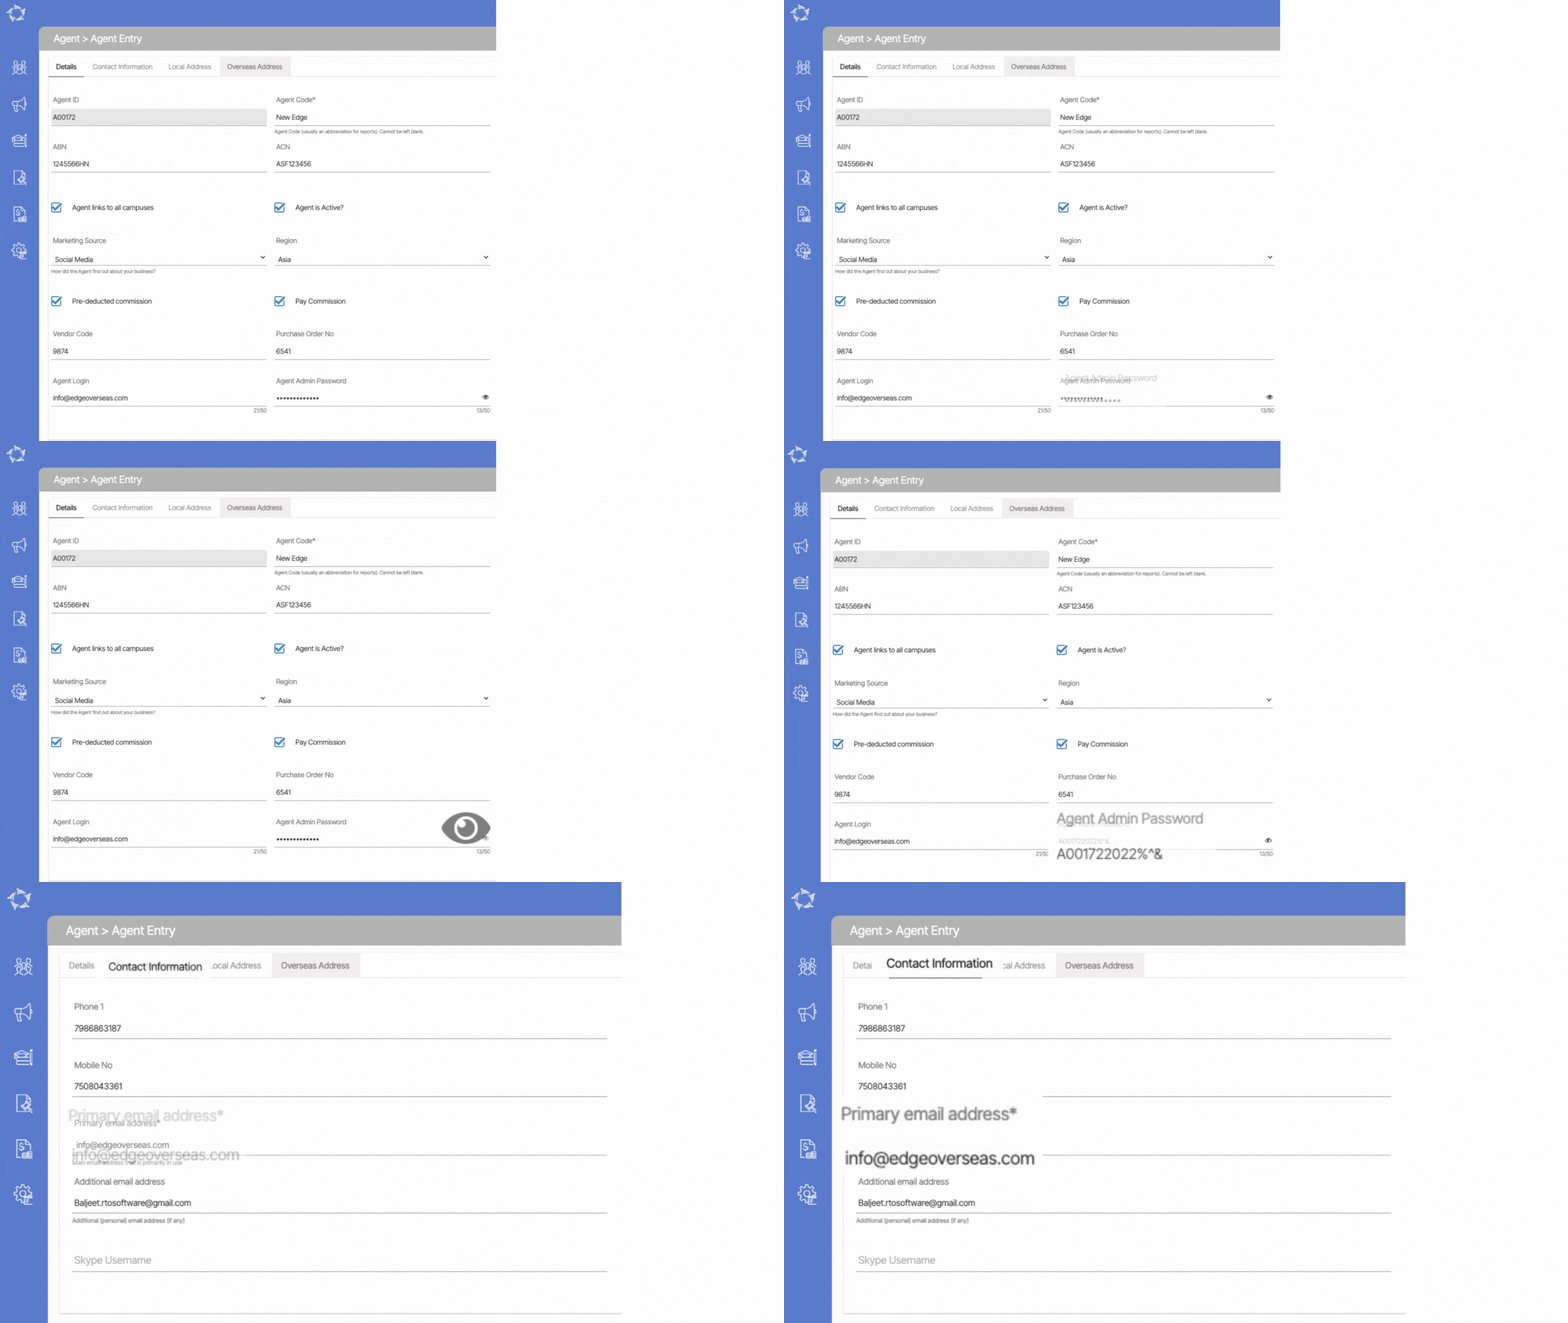
We have now added two new fields for Agent login and Agent Admin Password to allow you to setup an agent with a login to the Agent Portal. For the new password field you will also see the new View icon.

Note: When setting up login details for an agent to access your Agent Portal, it is our recommendation that you follow a standard format that your staff must use when creating logins for agents. The recommended format is as follows:

Agent Login: use the agent’s primary email address for this, such as info@edgeoverseas.com – the agent’s primary email address is on the Contact Information tab of the Agent Entry screen.

Agent Admin Password: use the Agent ID that the system automatically generates for an agent. This can be found on the Details tab of the Agent Entry screen. In the example below, the Agent ID is A00172. Then add a mix of numbers and symbols to make it a stronger password. So for this agent below it could be something like A001722022%^&

Both of the pieces of information we have recommended are unique to a specific agent. There can be no mistaking what agent the login is for and no chance that a user will use the same login details for two different agents.

Agent Portal Dashboard – Future Commissions Tile

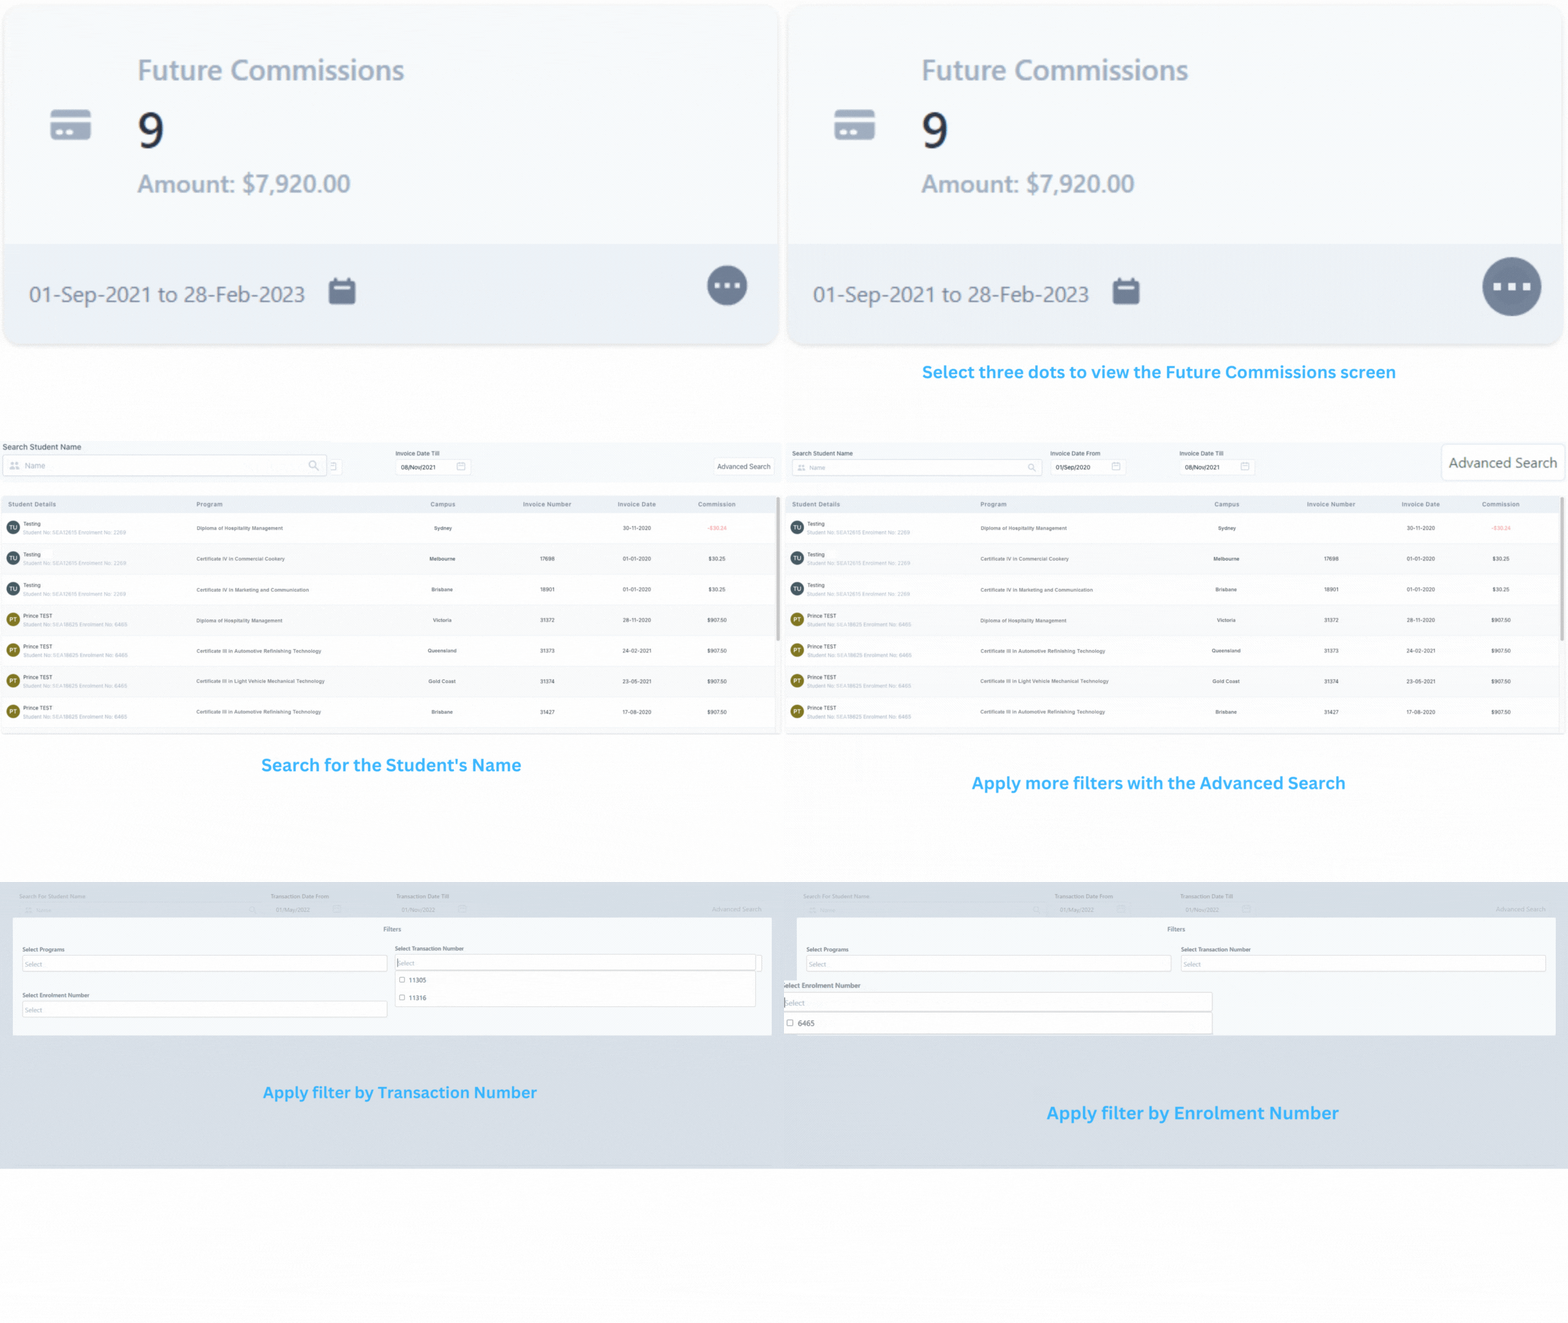
This tile will show you all the Future Commissions that the Agent will receive from the student, this screen will allow the agent to do the following-

  • You can Select the date range from the calendar to view Future Commissions accordingly
  • You can Select three dots to view the Future Commissions screen
  • You can search by Student’s Name
  • You can apply a Date Range (Date From and Date Till)
  • Apply more filters with the Advanced Search
  • Apply Filters by Programs, Enrolment Number, or by Transaction Number.

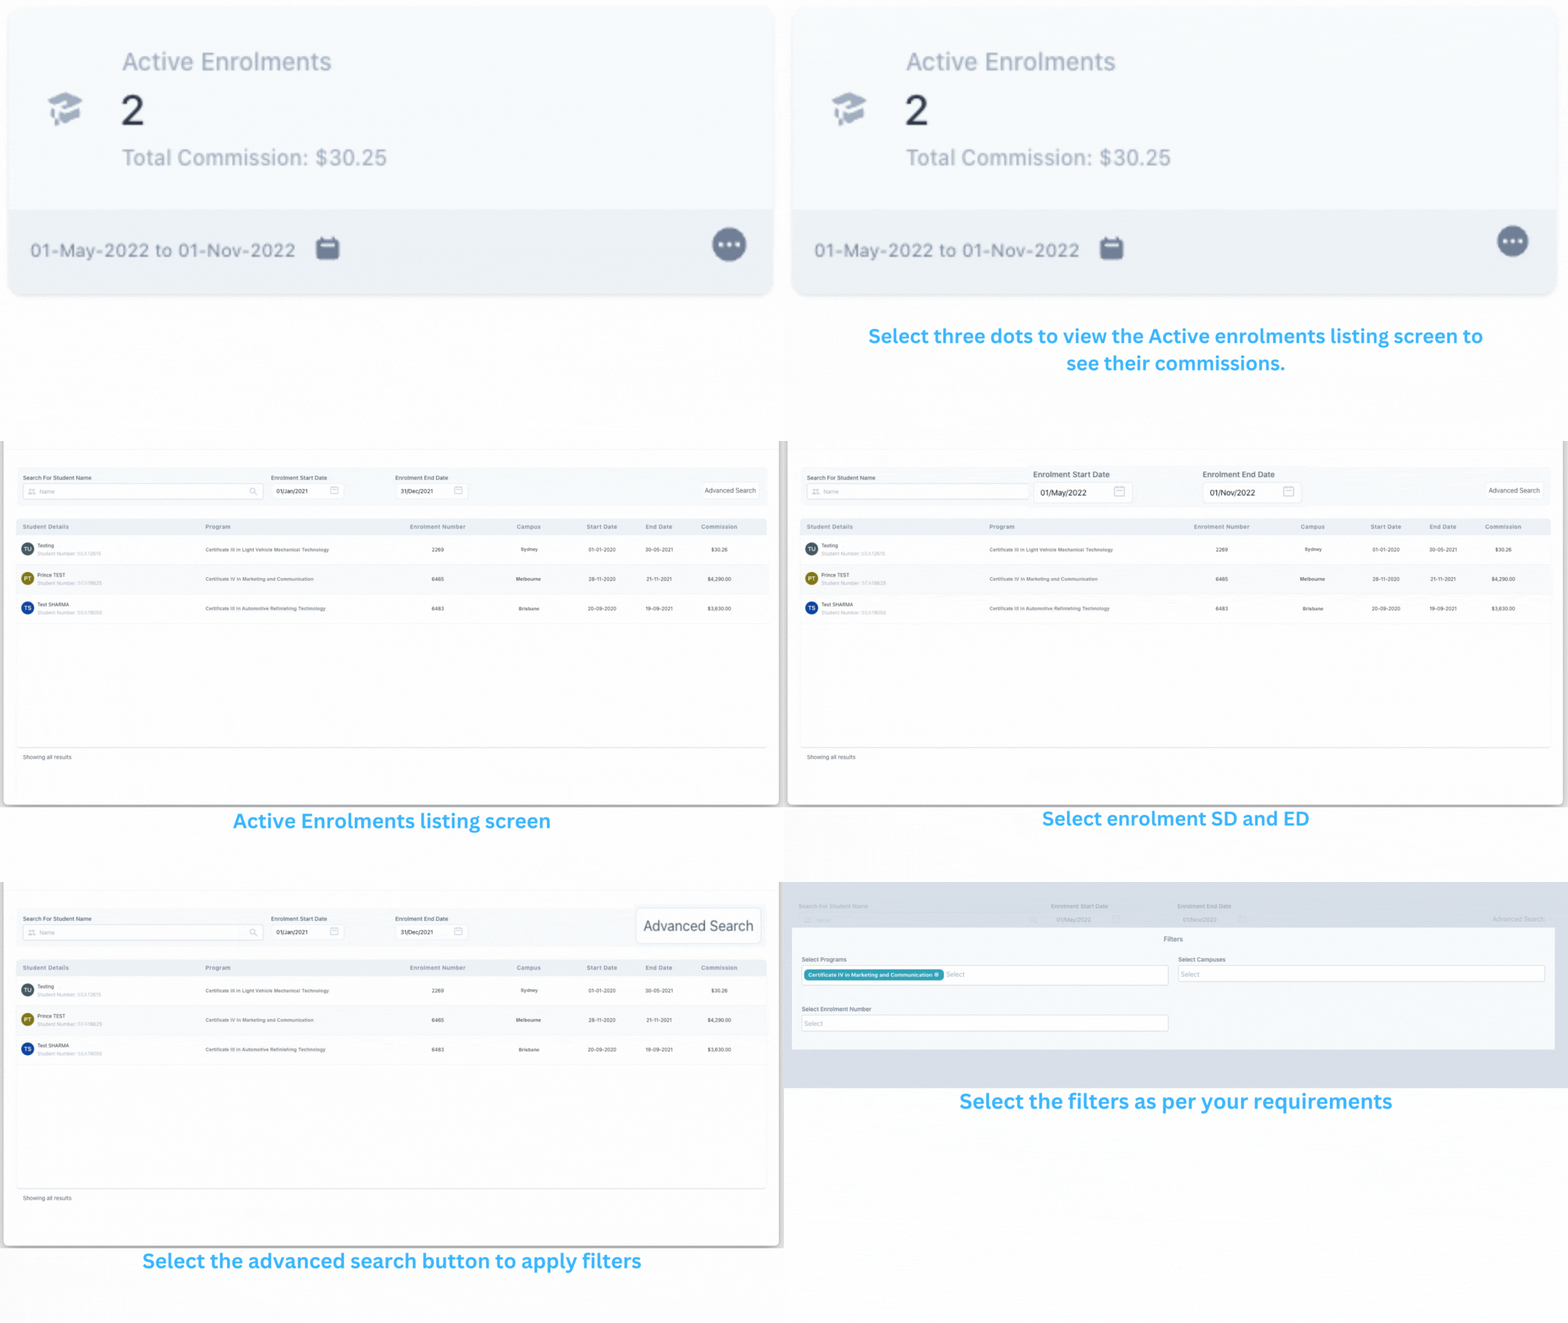
Agent Portal dashboard > Active Enrolments Tile

This tile will show you all the Active enrolments with their total commissions and it will allow you to do the followings.

  • Select the date range from the calendar to view the active enrolments accordingly.
  • Select three dots to view the Active enrolments listing screen to see their commissions.
  • You can search for a particular student with its name or with their enrolment start date and end date.
  • You can also do an Advanced search to apply more filters to view the enrolments accordingly.

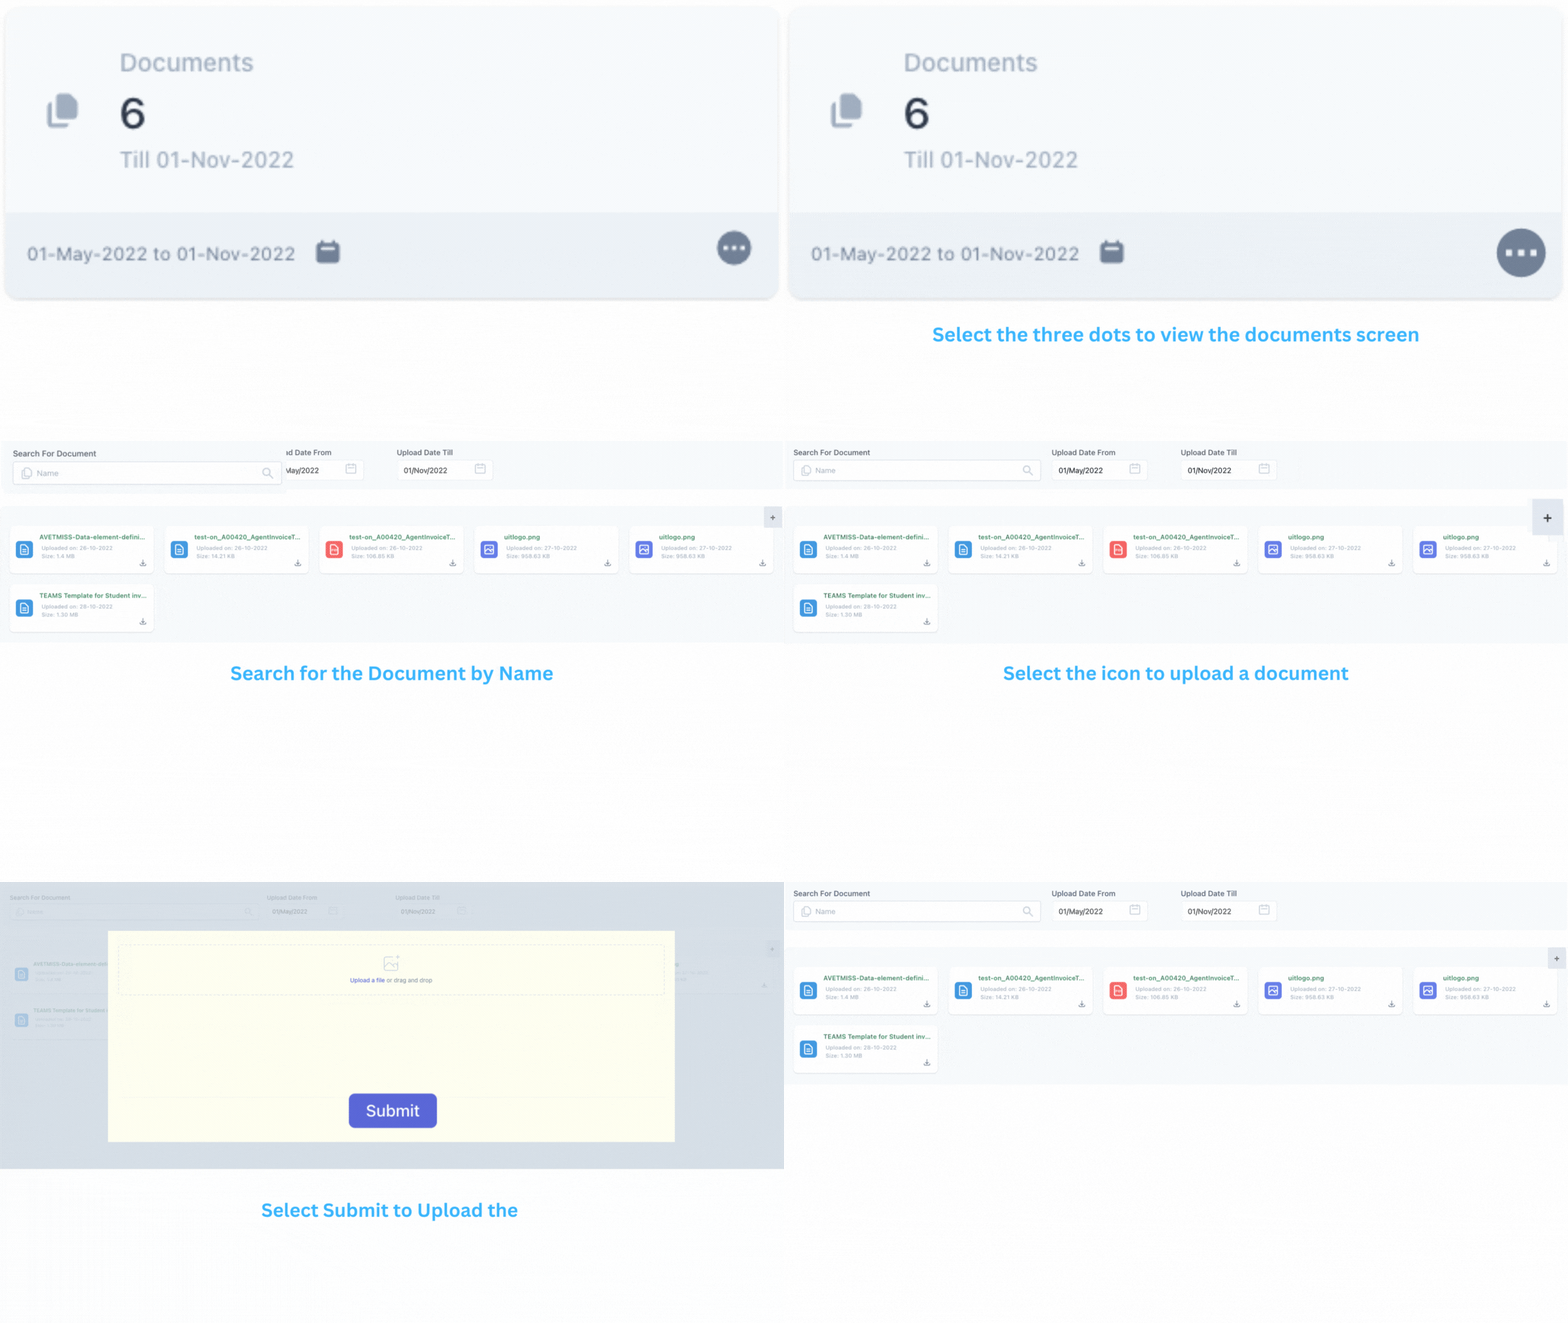
Agent Portal Dashboard – Documents Tile

This tile will show you all the Documents that are related to the Agent and this screen will allow the agent to do the following.

  • You can select the date range from the calendar to view documents accordingly.
  • You can select three dots to view the documents screen.
  • You can search the document by Name.
  • You can apply Dates (Upload Date From and Upload Date Till)
  • You can add a new document by selecting the plus icon.
  • You can upload a new document by selecting upload a new file and submit.
  • You can download the document from the download icon.