Agent Transactions

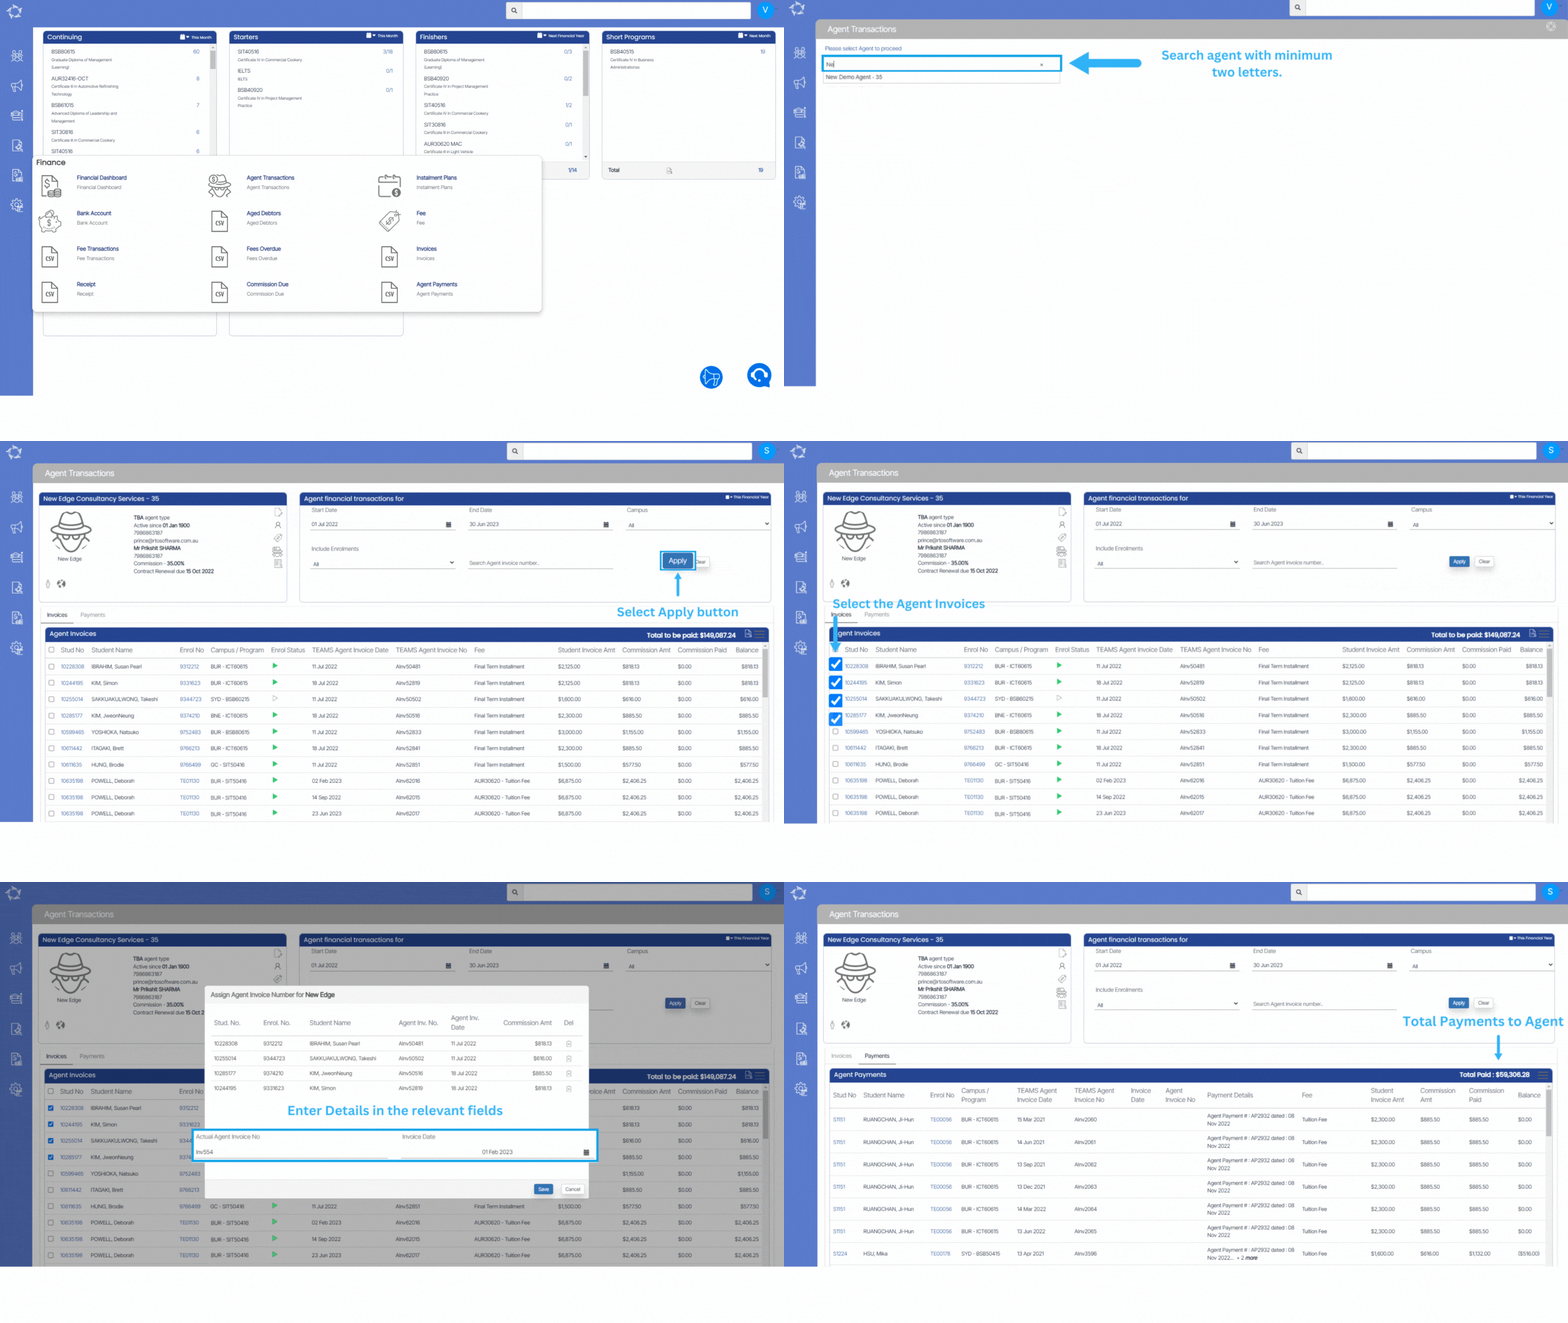
The Agent Transaction screen will allow you to manage and track financial activities associated with agents. Within this screen, you can access vital information such as invoices, payments, and detailed transaction records. The system provides an organised and structured view of all invoices generated for agents.

You will also have the ability to track the status of payments, ensuring transparency and efficiency in the payment process. The Agent Transaction screen provides real-time updates on payment statuses, allowing you to stay informed about outstanding payments and easily identify completed transactions.

Users can access the agent transaction screen through two methods:

  1. Marketing Menu > Agent Dashboard > Financials Tile > More.
  2. Finance Menu > Agent Transactions

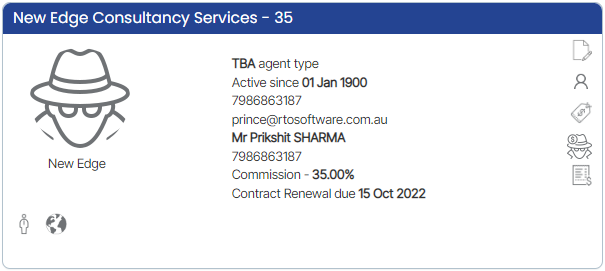
This tile will show you the basic details of the Agent and most of the icons in this tile are read-only. Please note – This screen will only allow you to edit the Agent or create a bonus invoice for the Agent.

You can select the various parameters as per your need from the Agent Financial Transactions tile and select the Apply button to show details as per the parameters you have selected.

The Agent Invoice Listing Grid will show you all the Agent invoices along with the total amount that is yet to be paid to the agent on the top right corner of the tile, download the CSV report of the agent
invoices and assign the agent invoices from the burger menu.

The Agent Payment Listing Grid will show you all the Agent Payments along with the total amount that is paid to the agent on the top right corner of the tile.
Agent Entry – Contact Logs

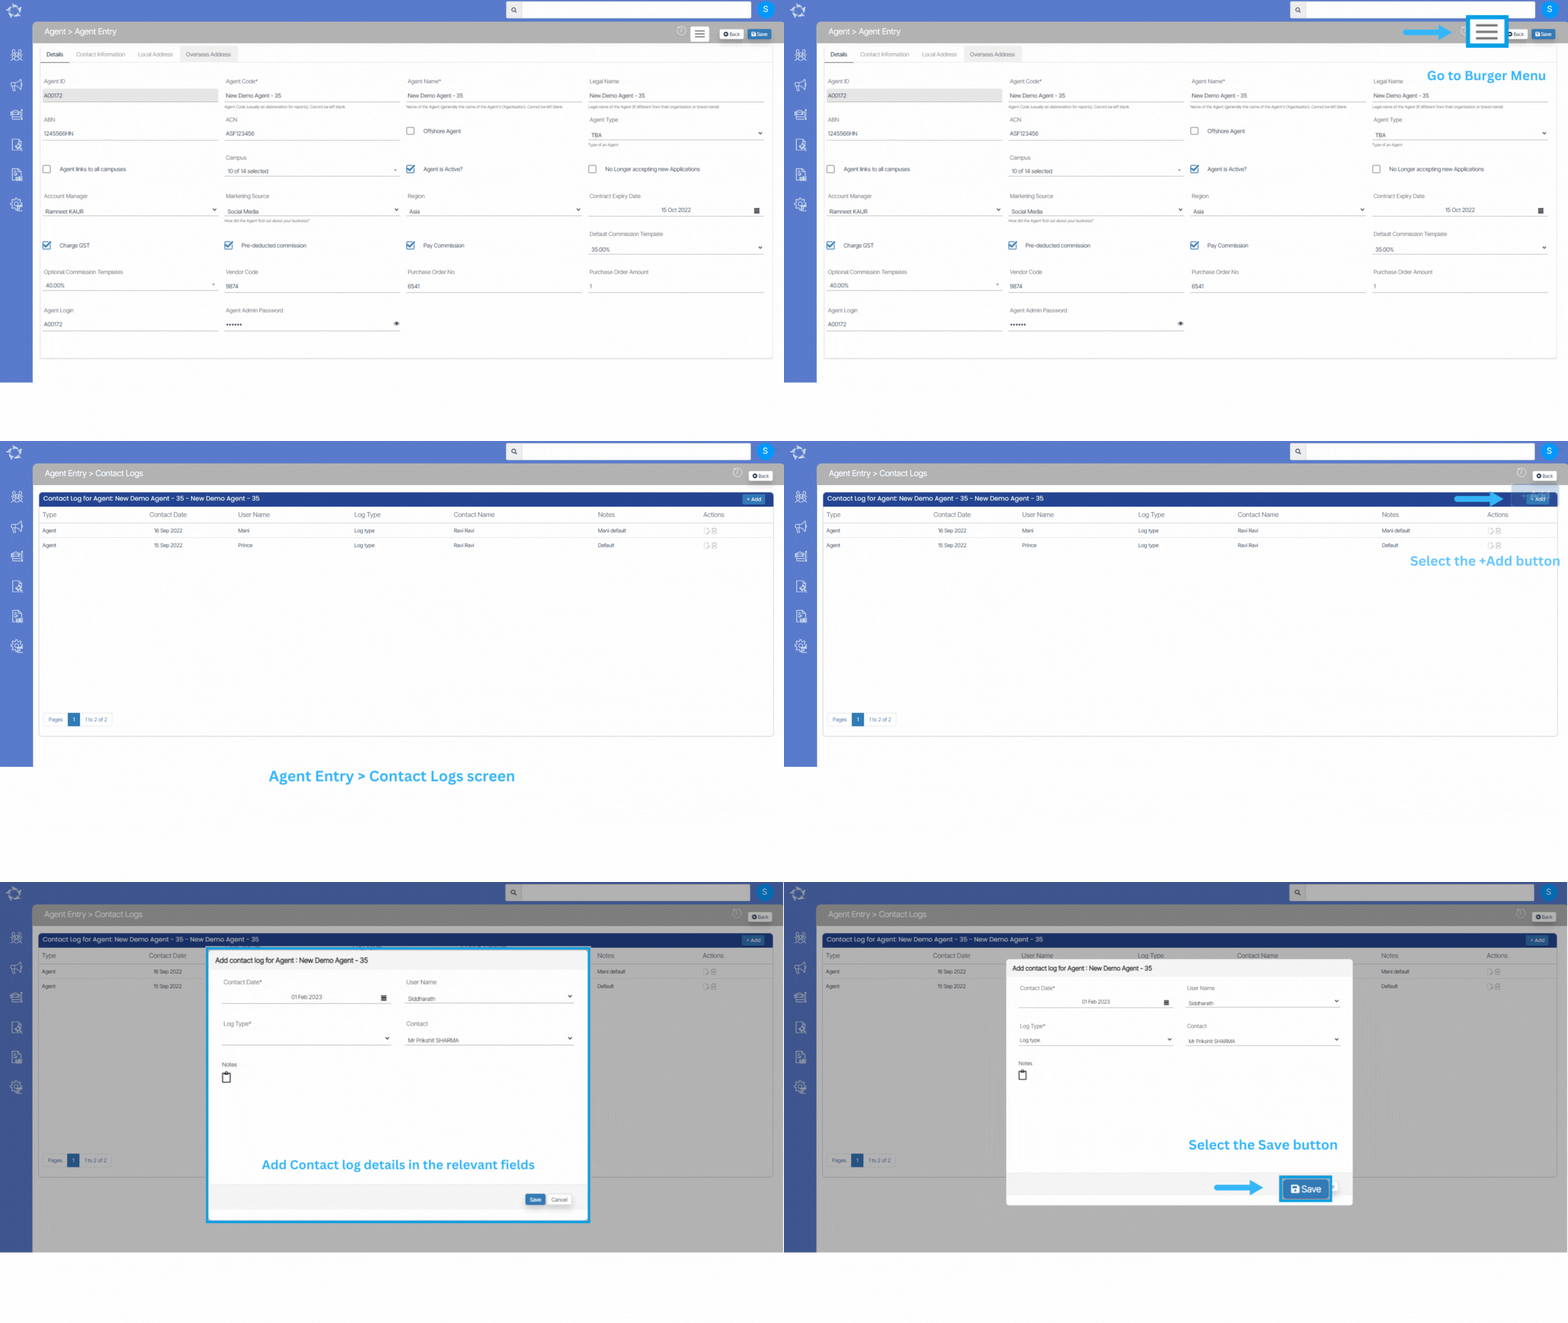
This screen lets you enter the contact logs for the agent. You will be able to view the agent’s current contact logs on the grid and make edits or deletions as necessary.

You can add or modify the details of the agent’s contact logs using the screens provided below.

Agent Dashboard > Agent Profile Tile > Edit Agent > Burger Menu > Contact logs

Agent Welcome screen > Add Agent > Burger Menu > Contact logs

The field’s name and explanations are given below:

FieldExplanation
Contact DateYou can enter the contact date in this field.
User NameSelect the user name from the dropdown field
Log TypeYou can select the log type from the dropdown field.
Contact Select the contacted person from the dropdown.
NotesYou can add notes related to the contact log.

Agent Entry – Documents

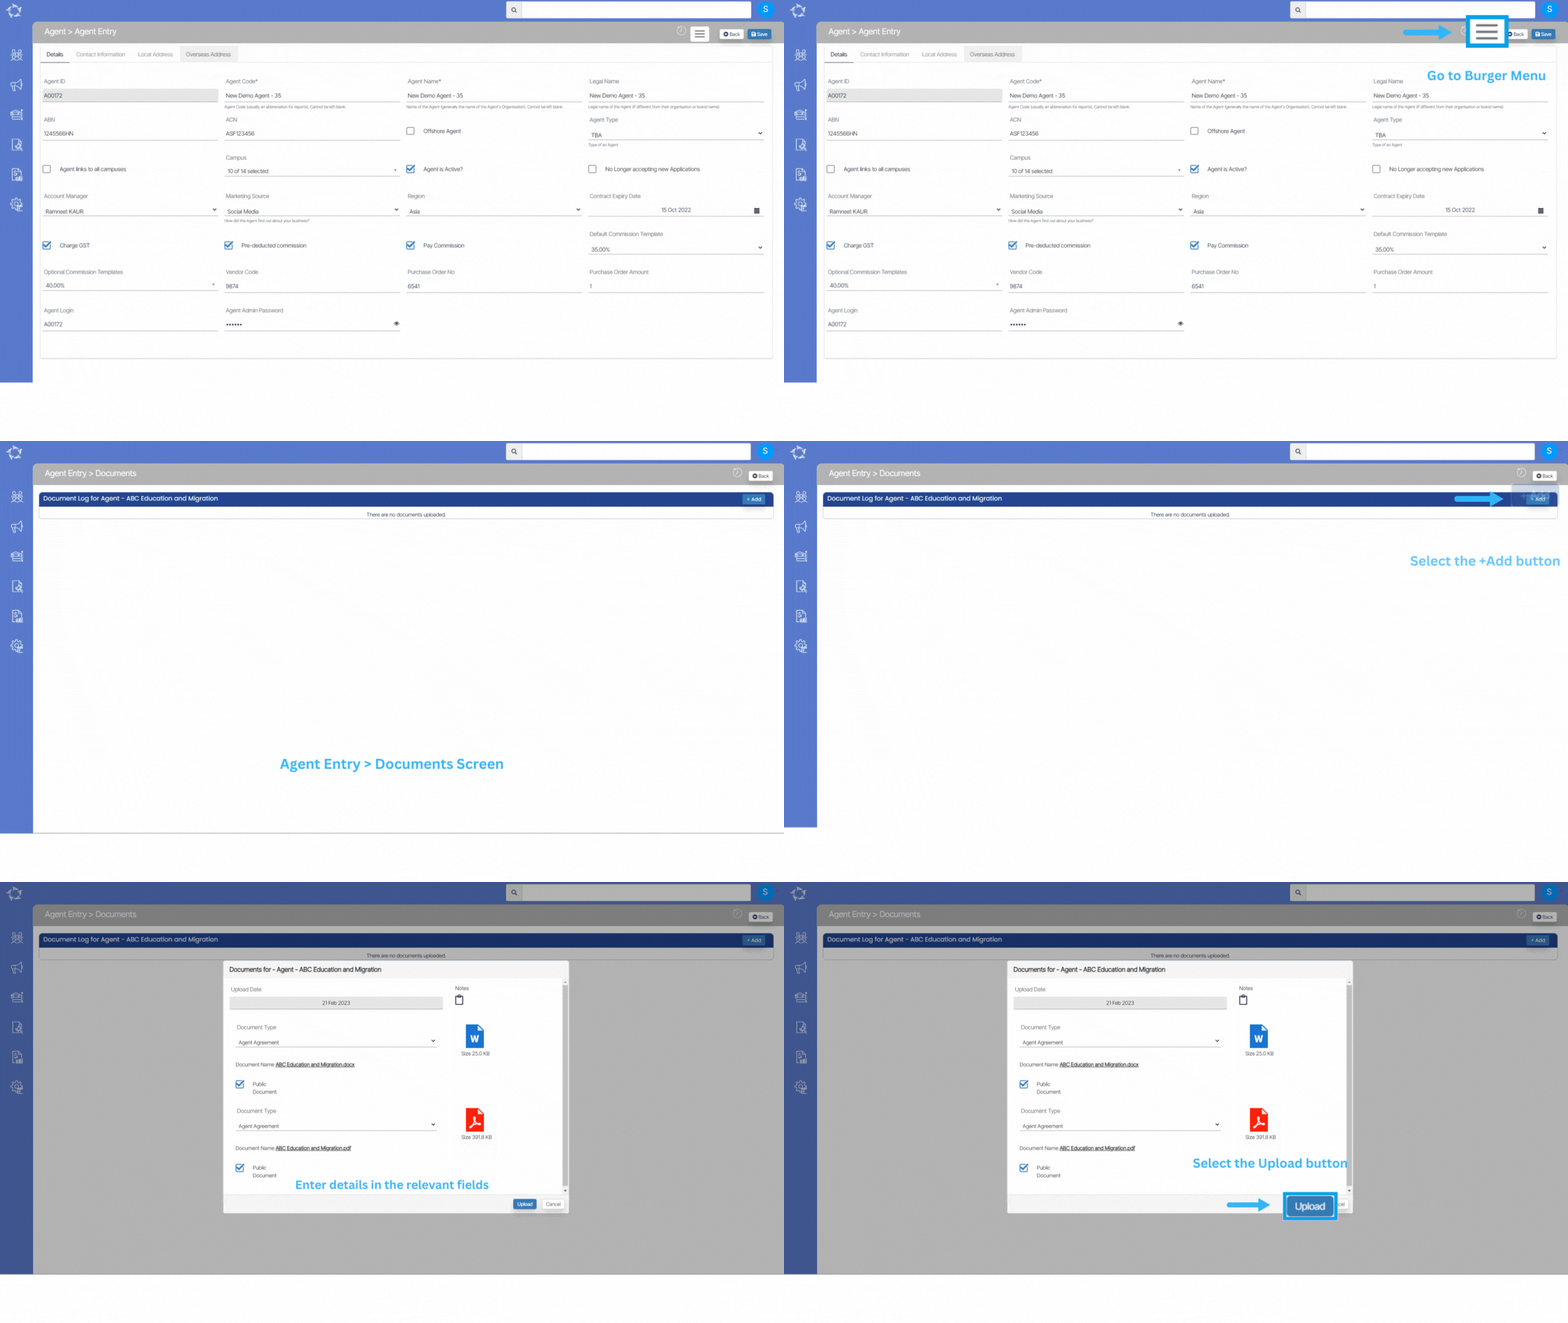
When you choose the “documents” option from the hamburger menu, a screen will appear where you can add documents for the agent by selecting the “+Add” button.

Once you select the “+Add” button, a pop-up window will appear on the screen where you can choose the document you want to upload for the agent.

The field’s name and explanations are given below:

FieldsExplanation
Upload DateIt will show you today’s date and will get auto-populated in the field
NotesYou can write any notes for your own reference.
Document TypeThis is a user code in TEAMS and based on the User Code created in TEAMS, you can select the document type
Document NameIt will show the name of the document which you have selected.
Public DocumentTick this box if you want to make the document public.

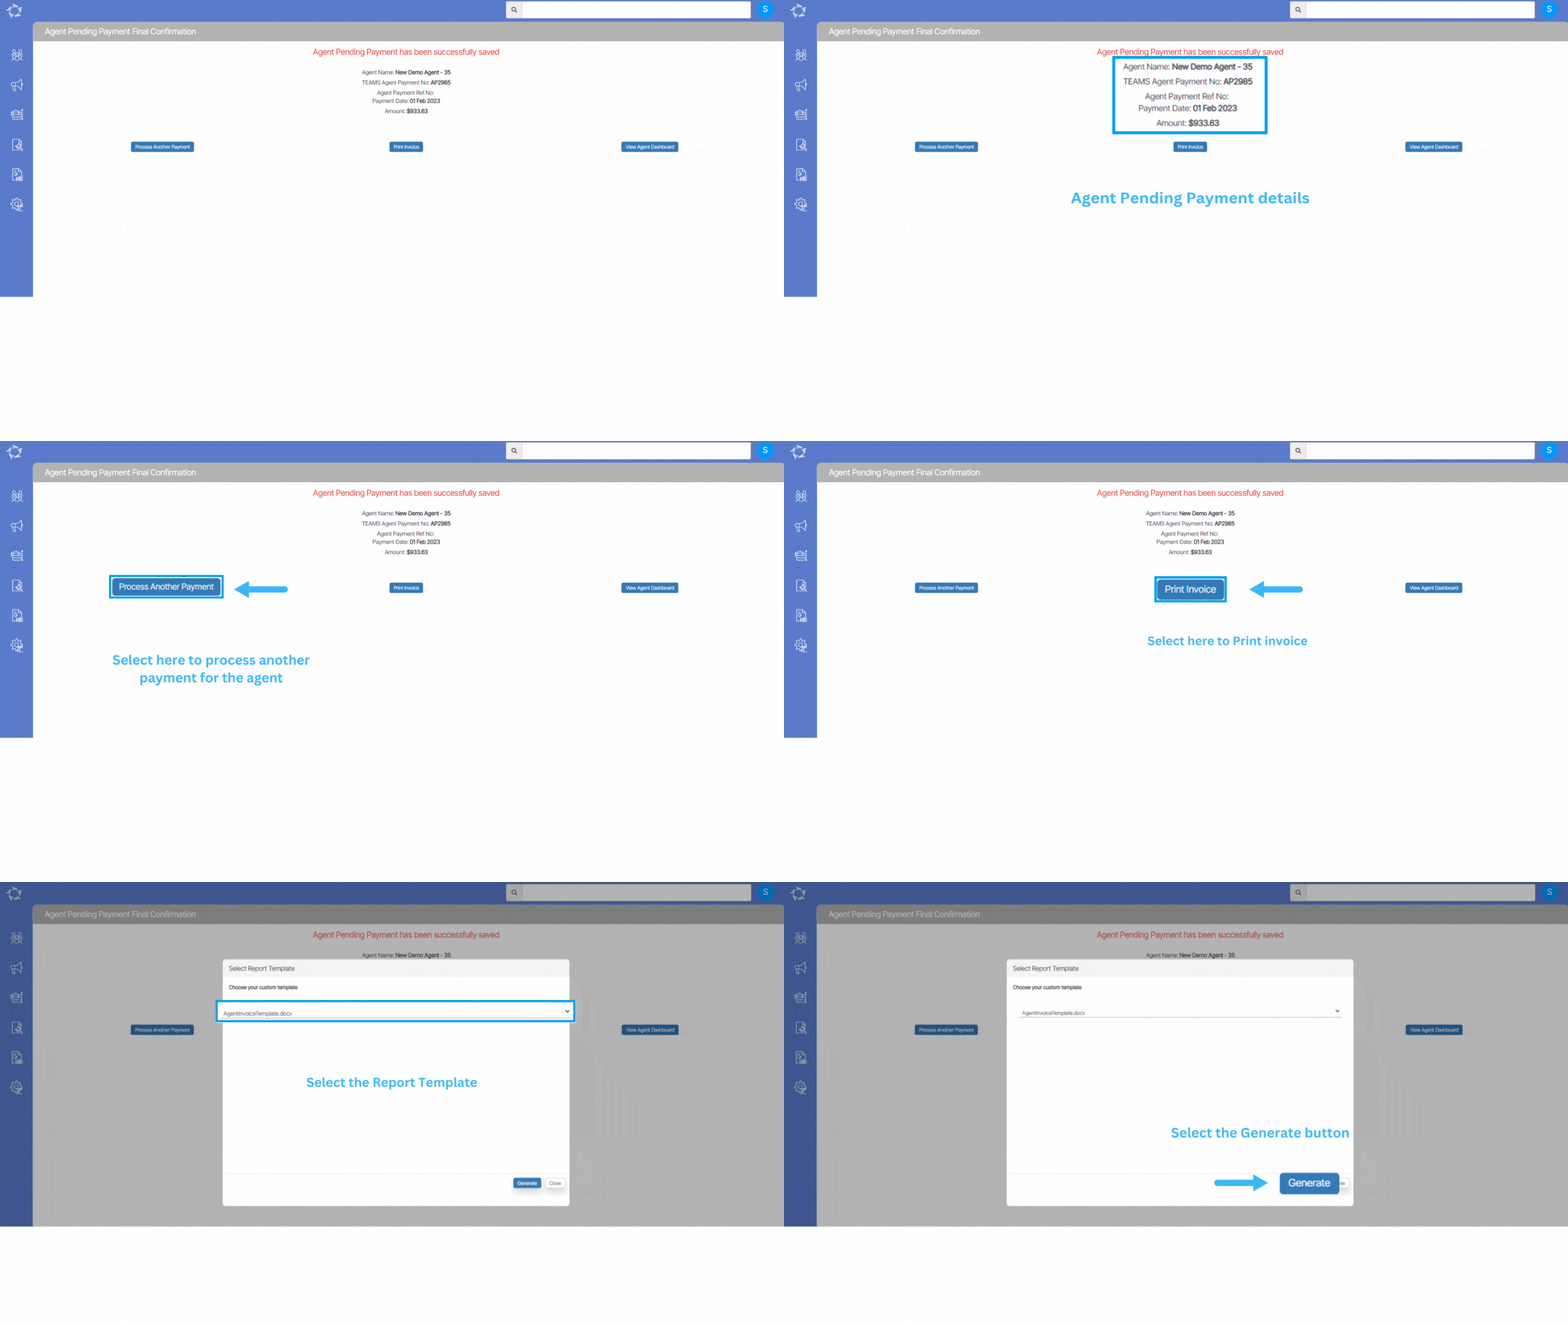
Agent Pending Payment Final Confirmation

When you finish creating an Agent Pending Payment, the corresponding screen will load to confirm the final details. This is known as the Agent Pending Payment Final Confirmation screen. Essentially, this screen serves as a summary of the information you just entered, allowing you to review and verify all of the details related to the pending payment. By reviewing this information, you can ensure that everything is accurate and correct before submitting the payment for processing.

The Agent Pending Payment Final Confirmation screen displays some buttons which are explained below:

  • Process Another Payment: This button allows you to initiate another payment for the agent, taking them back to the Agent Pending Payment screen where they can create a new payment.
  • Print Invoice: This button allows you to generate an invoice for the pending payment made to the agent. When selected, a pop-up window appears where you can select the invoice template and generate the invoice.
  • View Agent Dashboard: This button takes you directly to the Agent Dashboard, where you can view all the details related to the agent’s account, including their pending payments and transaction history.

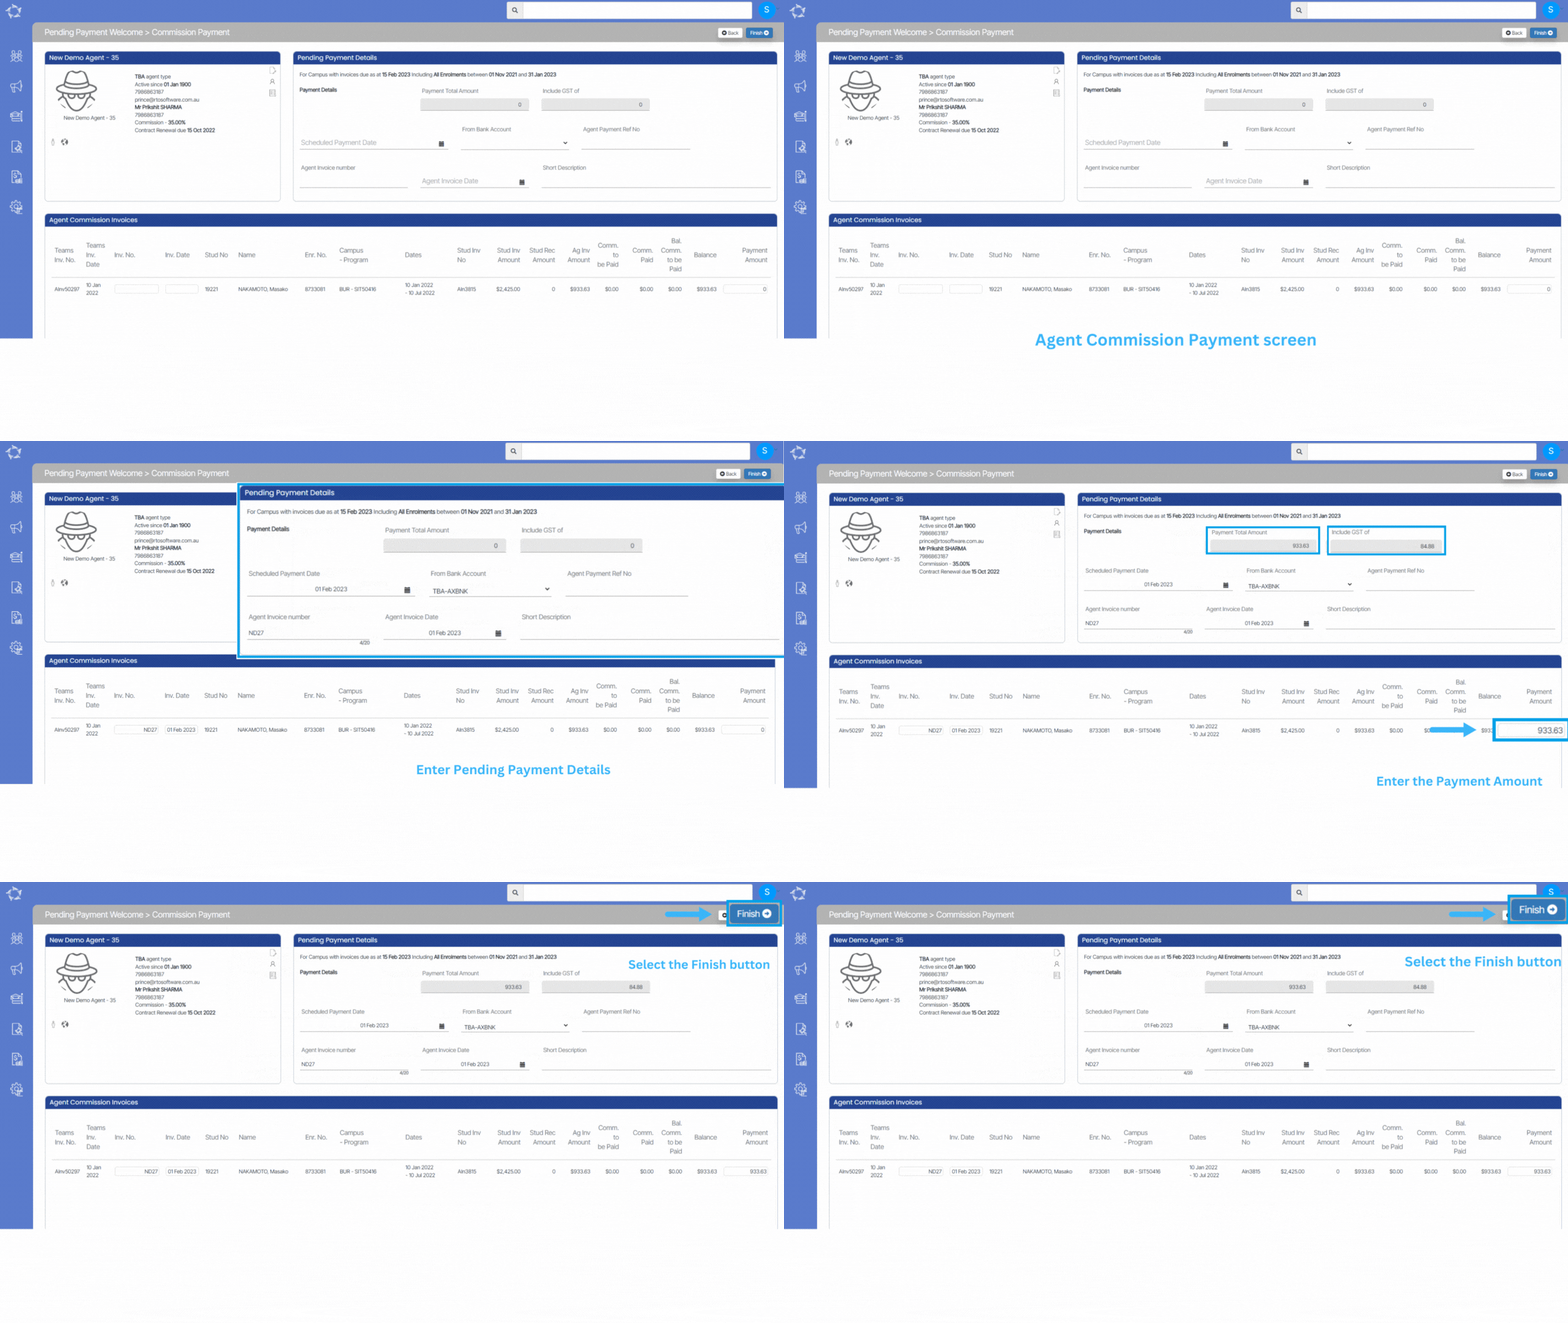
Pending Payment Welcome – Commission Payment Step 2

Agent Dashboard > Agent Profile Tile > Pending Payment > +New Payment

On the Agent Pending Payment Step 2 screen, the grid will display all the commission invoices that were selected in step 1. The Pending Payment Details section will replace the filter section on this screen. In the Pending Payment Details section, you must enter the payment details for the selected invoices. This includes information such as the payment date, payment method, and payment reference number. Once this information is entered, you can review the pending payment invoice before finalizing it. The Pending Payment Details section on the Agent Pending Payment Step 2 screen is where you can enter the necessary payment details to create a pending payment invoice.

Note: You are required to enter the Agent Invoice number and Agent Invoice Date for the selected commission invoices in the Pending Payment Details section. Once these details are entered, the system will automatically populate the values in the Inv. No. and Inv. Date columns in the grid for each selected invoice. This automation ensures that the correct information is recorded for each commission invoice, making it easier for you to keep track of payment details. By entering the Agent Invoice number and Agent Invoice Date, users can ensure that the correct information is associated with each commission invoice in the grid.

IMPORTANT – If an agent has not sent any invoice yet, you can leave the Agent Invoice number and Agent Invoice Date fields empty when creating a pending payment invoice on the Agent Pending Payment Step 2 screen. These fields can be edited in the future once the agent provides the necessary information.

The Scheduled Payment Date is the only mandatory field that must be filled in to save the pending payment batch. This field specifies the date on which the payment for the selected commission invoices is scheduled to be made. By leaving the Agent Invoice number and Agent Invoice Date fields empty for agents who have not yet provided this information, you can create pending payment invoices for those agents without delay. Once the agent provides the necessary information, these fields can be updated to ensure that the correct information is recorded for each commission invoice.

Once all the necessary information has been entered in the Pending Payment Details section of the Agent Pending Payment, you can select the Finish button located at the top of the screen and will finalise the pending payment invoice for the selected commission invoices. Before selecting the Finish button, you should review the information entered in the Pending Payment Details section to ensure that it is accurate and complete.

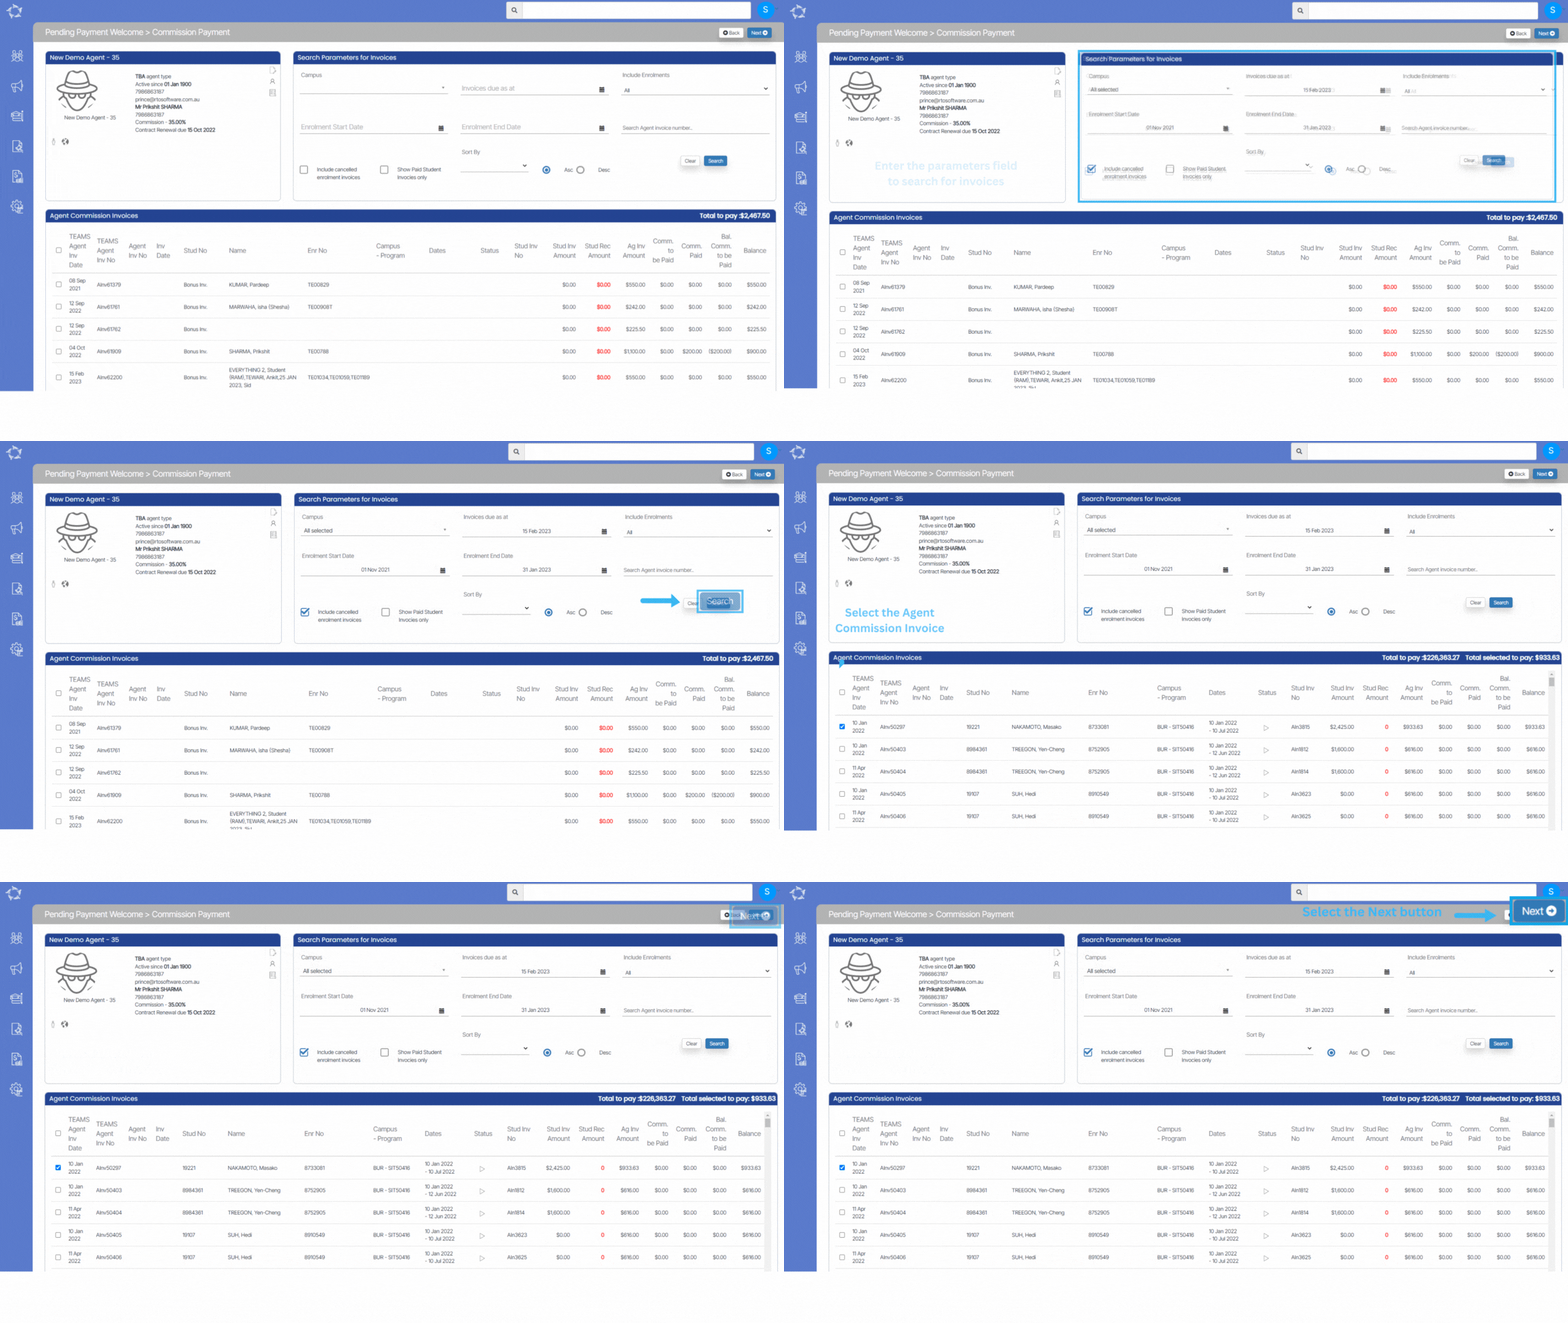
Pending Payment Welcome – Commission Payment Step 1

Agent Dashboard > Agent Profile Tile > Pending Payment > +New Payment

On the Agent Commission Payment screen, you can view commission invoices for agents in a grid format. Additionally, you can also create a new pending payment invoice for these commission invoices. To filter the invoices, you need to select mandatory fields like Campus and Invoices due as at. The Agent Commission Invoices Grid will then display all the commission invoices that match the selected parameters.

IMPORTANT – If the student is not appearing on the commission payment screen then please make sure that the student’s commission due date is falling under Invoice Due As At Date and have selected the correct Campus from the parameters.

To create an agent pending payments invoice, please follow the steps given below:

  • Select the necessary parameters for filtering the commission invoices. The mandatory fields are Campus and Invoices due as at.
  • Once you have selected the parameters, Select the Search button. The Agent Commission Invoices Grid will load all the commission invoices that match the selected filters.
  • Find the column named “TEAMS Agent Inv Date and Look for the tick box that is located right beside this column.
  • Select the box for the commission invoices that you want and then select the Next button on the right hand corner of the screen.

Note: On the Agent Commission Payment screen, the Stud Rec Amount column displays the amount that is received from the student for the outstanding commission invoice. If the student invoice for the outstanding commission invoice is not paid yet, the amount displayed in the Stud Rec Amount column will be in red font. This is a visual cue that the payment for the student invoice is still outstanding and needs to be collected. By checking the Stud Rec Amount column in the Agent Commission Invoices Grid, you can easily identify which commission invoices still require payment from students.

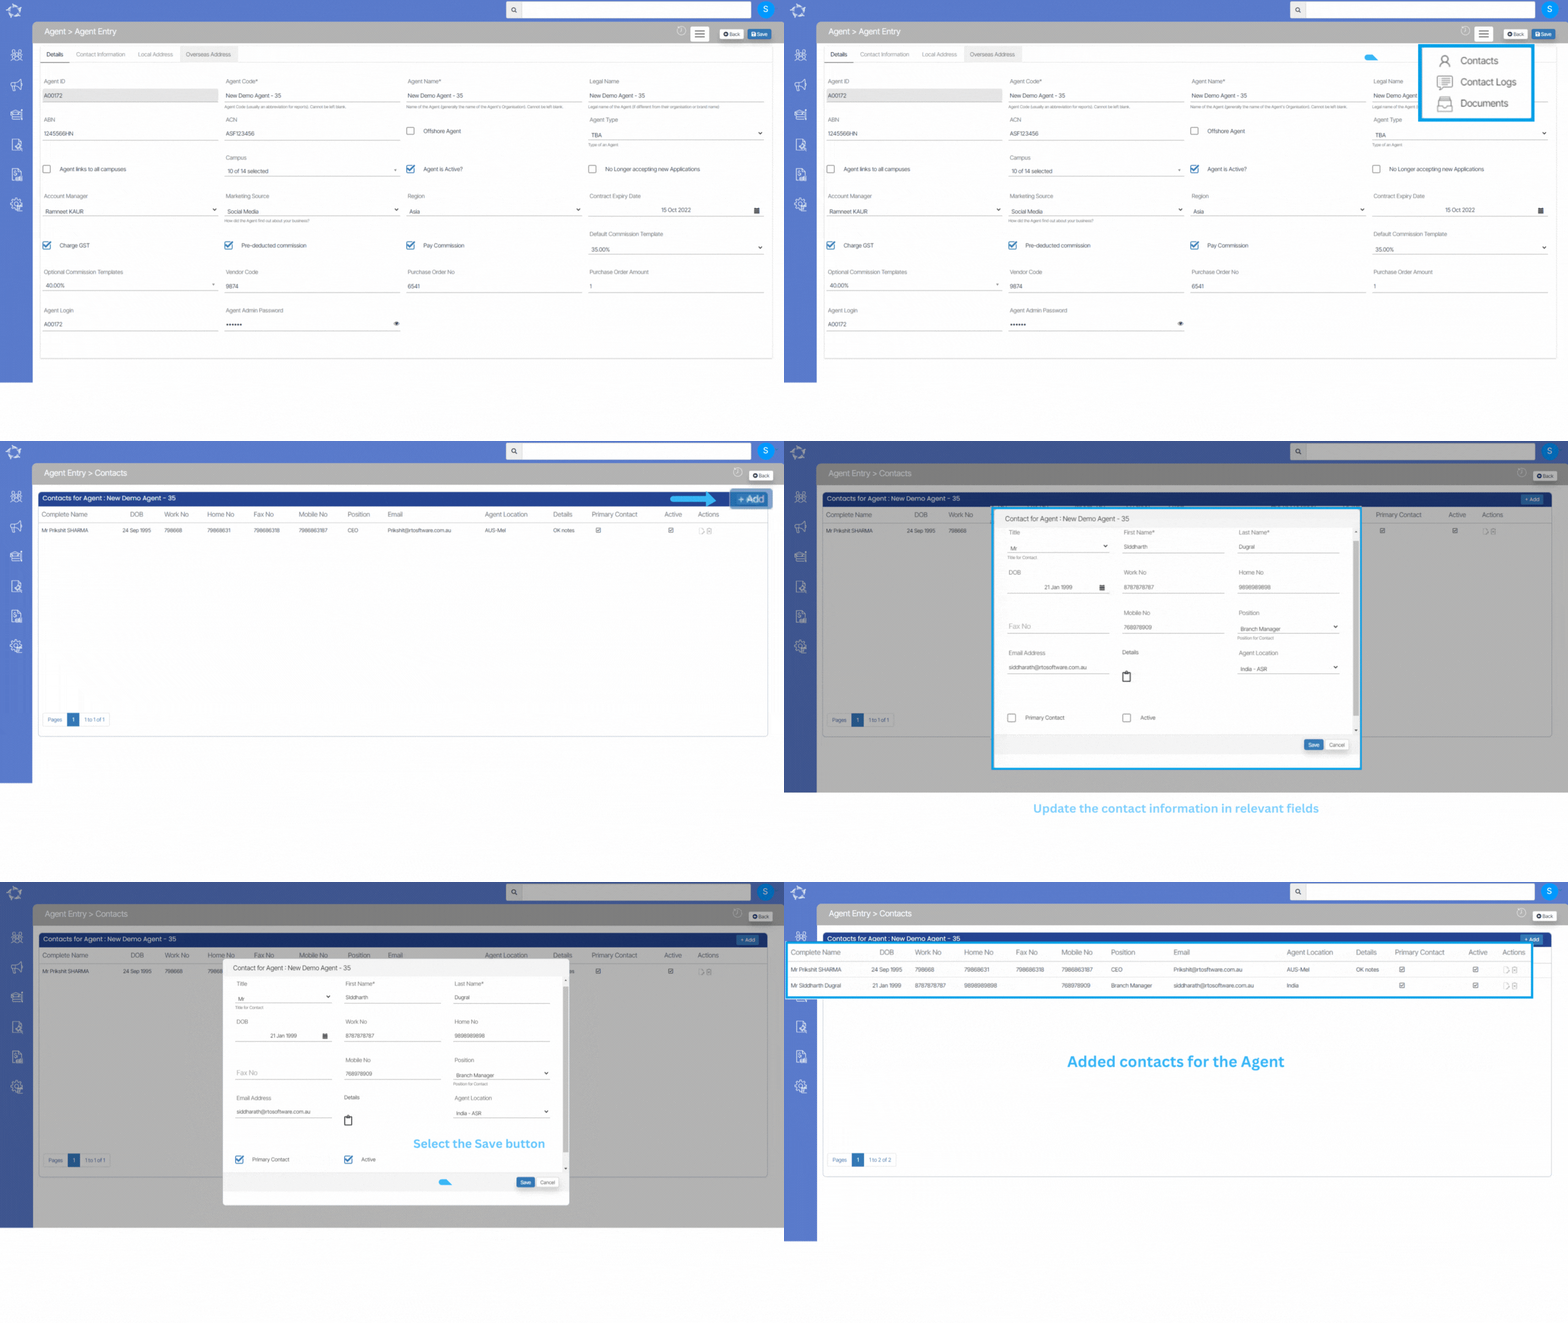
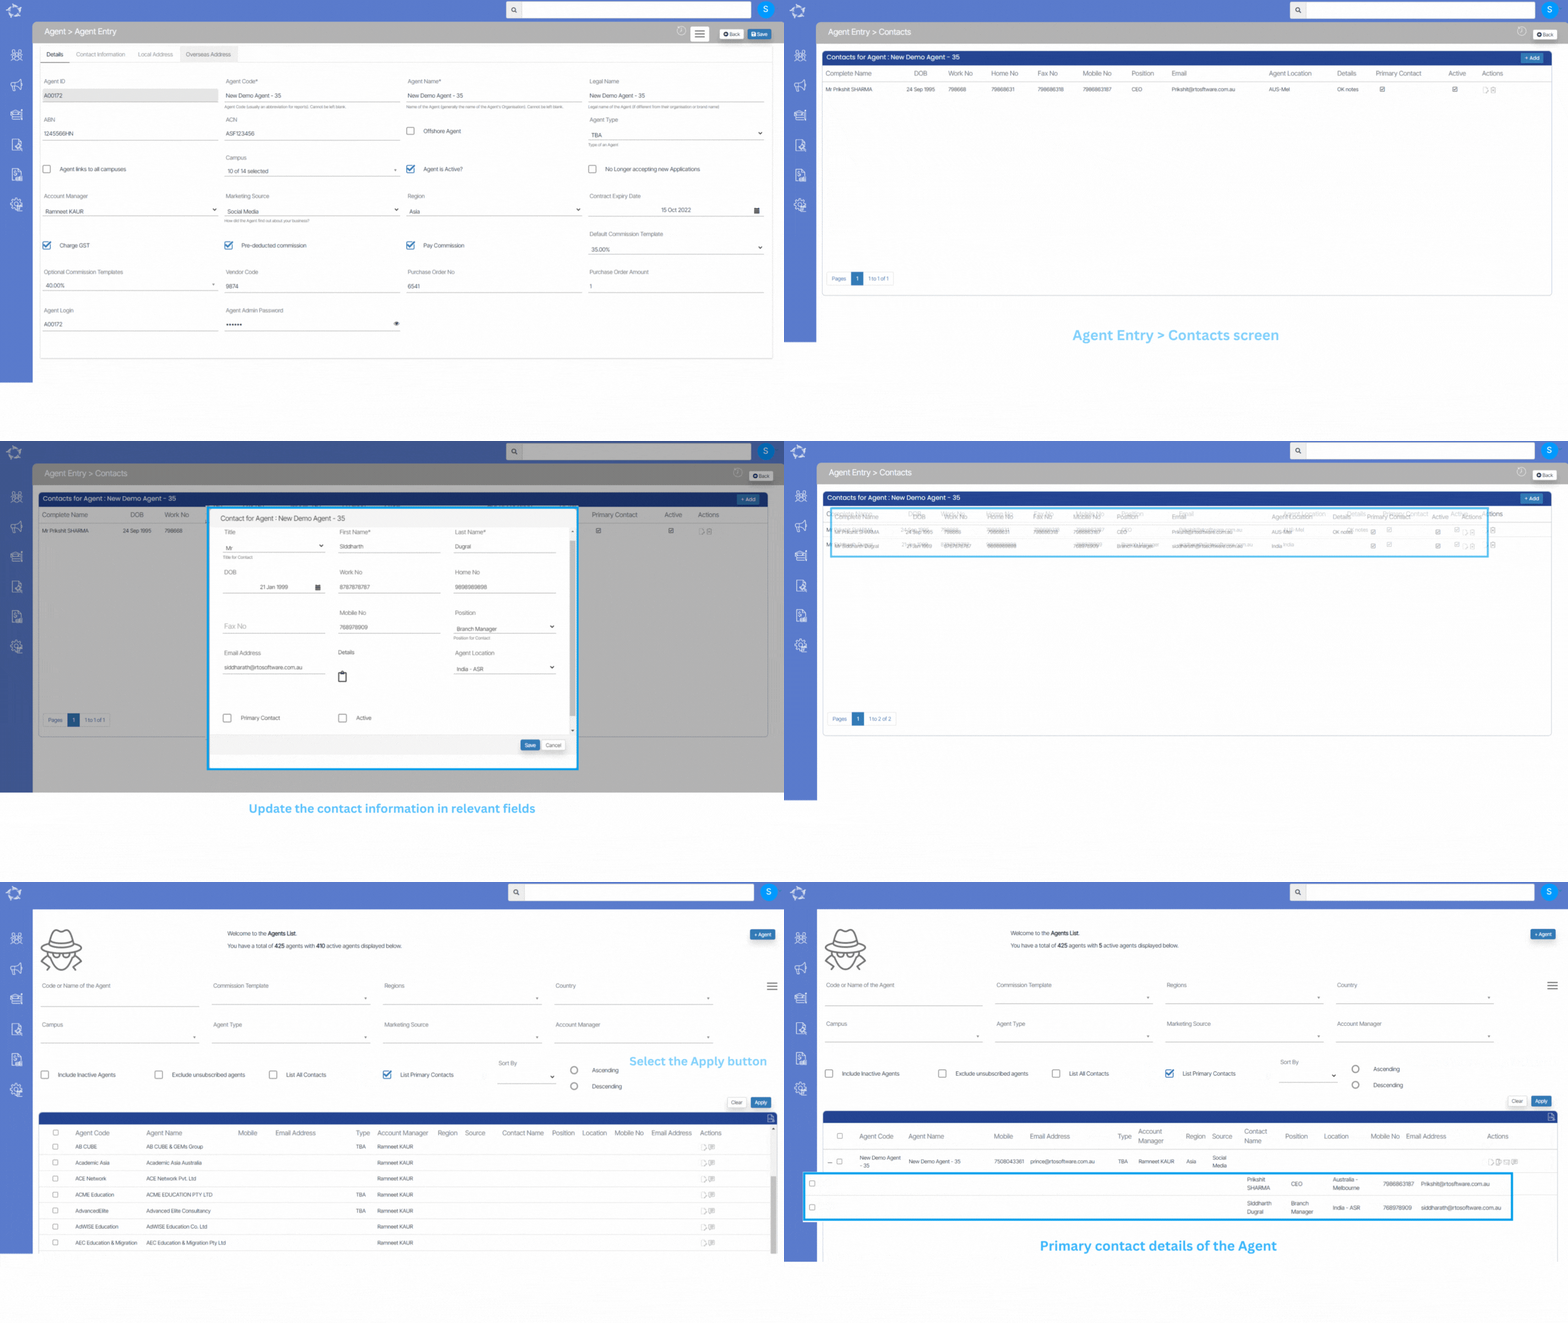
Agent Entry – Contacts

This screen is designed to enable the user to input and manage the primary contact for an agent. The user can add new contacts or edit and delete existing ones using the grid view provided. The grid view will display the current contacts associated with the agent and allow the user to modify them as necessary. This feature provides an efficient way for users to manage their contacts within the system and ensure that the information is up-to-date and accurate.

There are two screens within the system that allow users to add or edit the contact details of an agent. The first screen is accessed from the Agent Dashboard by selecting the Agent Profile Tile and then selecting the Edit Agent button. From there, the user can access the Burger Menu and select Contacts to view and manage the agent’s contact information.

The second screen is available from the Agent Welcome screen, which is accessed by adding a new agent to the system. Once on the Agent Welcome screen, the user can select the edit agent icon from the grid and then can access the Burger Menu and select Contacts to add or modify the agent’s contact information.

Both screens offer users a quick and easy way to manage an agent’s contact details. By providing multiple access points to this feature, the system ensures that users can efficiently add, edit, or delete contact information as needed.

Agent Pending payment

Agent Dashboard > Agent Profile Tile > Pending payment Icon

Business Rules

1. If you are not seeing the pending payment welcome screen and instead are seeing the Commission payment screen, it could be because the system setting is not enabled for your site. The pending payment welcome screen is a feature that displays pending payment batches that have not been paid or approved yet.

2. To enable this feature, you will need to contact support to turn on the system setting for your site. Once the setting is turned on, you should be able to access the pending payment welcome screen and view all pending payment batches that require processing or approval.

3. The pending payment welcome screen is a system feature that displays all pending payment batches that have not yet been paid or approved. Once a payment batch has been marked as paid or approved, it will no longer appear on the pending payment welcome screen.

In TEAMS, when a commission invoice is generated, an agent commission invoice number is also generated, and the invoice date is set to match the student invoice date linked to the enrolment. However, it’s important to note that the actual agent invoice number and invoice date may differ from the ones generated by TEAMS. This is because some agents may choose to assign their own invoice numbers and dates to the commission they receive from TEAMS.

Additionally, not all agent commissions are pre-deducted by agents. In some cases, commissions may be post-deducted, which means that the commission amount is deducted from the payment made to the agent after the payment has been received by TEAMS. This may impact the timing of the commission payment and the amount of funds that are received by the agent.

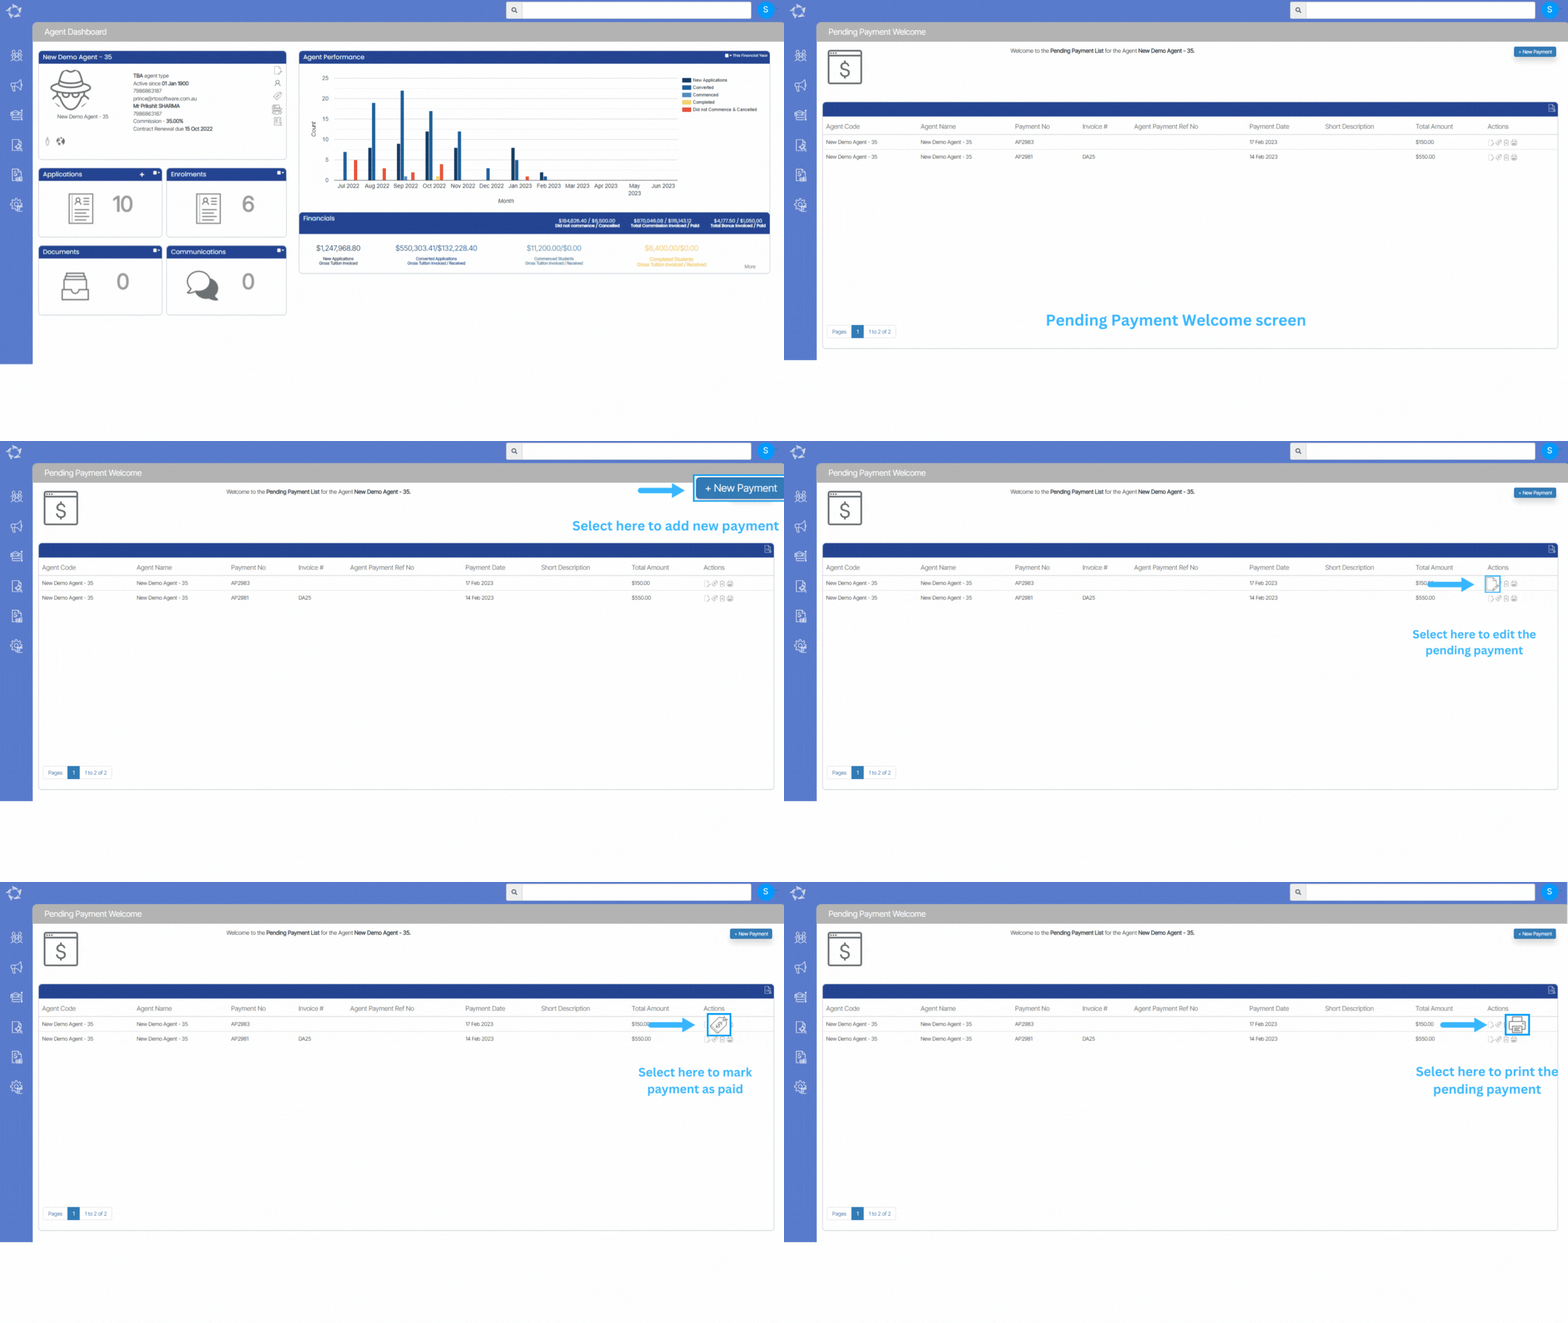
This screen will show all the pending outstanding payments which are not paid to the agents.

To open the pending payments screen, kindly follow the below-given steps:

  • Enter the name of the agent you wish to view and select the appropriate agent from the list of options provided. Once you have selected the agent, the system will open the Agent Dashboard.
  • Select the commission payment icon
  • It will open the commission pending payment screen. This will open the commission pending payment screen. The screen displays all the pending outstanding payments that have not been paid to the agents.
  • You can edit a payment batch if necessary. However, if the payment batch is already paid or approved, you can only mark it as paid by selecting the icon under the actions column.
  • If you wish to delete a batch, you can click on the delete icon located under the action column.

Note: When deleting a payment batch in the system, it’s important to note that all payments included in that batch will be deleted. This includes both partial and full payments that were associated with the batch. Therefore, it’s essential to review the payment batch carefully before proceeding with the deletion process to avoid accidentally deleting any necessary payment information. Once the payment batch has been deleted, it cannot be retrieved or recovered, so it’s crucial to take the necessary precautions to ensure that the deletion is intentional and necessary.

Agent Welcome Screen – How to List Primary Contacts?

Primary Contacts are those contacts that are linked to the agents with their contact information. Please see the below steps to list the primary contact on the Agent Welcome Screen.

  • The very first step is, you need to update the primary contact information of the person on the Agent Entry Screen > Burger Menu > Contacts Screen.
  • Select the +Add button to link the contact information and once you select it, the system will show you a pop window on the screen.
  • In the pop window, update the contact information as you required and Save.

IMPORTANT – Before saving the contact information on the pop window, If you wish to show the contact as a primary contact then you need to select the Primary Contact tick box for the contact.

  • When you are on the Agent Welcome Screen, you need to do the following steps:
  • Select the parameters as you required (including by selecting the List primary Contact tick box) and then select Apply Button.
  • The system will show the agents in the grid with their primary contact details.

Note – if the agent has a contact and they have a primary contact tick box is ticked for them then that agent entry will have the expand (+) icon against the agent code to see the primary contact.