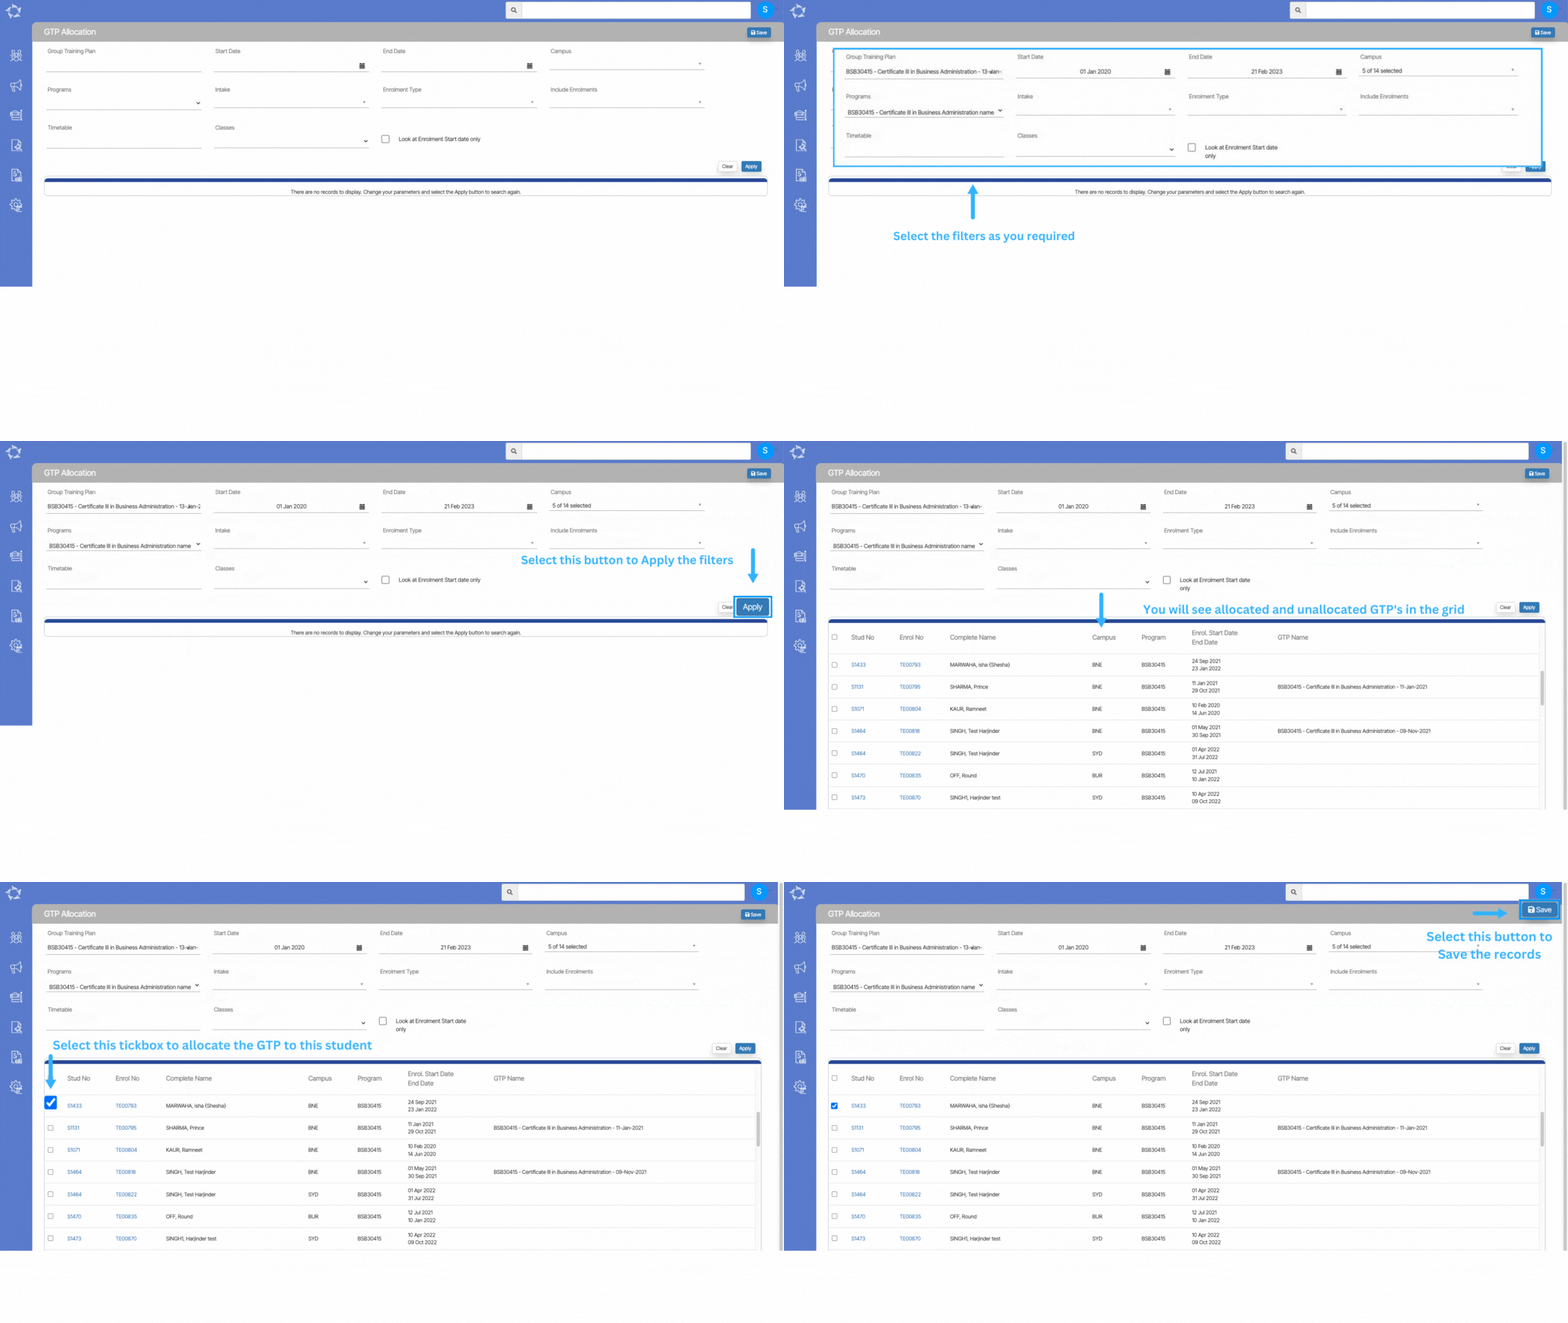
GTP Allocation

Main Dashboard > Academics > GTP Allocation

This screen provides you with the functionality to assign Group Training Plans (GTPs) to students who are currently not assigned in the system. The grid on the screen displays both the allocated and unallocated GTPs, giving you a clear overview of the assignment status. This allows you to efficiently manage and track the GTPs to ensure that all students are appropriately assigned to their respective training plans.

Explanation of the fields is below:

FieldsExplanation
Group Training PlanThis a multi select dropdown and if have multiple campuses then you select from the drop
Start DateSelect the Start Date from the calendar
End DateSelect the End date from the calendar
CampusThis a multi select dropdown and if have multiple campuses then you select the from the drop
ProgramsBased on the GTP selection, the system will show Program in this dropdown.
IntakeThis a multi select dropdown and you can select multiple intakes for the GTP.
Enrolment TypeSelect the Enrolment Type from this dropdown.
Include EnrolmentsSelect Include Enrolments from this dropdown.
TimetableEnter the Timetable in this field.
ClassesSelect classes from this dropdown.
Look at the Enrolment Start date onlyTick this tickbox if you wish to view only the enrolment start date.

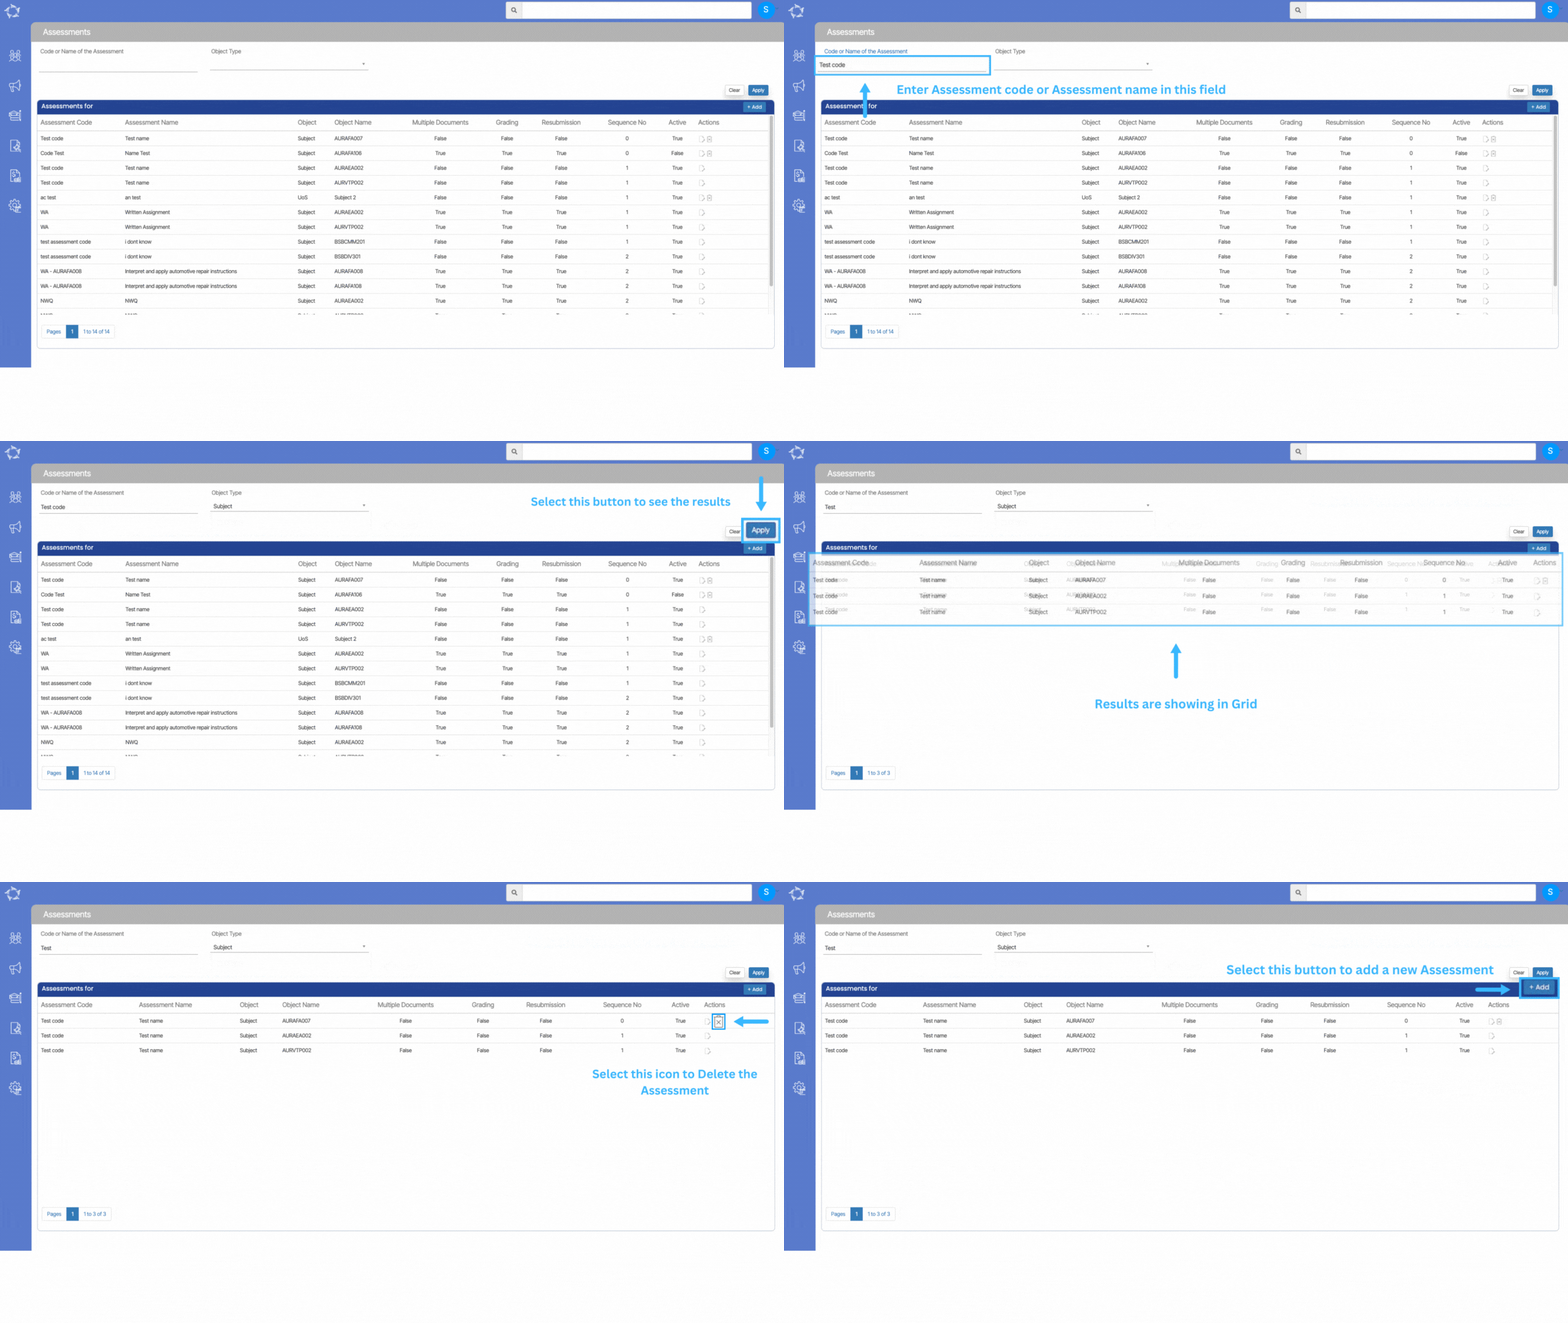
Assessments

Main Dashboard > Academics menu > Assessments

This screen will show you all the assessments in the grid that are in your system. You can search assessments with the Code or Name of the assessments in the search field for the object such as Subjects and Uos from the dropdown and select the apply button or hit the enter key from your keyboard.

To know more about the Icons under the Actions, select them here

Enrolment Dashboard Reports

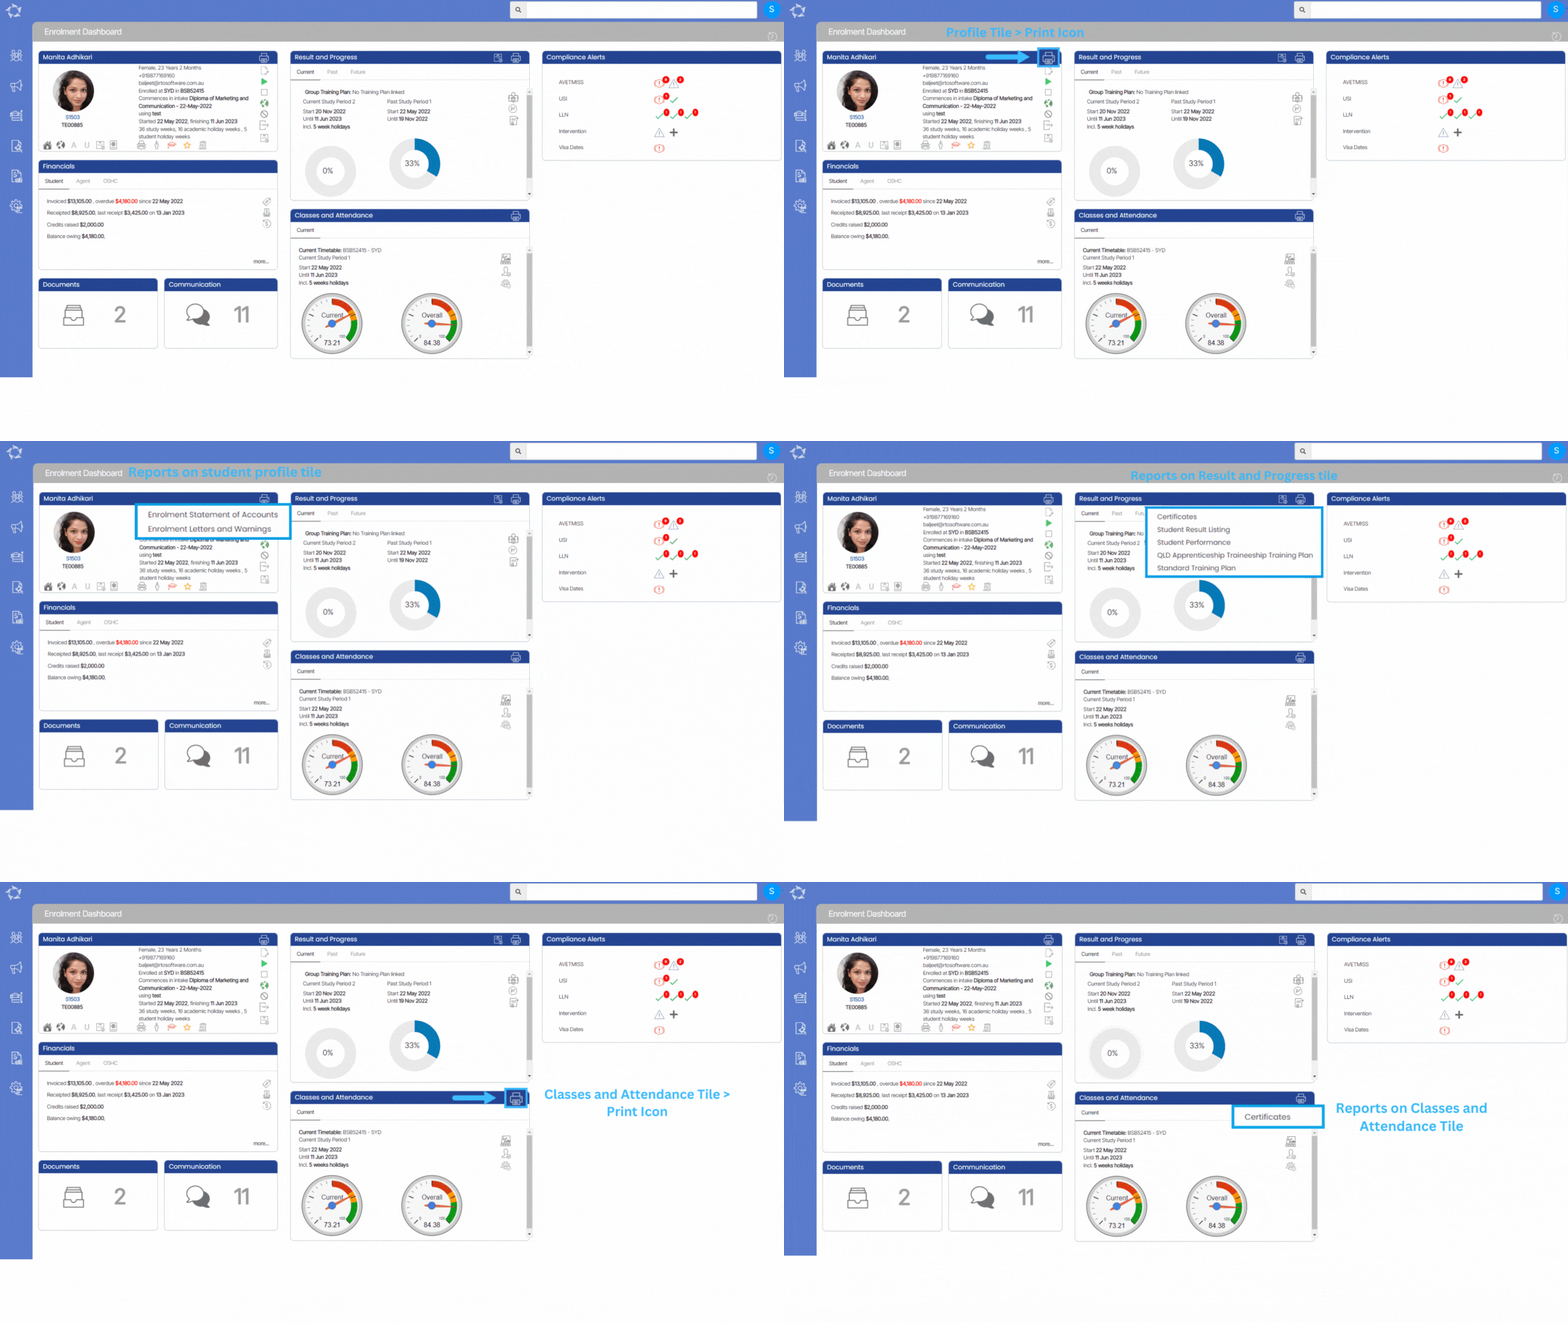
Different reports are available on different tiles under the Enrolment Dashboard. You can see these reports under the print icon

Reports on Student profile tile:

Each report listed below is a link to a post where you can understand the report and its parameters and view an example of the report.

Reports on result and progress tile:

Each report listed below is a link to a post where you can understand the report and its parameters and view an example of the report.

Reports on classes and attendance tile:

Each report listed below is a link to a post where you can understand the report and its parameters and view an example of the report.

Program – FEE HELP

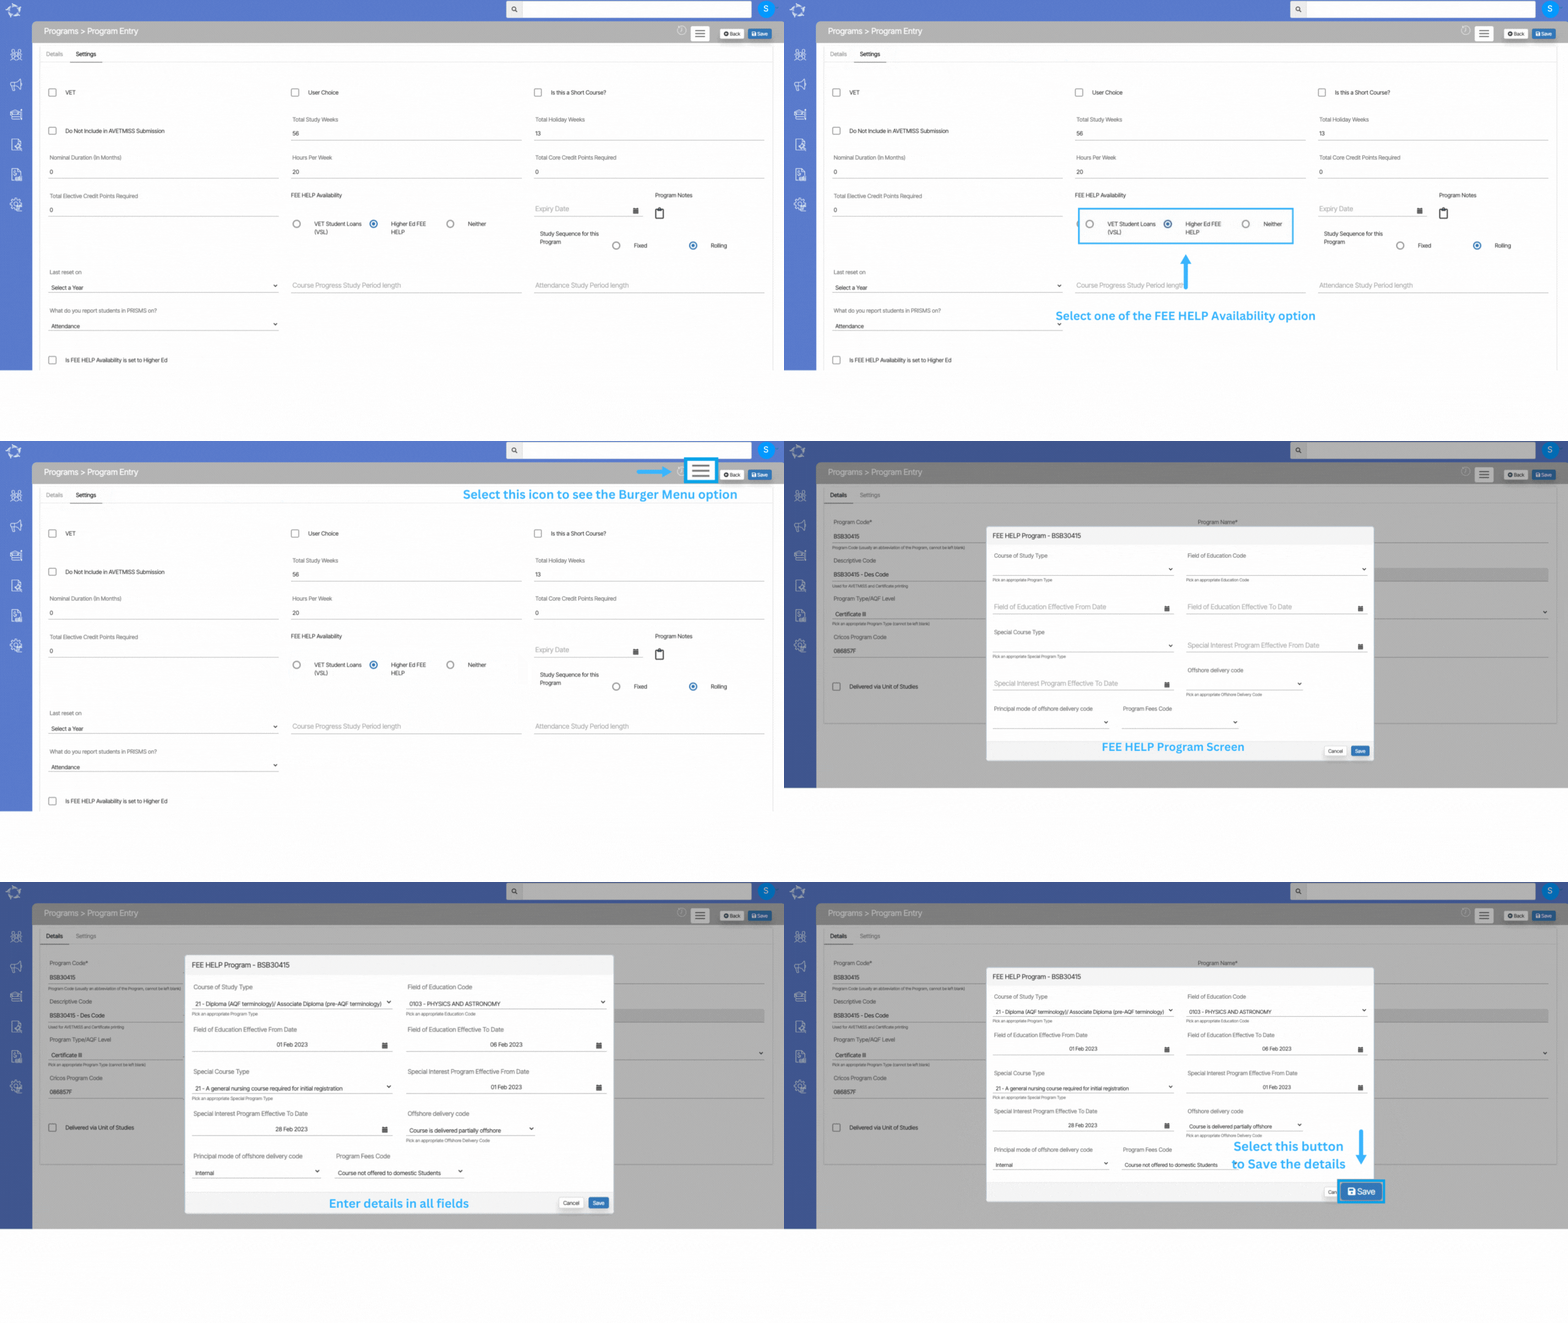
Program > Program Entry Burger Menu > FEE HELP Setting

When you select the FEE-HELP option, the program FEE-HELP popup screen will open, where you can add FEE-HELP details for a program. In the Settings tab, there will be a field for FEE HELP Availability and there are radio buttons for:

  • VET Student loan (VSL)
  • Higher Ed FEE HELP
  • Neither

IMPORTANT – The FEE HELP option will show you the settings as per the Fee HELP availability radio buttons (VSL or Hed) selected on the program entry screen. A program can only be one of the FEE HELP options it cannot be both.

By default, the option of neither will be selected, select the option that you want and then SAVE the change.

When any of the FEE HELP availability radio buttons is selected then you can update the FEE HELP for a Program accordingly. Once you select the FEE HELP option, the popup window will open on the screen.

Explanation of the Fields below:

FieldsExplanation
Course of Study TypeSelect an appropriate Course of Study type.
Field of Education CodeSelect an appropriate Field of Education code.
Field of Education Effective From DateFrom the calendar, you can select the date from when the field of education is effective.
Field of Education Effective To DateFrom the calendar, you can select the date when the field of education should be effective.
Special Course TypeFrom the dropdown, you can select the special course type.
Special Interest Program Effective From DateFrom the calendar, you can select the date from when the special interest program is effective.
Special Interest Program Effective To DateFrom the calendar, you can select the date when the special interest program should be effective.
Offshore Delivery CodeFrom the dropdown, you can select whether the course is partially delivered offshore or fully offshore.
Principal Interest of Offshore Delivery CodeFrom the dropdown, you can select the principal delivery mode of the course.
Program Fees CodeFrom the dropdown, you can select the program fee code.
Combined Program of Study IndicatorTick this box if FEE-HELP is for the combined program and then select the supplementary education code from the magic search field.
Indicative Student Contribution CSPHere you can add indicative student contributions.

Intake Allocate Program

Intakes > Intake Entry Burger Menu > Allocate Program

history of changes

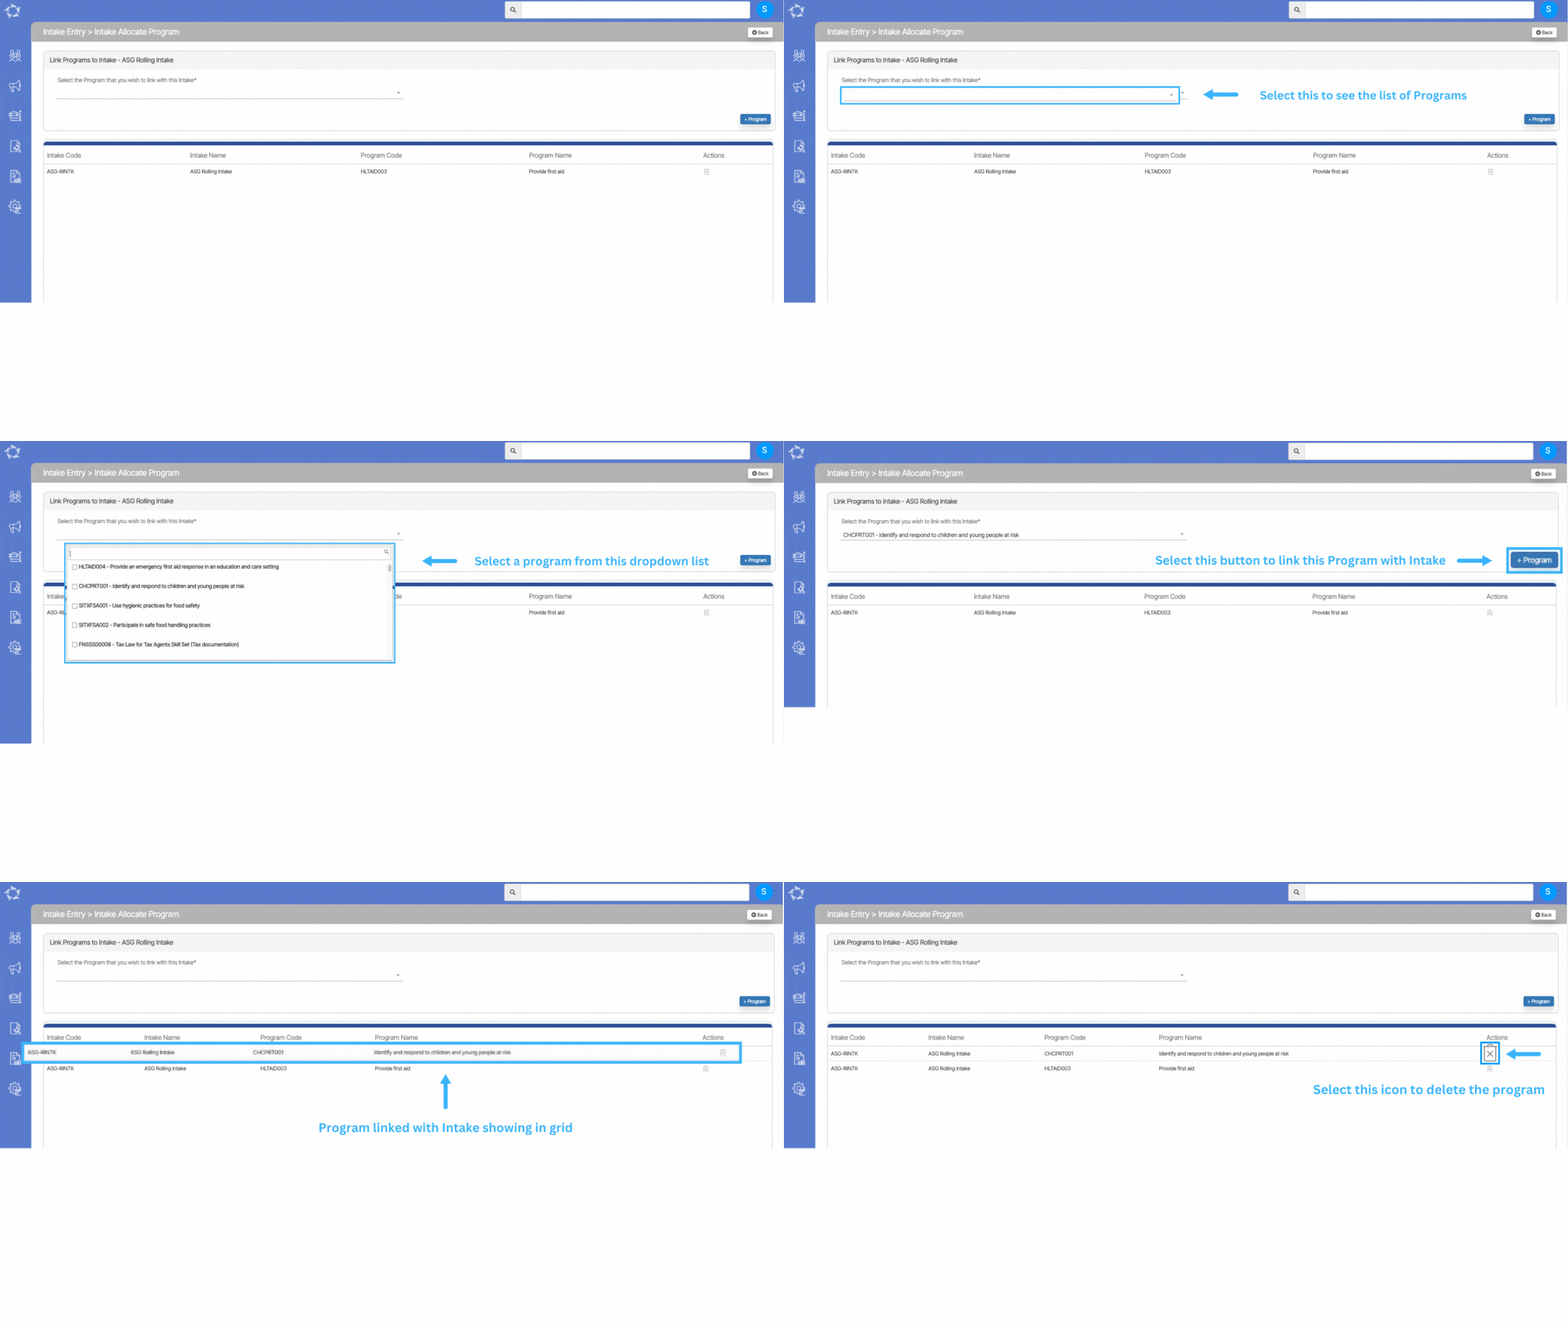
When you select the Allocate Program option from the burger menu, you will be taken to the Intake Allocate Program screen. You will see the programs in the grid that are already linked with the Intake. If you want to link a new program with the intake, you need to select the Program from the dropdown and then select the +Program button.

Program Entry Screen

Main Dashboard > Academics menu > Programs icon > Program Button

history of changes

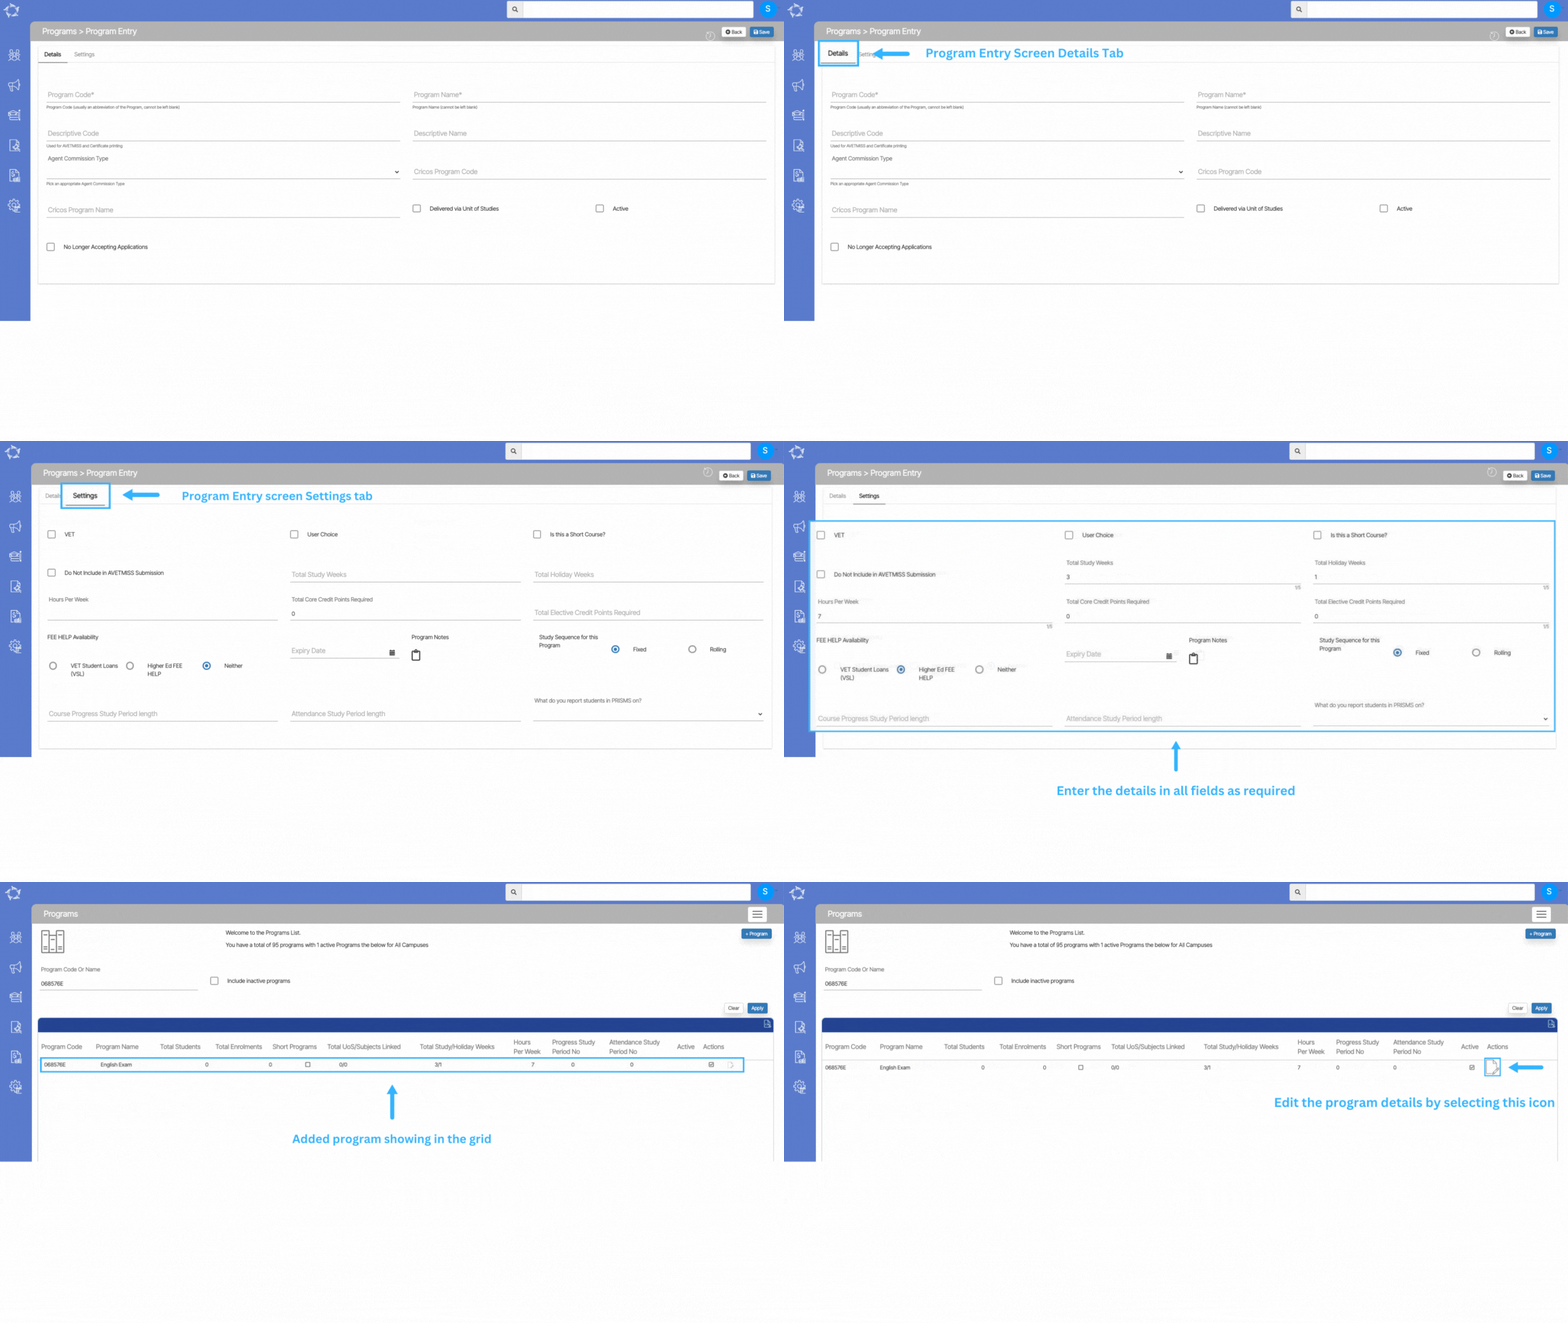
The Program Entry Screen in the system features two distinct tabs: Details and Settings. The Details tab serves as the primary section for creating a new program, encompassing all the mandatory fields required for program setup. Here, administrators can input essential information and specifications to define the program’s structure and offerings.

On the other hand, the Settings tab is dedicated to program customisation and updates. It provides a platform for you to modify and fine-tune various settings related to the program, ensuring it aligns with specific requirements and preferences. The clear separation of these two tabs streamlines the process of both initial program creation and subsequent adjustments, enhancing efficiency and user experience within the program entry screen.

Explanations of the fields on the Details Tab are below:

FieldsExplanations
Program Code*This is a mandatory field.
Program Name*This is a mandatory field.
Descriptive CodeYou can add the program code in this field but make sure the code that you are adding should be the same as the code on the training.gov.au site.
Descriptive NameYou can add the program name in this field but make sure the name that you are adding should be the same as the name on the training.gov.au site.
Agent Commission TypeYou can select from the dropdown if the course is ELICOS or VET. 
Cricos Program CodeCRICOS code of the program. You can find the correct CRICOS program Code on cricos.education.gov.au
Cricos Program NameCRICOS name of the program. You can find the correct CRICOS program Code on cricos.education.gov.au
Delivered via Unit of StudiesSelect this tickbox if you wish to deliver the program is delivered via a unit of studies criteria.
ActiveSelect this tick box to make the program active.
No Longer Accepting ApplicationsIf you select this tick box, you will not be able to see the program while creating many new applications.

Explanations of the fields on the Settings Tab are below:

FieldsExplanations
VETSelect this tick box if the program is active.
User ChoiceSelect this box if the program is a User Choice program. 
Is this a Short Course?Select this box if it is a short program.
Do Not Include in AVETMISS SubmissionSelect this tick box if you do not want to include the program in the AVETMISS submission.
Total Study WeeksTotal study weeks of the program.
Total Holiday WeeksTotal holiday weeks of the program. 
Hours Per WeekTotal hours per week of the program. It is recommended to always add hours per week as 20.
Total Core Credit Points RequiredYou can write the minimum core credit points required
Total Elective Credit Points RequiredYou can write the minimum elective credit points required.
FEE-HELP AvailabilityYou can select FEE-HELP availability from three radio buttons as per the program.
VET Student Loans (VSL)
Higher ed FEE HELP
Neither
Expiry DateFrom the calendar, you can select the expiry date of the program.
Program NotesYou can write notes for the program by selecting this icon.
Study Sequence for this ProgramThere are two radio buttons”Fixed”, and “Rolling” to select the study sequence for the program.

Fixed – Fixed intakes have specific, predetermined periods during the year when new students can enrol in their programs. It provides a structured and organised approach to student admissions, making it easier for you to plan your resources and academic schedules.

Rolling – Rolling intakes have more flexible admission processes. Instead of having specific intake periods, you can accept applications and admit students continuously throughout the year. This means that prospective students can apply and start their programs at various times, not just at the beginning of a semester.
Course Progress Study Period lengthWhen you select the Fixed Structure, the system will present you with the Course Progress Study Period Length field. This field will let you add the length of the study period in weeks when you want to monitor the student’s progress which will show you on the Enrolment Dashboard > Result and Progress Tile > Dials. For example – If you want to monitor the student after 1 month then you need to select 4 from the dropdown. Whatever the subjects are lying in that period of time, it will show those subjects in the dials.
Attendance Study Period lengthWhen you select the Fixed Structure, the system will present you with the Attendance Study Period length field. This field will let you add the length of the attendance study period in weeks when you want to monitor the student’s progress attendance which will show you on the Enrolment Dashboard > Classes and Attendance Tile. For example – If you want to monitor the student after 1 month then you need to select 4 from the dropdown. Whatever the subjects are lying in that period of time, it will show the attendance in the dials.
What do you report students in PRISMS on?This is a user code and based on the user code created in TEAMS, you can select the required option (recommended – Course Progress) from the dropdown
Last reset onIf you have selected the Rolling Structure, the system will show you the Last reset field as a dropdown. This dropdown will show you years and you can select the year you required when you want the system to reset the year for you. Once you update the last reset, you need to select the Course Progress Study Period Length, Attendance Study Period length and What do you report students in PRISMS on? (recommended to select Attendance).

Subject – Funding Fee Setup

Subjects > Subject Entry Burger Menu > Funding Fee Setup

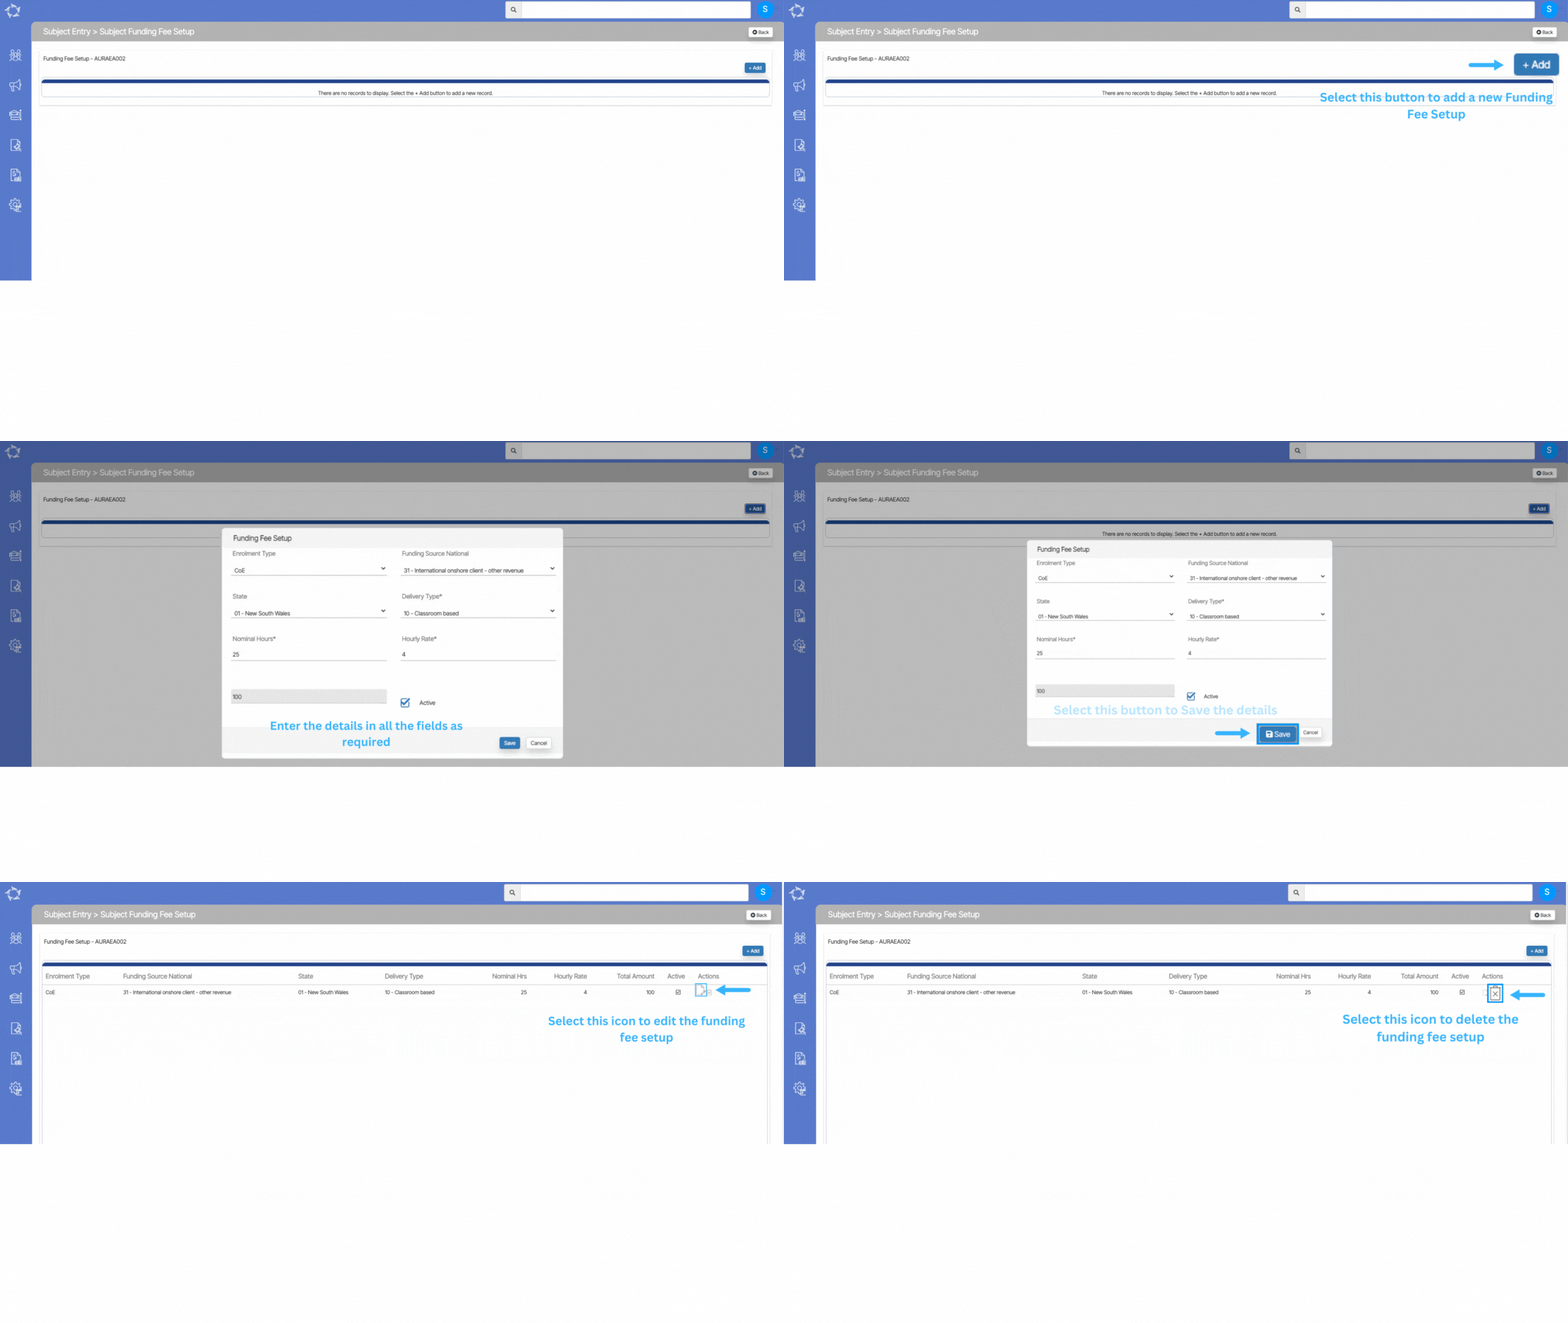
The funding of subjects or courses is primarily handled through government funding for the students. To update the FEE HELP settings of the subjects, navigate to the Funding Fee Setup option in the menu and select the burger menu, then choose the Funding Fee Setup option.

On the Funding Fee Setup screen, locate the +Add button and click on it. This action will open a funding fee setup pop-up window on your screen. In this window, carefully select the required fields as per your preferences and requirements.

Explanation of the fields below:

FieldsExplanation
Enrolment TypeThis is User Code and based on the user code created in TEAMS, you can select the enrolment type from the dropdown.
Funding Source NationalSelect the funding source national from the dropdown.
StateSelect the state from the dropdown.
Delivery TypeHere you can select the delivery type of the subject from the dropdown.
Nominal HoursHere you can add the nationally agreed nominal hours of the subject.
Hourly RateHere you can add the hourly rate of the subject and just below the nominal hour field, the total amount of the subject will be populated as it is a multiply of nominal hours with an hourly rate.
ActiveSelect this box to make the funding fee setup active.

Intake Entry Screen

Academics menu > Intakes > Intake Button

history of changes

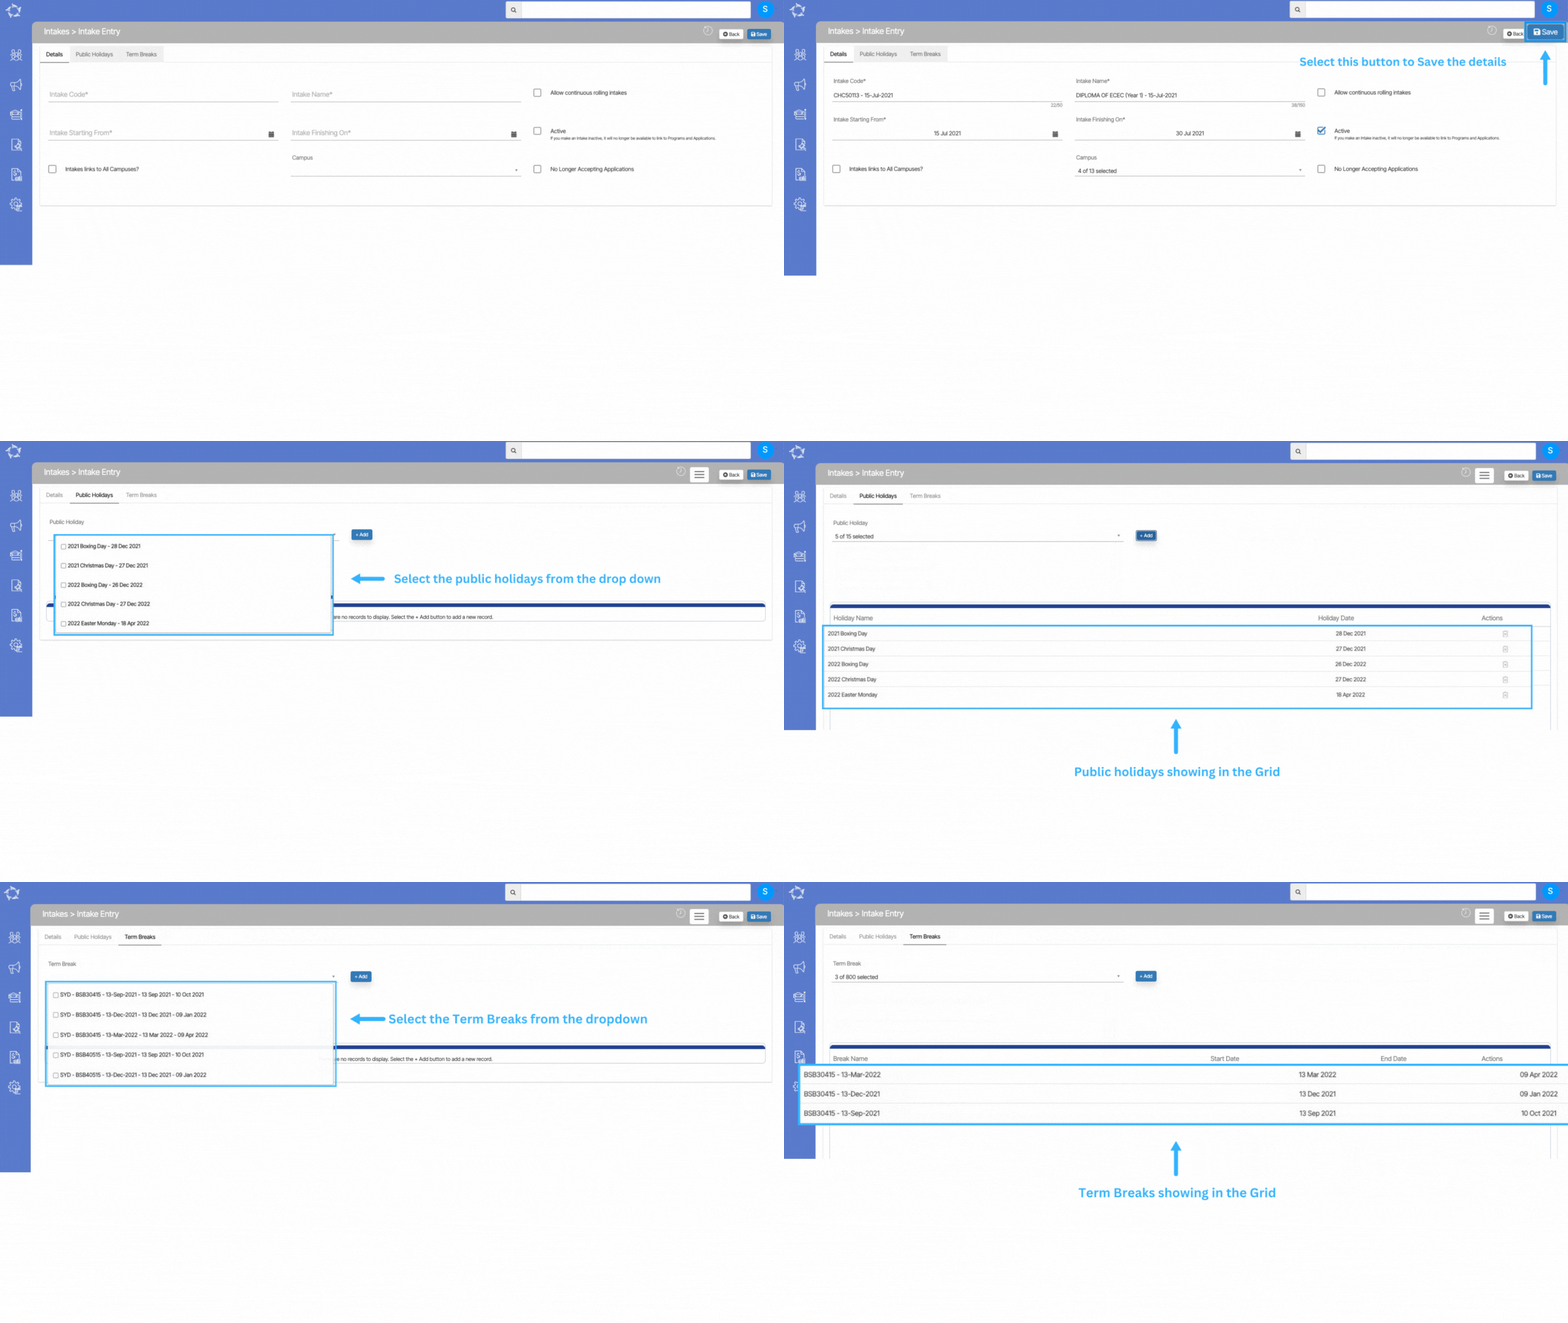
Once you select the + Intake button, you will be taken to the Intake Entry Screen. You will see three tabs and different fields.

Details tab – On this tab, you will be able to add new intake in the system or if you already have an intake then you make changes from this screen.

IMPORTANT – You will only be able to select the Public holidays and Term Breaks tab once you have created and saved the Intake.

Public Holidays Tab – This tab will allow you to link the public holidays with the Intake and to link the holidays you need to select the holidays from the drop-down and then select the +Add button. Please note – if the holidays are not appearing in the dropdown then it means the holiday is not active or it is not in the system. You can create or make the holiday active from the Main Dashboard > System Admin > Public Holidays.

Term Break Tab – This tab will allow you to link the Term Breaks to the Intakes. From the dropdown, you can select the term breaks and then select the +Add button to link the selected term break with intake. Please note – if the term breaks are not appearing in the dropdown then it means the term breaks are not active or it is not in the system. You can create or make the term breaks active from the Main Dashboard > System Admin > Term Breaks.

Explanation of the fields on the Intake Entry Screen – Details Tab is below:

FieldsExplanations
Intake CodeThis is a mandatory field
Intake NameThis is a mandatory field
Allow Continuous rolling intakesSelect this tick box if you want the use this intake as Continuous rolling intakes
Intake Starting FromThis is a mandatory field
Intake Finishing OnThis is a mandatory field
ActiveSelect this box to show the Intake as active
Intakes links to all Campuses?Select this box to link this intake to all the campuses
CampusesYou can select a particular campus from the dropdown to link the intake
No Longer Accepting ApplicationsIf you select this tick box then the will not show while creating applications