Enrolment – Certificate Report

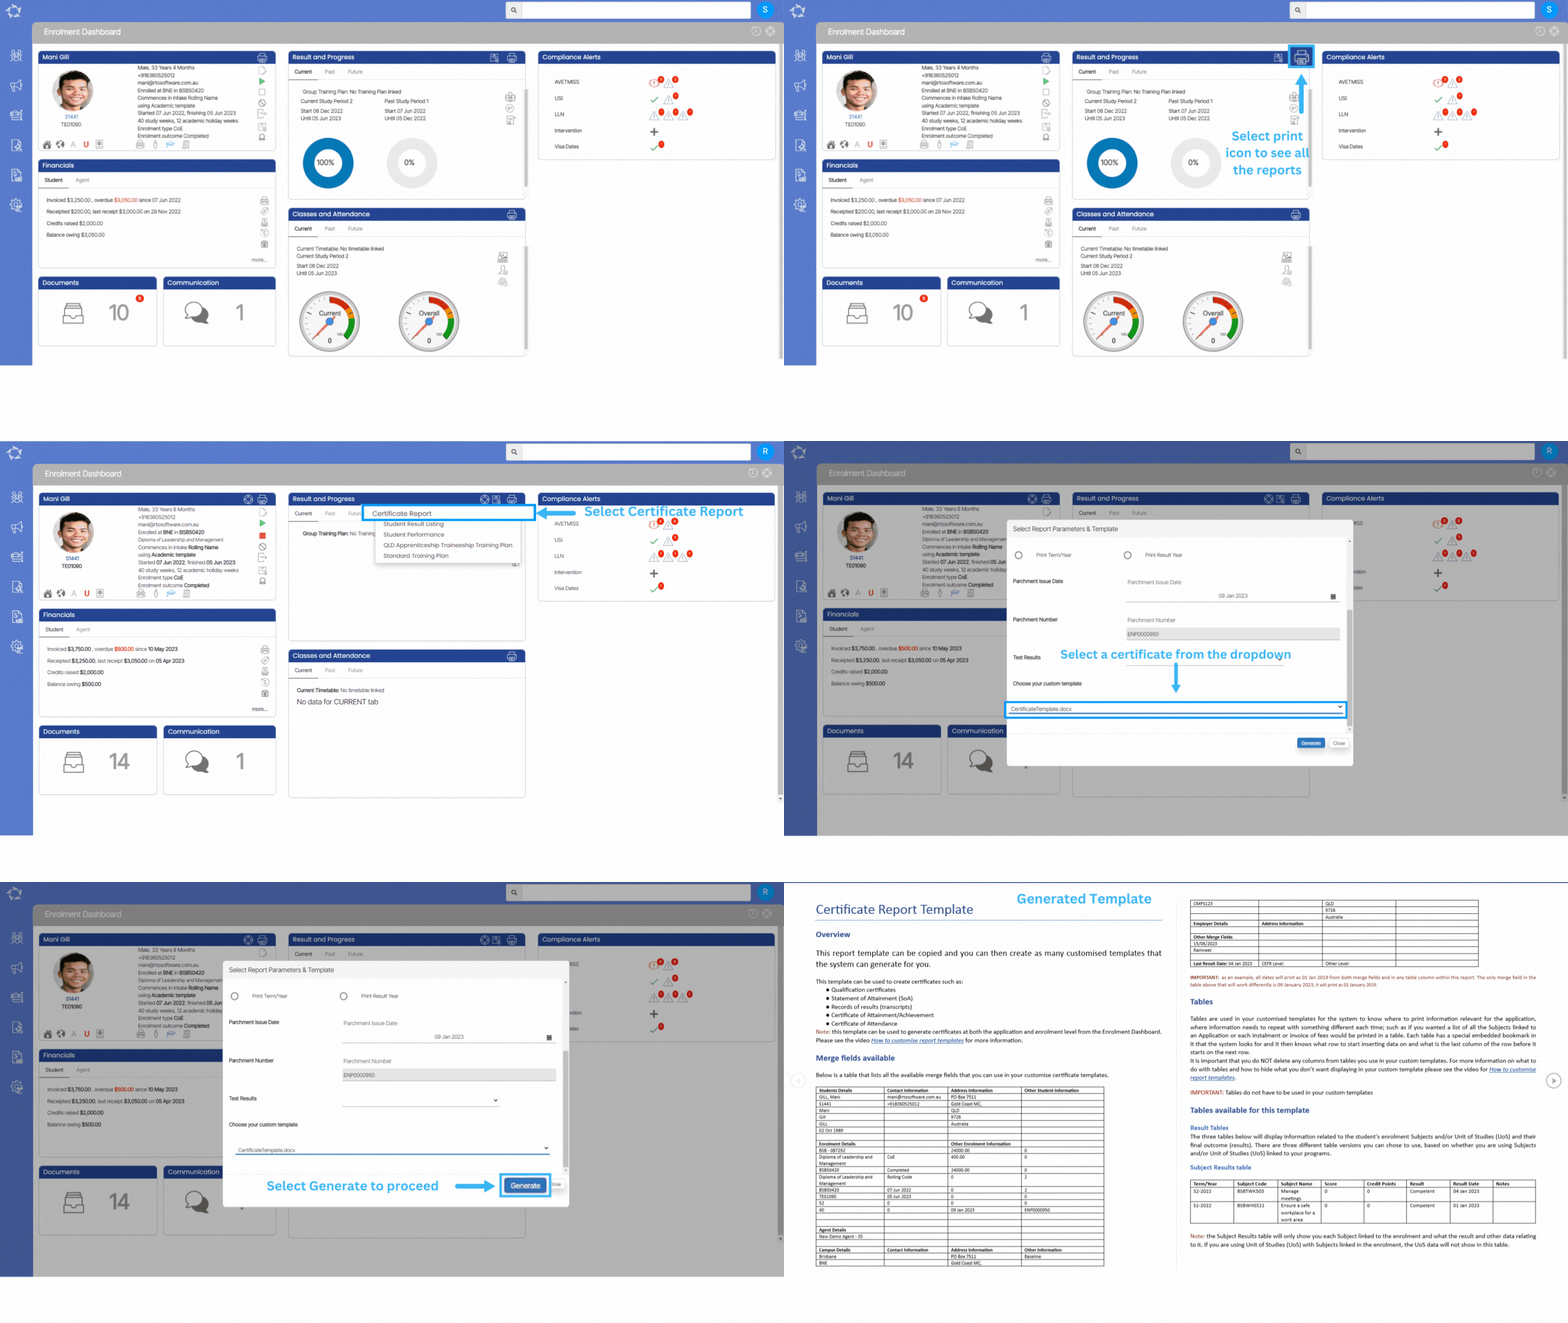
Enrolment Dashboard > Result and Progress Tile > Print Icon

history of changes

IMPORTANT – We believe that staying informed about the latest developments in our software is vital for optimising your experience and maximising the benefits of using our system. To view the latest updates and modifications for the Certificate Report, we kindly request you to navigate to the History icon history of changes showing above in the top right of the breadcrumbs. By selecting this icon, you will gain access to a detailed log of all the recent changes made to the software.

The certificate report template provided here is designed for easy copying and customisation to meet your specific needs. Once copied, you can create numerous customised templates that the system can generate for you.

This template is particularly suitable for generating various types of certificates, including:

  • Qualification certificates
  • Statement of Attainment (SoA)
  • Records of results (transcripts)
  • Certificate of Attainment/Achievement
  • Certificate of Attendance

These certificates can be utilised to recognise and acknowledge different levels of achievement, completion, or participation.

IMPORTANT – It is important to note that this template can be utilised for generating certificates at both the application and enrolment levels through the Enrolment Dashboard. To receive further guidance on customising the report templates according to your requirements, we recommend referring to the instructional post titled Report Templates. This post provides step-by-step instructions on modifying the templates to match your desired format and content.

How do the filters work?

FiltersExplanations
Only print Subjects /UoSWith any result – This radio button will print subjects with any result but does not print subjects if no result is marked. If you select this radio button then the system will allow you to print the final result or progressive results or both.

Only successful results – It prints subjects with successful results only.

With or without results – This radio button will print all subjects whether a result is marked or not. If you select this radio button then the system will allow you to print the final result or progressive results or both.
Sort Subjects based onSubject Code – This will help you to sort the subjects based on subject codes.

Result Date – This radio button will print all subjects whether a result is marked or not. If you select this radio button then the system will allow you to print the final result or progressive results or both.
Only print result types ofFinal Result – If you want to print only the final results (competent, not yet competent and so on) in the certificate report then you may select this radio button.

Progressive Result – To print only the progressive results (continuing enrolment and not yet started) in the certificate report you may select this radio button.

Both – If you want to print both final and progressive results in the certificate report then you may select this radio button.
in result gridPrint Term/Year – If you want to print term/year in the result grid then you may select this radio button.

Print Result Year – If you want to print only the result year in the result grid then you may select this radio button.

Parchment Issue Date – This radio button will print all subjects whether a result is marked or not. If you select this radio button then the system will allow you to print the final result or progressive results or both.

Parchment Number – The parchment number updated on the training plan and result screen will be visible here but can’t be changed on this screen.

Test Results – You can select the test results to get printed in the certificate report from this dropdown.

Choose your custom template – Choose your customised template.

Enrolment Letters & Warnings

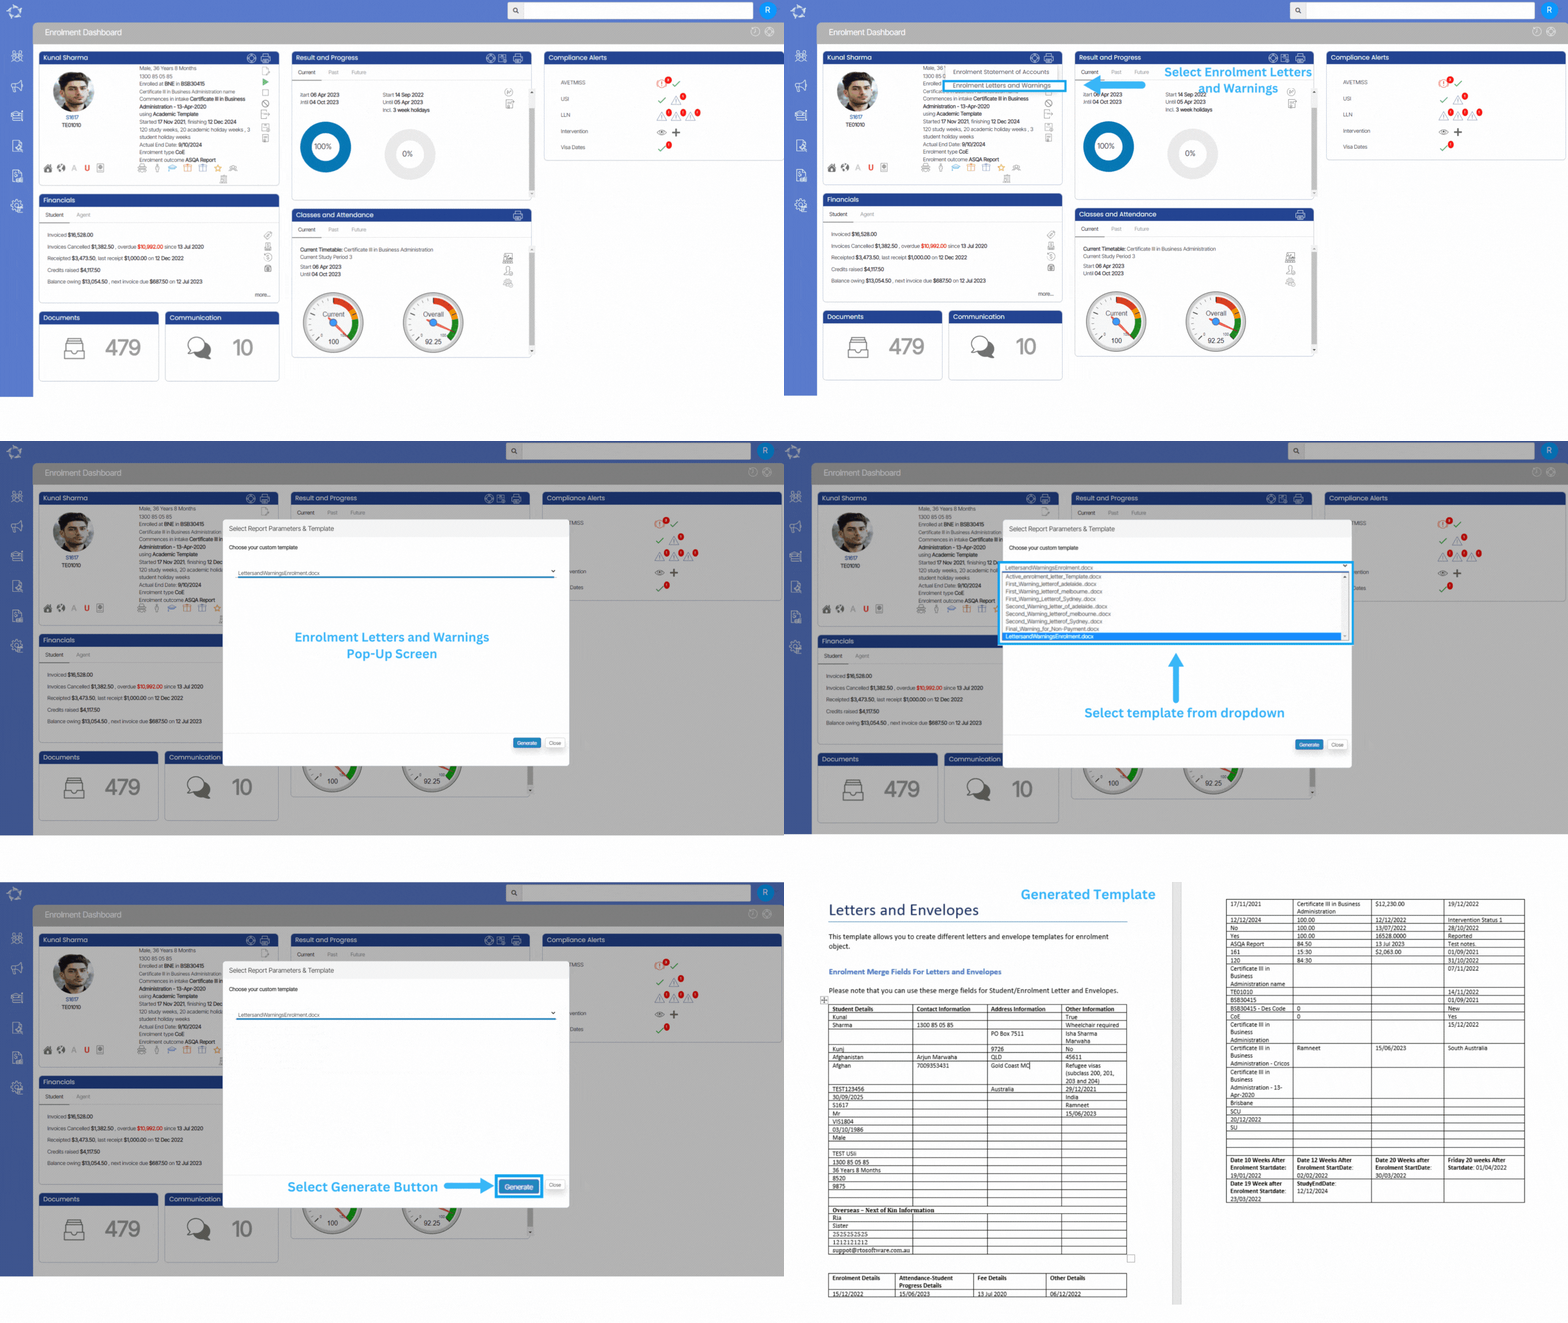
Enrolment Dashboard > Profile Tile > Print Icon

Enrolment letters and warnings play a crucial role in formal communication as they are used to convey a person’s acceptance and enrolment into a program, course, or organisation. They provide important information such as program details, start dates, duration, and any specific conditions or requirements the individual needs to full fill.

You can select the template from the dropdown menu and click on the Generate button. After a successful generation, you can easily download the template in either PDF or DOC format.

IMPORTANT – It is important to note that this template can be utilised for generating letters and warnings at both the application and enrolment levels through the Enrolment Dashboard. To receive further guidance on customising the report templates according to your requirements, we recommend referring to the instructional post titled Report Templates. This post provides step-by-step instructions on modifying the templates to match your desired format and content.

Enrolment – Statement of Account

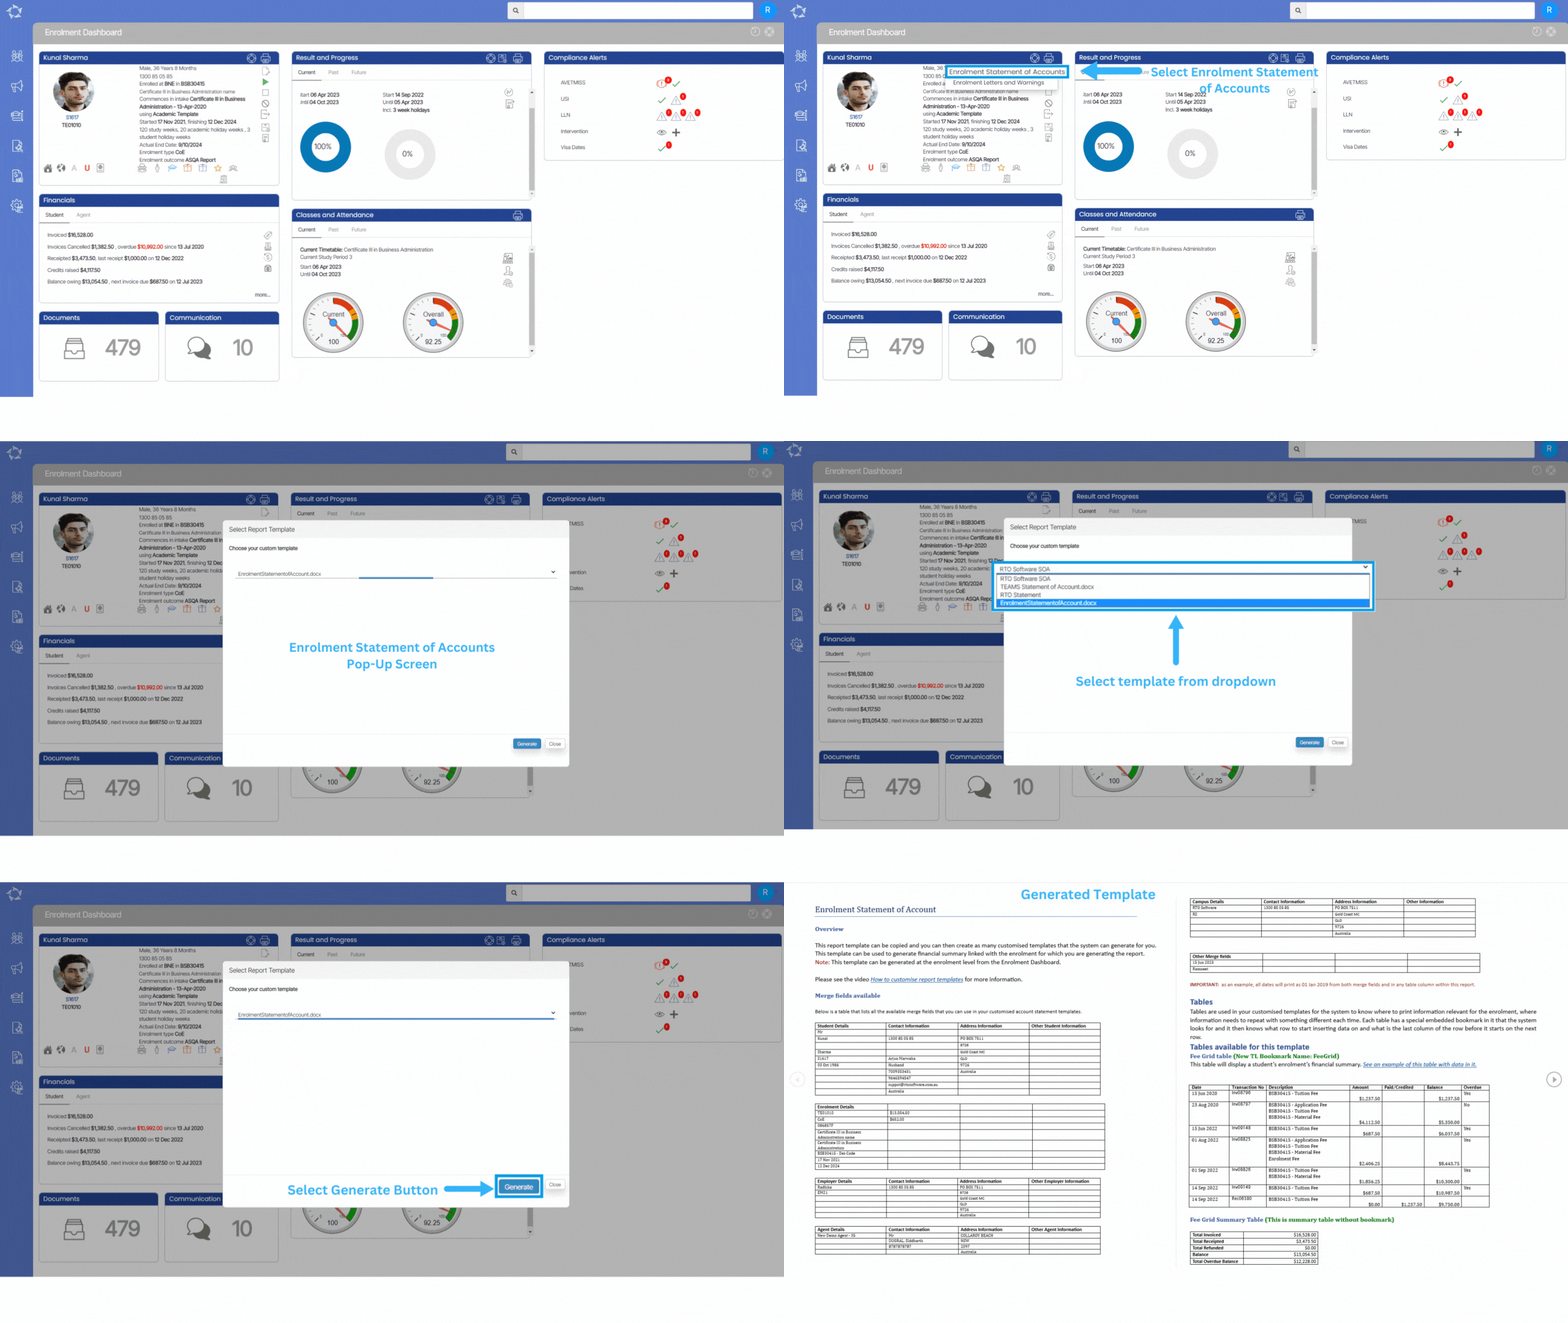
Enrolment Dashboard > Profile Tile > Print Icon

The enrolment statement of account report is used to generate financial summaries. It is specifically linked to a particular enrolment for which the report is being generated. This report provides a detailed overview of the financial transactions and activities related to the enrolment, including fees, payments, and any outstanding balances.

The report can be generated at the enrolment level from the Enrolment Dashboard. The system allows you to create customised templates for tailored financial summaries, which can be selected from a dropdown menu. Once the appropriate template is chosen, you can initiate the report generation process by clicking the designated Generate button.

Upon successful generation, the resulting report template is made available for download in either PDF or DOC format on the Report Dashboard.

Academic Template Date Preview Screen

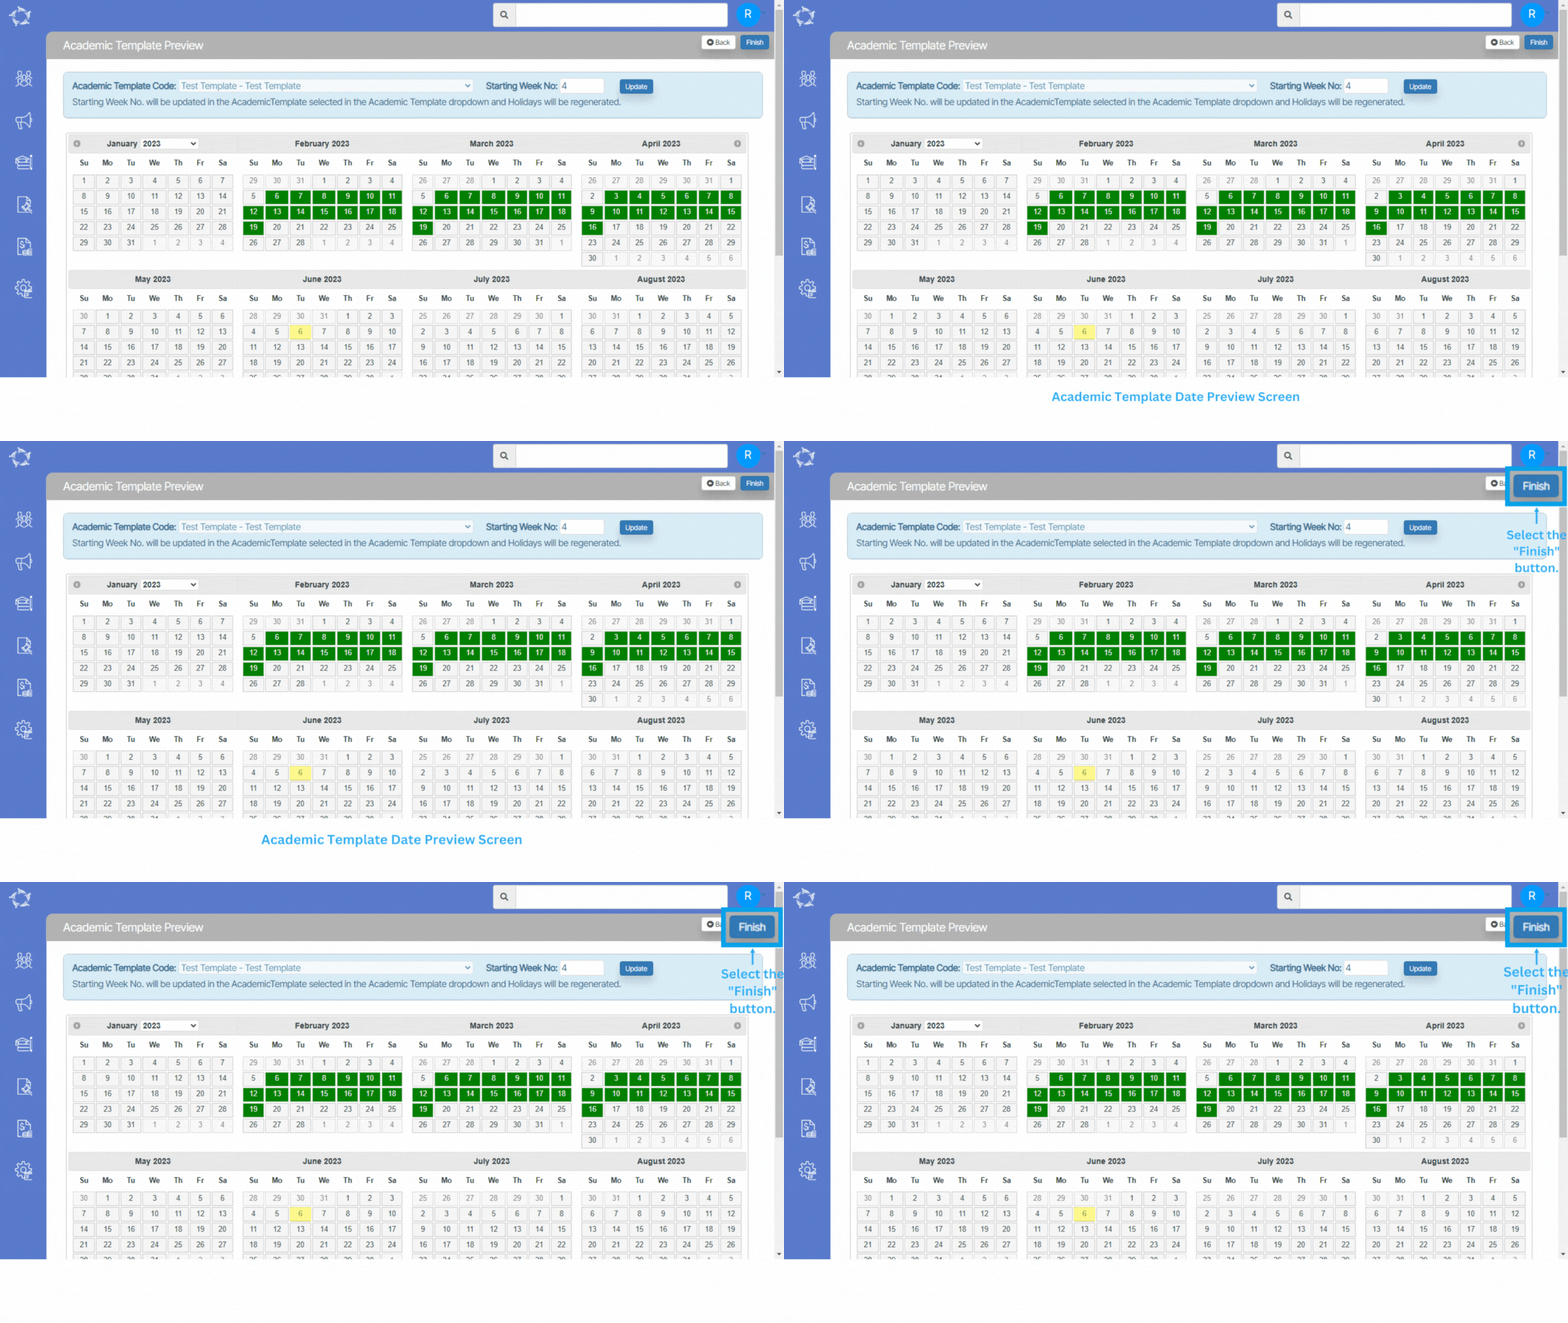
The Academic Template Date Preview Screen includes the Academic Template code for identification purposes. Additionally, it displays the Starting Week Number, which indicates the week when the academic template begins. This information is valuable for you, enabling you to align your personal academic schedule with the template for proper synchronisation.

To modify the template, you can utilise the Update button. By selecting the update button, you can make changes to the dates and other relevant information within the template.

Once the necessary adjustments have been made and the template has been reviewed, you can proceed by selecting the Finish button. This button signifies the completion of the template setup process on the Academic Template Date Preview Screen. By selecting the Finish button, you confirm that you have finalised the modifications and the template is ready to use.

Academic Template Yearwise Application

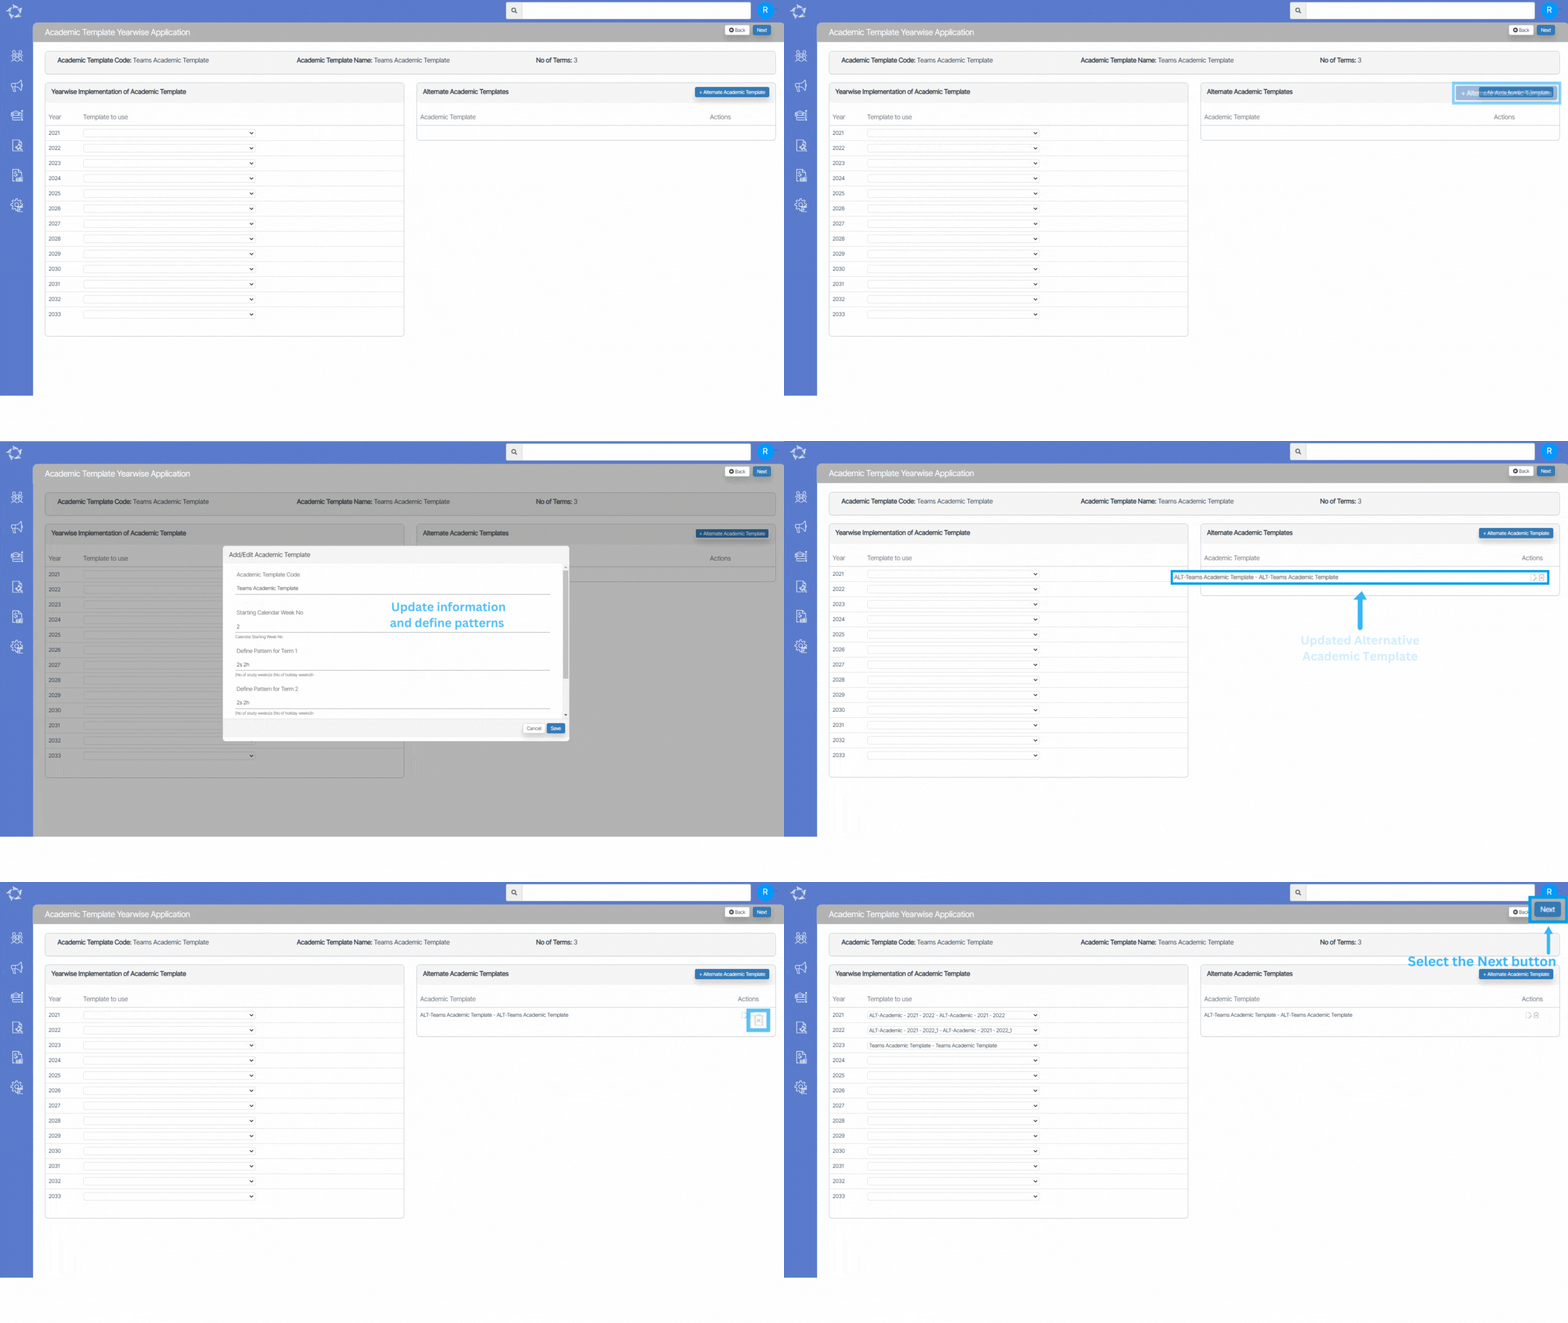
The Academic Template Yearwise Application Screen allows you to manage and organise academic templates based on different years. This screen consists of three different tiles. Here’s a breakdown of its functionalities:

  • The very first tile will show you the Academic Template code and its name along with its total number of terms
  • The second tile will show you the Yearwise Implementation of Academic Template includes a dropdown menu that lists available academic templates. You can select a specific template by choosing the desired year from the dropdown. This screen allows you to view and work with templates specific to a particular academic year.
  • The third tile will show you the Alternative Academic Template if you have already added it in the process of the academic template. You will have the option to edit your current academic template and Once a template is added, You can make modifications to the template’s content.
    • Adding Templates: You can also add Alternative Academic Templates by selecting the Alternative Academic Templates Users also have the ability to add new academic templates to the system. They can provide the necessary information and create a new template.

Overall, the Academic Template Yearwise Application Screen provides you with a convenient way to manage and access academic templates based on different years. After using the this screen, select the Next button to transition to the next stage, allowing you to continue with the template setup or perform additional related actions.

Academic Template Preview

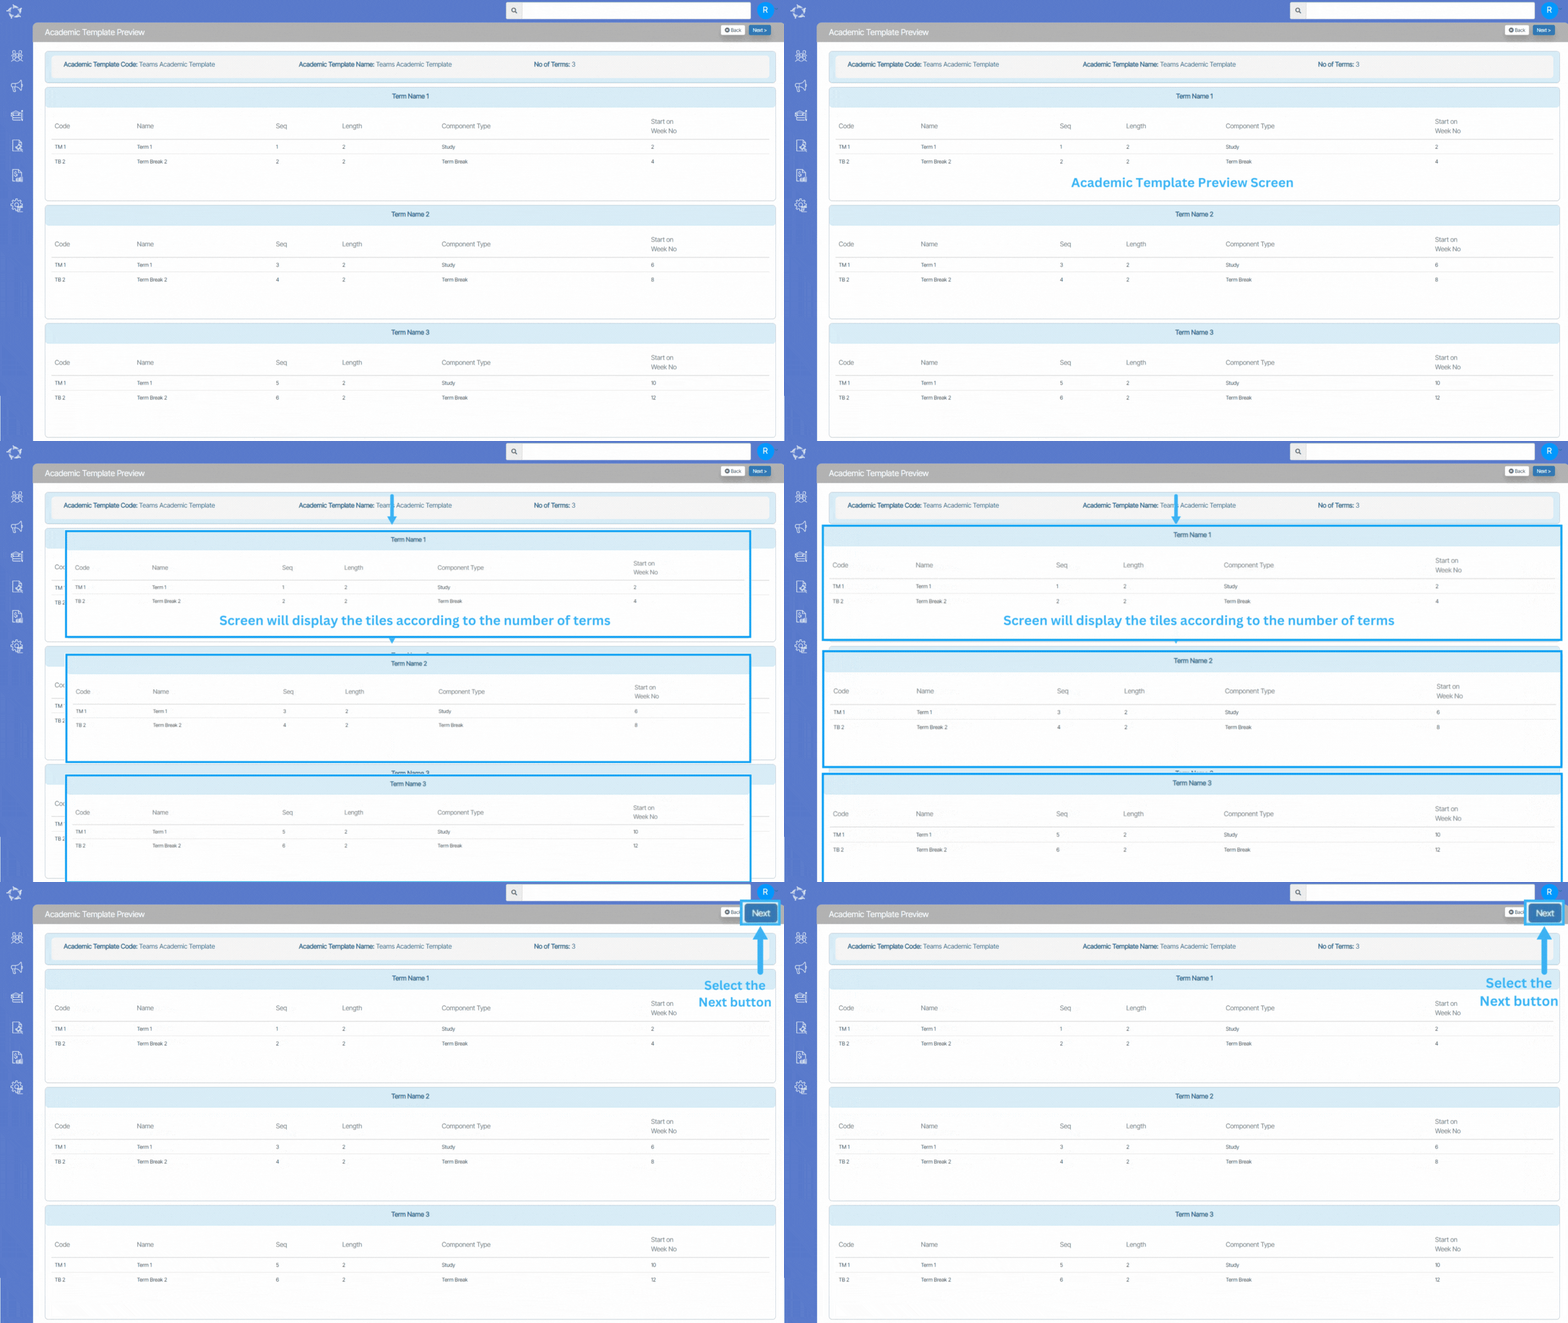
The Academic Template Preview Screen provides a comprehensive overview of an academic template. It presents essential details, including the unique code and name of the template, the total number of terms it consists of, and specific information about each term.

For each term, the screen displays the term code, term name, sequence in which it appears and its duration or length. Additionally, the screen indicates the component types present in the template, such as study or term break, which define different activities within the template. Furthermore, it showcases the starting week number designated for each term, allowing you to grasp the template’s scheduling.

After reviewing the Academic Template Preview Screen, you can proceed to the next step by selecting the Next button. This button takes you to the next screen or stage of the process, allowing you to continue with the template setup and perform additional actions related to the academic template.

Academic Template

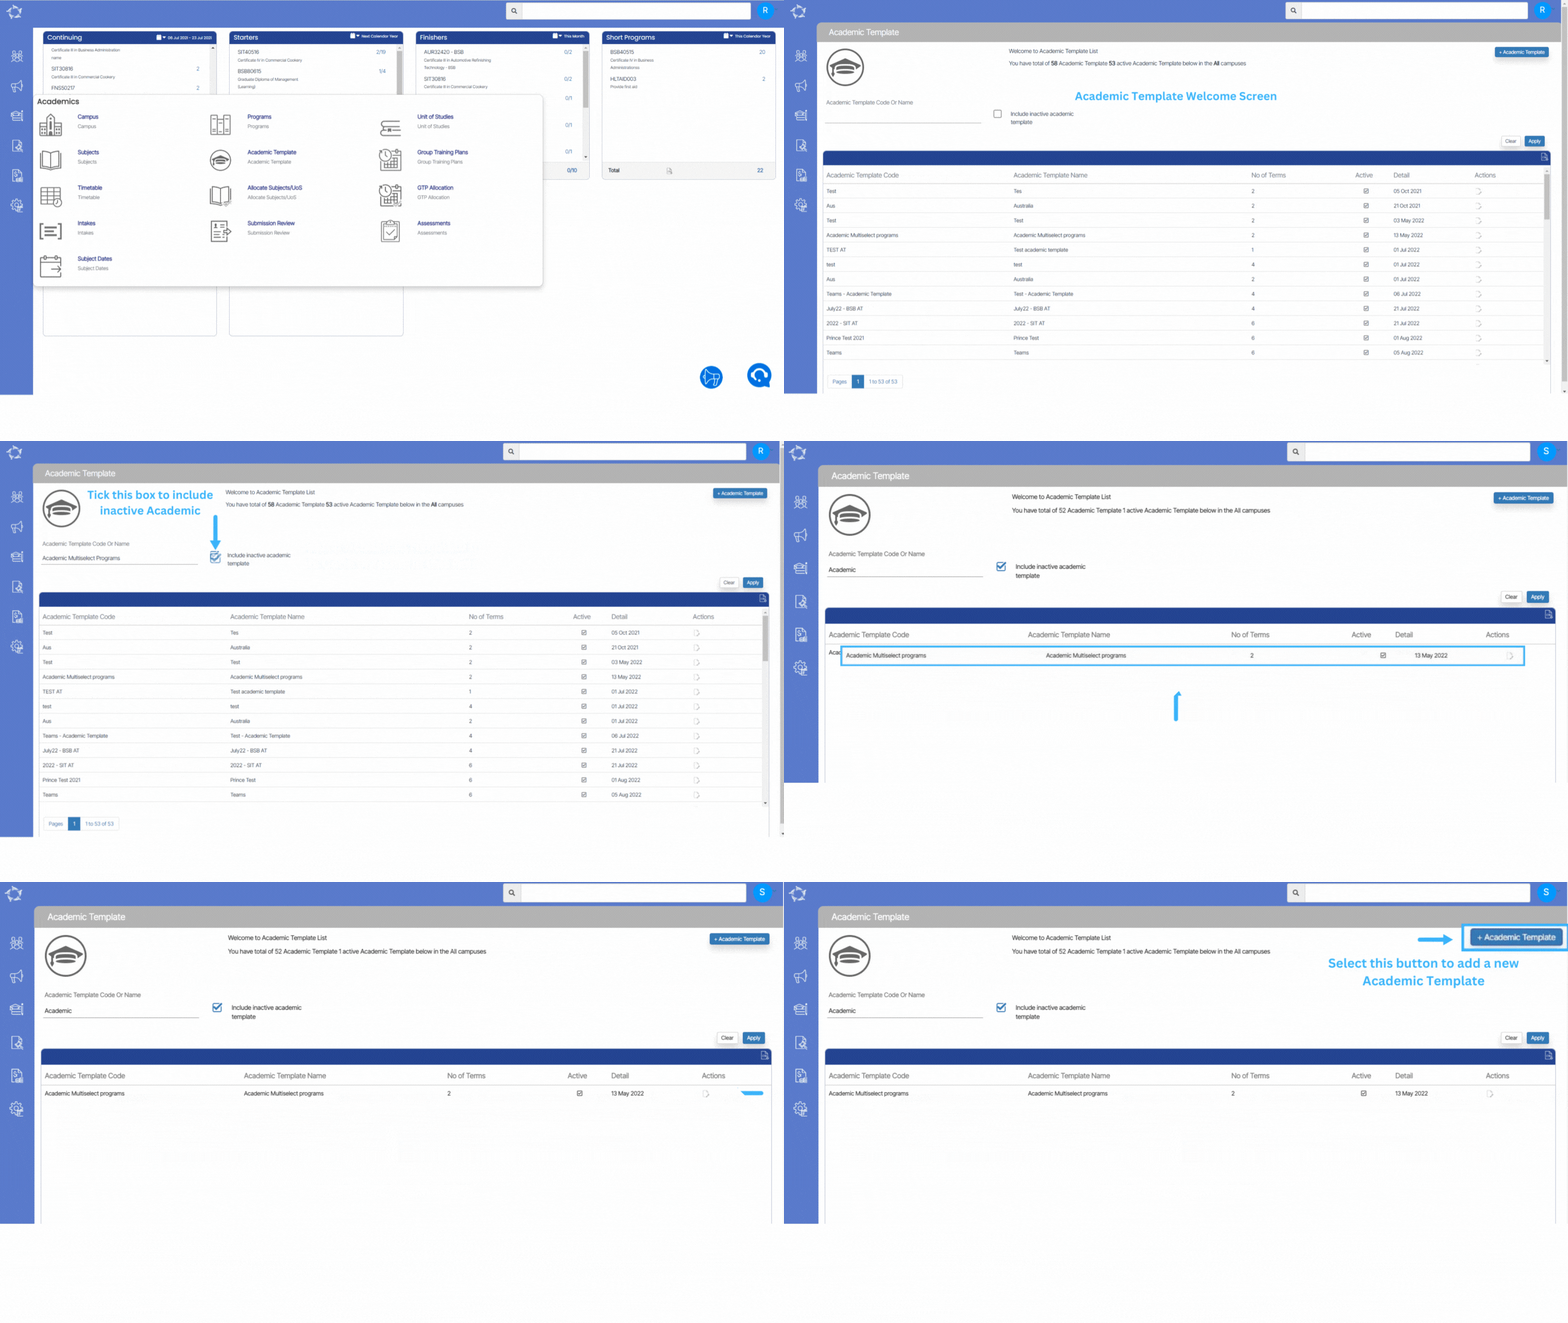
Main Dashboard > Academics Menu > Academic Template

An Academic Template serves as a structured framework utilised by RTO’s to present their academic calendars, outlining the start and end dates of each term or semester, as well as the designated breaks throughout the year.

The Academic Template Welcome screen provides a comprehensive overview of the academic templates available in the system. It displays a welcome message along with the total number of academic templates and the number of active ones. A listing grid is presented, showcasing all the currently active academic templates. To facilitate easy navigation, a search field is included, enabling you to quickly find specific academic templates they are looking for.

Additionally, there is a +Academic Template button that allows users to add new templates to the system. Furthermore, each academic template entry in the grid has an edit icon under the actions column, enabling you to make modifications to existing templates as needed.

The Academic Template process has a number of different steps in it. To view this post you can choose to either use the next arrow  below and you will be able to walk through each step OR you can select specific links below to go directly to the relevant step.

Academic Template – Academic Template Entry

Academic Template – Academic Template Entry – Setup

Academic Template – Academic Template Preview

Academic Template – Academic Template Yearwise Application

Academic Template – Academic Template Date Preview

Copy Timetable

Creating a timetable from scratch can be a time-consuming and a tedious task, especially if the same pattern of classes and schedule repeats after a certain period of time. However, there is a more efficient way to create a new timetable with the same pattern, and that is by using the copy timetable functionality.

This feature allows you to duplicate an existing timetable and make necessary changes as required. By doing so, you can save time and effort in creating a new timetable from scratch while ensuring that the schedule and class pattern remains consistent with the previous timetable.

How to create a copy of the Timetable?

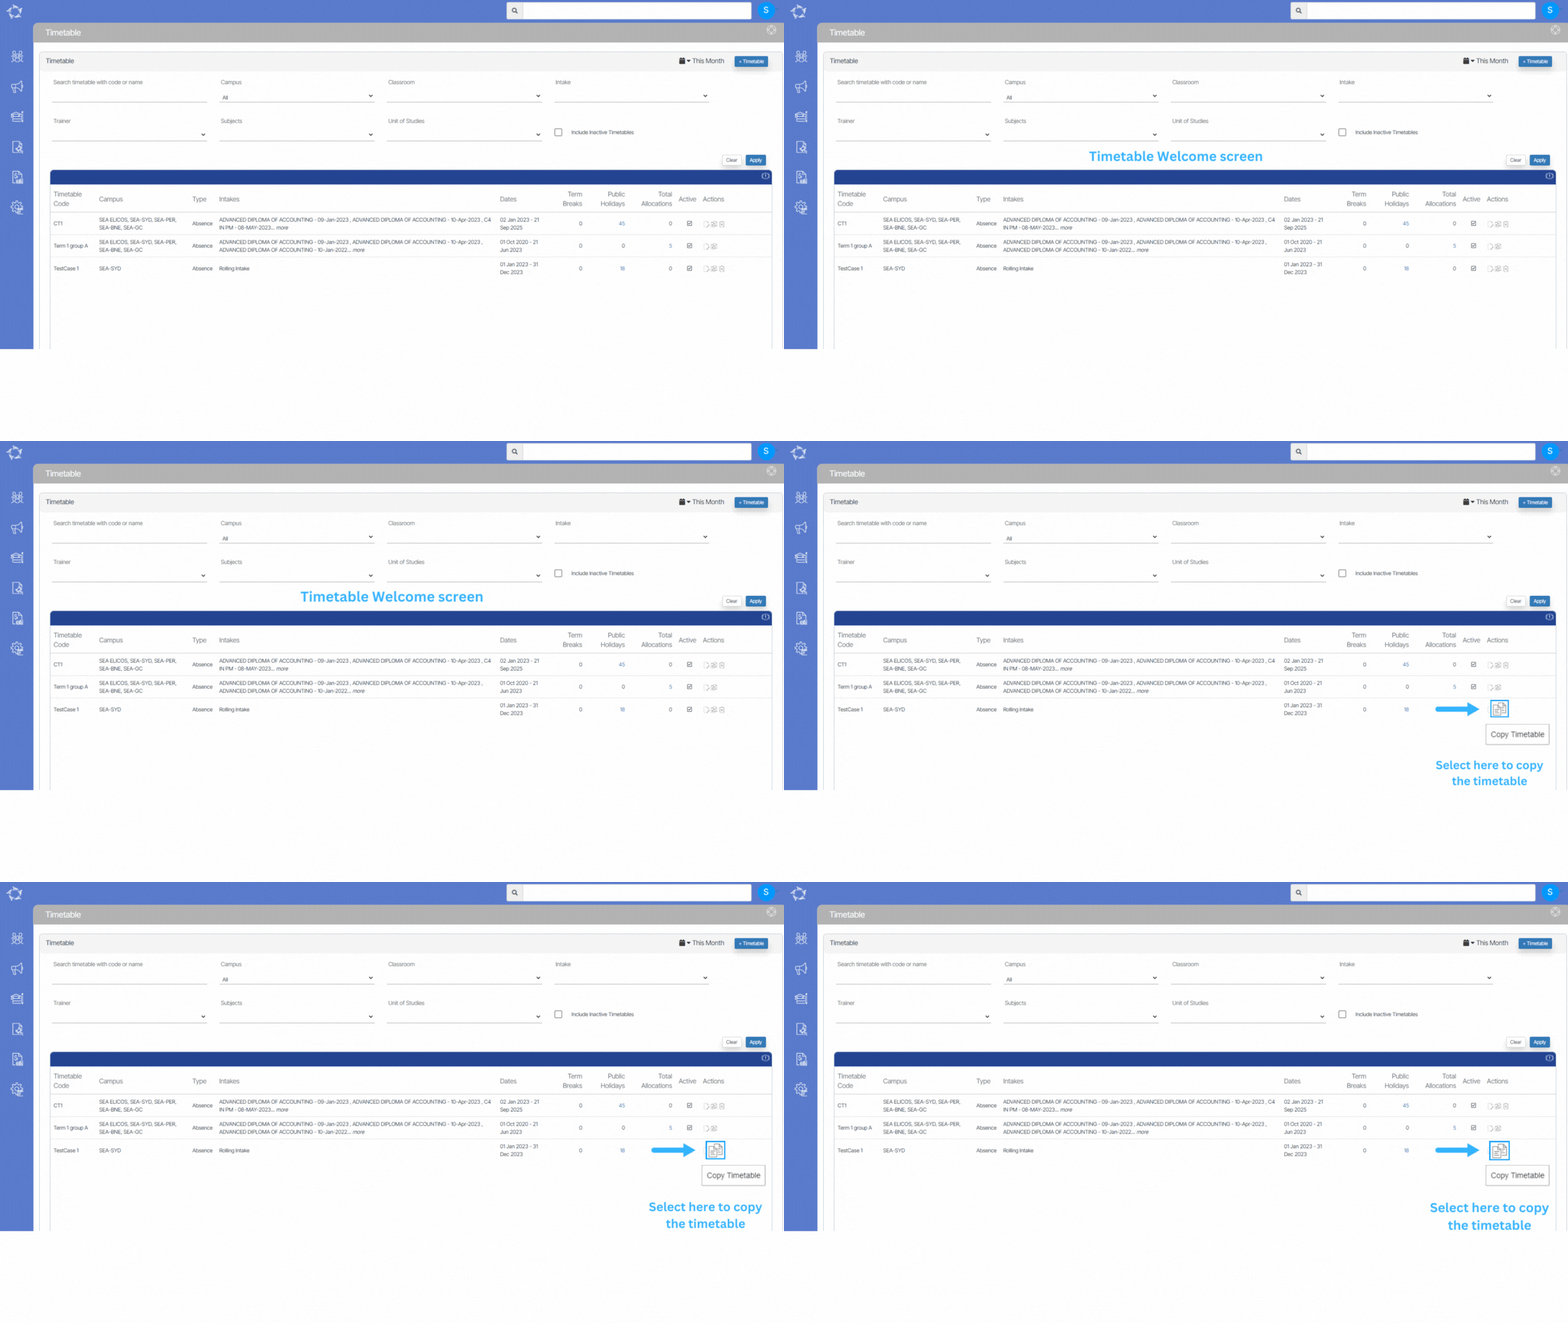
From the Timetable Welcome screen, you can see a copy timetable icon under the Actions column for each timetable entry in the grid. Select this icon to create a copy of the existing timetable.

Please select the below steps to make changes to the copied timetable.

Copy Timetable Step 1 Information & Resource Selection

Copy Timetable Step 2 Select Classes

Final Step Classes Preview

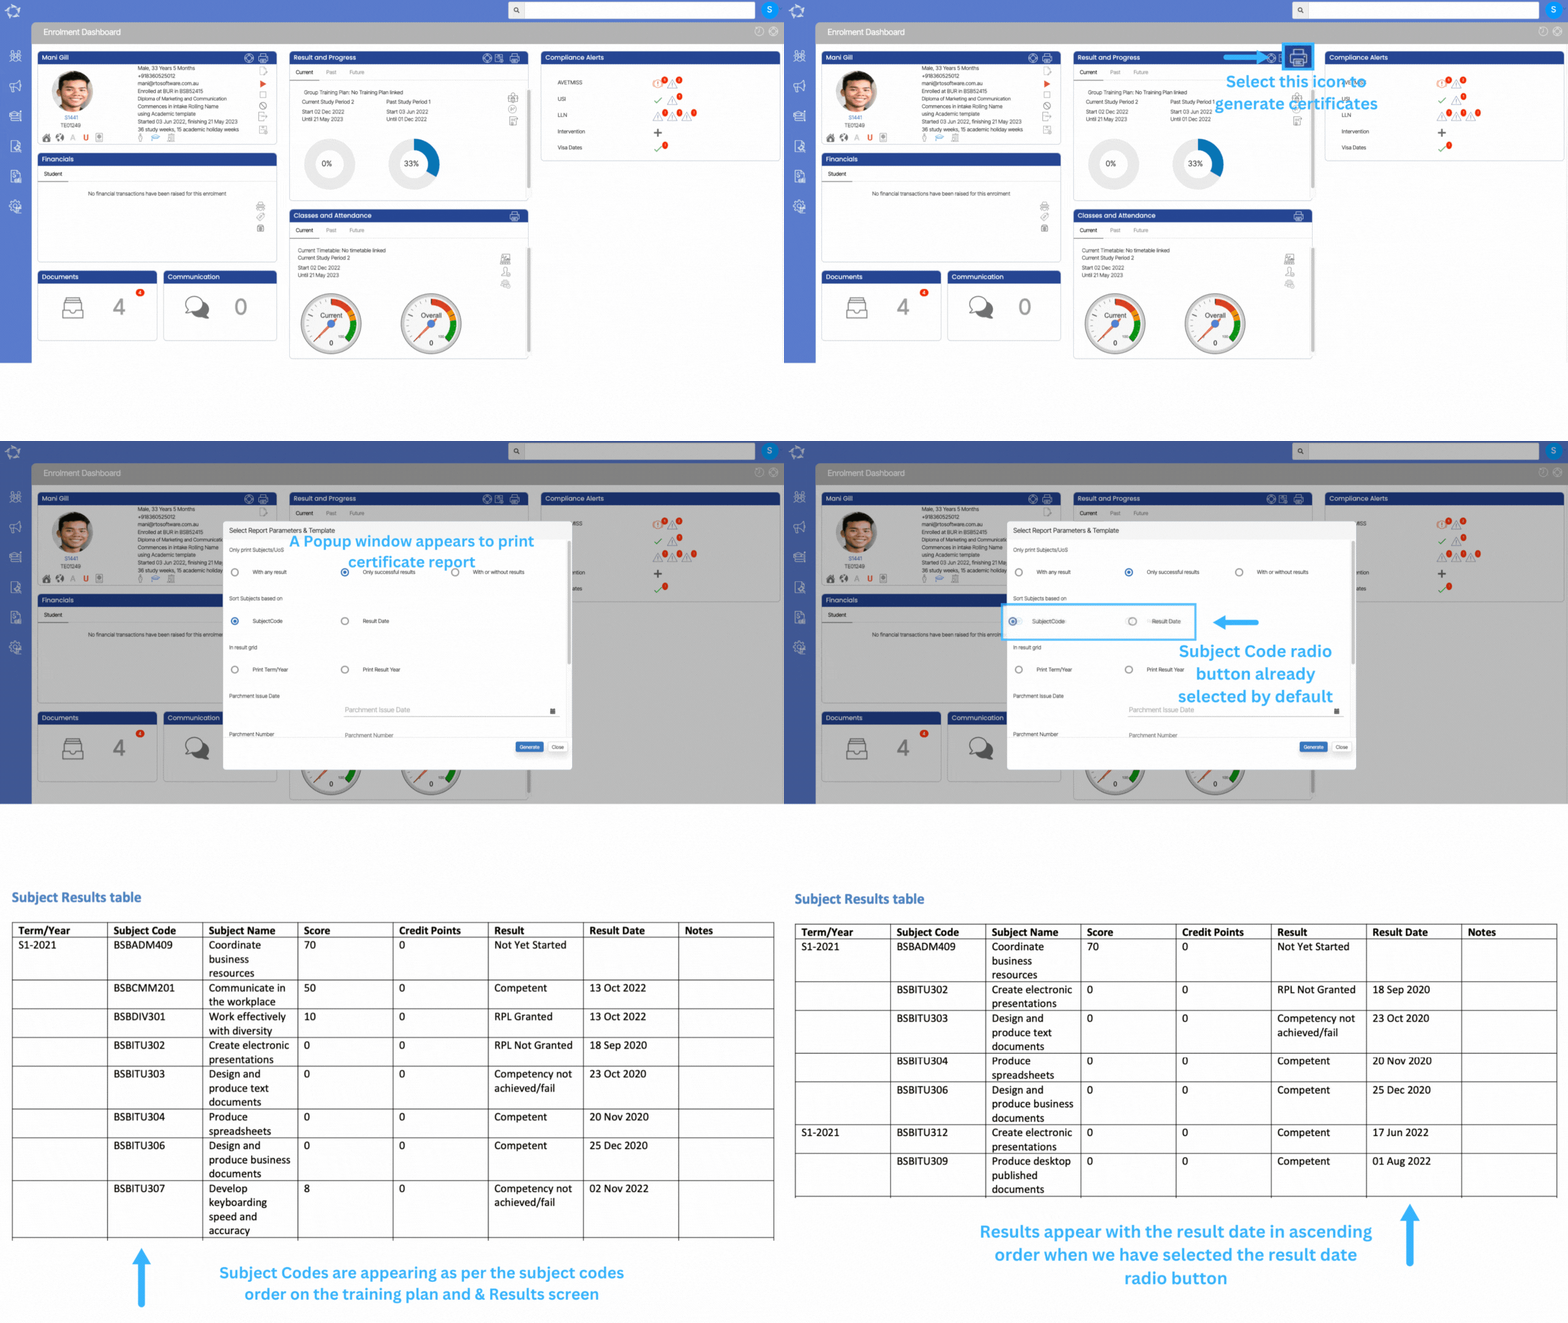
Certificates – Subject Code and Result Date – New System Setting

A new system setting has been implemented for certificates that allow the subjects to be sorted based on two criteria: Subject Code and Result Date.

When the Subject Code radio button is selected, the table within the certificates will display the subjects Code in alphabetical order and if the Result Date radio button is selected instead of the Subject Code radio button in the certificates, then the table within the certificates will display the results dates in ascending order.

Note – Our default settings have been configured to include the Subject Code as the default selection when generating certificates. However, if you prefer to have the Result date radio button selected by default, we offer the option to turn on this setting for you. To do this, please get in touch with our support team, and they will assist you in making the necessary changes to your organisation site.

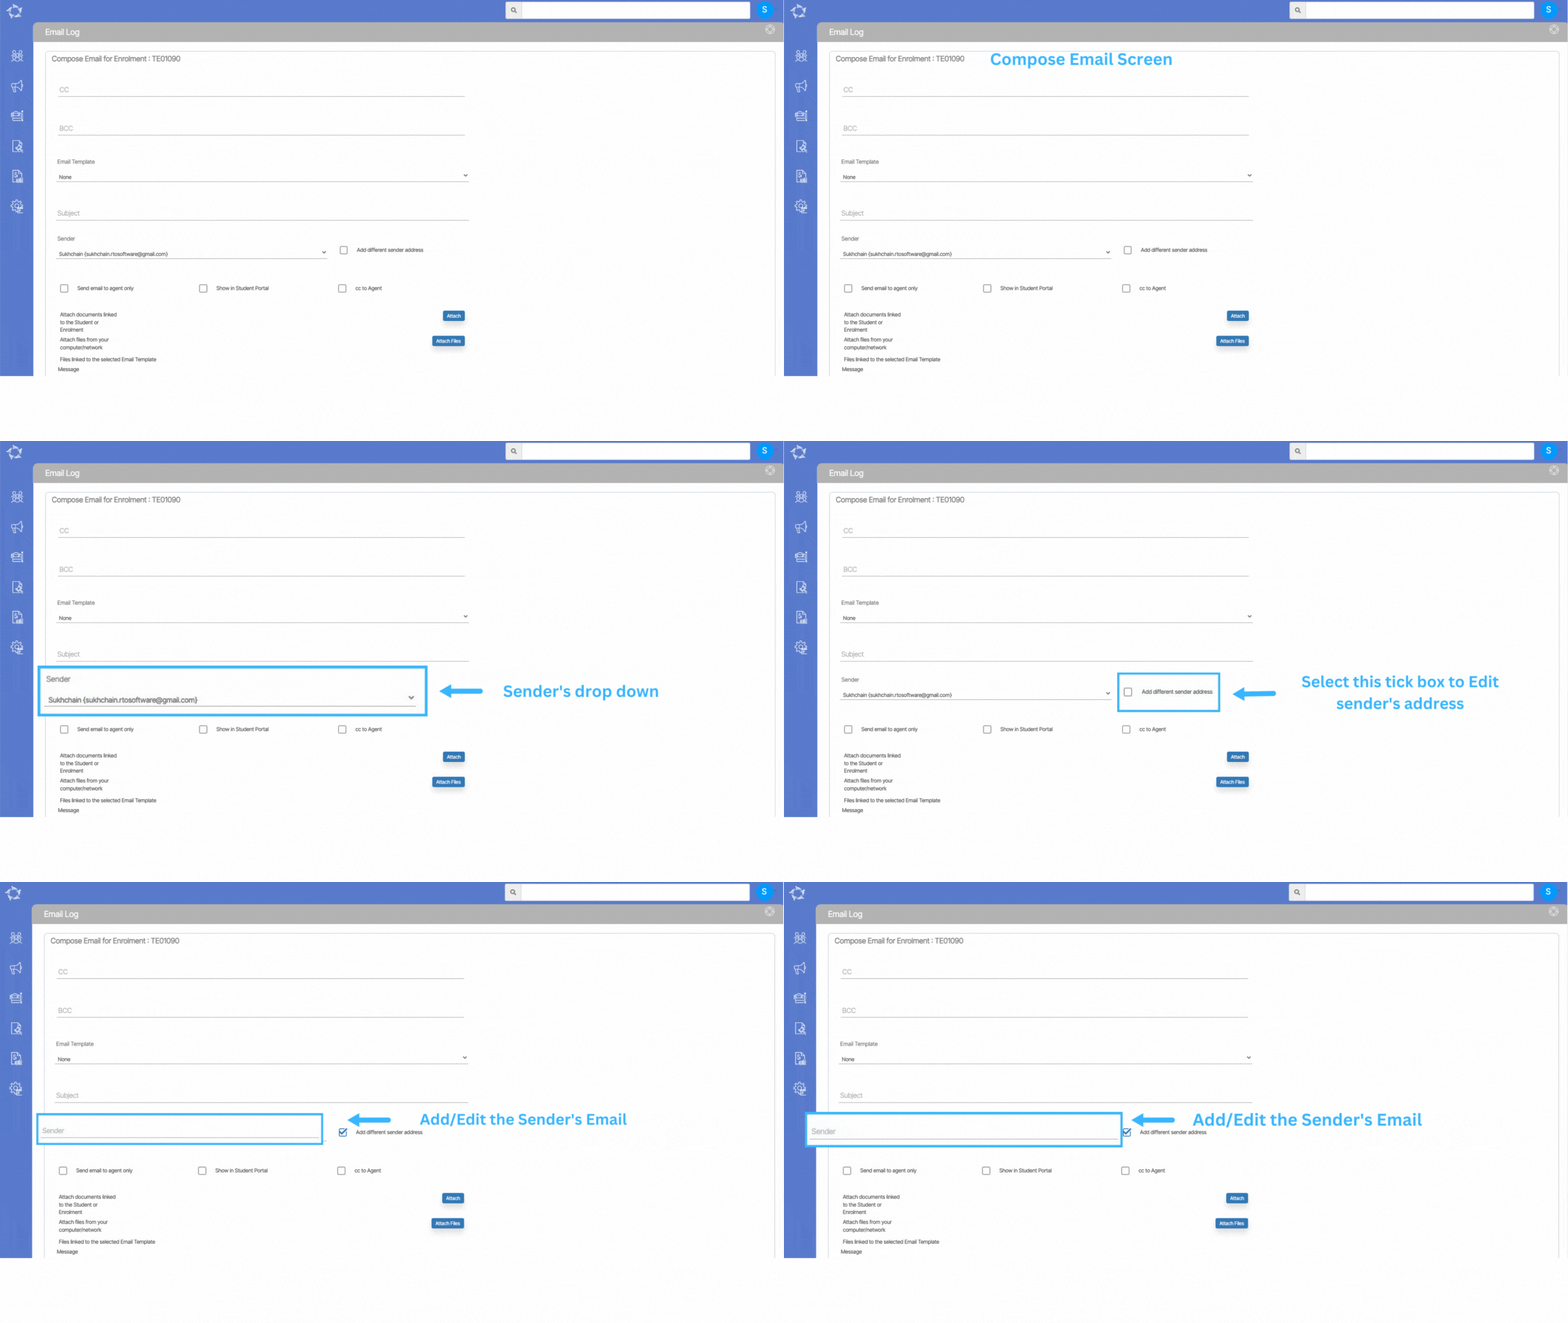
Compose Email – Sender Email Address option Changes

We’ve implemented a new feature in the compose email screen that allows you to edit the sender’s email address. To access this feature, simply select the Add different sender address tick box located next to the sender dropdown when composing an email. This change provides you with greater flexibility when sending emails, allowing you to easily switch between multiple email addresses or use a custom email address for each message you send.