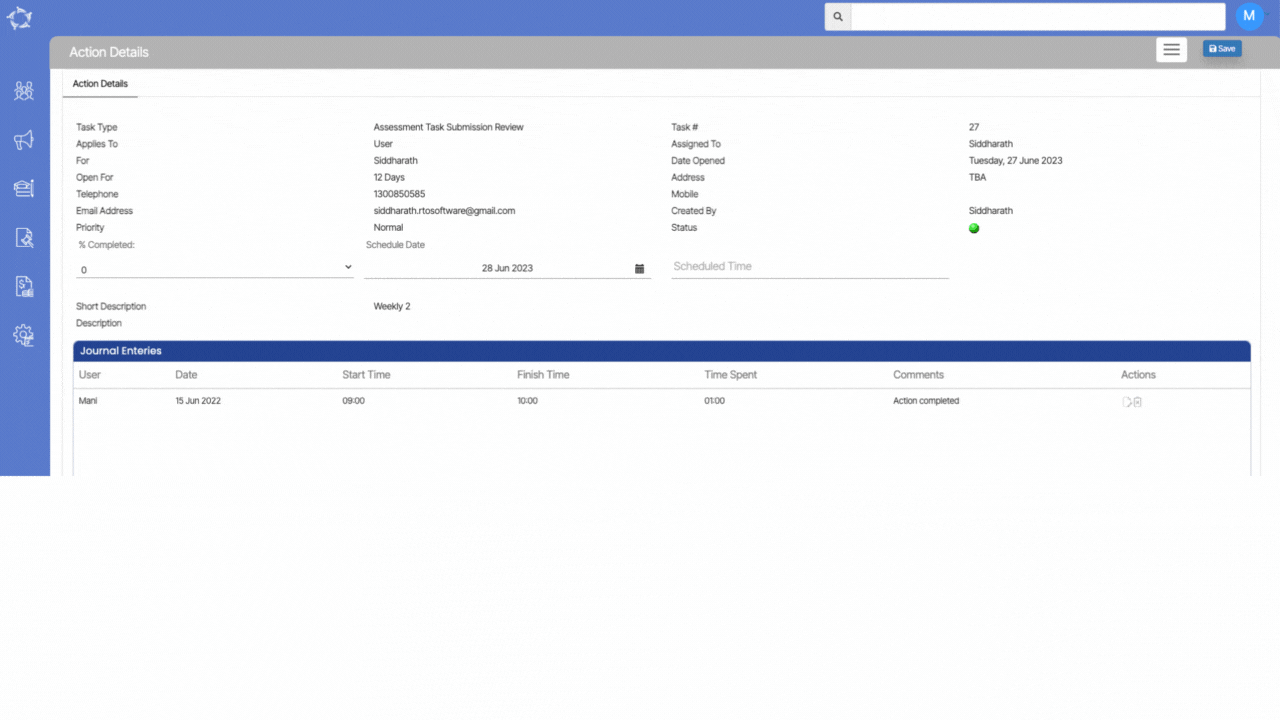
We are pleased to inform you that a new report called the Action Details Report has been added to our system. To access this report, navigate to the Action Details Screen and select the Burger menu. The report provides a comprehensive view of all the details associated with tasks created from the Task Entry Screen. Additionally, it includes action logs for Journal Entries. When you generate the report, it will be available in both Word and PDF formats.
If you wish to customise the template according to your specific requirements, you can easily do so by selecting the Report Template option. We have provided guidelines in a separate post on How to customise the Report template in TEAMS. This feature allows you to tailor the report template to align with your preferences and needs, providing you with greater flexibility and control over the generated reports.
By selecting the Active Tasks hyperlink number, users are directed to the Task Details screen, which provides a comprehensive overview of all active tasks in the calendar, as well as unassigned tasks. The screen is divided into two tabs: My Tasks and Unassigned/overdue Tasks, offering efficient task management.
Under the My Tasks tab, users can easily handle their tasks using various filters such as Task Type and logged or assigned names from the dropdown menu. This allows for quick searching of active tasks. Additionally, users can preview task details, make necessary edits, or delete tasks as needed. This functionality empowers users to review and modify their task list seamlessly, promoting an organized approach to task management.
The Unassigned/overdue tasks tab presents a grid displaying all unassigned and overdue tasks. The grid provides relevant information such as task description, logged date, action type, priority, and task status (pending or completed). This tab helps users stay informed about pending tasks and ensures timely completion.
To add a new task to the system, users can simply select the +Action Button located on the right-hand side of the screen, which will redirect them to the Actions Entry screen. This streamlined process allows for the easy creation of new tasks into the system, facilitating efficient task management and ensuring all necessary actions are accounted for.
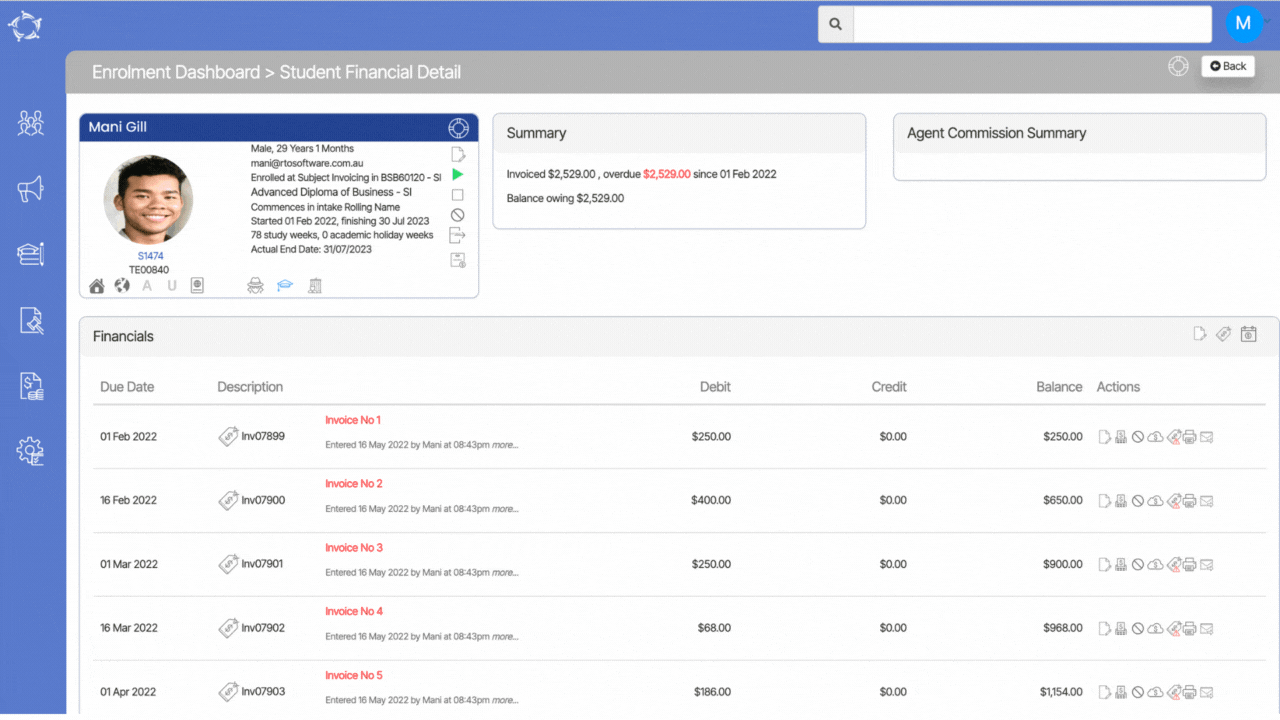
We are pleased to announce the addition of a new label called Negative Invoice Reference on the Student Financial Details screen. This label can be found within the Transactions Details pop-up, under the More option. The purpose of this enhancement is to provide you with a convenient way to associate a reference number with negative invoices.
When creating a negative invoice and specifying a reference number for it, the system will now display this Negative Invoice Reference Number in the Transactional Details section for that particular invoice. This feature enables you to easily track and reference negative invoices, streamlining financial management processes and ensuring clarity and accuracy in accounting practices.
We believe that this enhancement will contribute to better financial management and provide you with an improved and more comprehensive view of your student financial details.
When you select the Task Recurrence button, a pop-up window will appear on your screen, providing several options for configuring the task recurrence:
Schedule Type:
Within the pop-up window, you will find three radio buttons—Daily, Weekly, and Monthly. By selecting one of these options, the system will schedule the task according to your choice.
If you choose Daily Radio Button, you can specify the task recurrence on the daily basis. The system will show you the below fields as shown in the table.
Fields
Explanation
Range of Recurrence
This field allows you to define the date range for the recurring task. You can set a start date to determine when the recurrence should begin and end.
End After
If you select this radio button, you can specify the number of occurrences after which the task will automatically end. For instance, if you set it to 10, the system will repeat the task 9 times because the system will include the task that you have created the recurrences for.
End By
Alternatively, if you choose this radio button, you can select a specific end date for the task recurrence using the calendar icon. The task will continue repeating until the specified end date is reached.
Every days
This is a mandatory field. If you are choosing, the End After radio button for the specified occurrences then you must select the number of days for this field so that the system will look and create the task accordingly. For example – If you have entered the number 2 then the system will create a recurrence every second day.
Same as if you select the End By radio button and update the end date the system will look and create the task accordingly.
If you choose Weekly Radio Button, you can specify on which day of the week and for how long the task should recur. The system will show you the below fields as shown in the table.
Fields
Explanation
Range of Recurrence
This field allows you to define the date range for the recurring task. You can set a start date to determine when the recurrence should begin and end.
End After
If you select this radio button, you can specify the number of occurrences after which the task will automatically end. For instance, if you set it to 10, the system will repeat the task 9 times because the system will include the task that you have created the recurrences for.
End By
Alternatively, if you choose this radio button, you can select a specific end date for the task recurrence using the calendar icon. The task will continue repeating until the specified end date is reached.
Every Weeks
This is a mandatory field. If you are selecting, the End After radio button for the specified occurrences then you must select the number for every week, so that the system will look and create the task accordingly. For example – If you have entered the number 2 then the system will create a recurrence every 2 weeks.
Same as if you select the End By radio button and update the end date the system will look and create the task accordingly.
Please Note – You will also see tick boxes for the days of week (Sunday, Monday, Tuesday, Wednesday, Thursday, Friday and Saturday). When you select the days the system will create the recurrence every 2 weeks on the same days.
If you choose Monthly Radio Button, you can specify on which day of the month and for how long the task should recur. The system will show you the below fields as shown in the table.
Fields
Explanation
Range of Recurrence
This field allows you to define the date range for the recurring task. You can set a start date to determine when the recurrence should begin and end.
End After
If you select this radio button, you can specify the number of occurrences after which the task will automatically end. For instance, if you set it to 10, the system will repeat the task 9 times because the system will include the task that you have created the recurrences for.
End By
Alternatively, if you choose this radio button, you can select a specific end date for the task recurrence using the calendar icon. The task will continue repeating until the specified end date is reached.
Day of Month
This is a mandatory field. If you are selecting, End After radio button for the specified occurrences then you must select the day of the month, so that the system will look and create the task accordingly. For example – If you have entered number as 2 then the system will create the recurrence on every second day of the month.
Same as if you select the End By radio button and update the end date the system will look and create the task accordingly.
Every Month
This is a mandatory field. If you are selecting, the day of the month then you must mention the number for every month field. For example – If you have entered the number as for the day of the month and selected the number as 2 in every month field then the system will create the recurrence on the second month.
Same as if you select the End By radio button and update the end date the system will look and create the task accordingly.
After, selecting the above desired radio buttons, select the save button.
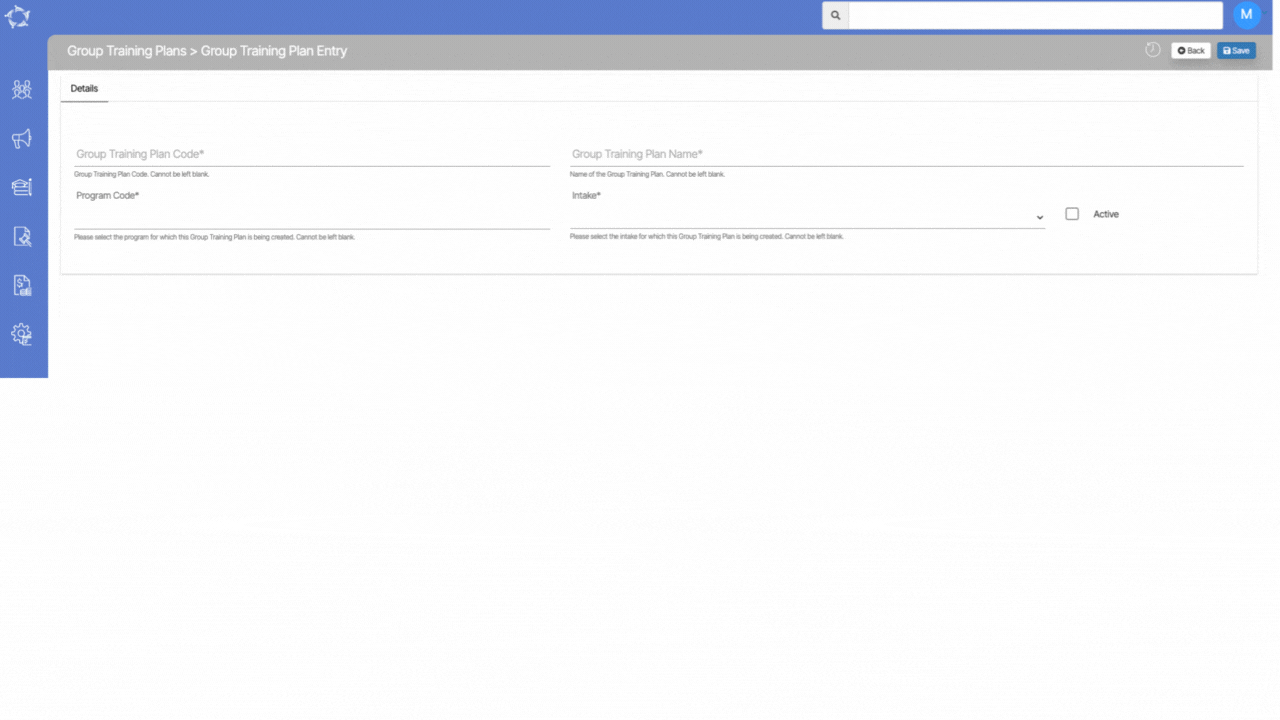
We have implemented significant optimisations and enhancements to the Group Training Plans entry screen. Previously, you had to manually input the subject, start date, and end date for each group training plan in the grid. However, we have introduced a new feature that simplifies the process.
Now, when you create a new group training plan, it automatically generates its own definition based on the program it is linked to, including the program code and name. It is important to note that certain fields, such as Group Training Plans code and name, Program Code, and Intake, are mandatory and must be filled in. Leaving these fields blank is not allowed.
Once the mandatory fields are saved and the Group Training Plan is created, it will automatically populate all the compulsory subjects from the selected program into the group training plan. You can then remove any subjects that are not required, eliminating the need for manual selection and addition of subjects to the grid.
In the grid, you have the flexibility to edit the dates of the subjects directly from the Start date and End date columns. Additionally, you can delete subjects using the delete icon located in the actions column.
Previously, you had to add subject dates one by one, but with this new enhancement, you can now edit the dates of multiple subjects simultaneously, by saving your valuable time and effort.
These improvements streamline the process of creating and managing group training plans, ensuring a more efficient and user friendly experience. We are committed to continuously enhancing our software to meet the evolving needs of our users and provide them with tools that improve productivity and ease of use.
NOTE – the Subjects tile, comprising the Subject Code dropdown, start date, and end date fields, will not display any subjects or their respective dates. Instead, the grid will show all the subjects linked to the program.
In the event that you delete a subject from the grid, it will reappear in the dropdown, allowing you to re-link it to the training plan at a later time. To do so, simply select the subject from the dropdown, specify the desired start and end dates, and add it back to the grid.
This functionality provides flexibility and ensures that subjects can be easily managed within the group training plan. It allows you to make changes to the plan’s composition and adjust subject dates as needed, providing a dynamic and customisable approach to training program creation and maintenance.
Here are some recent questions that have been asked, along with their corresponding answers. Our answers aim to offer clear and concise explanations, step-by-step instructions, and valuable insights. Whether you’re looking for guidance on a specific task or seeking to expand your knowledge in various fields, these questions and answers are here to provide you with useful and reliable information.
Questions
Answers
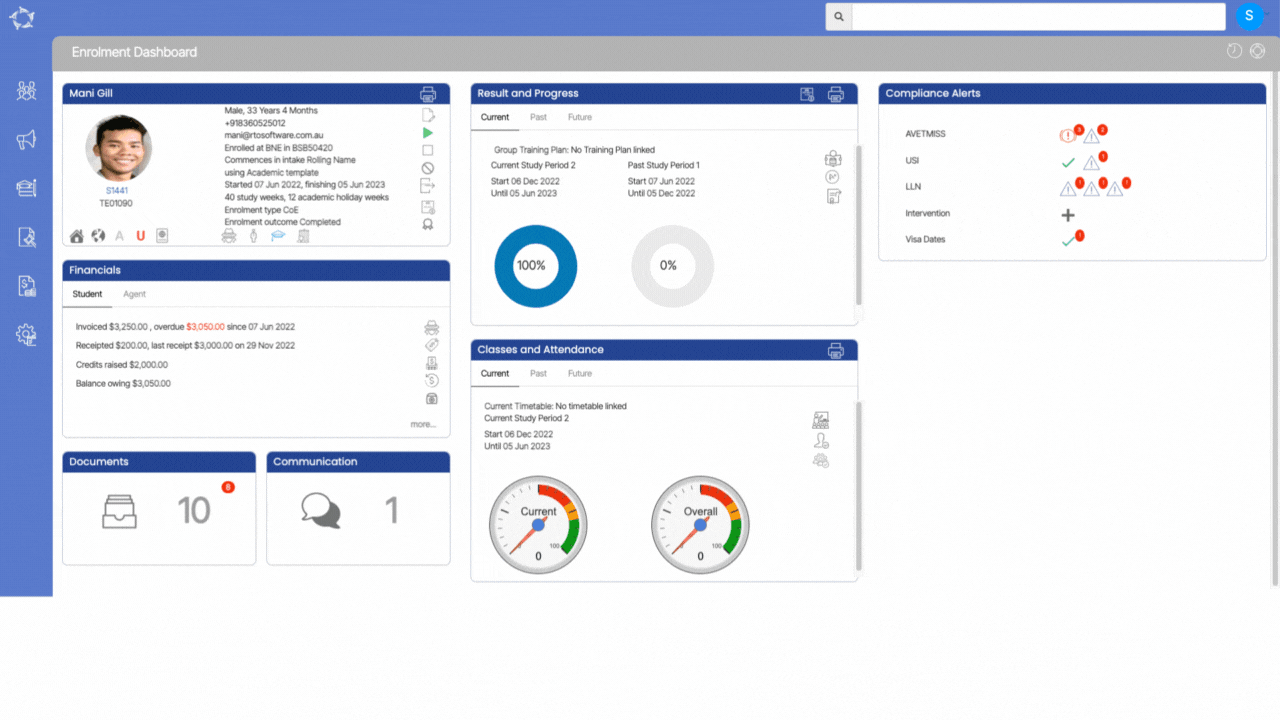
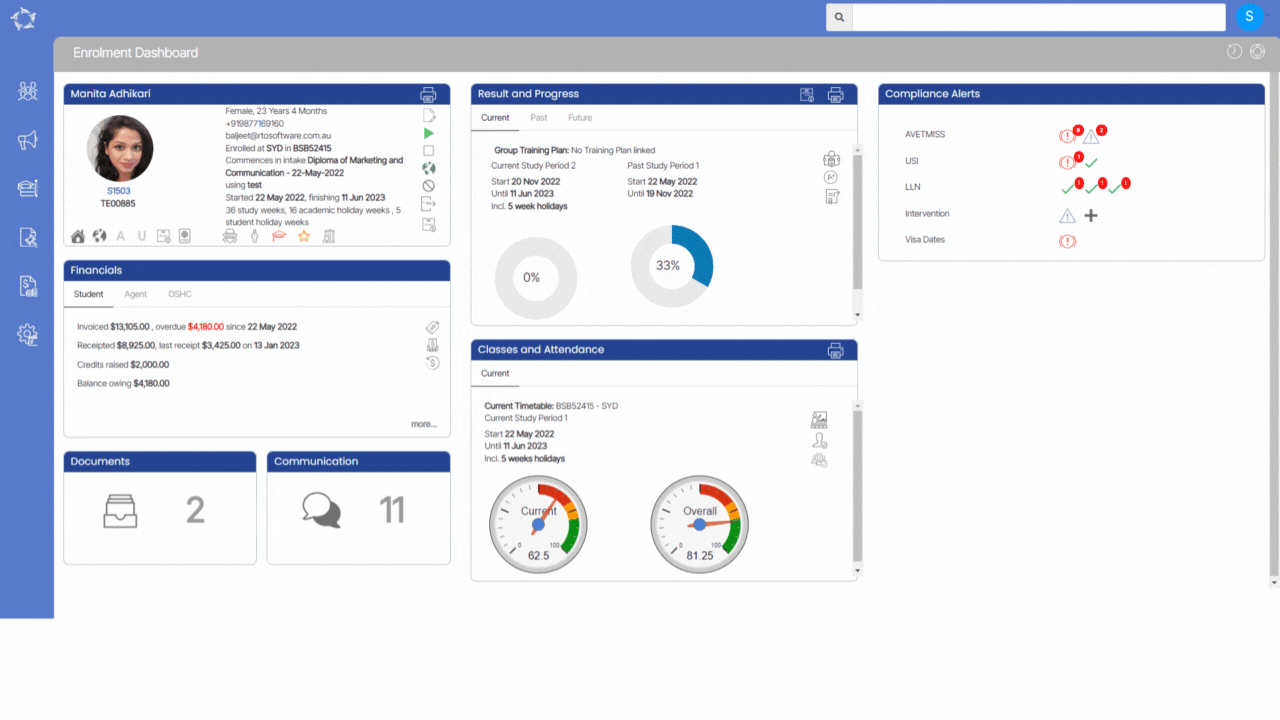
Unable to see the icons on the Classes and Attendance tile
Please select the read more link to know the answer.
When the icons on the Enrolment Dashboard’s > Classes and Attendance tile are not visible, it is likely due to a holiday that has been linked to the enrolment. This holiday is scheduled to begin exactly on the enrolment’s start date. Consequently, the system does not display any study periods or icons on that tile. This issue is specific to students who start their enrolment on the same day as the holiday. Those who do not have a holiday scheduled for that day will not encounter this problem.
Enrolment Dashboard > Result and Progress Tile > Print Icon
The Training Plan is a crucial document that outlines the training program for apprentices or trainees. It specifies the training content and who will provide it, as well as the details of when, where, and how the training will be delivered. The plan also explains the assessment process and when the apprentice/trainee will be deemed competent. Developed collaboratively by the RTO, apprentice/trainee, and employer, the Training Plan is a dynamic document that reflects the current status of the training and is regularly updated. It ensures compliance with standards, clarifies workplace tasks, and serves as a basis for reviewing and evaluating the training program.
In the Training Contract, all parties (apprentice/trainee, employer, and RTO) must fulfil their responsibilities as outlined.
Please select the desired template from the dropdown menu and select the Generate button. Once successfully generated, you can easily download the template in either PDF or DOC format.
IMPORTANT – To receive further guidance on customising the report templates according to your requirements, we recommend referring to the instructional post titled Report Templates. This post provides step-by-step instructions on modifying the templates to match your desired format and content.
Enrolment Dashboard > Result and Progress Tile > Print Icon
A student performance report provides information about a student’s academic progress and achievements in a particular subject or course. It typically includes details about the student’s successful and unsuccessful results, completed percentages and other relevant information. The report may also include basic information about the student including student number, enrolment number and program dates.
To provide a clear overview of the student’s progress, the report includes a result-completion ratio. This ratio indicates the percentage of courses or subjects successfully completed out of the total number attempted. It offers a quantitative measure of the student’s overall performance and provides educators with an easy way to gauge their progress.
To generate the student performance report, you can initiate the process by selecting the Generate button. Once the report is successfully created, it is typically available for download in CSV format.
Enrolment Dashboard > Result and Progress Tile > Print Icon
The student Result report file provides comprehensive information about student’s academic performance, including their Results, Results dates and other relevant details. By generating student result files, you can efficiently track and analyse student progress over time. The purpose of generating these result files is to provide a detailed record of a student’s academic achievements. In addition, student result reports may also include other relevant details such as the student’s name, enrolment details, timetable and any additional remarks or comments regarding their performance.
To access the generated result report file, you can select the generate button provided. Once the report is successfully generated, a download option is made available to obtain the file. Typically, the result report file is in CSV (Comma-Separated Values) format, which allows for easy import and analysis using spreadsheet software.