Initially, the system was showing Employer Tracking as the tooltip of the employer icon on the enrolment profile tile.
But now the system will show the name of the employer and the start/end dates of the employer in the tooltip which is linked to the enrolment recently. And If there is no employer linked to the enrolment, then in the tooltip it will say ” Employer – None linked”.
NOTE – The system will always show the details of the employer in the tooltip which is linked most recently with the enrolment.
We have added a new column Total Allocations on the Timetable Welcome Screen which shows you the total number of enrolments linked to that particular timetable.
Once you have allocated a class to any enrolment that enrolment will be added to the count under the total allocations column for the timetable of the enrolled class as shown below:
Once you will select the count under the total allocations column, the timetable allocation listing screen will open. This screen will show you the list of all allocated enrolments to this timetable.
If you want to send Emails and SMS or create Contact Log then you can select a tick box for all the students from the tick box column and select the burger icon as shown below:
You can also download the CSV file for all the allocated students from the CSV icon as shown below:
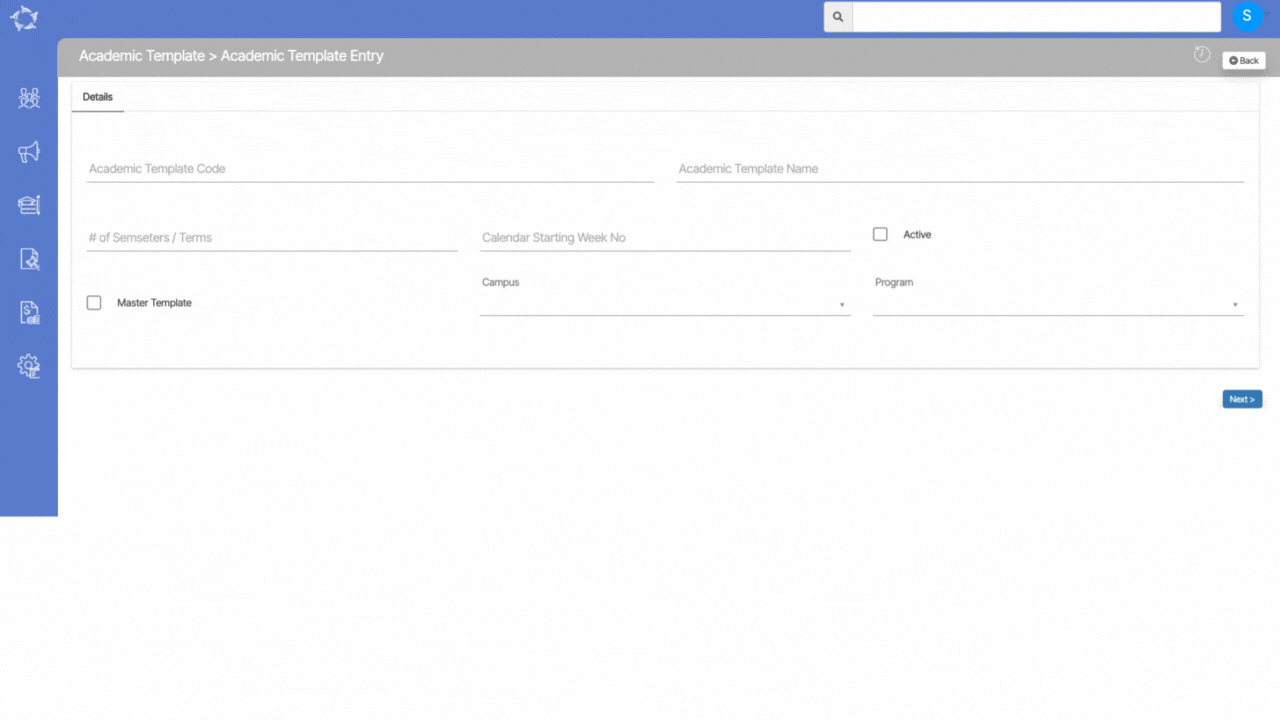
When you select the +Academic Template button on the Academic Template Welcome screen, the system will redirect you to the Academic Template Entry screen. This is where you will initiate the process of creating a new academic template within the system.
Note – Any changes made on this screen will not be saved unless you proceed to the next step and completes all the necessary actions in the academic template.
Explanation of the fields below:
Fields
Explanations
Academic Template Code
Depending upon your requirements type the academic template code in the field
Academic Template Name
Depending upon your requirements type the academic template name in the field
# of Semesters/Terms
Write the total number of semesters/terms. For example 2 or 4
Calendar starting week no
Write the calendar starting week number in this field
Active
Select this tick box to activate the academic template
Campus
If you have multiple campus and wanted to apply this template to all of your campuses then you can select them by selecting the tick boxes.
Program
If you wish to apply multiple programs to the template then you can select them from the dropdown
Once all the above fields are selected and updated then you need to select the next button to complete the further actions. To know more select the next arrow button below.
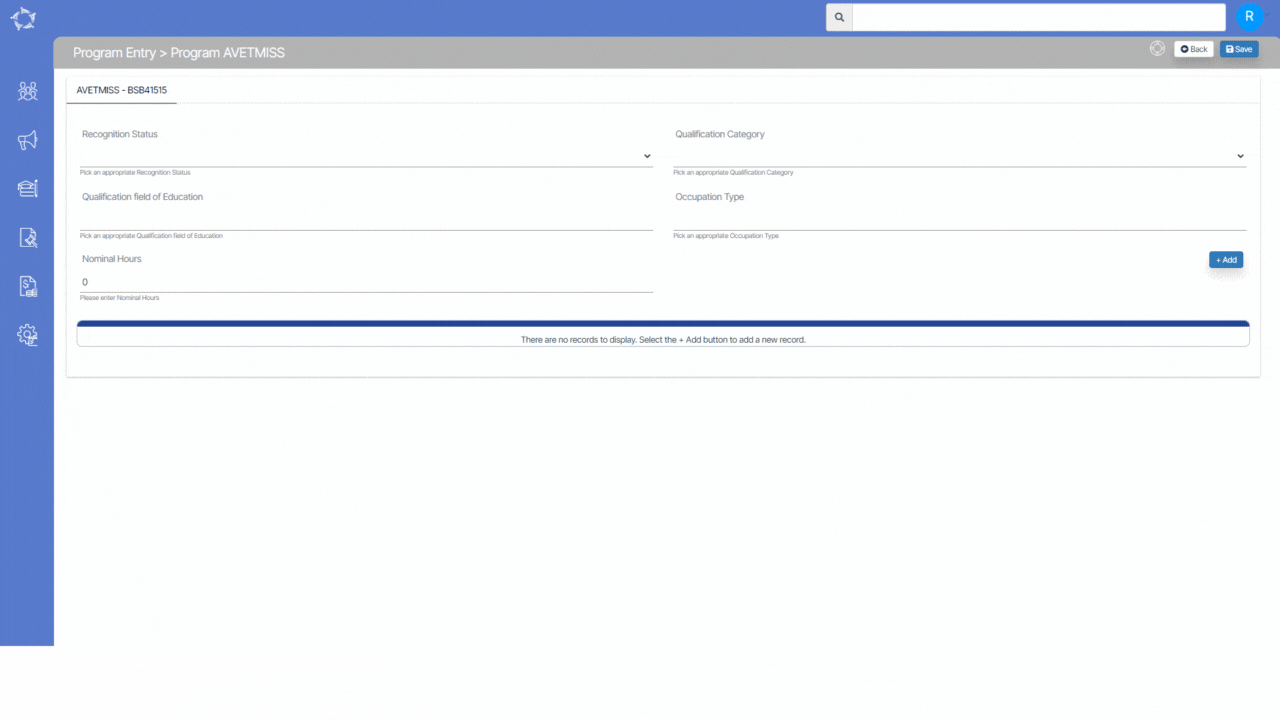
In AVETMISS reporting, Program AVETMISS settings refer to the specific data elements used to describe and report vocational education and training (VET) programs and qualifications. This screen will allow you to update the Avetmiss details for a program as well as Program AVETMISS State Settings.
IMPORTANT – It’s important to note that AVETMISS reporting requirements may be subject to updates and changes. Therefore, it is advisable to consult the official AVETMISS documentation and guidelines provided by the National Centre for Vocational Education Research (NCVER) or the relevant state or territory training authority for the most accurate and up-to-date information regarding AVETMISS settings for student programs in colleges in Australia.
Explanation of the fields below:
Recognition Status – From the dropdown menu, you can select the recognition status of the program.
Qualification Category – From the dropdown menu, you can select the qualification category of the program.
Qualification field of Education – It is a magic search field where you have to put the code of qualification field of education, and you can select the appropriate code from the suggestions.
Occupation Type – It is a magic search field where you have to put the code of occupation type, and you can select the appropriate code from the suggestions.
Nominal Hours – Here, you have to put the sum of all the nominal hours of the subjects linked with the program.
After that, you can select the +Add button to update the Program AVETMISS State Settings. Once you select the +Add button, the floating window will appear as shown below:
Explanation of the fields below:
State – You can select the state from the dropdown.
Nominal Hours – Here you have to write the nominal hours.
Program Unique Supervised Hours – Here you can add the total number of unique hours of supervised training and assessment activity for the Program.
Tuition Fee Contribution – Here you can add the total tuition fee contribution set by the government as per Band 1, Band 2, and Band 3.
Do Not Include in AVETMISS submission – Tick this box if you do not want to include this program in AVETMISS submission.
The program Subjects screen is where you can link subjects to the new program created in the system. If you already have a program and you are linking a subject to the existing program then the system will show you all the other subjects in the grid that are allocated to the Program. You can also edit the subject by selecting the edit icon under the actions column.
If you have created a brand new Program and you want to link the subjects to it, you need to select the +Add button on the right hand side of the screen. Once you have selected the Add button, you will be presented with the pop window where you need to do the following steps.
Explanations of the field below:
Fields
Explanations
Select the Subject Code
It is a magic search field, where you have to write the initials of the subject code and then you can select the subject code from the suggestions below.
Subject Name
It is a read-only field, which will be auto-populated when you select the subject code
Seq No
Here you have to write the sequence number of the subject. for eg if x,y, and z are three subjects then you can write seq no as x as 1, y as 2, and z as 3.
Subject Type
Select the radio buttons as core or elective.
Compulsory
Select the tick box to make the subject compulsory.
No of Days for Study
Here you can add the number of days required to study a particular subject.
No of Weeks for Study
Here you can add the number of weeks required to study a particular subject.
Delivery Group
Here you can select the delivery group from the dropdown.
Work Placement
Select this tick box if the subject is work-based, not classroom-based.
Default Amount
If your RTO is using subject invoicing, then you can add the amount to study the subject in this field.
We have introduced a new tick box called ‘No Longer Accepting Applications‘ on the Agent Entry screen as shown below:
Note – If this new tick box is selected for an agent then that particular Agent will not be visible under the agent magic search field while creating the applications. So instead of making an Agent inactive, we recommend you to use this new tick-box.