academics
Edit Enrolment AVETMISS Settings – History
Below is the list of changes that have been made to the Edit Enrolment AVETMISS Settings.
| Date Updated | Changes Made |
|---|---|
| 30 Nov 23 | Bulk Exclusion of Subjects from AVETMISS Submission |
Student Request Forms Workflow and Management
In the student request forms workflow and management process, you need to see the below steps.
Firstly, you need to start by creating a request within TEAMS. For instance, if you generate a request form like Apply For Holidays and upload it as a PDF document within TEAMS and save it. Once the request form is updated in TEAMS, it becomes accessible on the Make a Request screen within the Student Portal.
When a student selects their program, they can view the available request forms, including “Apply For Holidays.” Upon choosing this specific request, they will be presented with a download option, enabling them to retrieve the PDF document you have uploaded in TEAMS for this request.
After downloading, students can fill out the document and re-upload it, ensuring that the format remains in PDF. Upon the completion and submission of a request, it will appear as a Pending Request in the grid on the student portal.
These pending requests are displayed on the Student Request New Listing Screen within TEAMS, presented in the form of tiles. This visual representation enhances the visibility and accessibility of pending requests, making it easier for you to track and manage the request status. It’s a convenient and organised way to monitor the progress and status of student requests within the system. You can Approve, decline, download, view or create contact logs for the request.
Once the request is approved or declined by you the same status will be updated on the Student Portal for that particular request.
Please see the below tabs to understand the request form process in TEAMS and the Student Portal
As mentioned above, when you are on the Manage Request Document screen and you want to create a new request form then you need to see the below steps:
- Go to Main Dashboard > Alerts General Tile and select the Student Request New hyperlink.
- You will be directed to the Student Requests screen
- Select the Manage Requests Documents button on the right hand side of the screen and the system will open another screen namely Manage Requests documents.
- Select the +Add button above the grid on the right side and when you select it a popup window will appear on the same screen
- You will see a Request Type dropdown. (this dropdown is a user code and if you wish to create a user code related to your Request Type, please contact our support team and they will guide you to understand, how you can create a User Code in TEAMS).
- After selecting the Request Type, please select the Upload Documents button to upload the request form related to the selected request type. Please note that the documents that you are uploading are in PDF format only.
- Additionally, you can add the Notes in the Notes Box for your forms and save them.
IMPORTANT – if you upload multiple documents while creating a request form, the system will create two different entries in the grid for that specific request type.
Now, when students initiate a new request by selecting the Make a Request Icon and upon selecting the program from the dropdown, they will immediately see the Request Types and grid displaying essential information of all the requests as the Request Type, Request Date, and Request Status for the specific program they have chosen.
Additionally, we have added a new feature that allows the students to select any request on the screen and after selecting any request, the grid will show them all the related requests history and status. They can download the request forms and fill it out. When the request form is filled out by the student, they can upload it back into the system.
Please note, that if you have already submitted a request for any request type then you won’t be able to upload any documents for that specific request type. Also, its worth noting that the upload functionality is designed exclusively for PDF documents.
Certificate Report – New Enrolment Start Date and End Date Long Format Merge Fields
We have made a new addition namely a new merge field Enrolment Start Date Long Format and Enrolment End Date Long Format to our Certificate Report.
This enhancement now allows the certificate report to display the enrolment start date and enrolment end date in a long format. This means that when generating certificates, you can now include long format enrolment dates (for example – 23 October 2023 – 23 October 2024), providing comprehensive and detailed information on enrolment.
New Bulk Tick Box to Update Include In National Export
We have introduced a convenient feature to streamline the process of updating the Include in National Export status for multiple enrolments. Now, when you navigate to the Compliance Dashboard and access the Include in National Export listing screen, you’ll notice the “Include in National Export” tick box next to each student’s number in the grid.
To update this status in bulk, simply select the desired tick boxes corresponding to the students you want to include, then proceed to the Include in National Export tick box located above the grid. After making your selections, select the Update button. The system will promptly display a confirmation message at the top of the screen, asking for your confirmation to save the records. By selecting OK, the system will refresh the screen, and the chosen records will no longer appear in the grid. This signifies that the update has been successfully applied, and the “Include in National Export” status has been modified for the selected enrolments.
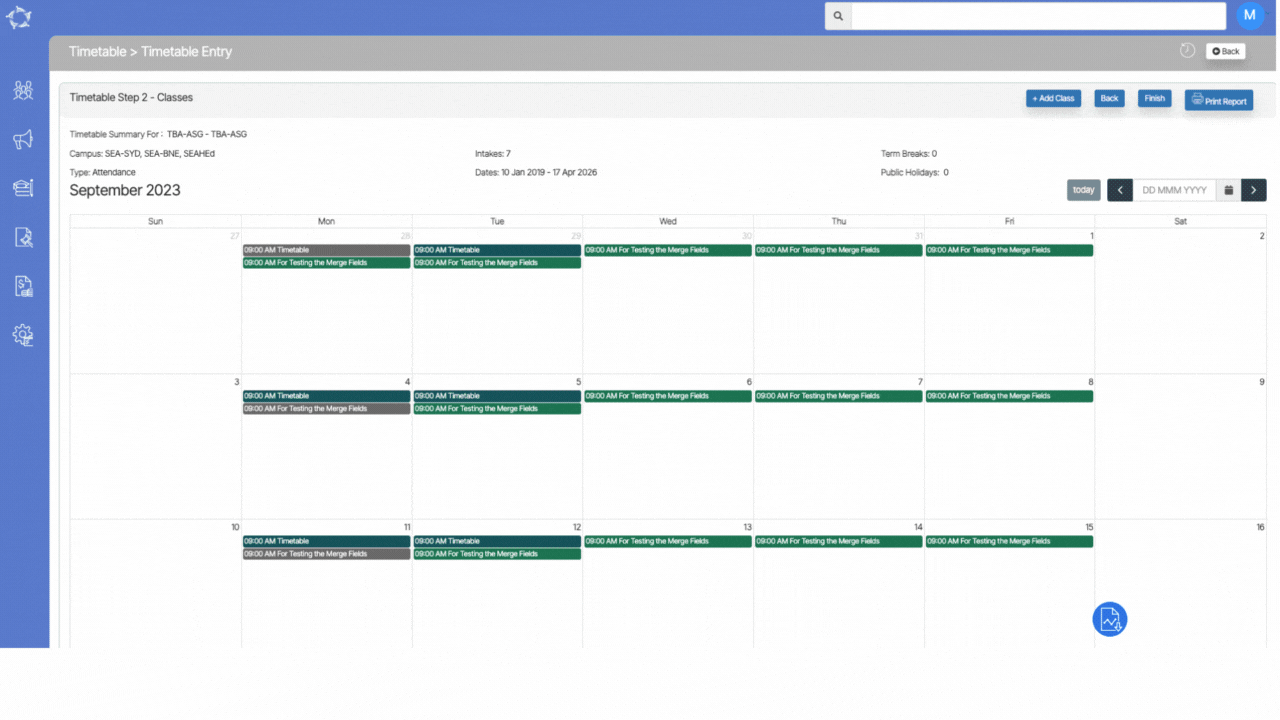
Timetable Detail Report
The Timetable Detail Report provides you basic information about a timetable including timetable code, timetable name, campus name and timetable start date and end date.
You can generate this timetable report from the Timetable step 2 screen > Print Report button. When you generate the report, the system will print it as per the timetable start date and end date and will show you all the classes and their relevant information within that period of time.
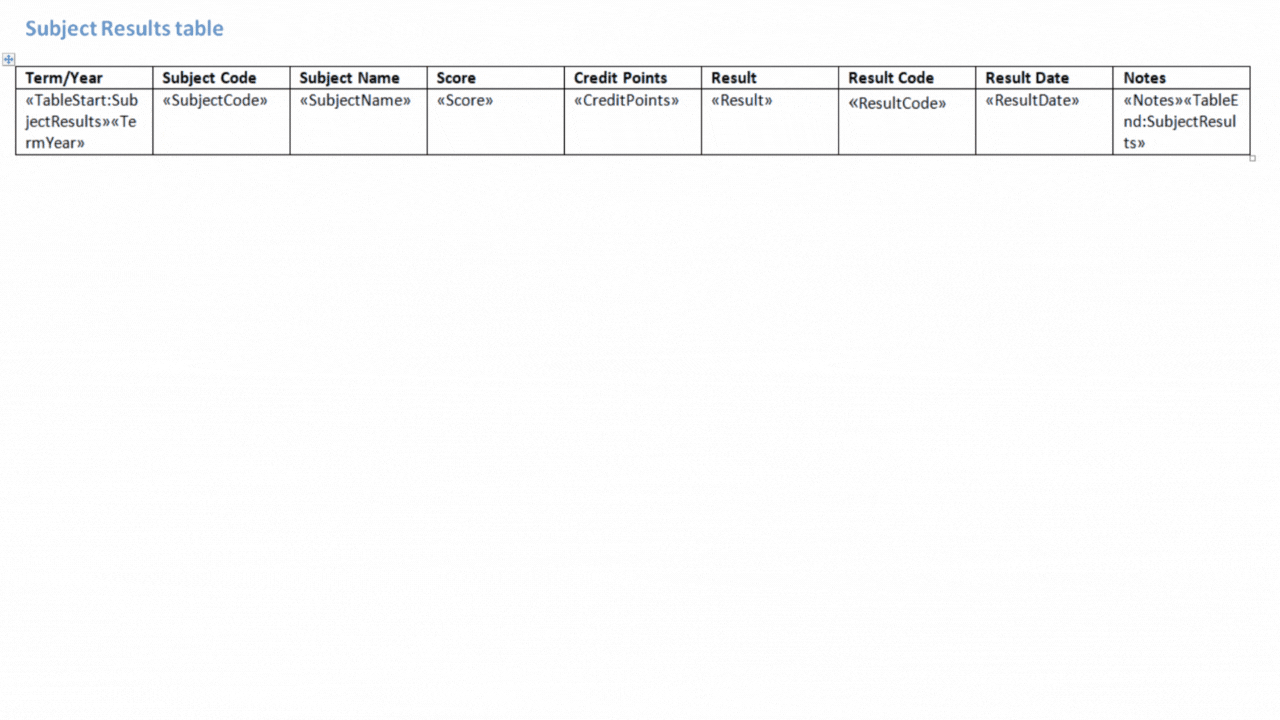
Certificate Report – New Result Code Column
We’re excited to announce the incorporation of a new Result Code column in the Subject Result Table within our certificate templates. This addition will now display a Result code corresponding to the updated results. For instance, if a result is Competent, it will be represented by C, Credit Transfer will be CT, Not Yet Started as NYS, and so on. This enhancement streamlines a more efficient and clear understanding of the certificate information. We believe that this addition will greatly enhance your experience in managing and interpreting results within our system.
Email Sent Listing Screen – New Program Code Column
As part of our continuous efforts to enhance user experience and provide valuable information at a glance, we have introduced a new column in the email listing screen. This new column, labeled “Program Code,” has been strategically placed next to the “Enrolment Number” column.
NOTE – The Program Code column has been purposefully designed exclusively for the enrolment object. This column will only be displayed within the grid view when you actively choose Enrolment from the object type dropdown.
Transition Screen Optimisation
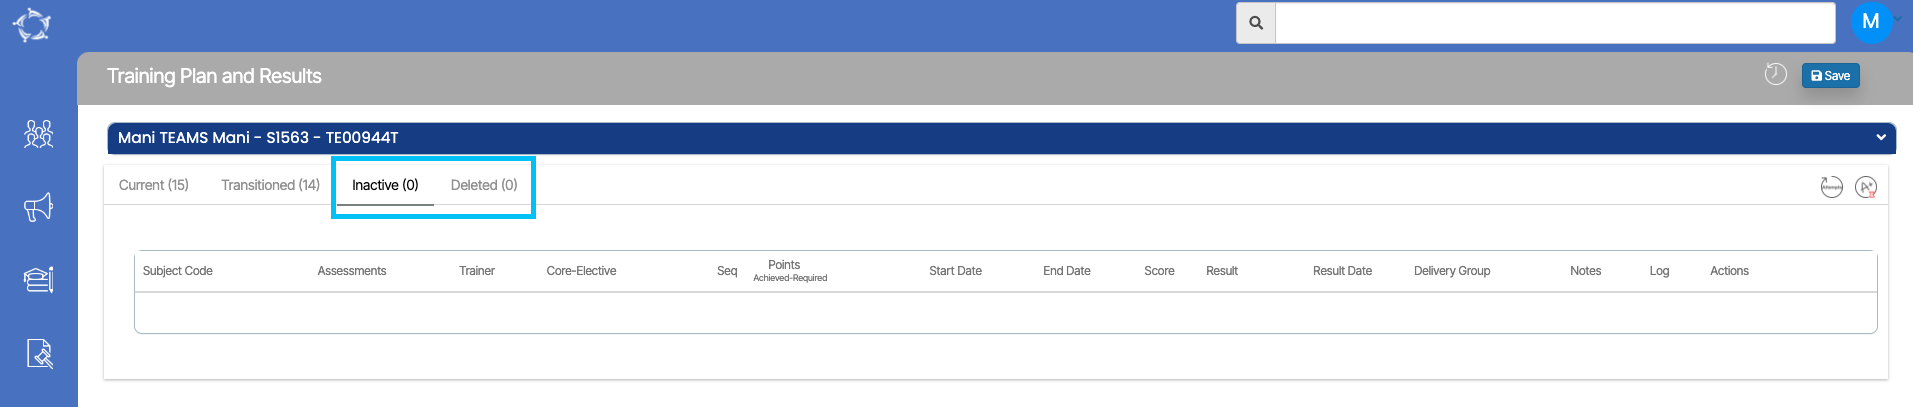
We have optimised the Transition Screen in the system. We have removed the common tab from the Training Plan and Result Screen. Now the system will display the Transitioned Tab instead of the common tab. This is an editable screen.
Previously, the old units from the old course appeared in the inactive tab after that transition. However, old units will now appear under the new Transitioned Tab.
Inactive tab and delete tabs will be there and these tabs will show the units that you will manually delete or make units inactive.
Note – You can only make those units inactive or delete the units that are under the current tab.
Please see the below to understand the process.
- On the transition screen (that we use to start the transition process), For the same units that are in both courses, the results will be copied from the old unit to the new unit. For the Superseded and Newly added units, you have a choice to change the Result and Result date while doing the transition.
- If in the old unit, the result is competent and it is a superseded unit, you can mark CT, RCCG, RCCNG, RPLG, RPLNG or GT and whatever the result date a client marks, the system will use that date to update the unit start and end date. Meaning, the unit start date, end date and result date will be the same in the mentioned result types.
- You will have a choice to generate a certificate report for old and new enrolment, the system will print the data in the report accordingly.
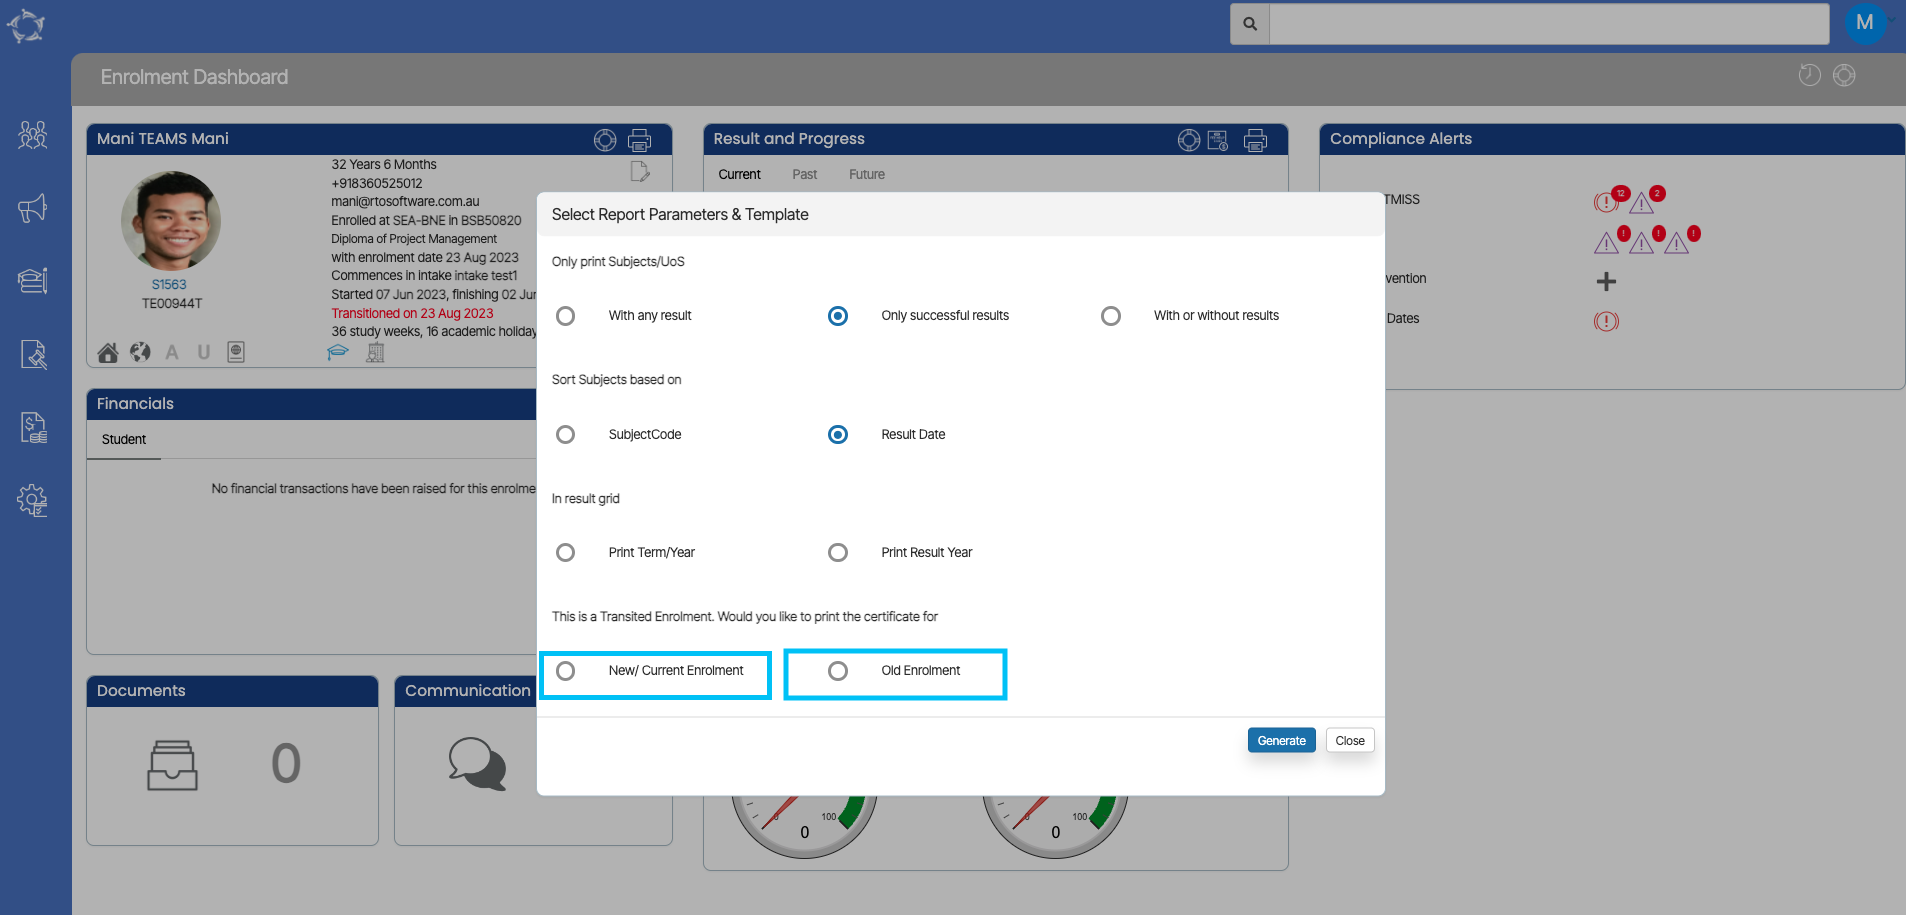
IMPORTANT – When generating any report or viewing any screen related to the transitioned enrolment in the system, it will show you the subjects according to the current programs.
Impact on the NAT Files
Nat files will print the data from the old enrolment as well if the activity start and end dates lie within the collection period. You have a choice to remove the progressive results such as continuing activity or NYS, so that those are not getting reported.
For Example – If the old enrolment has 10 units and two are competent, others are NYS then remove NYS from the units to exclude them from the submission. To know more about results, please follow the NCVER Rules for superseded training.
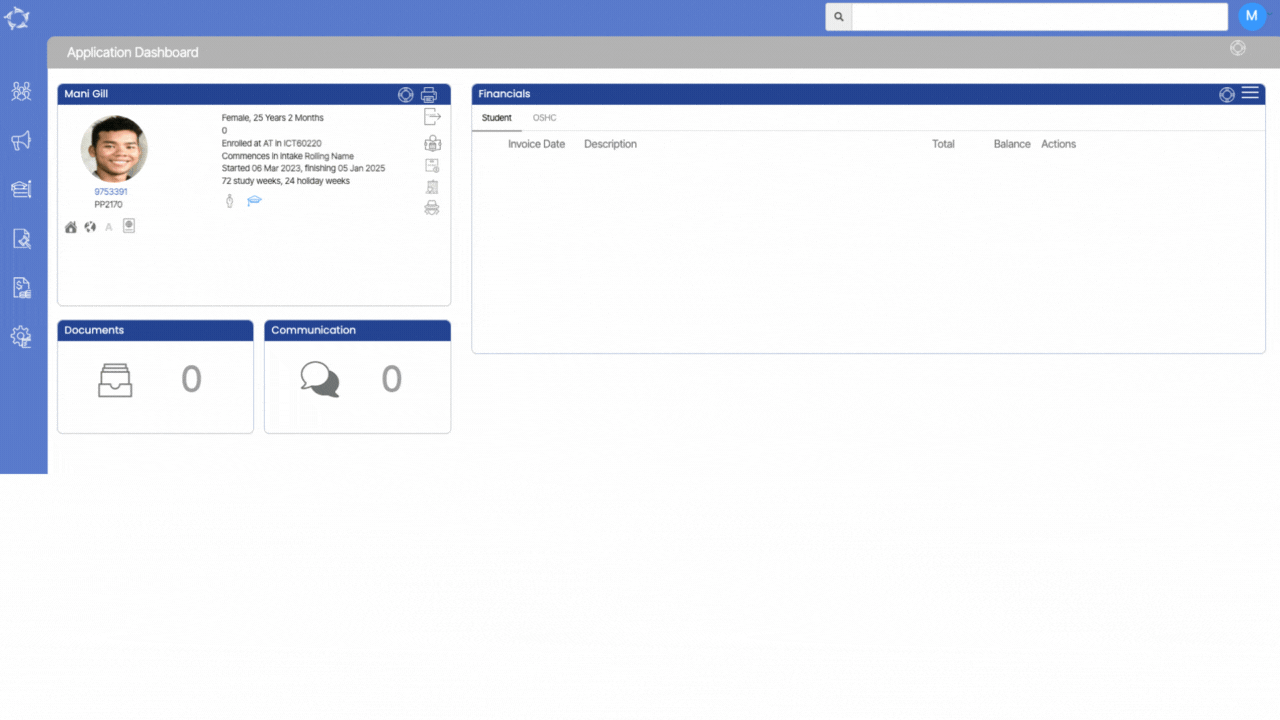
Raise New Invoice – Invoice Notes New Option
A valuable enhancement has been introduced to our invoicing process. When generating a new invoice, a convenient invoice notes feature has been incorporated into both the Application Dashboard’s Invoices section and the Enrolment Dashboard’s Invoices section. This enhancement allows you to include pertinent notes while generating invoices, enabling comprehensive communication. These notes are then seamlessly incorporated into the student financial summaries upon saving.
Furthermore, the convenience of adding invoice notes extends to the application creation stage. During the process of creating a new application, you now have the ability to add Invoice Notes from the Application Preview screen. This inclusion of invoice notes at the application level ensures that the information seamlessly carries forward.
Notably, these notes are visible on the Application Dashboard under the Financial tile’s Student Tab. This functionality continues to be relevant even after an application is converted, as the notes persistently appear on the Enrolment Dashboard’s Student Financial Details screen.