Student Dashboard – Application Tile – New Icons

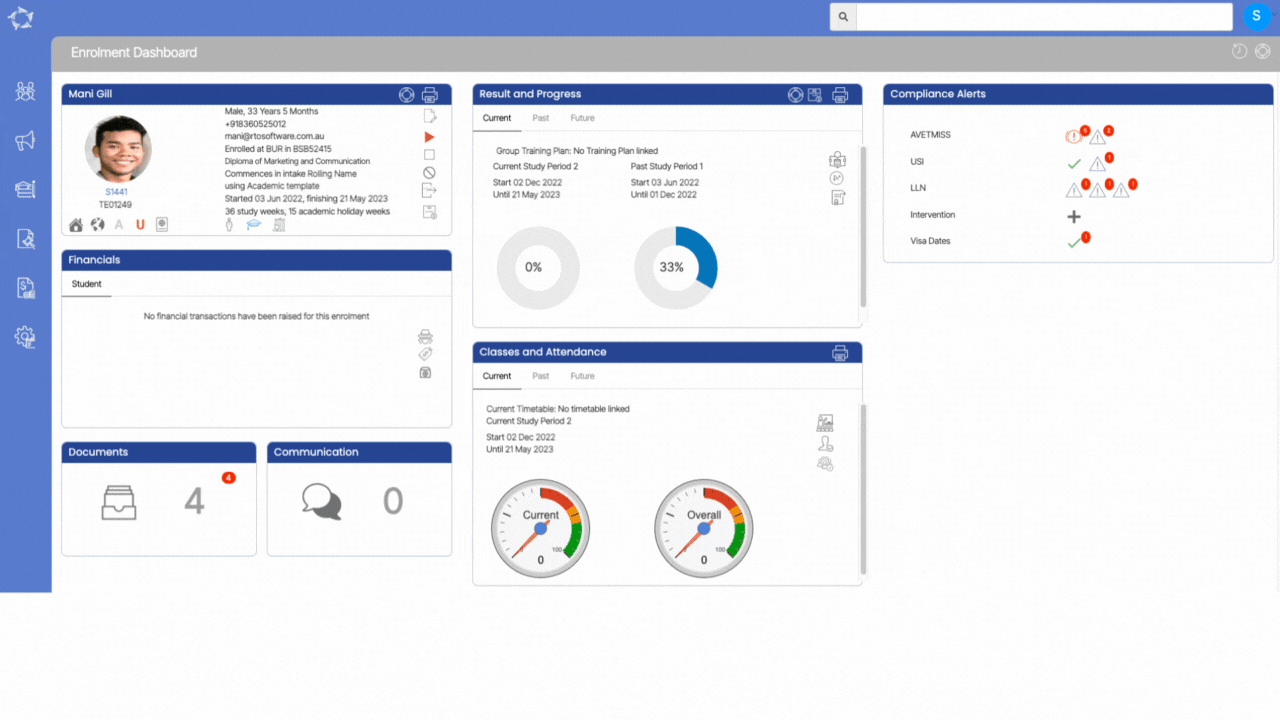
The Student Dashboard has undergone an update with the introduction of new icons in the Applications tile. These icons will provide easy access to the student’s Applicant Dashboard, allowing for quick navigation to view and edit the student’s pending application.

This icon will allow you to go to the Applicant dashboard for the particular student.

This icon will allow you to edit the pending application of the student. Please note this icon will only appear if the students have any pending application for them.

New Application – Edit Invoices/Preview Screen – New Column

A new column called Amount (Amt) has been added to the Application Edit Invoice Screen. This column is specifically for the Rate Based Tuition fee. When selecting the rate based tuition fee and inputting the quantity on the New Application Fee Selection Screen, selecting next button will show you the Amount column, Quantity column. With this new feature, you can easily view the amount you will be charging based on the quantity you have selected for the rate based tuition fee.

For Example – if the rate based tuition fee is $13.94 and a quantity of 12 is selected in the quantity column, the system will calculate the total amount as $184.01 (13.94 x 12 with inclusive of GST amount 16.73) and display it on the New Application Invoice Preview Screen.

Student Dashboard – New Agent Icon for Enrolments

On the Student Dashboard, a new Agent Icon has been added beneath the Current and Upcoming Enrolment tile. When hovering the cursor over the icon, a tooltip will appear displaying the name of the agent. This icon will allow you to identify the designated agent linked to an enrolment.

Note – The Agent Icon will only be visible on the Student Dashboard if the agent is linked to an enrolment. If the agent is not assigned to a particular enrolment, the icon will not appear.

Copy Timetable

Creating a timetable from scratch can be a time-consuming and a tedious task, especially if the same pattern of classes and schedule repeats after a certain period of time. However, there is a more efficient way to create a new timetable with the same pattern, and that is by using the copy timetable functionality.

This feature allows you to duplicate an existing timetable and make necessary changes as required. By doing so, you can save time and effort in creating a new timetable from scratch while ensuring that the schedule and class pattern remains consistent with the previous timetable.

How to create a copy of the Timetable?

From the Timetable Welcome screen, you can see a copy timetable icon under the Actions column for each timetable entry in the grid. Select this icon to create a copy of the existing timetable.

Please select the below steps to make changes to the copied timetable.

Copy Timetable Step 1 Information & Resource Selection

Copy Timetable Step 2 Select Classes

Final Step Classes Preview

Refund Report – New Merge field and Column

Recently, we have made some changes to the Refund report. Two new elements have been added to it, namely the Refund Number merge field and the Quantity Column.

The Refund Number merge field is designed to display the specific refund number associated with a particular student’s refund. On the other hand, the Quantity Column is used for the rate-based fee which will show you the quantity of refunded rate based fees.

What’s New – 06th April 2023

Welcome to the latest update for TEAMS

Some key changes made in this update are:

  • New Visa Expiry Date merge field introduced for Email Template
  • New merge field and Column introduced for Refund Report

You will also see the Q&A section of our What’s New summary. Here we will provide answers to the questions that are most frequently asked about TEAMS.

Email Template – Visa Expiry Date – New Merge Field

A new merge field called Visa Expiry Date has been added to the Email Template Screen. This merge field applies to email templates for both student and enrolment types.

Refund Report – New Merge field and Column

Recently, we have made some changes to the Refund report. Two new elements have been added to it, namely the Refund Number merge field and the Quantity Column.

Q&A

Do you have a TEAMS question?

Make a list of your questions, send them to our support teams and we will send you the answer and add them to our fortnightly update.

Select the read more button as here are some questions we get asked and then answers on how to do them in TEAMS.

Our mission is to build software that helps you do things more efficiently. Your input and engagement are vital in helping us improve our service and offerings for your college. We are always open to listening to your feedback.

Any questions, please feel free to reach out to us. We look forward to serving you to the best of our ability.

Please review the changes and if you would like further clarification, please contact our Support team.

A big thank you to so many of you who have been actively participating in helping us bring these new improvements to life.

Next update is due on Thursday, 20th April 2023

Note: Please alert other team members within your college if the changes outlined above affect their role or department.

Thank you for taking the time to read this post.

Certificates – Subject Code and Result Date – New System Setting

A new system setting has been implemented for certificates that allow the subjects to be sorted based on two criteria: Subject Code and Result Date.

When the Subject Code radio button is selected, the table within the certificates will display the subjects Code in alphabetical order and if the Result Date radio button is selected instead of the Subject Code radio button in the certificates, then the table within the certificates will display the results dates in ascending order.

Note – Our default settings have been configured to include the Subject Code as the default selection when generating certificates. However, if you prefer to have the Result date radio button selected by default, we offer the option to turn on this setting for you. To do this, please get in touch with our support team, and they will assist you in making the necessary changes to your organisation site.

Final Step Classes Preview

In this step, you will be able to view all the classes that you have created or edited. Once you are satisfied with the changes, you can select the Finish button to complete the process of creating the classes. However, you can still make further edits and add any new class during this step. It’s important to ensure that all the necessary classes are created accurately and efficiently to avoid any issues in the future.

Copy Timetable Step 2 Select Classes

In this step of the process, the system displays all the classes that were linked to the previous timetable. The information for each class remains the same, except for the start and end dates which will now be different. The system will automatically copy over the timetable dates entered in the previous step and apply them to all the classes.

In addition to displaying the previously linked classes, this step also allows you to create new classes and make edits to existing ones. This gives you the flexibility to make any necessary changes or additions to the class. Select all the classes that you wish to copy in this new timetable.