This screen lets you enter the contact logs for the school. You will be able to view the school’s current contact logs in the grid and make edits or deletions as necessary.
You will also be able to add a new contact log for a school from the +Add button.
The field’s name and explanations are given below:
Field
Explanation
Contact Date
You can enter the contact date in this field.
User Name
Select the user name from the dropdown field
Log Type
You can select the log type from the dropdown field.
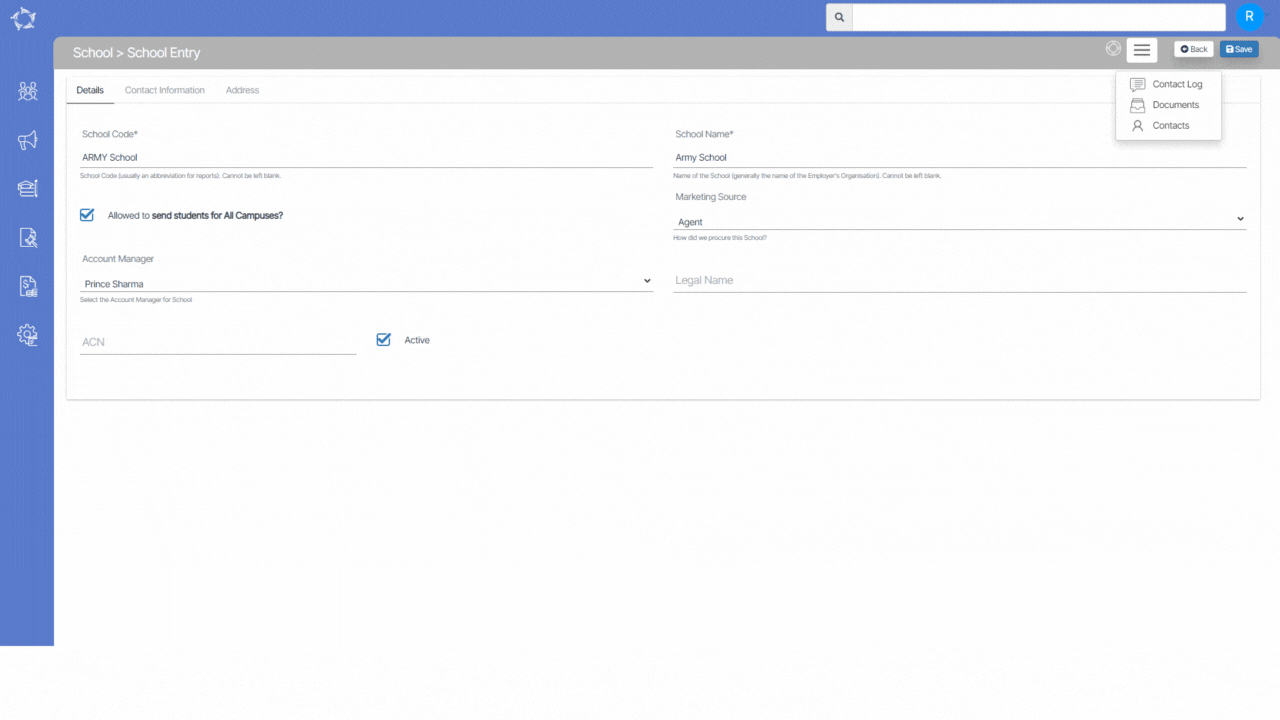
The School Entry Screen provides the functionality to add a new school to the system. When accessing this screen, you will notice three distinct tabs, each serving a specific purpose.
The first tab allows you to input and update the school’s details, such as its name, type, and other relevant information.
The second tab is dedicated to capturing the school’s contact information, including phone numbers, email addresses, and relevant personnel details.
Lastly, the third tab focuses on entering the school’s address details, such as street name, city, state, and postal code.
Fields
Explanation
School Code
This is a mandatory field and it cannot be left blank
School Name
This is a mandatory field and it cannot be left blank
Allowed to send students for All Campuses?
If you wish to allow all students for all campus links to this school then tick this checkbox
Campus
You can select the specific campus from the dropdown field. This field will be visible if the allowed to send students for all campuses check box is un-tick
Marketing Source
You can select the marketing source from the dropdown
Account Manager
Select the Account Manager from the dropdown
Legal Name
Legal Name of the School
ACN
You can add the Australian Corporation Number in this field.
Active
To make the school active this tick box should be ticked
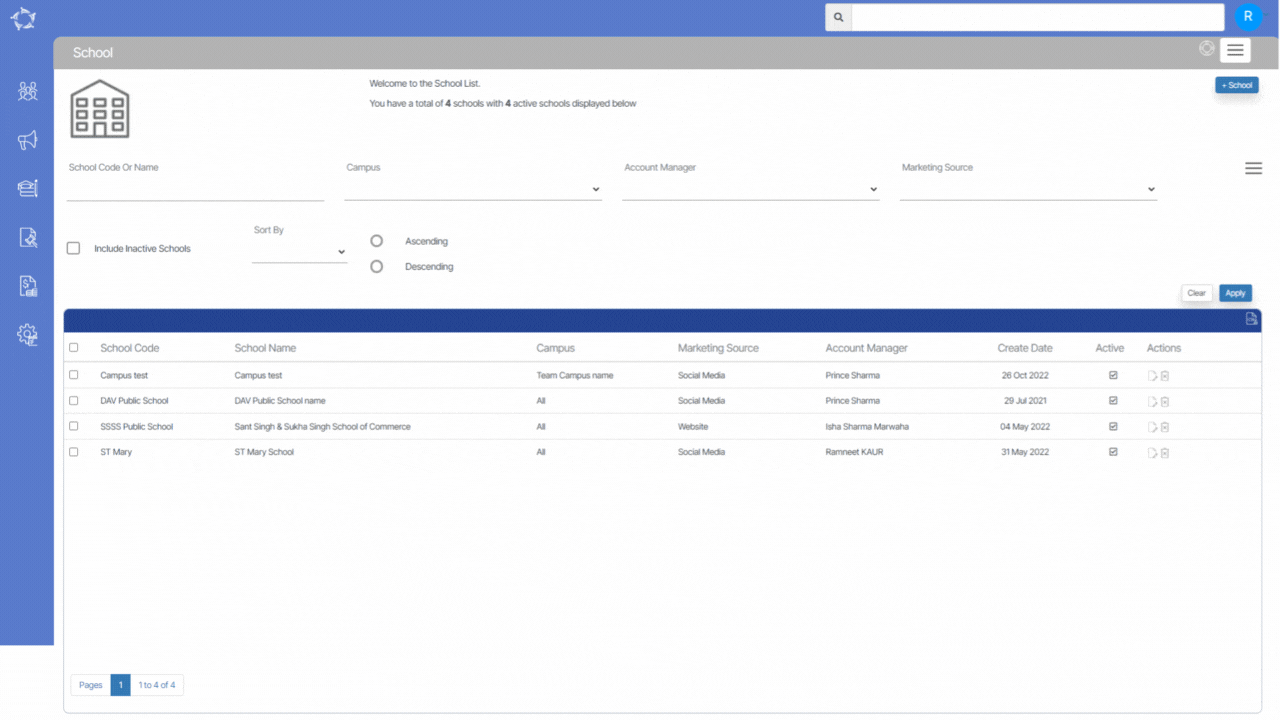
This is the School Welcome screen which will show you the list of Schools in the grid that are Active in your system.
This screen is divided into two sections:
Filters/Parameters
Listing Grid
Filters/Parameters
The filters will show you different fields where you can select the data as per your need then select the Apply button and based on your selection the system will load the list of schools in the grid. You can also see the Total count and the Active count of the Schools.
Listing Grid
In this grid, you can see the list of all Schools. You will see columns such as School Code, School Name, Campus, Marketing Source, Account Manager, Create Date, Active, and Actions. All of the columns are self-explanatory.
You can select the +School button to add a new School to the system.
Payment Received Tile > Payment Received Listing Screen
Overview
The Payment Received Listing Screen provides you with valuable information regarding the amounts of money received from students as receipts. This screen serves as a record-keeping system, displaying the received payments and their corresponding receipts. By utilising this screen, you can easily track and verify the payments made by students, ensuring accurate and up-to-date financial records.
This screen is divided into two sections. 1) Parameters 2) List of all students
Filters/Parameters:
To open this screen, you would have selected the fee link for a specific program code or at the bottom of the Payment Received Tile, you would have selected the link for the total number count. Based on what you selected the system will open the screen and populate the information in this section. For example, it will show you the date range that was used in the tile as well as the program/s that were displayed or selected in the tile. You can even sort your list in ascending or descending order.
Select here to learn more about the filters/parameters
Listing Grid
The Payment Received list will show you the list of students according to the selected parameters. We are showing columns Stud No, Student Name which will display the student-specific information and Enrol No, Enrolment Type, Campus, Program, Intake/dates, Enrol Status and Agent will show enrolment-specific details. All of these columns are self-explanatory.
Note – There is a Page Limit dropdown after the filter’s sections which will allow you to specify the number of students you want to view on a single page.
Select here to know about the Icons under the Actions column and Burger Menu
How to select students?
Use tick boxes to select students if you wish to send email/SMS, create a contact log, print letters and generate invoices in bulk. After selecting the students, pick the option from the burger menu and you are one step away to perform your heap of work in one go.
Or if you wish to select all students at once, use the tick box present right beside the Stud No column.
This screen describes the functionality of managing payment information. Through the use of an edit icon and a popup dialogue box, you can easily update payment details such as the amount, date, and supporting documents like invoices and receipts. This enables convenient tracking of payment statuses for specific TPS records.
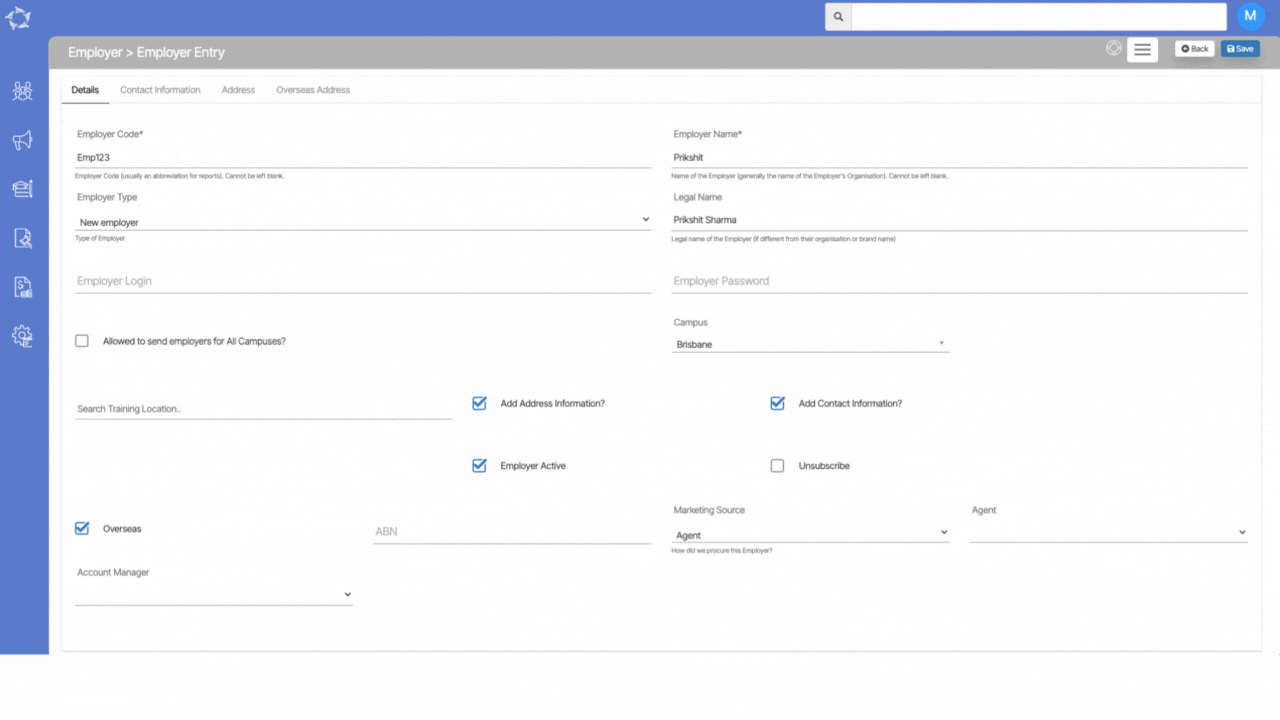
Main Dashboard > System Admin menu > Employer Entry
To create a new employer, simply select the +Employer button, which will direct you to the Employer Entry Screen. This screen allows you to input and enter the information and details of the employer. The screen includes fields and tabs for employers to provide their legal name, contact information, address and other relevant data.
The Details tab allows you to input and update employers’ details, including the Employer Code, Employer Name, Legal Name, type, and other pertinent information. Please note that the Employer Code and Employer Name cannot be left blank when entering the employer in TEAMS as these two fields are mandatory.
The Contact Information taballows you to enter the employer’s contact information, including phone numbers and email addresses.
The Address tab focuses on entering the employer’s address details, such as street name, city, state, and postal code.
Lastly, the Overseas tab will only allow you to add the overseas details, if you have selected the overseas tick box on the details tab.
Select the ‘Save‘ button after filling in the details of the Employer.
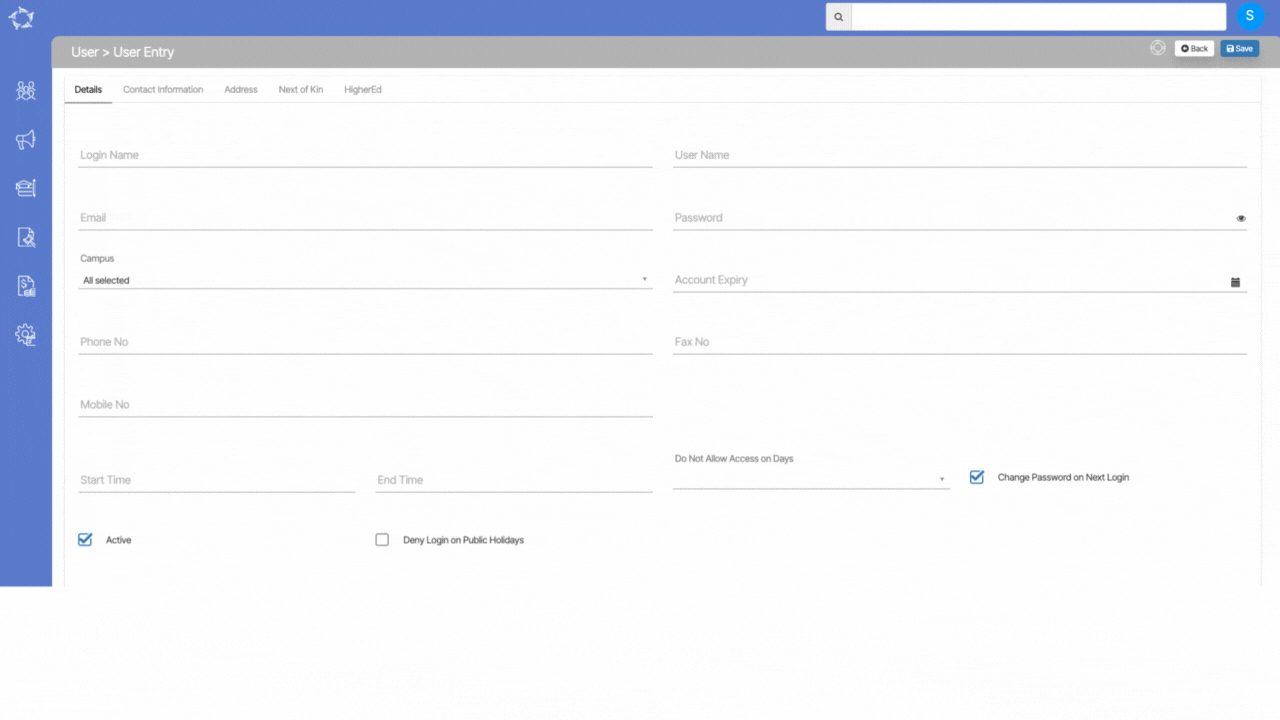
Once you select the +User button, it will open the User Entry Screen where you will find various fields to fill out the user’s basic details and other contact-related information.
There are different tabs on this screen, and you can navigate to the next tab by clicking on the particular tab name.
This screen is called the Fee Welcome screen and it will show you the list of active Fees in the grid that is already in your database. You can search for the Fee by the Code or Name of the fee in the search field, you can select Fee Type from the drop-down list, you can select the Object Type from the drop-down list and also if you want to see any inactive fees then you can select the Include inactive fees tick box.
You can select the +Addbutton to add the new fee to the system.
Below is a list of all the reports available under this menu option in the system. You can see the name of the report with an icon that has the letters CSV in it. Generally, all reports in the system generate a CSV (Comma-separated values) file.
Each report listed below is a link to a post where you can understand the report, and its parameters and view an example of the report.
The main menu for Finance provides a list of icons that allow you to navigate to different areas related to financial transactions for students and agents. By selecting the icons, you can access the financial dashboard, screens, and reports that provide information on the financial status and activities of these groups.