Agent Transactions

The Agent Transaction screen will allow you to manage and track financial activities associated with agents. Within this screen, you can access vital information such as invoices, payments, and detailed transaction records. The system provides an organised and structured view of all invoices generated for agents.

You will also have the ability to track the status of payments, ensuring transparency and efficiency in the payment process. The Agent Transaction screen provides real-time updates on payment statuses, allowing you to stay informed about outstanding payments and easily identify completed transactions.

Users can access the agent transaction screen through two methods:

  1. Marketing Menu > Agent Dashboard > Financials Tile > More.
  2. Finance Menu > Agent Transactions

This tile will show you the basic details of the Agent and most of the icons in this tile are read-only. Please note – This screen will only allow you to edit the Agent or create a bonus invoice for the Agent.

You can select the various parameters as per your need from the Agent Financial Transactions tile and select the Apply button to show details as per the parameters you have selected.

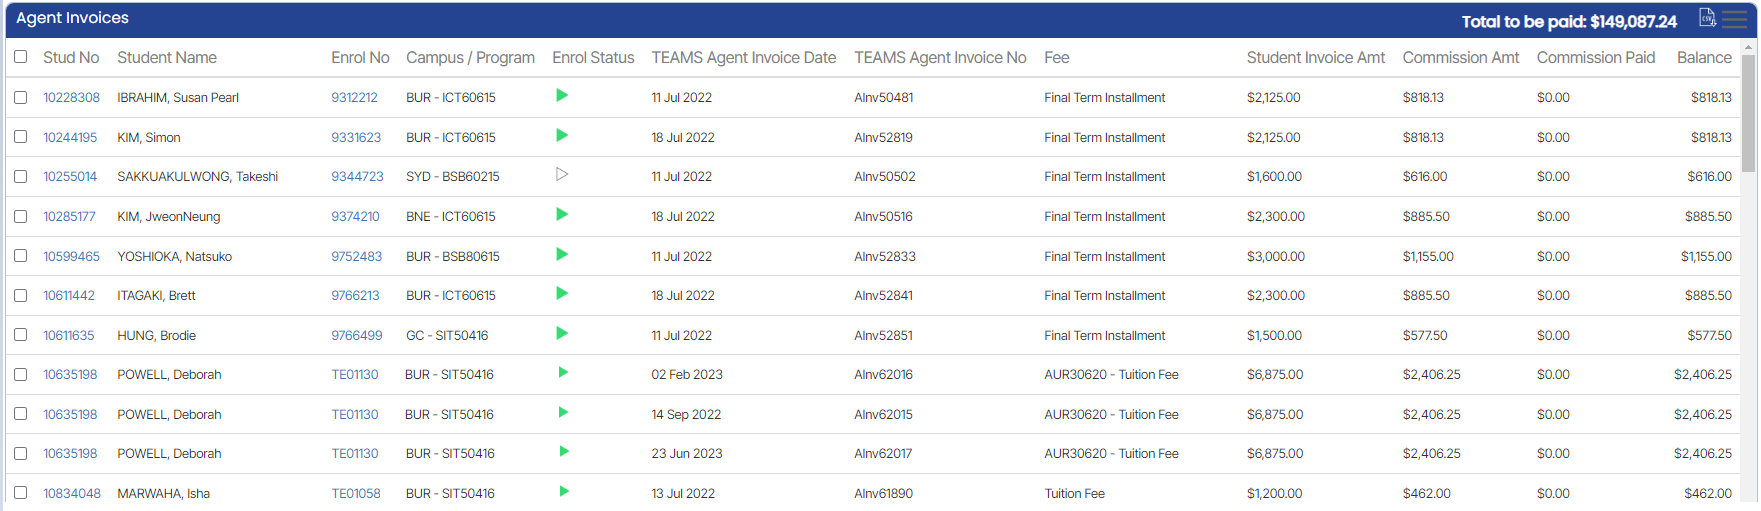
The Agent Invoice Listing Grid will show you all the Agent invoices along with the total amount that is yet to be paid to the agent on the top right corner of the tile, download the CSV report of the agent
invoices and assign the agent invoices from the burger menu.

The Agent Payment Listing Grid will show you all the Agent Payments along with the total amount that is paid to the agent on the top right corner of the tile.

Report Setting

Dashboard > System Admin > Report Setting

The report settings screen provides you with the ability to manage and customise the report configurations. You can add new report settings, edit existing settings, or delete outdated ones. This ensures that the generated reports meet their specific needs and provide relevant and accurate information.

If you wish to add another report setting to the campus, you can select the +Add button.

Once you select the +Add button, a popup window will open on the screen. Fill in the required information in the provided fields. Ensure the accuracy of the details entered to avoid any transactional issues. Double-check the information before proceeding to the next step. Once all the necessary fields have been completed, select the save button to finalise the process.

You can also edit or remove existing report settings by selecting the respective icons next to each account.

Below is the explanation of the fields

FieldsExplanation
ReportSelect the desired report from the available options in the dropdown menu.
CampusYou can select specific Campus for the report setting here
Summary data to includeYou can select what types of summarised information should be included in the report at the end.
Columns to includeSelect the desired data fields or columns from the dropdown for inclusion in the report.
How many times will you mark attendance for each day?You can determine the frequency of attendance marking for each day.
Warnings to include for each recordYou can select the specific warnings to be included for each record in the report.

Academic Template Date Preview Screen

The Academic Template Date Preview Screen includes the Academic Template code for identification purposes. Additionally, it displays the Starting Week Number, which indicates the week when the academic template begins. This information is valuable for you, enabling you to align your personal academic schedule with the template for proper synchronisation.

To modify the template, you can utilise the Update button. By selecting the update button, you can make changes to the dates and other relevant information within the template.

Once the necessary adjustments have been made and the template has been reviewed, you can proceed by selecting the Finish button. This button signifies the completion of the template setup process on the Academic Template Date Preview Screen. By selecting the Finish button, you confirm that you have finalised the modifications and the template is ready to use.

Academic Template Yearwise Application

The Academic Template Yearwise Application Screen allows you to manage and organise academic templates based on different years. This screen consists of three different tiles. Here’s a breakdown of its functionalities:

  • The very first tile will show you the Academic Template code and its name along with its total number of terms
  • The second tile will show you the Yearwise Implementation of Academic Template includes a dropdown menu that lists available academic templates. You can select a specific template by choosing the desired year from the dropdown. This screen allows you to view and work with templates specific to a particular academic year.
  • The third tile will show you the Alternative Academic Template if you have already added it in the process of the academic template. You will have the option to edit your current academic template and Once a template is added, You can make modifications to the template’s content.
    • Adding Templates: You can also add Alternative Academic Templates by selecting the Alternative Academic Templates Users also have the ability to add new academic templates to the system. They can provide the necessary information and create a new template.

Overall, the Academic Template Yearwise Application Screen provides you with a convenient way to manage and access academic templates based on different years. After using the this screen, select the Next button to transition to the next stage, allowing you to continue with the template setup or perform additional related actions.

Academic Template Preview

The Academic Template Preview Screen provides a comprehensive overview of an academic template. It presents essential details, including the unique code and name of the template, the total number of terms it consists of, and specific information about each term.

For each term, the screen displays the term code, term name, sequence in which it appears and its duration or length. Additionally, the screen indicates the component types present in the template, such as study or term break, which define different activities within the template. Furthermore, it showcases the starting week number designated for each term, allowing you to grasp the template’s scheduling.

After reviewing the Academic Template Preview Screen, you can proceed to the next step by selecting the Next button. This button takes you to the next screen or stage of the process, allowing you to continue with the template setup and perform additional actions related to the academic template.

Academic Template Entry – Setup

The Academic Template Entry screen provides a convenient way to select the number of semesters or terms for a particular academic program. Based on the chosen number of semesters/terms, the screen dynamically displays the corresponding academic patterns. Each pattern represents a specific arrangement of study weeks and holiday weeks within a semester/term.

To ensure accurate scheduling, it is necessary to update the number of study weeks in each pattern by taking into account the total number of holiday weeks. This adjustment ensures that the academic schedule accurately reflects the available time for studying and taking breaks throughout the academic year.

When accessing the Academic Template Entry Setup screen, you will be presented with two tiles. The first tile displays the Academic Template code and name, providing a quick reference to identify the specific template being utilised. The second tile on the screen is dedicated to the Define Academic Pattern functionality. Here, you can explore and configure the academic patterns associated with the selected template. These patterns represent different arrangements of study weeks and holiday weeks within a semester or term.

Import Summary Screen

The Import File Step 2 screen provides you with the necessary functionalities to manage your imported files. It offers the following features:

  • Upload- It allows you to select and upload files from your local device or a designated location. This step initiates the data import process.
  • Show List– Selecting the Show List button presents a comprehensive dropdown view of the imported data, enabling you to thoroughly review, analyse, and evaluate the records along with the associated information.
  • Warning Log– The Warning Log highlights any warnings or potential issues that occurred during the import. It allows you to take appropriate action or investigate further if needed.
  • Error Log– Similarly, the Error Log section provides a log or list of any errors encountered during the import process. It helps you identify and address any issues that prevented certain records from being imported successfully.
  • Grid– The Grid represents the tabular representation of the imported data, displaying the various fields and values for each record. You can analyse and manipulate the data within the grid as necessary. Importable Status indicates the import status of each record as true or false.
  • Save– Lastly, the Save button allows you to save the changes or updates made during the import process. This ensures that any modifications or corrections are applied and stored in the system

Once you selected the Save button, you will be directed towards the import success screen which will allow you to import another import file to the system and once you select the New Import button, the system will take you to the Import Summary screen.

Import Data

Main Dashboard > System Admin menu> Import Data

The Import File screen is designed to facilitate the seamless transfer of data in the system. With its intuitive layout and clear instructions, you can easily navigate through the process of selecting and uploading files. You can import data in CSV format, including student master, avetmiss information, overseas information, and result results.

The Approved User dropdown field allows you to assign specific users with the authority to perform the import operation, ensuring data security and accountability.

Selecting the Next button prompts you to proceed confidently to the next step, enhancing usability and efficiency.

Academic Template

Main Dashboard > Academics Menu > Academic Template

An Academic Template serves as a structured framework utilised by RTO’s to present their academic calendars, outlining the start and end dates of each term or semester, as well as the designated breaks throughout the year.

The Academic Template Welcome screen provides a comprehensive overview of the academic templates available in the system. It displays a welcome message along with the total number of academic templates and the number of active ones. A listing grid is presented, showcasing all the currently active academic templates. To facilitate easy navigation, a search field is included, enabling you to quickly find specific academic templates they are looking for.

Additionally, there is a +Academic Template button that allows users to add new templates to the system. Furthermore, each academic template entry in the grid has an edit icon under the actions column, enabling you to make modifications to existing templates as needed.

The Academic Template process has a number of different steps in it. To view this post you can choose to either use the next arrow  below and you will be able to walk through each step OR you can select specific links below to go directly to the relevant step.

Academic Template – Academic Template Entry

Academic Template – Academic Template Entry – Setup

Academic Template – Academic Template Preview

Academic Template – Academic Template Yearwise Application

Academic Template – Academic Template Date Preview

User Code Entry

User Codes > +User Code Button > User Code Entry Screen

Before attempting to create or modify a User Code, it is essential to identify the field’s name where the dropdown is located. For example, the field could be named Marketing Source. This step is crucial as it allows us to determine if the field is available on the current screen for customising the dropdown options. Once we have obtained the field’s name, we can proceed to the User Code screen to carry out the necessary actions.

How to Create User Codes

Step 1 – Select the + User Code button on the User Code Welcome screen and the system will open the User Code entry screen.

Step 2 Code Type – Select the option from the dropdown for the Code Type field and this is where you need to select the name of the field you want to add in the dropdown as Marketing Source.

Step 3 Code – This is usually an abbreviation of the User Code Name field, for example, the User Code Name that you want to see in the dropdown for Marketing Source could be Website, so the code could be entered as www.

Note – the code that you enter does not show anywhere else in the system, it only shows on this screen and the initial User Code List screen.

Step 4User Code Name – this is the entry that will display in the dropdown, such as Website.

Step 5Group Name & User Name – select the option as All in these fields.

Step 6 – Fields like Contact Name, Contact Phone, Contact Mobile and Address are self explanatory fields and you can fill them accordingly.

Step 7 – Once all the above fields have information entered then select the Save button at the top of the screen. Once you have saved the new entry, you can navigate back to your original screen and you would need to refresh it (if you already have it open) and you will see your new user code displaying in the dropdown.