Enrolment – QLD Apprenticeship Traineeship Training Plan Report

Enrolment Dashboard > Result and Progress Tile > Print Icon


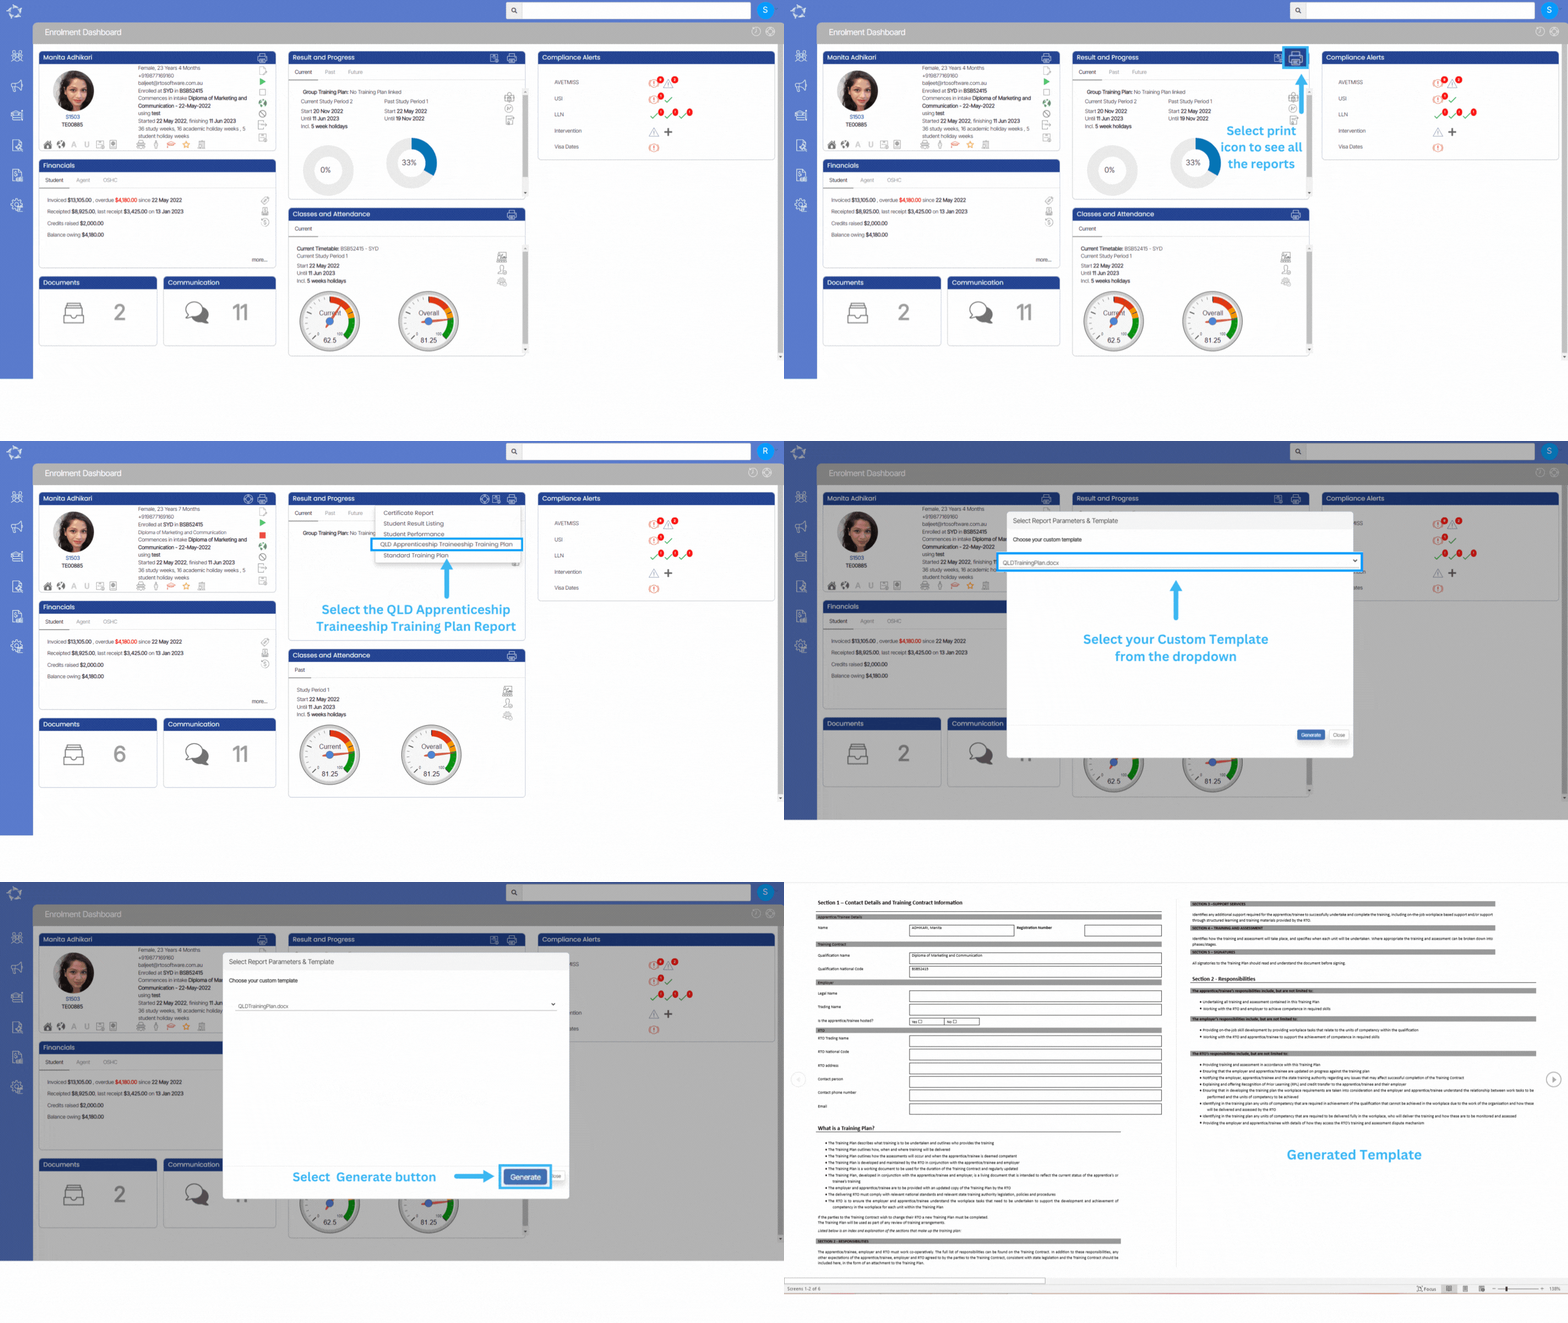
The Training Plan is a crucial document that outlines the training program for apprentices or trainees. It specifies the training content and who will provide it, as well as the details of when, where, and how the training will be delivered. The plan also explains the assessment process and when the apprentice/trainee will be deemed competent. Developed collaboratively by the RTO, apprentice/trainee, and employer, the Training Plan is a dynamic document that reflects the current status of the training and is regularly updated. It ensures compliance with standards, clarifies workplace tasks, and serves as a basis for reviewing and evaluating the training program.

In the Training Contract, all parties (apprentice/trainee, employer, and RTO) must fulfil their responsibilities as outlined.

Please select the desired template from the dropdown menu and select the Generate button. Once successfully generated, you can easily download the template in either PDF or DOC format.

IMPORTANT – To receive further guidance on customising the report templates according to your requirements, we recommend referring to the instructional post titled Report Templates. This post provides step-by-step instructions on modifying the templates to match your desired format and content.

Enrolment – Student Performance Report

Enrolment Dashboard > Result and Progress Tile > Print Icon

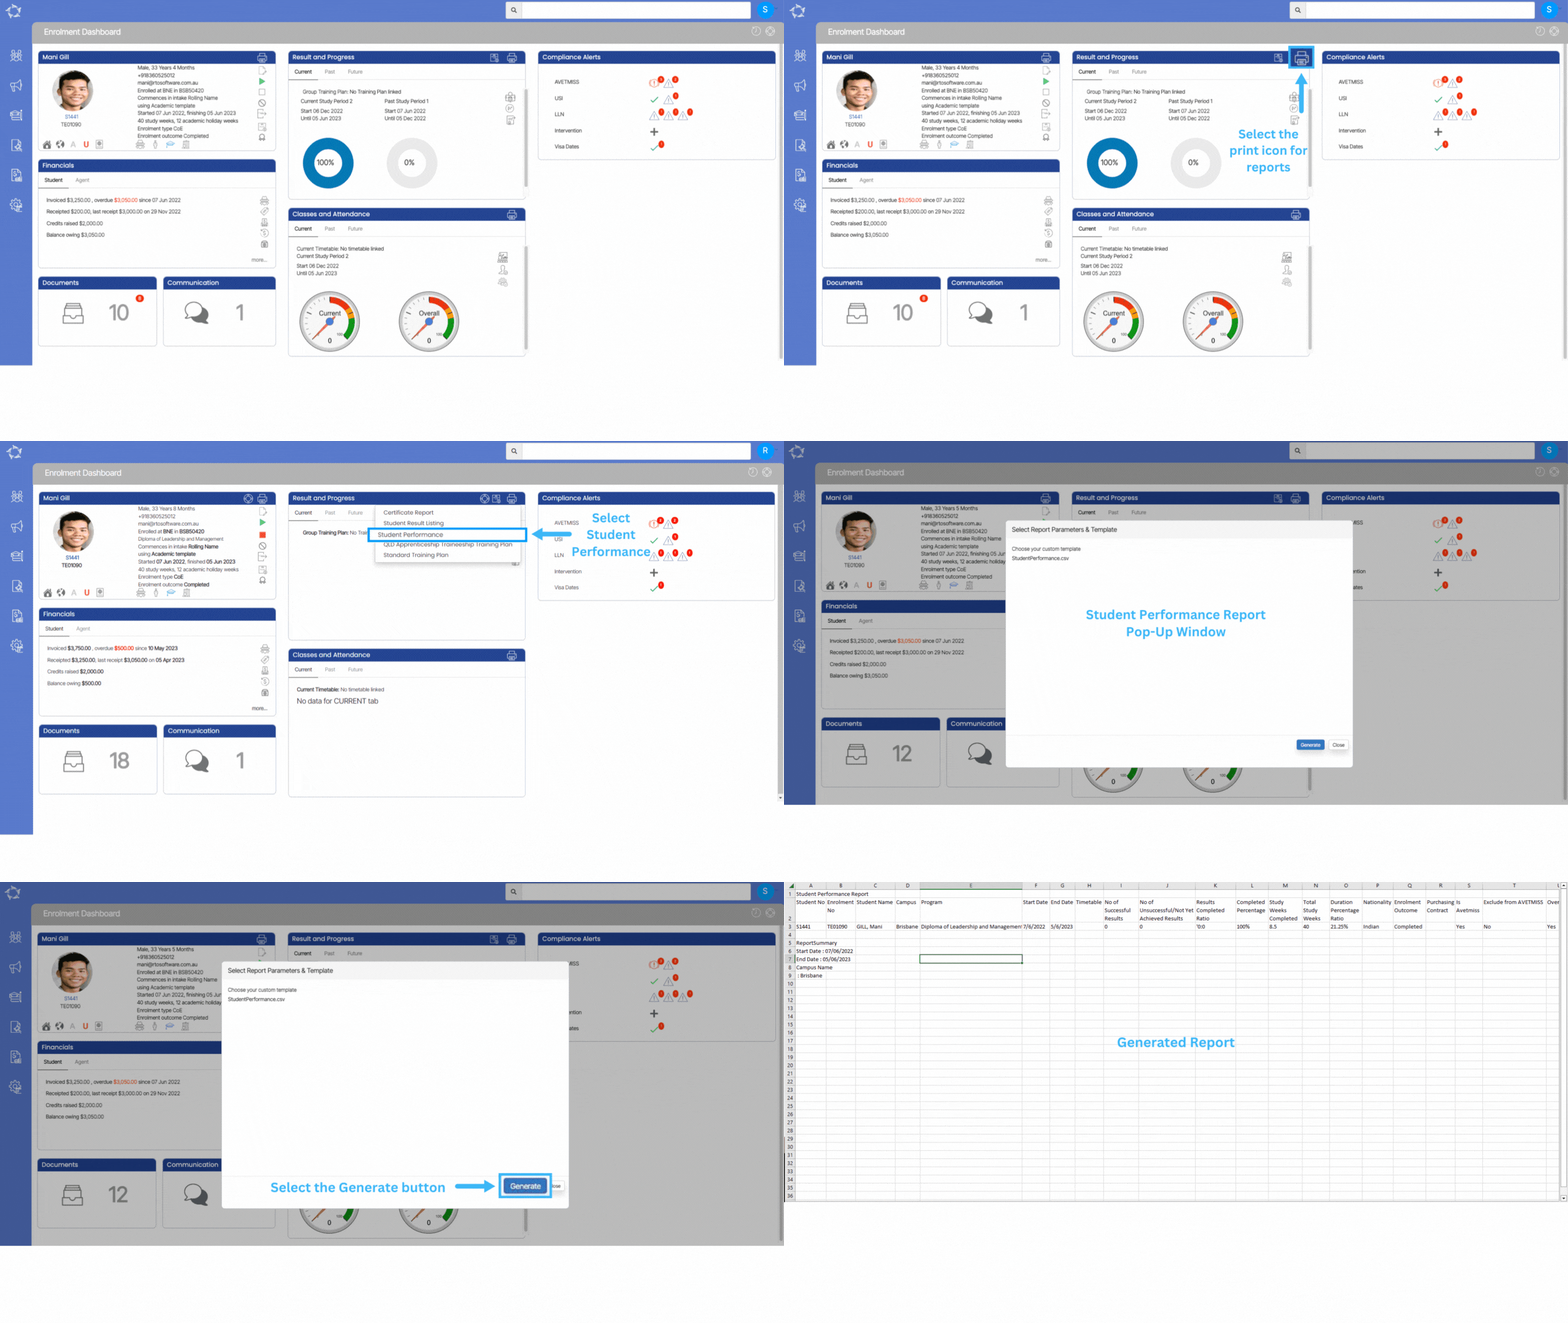
A student performance report provides information about a student’s academic progress and achievements in a particular subject or course. It typically includes details about the student’s successful and unsuccessful results, completed percentages and other relevant information. The report may also include basic information about the student including student number, enrolment number and program dates.

To provide a clear overview of the student’s progress, the report includes a result-completion ratio. This ratio indicates the percentage of courses or subjects successfully completed out of the total number attempted. It offers a quantitative measure of the student’s overall performance and provides educators with an easy way to gauge their progress.

To generate the student performance report, you can initiate the process by selecting the Generate button. Once the report is successfully created, it is typically available for download in CSV format.

Enrolment – Student Resulting Report

Enrolment Dashboard > Result and Progress Tile > Print Icon

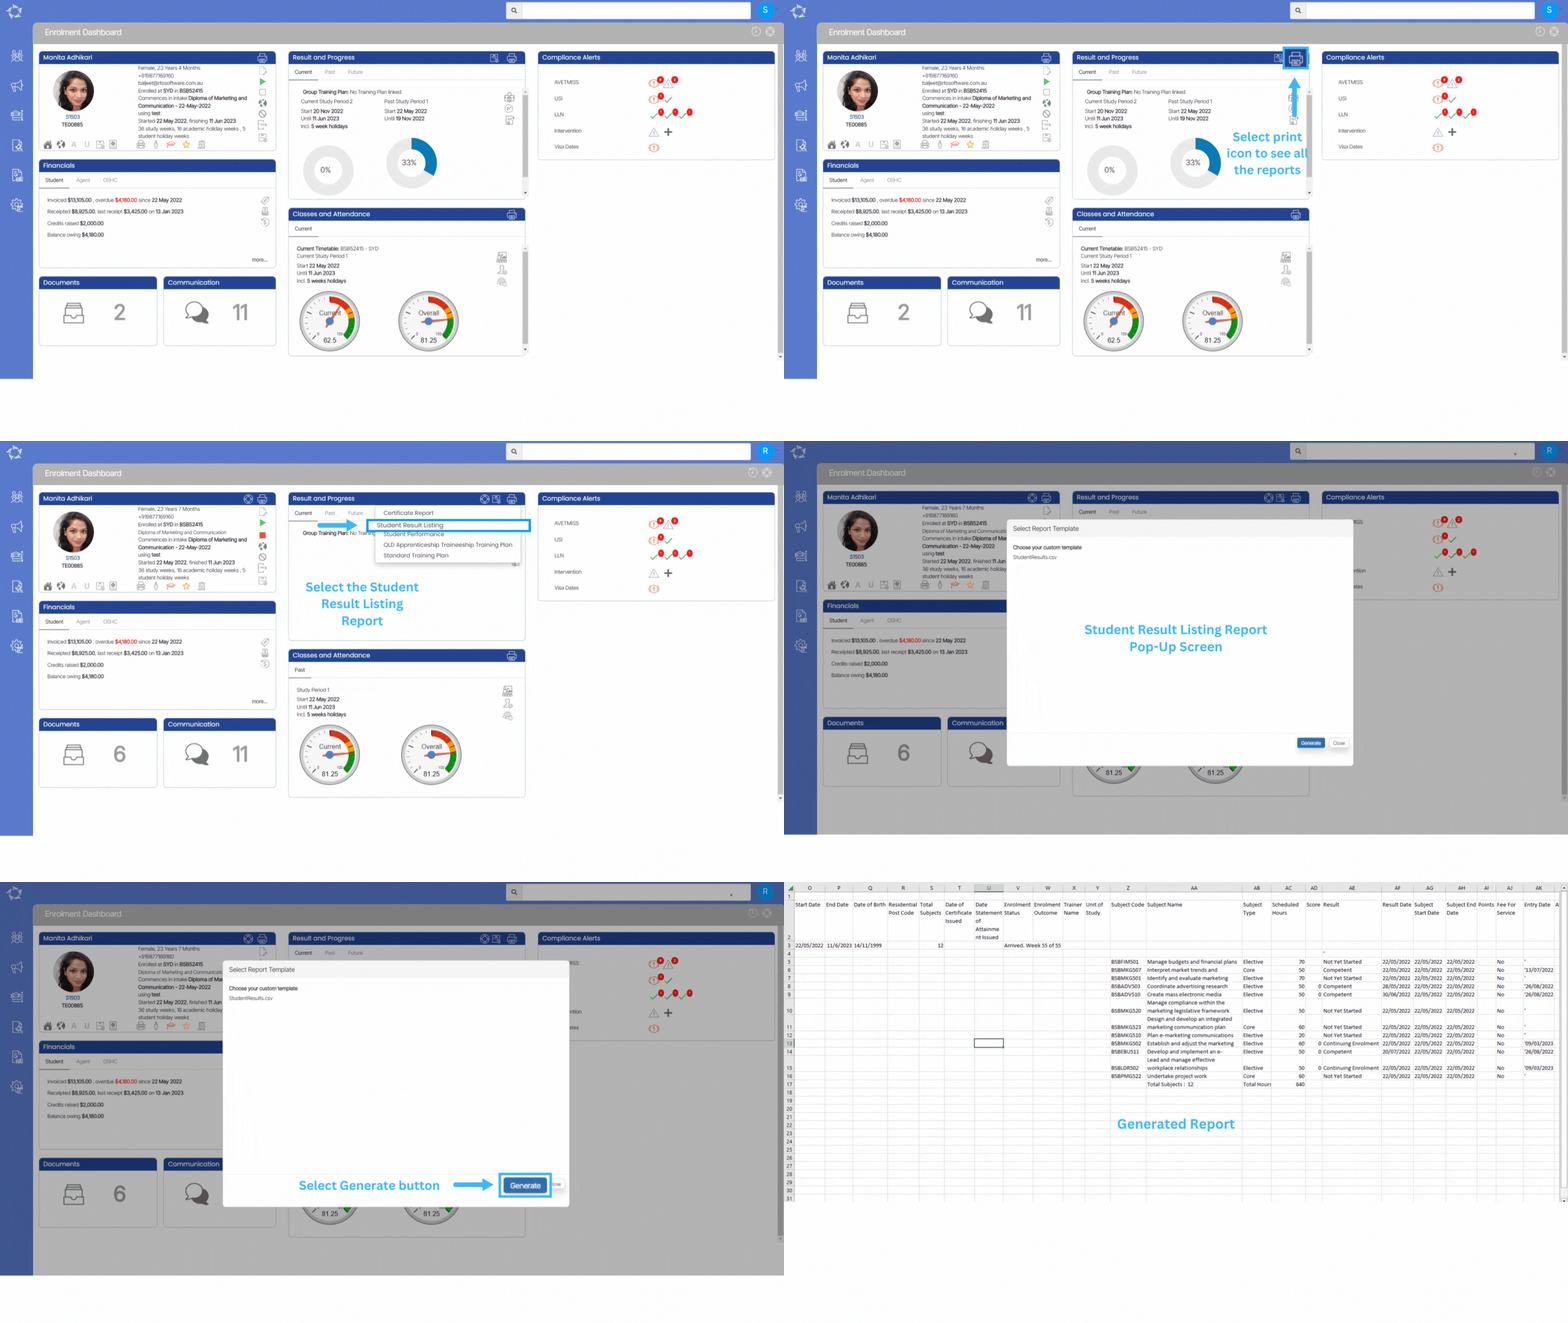
The student Result report file provides comprehensive information about student’s academic performance, including their Results, Results dates and other relevant details. By generating student result files, you can efficiently track and analyse student progress over time. The purpose of generating these result files is to provide a detailed record of a student’s academic achievements. In addition, student result reports may also include other relevant details such as the student’s name, enrolment details, timetable and any additional remarks or comments regarding their performance.

To access the generated result report file, you can select the generate button provided. Once the report is successfully generated, a download option is made available to obtain the file. Typically, the result report file is in CSV (Comma-Separated Values) format, which allows for easy import and analysis using spreadsheet software.

Enrolment – Certificate Report

Enrolment Dashboard > Result and Progress Tile > Print Icon

history of changes

IMPORTANT – We believe that staying informed about the latest developments in our software is vital for optimising your experience and maximising the benefits of using our system. To view the latest updates and modifications for the Certificate Report, we kindly request you to navigate to the History icon history of changes showing above in the top right of the breadcrumbs. By selecting this icon, you will gain access to a detailed log of all the recent changes made to the software.

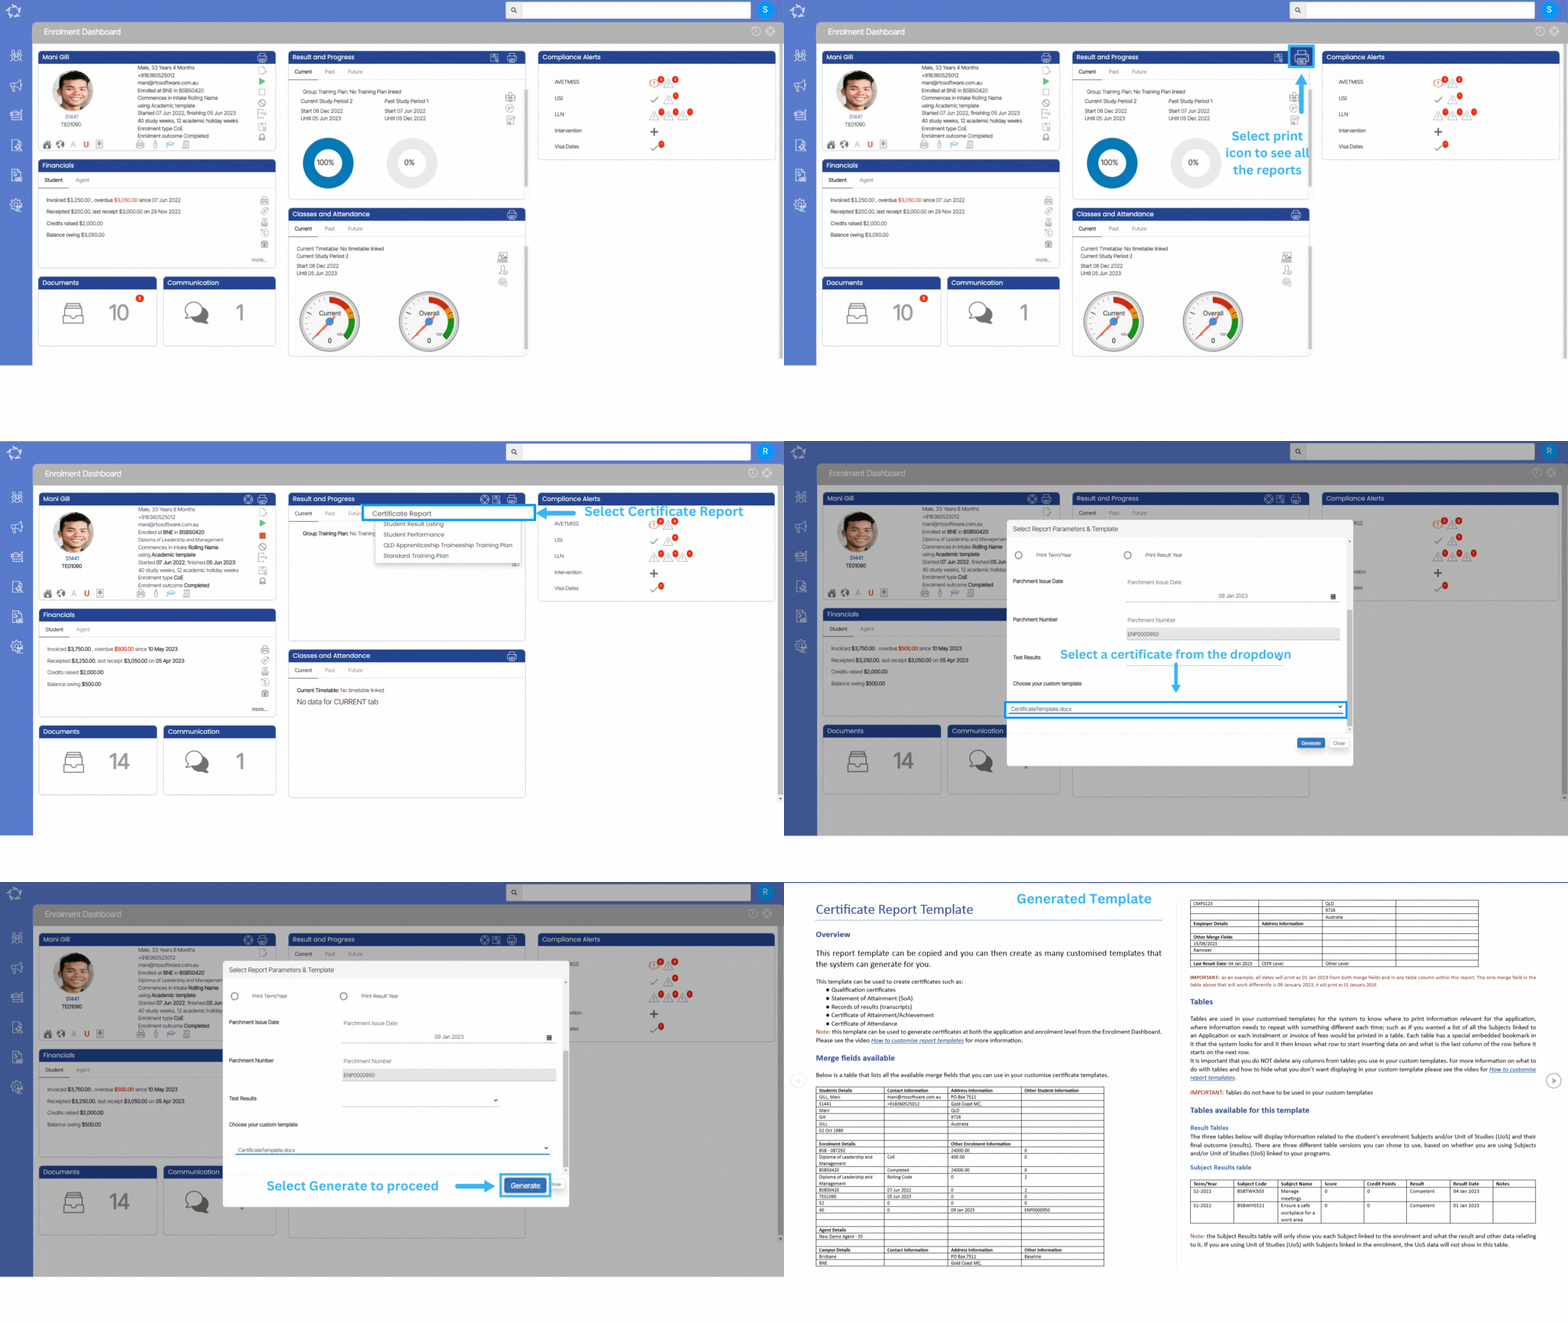
The certificate report template provided here is designed for easy copying and customisation to meet your specific needs. Once copied, you can create numerous customised templates that the system can generate for you.

This template is particularly suitable for generating various types of certificates, including:

  • Qualification certificates
  • Statement of Attainment (SoA)
  • Records of results (transcripts)
  • Certificate of Attainment/Achievement
  • Certificate of Attendance

These certificates can be utilised to recognise and acknowledge different levels of achievement, completion, or participation.

IMPORTANT – It is important to note that this template can be utilised for generating certificates at both the application and enrolment levels through the Enrolment Dashboard. To receive further guidance on customising the report templates according to your requirements, we recommend referring to the instructional post titled Report Templates. This post provides step-by-step instructions on modifying the templates to match your desired format and content.

How do the filters work?

FiltersExplanations
Only print Subjects /UoSWith any result – This radio button will print subjects with any result but does not print subjects if no result is marked. If you select this radio button then the system will allow you to print the final result or progressive results or both.

Only successful results – It prints subjects with successful results only.

With or without results – This radio button will print all subjects whether a result is marked or not. If you select this radio button then the system will allow you to print the final result or progressive results or both.
Sort Subjects based onSubject Code – This will help you to sort the subjects based on subject codes.

Result Date – This radio button will print all subjects whether a result is marked or not. If you select this radio button then the system will allow you to print the final result or progressive results or both.
Only print result types ofFinal Result – If you want to print only the final results (competent, not yet competent and so on) in the certificate report then you may select this radio button.

Progressive Result – To print only the progressive results (continuing enrolment and not yet started) in the certificate report you may select this radio button.

Both – If you want to print both final and progressive results in the certificate report then you may select this radio button.
in result gridPrint Term/Year – If you want to print term/year in the result grid then you may select this radio button.

Print Result Year – If you want to print only the result year in the result grid then you may select this radio button.

Parchment Issue Date – This radio button will print all subjects whether a result is marked or not. If you select this radio button then the system will allow you to print the final result or progressive results or both.

Parchment Number – The parchment number updated on the training plan and result screen will be visible here but can’t be changed on this screen.

Test Results – You can select the test results to get printed in the certificate report from this dropdown.

Choose your custom template – Choose your customised template.

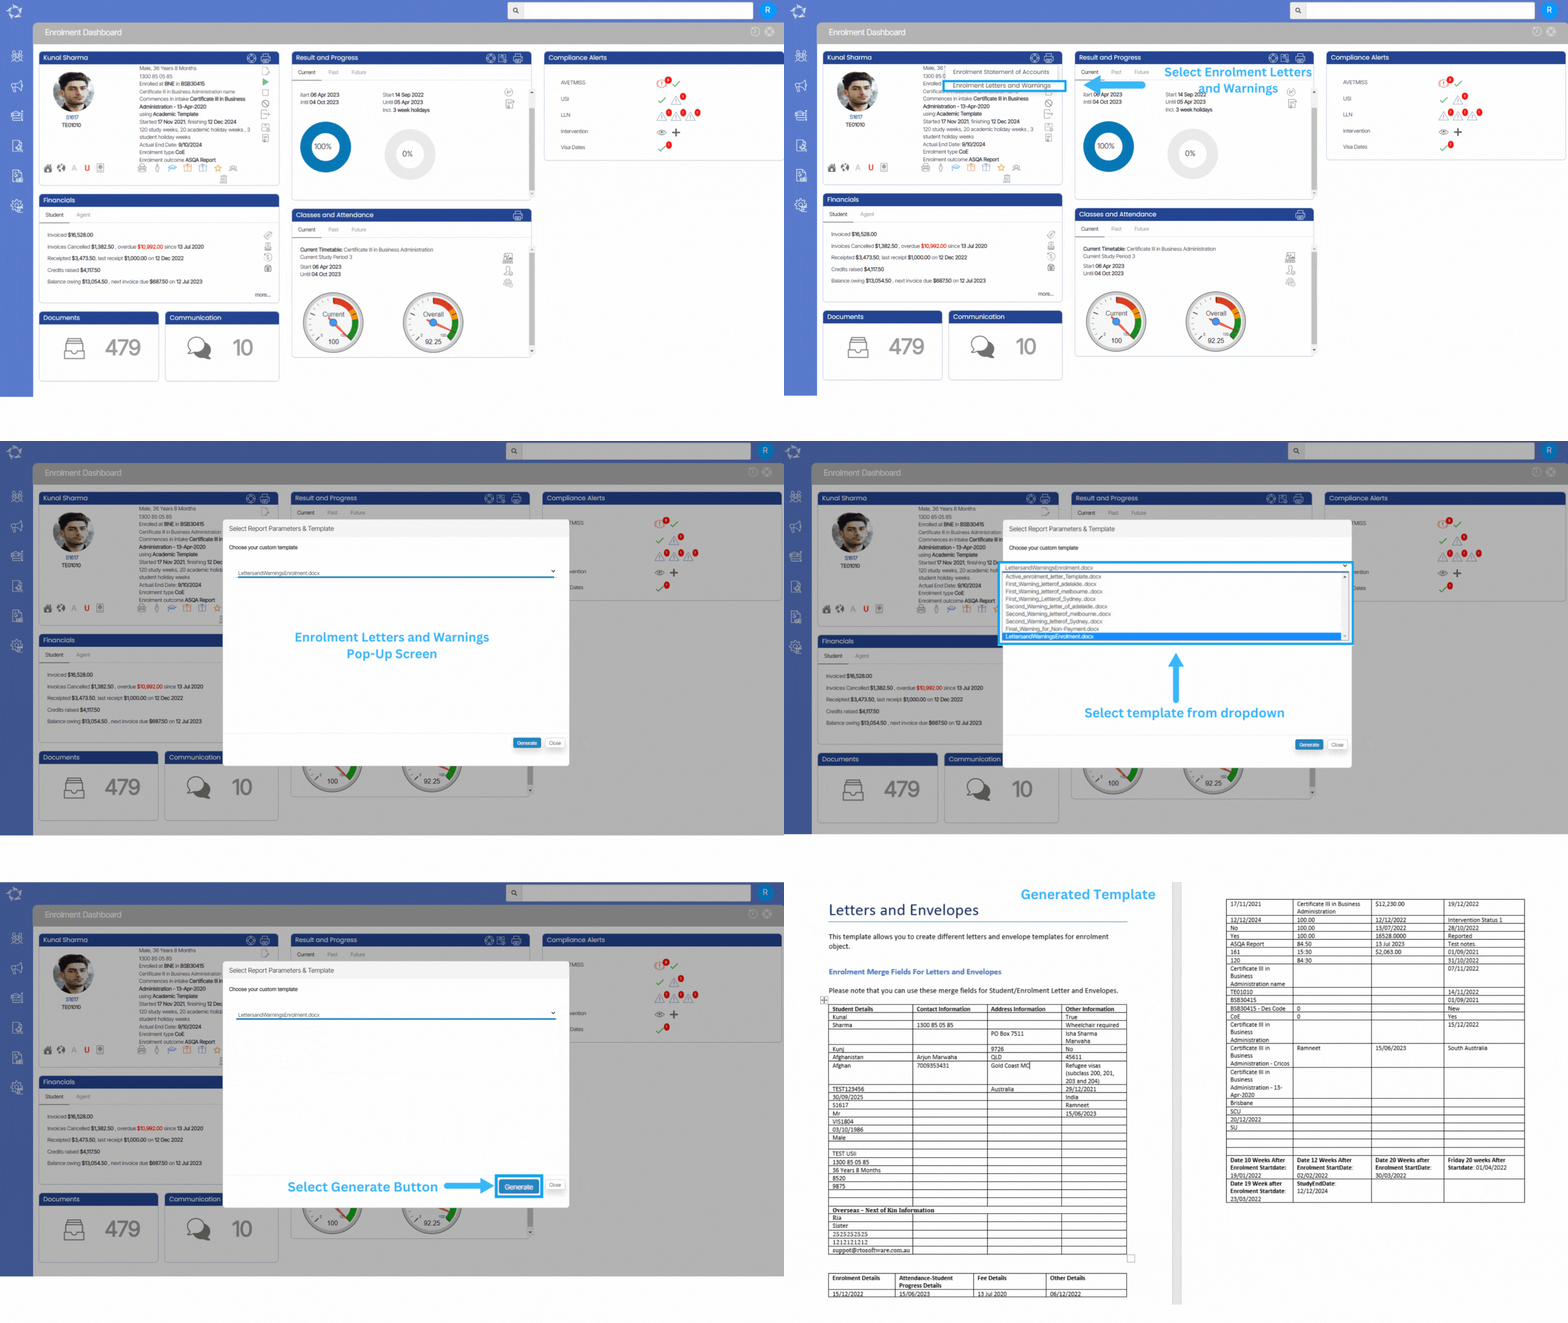
Enrolment Letters & Warnings

Enrolment Dashboard > Profile Tile > Print Icon

Enrolment letters and warnings play a crucial role in formal communication as they are used to convey a person’s acceptance and enrolment into a program, course, or organisation. They provide important information such as program details, start dates, duration, and any specific conditions or requirements the individual needs to full fill.

You can select the template from the dropdown menu and click on the Generate button. After a successful generation, you can easily download the template in either PDF or DOC format.

IMPORTANT – It is important to note that this template can be utilised for generating letters and warnings at both the application and enrolment levels through the Enrolment Dashboard. To receive further guidance on customising the report templates according to your requirements, we recommend referring to the instructional post titled Report Templates. This post provides step-by-step instructions on modifying the templates to match your desired format and content.

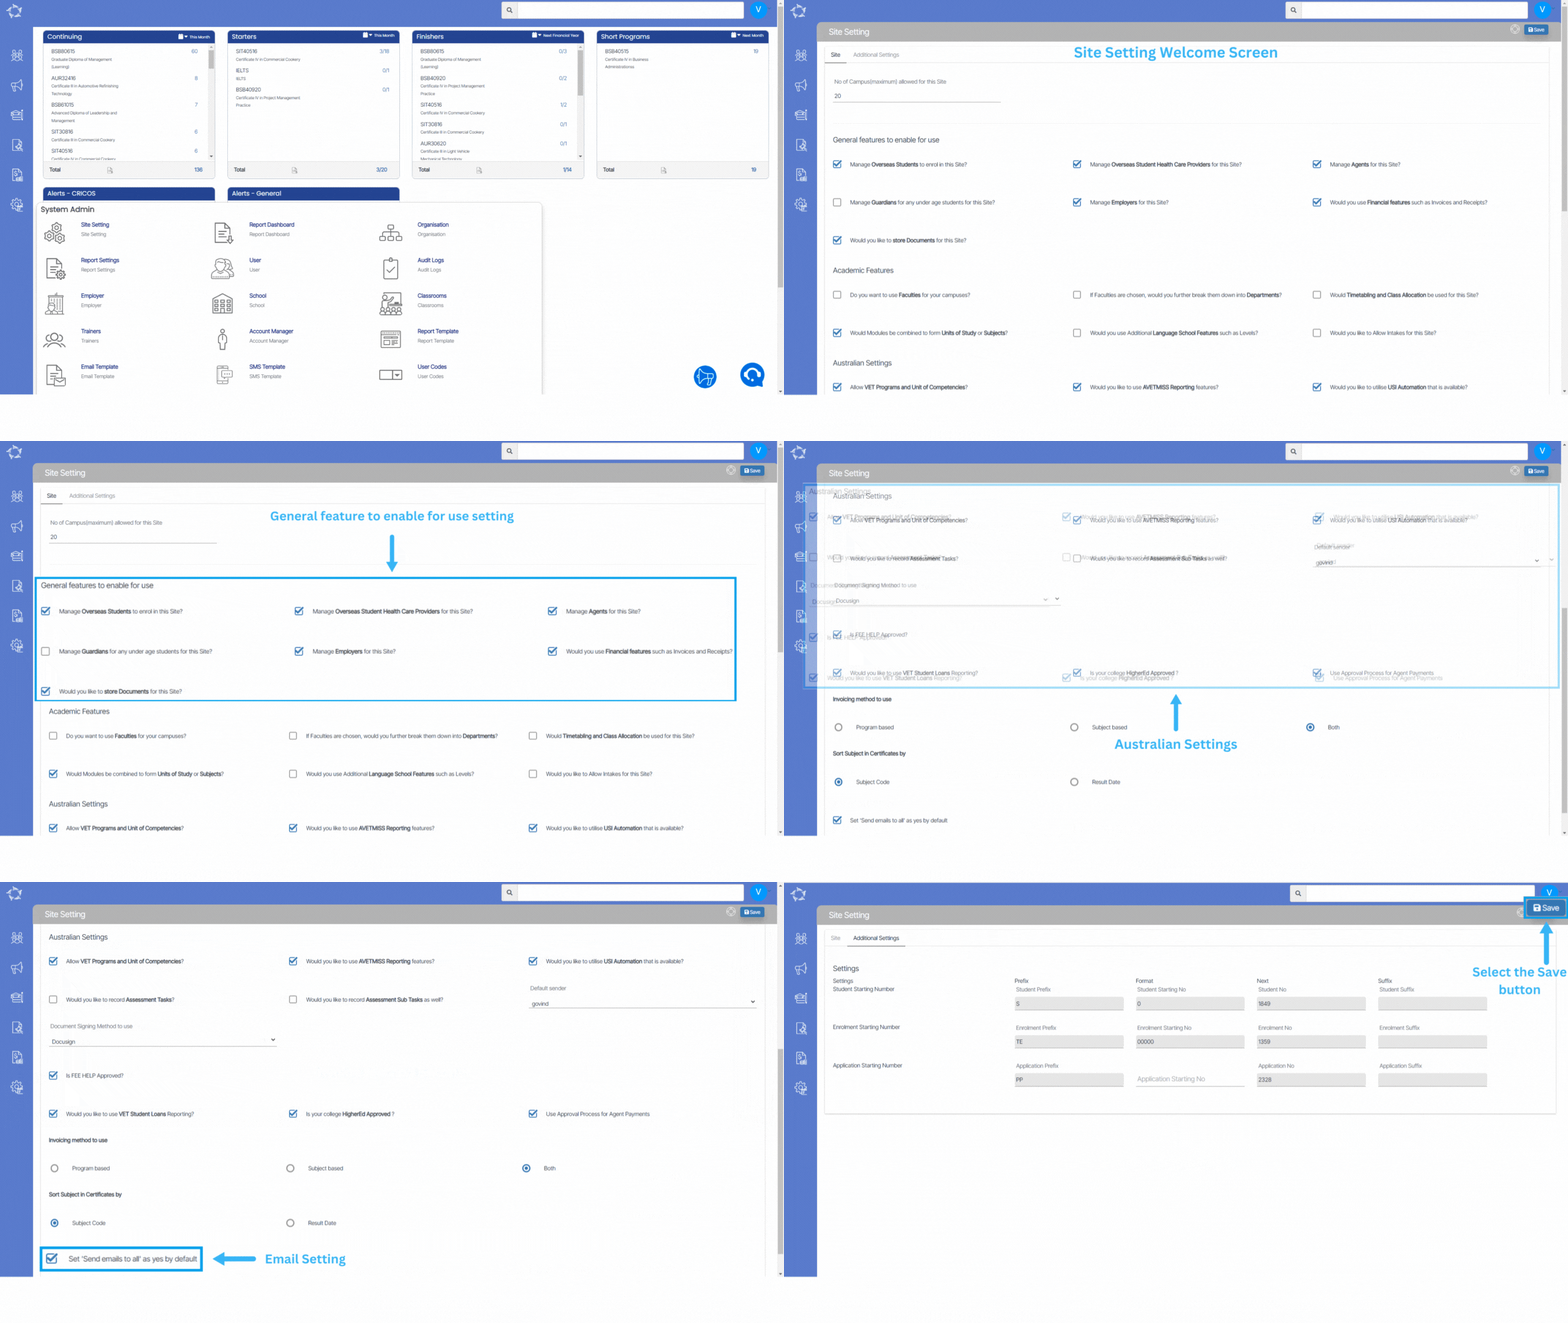
Site Setting

You can access the site setting screen through two methods:

  1. Go to System Admin > Site Setting
  2. Navigate to System Admin > Organisation > System Setting Button

The site setting screen allows you to configure and customise various settings for you RTO. It provides a centralised place where administrators can define and modify parameters related to the functionality, appearance of a specific screen.

Below is the explanation of Site tab fields

FieldsExplanation
No of Campus (maximum) allowed for this siteSpecifies the maximum number of campuses that can be associated with this particular site.
General features to enable for use FieldsExplanations
Manage Overseas Students to enrol in this Site?Select this checkbox if you want to manage overseas students enrolling at this site.
Manager Overseas Student Health Care Providers for this site?Select this checkbox if you want to manage overseas student healthcare providers for this site.
Manage Agents for this Site?Select this checkbox for managing agents associated with this site.
Manage Guardians for any under age students for this site?By selecting this checkbox, you grant permission to manage the guardians or parents of underage students attending this site.
Manage Employers for this site?Select this checkbox to manage the employers associated with this site.
Would you use Financial features such as Invoices and Receipts?Select this checkbox if you intend to utilize financial features such as invoices and receipts.
Would you like to store documents for this site?Select this checkbox if you want to store documents for this site.
Academic Features FieldsExplanations
Do you want to use Faculties for your campuses?Select this checkbox to enable the use of faculties for your campuses.
If Faculties are chosen, would you further break them down into Departments?Select this checkbox to enable the breakdown of faculties into departments if chosen.
Would Timetabling and Class Allocation be used for this Site?Select this checkbox to indicate whether timetabling and class allocation will be used for this site.
Would Modules be combined to form Units of Study or Subjects?Select this checkbox to determine whether modules will be combined to form units of study or subjects.
Would you use Additional Language School Features such as Levels?Select this checkbox to indicate whether additional language school features, such as levels, will be used.
Would you like to Allow Intakes for this Site?Select this checkbox to specify whether intakes will be allowed for this site.
Australian Settings FieldsExplanations
Allow VET Programs and Unit of Competencies?Select this checkbox to enable the inclusion of VET programs and units of competencies.
Would you like to use AVETMISS Reporting features?Select this checkbox to indicate whether AVETMISS reporting features will be utilized.
Would you like to utilise USI Automation that is available?Select this box if you want to utilize USI Automation functionality.
Would you like to record Assessment Tasks?Select this box if you want to record assessment tasks.
Would you like to record Assessment Sub Tasks as well?Select this box if you want to record assessment sub tasks.
Default senderSelect the default sender user from the dropdown for communication.
Document signing method to useSelect the preferred method from the dropdown for document signing.
Is FEE HELP Approved?Select this box if FEE HELP is approved.
Would you like to use VET Student Loans Reporting?Enable VET Student Loans reporting by selecting this box.
Is your college HigherEd Approved ?Select this box if your college is HigherEd approved.
Use Approval Process for Agent PaymentsEnable approval process for agent payments by checking this box.
Invoicing method to useThis is a radio button field where you can select the preferred invoicing method: Program Based, Subject Based, or Both.
Sort Subject in Certificates bySelect the sorting criteria for subjects in certificates: Subject Code or Result Date.
Set ‘Send emails to all’ as yes by defaultSelect this box to set ‘Send emails to all’ as the default option.

Below is the explanation of the Additional tab fields

Additional Settings FieldsPrefixFormatNext Suffix
Student Starting NumberEnter the desired prefix to be used for student numbers.Define the format for student numbers to be used.Enter the next number to be used for student numbers.Enter the desired suffix to be used for student numbers.
Enrolment Starting NumberEnter the desired prefix to be used for enrolment numbers.Define the format for enrolment numbers to be used.Enter the next number to be used for Enrolment numbers.Enter the desired suffix to be used for enrolment numbers.
Application Starting NumberEnter the desired prefix to be used for application numbers.Define the format for application numbers to be used.Enter the next number to be used for application numbers.Enter the desired suffix to be used for application numbers.

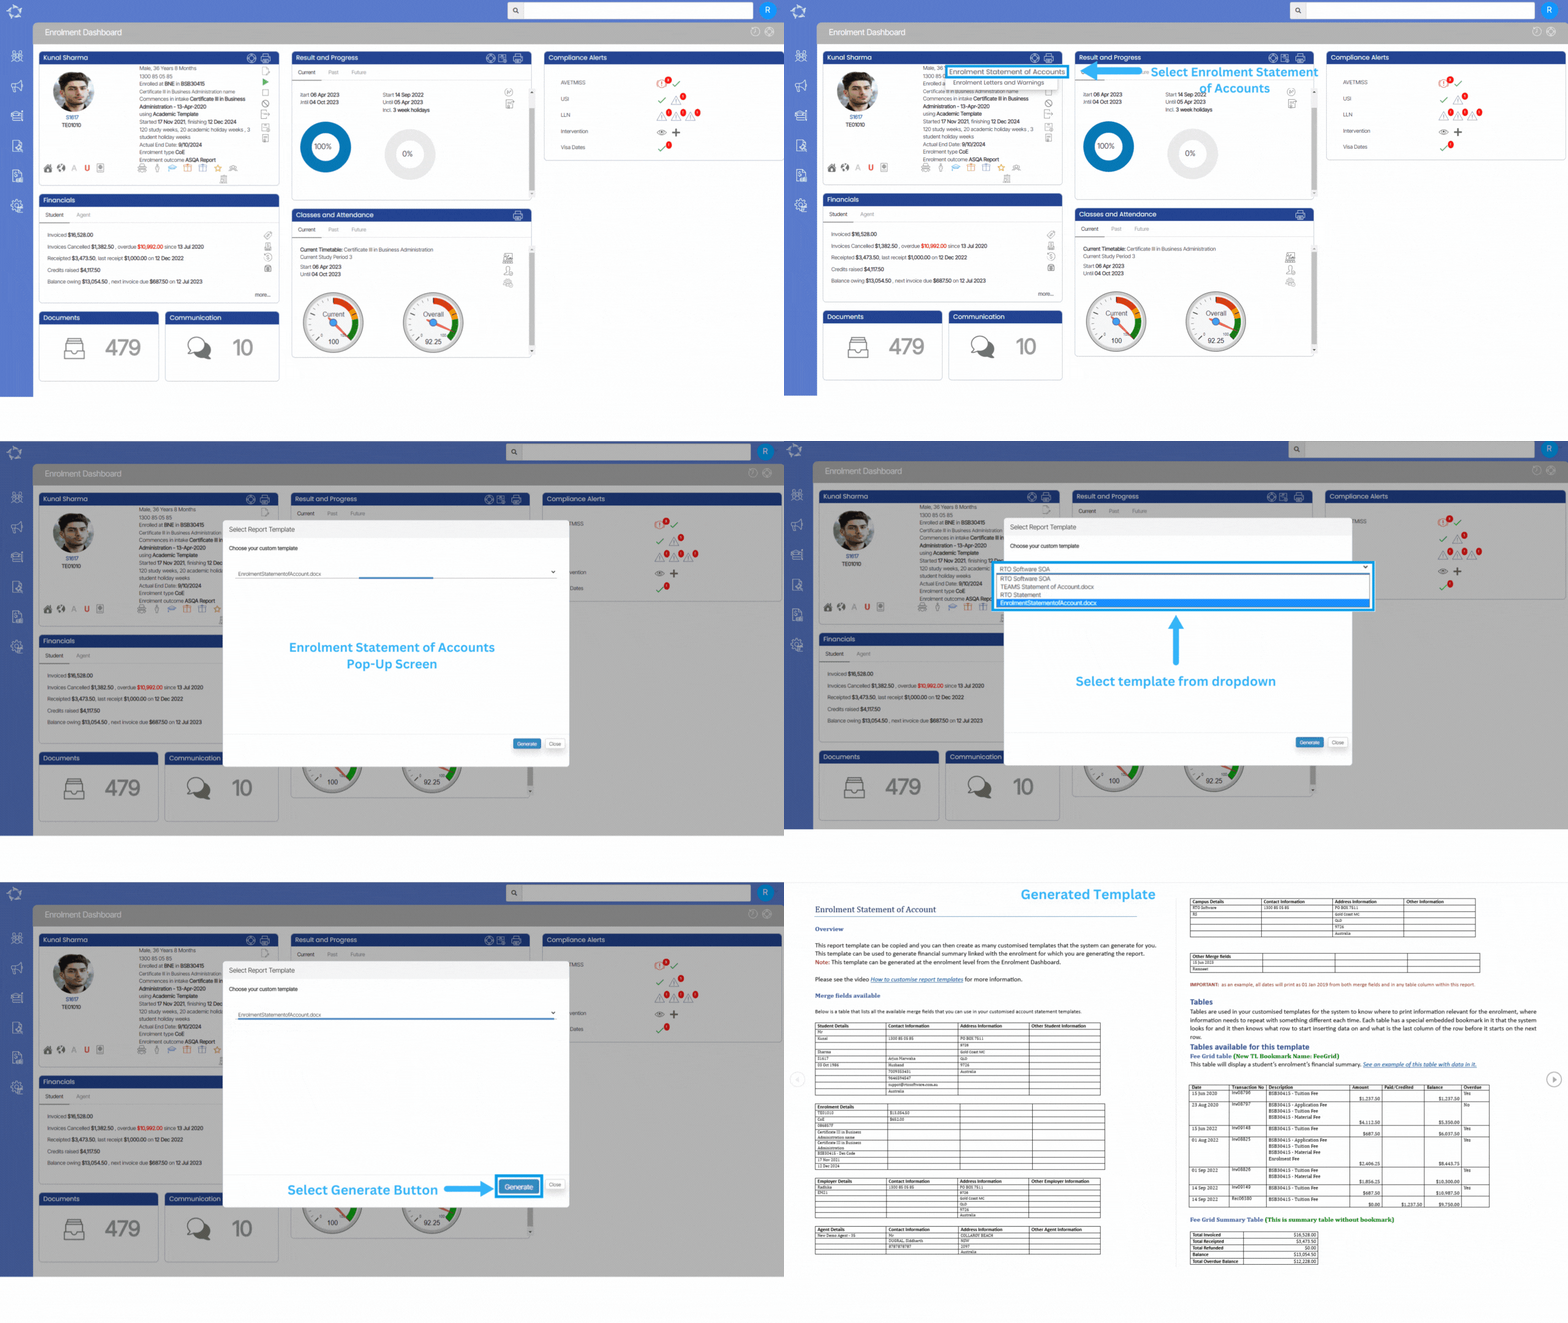
Enrolment – Statement of Account

Enrolment Dashboard > Profile Tile > Print Icon

The enrolment statement of account report is used to generate financial summaries. It is specifically linked to a particular enrolment for which the report is being generated. This report provides a detailed overview of the financial transactions and activities related to the enrolment, including fees, payments, and any outstanding balances.

The report can be generated at the enrolment level from the Enrolment Dashboard. The system allows you to create customised templates for tailored financial summaries, which can be selected from a dropdown menu. Once the appropriate template is chosen, you can initiate the report generation process by clicking the designated Generate button.

Upon successful generation, the resulting report template is made available for download in either PDF or DOC format on the Report Dashboard.

Task Management -Actions Details

Tasks Details > Action Information > Preview Icon > Action Details Screen

history of changes

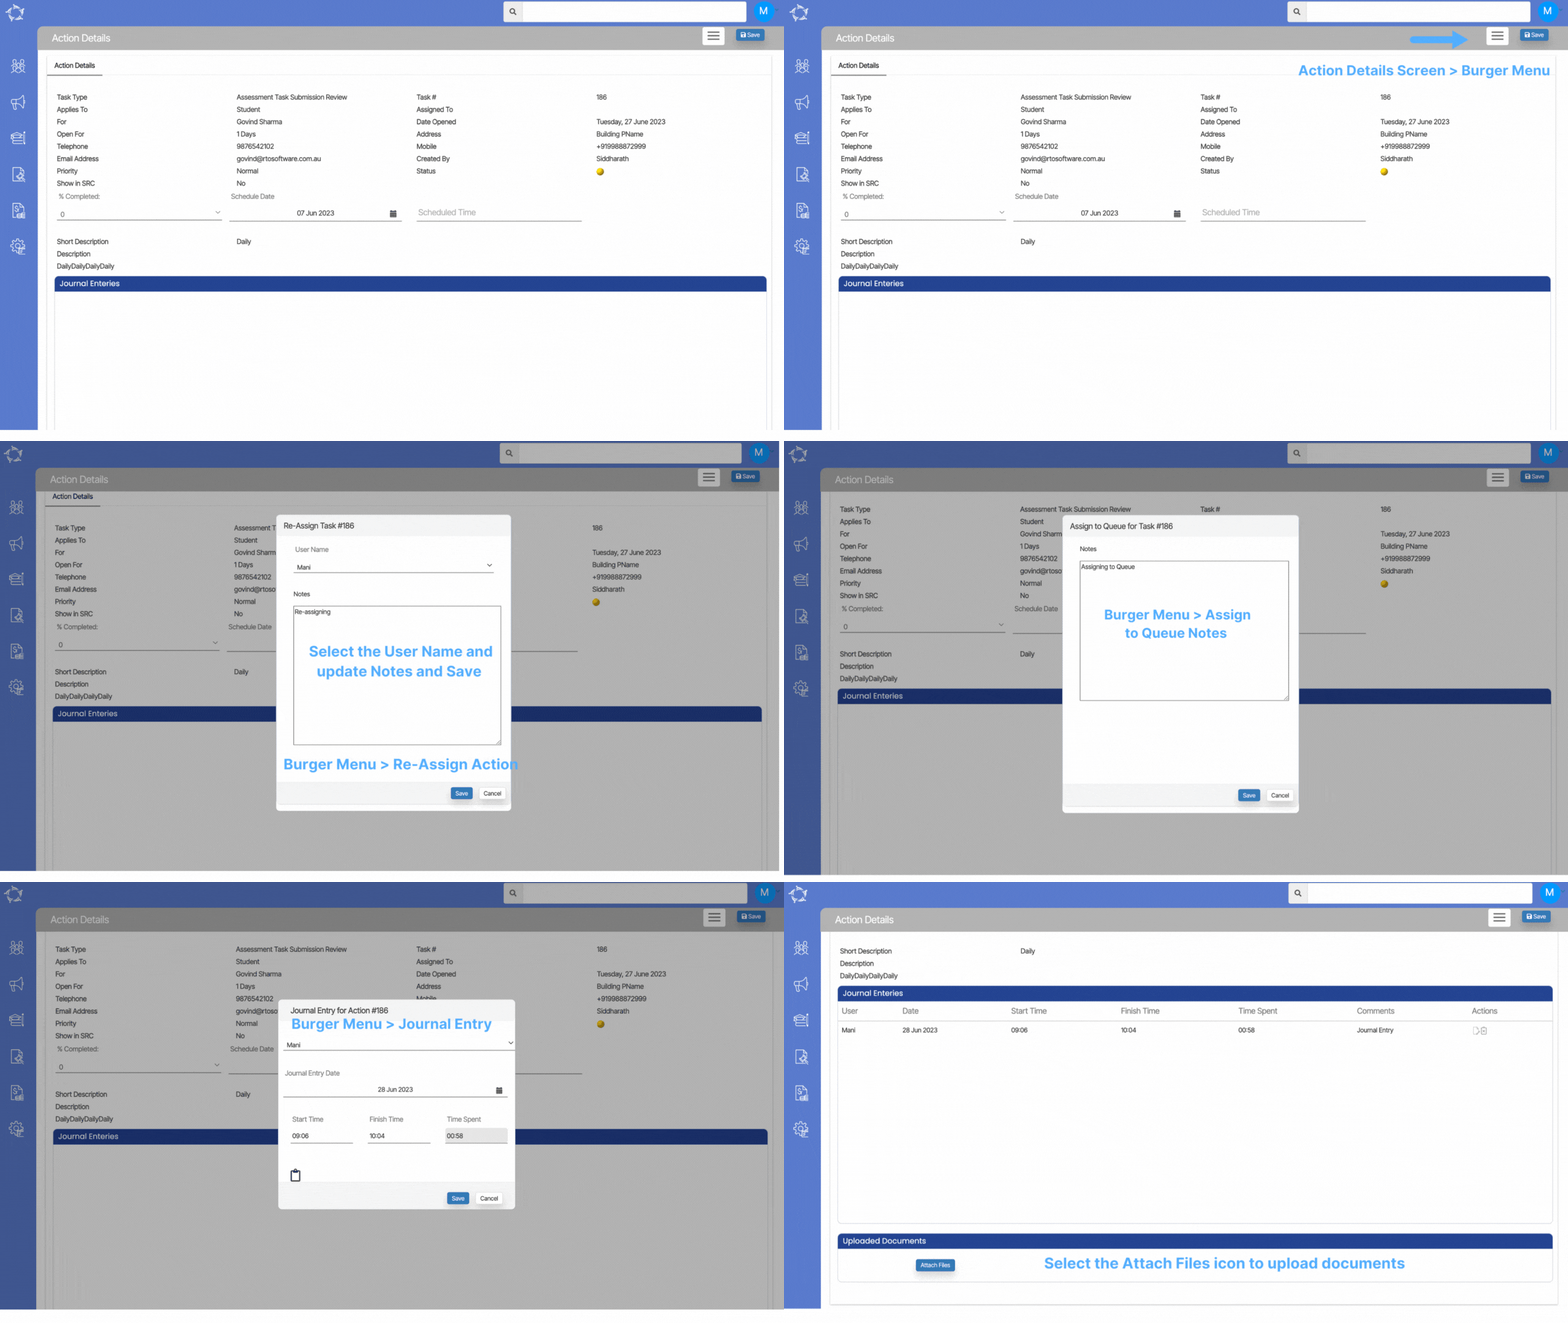
When you select the Preview Icon within the Action Information pop-up on the Task Details screen, you will be directed to the Actions Details Screen. This screen provides a comprehensive view of all the details associated with the task created from the Task Entry Screen. Additionally, you have the option to attach documents to the task directly from this screen, facilitating efficient documentation and reference.

Furthermore, you will notice a Burger Menu icon positioned on the right-hand side of the screen. This menu offers various options to manage the task effectively. Within this menu, you can choose to re-assign the action to a different person, edit the action details if necessary, mark the action as complete to indicate its fulfilment, assign the action to a queue for further processing, or cancel the action if it is no longer needed. The flexibility provided by this menu empowers users to make necessary adjustments and updates to the task based on changing requirements. In addition, through the burger menu, you can also add a Journal Entry, which allows you to include any relevant information or notes pertaining to the task.

Overall, the Actions Details Screen, accompanied by the Burger Menu functionality, offers a comprehensive platform for managing tasks efficiently. You can access task specific information, attach documents, and utilise the menu options to make necessary updates, track progress, and maintain accurate records of their actions.

How do the Burger Menu options work?

  • Re-Assign Action – When you select this option from the Burger Menu, a pop-up window will appear, allowing you to re-assign the action to a different person.
  • Edit Action – Upon selecting the edit action, the system will take you to the Action Entry/Task Entry Screen where you can make the necessary changes to the task.
  • Mark Complete – When you choose this option, a pop-up message will appear at the top of the screen, prompting you to select OK to complete the task or Cancel to leave it as it is.
  • Assign to Queue – Selecting this option triggers a pop-up message with Yes and No options. You can indicate whether you want to assign the action to a queue or not. If you select Yes, the system will display another pop-up window where you can add notes related to the action and save them.
  • Cancel – Upon selecting this option, a message will appear at the top of the screen asking, Do you want to cancel the Action? You can choose Yes or No based on your preference.
  • Journal Entry – When you choose this option, a pop-up window will appear. Within this window, you can update the Journal entry date, and start and finish time (the system will calculate the total time and update it in the “Time Spent” field). If you wish to add any notes, you can do so by selecting the Notes Icon and saving them. After saving the Journal Entry, the screen will refresh, and the journal entry will appear in the Journal Entries Grid on the Action Details screen. You will have the flexibility to edit and delete the Journal Entry from the grid using the edit and delete icons available in the Actions column.

Task Management

Main Dashboard > Task Management Tile

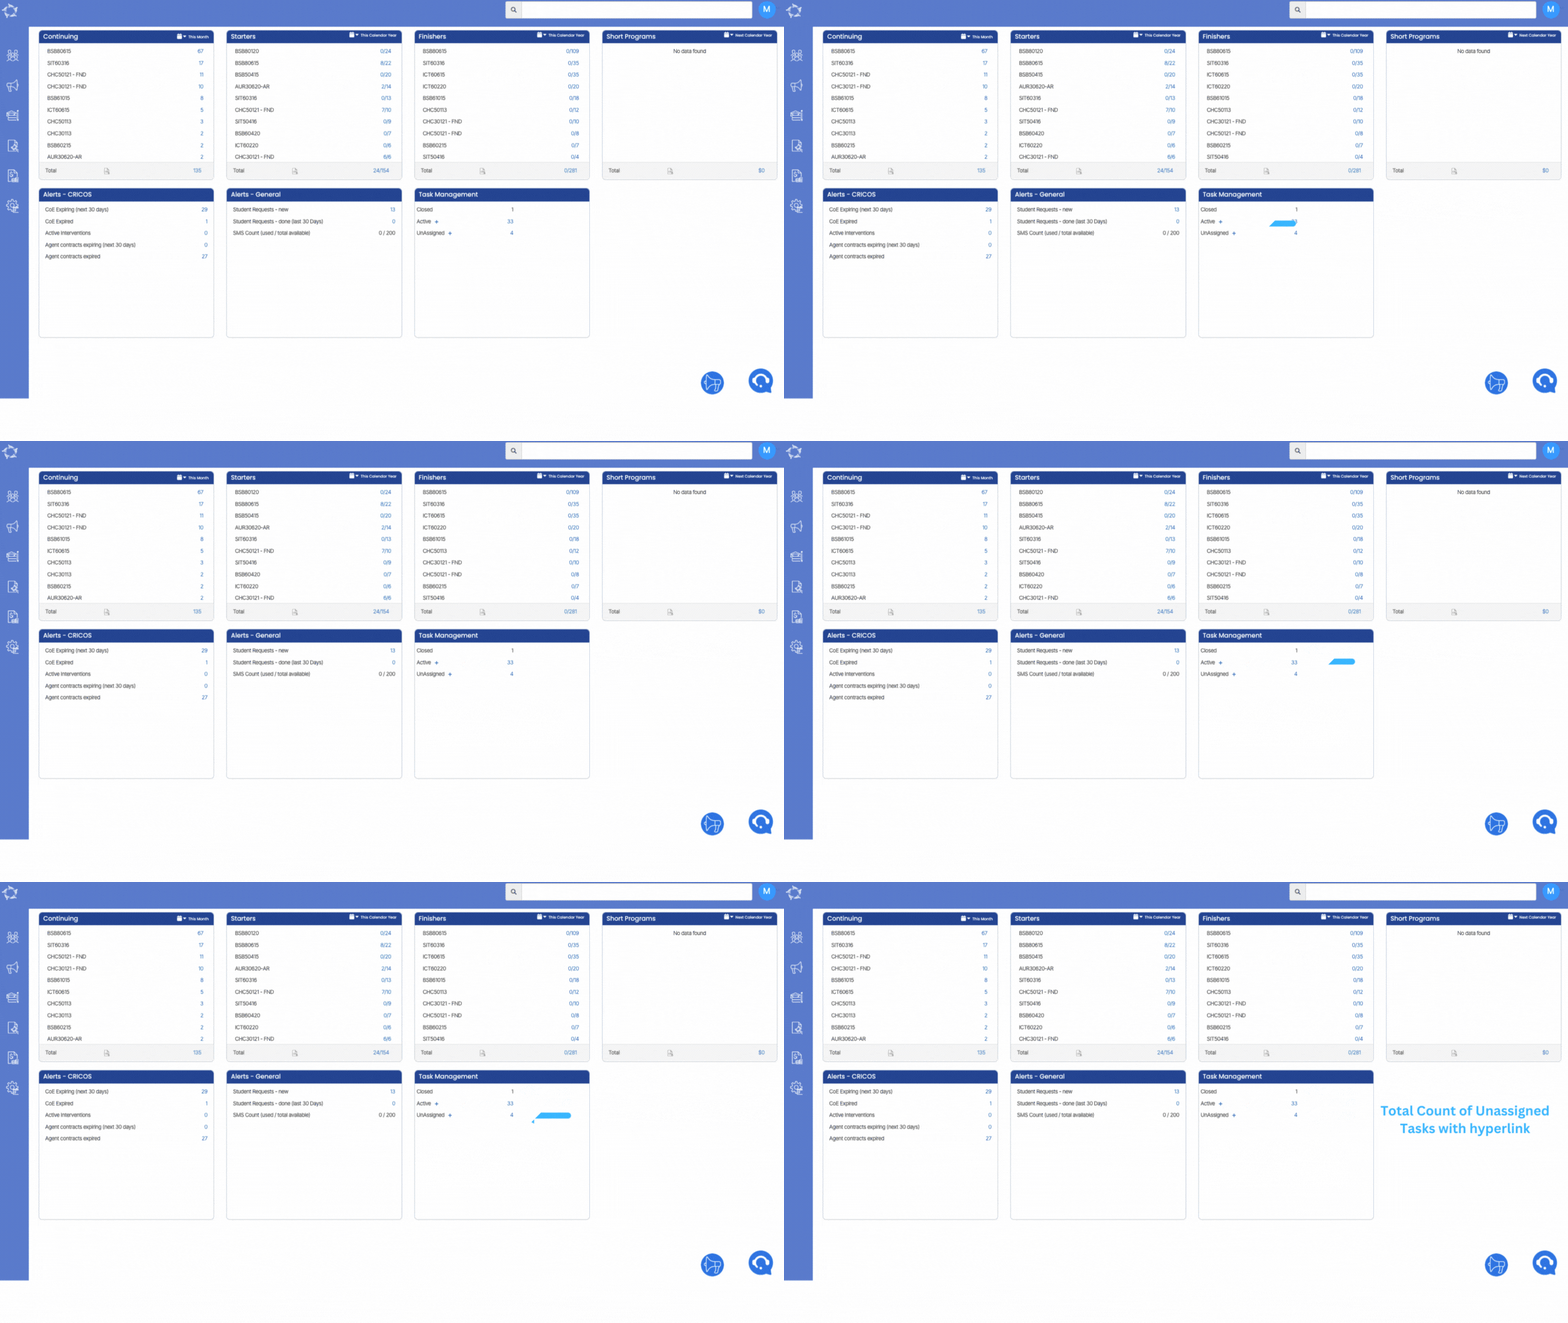
A new feature: Task Management, has been introduced in the system for you to efficiently manage and organise tasks related to various objects in TEAMS; Students, Enrolments, Agents, Employers, and more. The Task Management tile provides an overview of different task categories, including Closed tasks, Active tasks and Unassigned tasks. Each of these sections has dedicated screens that let you perform specific actions on tasks.

IMPORTANT – It is of utmost importance to note that Task Management is a system setting that exists within the system. Should you desire to enable this setting for your RTO, it is imperative that you contact our support team, who will then provide you with the guidance and support required to proceed with the subsequent actions involved in enabling this setting.

The Task Management tile will show you:

  • Closed Tasks – When a task is completed, it is moved to the closed tasks section. This allows users to have a clear record of tasks that have been successfully completed, providing a realistic overview of progress and helping with performance analysis.
  • Active Tasks – You will be able to add new tasks and view the existing ones from this section. Click on the Task Details screen link to know more about its subsequent actions.
  • Unassigned/Overdue Tasks – When you select this option, the system will direct to you to the Task Details screen, where you will be able to see the unassigned and overdue tasks..

Organisation

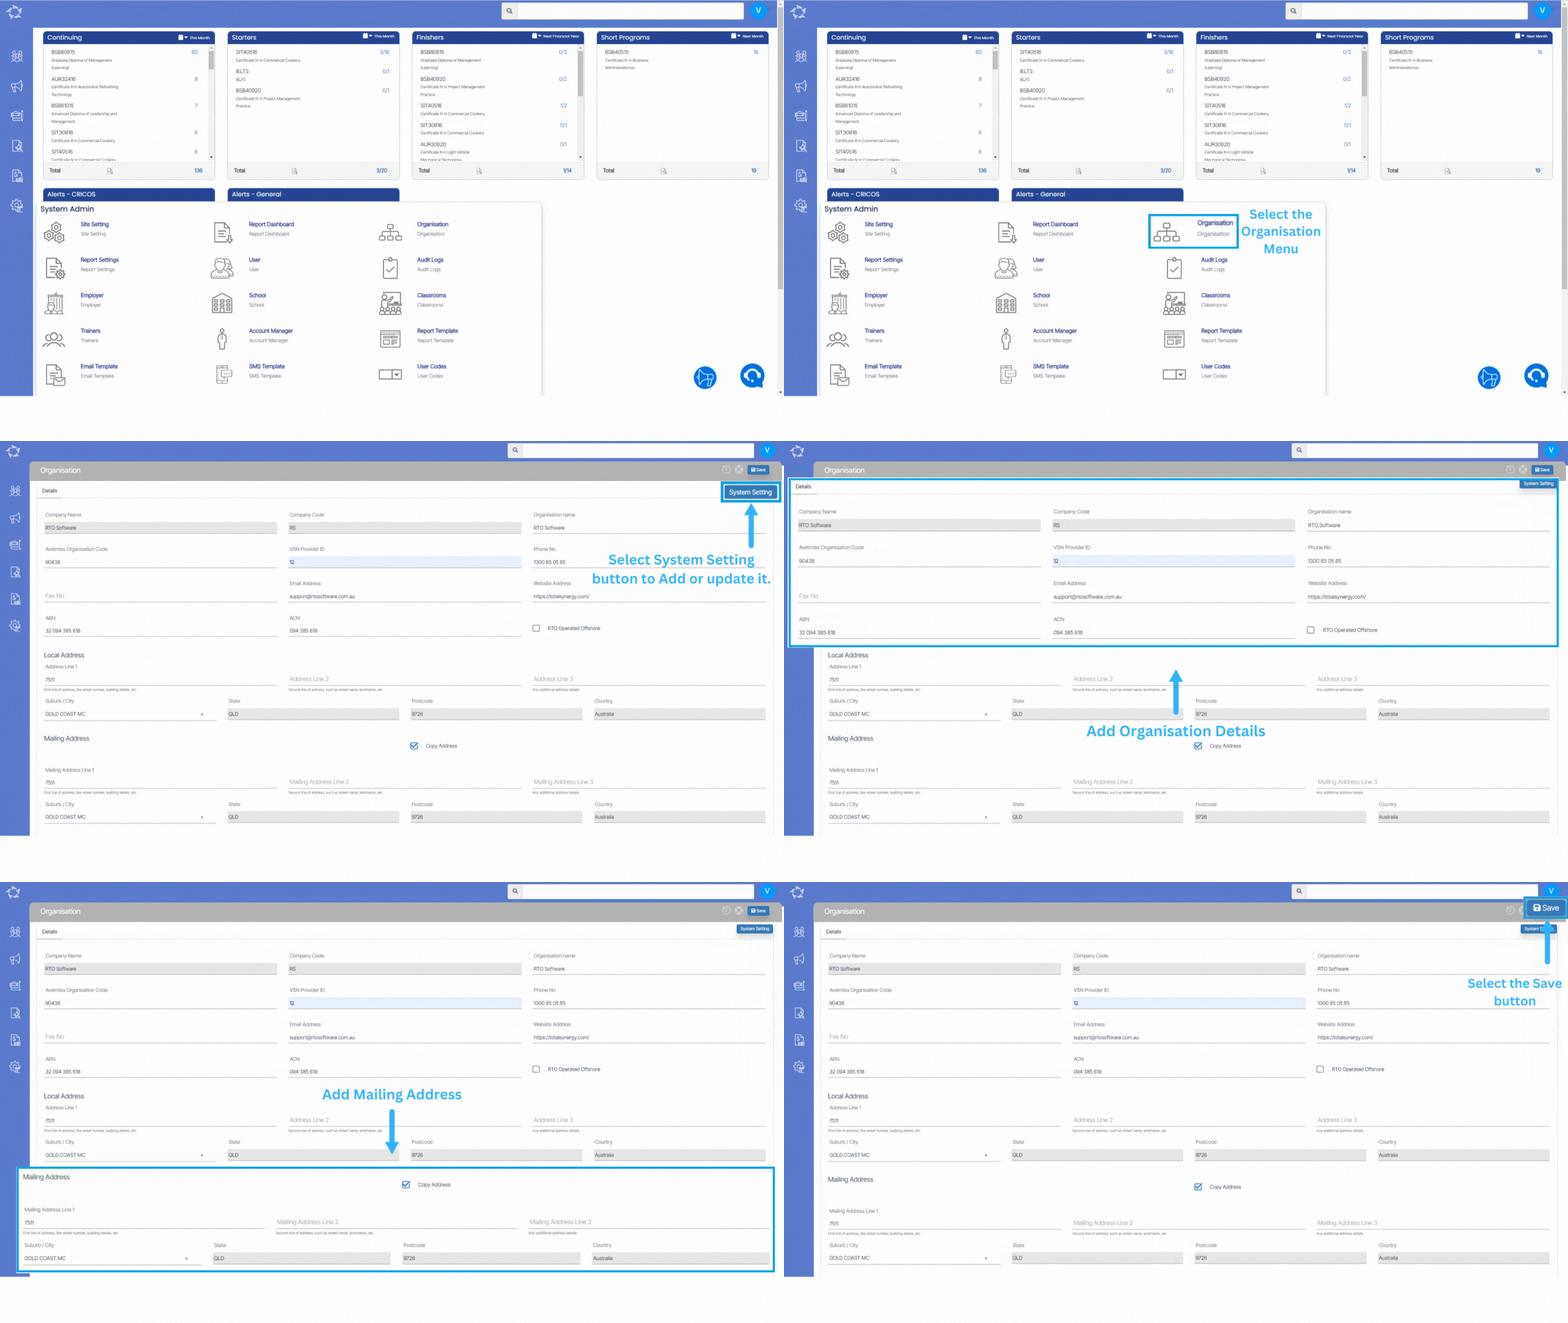
Main Dashboard > System Admin > Organisation

The organisation screen refers to a section or interface that allows you to configure and customise various settings specific to your organisation or company.

  • Company Details: This section allows you to input and update information about your company. It typically includes fields such as the Company Name, Code, Website, Contact information, and other relevant details that help identify and represent the organisation.
  • Local Address: You can enter the local address of their company in this section. It includes details such as address lines 1,2,3, suburb/city, state, postcode, and country. This information is used to identify the physical location of the company’s primary office. All the fields are self-explanatory.
  • Mailing Address: If the mailing address for the company is different from the local address, this section allows you to provide the mailing address. If the local address and mailing address are the same, then you can select the checkbox labelled Copy Address. This option can be used for correspondence purposes or as an alternative address for receiving mail or packages. Each field in this section is self-explanatory.
  • Save: Selecting the Save button applies and saves any modifications made to the company details, local address, or mailing address. It ensures that the entered information is stored and used for future reference.
  • Site Setting: The Site Setting button typically leads to a separate screen. By selecting this button, you can access and modify settings related to the invoicing method to use, student number, enrolment number, academic features and other site-specific settings.

Below is the explanation of the fields

FieldsExplanation
Company NameType the Company Name in this field.
Company CodeType the Company Code in this field.
Organisation NameIn this field, you can type the Organisation Name
Avetmiss Organisation CodeIn this field, you can type the Avetmiss Organisation Code
VSN Provider IDYou can add the Victorian Student Number (VSN) Provider ID in this field.
Phone NoIn this field, you can add the contact details of the organisation.
Fax NoFax number can be added in this field.
Email AddressHere you can add the official email address of the organisation.
Website AddressHere you can web address of the organisation.
ABNYou can add Australian Business Number in this field.
ACNYou can add the Australian Corporation Number in this field.
RTO Operated OffshoreSelect this checkbox if the Registered Training Organization (RTO) operates outside of its home country or jurisdiction.