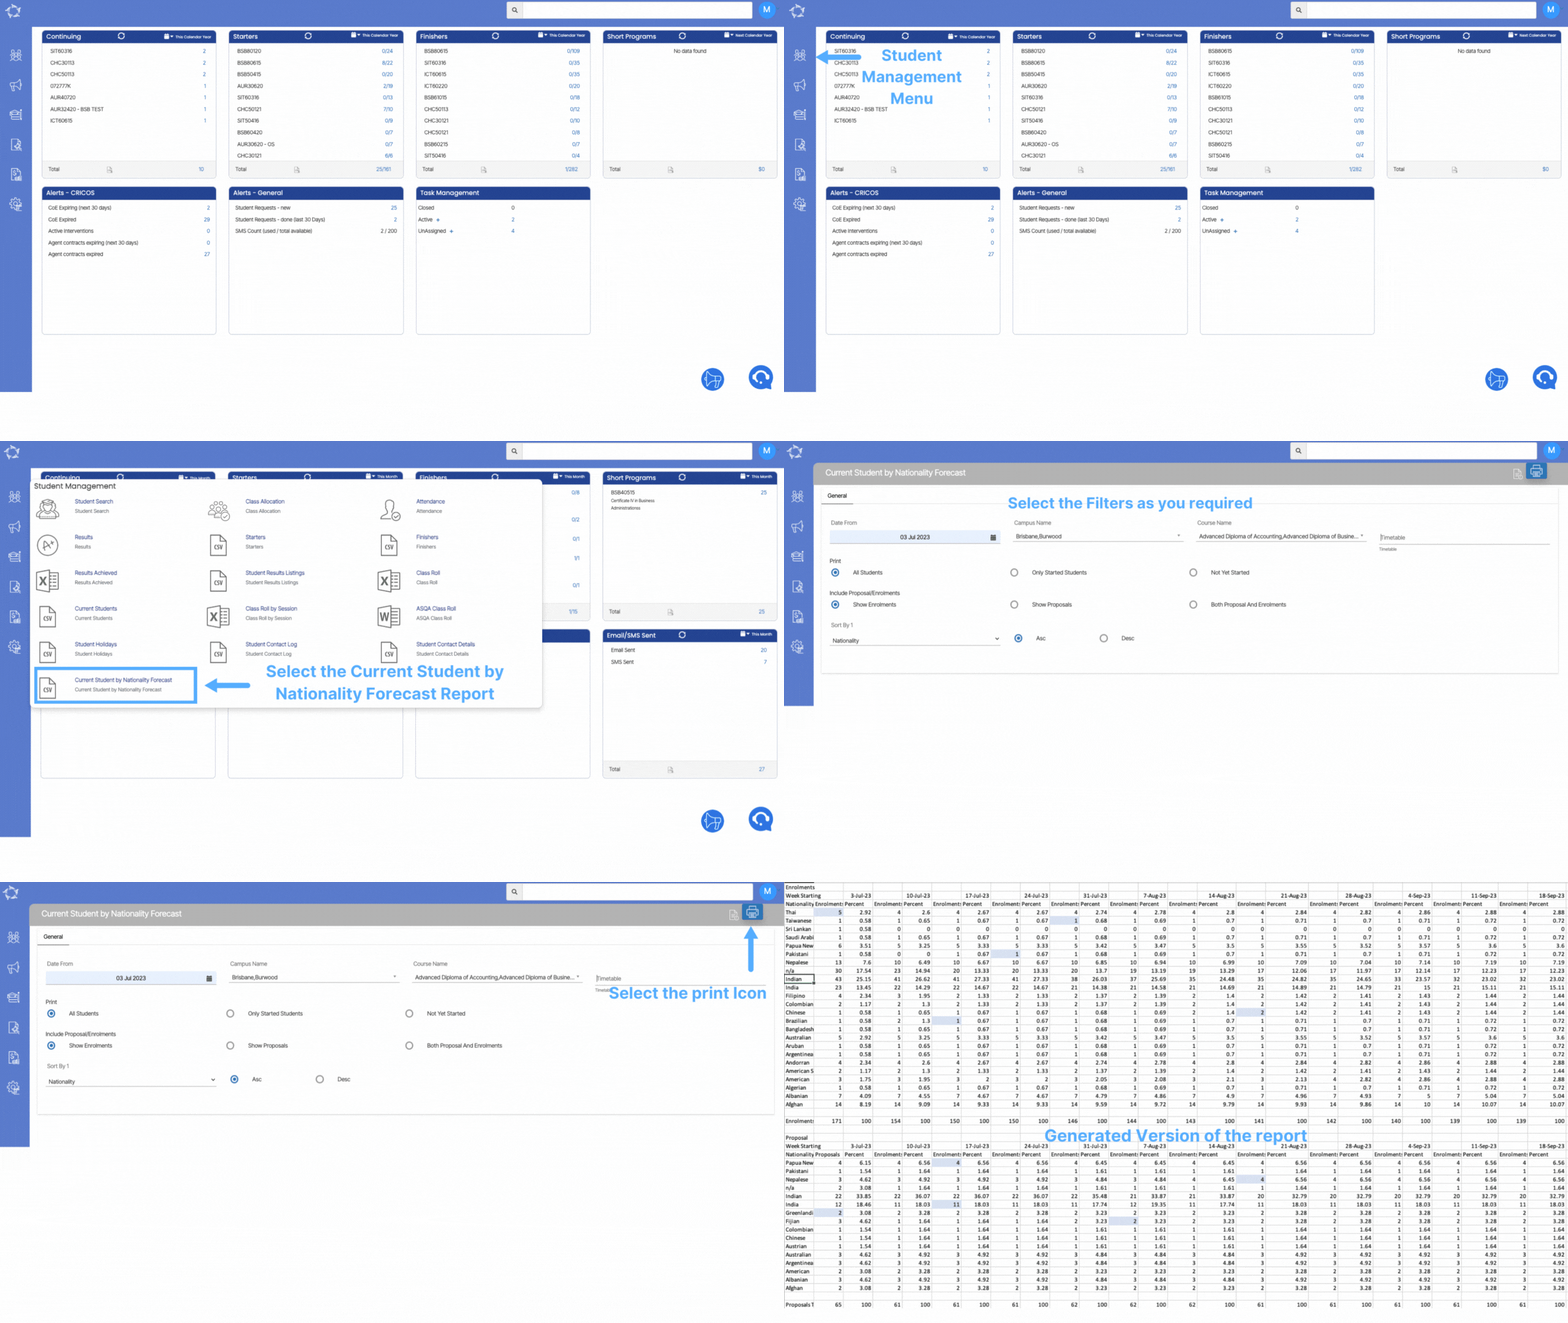
Current Student by Nationality Forecast Report Filters

Below is the table that will show you the general filter’s explanation.

Filters/ParametersExplanations
Date FromWhen selecting the date from the calendar, it is recommended you select the date that falls on Monday because the system will not pick any other date or day.
Campus NameThe Campus Name dropdown will show you a list of campuses as a check box in the dropdown. You can select your campus by selecting the tick box against the campus name.
Course NameThe Course Name dropdown will show you a list of Courses as a check box in the dropdown. You can select your Course by selecting the tick box against the campus name.
TimetableThis is a magic search field and you can search and select the appropriate timetable linked to the campus and course.
PrintThe print field will give you three radio buttons-: Please note that you can only select one radio button at a time.

All Students – Select this radio button to print the report for all students in the system.
Only Started Students – Select this radio button to print only started students.
Not Yet Started – Select this radio button to print not yet started students.
Include Proposal/EnrolmentsThe Include proposal/enrolments field will give you three radio buttons-: Please note that you can only select one radio button at a time.

Show Enrolments – You can select this radio button to see only enrolments in the report.
Show Proposals – Select this radio button to print only Proposals in the report.
Both Proposal And Enrolments – Select this radio button to print both proposal and enrolments.
Sort ByYou have the option to sort the report by Nationality, Students and percentages.
Asc/DescFor Asc/Desc, Please see TEAMS Basic.

Current Student by Nationality Forecast Report

We have recently implemented a new report in our system called “Current Student by Nationality Forecast.” This report provides comprehensive insights into the enrollment statistics of our students based on their nationalities. It offers both the total number of enrollments and the corresponding percentage breakdown for each nationality category.

IMPORTANT – It’s important to keep in mind that when generating this report, it’s advisable to choose a date that falls on a Monday. This selection is crucial, as the system restricts the option to select any other day from the calendar. Additionally, the generated report will cover a span of 12 weeks starting from the chosen date on the calendar.

Please select the below links that will explain the filters and columns for the report.

Current Student by Nationality Forecast Report Filters

Current Student by Nationality Forecast Report Data Columns

Survey Data Export

Main Dashboard > System Admin Menu > Survey Data Export

A survey export report contains the results and responses collected from a survey. When you conduct a survey, whether it’s through online survey platforms, the data is typically compiled and can be exported into a more manageable and analysable format.

How to generate survey data Export in TEAMS?

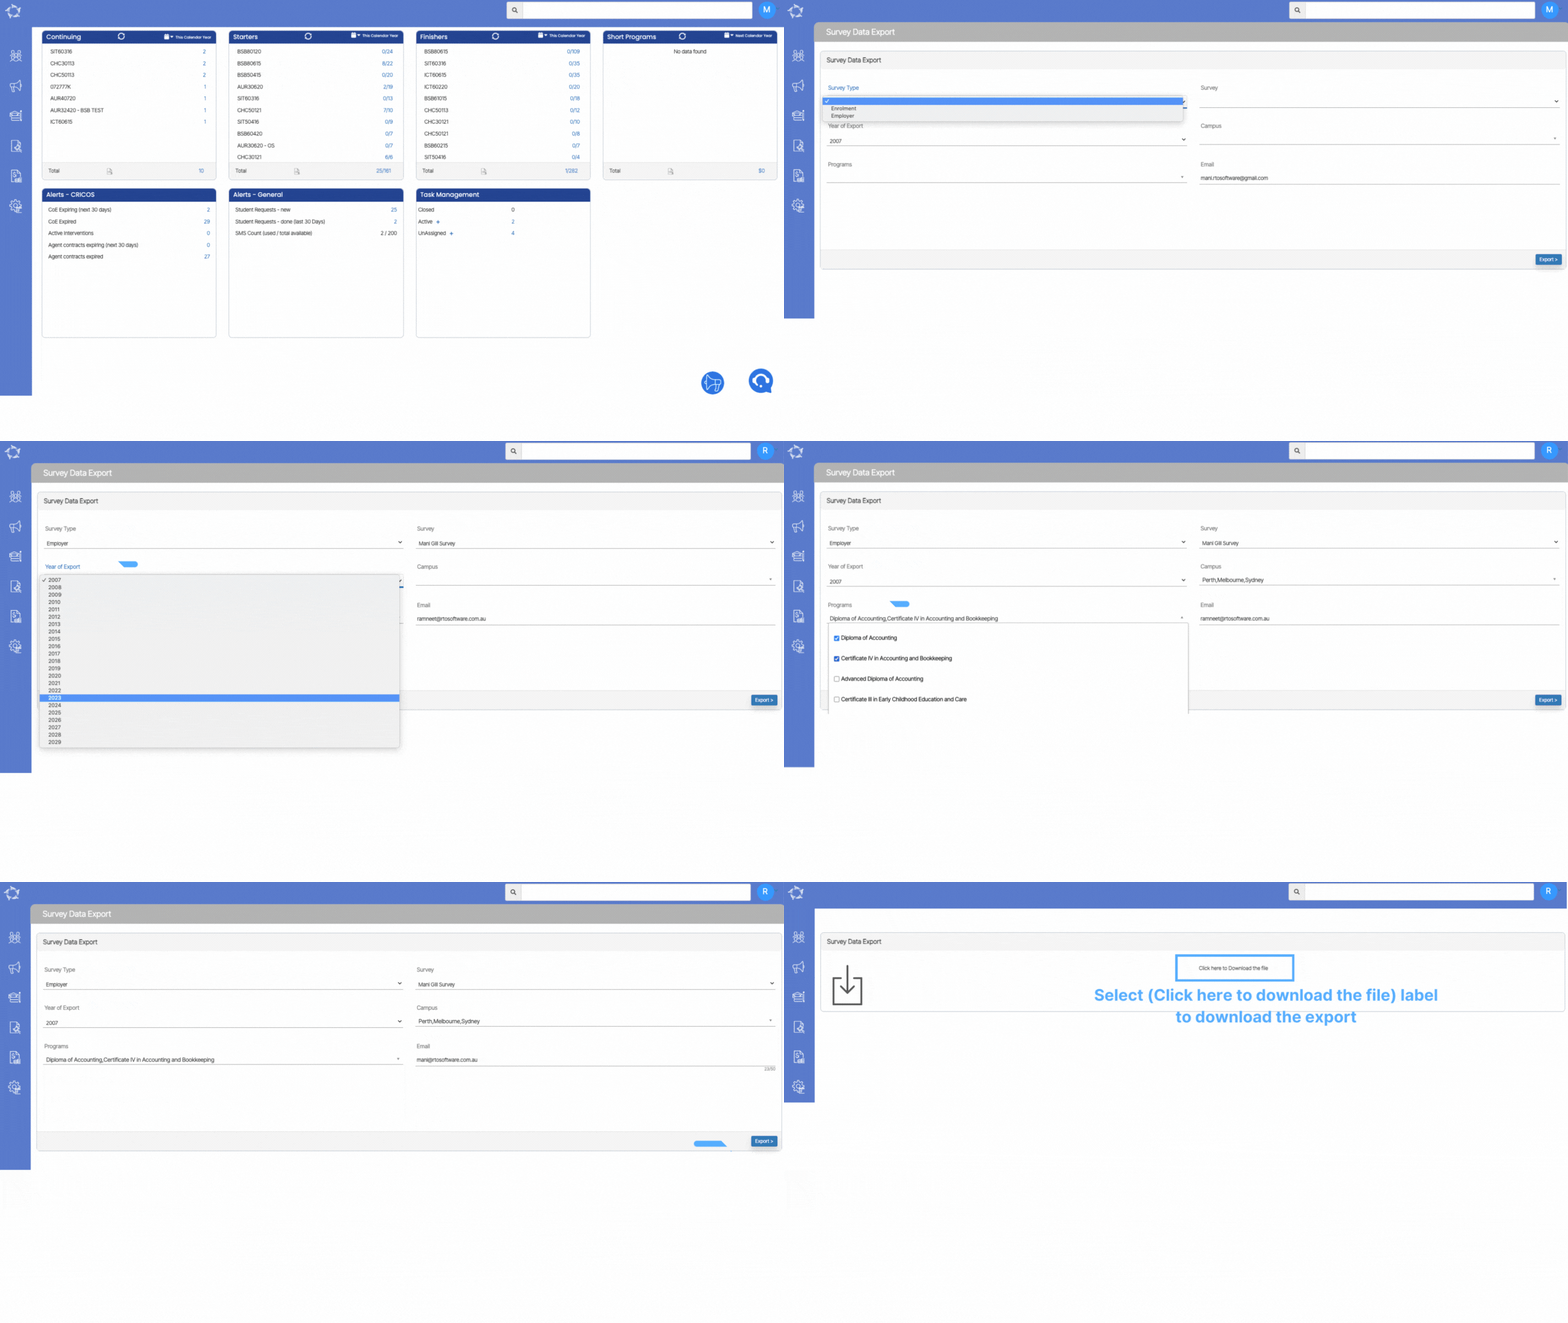
Firstly, you need to go to Main Dashboard > System Admin Menu > Survey Data Export. When you select the Survey Data Export sub menu, the system will take you to the filters /parameters screen. from this screen, you can select the required filters and generate the survey data export. Please see the below table that will give you the filter’s explanation.

Filters/ParametersExplanation
Survey TypeThe Survey Type is a User Code and one can create them from the user code screen in TEAMS. You can select the Survey Type from the dropdown. For example Enrolment, Employers etc.
SurveyWhen you select the Survey Type, the Survey dropdown will show you the name of the users.
Year of ExportSelect the year from the dropdown as you required.
CampusThis is a multiselect dropdown and if you have multiple campuses, you can select them from the dropdown.
ProgramsThis is a multiselect dropdown and you can select the programs by selecting the tick boxes against them from the dropdown
Email AddressThis field will display your email address
Export ButtonWhen you select this button, you will be taken to the Survey Export log screen. When you are on this screen, you need to select the Click here to Download the file label to download your Survey export.

How to setup Pin Payment Email Template in TEAMS

To set up an Email Template for Pin Payments you need to follow the below steps

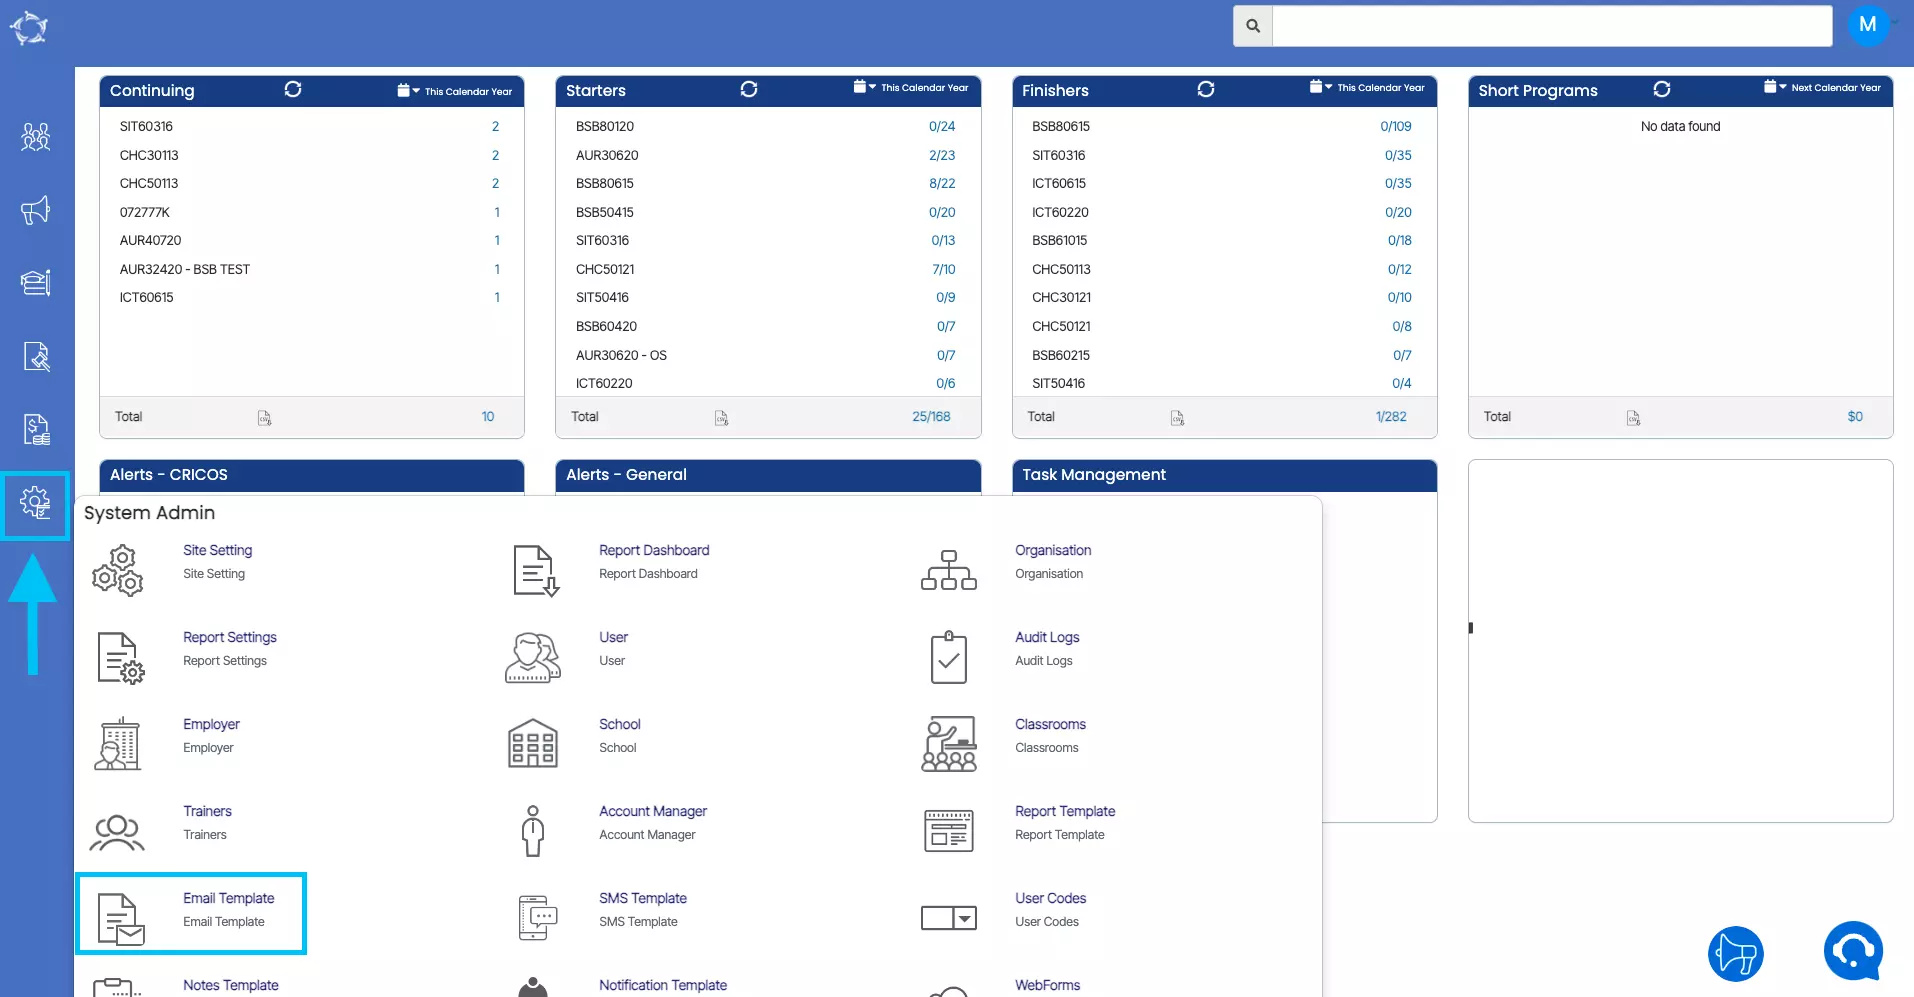
1. Go To TEAMS > Main Dashboard > System Admin Menu > Email Template Icon.

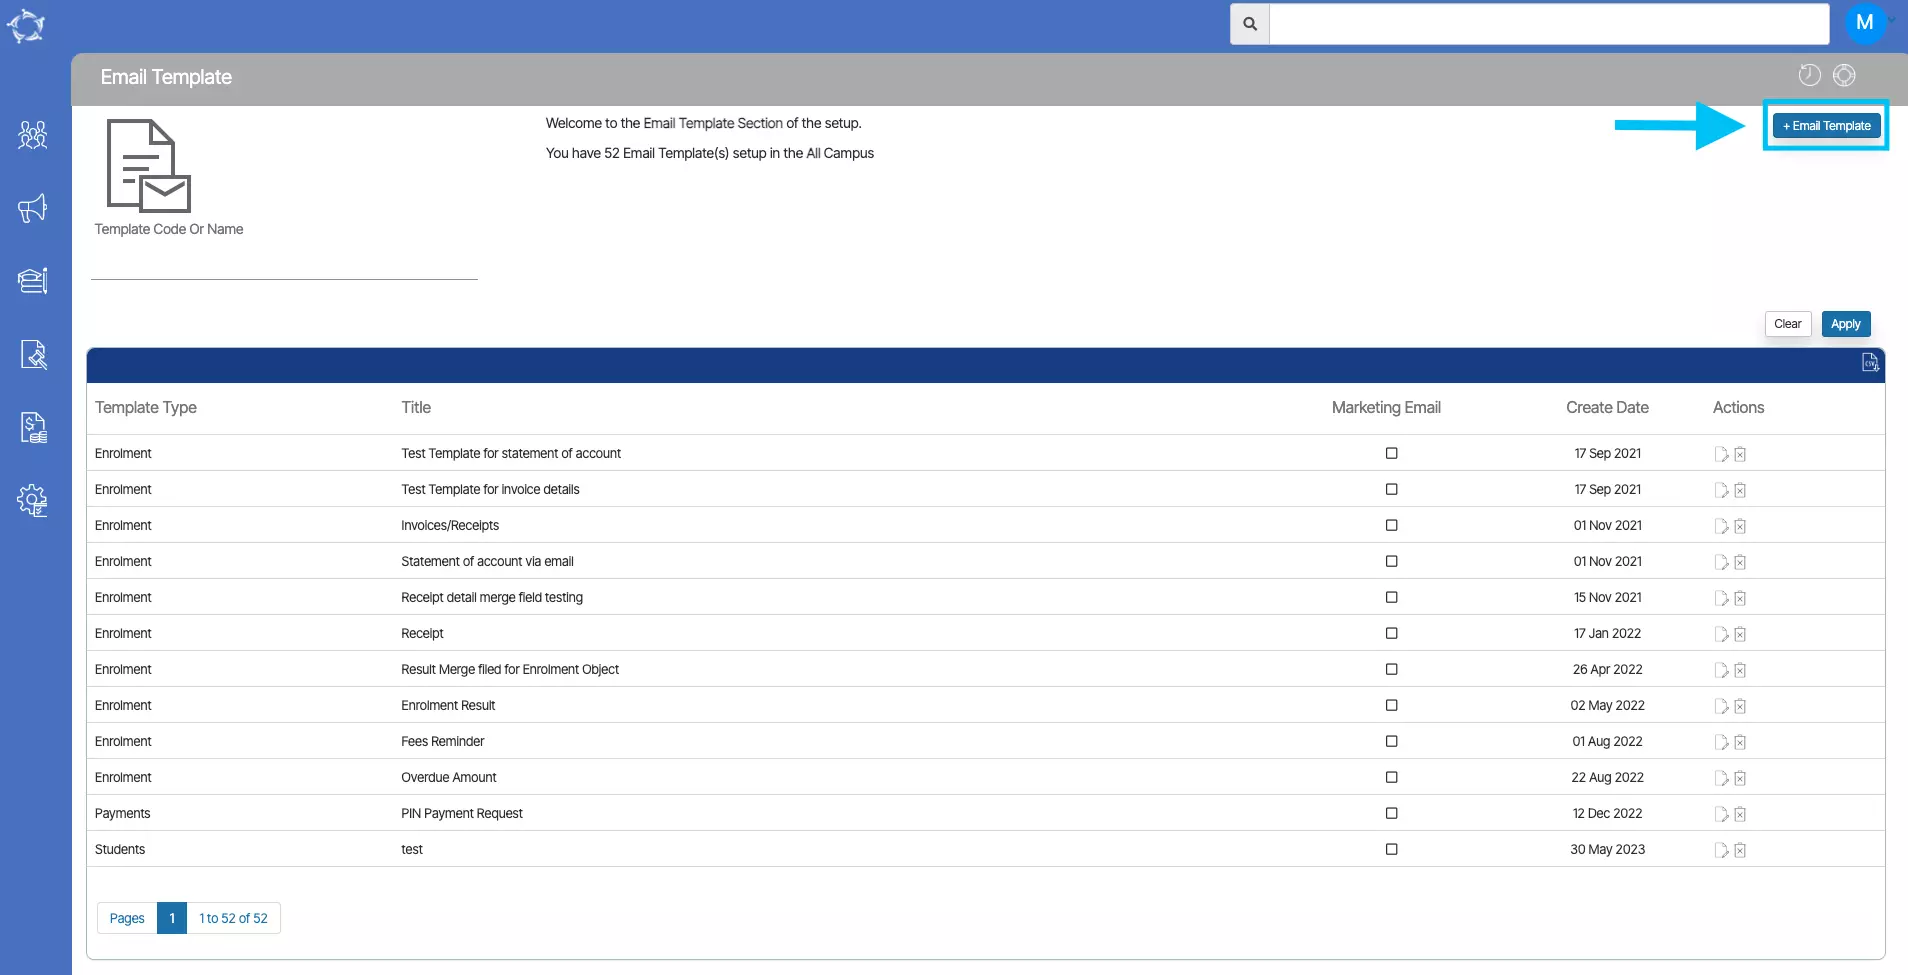
2. Select the +Email template Button on the Email template Welcome Screen.

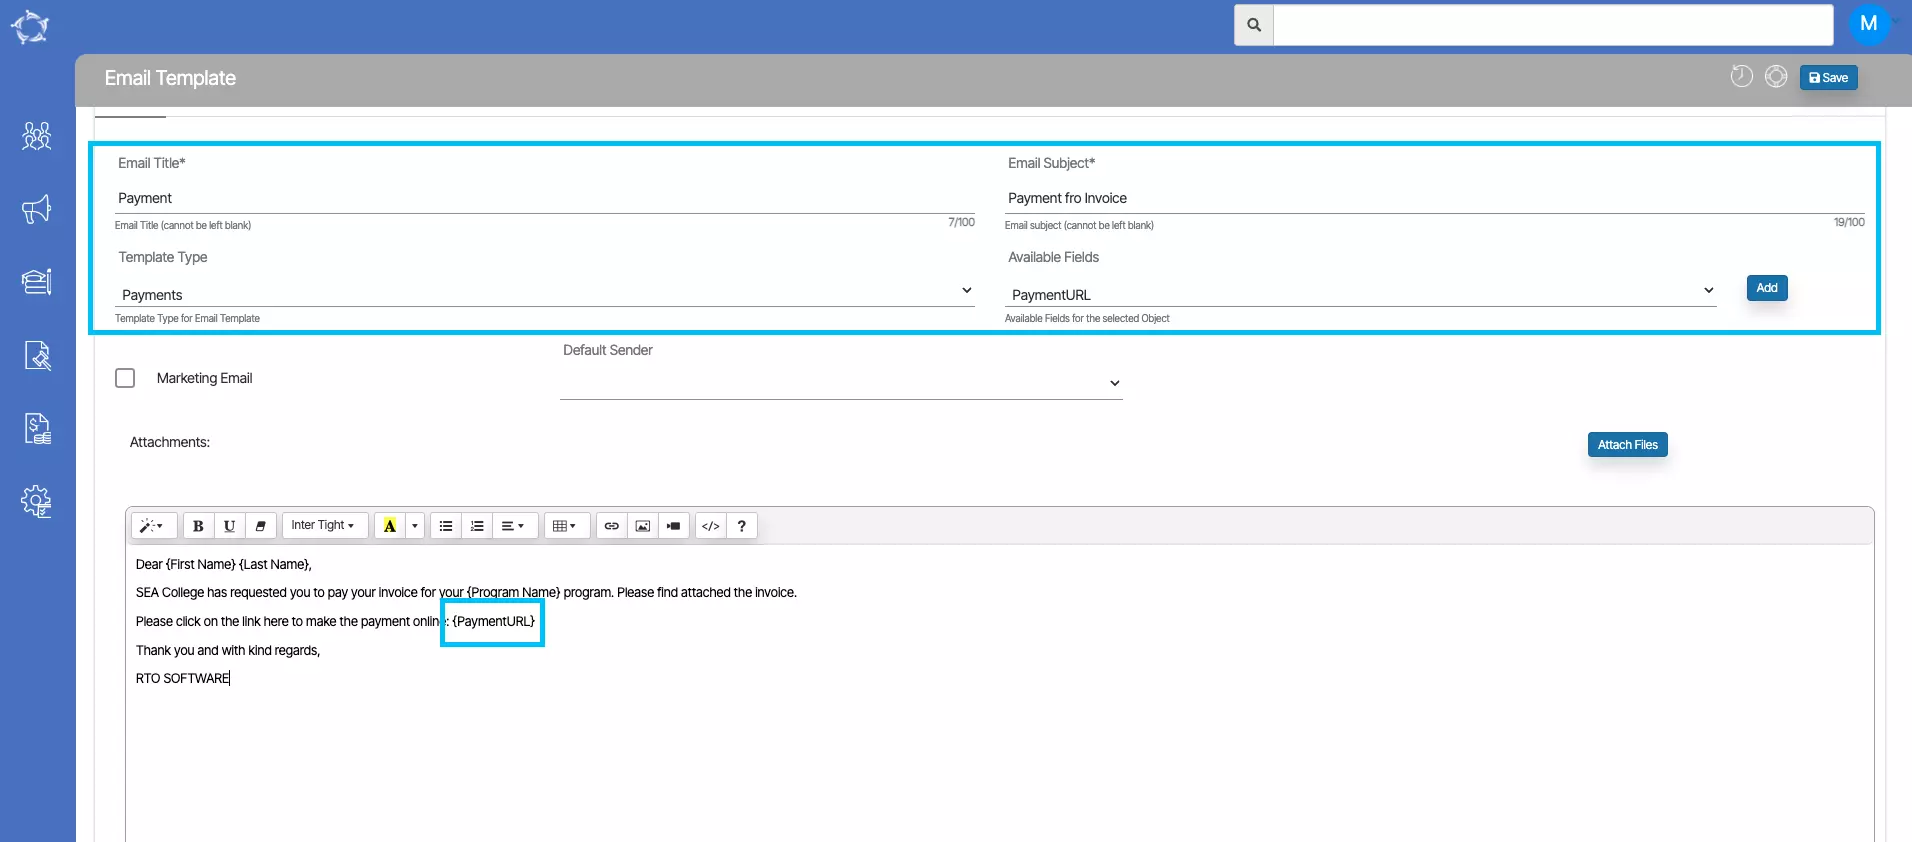
3. On the Email Template Entry Screen, you need to select the Email Title and Email Subject (please note that these two are mandatory to select and they can be left blank). On the other hand, you need to select Template Type and available Merge Field from their respective dropdowns.

Template Type – While creating the template for Pin Payments, you need to select the template from the dropdown as Payments.

Available Fields – This is an important and mandatory merge field PaymentURL and you can select it from this drop dropdown. (Please note that when you select this merge field while creating the email template and then send the email to students then TEAMS will generate the unique URL where students can click pay online).

4. Once all the above steps are done, select the Save button to save the Email Template.

Pin Payments Integration

Our team has been hard at work to bring you a seamless and efficient experience, and we are excited to unveil our latest feature: the Integration of Pin Payment!

This integration marks a significant milestone for us as it allows us to streamline your payment processes, making transactions easier, faster, and more secure than ever before. Pin Payment is a trusted and widely recognised payment gateway that ensures a smooth and hassle-free payment experience for your students and clients.

There are some of the key benefits of our Pin Payment Integration-:

  • Effortless Transactions: With Pin Payment integrated, your students can now make payments directly online. This means no more redirection to external payment portals, ensuring a frictionless and convenient payment process.
  • Enhanced Security: Pin Payment implements top-notch security protocols, safeguarding sensitive payment information and reducing the risk of fraudulent activities.
  • Simplified Record-Keeping: Our system will automatically record and organise all payment details, saving your administrative staff valuable time and effort. 
  • Increased Trust and Credibility: By integrating Pin Payment, we demonstrate our commitment to providing you with the best tools and services. This partnership enhances the credibility of your RTO, fostering trust among students.

NOTE – We understand that adopting a new payment system can be both exciting and challenging. To ensure a smooth transition, our dedicated support team is ready to assist you every step of the way.

IMPORTANT – Before you send a Pin Payment email to students, it is recommended to create a Pin Payments Email Template in TEAMS.

Please select the link below to know more about on how to create email template for Pin Payment and how to send pay request email for invoices.

How to setup Pin Payment Email Template?

How to send Pay Request Email for Invoices?

Application Dashboard Reports

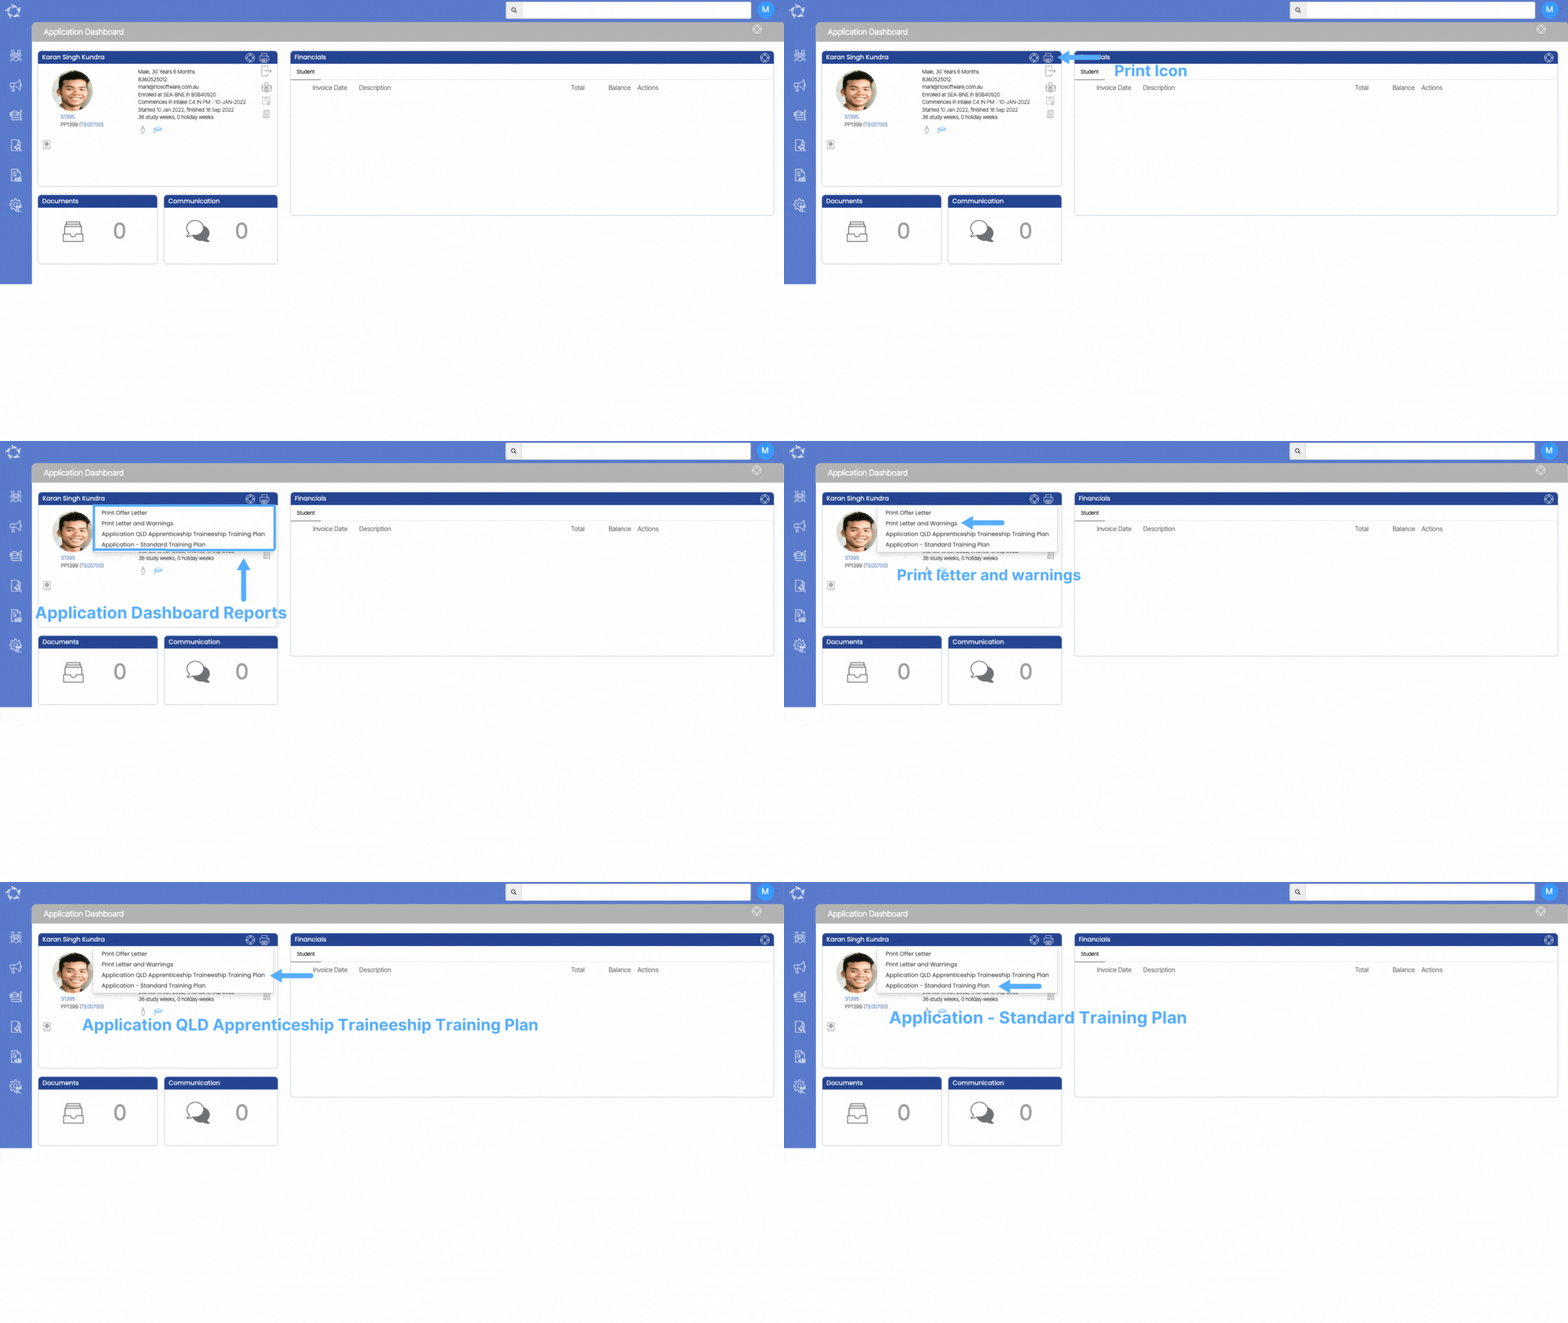
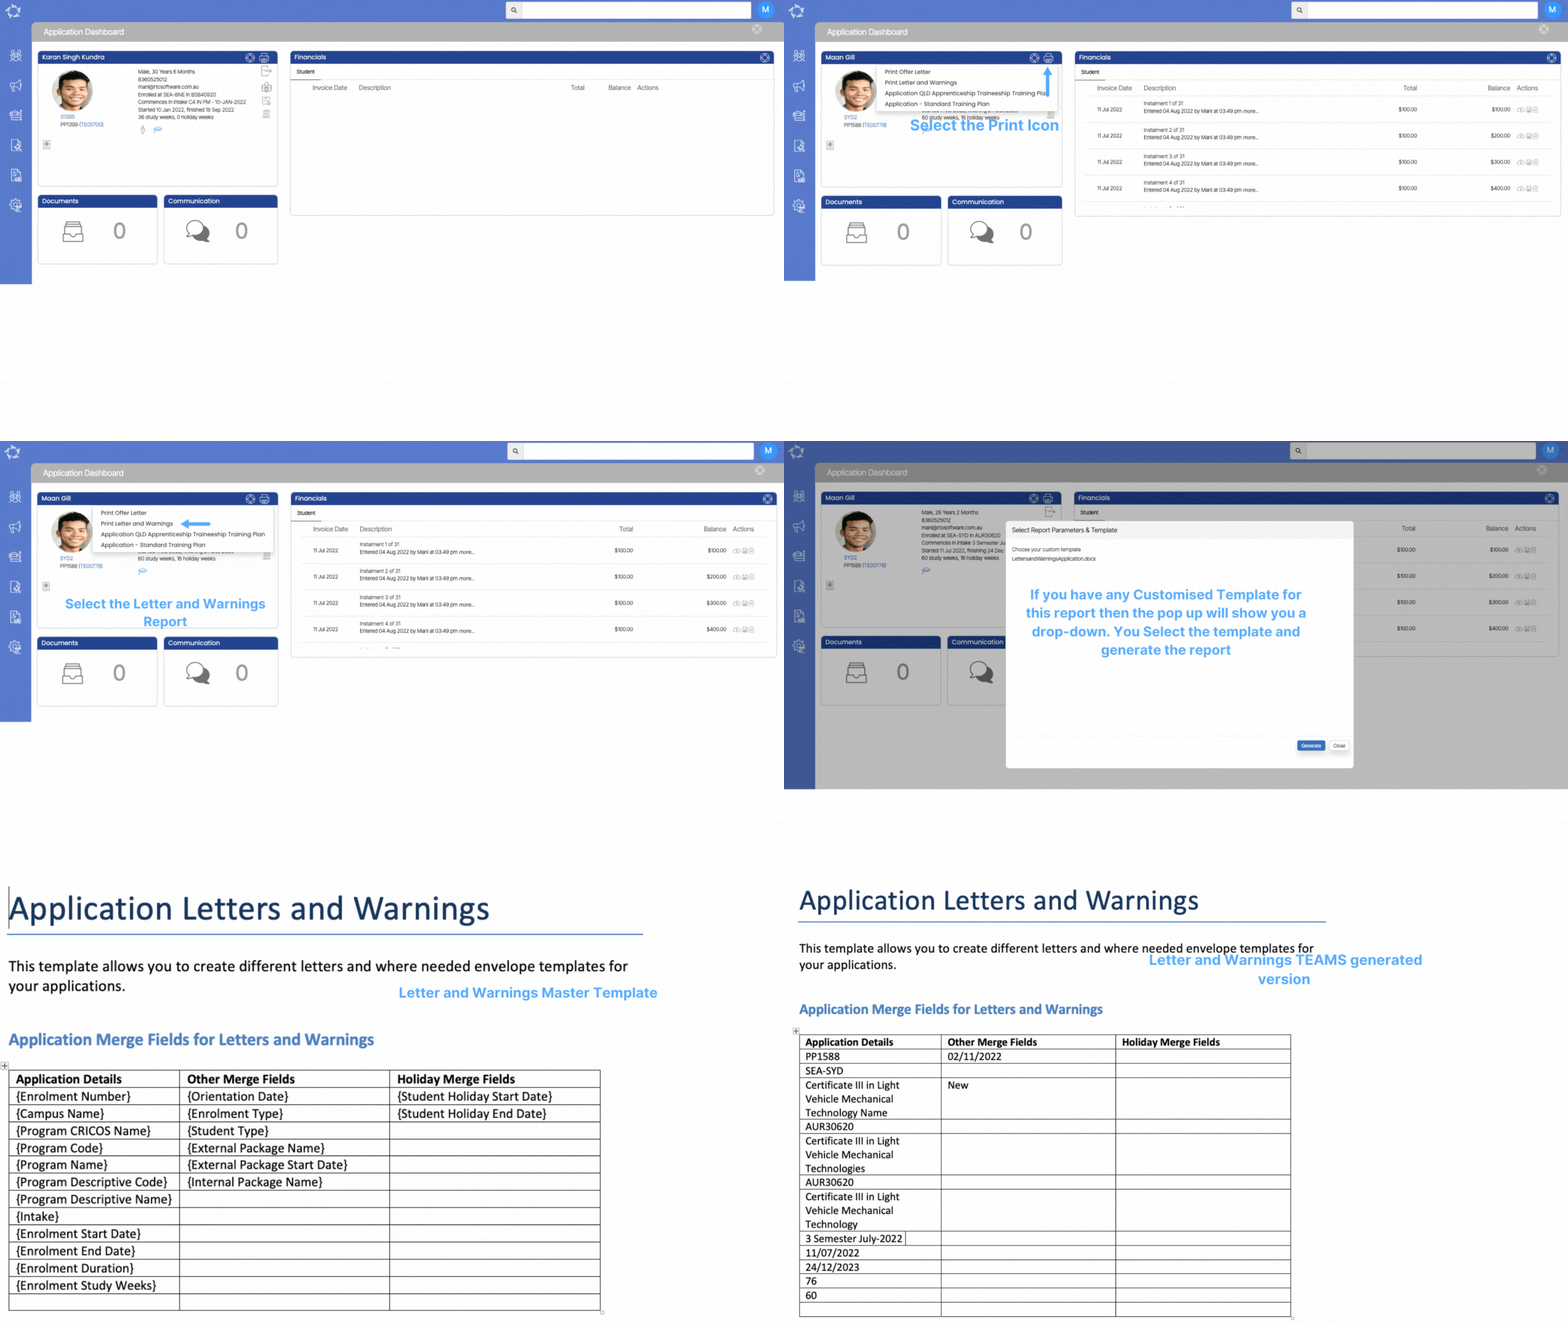
Different reports are available on different tiles under the Application Dashboard. You can see these reports under Print Icon on the Application Profile Tile.

Each report listed below is a link to a post where you can understand the report and its parameters and view an example of the report.

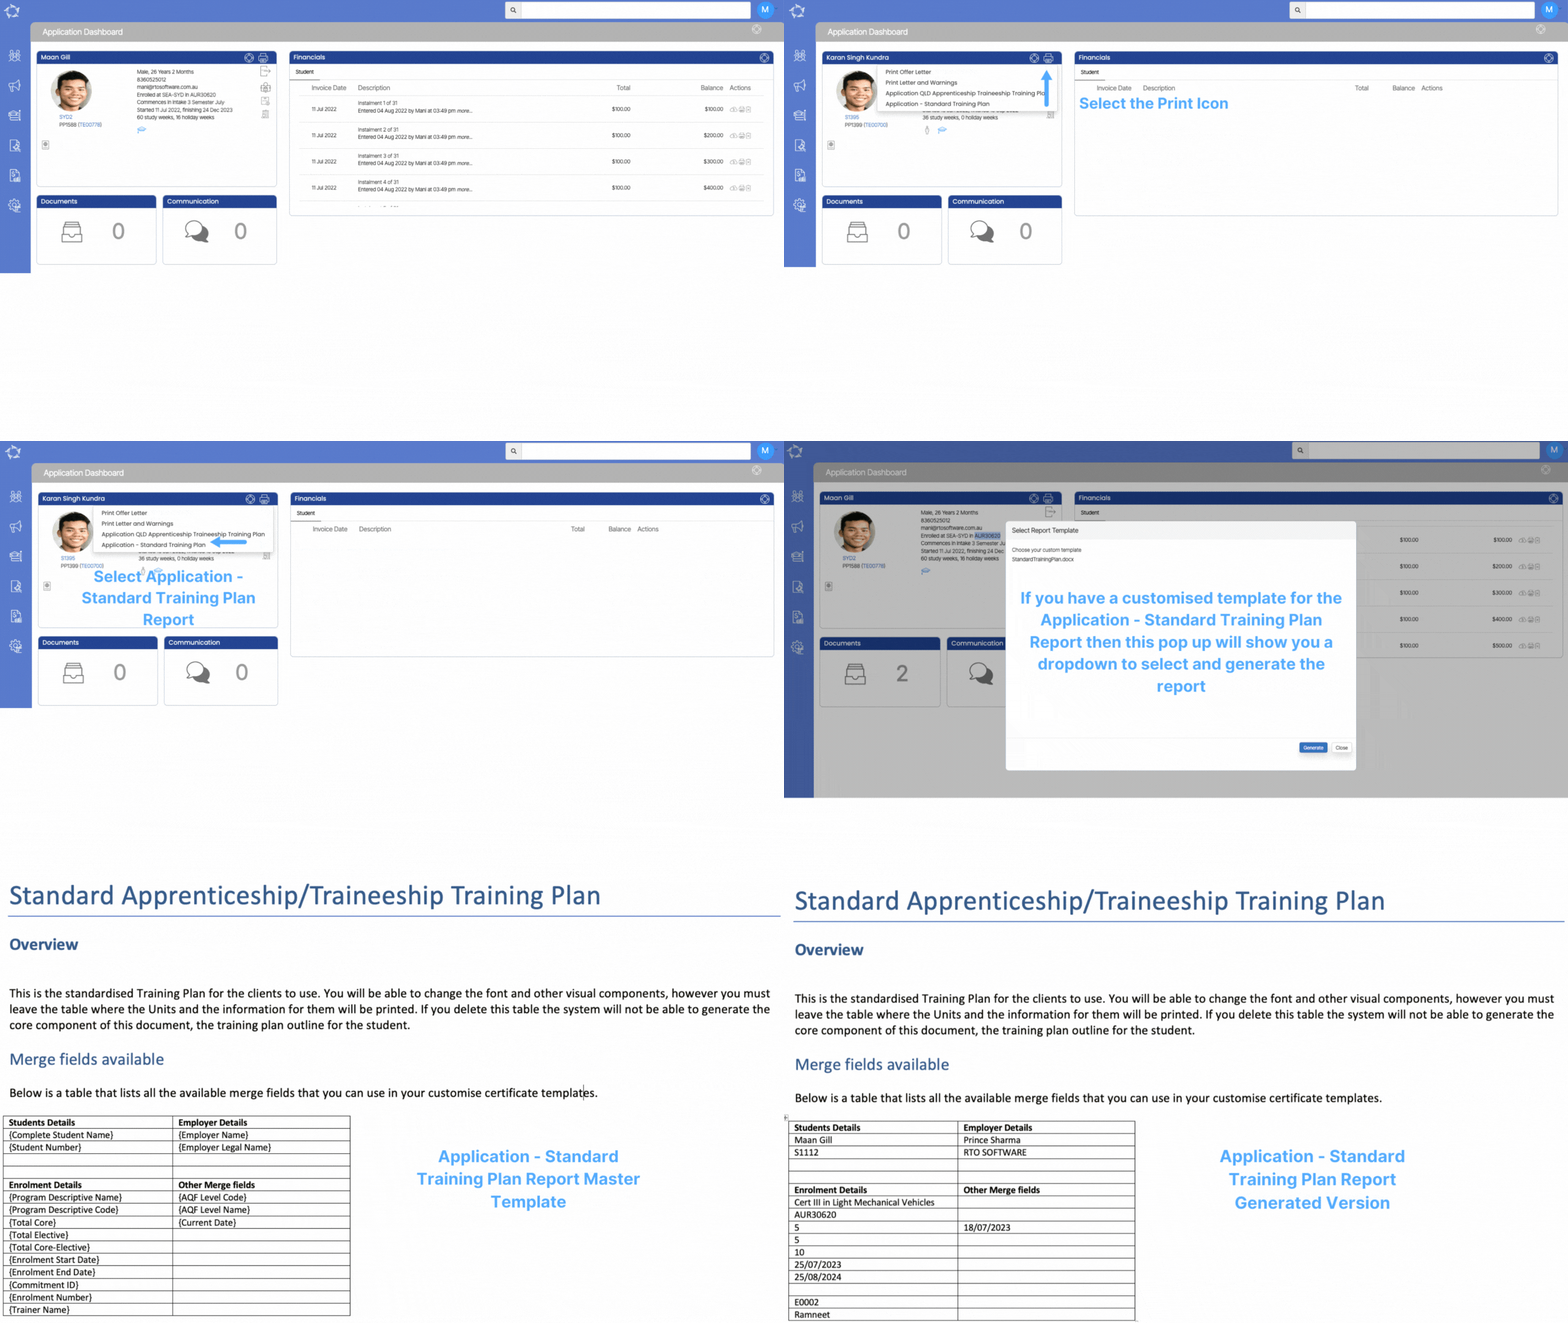
Application – Standard Training Plan

The Application Standard Training Plan report serves as a comprehensive document that offers students a concise yet comprehensive understanding of the training program. Its primary objective is to provide a clear outline of the program’s structure and anticipated outcomes, benefiting trainees in monitoring progress and facilitating effective training delivery. This report encompasses essential details, including the training mode, specific unit start and end dates, allocated hours, and outcome status, ensuring transparency and facilitating efficient coordination. The unit starts and end dates specifically define the duration of each module or unit within the training, enabling students to plan and manage their learning journey effectively.

Please select the desired template from the dropdown menu and select the Generate button. Once successfully generated, you can easily download the template in either PDF or DOC format from the Report Dashboard.

IMPORTANT – To receive further guidance on customising the report templates according to your requirements, we recommend referring to the instructional post titled Report Templates. This post provides step-by-step instructions on modifying the templates to match your desired format and content.

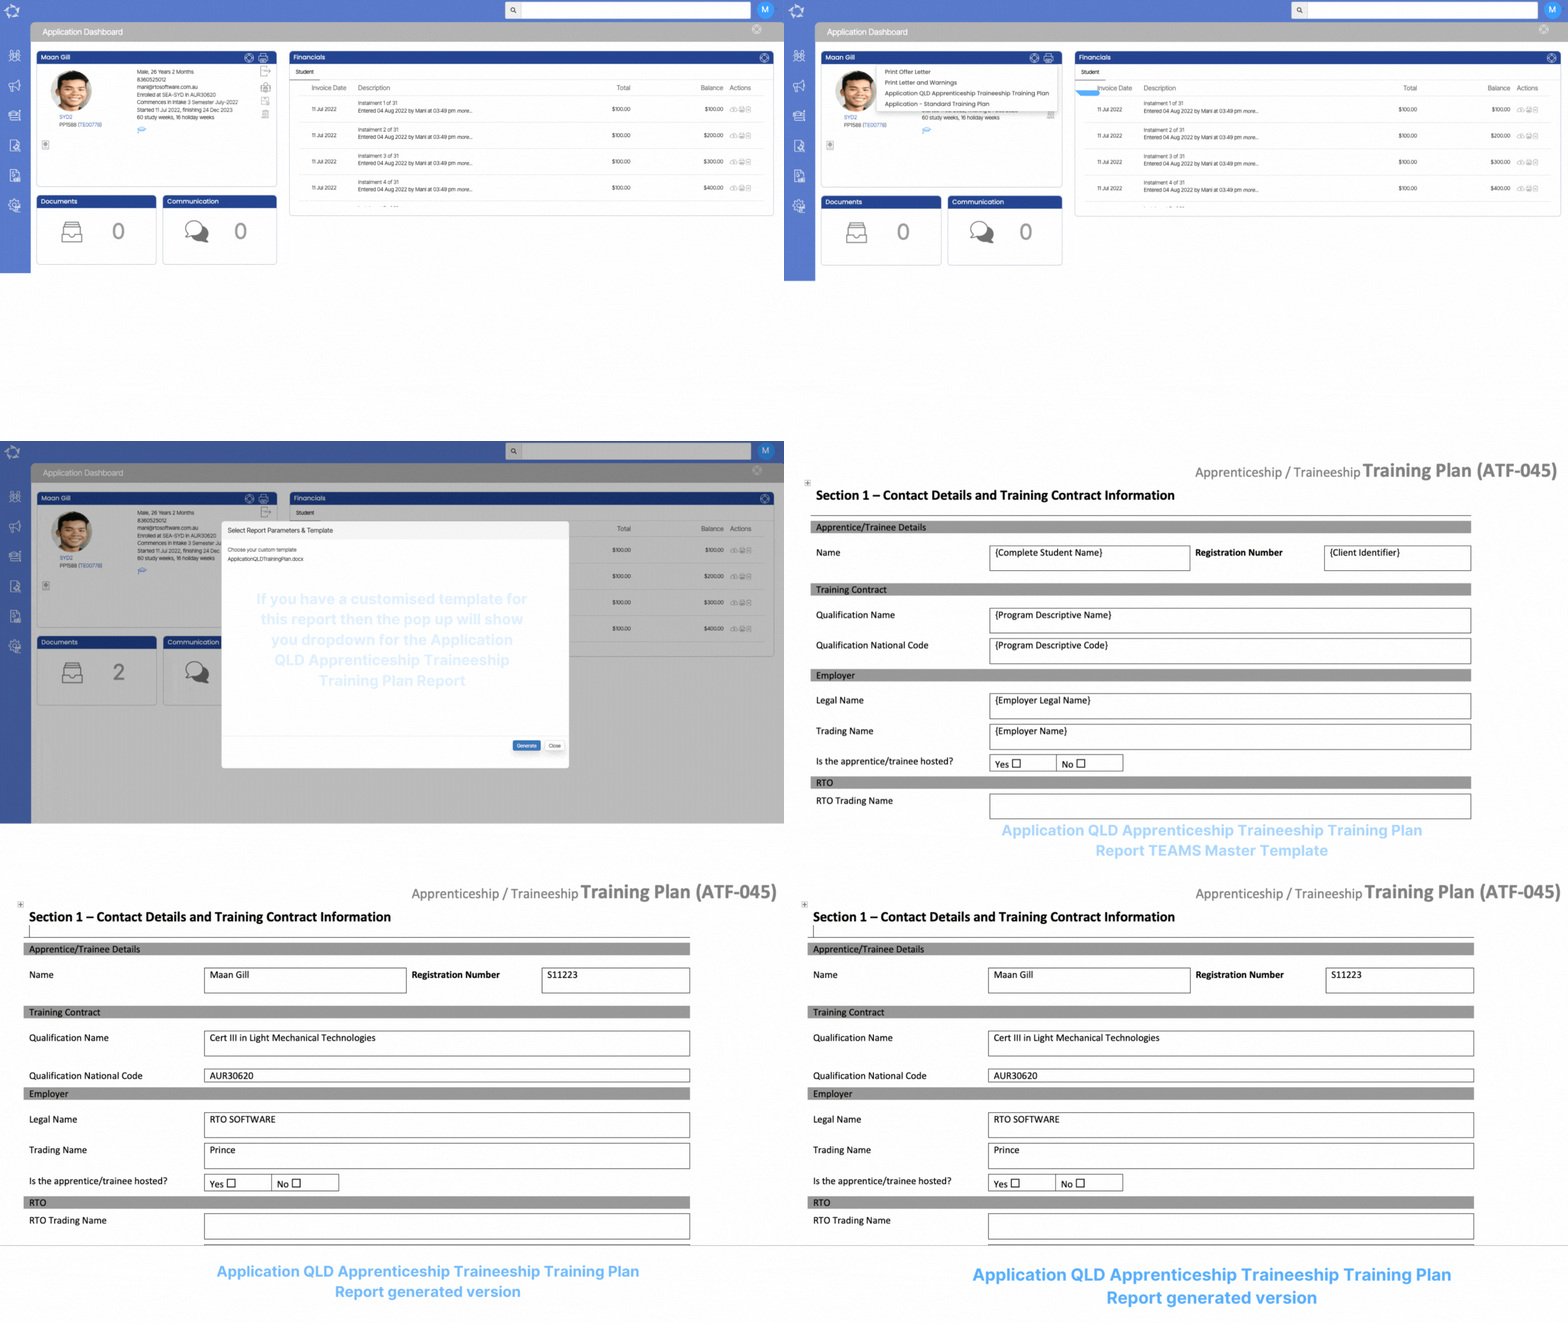
Application – QLD Apprenticeship Traineeship Training Plan Report

The Training Plan is a crucial document that outlines the training program for apprentices or trainees. It specifies the training content and who will provide it, as well as the details of when, where, and how the training will be delivered. The plan also explains the assessment process and when the apprentice/trainee will be deemed competent. Developed collaboratively by the RTO, apprentice/trainee, and employer, the Training Plan is a dynamic document that reflects the current status of the training and is regularly updated. It ensures compliance with standards, clarifies workplace tasks, and serves as a basis for reviewing and evaluating the training program.

In the Training Contract, all parties (apprentice/trainee, employer, and RTO) must fulfil their responsibilities as outlined.

Please select the desired template from the dropdown menu and select the Generate button. Once successfully generated, you can easily download the template in either PDF or DOC format from Report Dashboard.

IMPORTANT – To receive further guidance on customising the report templates according to your requirements, we recommend referring to the instructional post titled Report Templates. This post provides step-by-step instructions on modifying the templates to match your desired format and content.

Application Letters & Warnings

Application letter and warnings play a crucial role in formal communication as they are used to convey a person’s acceptance and enrolment into a program, course, or organisation. They provide important information such as program details, start dates, duration, and any specific conditions or requirements the individual needs to full fill.

You can select the template from the dropdown menu and select the Generate button. After a successful generation, you can easily download the report in either PDF or DOC format from the Report Dashboard.

IMPORTANT – It is important to note that this template can be utilised for generating letters and warnings at both the application and enrolment levels. To receive further guidance on customising the report templates according to your requirements, we recommend referring to the instructional post titled Report Templates. This post provides step-by-step instructions on modifying the templates to match your desired format and content.

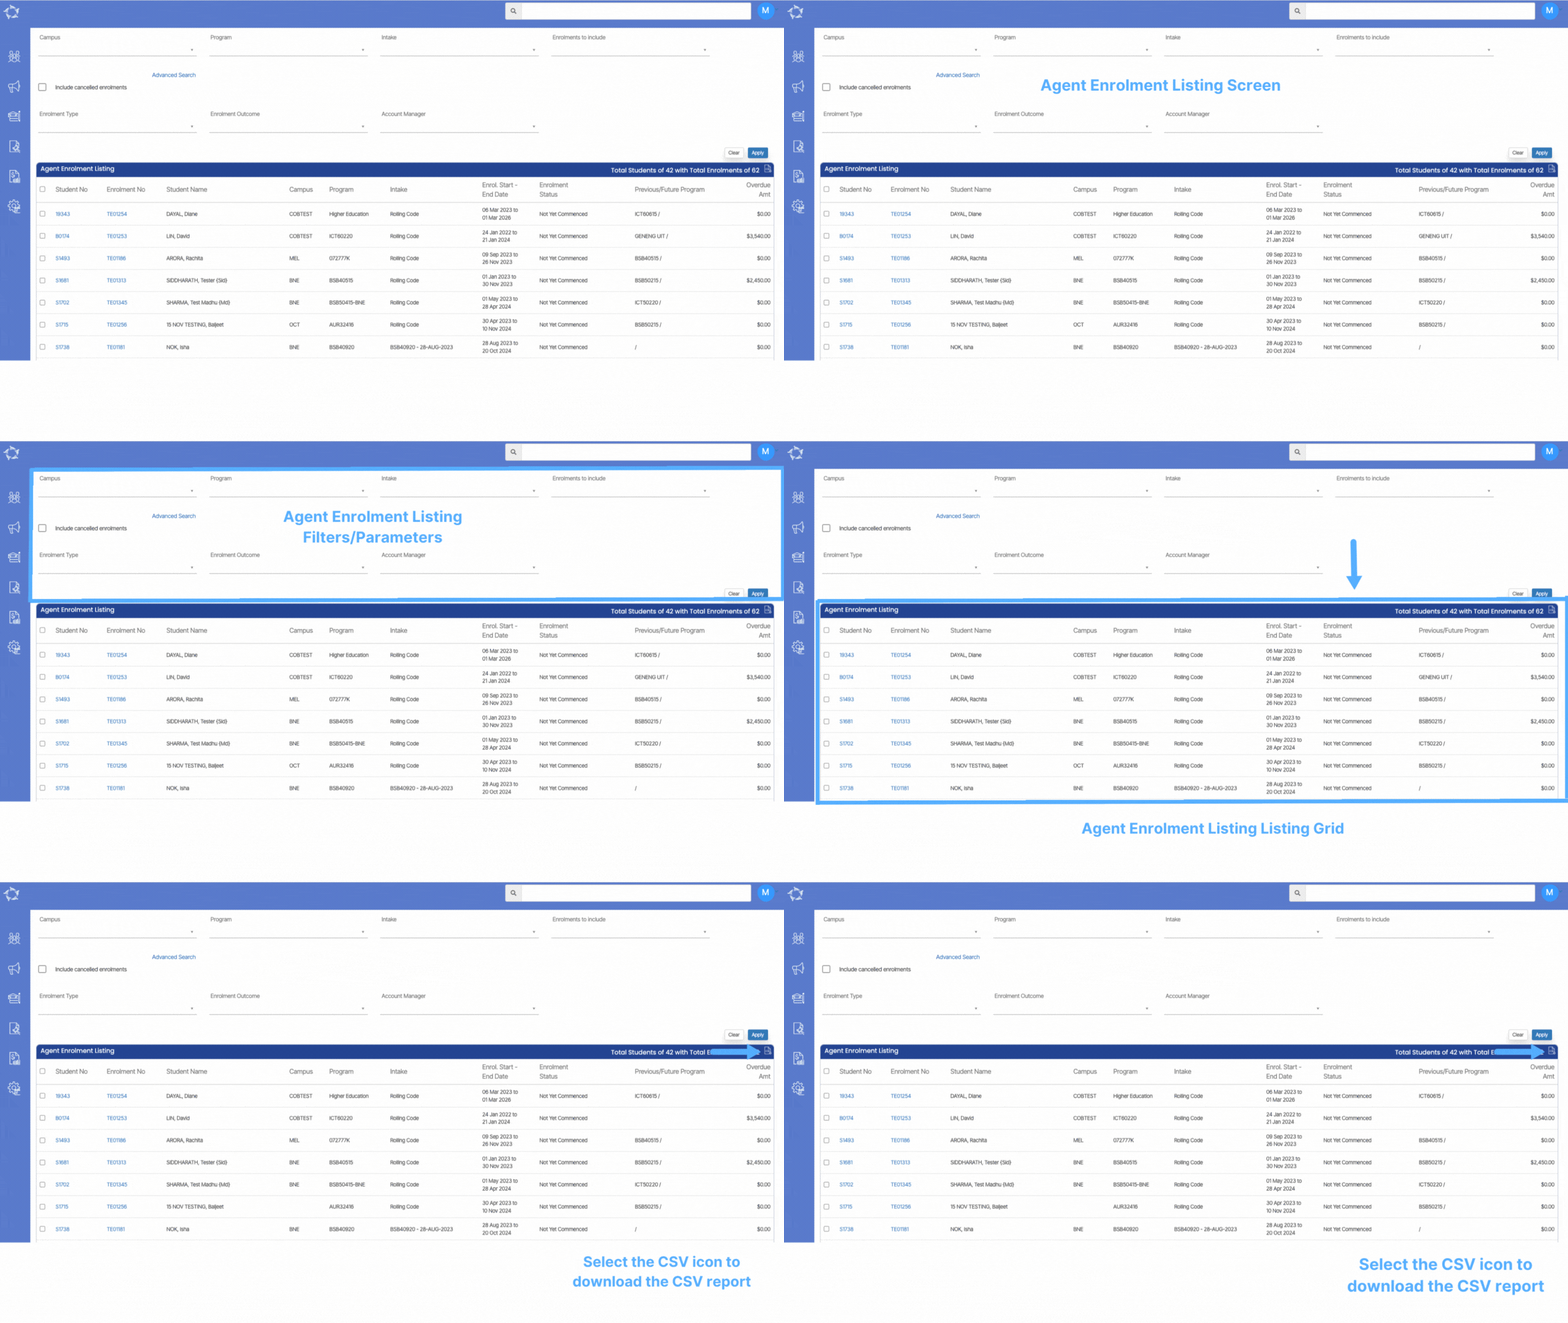
Agent Enrolment Listing Screen

This screen can be accessed from the Agent Dashboard in TEAMS and provides a comprehensive list of both enrolments that are linked to the specific selected Agent. The displayed enrolments are filtered based on the selected parameters of a particular Agent. This screen serves as a centralised hub to track and manage enrolment’s overdue amount. It will also show you Current, Start and Finished enrolments based on the filters selected.

As you can see below, this screen is divided into two sections:

  1. Filters/Parameters
  2. Listing Grid

Filters/Parameters

To open this screen, you would have selected the Enrolments from the Enrolments Tile on the Agent Dashboard. Based on what you selected the system will open the screen and populate the information in this section.

For an explanation of each filter and how the system will use it, please click here for more information.

Listing Grid

The system will show you a summary of information for each enrolment linked to the agent. The information that displays in the columns for this grid is generally standard information. However, please keep an eye out for any What’s New posts for this screen as this is where we would let you know of any new columns or changes to existing ones that we do.

Icons – Click here to learn more about how to use these icons

Burger Menu – Click here to learn more about how to use the burger menu