Term Breaks

Main Dashboard > System Admin menu > Term Breaks

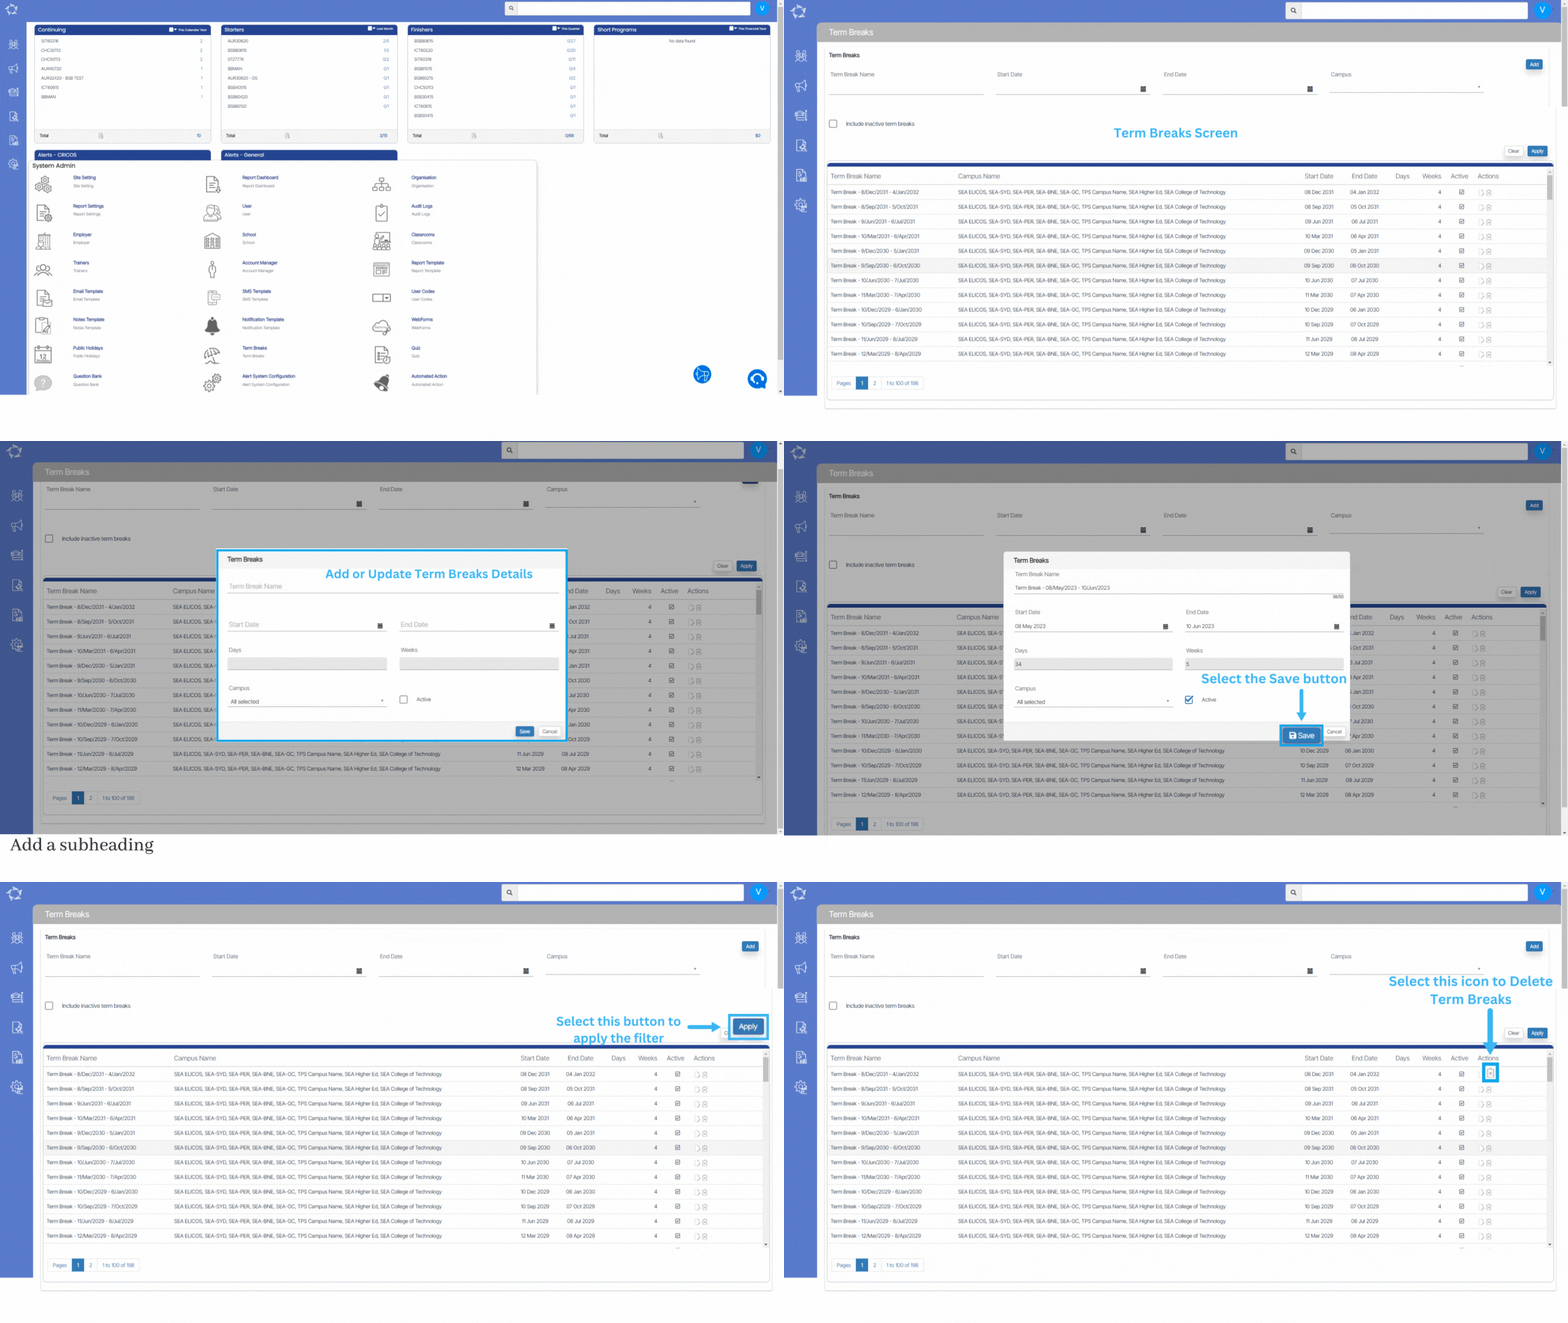
The Term Breaks screen allows you to manage and view information about term breaks. On this screen, there is a grid that displays the existing term breaks. Each term break is represented by a row in the grid.

To find specific term breaks, you can search by the name of the term break, the start and end dates of the break, and also filter by campus if applicable. Once the desired search criteria are entered, you can select the Apply button to filter the term break. This will update the grid to display only the term breaks that match the specified search criteria.

On the top right corner of the screen, Add button. By selecting this button, a popup window will appear. This popup window provides a set of fields where you can enter information to create a new term break.

Once all the necessary information is entered into the popup form, you can save the new term break by selecting the save button within the popup window. This action will add the new term break to the existing list in the grid on the Term Breaks screen.

Instalment Plan Step 2

Instalment Plans > + Instalment Plan button

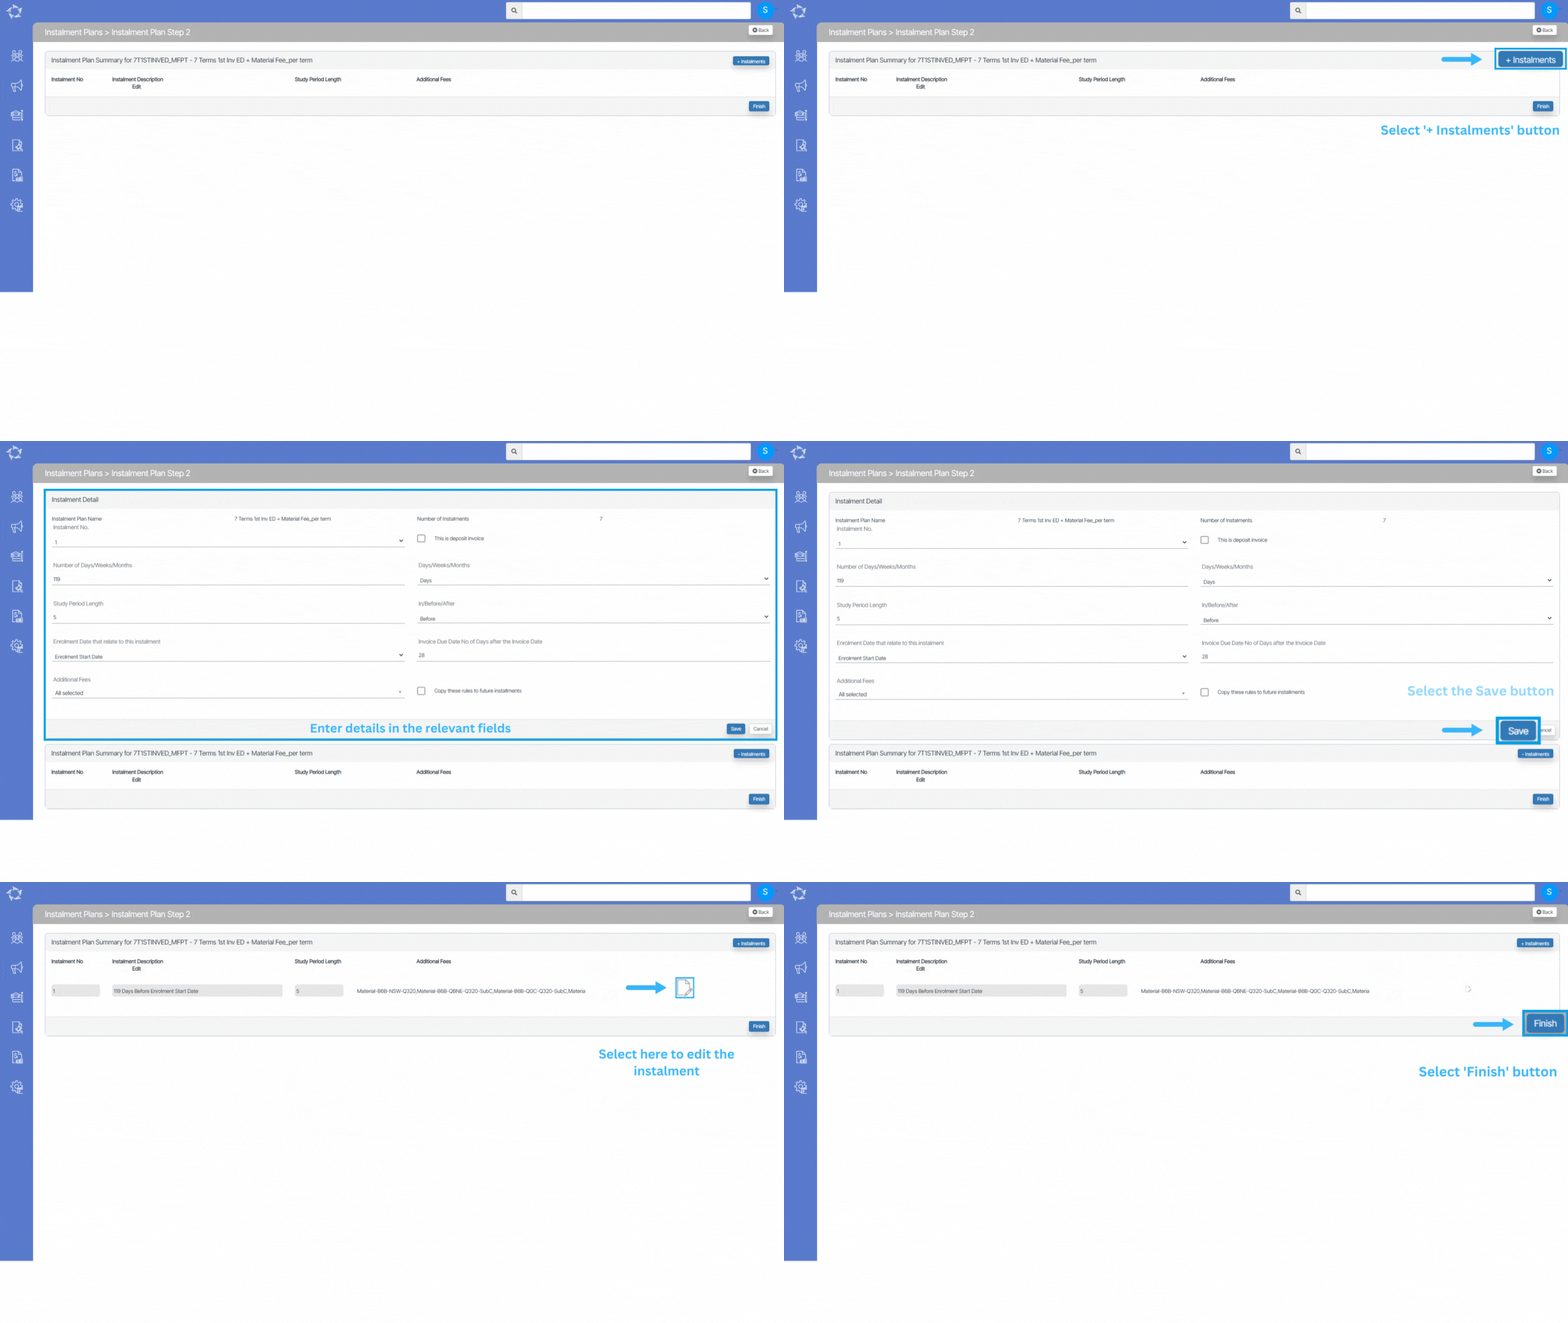
Follow the below steps to add the Instalments to the Instalment Plan:

  • Select the + Instalments button to add the new Instalment Plan to the system.
  • Once the +Instalments button is selected, it will display the Instalment detail screen where you will see different fields.
  • Enter details in the relevant fields and select the Save button.
  • You will see the instalment plan in the grid, you can edit your instalment plan as well.
  • Select Finish to finish to create the instalment plan

Below is the Explanation of the fields:

FieldsExplanation
Instalment No.Select instalment no. from dropdown list.
This is Deposit InvoiceSelect this tick box if it is a deposit invoice.
Number of Days/Weeks/MonthsYou can add a number of days/weeks/months.
Days/Weeks/MonthsYou can select days weeks or months from dropdown list.
Study Period lengthEnter the Study period length
In/Before/AfterYou can select before or after from dropdown
Enrolment date that relate to this instalmentYou can select enrolment date from the dropdown list.
Invoice Due Date no of Days after the Invoice dateYou can add invoice due date no of Days after the Invoice date.
Additional FeesSelect additional fees from dropdown list if any.
Copy these rules to future installmentsTick this box if you want these rules for your future installments. If you tick this box then In/Before/Months field will be selected as On and the Enrolment date that relate to this instalment field will show days in dropdown list

The unit’s start and end date should be within the enrolment dates

On the Training plan and Results screen, where you can see all the units’ related and other information for a student’s enrolment, we have some set of business rules that you must follow to avoid certain errors/issues. This post will explain to you all those business rules.

1. The unit’s start and end date should be within the enrolment dates. For instance, if an enrolment’s start and end dates are 11 Jan 2021 and 16 Oct 2022 respectively, then all the units linked with that enrolment should have their start and end dates within these dates. The system itself will not allow you to enter the dates out of enrolment dates. The calendar will strikethrough the dates which are outside of enrolment dates. See the below screenshot:

2. A unit’s end date cannot be lesser than its start date. The system will throw an error if any user by mistake have clicked on the end date which is before its start date. And as a result, the end date will be updated the same as the start date of the unit.

3. A unit’s start date cannot be greater than its end date. If any user by mistake has clicked on the start date which is after its end date, the system will update the end date the same as the new start date.

4. Result date cannot be after the enrolment’s end date. If an enrolment’s end date is 16 Oct 2022, then the result date cannot be after this date. However, the result date can be after the unit’s end date.

5. You cannot delete a unit if it has a final outcome such as Competent, Credit Transfer, Competency not achieved/fail etc. The delete icon will disappear under the Actions column for such units.

6. Always update the final outcome for all the units once a student has completed the course to avoid errors in AVETMISS reporting. For instance, if a unit’s result is Continuing Enrolment and the end date has passed, then there will be an error for that unit in the AVETMISS reporting.

7. In case of a superseded unit, always link the new unit with the enrolment and delete the one that is no longer required to avoid errors/warnings.

8. If you are using TEAMS for assessments as well, make sure the final result is updated for the unit after you have marked the result for that unit’s assessments.

9. Update the Qualification Information section very carefully after a student has completed a course, so that the enrolment can be reported correctly.

10. All the units will display in a seq, based on the seq no. updated at the program > subject screen.

Note: If the seq no. is not updated, then the units will display in the ascending alphabetical order based on the unit code.

If you have any queries, please do not hesitate to contact us on 1300 85 05 85 or email us via support@rtosoftware.com.au
Academic Template Entry

Overview

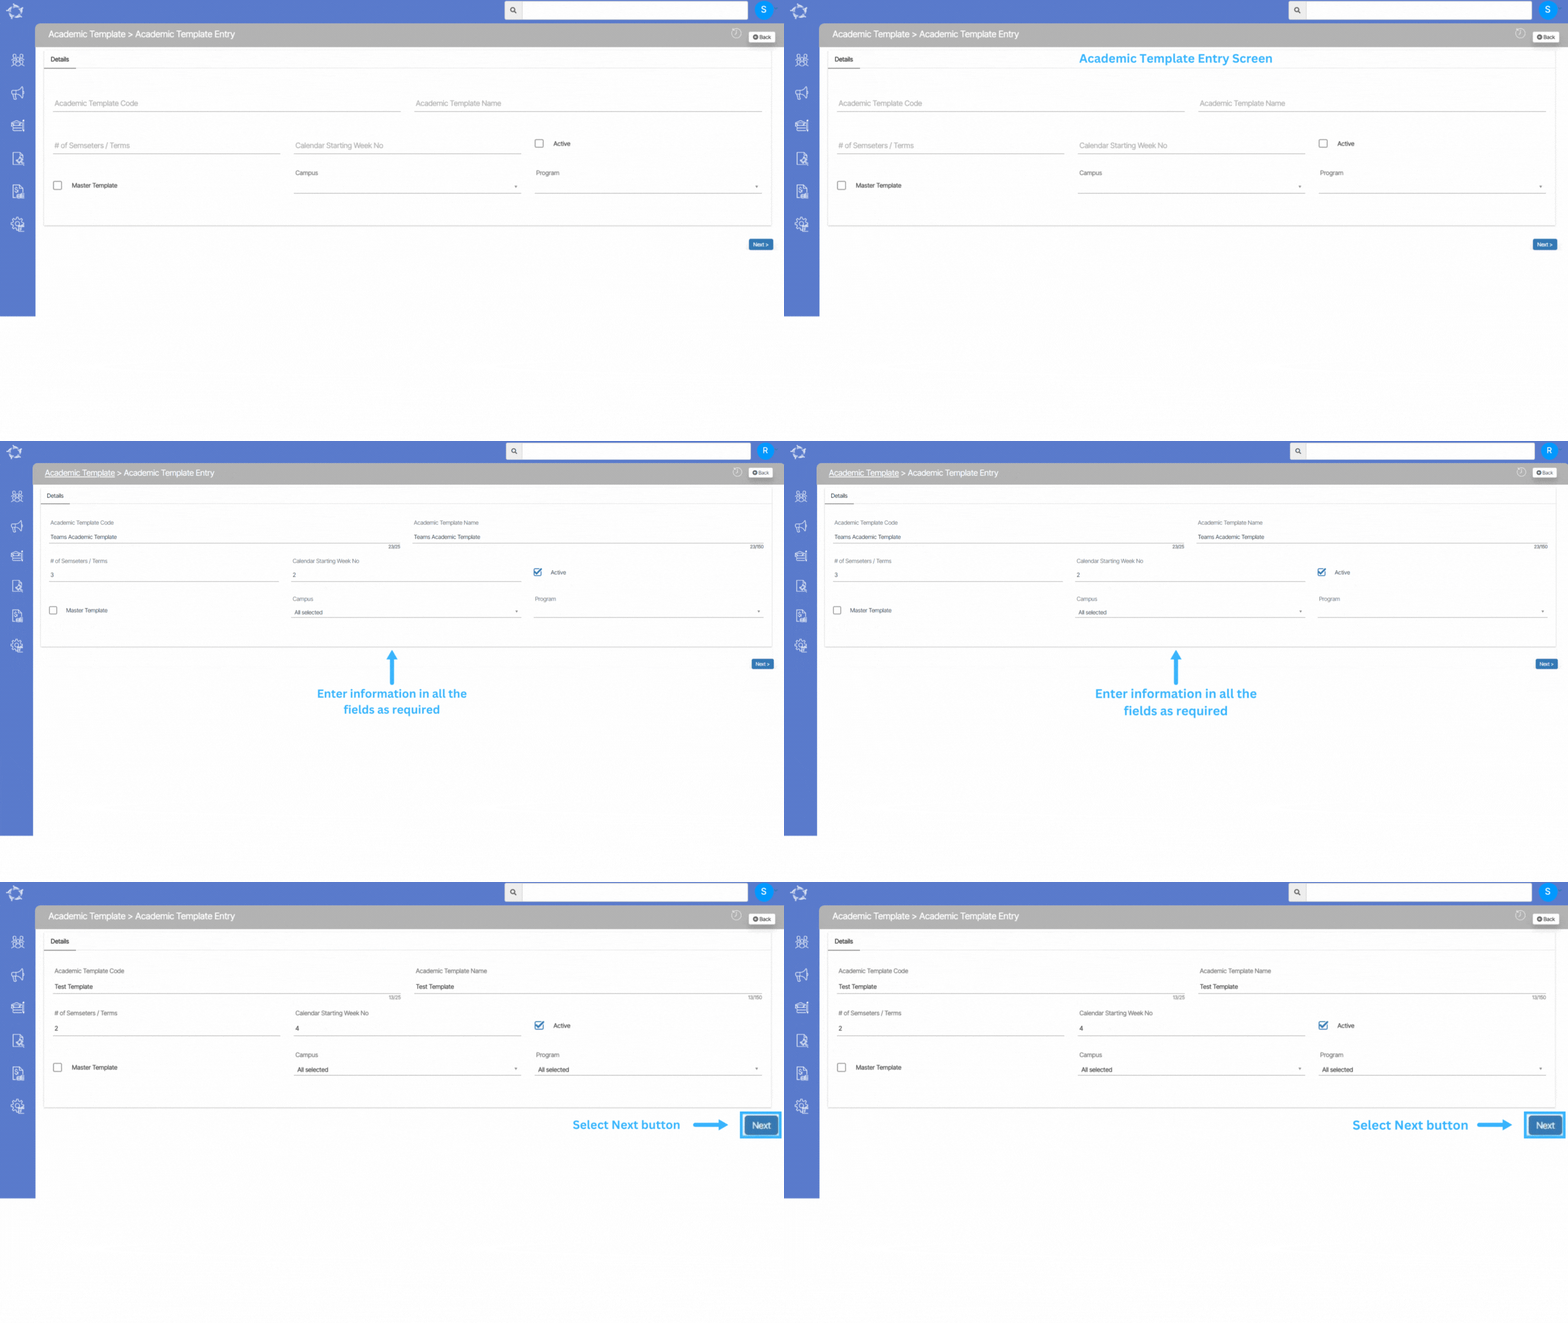
When you select the +Academic Template button on the Academic Template Welcome screen, the system will redirect you to the Academic Template Entry screen. This is where you will initiate the process of creating a new academic template within the system.

Note – Any changes made on this screen will not be saved unless you proceed to the next step and completes all the necessary actions in the academic template.

Explanation of the fields below:

FieldsExplanations
Academic Template CodeDepending upon your requirements type the academic template code in the field
Academic Template NameDepending upon your requirements type the academic template name in the field
# of Semesters/TermsWrite the total number of semesters/terms. For example 2 or 4
Calendar starting week noWrite the calendar starting week number in this field
ActiveSelect this tick box to activate the academic template
CampusIf you have multiple campus and wanted to apply this template to all of your campuses then you can select them by selecting the tick boxes.
ProgramIf you wish to apply multiple programs to the template then you can select them from the dropdown

Once all the above fields are selected and updated then you need to select the next button to complete the further actions. To know more select the next arrow button below.

Subject – Assessments

When you click on the Assessments option, the assessments screen will open, where you can add assessments of the subject as shown below:

When to select the “+Add” button, an assessment entry screen will open as shown below:

Explanation of the fields below:

  • Object Type – From the dropdown menu you can select the object type.
  • Select Subject – It is a magic search field, where you can select a particular subject.
  • Assessment Code – Here you can write assessment code.
  • Assessment Name – Here you can write the assessment name.
  • Assessment Description – Here you can write an assessment description.
  • Sequence No. – Here you can write the sequence number of the assessment.
  • Allow Multiple documents – Tick this box if you want to upload multiple documents with one assessment.
  • Allow Grading – Tick this box if you want to mark grades for an assessment.
  • Allow Resubmission – Tick this box if you want to allow an assessment to be resubmitted.
  • Active – Tick this box to make an assessment active.

Then hit the save button, to save an assessment. you can see the saved assessment in the grid below:

If you have any queries, please do not hesitate to contact us on 1300 85 05 85 or email us via support@rtosoftware.com.au


Subject – Burger Menu

Once the subject is created you will see a burger menu on the Subject Entry Screen as shown below:

When you select the burger menu, you can see different options under the burger menu as shown below:

Explanation of the options under the Burger menu

If you have any queries, please do not hesitate to contact us on 1300 85 05 85 or email us via support@rtosoftware.com.au
Program – Purchasing Contract

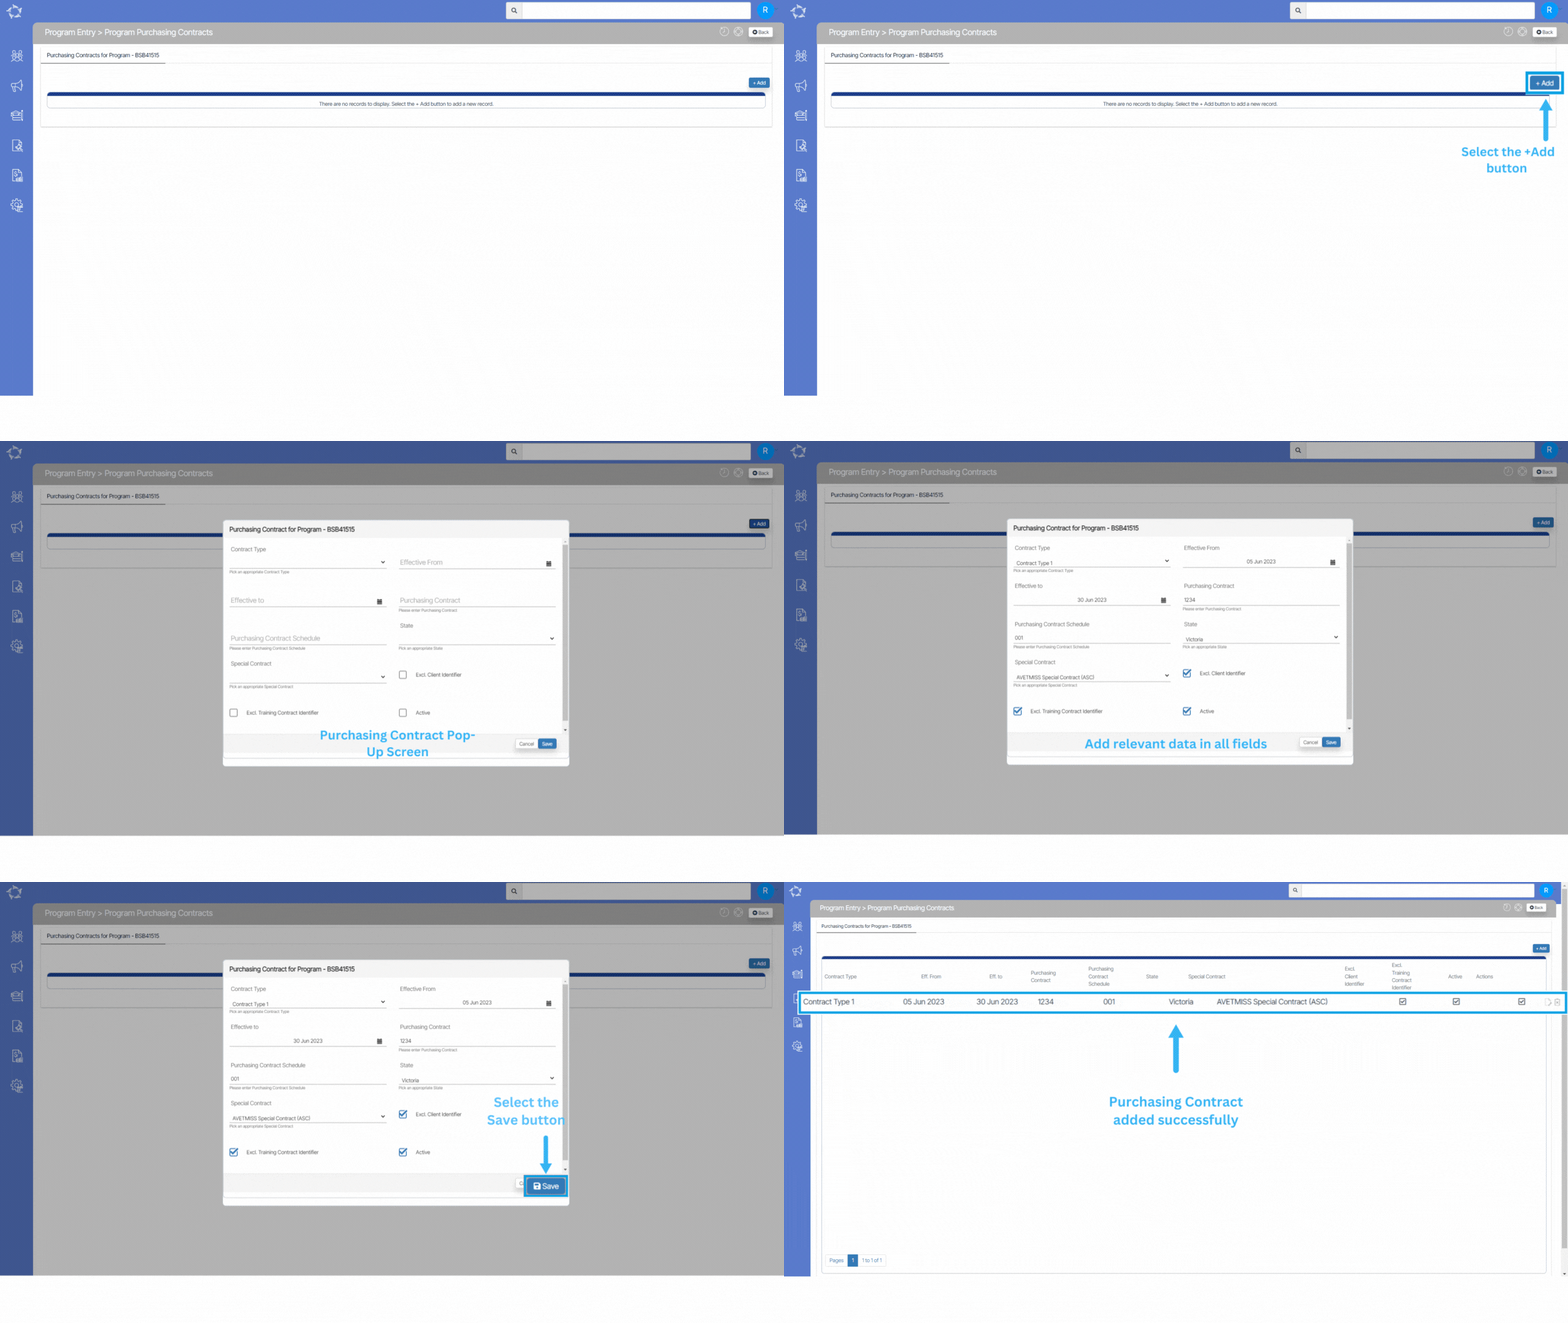
On the purchasing contract screen, you have the option to add the details of the purchasing contract for the program.

When you select the +Add button, a popup window will appear where you can enter the necessary information

Explanation of the fields below:

  • Contract Type – From the dropdown, you can select the contract type.
  • Effective From – From the calendar, you can select the contract starting date.
  • Effective to – From the calendar, you can select the expiry date of the contract.
  • Purchasing Contract – Here you can add the contract number.
  • Purchasing Contract Schedule – Here you can add the contract schedule number.
  • State – From the dropdown, you can select the state.
  • Special Contract – From the dropdown, you can select the special contract type.
  • Excl. Client Identifier – Tick this box if you want to exclude the client identifier from the purchasing contract.
  • Excl. Training Contract Identifier – Tick this box if you want to exclude the training contract identifier from the purchasing contract.
  • Active – Tick this box to make the contract active.

After filling in the required details, click the save button. You will then be able to see the added purchasing contract in the grid below.

Program – AVETMISS

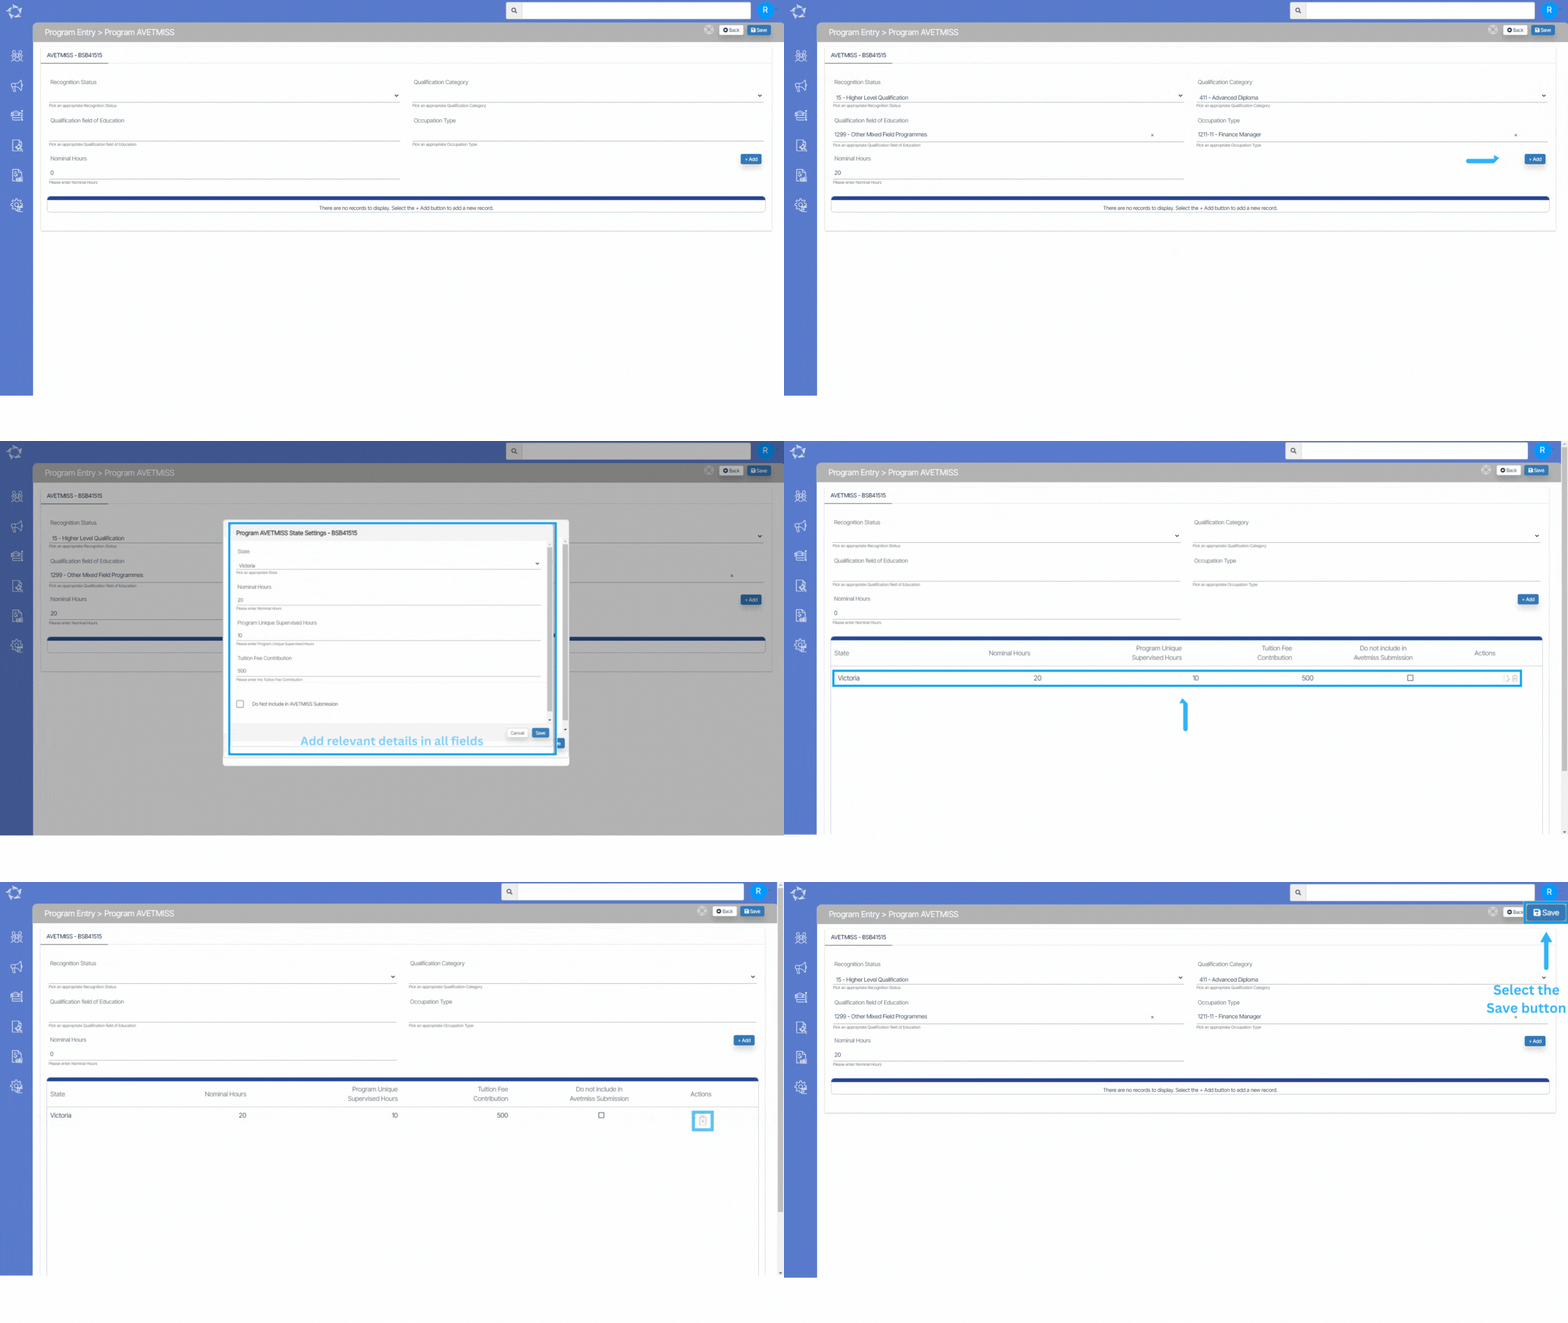
In AVETMISS reporting, Program AVETMISS settings refer to the specific data elements used to describe and report vocational education and training (VET) programs and qualifications. This screen will allow you to update the Avetmiss details for a program as well as Program AVETMISS State Settings.

IMPORTANT – It’s important to note that AVETMISS reporting requirements may be subject to updates and changes. Therefore, it is advisable to consult the official AVETMISS documentation and guidelines provided by the National Centre for Vocational Education Research (NCVER) or the relevant state or territory training authority for the most accurate and up-to-date information regarding AVETMISS settings for student programs in colleges in Australia.

Explanation of the fields below:

  • Recognition Status – From the dropdown menu, you can select the recognition status of the program.
  • Qualification Category – From the dropdown menu, you can select the qualification category of the program.
  • Qualification field of Education – It is a magic search field where you have to put the code of qualification field of education, and you can select the appropriate code from the suggestions.
  • Occupation Type – It is a magic search field where you have to put the code of occupation type, and you can select the appropriate code from the suggestions.
  • Nominal Hours – Here, you have to put the sum of all the nominal hours of the subjects linked with the program.

After that, you can select the +Add button to update the Program AVETMISS State Settings. Once you select the +Add button, the floating window will appear as shown below:

Explanation of the fields below:

  • State – You can select the state from the dropdown.
  • Nominal Hours – Here you have to write the nominal hours.
  • Program Unique Supervised Hours – Here you can add the total number of unique hours of supervised training and assessment activity for the Program.
  • Tuition Fee Contribution – Here you can add the total tuition fee contribution set by the government as per Band 1, Band 2, and Band 3.
  • Do Not Include in AVETMISS submission – Tick this box if you do not want to include this program in AVETMISS submission.

Then hit the save button to save these details.

Program – GTP

This screen will show the GTP code, GTP Name and their Dates in the grid that are linked to the Program as shown below:

Note: GTPs can be created and linked to a program from the Group Training Plan Entry screen.

If you have any queries, please do not hesitate to contact us on 1300 85 05 85 or email us via support@rtosoftware.com.au

Program – Subjects

Program > Program Entry Burger Menu > Subjects

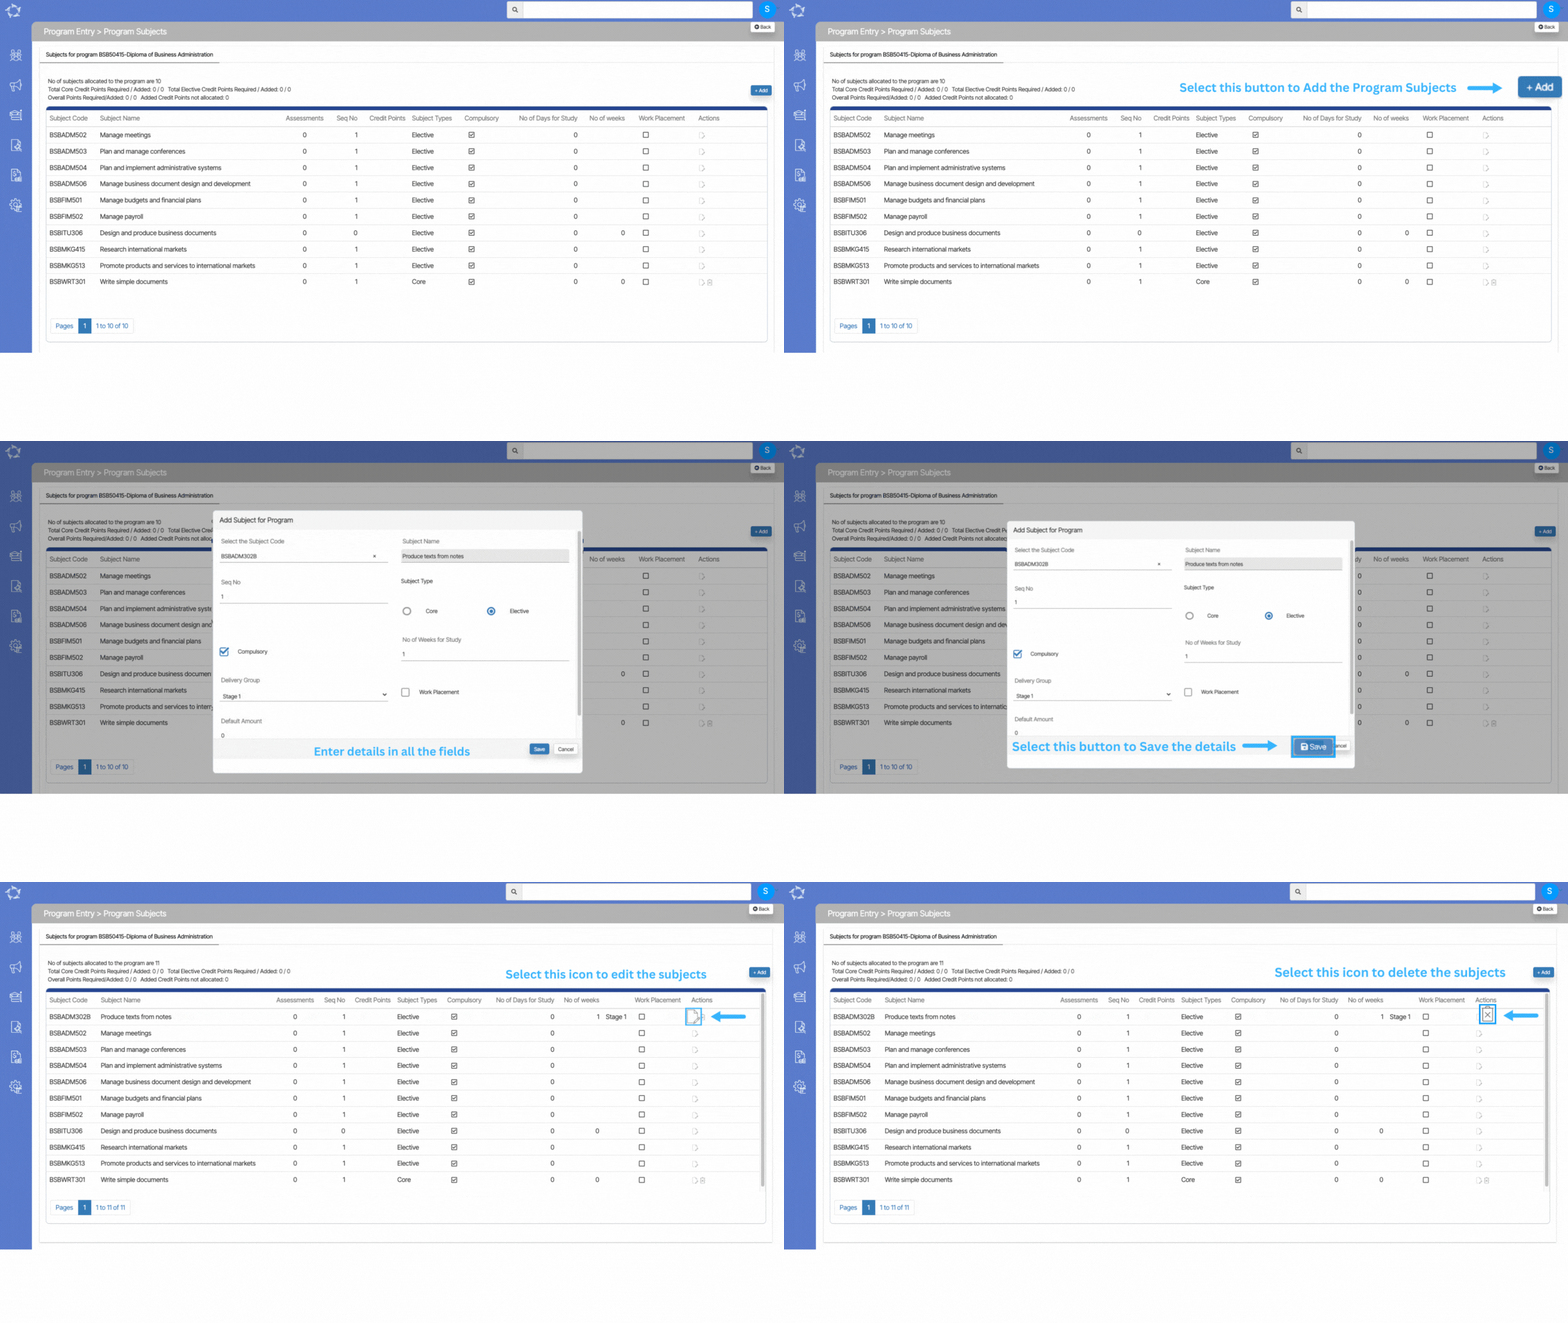
The program Subjects screen is where you can link subjects to the new program created in the system. If you already have a program and you are linking a subject to the existing program then the system will show you all the other subjects in the grid that are allocated to the Program. You can also edit the subject by selecting the edit icon under the actions column.

If you have created a brand new Program and you want to link the subjects to it, you need to select the +Add button on the right hand side of the screen. Once you have selected the Add button, you will be presented with the pop window where you need to do the following steps.

Explanations of the field below:

FieldsExplanations
Select the Subject CodeIt is a magic search field, where you have to write the initials of the subject code and then you can select the subject code from the suggestions below.
Subject NameIt is a read-only field, which will be auto-populated when you select the subject code
Seq NoHere you have to write the sequence number of the subject. for eg if x,y, and z are three subjects then you can write seq no as x as 1, y as 2, and z as 3.
Subject TypeSelect the radio buttons as core or elective.
CompulsorySelect the tick box to make the subject compulsory.
No of Days for StudyHere you can add the number of days required to study a particular subject.
No of Weeks for StudyHere you can add the number of weeks required to study a particular subject.
Delivery GroupHere you can select the delivery group from the dropdown.
Work PlacementSelect this tick box if the subject is work-based, not classroom-based.
Default AmountIf your RTO is using subject invoicing, then you can add the amount to study the subject in this field.