Contact Information Merge Fields

In the system, there are contact information merge fields for each object such as Applicant/Student, Agent, Employer and Schools. There is also contact information at the user and campus etc.

For each of these objects, there will be one or many types of contact information merge fields such as Phone number, Mobile number, Fax number, and Email Address for local and international contact information.

Each of the fields for contact information then becomes a merge field in our MS Word report templates. For example, the merge fields of each object’s contact information fields are as follows:

Applicant/Student Contact merge fields
Agent Contact Merge fields
Employer contact merge fields
School Contact information merge fields

IMPORTANT – Always insert the merge field with the {} brackets, do NOT change them to any other style of bracket such as (), the system looks for the {} ones and will not work if you use any other style of brackets.

This is how the contact information merge fields will print the data in your customise templates

If you have any queries, please do not hesitate to contact us on 1300 85 05 85 or email us via support@rtosoftware.com.au

Business Rules – Linking Employers to Enrolment

For Funded Employers

1. For employer role ” Legal“, you can not add multiple entries with overlapping dates.
2. If an employer with the role “GTO” is added then you can not add another employer with the role of GTO or legal.
3. If employer role ” GTO ” is selected then the system will check if its start date is greater than the last legal employer end date, only then it will allow adding the GTO employer to the grid

Applicant/Student Merge Fields

Merge FieldsObjectsExplanations
{Student First Name}Applicant/Student
Applications/Enrolments
This merge field will show you the student’s first name updated on the Applicant and Student entry screen
{Student Last Name}Applicant/Student
Applications/Enrolments
This merge field will show you the student’s last name updated on the Applicant and Student entry screen
{Student Middle Name}Applicant/Student
Applications/Enrolments
This merge field will show you the student’s middle name updated on the Applicant and Student entry screen
{Student English Name}Applicant/StudentThis merge field will show you the student’s english name updated on the Applicant and Student entry screen
{Student Country}Applicant/StudentThis merge field will print the country name which is selected at the applicant entry screen and the student entry screen
{Student Nationality}Applicant/StudentThis merge field will print the Nationality which is selected at the applicant entry screen and the student entry screen
{Student Passport Number}Applicant/StudentThis will print the student passport number updated on the student profile > overseas icon > overseas screen
{Student Passport Expiry Date}Applicant/StudentThis is the student visa expiry detail field updated on the Applicant/student > visa screen
{Student Number}Applicant/Student
Applications/Enrolments
Generated by TEAMS
{Student Title}Applicant/StudentStudent title selected that the Applicant/Student level
{Visa Number}Applicant/StudentVisa number updated at the applicant/student level
{Student DOB}Applicant/StudentUpdated at the Applicant/Student level
{Student Gender}Applicant/StudentUpdated at the Applicant/Student level
{VSN}Applicant/StudentUpdated at the Applicant/Student level
{USI}Applicant/StudentUpdated at the Student level
{CHESSN}Applicant/Student
{Age}Applicant/StudentThis field will print the age of the applicant and Student selected the at the applicant/student level
{LUI}Applicant/Student
{TRS No}Applicant/Student

Merge Fields

Report merge fields are special fields that are used in different MS Word reports, Email and SMS templates in TEAMS.

When you customise any of the templates you would add merge fields into the custom templates you create. Then when you select the custom template for the system to use to send an email or sms or generate a specific report it shows you a list of your custom templates to choose from. Once you have selected the specific custom template and selected Generate (reports) or Send (Email and SMS) the system looks for the merge fields you have added to know what information to copy into the report or message you are generating and replace the merge field with the relevant information into the report/message instead. Where there is no data in the database to replace the merge field, in the generated report or message there will be no information and the merge field would not show.

For each object in the system such as Applicant/Student, Applications/Enrolments, Agents, Employers, Schools etc there will be different merge fields available. This post will show you for each object, what merge fields are available and give you an explanation of what data/information the system will replace the merge field with. Please note, that there will be a large number of very common sense merge fields such as Student First Name, Student Middle Name etc, where the explanation will be very simple. The system will replace the merge field with the student’s first name or middle name etc, however, there will be some fields where it is not evident what the system will replace, so please make note of them.

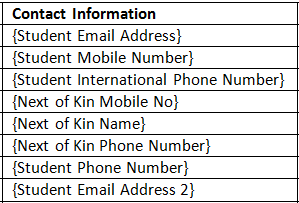
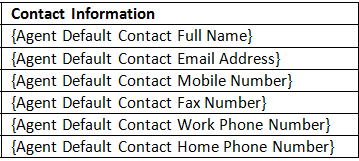
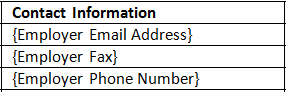
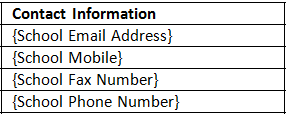
For some merge fields, such as Addresses and Contact information we will not list them for each object as they are the same across. Below you can select the icon for Addresses or Contact Information to learn more about these merge fields and any important information for them.

Objects such as Applicant/Student, Applications/Enrolments, Agents, Employers, Schools etc have different merge fields available in the system.

Applicant/Student Merge Fields

Application/Enrolment Merge Fields

Agents Merge Fields

Employers Merge Fields

Schools Merge Fields

Bank Account

Main Dashboard > Finance > Bank Account

The Bank Account screen allows you to manage your linked bank accounts effortlessly. From this screen, you can view your existing bank accounts, add new ones, or make changes to the existing ones.

If you wish to add another bank to the campus then you can select the +Add button.

Once you select the +Add button, a floating window will open on the screen. Fill in the required information in the provided fields, Enter your account holder name, followed by the account number and the associated bank’s name. Ensure the accuracy of the details entered to avoid any transactional issues. Double-check the information before proceeding to the next step. Once all the necessary fields have been completed, click the “save” button to finalize the process.

You can also edit or remove existing bank accounts by clicking on the respective icons next to each account.

Below is the explanation of the fields

FieldsExplanation
Bank NameAdd Bank Name here.
BSB No/Swift CodeAdd your bank BSB No/Swift Code.
Account NumberAdd account number in this field.
Account NameAdd the Bank account holder’s name here.
AddressYou can add your bank address in this field.
ActiveTick this box if you want to active this Bank Account.

Trainer Entry Screen

Main Dashboard > System Admin menu > Trainers Entry

To create a new trainer, you need to click on the +Trainer button. This will take you to the Trainer Entry Screen, where you will be required to select the appropriate trainer code and name, along with other relevant details that need to be filled in. It is essential to ensure that you enter the correct trainer code and name to avoid any confusion later on.

Click on the ‘Save‘ button after filling in the details of the Trainer.

Below is the Explanation of the fields.

Field NameExplanation
Trainer CodeYou can add the Trainer Code here
Trainer NameYou can add the Trainer Name here
Trainer Links to all CampusesTick this option to select this Trainer for all campuses
CampusYou can select specific Campus for the Trainer here
UserSelect the User from the dropdown list.
ActiveTick this box to make the Trainer active.

Account Manager

Main Dashboard > System Admin > Account Manager

history of changes

Overview

An account Manager typically refers to a professional who is responsible for managing relationships with accounts within your educational institution or organization. Their primary role is to serve the institution, ensuring that their needs are met and that they receive excellent service.

The Account Manager Welcome screen will show you the welcome message (the total number of active account managers with total active account managers) The screen shows you the list of Account Managers in the grid that are Active in your system.

This screen is divided into two sections:

  • Filters/Parameters
  • Listing Grid

Filters/Parameters

The filters will show you different fields where you can select the data as per your need then select the Apply button and based on your selection the system will load the list of Account Managers in the grid. You can also see the Total count and the Active count of the Account Managers. You can select the +Account Manager button to add a new Account Manager to the system.

Listing Grid

In this grid, you can see the list of all Account Managers. You will see columns such as Account Manager Code, Account Manager Name, Campus, Total enrolments, Total Applications (Pending/Cold), Total agents, Active and Actions. All of the columns are self-explanatory.

Select here to know more about the Burger Menu

Select here to know more about the Action Column

Employer

Main Dashboard > System Admin menu > Employer

The Employer screen displays a grid showing all the employers that have been created in the system. You can search for a specific employer by name or code, campus, marketing source, or account manager, and then select apply button to view the relevant results.

Additionally, there is an option to add a new employer by selecting the “+Employer” button. This functionality allows users to easily manage and search for existing employers, as well as add new employers to the system.

Public Holidays

Main Dashboard > System Admin menu > Public Holidays

history of changes

The Public Holidays screen provides you with a comprehensive view of all the existing public holidays on your TEAMS site. It is displayed in a grid format, highlighting the relevant details of each holiday. In order to add new public holidays, you can locate the Add button situated at the top right corner of the screen.

Within this screen, you will find icons for editing and deleting holidays. The edit icon allows you to modify the details of a specific holiday, such as changing the name or date. By clicking on the delete icon, you can permanently remove a holiday from the system. These icons provide convenient options for managing and maintaining an up-to-date list of public holidays.

Below is the explanation of the fields

FieldsExplanation
Holiday NameEnter the desired name for the Holiday Name field.
Holiday DatePlease select the date for the holiday.
NationalWhen you select the radio button as a National holiday, it will display National in the State column on the holidays screen
StateWhen you select the radio button for State, the system will show you a dropdown next to the State radio button and you can select states manually by selecting the tick boxes. Once you select and save, you will be able to see those selected states in the grid on the public holidays screen.
SaveSelect the “Save” button to add the holiday.
CancelUse the “Cancel” button to abort the process of adding a holiday.

Instalment Plans

Main Dashboard > Finance > Instalment Plans

Overview

An instalment plan is a financial arrangement that enables students to pay their tuition fees in smaller, more manageable amounts over a specified period of time, instead of paying the entire amount upfront. it can help make education more accessible and affordable for students who may not have the financial means to pay the full amount at once.

The instalment plans welcome screen is divided into two sections:
1) Filters/Parameters
2) Listing Grids

Filters/Parameters:

The filters/parameters section under the Instalment Plans welcome screen allows you to search for instalment plans using the Instalment Plan Name and Code in the search field. Additionally, you can choose to include inactive instalment plans by selecting the Include Inactive instalment plan tick box. The + Instalment Plan button allows you to add a new instalment plan to the system.

Listing Grid:

The listing grid displays all of the active instalment plans that currently exist in the database. Users can use this information to manage and track existing instalment plans, ensuring that they are being used effectively and efficiently.

Icons – Click here to learn more about how to use these icons