Subjects

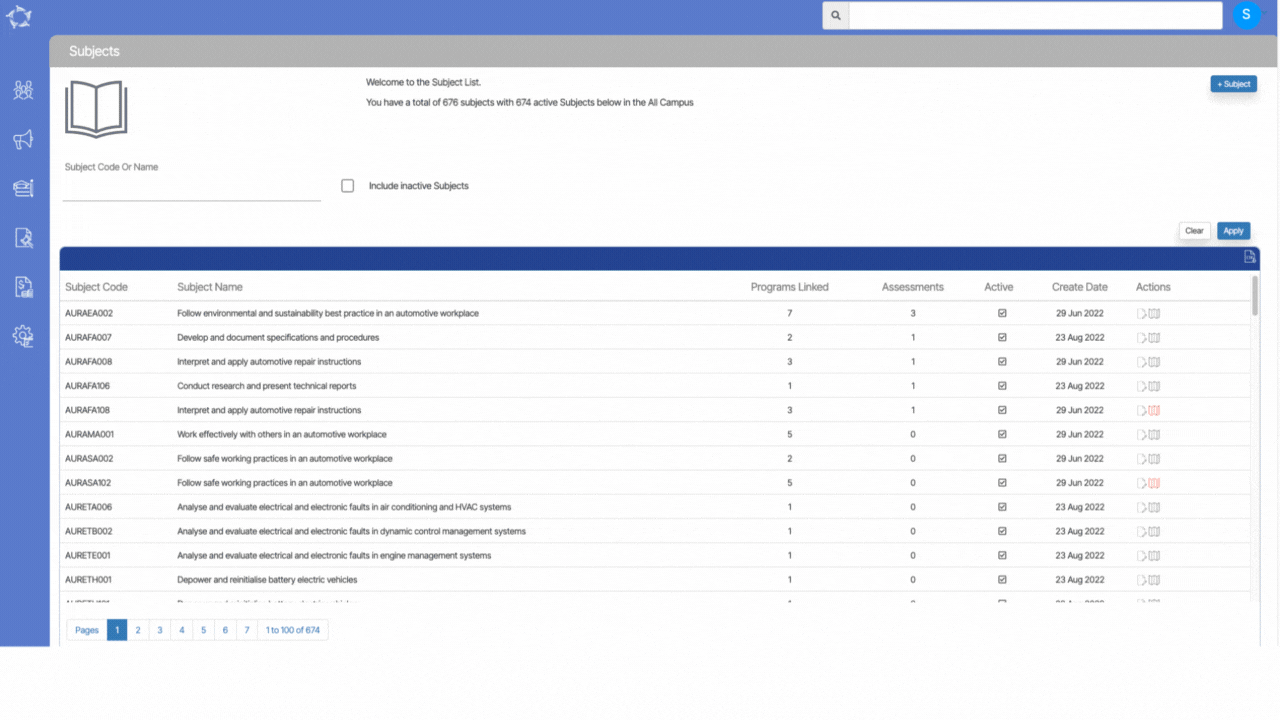
Main Dashboard > Academics menu > Subjects

The Subjects welcome screen will show you the total number of subjects with the total number of active subjects for all the campuses.

To find a particular subject, you can search for it using either its code or name. If you want to see subjects that are no longer active, you can choose to include them in your search results by ticking a box and clicking the apply button. This can be useful when you need to manage both active and inactive subjects.

IMPORTANT – It is recommended that when creating any new subject, you need to check whether the subject is already in the system and it is superseding with the new subject code.

To do this, you need to search the subject by the subject name in the search field. If the subject name is already in the system with the old subject code then you need to create the subject with the New Subject Code and Name from the Subject Entry Screen.

Once you have created the Subject, you need to come back to the subject welcome screen, search the subject with the subject name, the system will show you both the old and new subject in the grid. There you need to go to the old subject’s supersede icon , the system will show you a pop window where you can search and add new subject and save. This will supersedes the subject with the new subject.
Once you have done this, you will be presented with new supersede icon which will show you that this subject has supersedes the old subject (with the old subject code).

NOTE – For your upcoming students/enrolments, you will be using the new subject for the program and it recommended to untick the compulsory tick box if it is linked with the Program from the Program Entry Screen.

Icons under the Actions column

Edit Icon – If you want to make any changes to the subject then you can simply select this icon to edit the desired subject.

Supersede Subject Icon – This icon is used to supersede the subject and when you select the icon, the screen will open the pop window where you add the new subject code and select save.

Subject Supersede Icon – When the subject gets superseded, the grey icon will turn red and you can select the icon and the screen will open the pop window where you can see the superseded subject.

Marketing

Main Dashboard > Marketing Menu

When accessing the Marketing section from the main menu, you will be presented with a selection of icons that serve as shortcuts to various screens and reports related to marketing activities. These icons enable easy navigation to different sections where you can perform tasks such as managing applications, handling inquiries, and processing agent transactions on a daily basis.

Marketing Dashboard

System Admin

Main Dashboard > System Admin Menu

When accessing the System Admin section from the main menu, you will be presented with a list of icons that grant you access to various screens associated with the setup and configuration of templates, users, employers, account managers, and other system-level functions. This section is specifically designed to facilitate the management and customisation of the system according to your specific requirements.

By selecting the appropriate icons, you can navigate to the respective screens where you can perform tasks such as creating and modifying templates, managing user accounts and permissions, configuring employer settings, assigning account managers, and leveraging automation features. These icons include:

Notification Template

WebForms

Quiz

Question Bank

Automated Action

Automated System Actions

New Enquiry – Employer

Main Dashboard > Student Management > New Enquiry Sub-Menu > Employer Enquiry

Overview

This screen allows you to enter enquiries (new leads) of the Employers, so you can track communication and the progression of discussions with them.

Follow the below steps to create an Enquiry

  • Select the New Enquiry sub-menu.
  • Select the Employer radio button and select the Next button.
  • Enter data into the relevant fields and select the Save button.

Note: On the new enquiry screen when you select the save button, the enquiry will be created and you can see the Burger Menu icon beside the Save button in the top right corner which allows you to perform some important functions for that enquiry.

You can create a Communication Log and New Application from the burger menu.

New Enquiry – Student

Main Dashboard > Student Management > New Enquiry Sub-Menu > Student Enquiry

Overview

This screen allows you to enter enquiries (new leads) of the students, so you can track communication and the progression of discussions with them.

Follow the below steps to create an Enquiry

  • Select the New Enquiry sub-menu.
  • Select the Student radio button and select the Next button.
  • Enter data into the relevant fields and select the Save button.

Note: On the new enquiry screen when you select the save button, the enquiry will be created and you can see the Burger Menu icon beside the Save button in the top right corner which allows you to perform some important functions for that enquiry.

You can create a Communication Log and New Application from the burger menu.

New Enquiry – Agent

Main Dashboard > Student Management > New Enquiry Sub-Menu > Agent Enquiry

Overview

This screen allows you to enter enquiries (new leads) of the agents, so you can track communication and the progression of discussions with them.

Follow the below steps to create an Enquiry

  • Select the New Enquiry sub-menu.
  • Select the Agent radio button and select the Next button.
  • Enter data into the relevant fields and select the Save button.

Note: On the Agent enquiry screen when you select the save button, the enquiry will be created and you can see the Burger Menu icon beside the Save button in the top right corner which allows you to perform some important functions for that enquiry.

You can create a Communication Log and New Application from the burger menu.

New Enquiry

Main Dashboard > Student Management > New Enquiry Sub-Menu

Overview

This screen allows you to enter enquiries (new leads) so you can track communication and the progression of discussions with them. Based on the type of college you will determine what type of enquiry you are entering. There are three enquiry types that are –

  • Student – This option would be used by any college type.
  • Agent – This option is typically used by CRICOS colleges to track their marketing of potential new agents.
  • Employer – This option is typically used by domestic funded or fee-for-service (FFS) colleges, to track their marketing of potential new employers as a source of training their staff.

Agent

Main Dashboard > Marketing > Agent

Overview

This is the Agent Welcome screen which will show you the list of Agents in the grid that are Active in your system. This screen is divided into two sections:

  • Filters/Parameters
  • Listing Grid

Filters/Parameters

The filters will show you different fields where you can select the data as per your need then select the Apply Button and based on your selection the system will load the list of agents in the grid. You can also see the Total count and the Active count of the Agents.

Listing Grid

In this grid, you can see the list of all Agents. You will see columns such as Agent Code, Agent Name, Type, Region, Account manager, and other Agent contact details in this grid. All of the columns are self-explanatory.

You can select the +Agent button to add a new Agent to the system.

Select here to know more about the Burger Menu

Select here to know more about the Action Column

Send SMS icon is not appearing!
No need to worry if send SMS icon is not appearing under the Actions column. It means Mobile No is missing for that particular agent.

Academics

Main Dashboard > Academics menu

The Academic menu icon provides access to various screens related to student academics. When you select this icon, you will be presented with a list of icons that allow you to navigate to different screens associated with academic information. These screens include setting up the campus, program structures, subjects, and the academic calendar.

Each of these icons represents a specific aspect of the academic system and enables you to manage and configure various academic-related functionalities. Whether it’s defining the campus layout, organising program structures, managing subjects and courses, or planning the academic calendar, these icons provide a convenient way to access and modify academic information within the system.

Student Management

Main Dashboard > Student Management icon

Upon selecting the icons from the main menu for Student Management, a comprehensive list of icons will be displayed, offering easy access to various screens and reports specifically designed for effectively managing your students on a day-to-day basis. These icons serve as shortcuts, providing efficient navigation to different sections where you can oversee and handle various aspects of student management. Whether it involves tracking attendance, managing Results, or generating reports, these icons offer a streamlined approach to efficiently carry out your student management tasks.