Student Portal

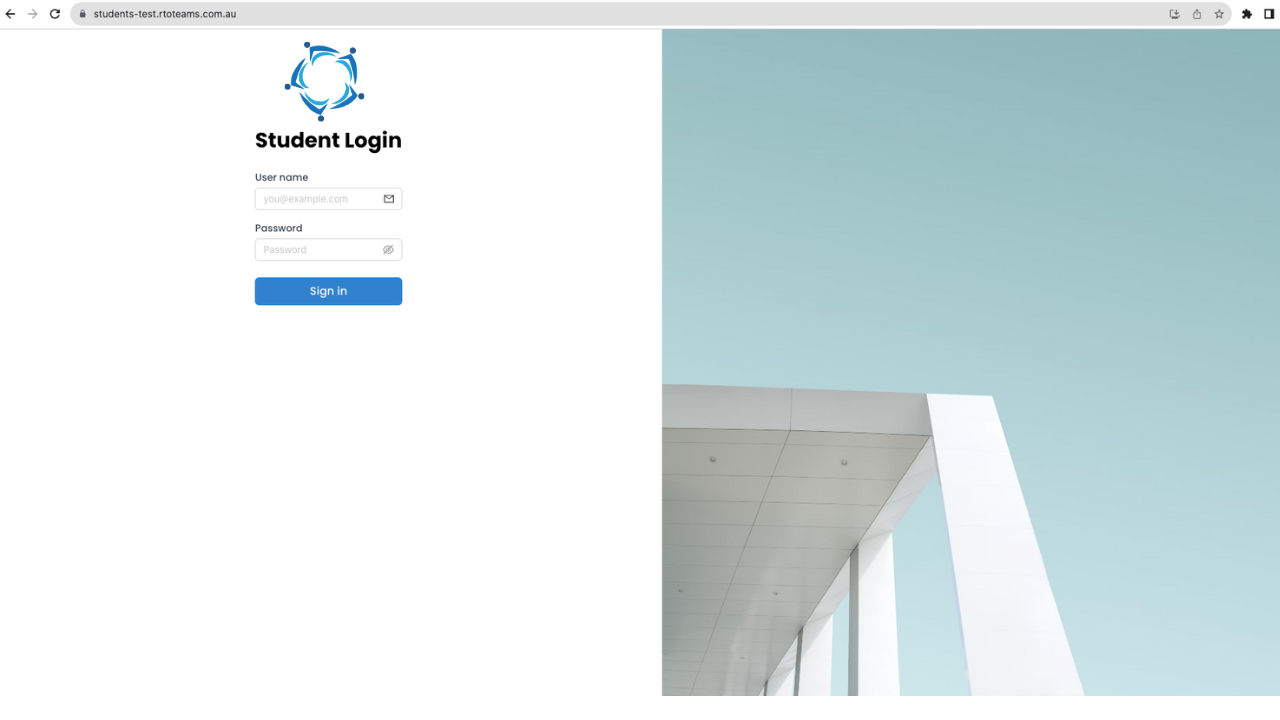
A student portal is an online platform, offering students to log in using their email addresses. Students can access a range of personalised information, including academic results, and details of their past enrolments and future enrolments.

Student portal login page – to log in to the student portal, your students will be provided with the URL for example – https://Students-teams web address.(https://Students-xyz.rtoteam.com.au)

Note – A student can log into the student portal by using the user name which will be the primary email address or student number and the password will be available on the “Edit student entry” screen.

For Login details: The user name will be the student’s primary email address and the password, will be available on the Edit Student Details screen. When you are on the screen, you can see the password in the Current Password field.

Automated System Actions Entry Screen

This screen allows you to create automated system actions in the system. Please see the below table that will show you the explanation of each filter presented on this screen.

Please note that the dropdown on this is user code and one can create them from the User Code Screen in the System. If you still have queries, please contact our support team.

FieldsExplanation
Department If you have created departments such as Finance, Marketing, Academic, Compliance or any other based on your requirement then this dropdown will show accordingly.
Automated ProcessBased on the department selected, this dropdown will show you the options accordingly.
CampusIf you have more than one campus then this dropdown will show you the list of all your campuses. You can select the desired campus. Please note – you can only select one campus at a time.
System Action NameType in the appropriate System Action Name in this field.
ActiveSelect the Active tick box to make the action active. Please make sure to select this tick box to see this entry as active in the system.
Action RuleBased on the Action rule you have created from the User code screen, it will be visible here. for example, if you have No. of days before the Start Date(Enrolment Start Date) as an option upon selecting, it will show you another dropdown as # of days before Start date.
# of days before Start dateHere you need to enter the number value. For example – If you have added the number value as 5 then the system will automate this action 5 days before the enrolment start date.

When all the above steps are done, you need to select the Save button on the right hand side of the screen to save the record.

Automated System Actions Welcome Screen

Main Dashboard > System Admin > Automated System Actions

Automated system actions refer to predefined and programmed tasks that are executed automatically within a system. These actions are typically designed to streamline processes, enhance efficiency, and reduce the need for manual intervention. Automated system actions can include a wide range of functions, such as sending notifications, triggering workflows or performing any other predetermined tasks based on predefined conditions or events.

Notification Template Entry Screen

This screen will allow you a create a new notification template in the system. before creating the template, you need to understand the fields on this screen.

Notification Title – The “Notification Title” is a mandatory field, serving as the displayed title preceding the message when students receive the notification. This field must be filled out and cannot be left blank.

Template Type – This dropdown is a user code and if you wish to set up a user code for your TEAMS site, please contact our support team.

Available Fields – Based on the Template Type selected, the Available fields (merge fields) will appear in the field.

Add Button – Once you have selected the merge field, you need to select the Add button to add the merge field in the message field. Note: Please do not change the brackets used for the merge fields, otherwise they will not function correctly

Message – You can type in the message for your notification template and please be aware that your Notification Template cannot be longer than 300 characters. Also, be aware that if you use merge fields this may cause your message to exceed 300 characters upon merging.

Notification Template

A notification template serves as a pre-defined format or structure for messages and alerts sent to students. The Notification Template welcome screen provides a convenient overview of existing templates within your system, presented in a grid format. From this screen, you have the flexibility to edit or delete templates by selecting the corresponding icons in the Actions column. Additionally, the option to add a new notification template is readily available through the +Notification Template button.

Manage Request Documents

On this screen, you will find a grid displaying a list of Student Requests completed within the past 30 days. Each request can be managed with options to download, view, edit, or delete as needed. Additionally, you have the capability to initiate a new request by simply selecting the +Add button located on the right-hand side of the screen.

When you select the “Add” button, a pop-up window will appear, providing you with the means to create a new Request Type, upload any necessary documents, add relevant notes, and save the request.

IMPORTANT – When multiple documents are uploaded for a single request type, the system will generate multiple entries within the grid dedicated to that specific request.

Please ensure that the documents you are uploading are in PDF format only.

Alerts – General Tile

This tile provides a comprehensive overview of Student Requests, offering information on newly submitted requests and those completed within the last 30 days. Additionally, it presents the total count of SMS messages used and the remaining quantity available within the system. By displaying these vital details in a single tile, you can easily track recent student requests and monitor SMS usage, ensuring efficient communication.

To Know more about the counts in this tile, select the links below:

Student Requests – New

Student Resuests – done (last 30 Days)

SMS Count (Used/total available)

Student Requests – New

Select the ‘Student Requests – New’ option from the ‘Alerts – General’ tile on the main dashboard. This hyperlink serves as a centralised hub for managing Student Requests. It displays a listing grid containing all newly submitted requests, offering a range of flexible actions for each entry. You can conveniently view request details, add notes, initiate the processing of requests, decline them if necessary, or download request documents.

Additionally, the screen provides a dedicated Manage Requests Documents Button for efficient management of requested documents. For added convenience, a CSV report can be downloaded, providing a comprehensive overview of the requested data.

Student Request Done (last 30 Days)

The Student Requests Done (Last 30 Days) screen focuses on requests that have been submitted and successfully processed within the preceding 30 days. This screen is designed with a clear division into two main sections: filters and the grid.

Within the filters section, you are empowered to refine your view by selecting a specific date range. The dropdown menus for Campus and Request Type offer further customisation, allowing you to narrow down the displayed information based on these criteria.

Additionally, a page limit option is available to streamline the presentation of requests. If there are more than 100 requests distributed across different pages, you can choose a page limit to consolidate all requests onto a single page. The grid then dynamically displays the requests according to the selected filters, and for those wishing to delve deeper, the view icon provides detailed student request Notes. You can also manage documents from the Manage Request Documents buttons.

Automated Action Entry Screen

The automated entry screen provides the capability to send emails based on the setup such as overdue emails, reminder emails, and orientation emails.

It’s important to note that for these actions and alerts to become fully functional, they must be activated from the backend. To initiate the setup process, please reach out to our support team, who will ensure the proper activation of these features.

Please note that the dropdown on this is user code and one can create them from the User Code Screen in the System.

FiltersExplanation
DepartmentSelect the department from the dropdown, it can be financed, academic, student services etc
Action TypeBased on the department selected, the Action Type dropdown will show you the list in the dropdown.
CampusIf you have multiple campuses, this will show you a list of all the campuses in the dropdown and you can select one campus at a time.
Action NameYou can type in the Action Name as you require.
Action RuleIf you have any action rule created in TEAMS, please select it from the dropdown.
Send Email ToSelect the desired email sent to (Agent, user or student) option from the dropdown.
Email TemplateSelect the email template that you wish to set up for the Automated Action
Email UsersSelect the user name from the dropdown (this name will be visible as from in the email)
Send SMS ToSelect the desired SMS sent to (Agent, user or student) option from the dropdown.
SMS TemplateSelect the SMS template that you wish to set up for the Automated Action
Send Notification ToThe selected object from the dropdown will receive the notification.
Notification TemplateIf you have created any notification template, it will appear here.
ActiveSelecting the Active tick box will make the automated action active.