Compliance Dashboard – Troubleshoot and fix AVETMISS errors

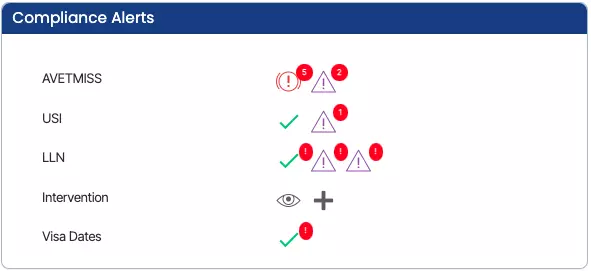
In TEAMS, if you are looking to fix AVETMISS errors, the Compliance Dashboard serves as the primary interface for addressing these errors during the submission process. It can be found under the Compliance menu.

Certain errors, such as those occurring at the program or subject level can lead to the error being duplicated many times. These errors can be fixed in bulk, which may be fairly quick and easy. In some other cases, when errors relate to an individual student or enrolment, they need to be fixed individually either from the Compliance Dashboard or other screens, such as the Student and Enrolment dashboards.

By following the links below, a user will be able to rectify certain errors in bulk:

This tile will show you the count of programs whose AVETMISS details are missing.

The correct national program code is mandatory in AVETMISS submission.

The correct national Program name is mandatory in the AVETMISS submission.

This tile will show you the count of subjects whose AVETMISS details are missing.

The correct national subject code is mandatory in AVETMISS submission.

The correct national subject name is mandatory in AVETMISS submission.

This tile will show you the count of students whose AVETMISS details are missing.

The AVETMISS tickbox should be ticked to report students in the submission.

Survey status is mandatory to select in submission. This can be updated in bulk from the compliance dashboard.

Complete student address is mandatory while AVETMISS submission.

You need to update the USI number of each student in the list as it is necessary to update before AVETMISS submission.

This is a list of students whose USI is not verified due to a certain reason.

This link will provide you with a list of students whose DOBs are not updated. It is mandatory to update the student’s DOB.

This tile will show you the count of programs whose AVETMISS details are missing.

It will provide you with a list of enrolments whose results are overdue and the end date of the subject has been passed.

If a student is overseas (onshore/offshore) then enrolment has to be flagged as overseas.

Enrolments with funding source National missing are listed, which needs to be updated before submission.

This list will provide you with the list of enrolments that are not flagged as included in national export.

This list will provide you with the list of students whose training location is missing.

This tile will show you the count of enrolments whose subject dates, results and delivery modes are incorrect.

If the enrolment is finished, then all the subjects should have the results against them.

The correct delivery mode should be updated for competent results as these are mandatory in AVETMISS submission.

Subject start/end date should be updated before submitting data to NCVER.

As we mentioned, you can also fix the errors for specific/individual students and enrolment by following the links below.

Student Level errors

Errors

Students are missing from NAT files

Incomplete address

Survey Contact Status missing

Overseas Enrolment

Student Level errors

Delivery Mode/Pre-Dominant Identifiers is missing

How to finish an Enrolment

Enrolment Dashboard > Enrolment Profile Tile > Finish Icon

On the Enrolment Dashboard, Under the Student Profile Tile, 3rd vertical icon allows you to finish the enrolment. It has three different colors – white, red and green. You can finish/ unfinish the enrolment by clicking the finish icon.

  • The white icon indicates the enrolment is yet to finish i.e. enrolment end date is in the future.
  • The red icon indicates that the enrolment’s end date was in the past and is not yet finished.
  • The green icon indicates that the enrolment is finished.

Enrolment Dashboard

history of changes

This will give you an overview of a student’s study for a particular program that they are currently or have previously studied with you. Like all dashboards, it is comprised of a number of different tiles that will allow you to navigate to different screens and information linked to the enrolment.

Tiles

Here are all the tiles present on the enrolment dashboard. You can learn more about each tile by clicking on the image of the tile.

These tiles are common tiles in all the dashboards.

Progress Dials on Enrolment Dashboard

Each RTO has to monitor their students be it based on attendance or course progress. To make it easy for you to read and understand a student’s progress, we have dials on the Enrolment Dashboard to provide you with information about a student’s progress in a program. These dials are called Progress Dials.

You will see Progress Dials under the below tiles on Enrolment Dashboard:

  • Result and Progress
  • Classes and Attendance

Result and Progress Dial

For the subjects which lie within the current study period week and have results marked, the system will do a calculation and provide you with the progress percentage for the current study period. For instance, there are 5 subjects that have start and end dates within the current study period week, and out of those 5 subjects, 3 subjects have final results marked be it Competent, Not Yet Competent or Credit Transfer. The system will divide the successful results with the total number of subjects for that specific study period i.e. Successful Results/Total Subjects * 100. So if there are three successful results out of 5, the system will show the progress percentage as 60% (3/5*100). This progress dial gives you a tooltip too to see the results for subjects that belong to the current study period. Click on the dial and you will see a tooltip.

Classes and Attendance Progress Dials

If you have marked the attendance for the student, the system will display the attendance percentages in the dials. One dial represents the current attendance percentage and another dial represents the overall attendance percentage. The current dial will calculate the attendance as of today’s date i.e. from the start date of the current study period till today’s date and the Overall dial will calculate the attendance for the whole current study period i.e. from the start date of the current study period till the end date of the current study period.

Important points to note about Progress Dials

  • You will not see any attendance calculation in the dials under the Classes and Attendance tile if the enrolment is not started, even if you have marked attendance for the student. Moreover, If the timetable is not allocated to the enrolment, then also, you will not see any attendance calculation. The dials will show you 0% by default.
  • For the enrolment with a future start date, you will not see these dials at all.
  • You will only see the progress percentage in the Results and Progress dial if the results are marked for the subjects for the current study period.
  • For the progress percentage in the Results and Progress dial, the system will only count Competent as a successful result. Other results such as Credit Transfer, Recognition of Prior Learning granted, and Recognition of Current Competency granted will not be counted as successful results.
  • You will only see the attendance percentages in the Classes and Attendance dials if there is attendance marked for the current study period. Otherwise, the system will display 100% as attendance in both dials.

Application Profile Tile

Application Dashboard > Application Profile Tile

This tile will show you the basic information about the applicant. You can update and edit the AVETMISS settings, Group Training Plans, FEE-HELP, and Employer Tracking, and many more fields related to the application.

Note – In the horizontal icons, Some of them Address, Overseas information, AVETMISS Student, etc. have tooltips and once you move the cursor on the icon, it will show you the information about the icon. To know more about the tooltip icons you can see the information on the Applicant Profile Tile and Student Profile Tiles.

Also, once the application is converted to enrolment, you cannot make any changes from the application dashboard. However, you can make changes from the Enrolment Dashboard.

Vertical Icons

Horizontal Icons

Address

Overseas Information

AVETMISS Student

AD – Application Tile

Applicant Dashboard > Applications Tile

history of changes

This tile will show you the number of converted and pending applications linked to the applicant. The columns in the tile will show you some basic (Campus, Program, Intake, Start and End Dates of the application, financials, etc.

Select here to know more about the Icons and Burger Menu

Select here to know more about the Print Offer Letter

Main Dashboard

history of changes

IMPORTANT – Staying informed about the latest developments in our software is vital for optimising your experience and maximising the benefits of using our system. To view the latest updates and modifications on the Main Dashboard, click on the History icon history of changes at the top-left corner of the screen. You will then gain access to a detailed log of all the recent changes made to the software.

The Main Dashboard is what you see when you log in, which is broken up into what we call “Tiles”. Each Tile contains different bits of information that you can further drill down on to see the details relating to that section. From the subsequent information screens, you will be able to send bulk emails and SMS to students. For example, you may wish to send an Orientation Pack to all the Starting students in the coming month, which you can do from the “Starters List” screen that you can access from the “Starters” tile on the Dashboard.

To know more, click on tiles listed below

New Financial Dashboard

Overview

In this post, we will be explaining:

  • Key features
  • How to access
  • Business Rules

Key Features

Better Visual

In the past we were displaying all financial tile in the main dashboard. There were 10 tiles in total including financial tiles. So now to make it more easy to understand. We will be showing 7 tiles only i.e. excluding all financial tiles.

Reduced Page Load Time

Now no more delays in loading main dashboard tiles. As the financial tiles were taking a bit more time then others to get loaded when you login to TEAMS. Now by excluding this financial tiles, main dashboard becomes feature rich.

Privacy

If any user does not have access to Finance menu, will get no access to these tiles too. So yours financials are secured within the users having permissions to financials.

How to access

Previously we were displaying main dashboard with 10 tiles including financials tiles.


But now we will be displaying all other tiles except financial tiles which are:

>Overdue Tile
>Payment Received Tiles
>Payment Due
Tile

Here is the new look of Main Dashboard


Now how to access three financial tiles? All financial tiles have been moved to New Financial dashboard. Follow the below steps to open financial dashboard from main dashboard.


1.Follow the path to open Financial Dashboard

Main Dashboard > Finance > Financial dashboard


Once you will open the financial dashboard, you will get access to all three financial tiles in the same way we were displaying at main dashboard in the past. The working and logic of the tiles is same only the access point is changed. Below is the glimpse of the New Financial dashboard.

Business Rules

If a user does not have access to Finance menu, will get no access to financial dashboard and financial tiles too. As these tiles have been moved under Finance menu so who ever wants to get access to these tiles then finance menu item permission has to be given to them.