Pending Payment Welcome – Commission Payment Step 1

Agent Dashboard > Agent Profile Tile > Pending Payment > +New Payment

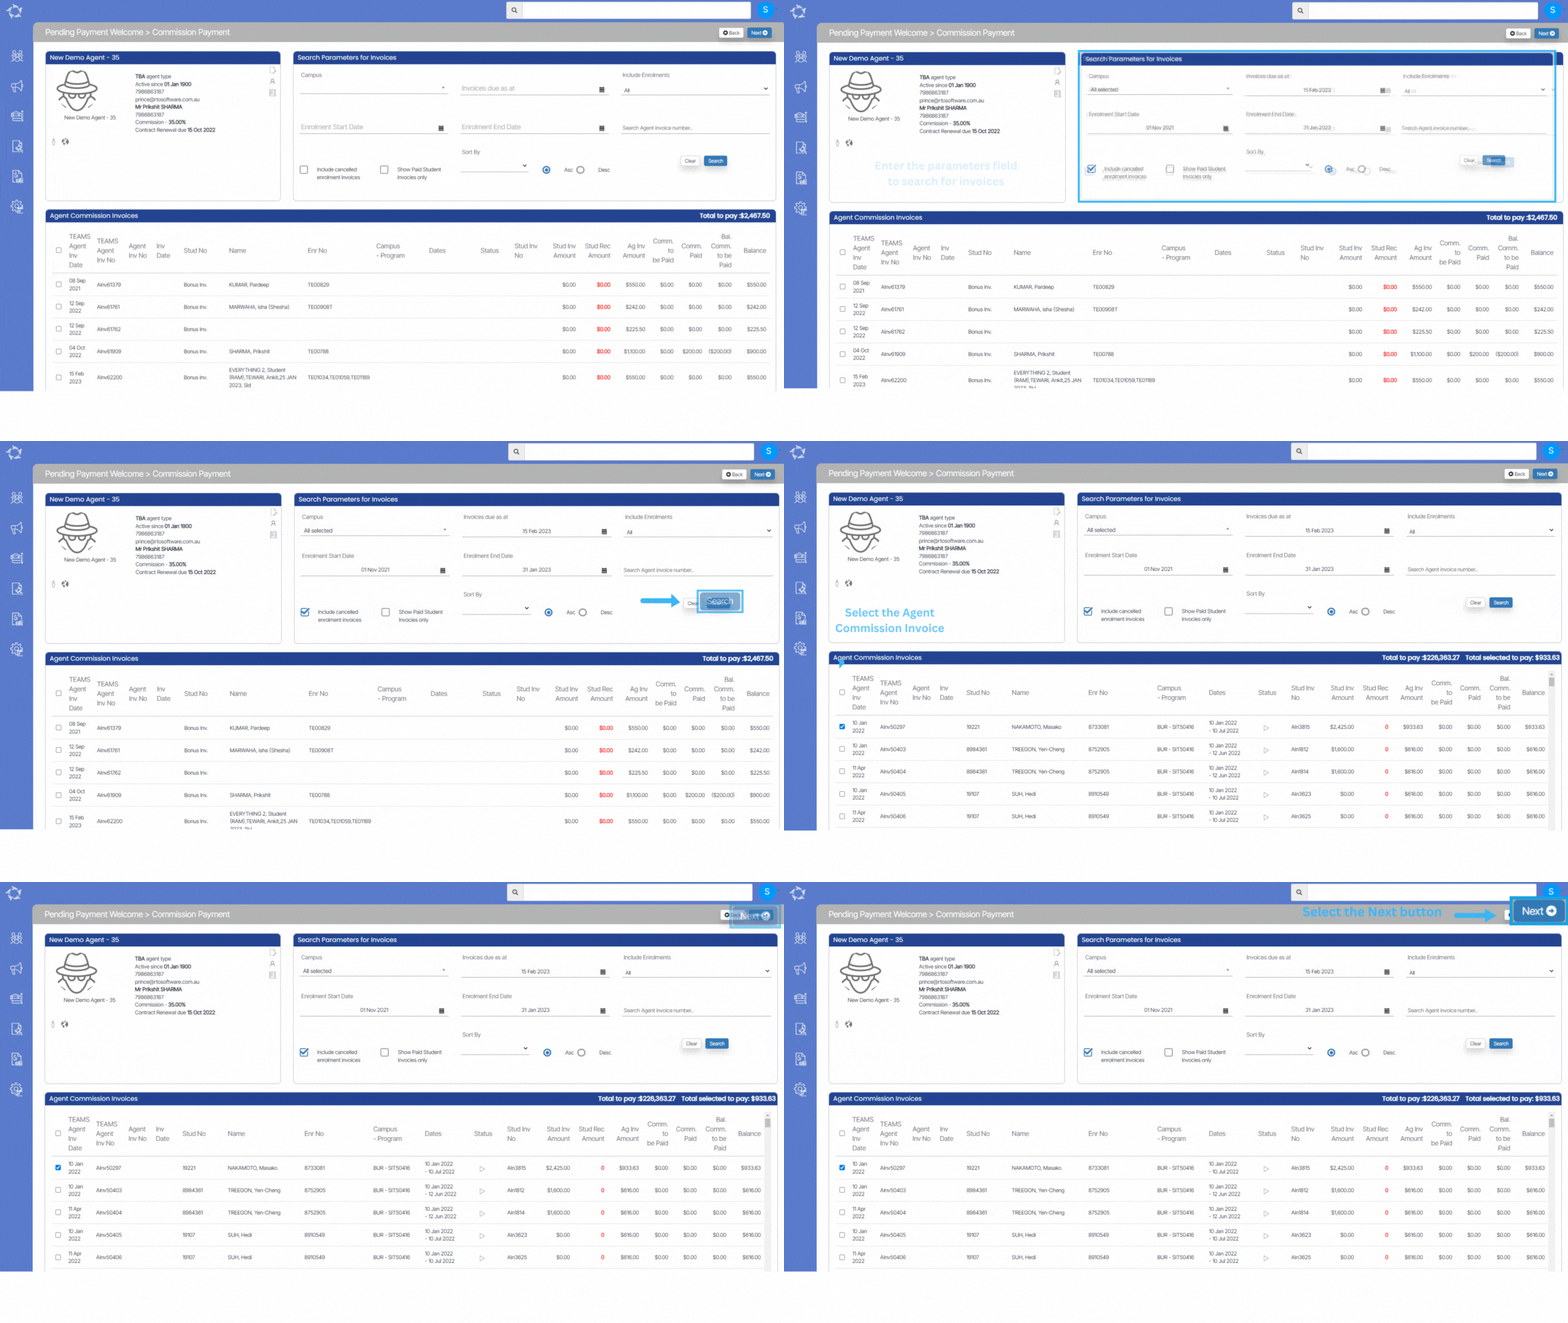
On the Agent Commission Payment screen, you can view commission invoices for agents in a grid format. Additionally, you can also create a new pending payment invoice for these commission invoices. To filter the invoices, you need to select mandatory fields like Campus and Invoices due as at. The Agent Commission Invoices Grid will then display all the commission invoices that match the selected parameters.

IMPORTANT – If the student is not appearing on the commission payment screen then please make sure that the student’s commission due date is falling under Invoice Due As At Date and have selected the correct Campus from the parameters.

To create an agent pending payments invoice, please follow the steps given below:

  • Select the necessary parameters for filtering the commission invoices. The mandatory fields are Campus and Invoices due as at.
  • Once you have selected the parameters, Select the Search button. The Agent Commission Invoices Grid will load all the commission invoices that match the selected filters.
  • Find the column named “TEAMS Agent Inv Date and Look for the tick box that is located right beside this column.
  • Select the box for the commission invoices that you want and then select the Next button on the right hand corner of the screen.

Note: On the Agent Commission Payment screen, the Stud Rec Amount column displays the amount that is received from the student for the outstanding commission invoice. If the student invoice for the outstanding commission invoice is not paid yet, the amount displayed in the Stud Rec Amount column will be in red font. This is a visual cue that the payment for the student invoice is still outstanding and needs to be collected. By checking the Stud Rec Amount column in the Agent Commission Invoices Grid, you can easily identify which commission invoices still require payment from students.
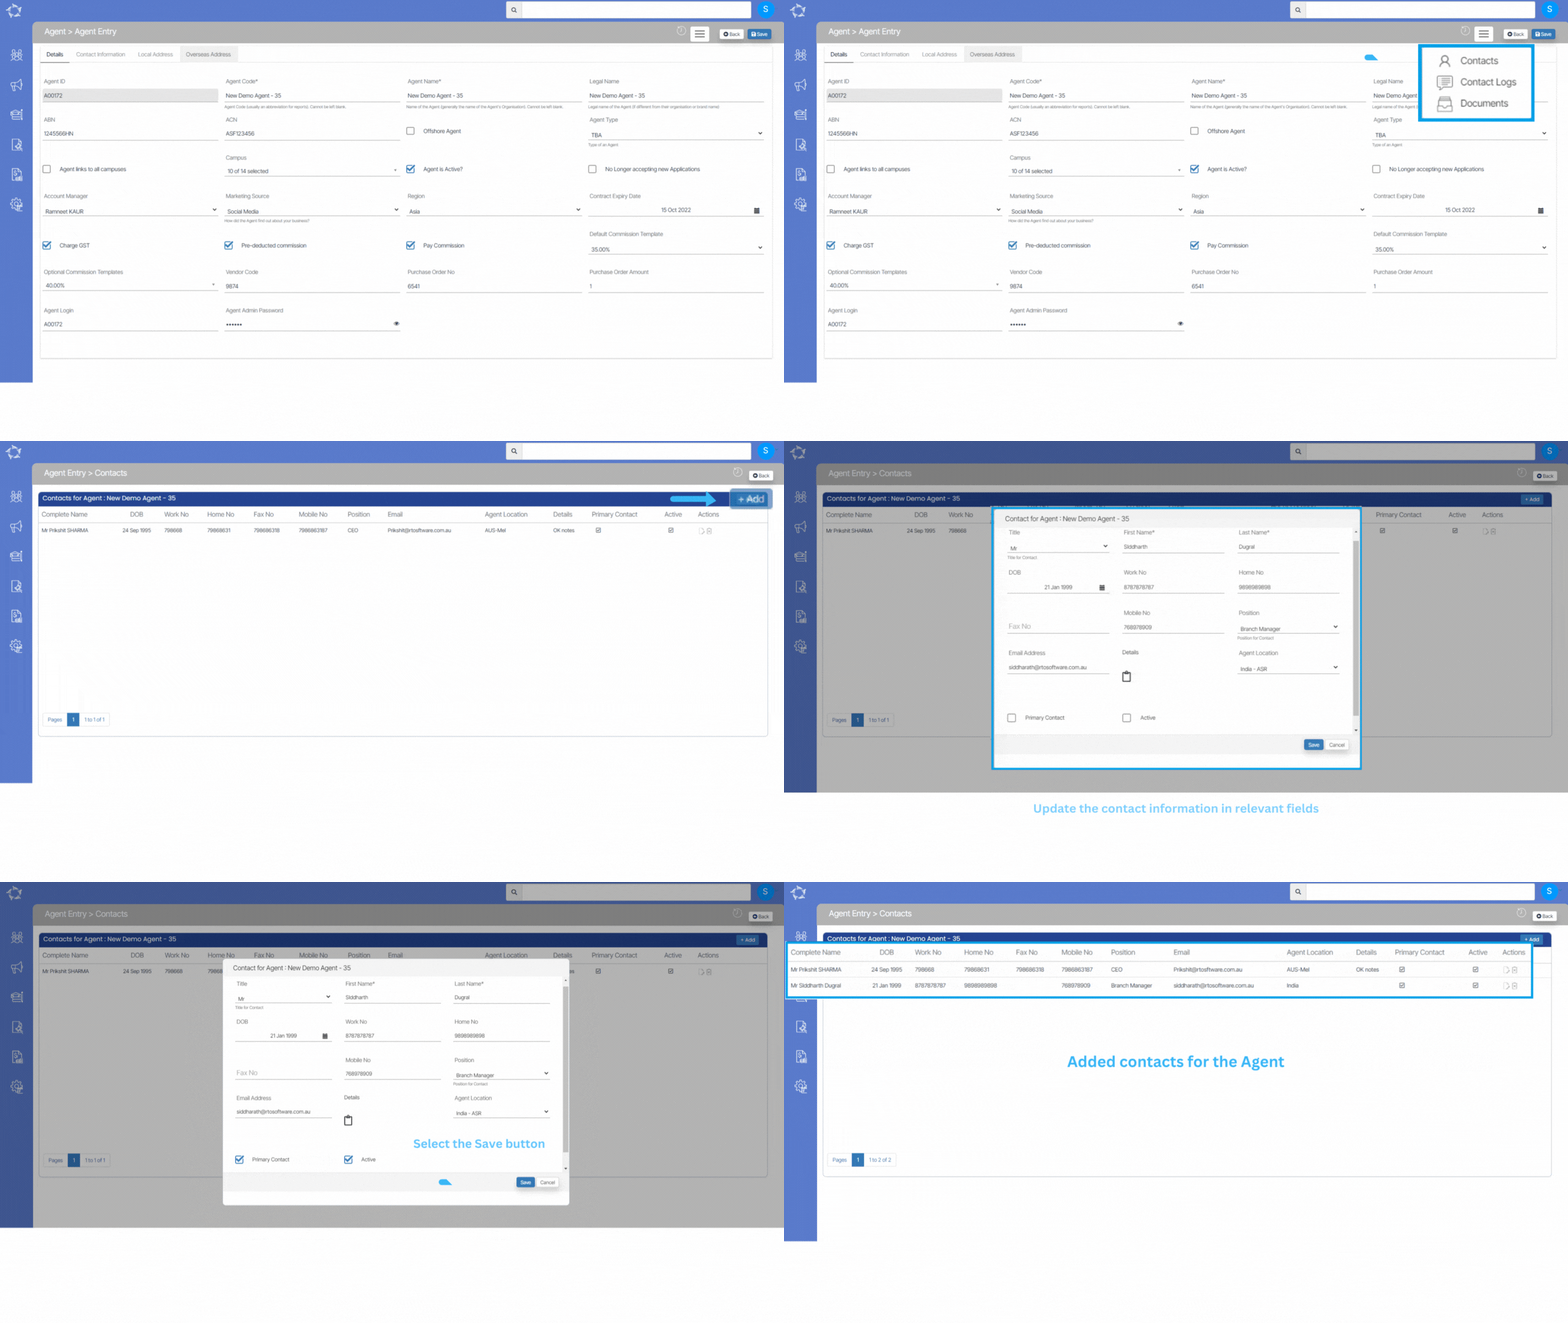
Agent Entry – Contacts

This screen is designed to enable the user to input and manage the primary contact for an agent. The user can add new contacts or edit and delete existing ones using the grid view provided. The grid view will display the current contacts associated with the agent and allow the user to modify them as necessary. This feature provides an efficient way for users to manage their contacts within the system and ensure that the information is up-to-date and accurate.

There are two screens within the system that allow users to add or edit the contact details of an agent. The first screen is accessed from the Agent Dashboard by selecting the Agent Profile Tile and then selecting the Edit Agent button. From there, the user can access the Burger Menu and select Contacts to view and manage the agent’s contact information.

The second screen is available from the Agent Welcome screen, which is accessed by adding a new agent to the system. Once on the Agent Welcome screen, the user can select the edit agent icon from the grid and then can access the Burger Menu and select Contacts to add or modify the agent’s contact information.

Both screens offer users a quick and easy way to manage an agent’s contact details. By providing multiple access points to this feature, the system ensures that users can efficiently add, edit, or delete contact information as needed.

Agent Pending payment

Agent Dashboard > Agent Profile Tile > Pending payment Icon

Business Rules

1. If you are not seeing the pending payment welcome screen and instead are seeing the Commission payment screen, it could be because the system setting is not enabled for your site. The pending payment welcome screen is a feature that displays pending payment batches that have not been paid or approved yet.

2. To enable this feature, you will need to contact support to turn on the system setting for your site. Once the setting is turned on, you should be able to access the pending payment welcome screen and view all pending payment batches that require processing or approval.

3. The pending payment welcome screen is a system feature that displays all pending payment batches that have not yet been paid or approved. Once a payment batch has been marked as paid or approved, it will no longer appear on the pending payment welcome screen.

In TEAMS, when a commission invoice is generated, an agent commission invoice number is also generated, and the invoice date is set to match the student invoice date linked to the enrolment. However, it’s important to note that the actual agent invoice number and invoice date may differ from the ones generated by TEAMS. This is because some agents may choose to assign their own invoice numbers and dates to the commission they receive from TEAMS.

Additionally, not all agent commissions are pre-deducted by agents. In some cases, commissions may be post-deducted, which means that the commission amount is deducted from the payment made to the agent after the payment has been received by TEAMS. This may impact the timing of the commission payment and the amount of funds that are received by the agent.

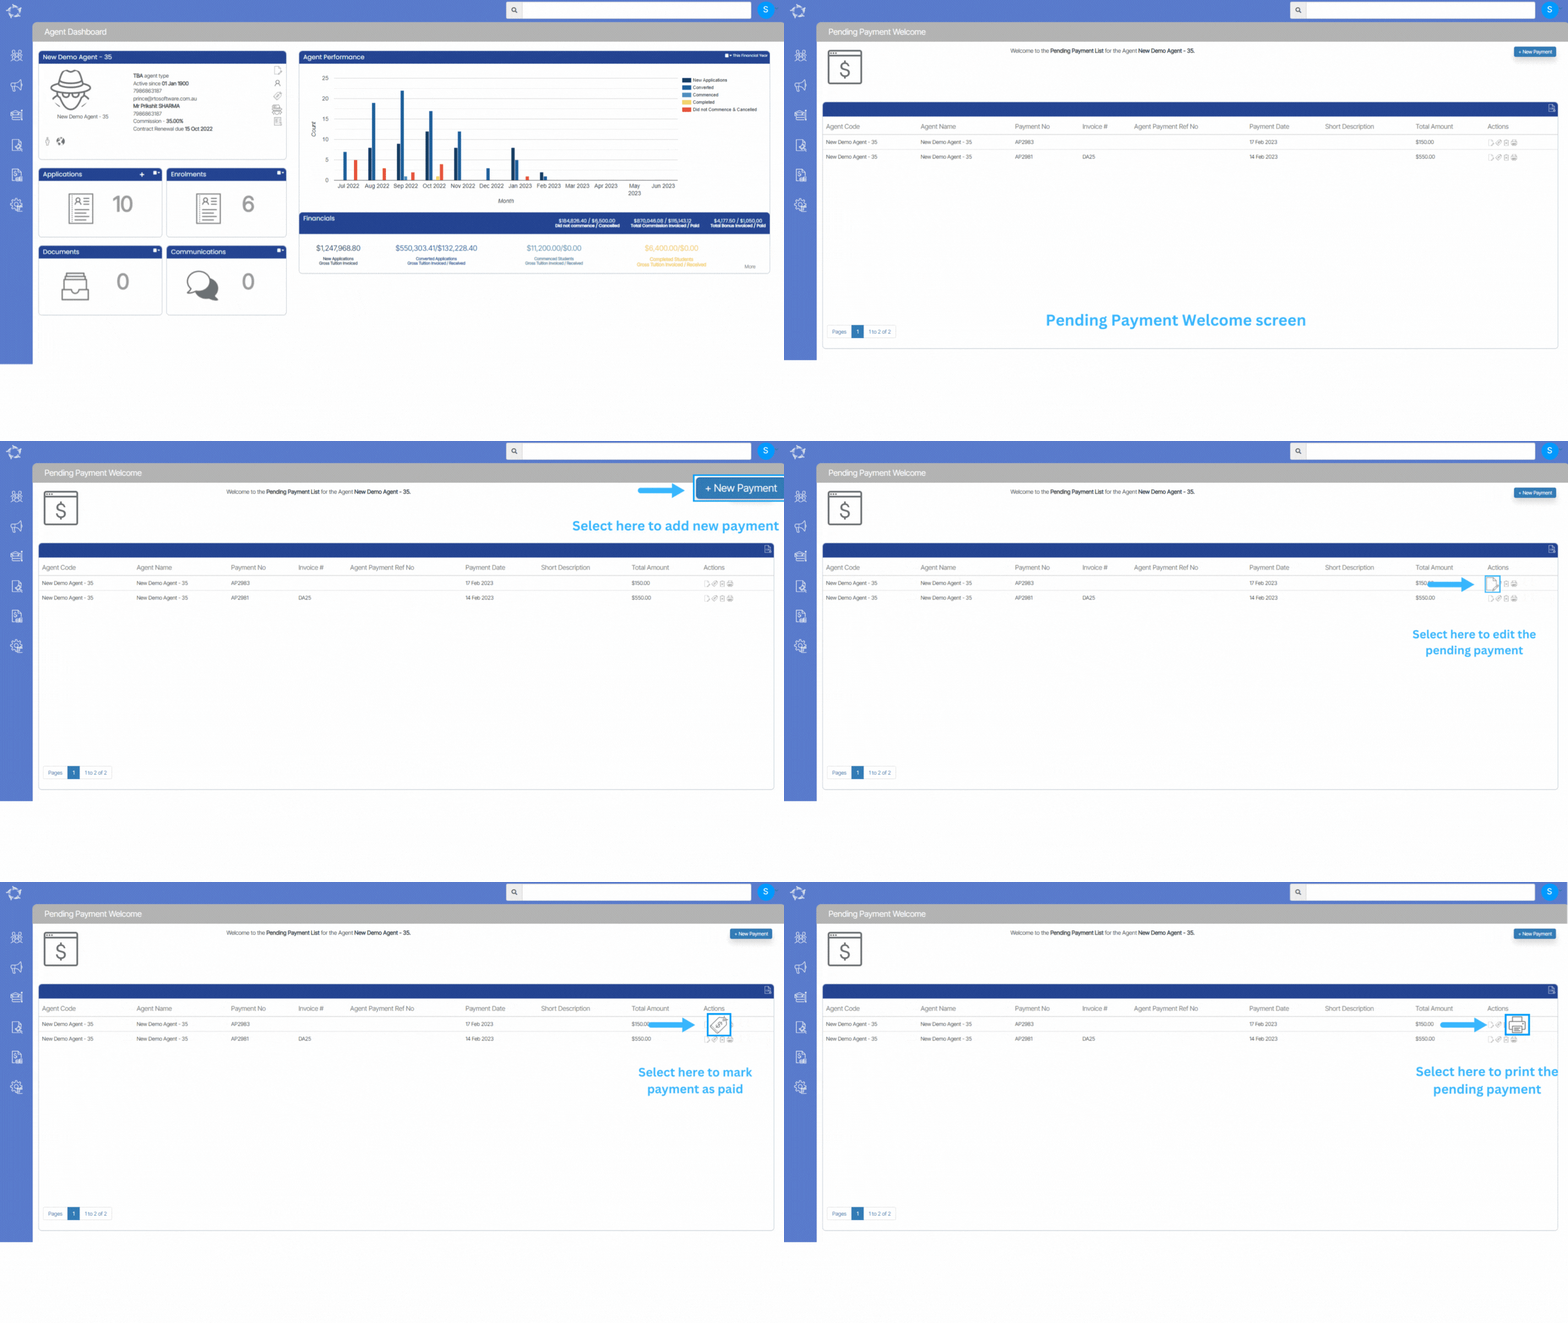
This screen will show all the pending outstanding payments which are not paid to the agents.

To open the pending payments screen, kindly follow the below-given steps:

  • Enter the name of the agent you wish to view and select the appropriate agent from the list of options provided. Once you have selected the agent, the system will open the Agent Dashboard.
  • Select the commission payment icon
  • It will open the commission pending payment screen. This will open the commission pending payment screen. The screen displays all the pending outstanding payments that have not been paid to the agents.
  • You can edit a payment batch if necessary. However, if the payment batch is already paid or approved, you can only mark it as paid by selecting the icon under the actions column.
  • If you wish to delete a batch, you can click on the delete icon located under the action column.

Note: When deleting a payment batch in the system, it’s important to note that all payments included in that batch will be deleted. This includes both partial and full payments that were associated with the batch. Therefore, it’s essential to review the payment batch carefully before proceeding with the deletion process to avoid accidentally deleting any necessary payment information. Once the payment batch has been deleted, it cannot be retrieved or recovered, so it’s crucial to take the necessary precautions to ensure that the deletion is intentional and necessary.

AGD – Applications Tile

Main Dashboard > Marketing Menu > Agent Dashboard > Applications Tile

Overview

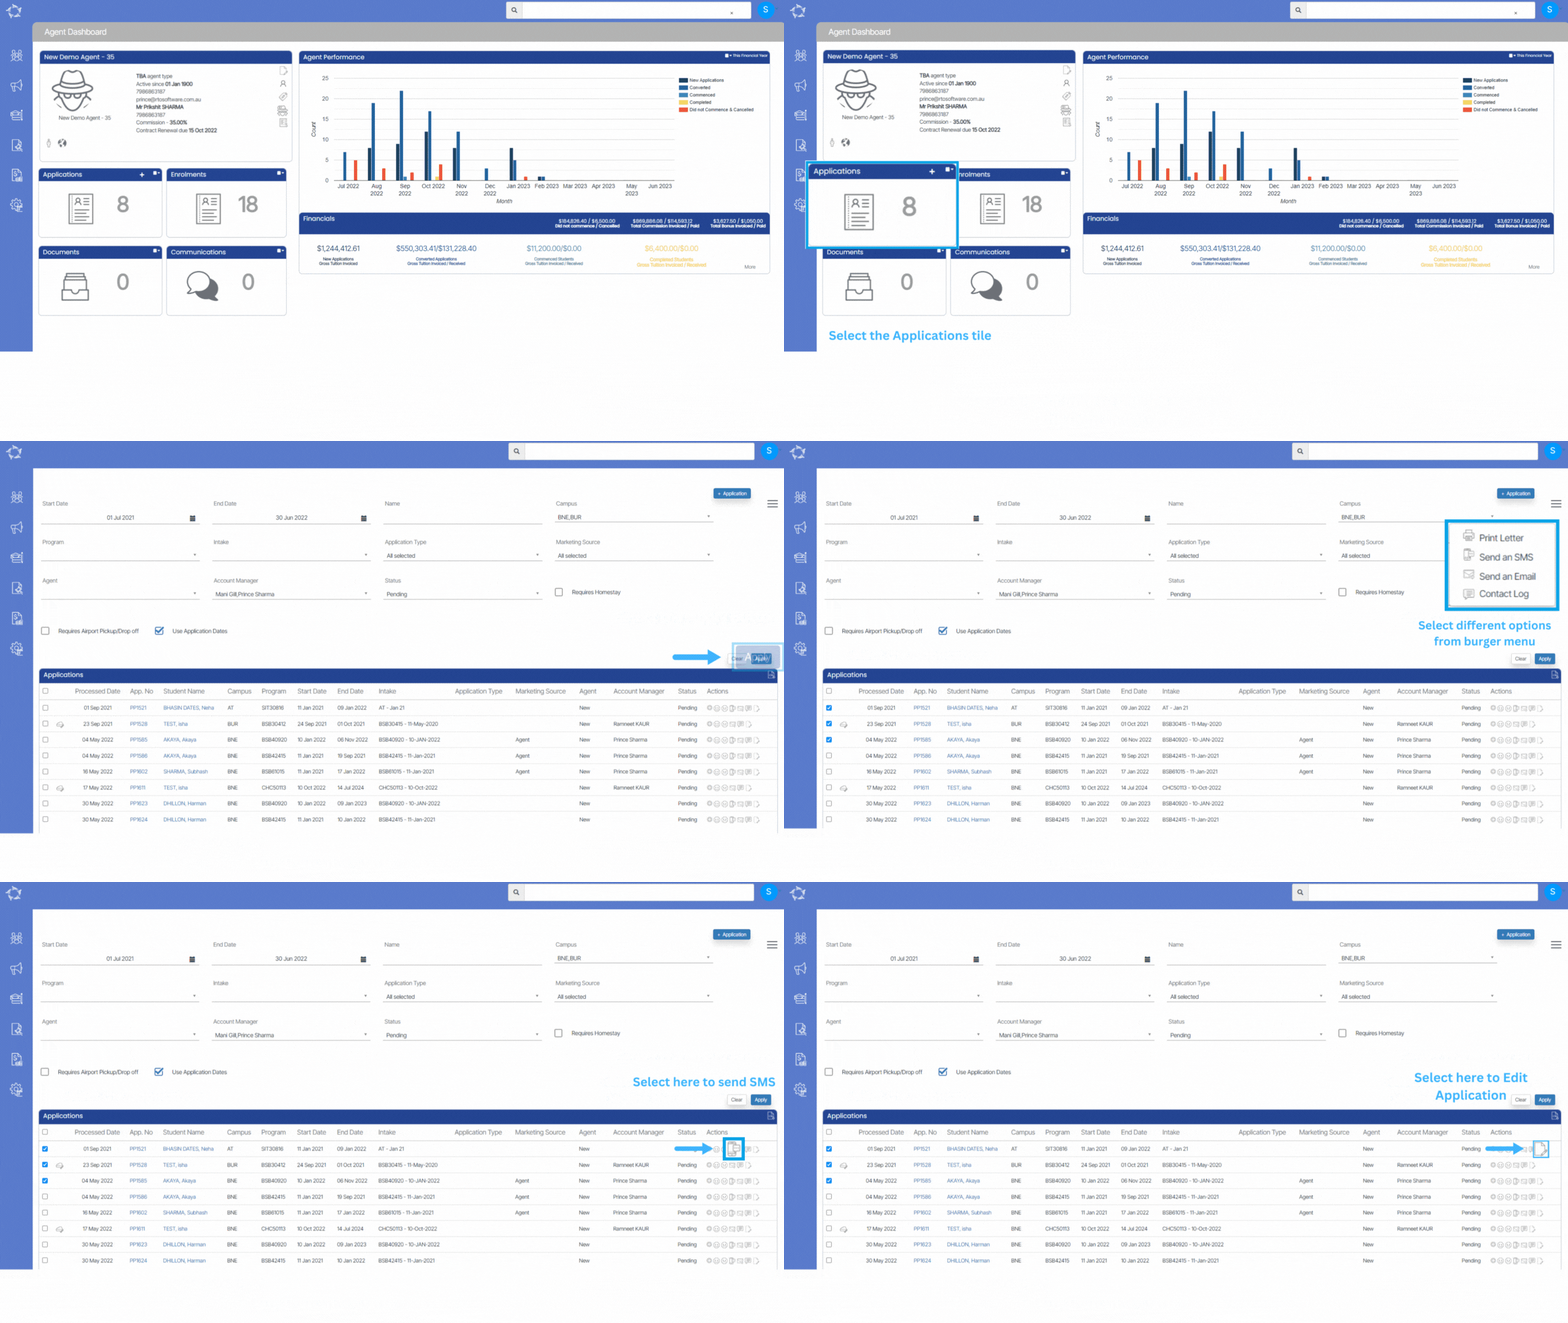
In the Applications Tile, we show all the pending applications linked to the Agent. You can convert, decline and perform other actions to the applications from this listing screen.

This screen is divided into two sections.
1) Filters/Parameters
2) Listing Grids

Filters/Parameters:

To open this screen, you would have selected the Applications Tile link from the Agent Dashboard. Based on the date range you have selected on the Application Tile, the system will open the screen and populate the information in this section. For example, it will show you the start and end dates that were used in the tile. You can add a New Application with this agent by selecting the +Application button.

Select here to know more about the filters/parameters.

Listing Grid

In this grid, we are displaying the list of all pending applications. We are showing the Applications Processed Date, App No, Student Name, Campus, Program, Start Date, End Date, Intake, Application Type, Marketing Source, Agent, Account Manager, Status, and Actions columns. All of these columns are self-explanatory.

Select here to know about the Icons under the Actions column and Burger Menu

How to select Applications?

Use tick boxes to select applications if you wish to send email/SMS, create a contact log, print letters and start enrolments in bulk. After selecting the students, pick the option from the burger menu and you are one step away to finish your heap of work in one go.

Or if you wish to select all students at once, use the tick box present right beside the Processed Date column.

AGD – Enrolments Tile

Main Dashboard > Marketing Menu > Agent Dashboard > Enrolments Tile

Overview

In the Applications Tile, we show all the enrolments that are linked to the Agent.

This screen is divided into two sections.
1) Filters/Parameters
2) Listing Grids

Filters/Parameters:

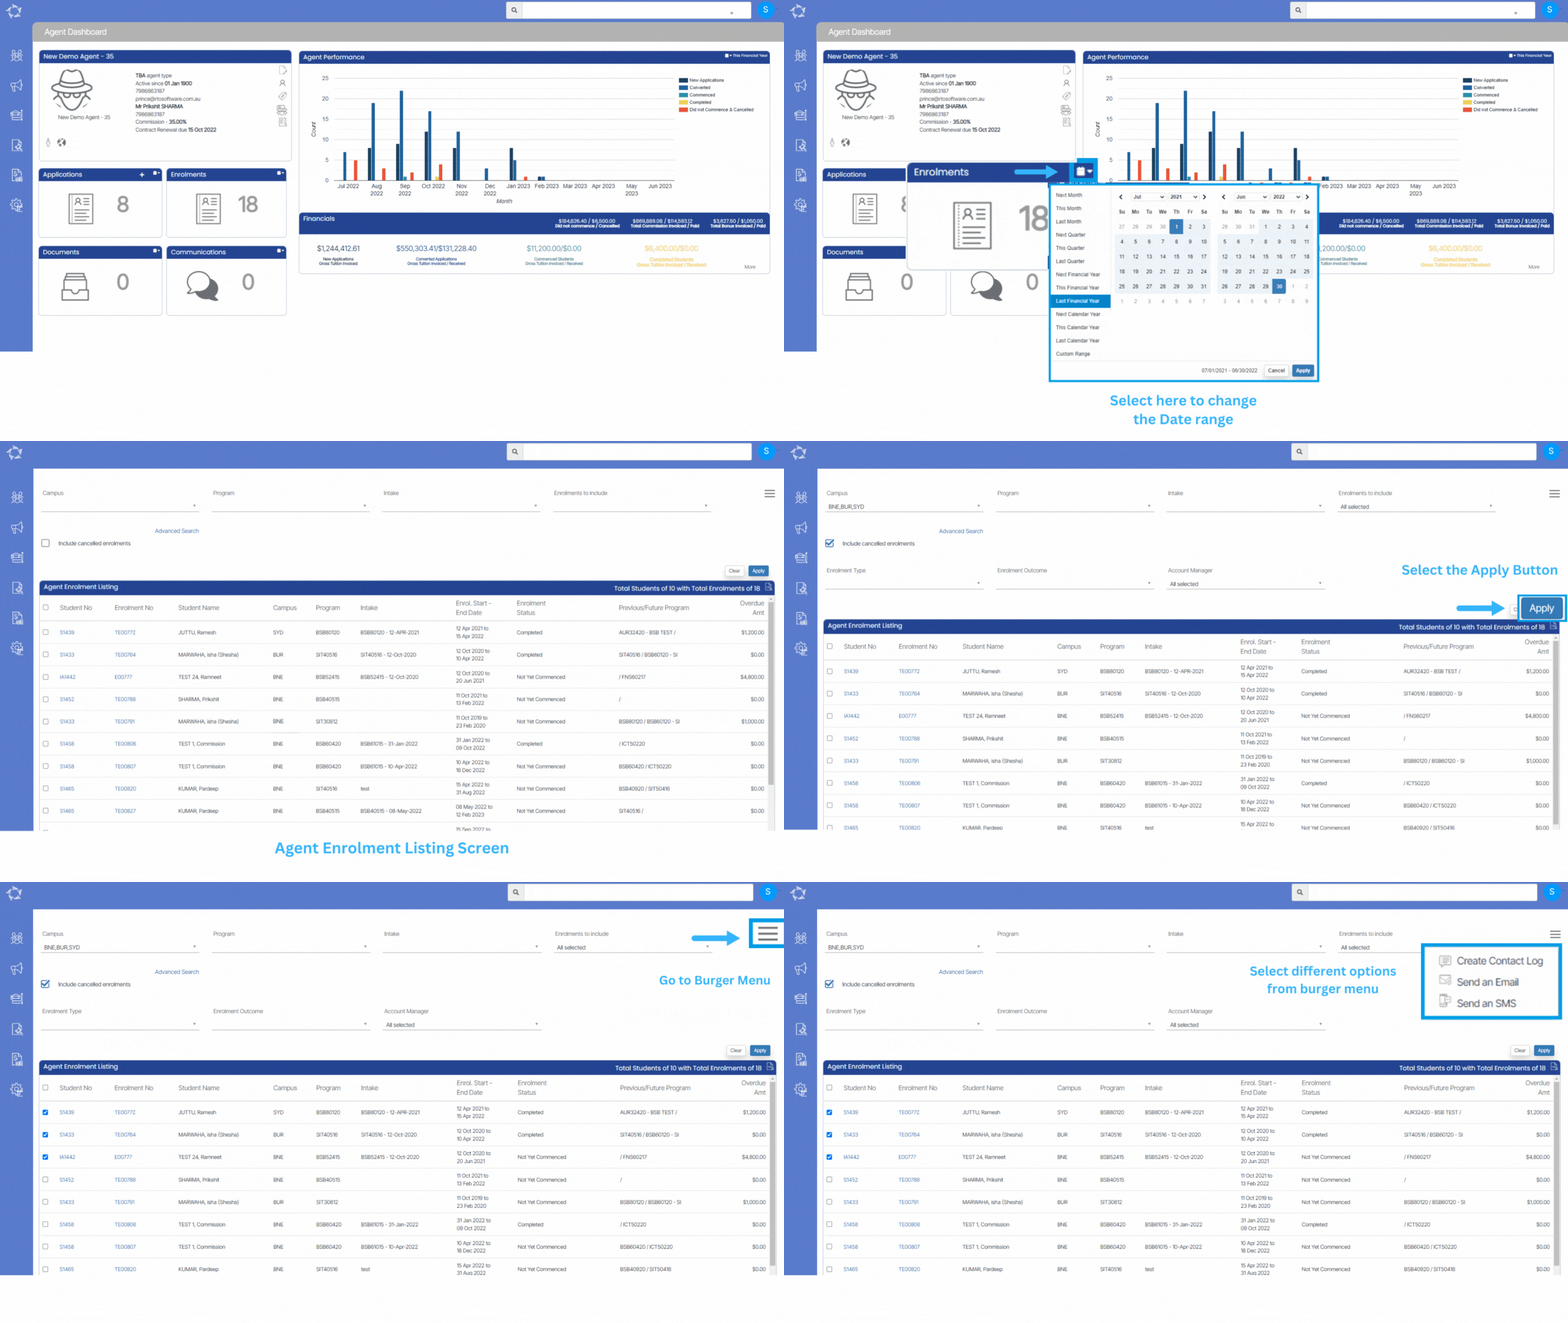
To open this screen, you would have selected the Enrolments Tile link from the Agent Dashboard. Based on the date range you have selected on the Enrolments Tile, the system will open the screen and populate the information in this section. For example, it will show you the start and end dates that were used in the tile.

Select here to know more about the filters/parameters.

Listing Grid

In this grid, we are displaying the list of all enrolments. We are showing the Student No, Enrolment No, Student Name, Campus, Program, Intake, Enrol. Start-End Date, Enrolment Status, Previous/Future Program, and Overdue Amt columns. All of these columns are self-explanatory.

Select here to know about the Icons under the Actions column and Burger Menu

How to select Enrolments?

Use tick boxes to select enrolments if you wish to send email/SMS, create a contact log, print letters and start enrolments in bulk. After selecting the students, pick the option from the burger menu and you are one step away to finish your heap of work in one go.

Or if you wish to select all students at once, use the tick box present right beside the Student No column.

Commission Template Entry Screen

Main Dashboard > Marketing Menu > Commission Templates > +Template Button

Overview

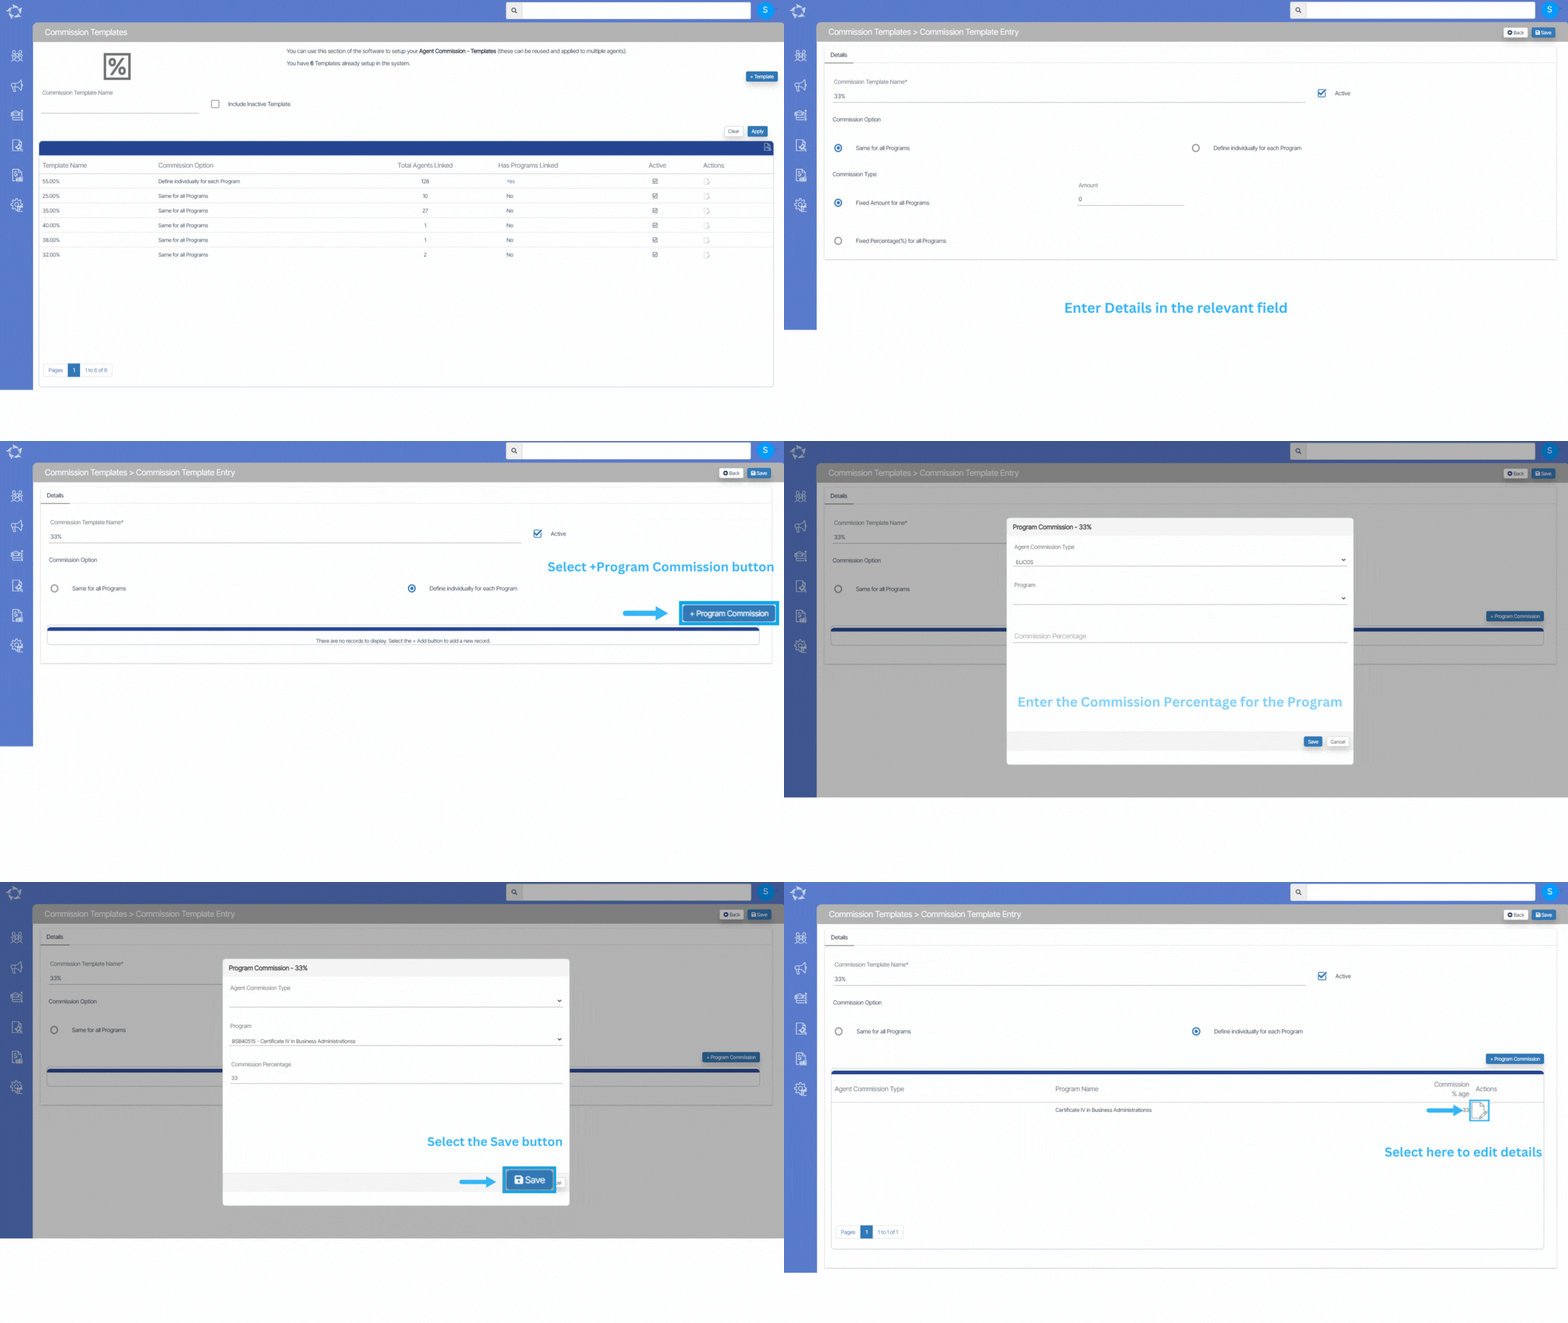
A commission template specifies the percentage amount that will be paid to the Agent for their services. The Commission Template entry screen will let you create the template as per your need. You need to enter the template name and mark the template as Active.

The system will let you create two different types of Commission Templates:

Same for all Programs

The system will allow you to create a commission template that will be the same for all the programs and you can select the template when creating the student application. You can choose from the two different commission types that are explained below:

Fixed Amount for all Programs: By selecting the Fixed Amount for all Programs radio button, You can enter a fixed amount of commission that will be set as the default amount whenever the respected commission template is selected while creating the application or linking agent to an enrolment.

Fixed Percentage for all Programs: By selecting the Fixed Percentage for all Programs radio button, You can enter a fixed percentage of commission that will be set as the default whenever the respected commission template is selected while creating the application or linking agent to an enrolment.

Define individually for each Program

The system will allow you to create a Commission Template individually for a specific program when the Define individually for each Program radio button is selected. Enter the Commission Template name and select the save button first. Then you need to select the +Program Commission button from where you can choose the specific program for this commission template.

Note: You can either select the Agent commission Type or Program from the Program Commission screen. The system will not allow you to select both fields at the same time for the commission template.

The field name and Explanation of the field are given below:

Field NameExplanations
Agent Commission TypeThis is a user code in TEAMS and you can select the Agent Commission Type from the dropdown field.
ProgramSelect the Program for the commission template from the dropdown field.
Commission PercentageEnter the Commission Percentage in this field.

Commission Templates

Main Dashboard > Marketing Menu > Commission Templates

Overview

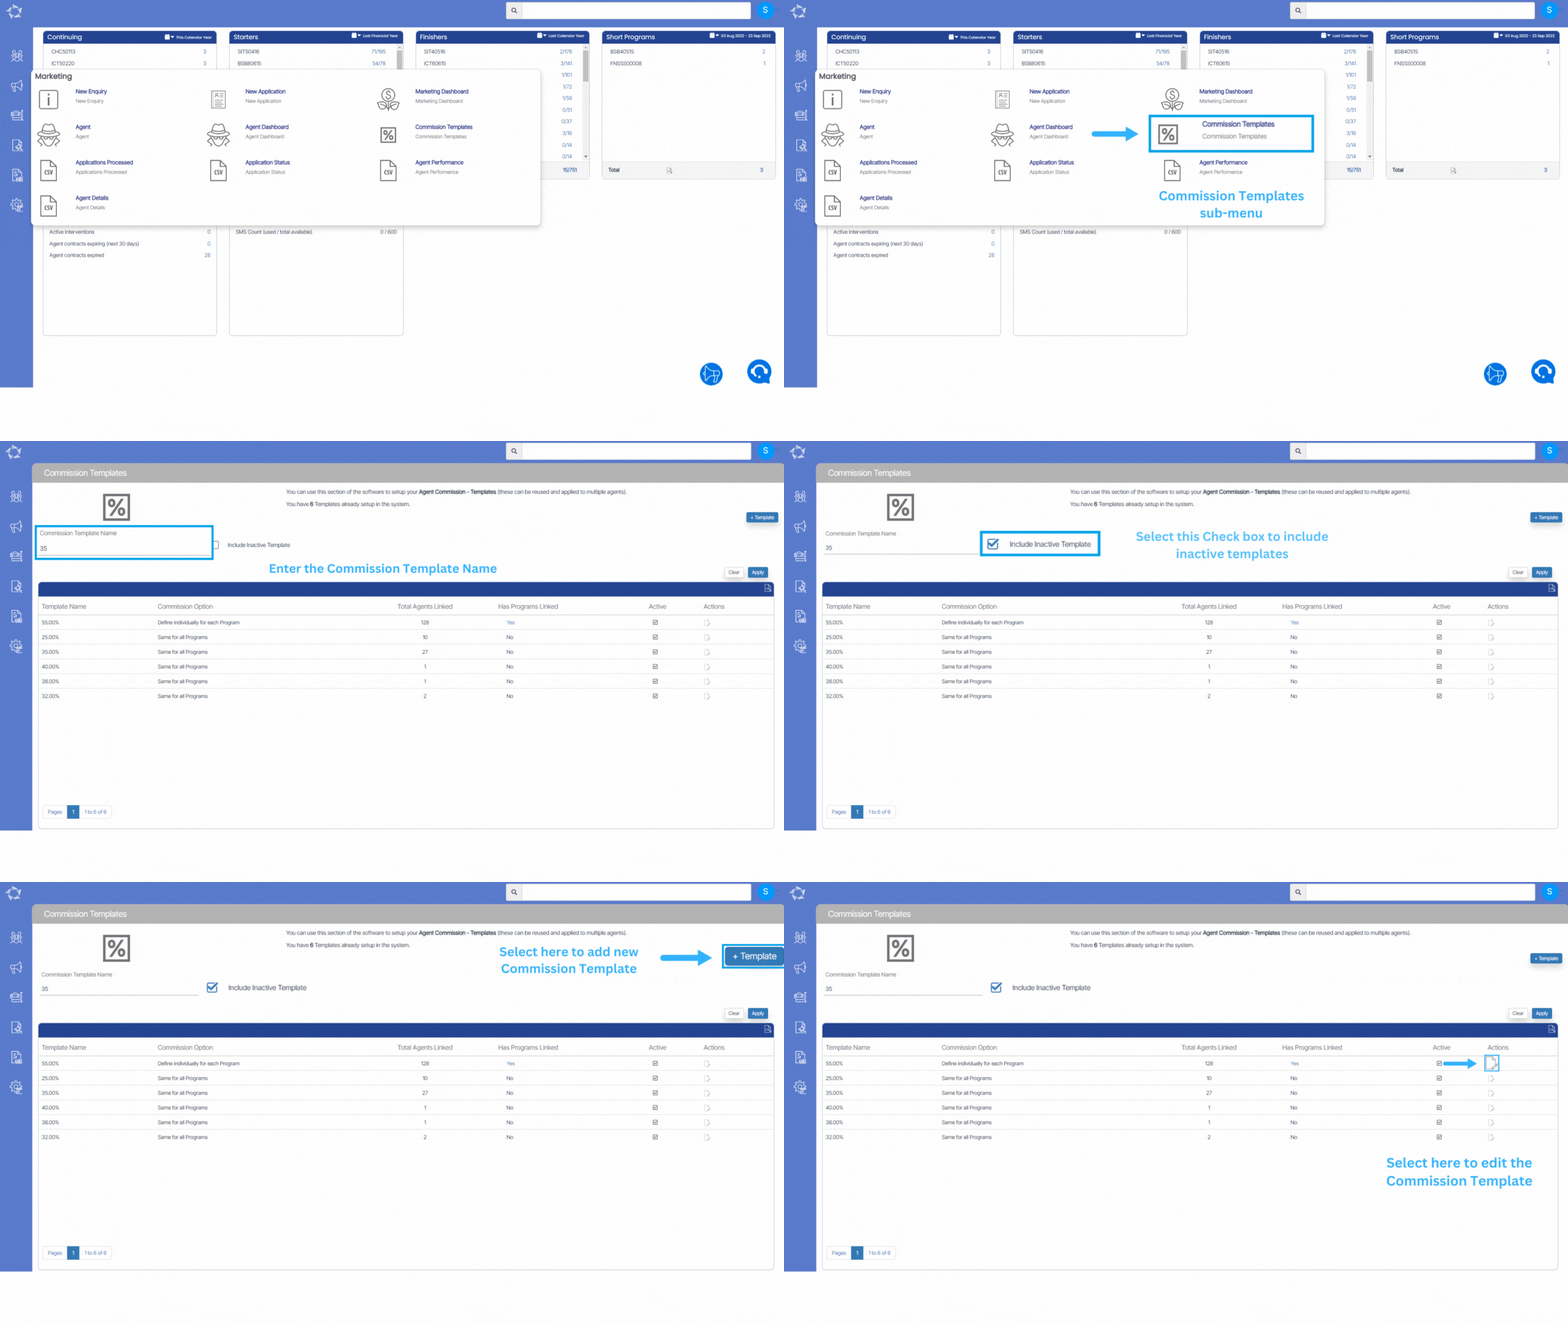
A commission template specifies the percentage amount that will be paid to the Agent for their services. The Commission Template welcome screen will show you some basic information about the Commission Template and will allow you to search, edit and create commission template for the agent. You can edit the commission template by selecting the icon.

You can create new commission templates by selecting the +Template button.

New Enquiry – Employer

Main Dashboard > Student Management > New Enquiry Sub-Menu > Employer Enquiry

Overview

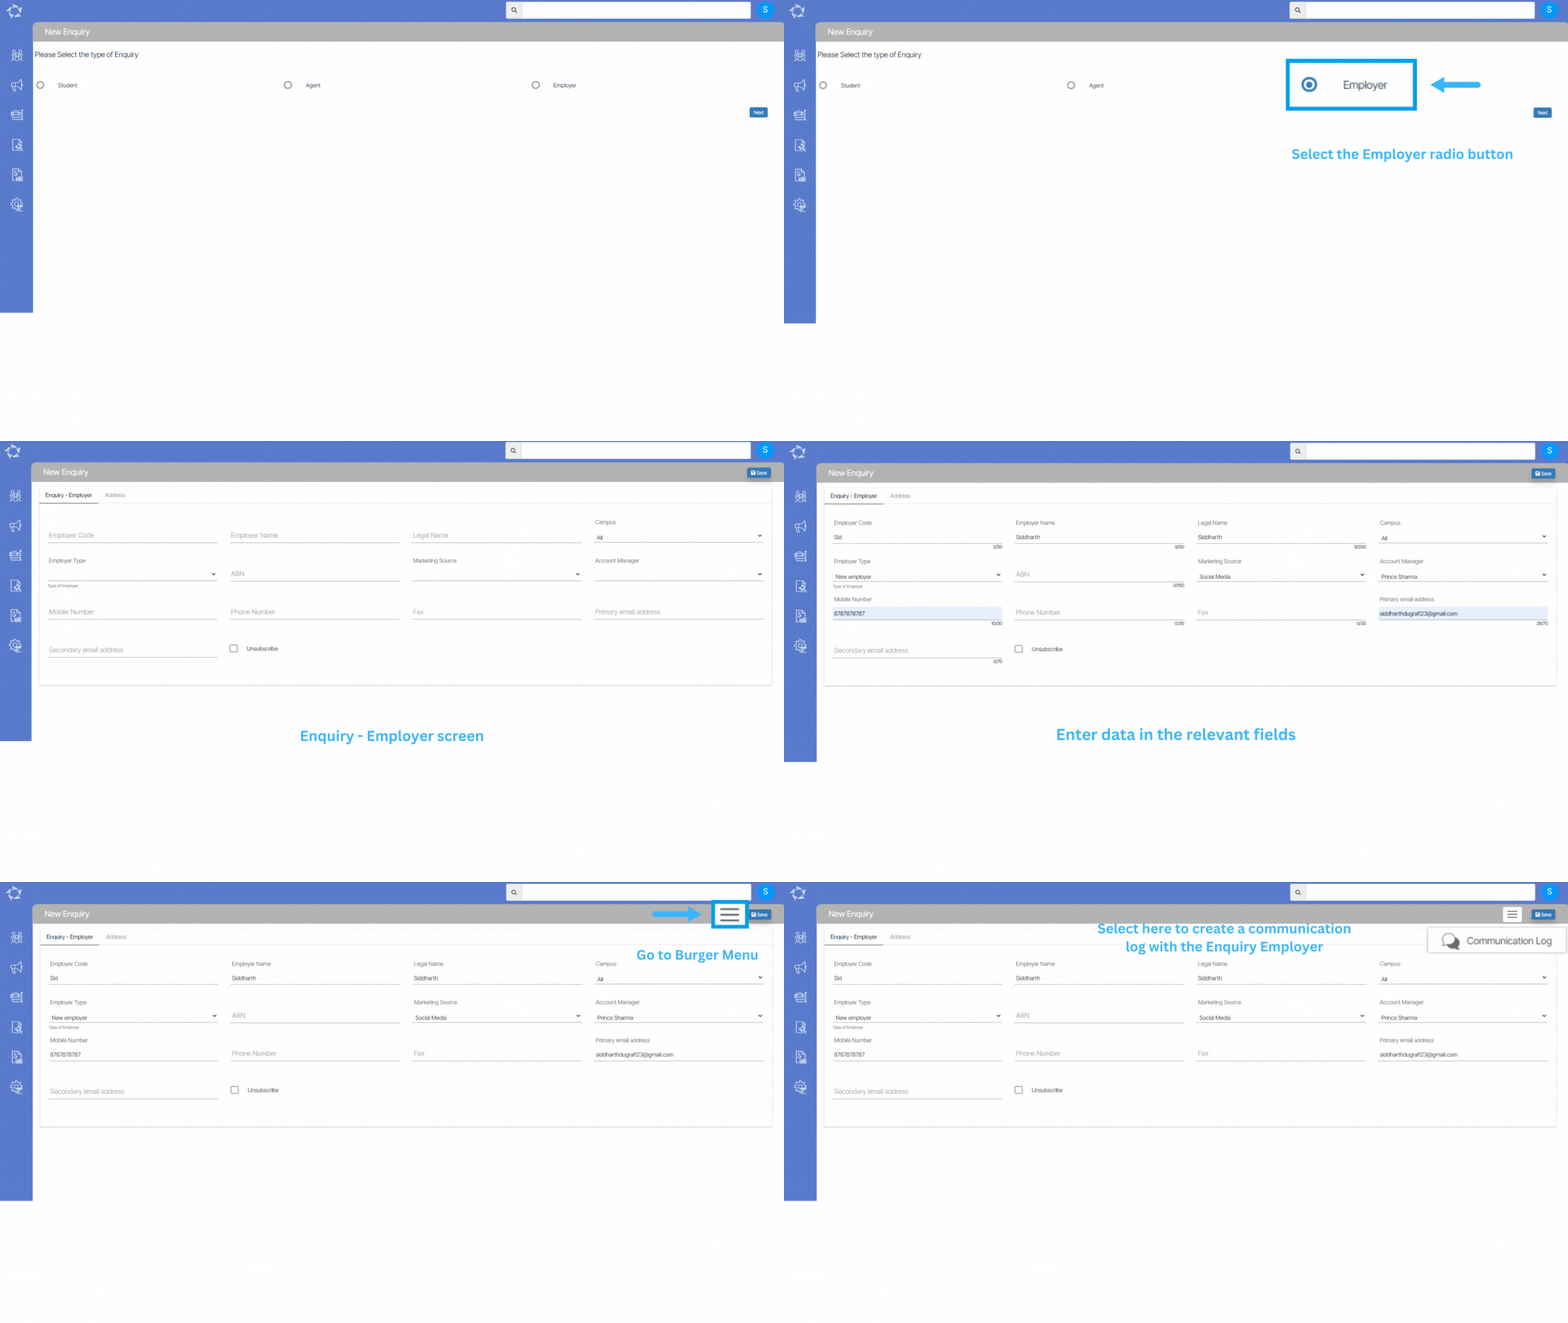
This screen allows you to enter enquiries (new leads) of the Employers, so you can track communication and the progression of discussions with them.

Follow the below steps to create an Enquiry

  • Select the New Enquiry sub-menu.
  • Select the Employer radio button and select the Next button.
  • Enter data into the relevant fields and select the Save button.

Note: On the new enquiry screen when you select the save button, the enquiry will be created and you can see the Burger Menu icon beside the Save button in the top right corner which allows you to perform some important functions for that enquiry.

You can create a Communication Log and New Application from the burger menu.

New Enquiry – Student

Main Dashboard > Student Management > New Enquiry Sub-Menu > Student Enquiry

Overview

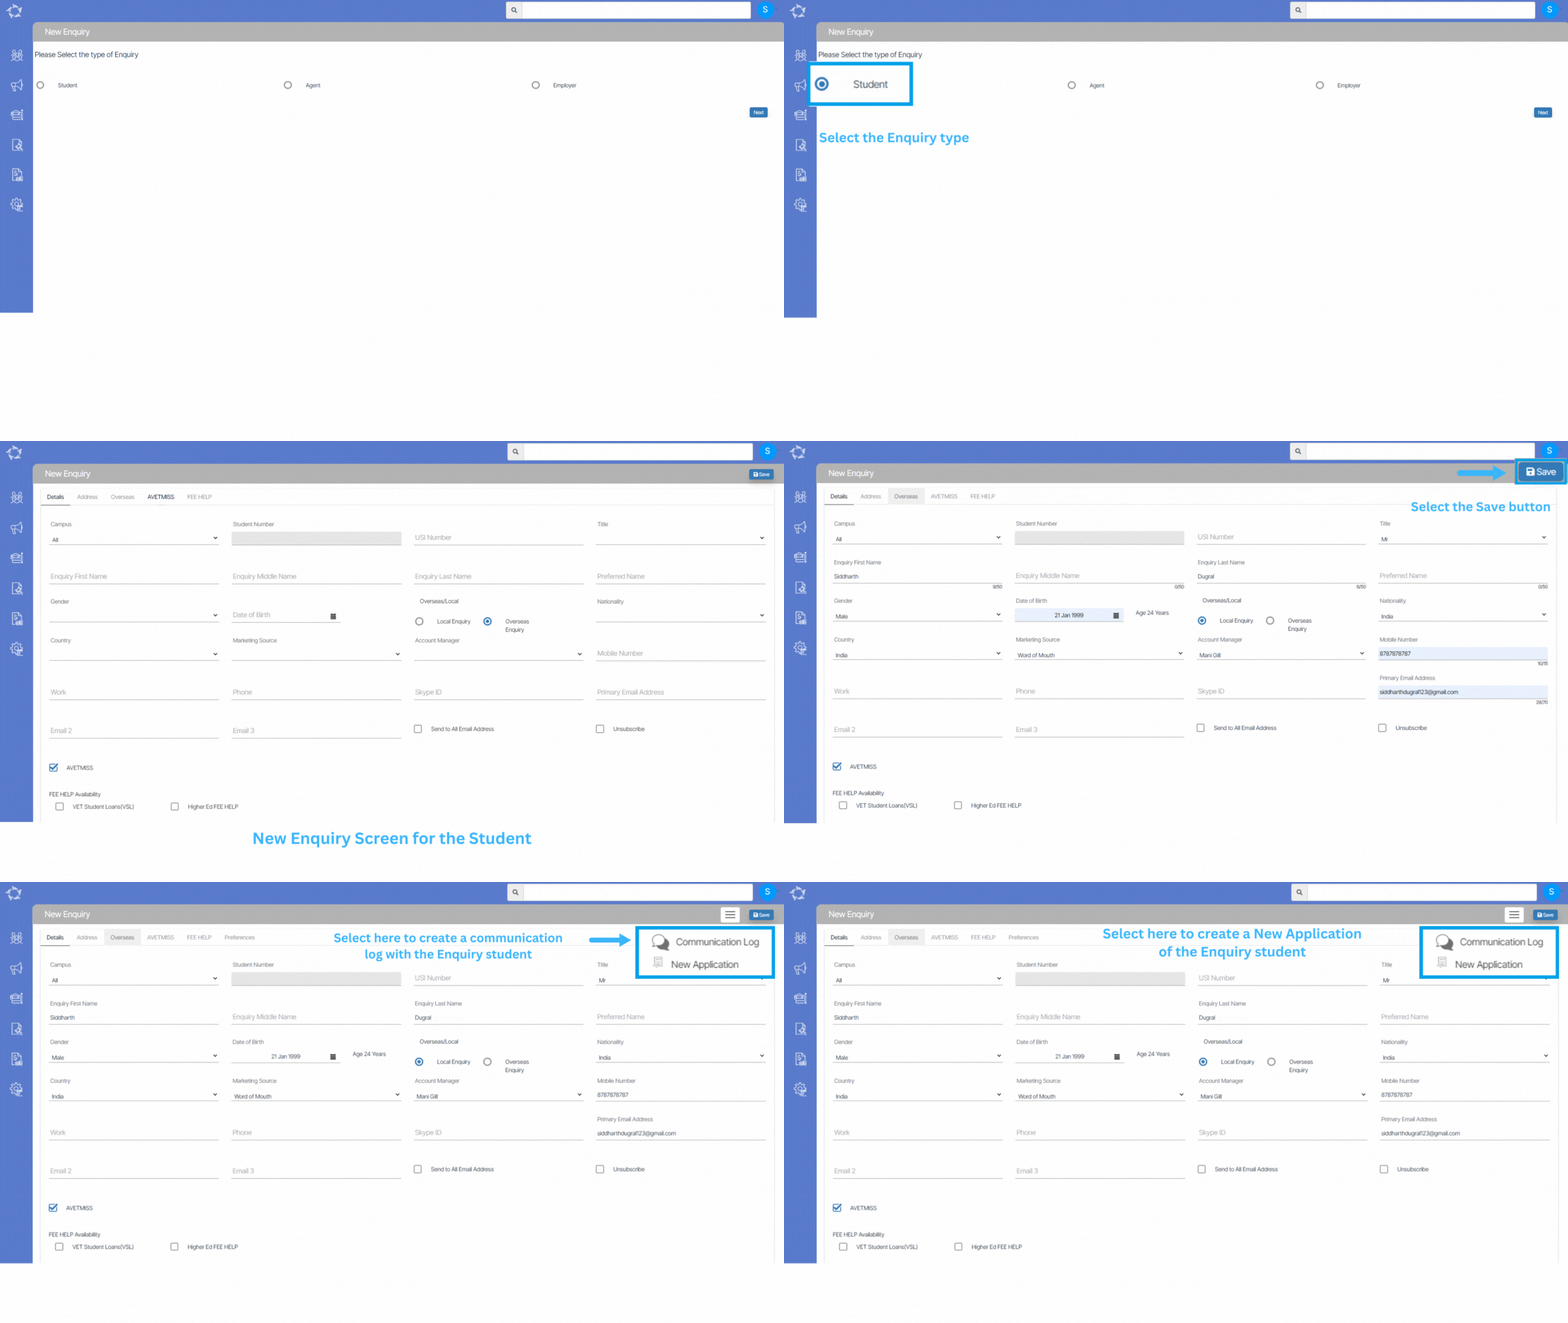
This screen allows you to enter enquiries (new leads) of the students, so you can track communication and the progression of discussions with them.

Follow the below steps to create an Enquiry

  • Select the New Enquiry sub-menu.
  • Select the Student radio button and select the Next button.
  • Enter data into the relevant fields and select the Save button.

Note: On the new enquiry screen when you select the save button, the enquiry will be created and you can see the Burger Menu icon beside the Save button in the top right corner which allows you to perform some important functions for that enquiry.

You can create a Communication Log and New Application from the burger menu.

New Enquiry – Agent

Main Dashboard > Student Management > New Enquiry Sub-Menu > Agent Enquiry

Overview

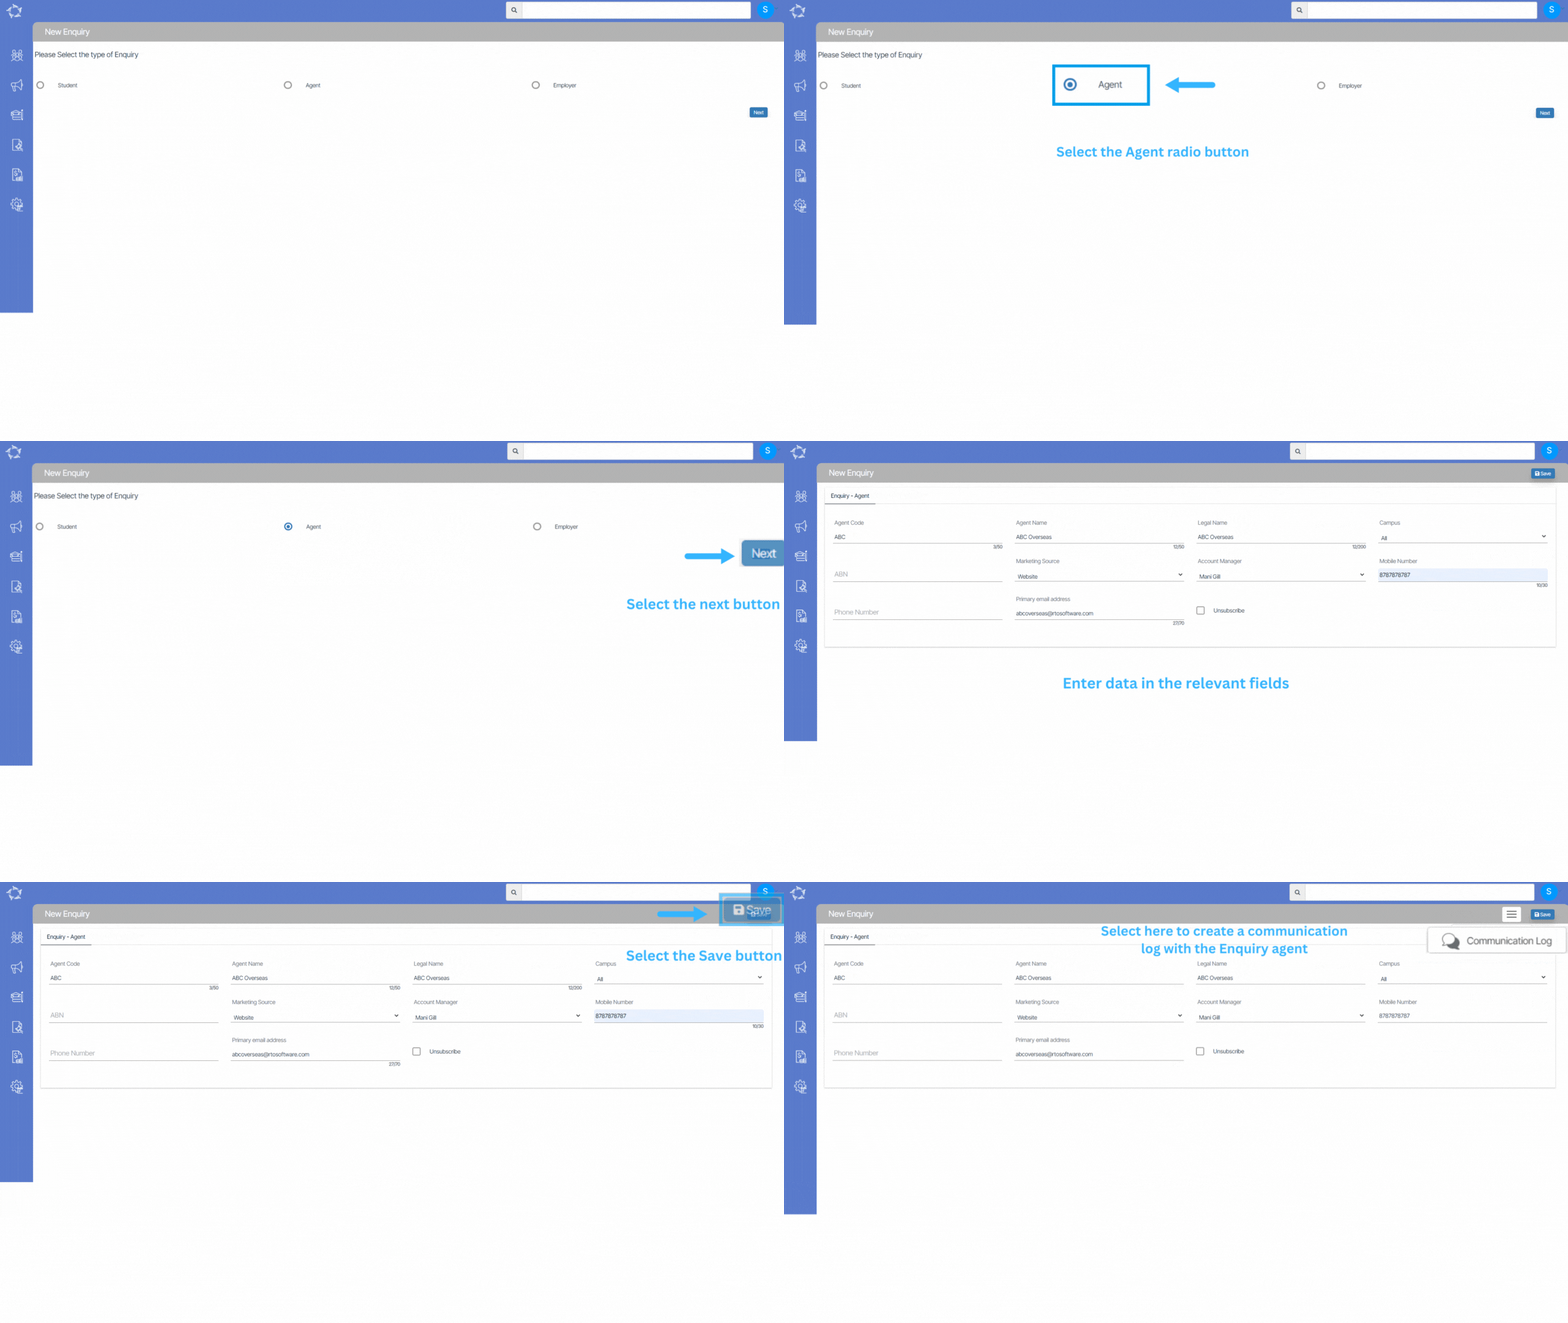
This screen allows you to enter enquiries (new leads) of the agents, so you can track communication and the progression of discussions with them.

Follow the below steps to create an Enquiry

  • Select the New Enquiry sub-menu.
  • Select the Agent radio button and select the Next button.
  • Enter data into the relevant fields and select the Save button.

Note: On the Agent enquiry screen when you select the save button, the enquiry will be created and you can see the Burger Menu icon beside the Save button in the top right corner which allows you to perform some important functions for that enquiry.

You can create a Communication Log and New Application from the burger menu.