Employer Entry – Contacts


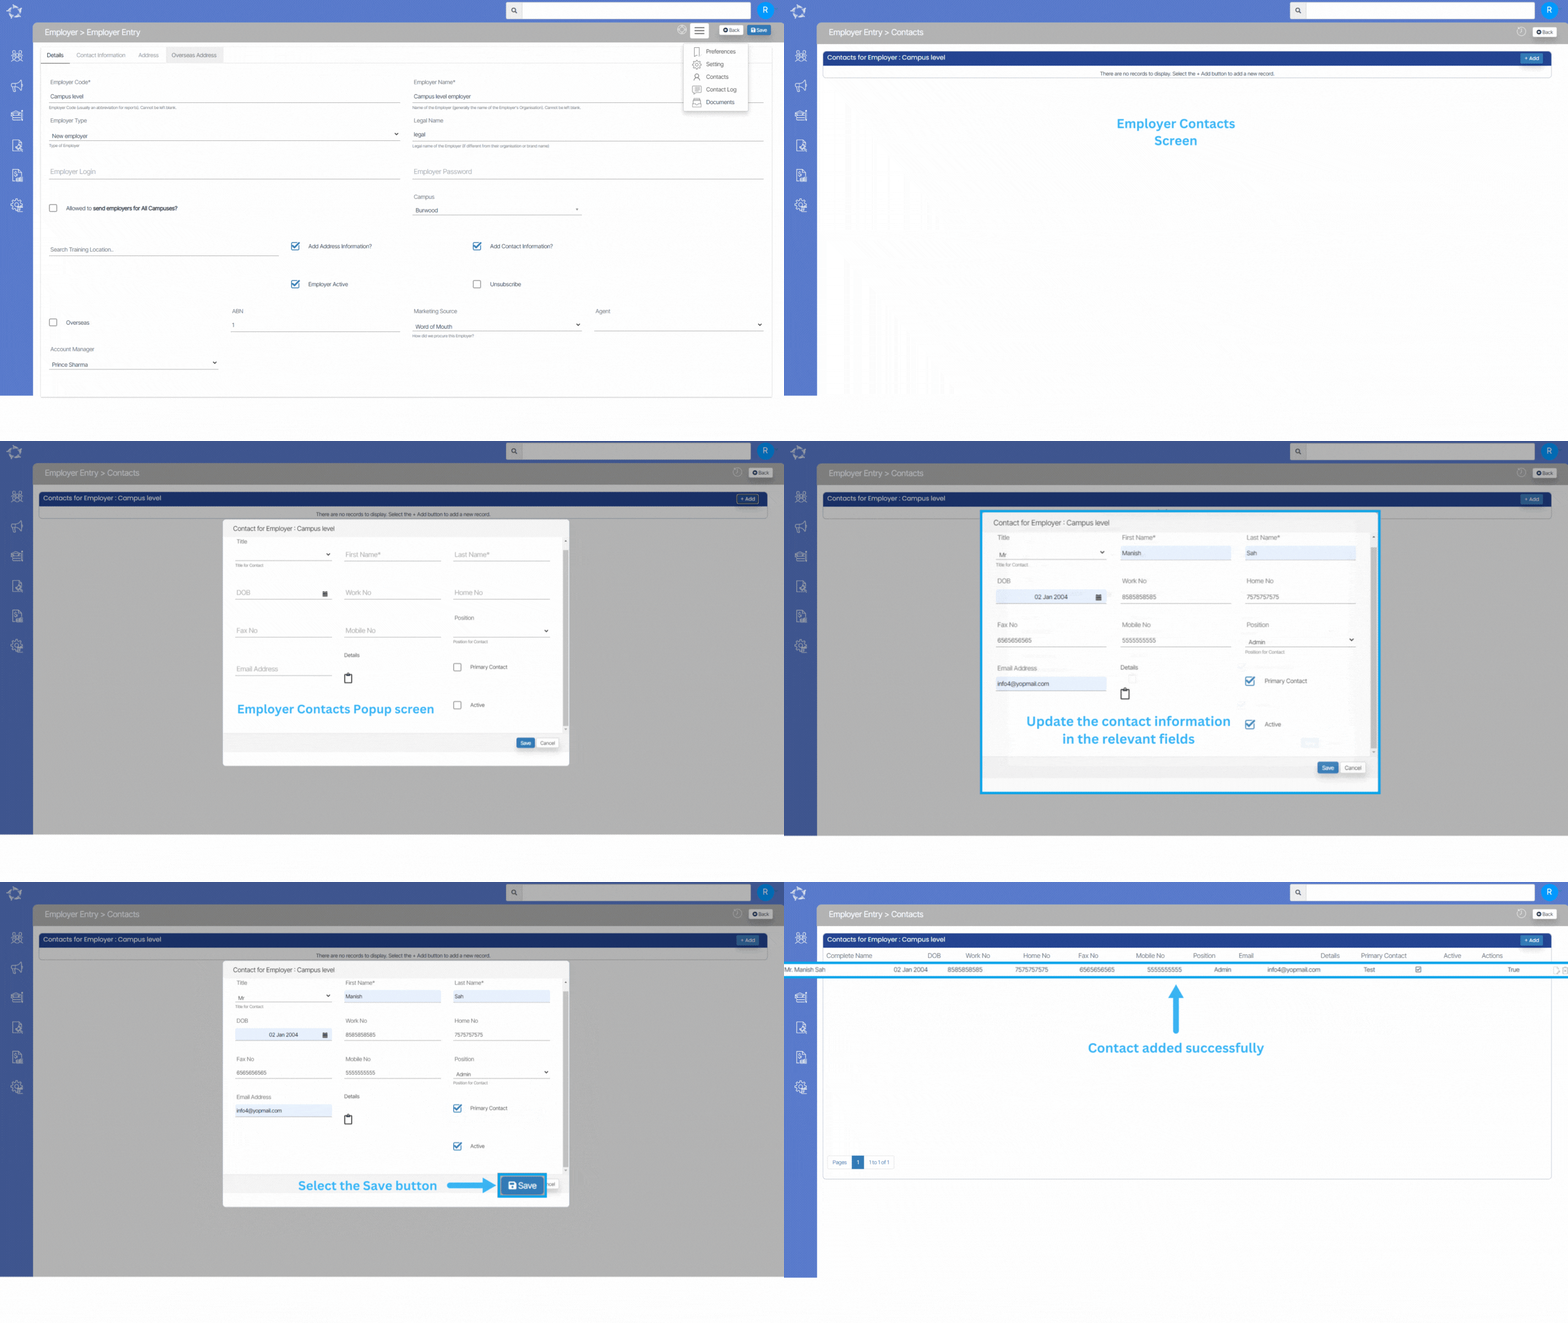
Contact screens offer you a quick and easy way to manage an Employer’s contact details. You can efficiently add, edit, or delete contact information as needed.

This screen enables you to input and manage the primary contact for an employer. You can add new contacts or edit and delete existing ones using the grid view provided. The grid view will display the current contacts associated with the employer and allow you to modify them as necessary.

To edit or add contact details for an employer, simply select the  Edit icon or the Add button on the Employer’s Welcome screen. From there, access the Burger Menu and choose contacts to view and manage the Employer’s contact information.
What’s New – 1st June 2023

Welcome to the latest update for TEAMS

Some key changes made in this update are:

  • Optimised email deliverability which will deliver emails directly to the recipient’s inbox
  • New Invoice Due Changes for Agent Commission Invoices

In Q&A, we look at why sometimes you may not be able to see GST for Agent commission invoice/s.

Email Deliverability Optimisation

We understand the importance of effective email communication for your business, and we are delighted to be able to offer you an even more reliable and efficient email delivery service. 

We have optimised email deliverability where emails will be delivered directly to the recipient’s inbox.

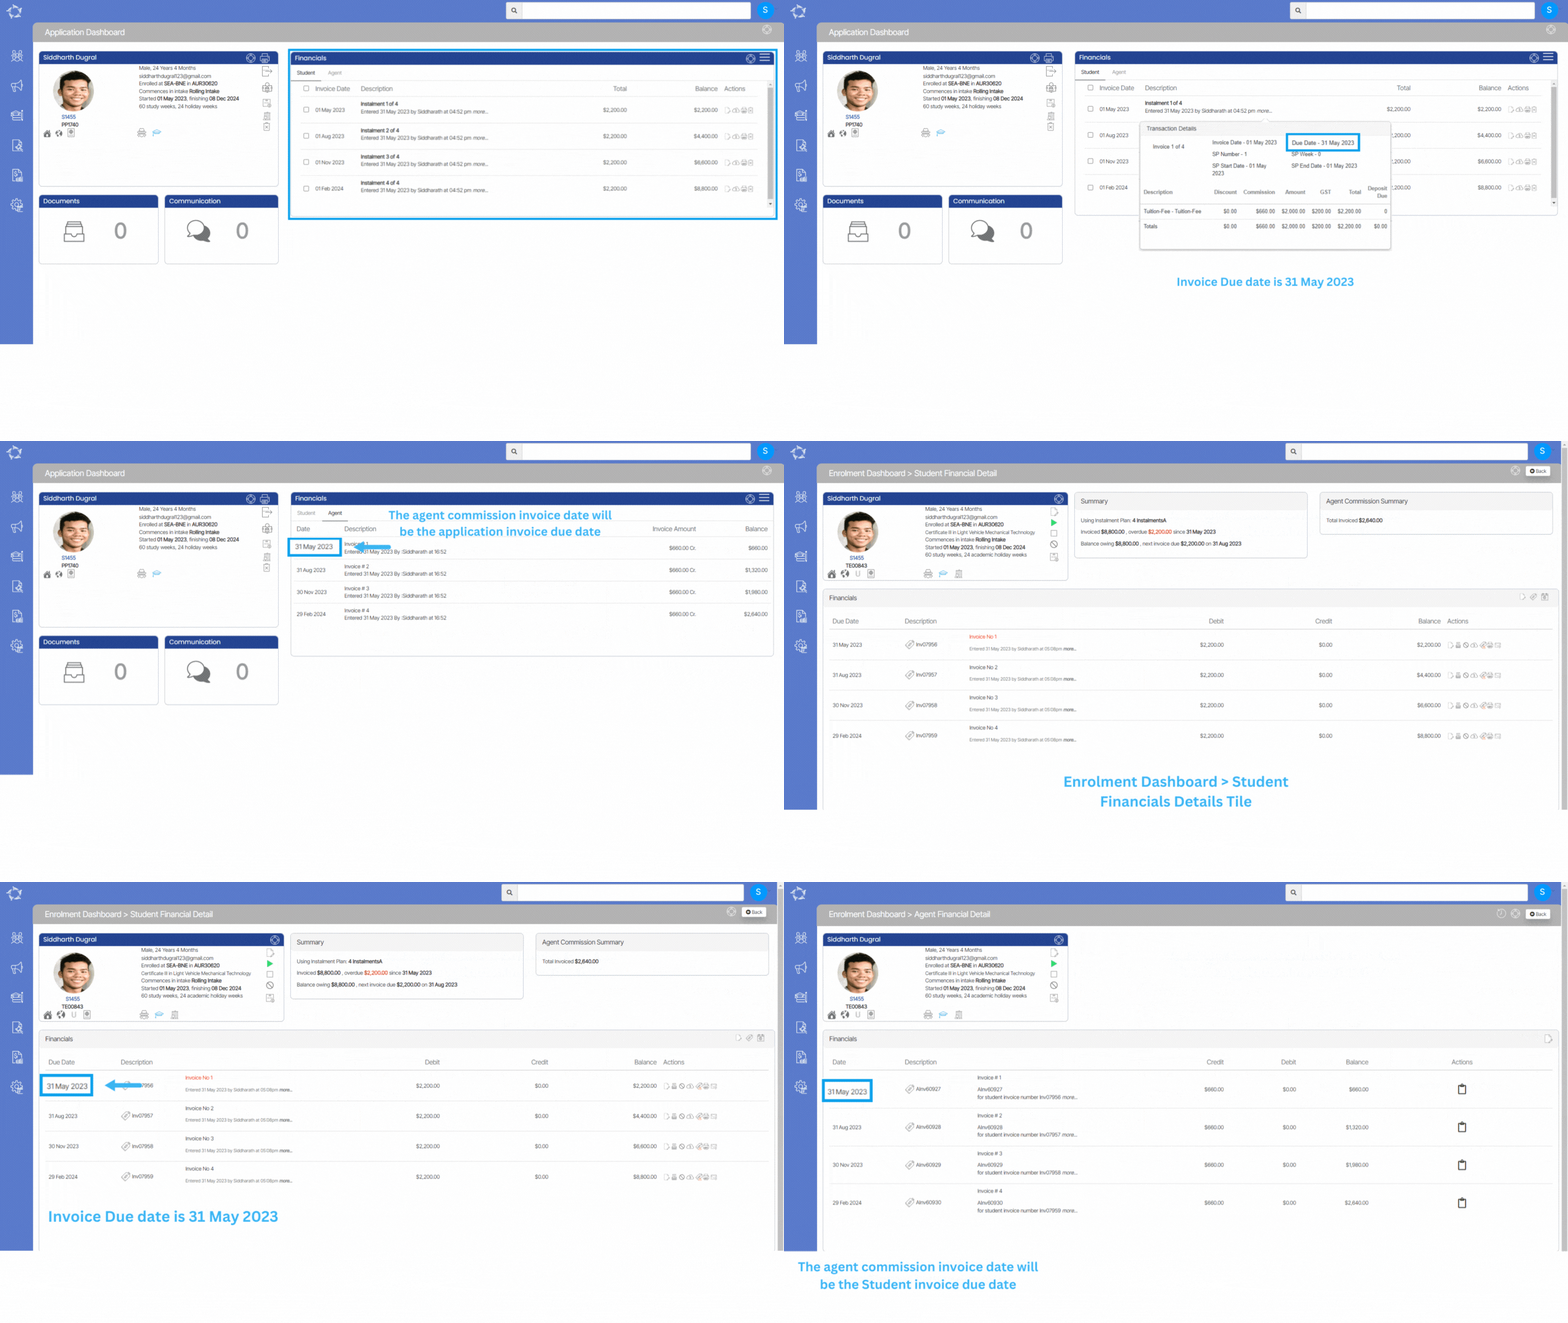
Invoice Due Date change for Agent Commission Invoices

Whenever an invoice is created for a student, the due date for that particular invoice will be copied as the Agent commission invoice date.

Q&A

Do you have a TEAMS question?

Make a list of your questions, send them to our support teams and we will send you the answer and add them to our fortnightly update.

Select the read more button as here are some questions we get asked and then answers on how to do them in TEAMS.

Our mission is to build software that helps you do things more efficiently. Your input and engagement are vital in helping us improve our service and offerings for your college. We are always open to listening to your feedback.

Any questions, please feel free to reach out to us. We look forward to serving you to the best of our ability.

Please review the changes and if you would like further clarification, please contact our Support team.

A big thank you to so many of you who have been actively participating in helping us bring these new improvements to life.

Next update is due on Thursday, 15th June 2023

Note: Please alert other team members within your college if the changes outlined above affect their role or department.

Thank you for taking the time to read this post.

Invoice Due Date change for Agent Commission Invoices

Previously, the system was using the student invoice date as the agent commission invoice date. With this new change, the system will now look at the student invoice due date and use it for the agent commission invoice date instead.

Note – The system will only do this for new transactions in the new application process and where you are raising invoices/instalments for applications and enrolments

Trainer

Main Dashboard > System Admin > Trainer

history of changes

Overview

This is the Trainer Welcome screen which will show you the list of Trainers in the grid that are Active in your system.

This screen is divided into two sections:

  • Filters/Parameters
  • Listing Grid

Filters/Parameters

The filters will show you different fields where you can select the data as per your need then select the Apply button and based on your selection the system will load the list of trainers in the grid. You can also see the Total count and the Active count of the Trainers.

Listing Grid

In this grid, you can see the list of all Trainers. You will see columns such as Trainer Code, Trainer Name, Campus, Allocated to Classes, Allocate to enrolments, Active and Actions. All of the columns are self-explanatory.

You can select the +Trainer button to add a new Trainer to the system.

Select here to know more about the Burger Menu

Select here to know more about the Action Column

School Entry – Contacts

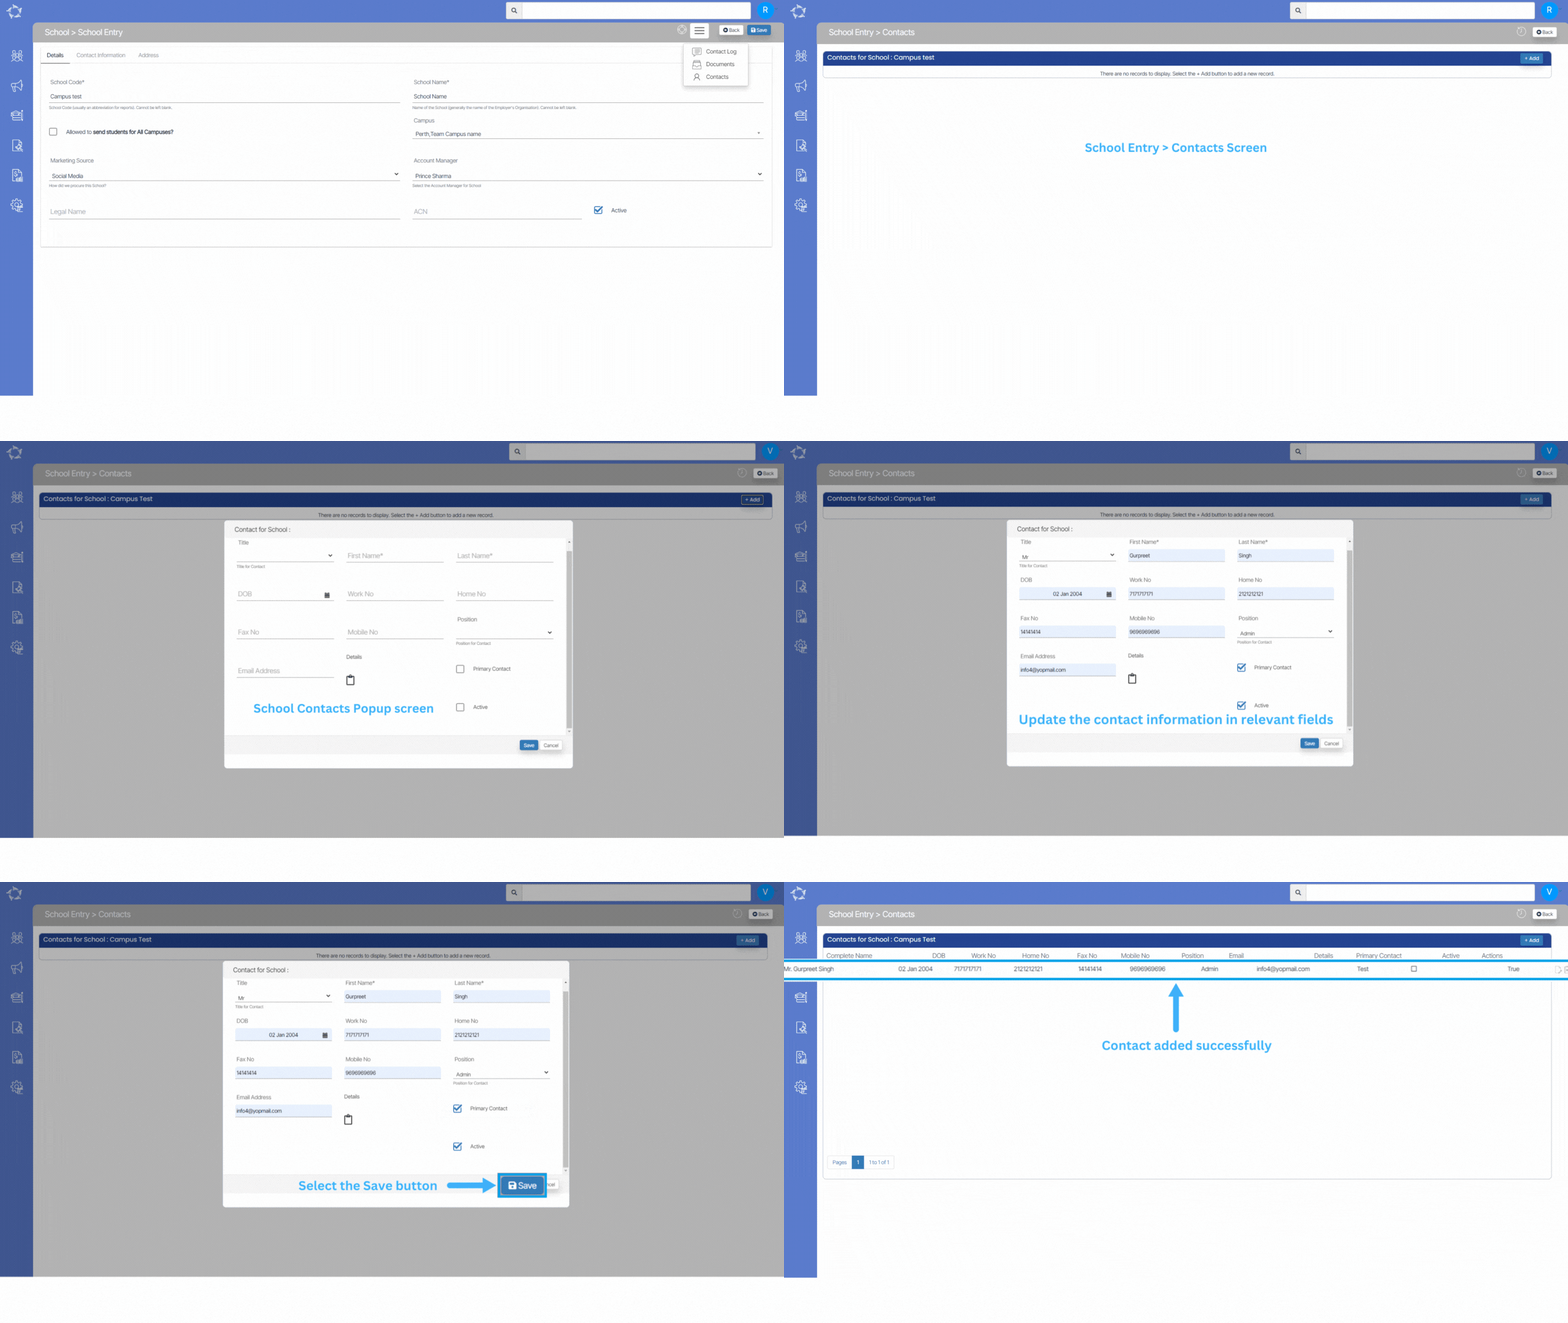
This screen is designed to enable you to input and manage the primary contact for a school. You can add new contacts or edit and delete existing ones using the grid view provided. The grid view will display the current contacts associated with the school and allow you to modify them as necessary. This is an efficient way for you to manage your contacts within the system and ensure that the information is up-to-date and accurate.

To edit or add contact details for a school, simply select the  Edit icon or the Add button on the School’s Welcome screen. From there, access the Burger Menu and choose Contacts to view and manage the school’s contact information.

Contact screens offer you a quick and easy way to manage a School’s contact details. By providing multiple access points to this screen, you can efficiently add, edit, or delete contact information as needed.

School – Documents

School Entry > Burger Menu > Documents

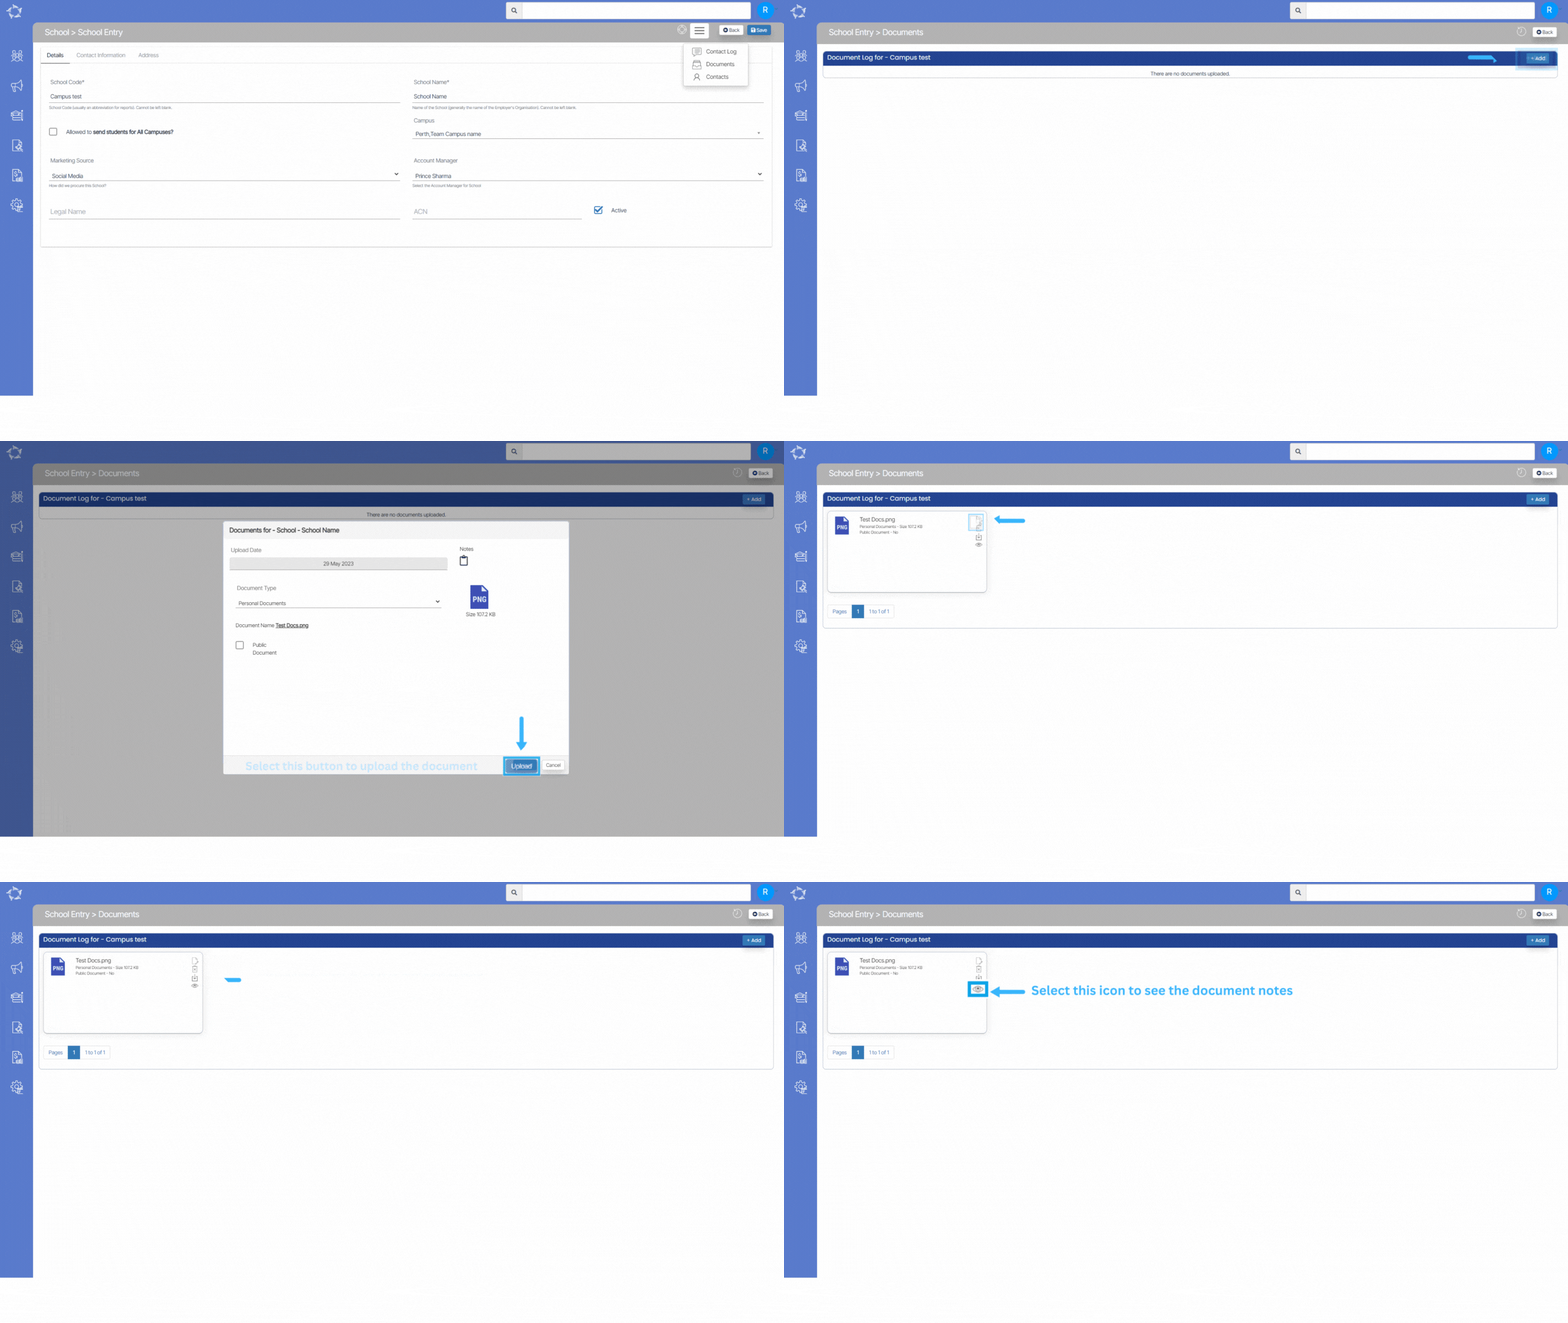
When you select the Documents option, you will be taken to the School Entry > Documents screen. If you have already uploaded documents for the school, it will show you in the grid.

You can also add the document by selecting the “+Add” button, a pop-up window will appear on the screen where you can choose the document you want to upload for the school.

The field’s name and explanations are given below:

FieldsExplanations
Upload DateThis will show the date, the day you upload the document
NotesYou can write notes for your own reference by selecting the notes icon.
Document TypeThis is a user code in TEAMS and based on the user, you can select the document type.
Document NameIt will show the name of the document which you have selected.
Public DocumentSelect this box if you want to make the document public on the student portal.

School Entry – Contact Log

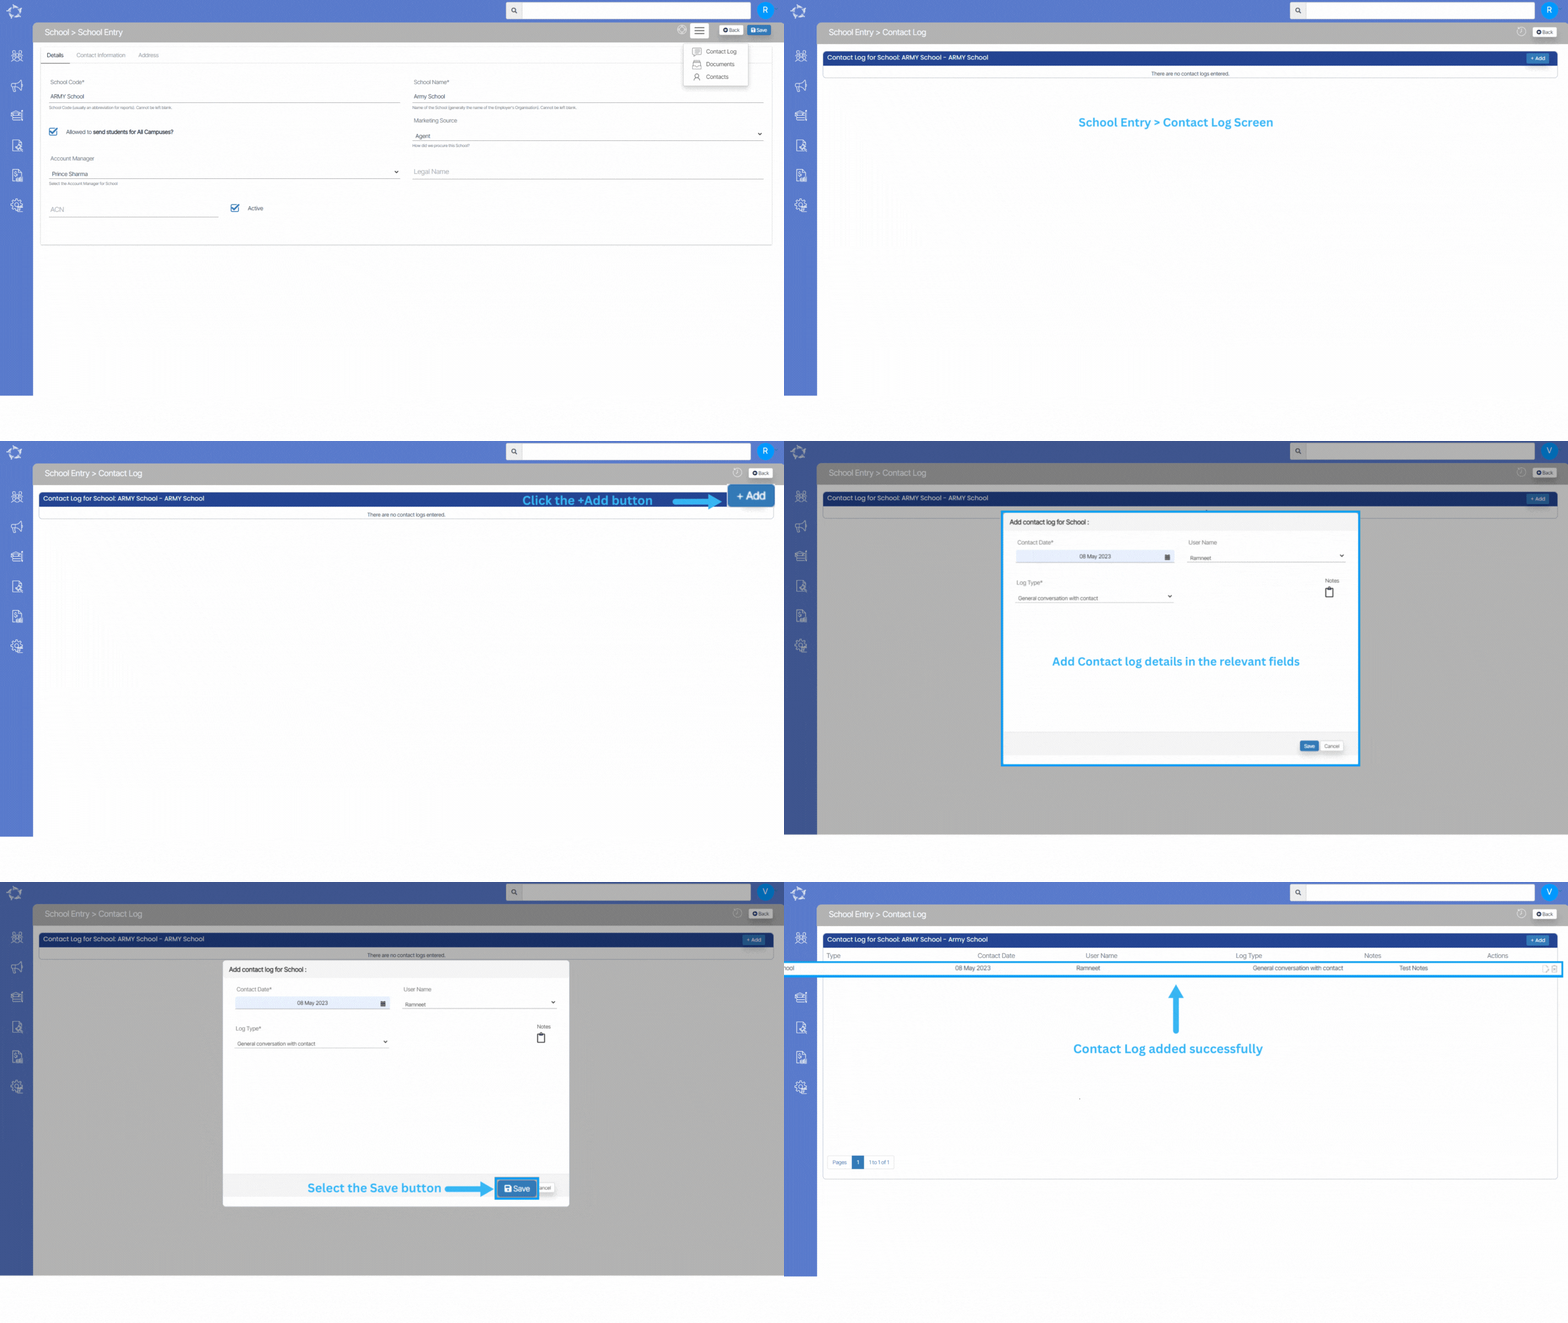
This screen lets you enter the contact logs for the school. You will be able to view the school’s current contact logs in the grid and make edits or deletions as necessary.

You will also be able to add a new contact log for a school from the +Add button.

The field’s name and explanations are given below:

FieldExplanation
Contact DateYou can enter the contact date in this field.
User NameSelect the user name from the dropdown field
Log TypeYou can select the log type from the dropdown field.
NotesYou can add notes related to the contact log.

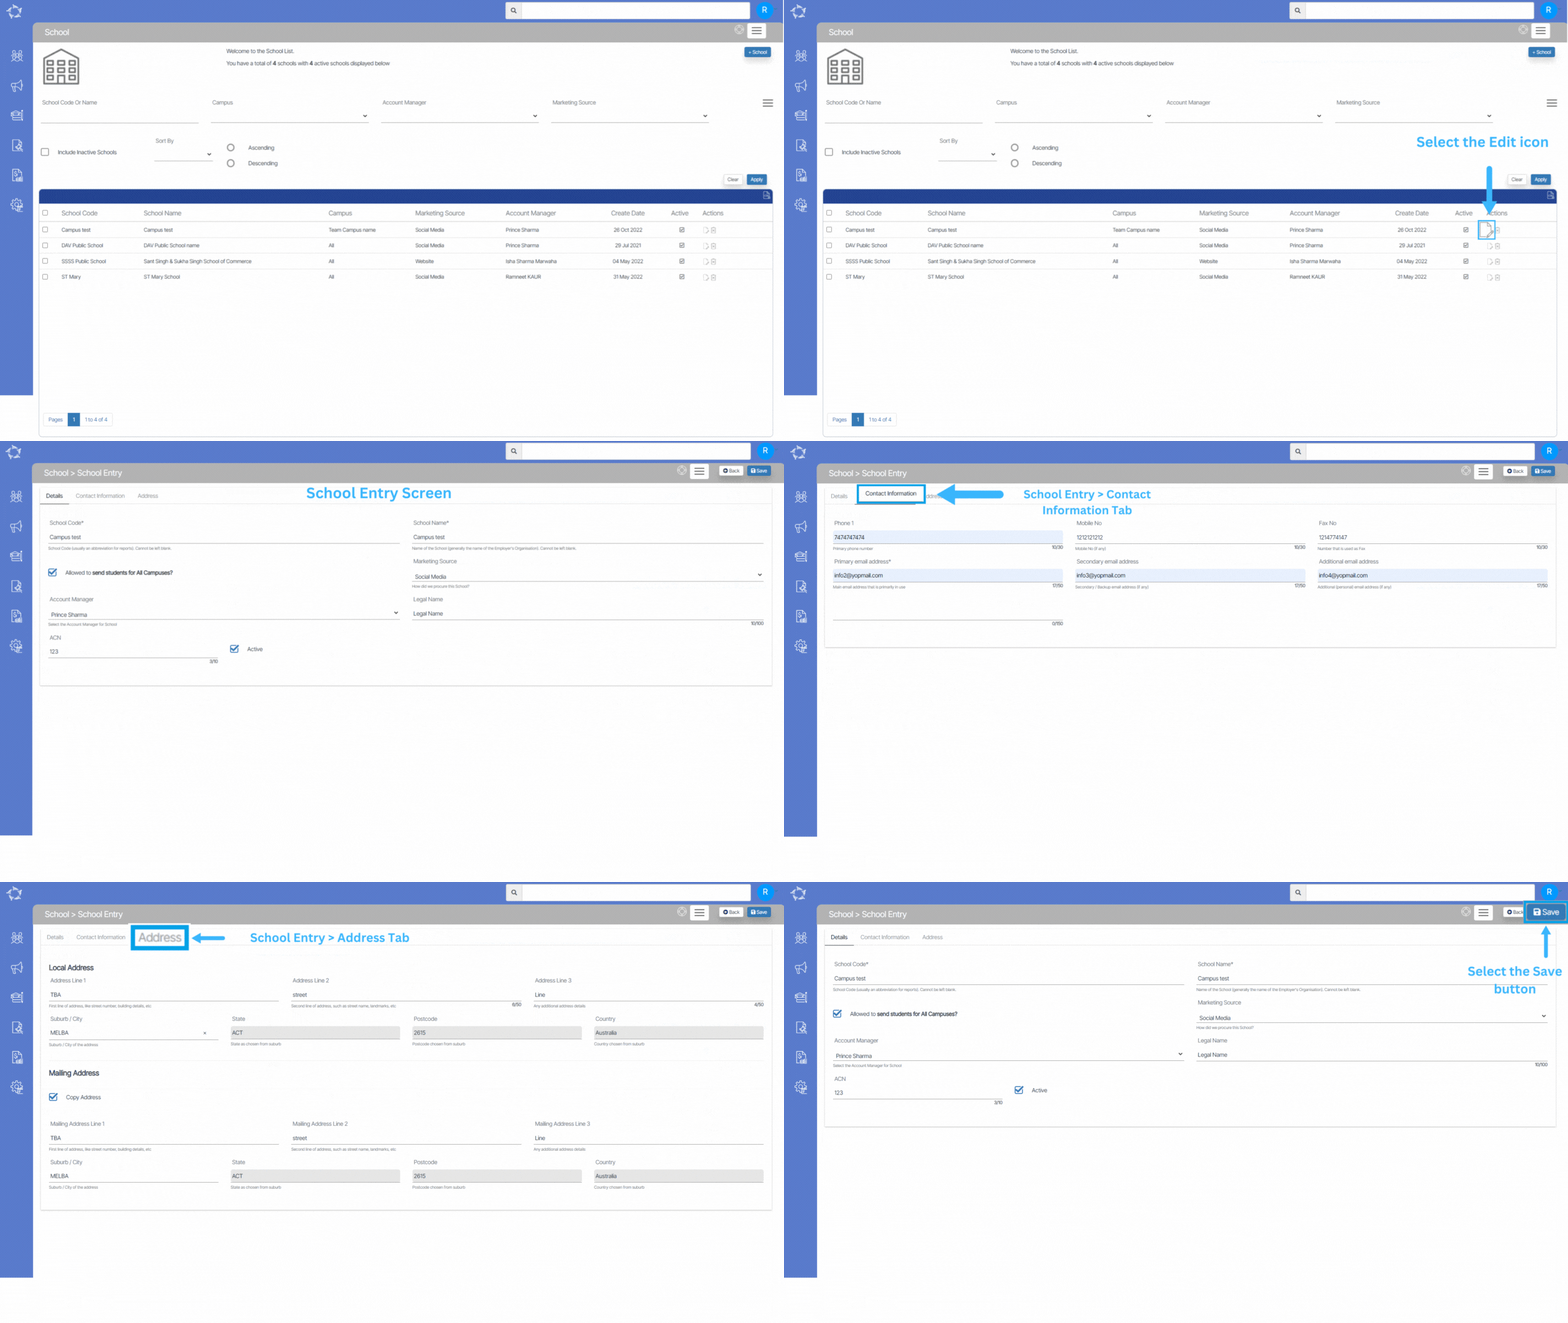
School Entry Screen

The School Entry Screen provides the functionality to add a new school to the system. When accessing this screen, you will notice three distinct tabs, each serving a specific purpose.

The first tab allows you to input and update the school’s details, such as its name, type, and other relevant information.

The second tab is dedicated to capturing the school’s contact information, including phone numbers, email addresses, and relevant personnel details.

Lastly, the third tab focuses on entering the school’s address details, such as street name, city, state, and postal code.

FieldsExplanation
School CodeThis is a mandatory field and it cannot be left blank
School NameThis is a mandatory field and it cannot be left blank
Allowed to send students for All Campuses?If you wish to allow all students for all campus links to this school then tick this checkbox
CampusYou can select the specific campus from the dropdown field. This field will be visible if the allowed to send students for all campuses check box is un-tick
Marketing SourceYou can select the marketing source from the dropdown
Account ManagerSelect the Account Manager from the dropdown
Legal NameLegal Name of the School
ACNYou can add the Australian Corporation Number in this field.
ActiveTo make the school active this tick box should be ticked

School

Main Dashboard > System Admin > School

Overview

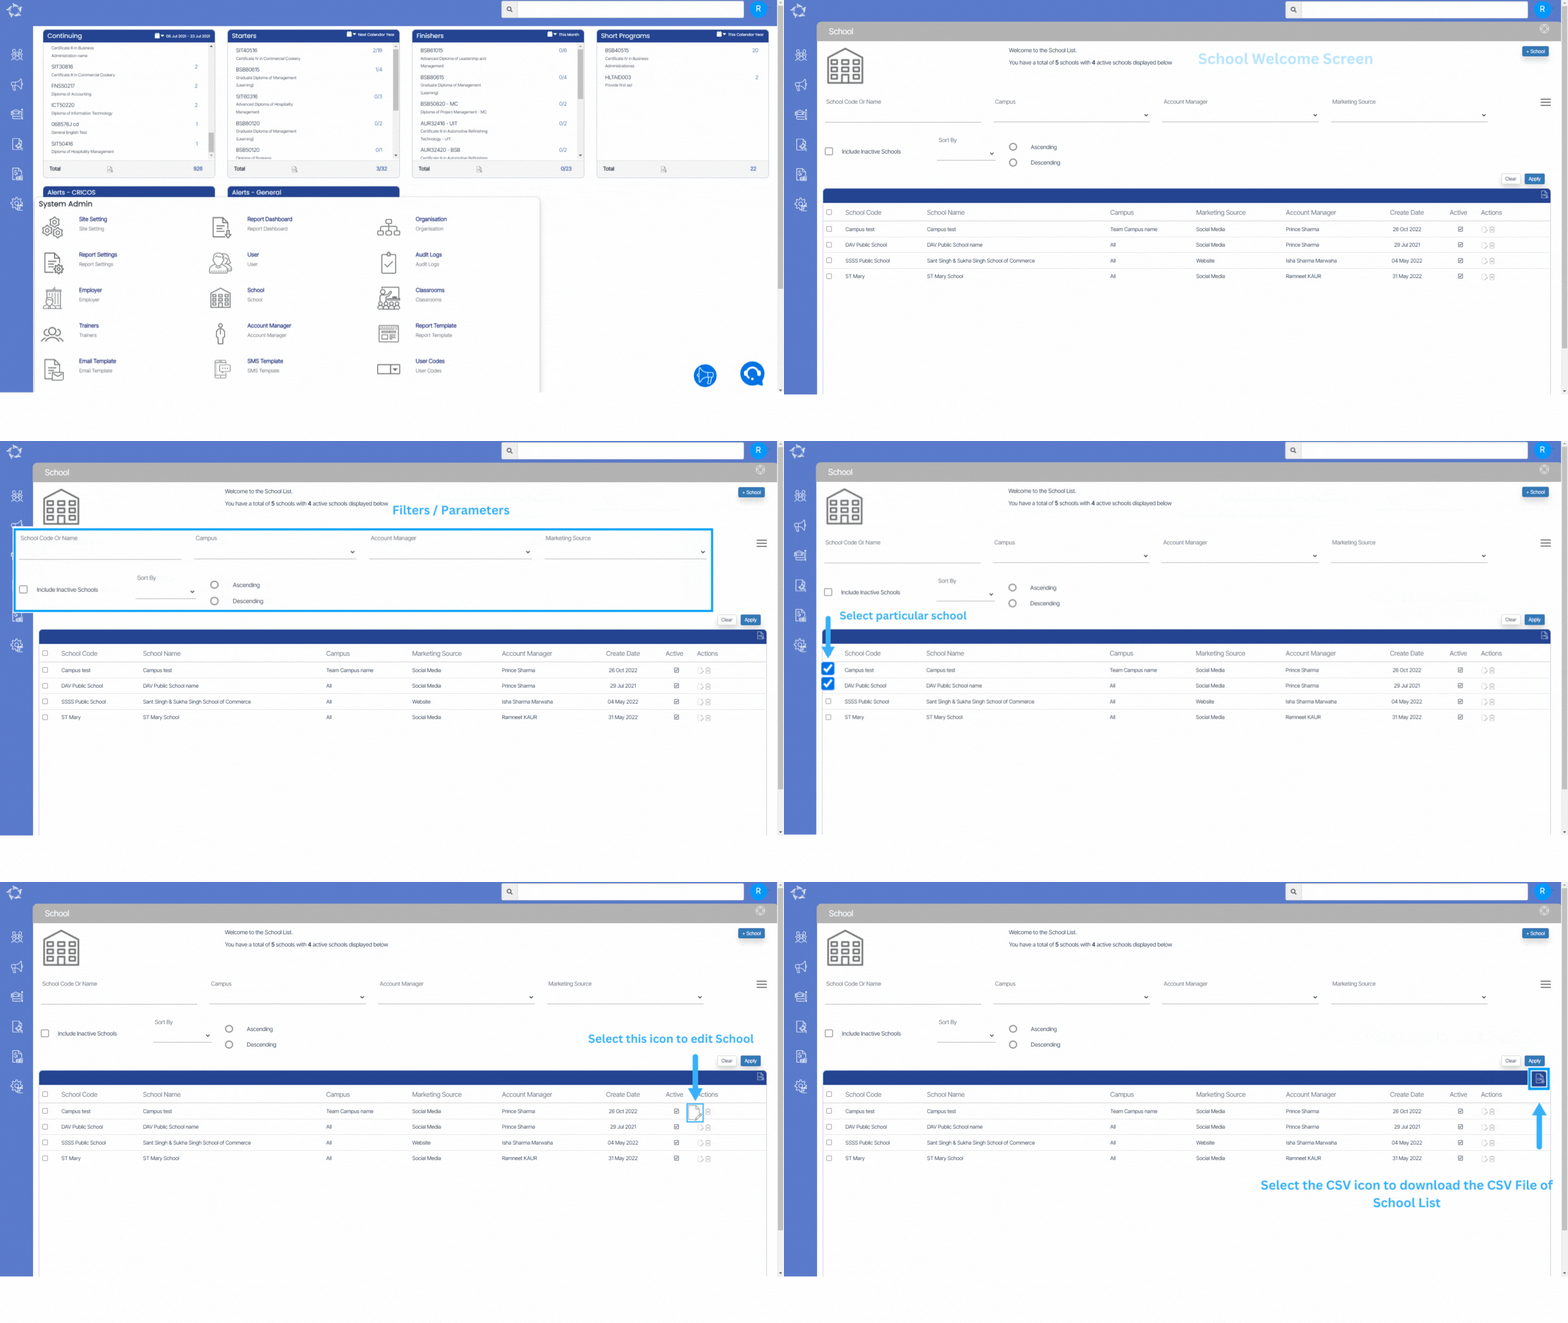
This is the School Welcome screen which will show you the list of Schools in the grid that are Active in your system.

This screen is divided into two sections:

  • Filters/Parameters
  • Listing Grid

Filters/Parameters

The filters will show you different fields where you can select the data as per your need then select the Apply button and based on your selection the system will load the list of schools in the grid. You can also see the Total count and the Active count of the Schools.

Listing Grid

In this grid, you can see the list of all Schools. You will see columns such as School Code, School Name, Campus, Marketing Source, Account Manager, Create Date, Active, and Actions. All of the columns are self-explanatory.

You can select the +School button to add a new School to the system.

Select here to know more about the Burger Menu

Select here to know more about the Action Column