How to enter information for a FEE HELP Applicant/Student

If you wish to report a student as FEE HELP then you need to set up the student with the FEE HELP settings in TEAMS.

IMPORTANT: The student can over time be set as both VSL and HEd FEE HELP and should be enrolled in a program that has been set up for FEE HELP. However, an enrolment can only be one of the FEE HELP options, it cannot be both.

Also, FEE HELP uses the terminology of the Unit of Study that a student has a loan for. In TEAMS we also use the term for a group/cluster of Subjects that link to a Unit of Subject (UoS). However, if you do not use the TEAMS UoS but Subjects for a program then you need to remember when we discuss a Unit of Study for FEE HELP it is also relating to the Subjects for an application or enrolment.

Note: Before creating the application please make sure that the FEE HELP settings have been updated at the Program level and Subject/UoS level.

For Application and Enrolment

Follow the below steps to enter FEE HELP:

  • While creating the application in TEAMS for a FEE HELP applicant then you need to tick the FEE HELP tick box option in the New Applicant screen when you are doing a new application.
  • Once the application has been created then you need to open the Application Dashboard and click on the Fee Help Settings icon from the applicant profile tile. The system will take you to the Fee Help settings screen and you need to enter the data in the field.

Note: There is a tick box called “This is a Fee Help Enrolment” which should be ticked if you want to report this student enrolment as a FEE HELP after approving it.

  • When the application is approved, all the settings that you have updated on the “Fee Help Setting” while creating the application, the system will carry forward them to the enrolment level FEE HELP Settings.
  • On Enrolment Dashboard > FEE HELP Settings, all the UoS or Subject level settings will appear on the UoS FH setting tab under the grid. You can edit and update them by clicking on the edit button from the action column.

After, clicking on the edit icon, the system will open a floating window of Edit Fee Help settings from where you can edit and update the settings and then select the SAVE button in the bottom right-hand corner of the screen.

Fee Help Loan screen

Follow the below steps to enter FEE HELP

  • On Enrolment Dashboard > Fee help loan screen, all the UoS/subjects will be visible which are linked with the enrolment. You can edit the Fee help loan by clicking on the edit icon from the Action column.

After clicking on the edit icon, the system will open the floating window from where you can edit and update the settings and then select the SAVE button in the bottom right-hand corner of the screen.

Note: In the above screen, you can see the Unit of studies is visible on the Fee help loan screen/Fee Help setting screen. There is a system setting which is called Loan calculation based on. Under this system setting, you can choose a Subject or Unit of study to calculate the loan amount. On the selection of UoS, the system will show all the linked units of studies with the enrolment on the Fee Help loan screen and Fee Help setting screen. Same as if the subject set is chosen then the system will show the linked subjects with the enrolment on the Fee Help loan screen and fee Help setting screen.

For existing Applicant and Student:

Note: Depending on what stage your student is at in TEAMS i.e. Applicant & Application or Student & Enrolment, determines where you need to go and update FEE HELP information you do not need to do it at both levels if it is a student with an enrolment. Just go to the Student Dashboard and update from there.

If you wish to flag an existing applicant or student as a FEE HELP student then you need to tick the relevant FEE Help option as explained below:
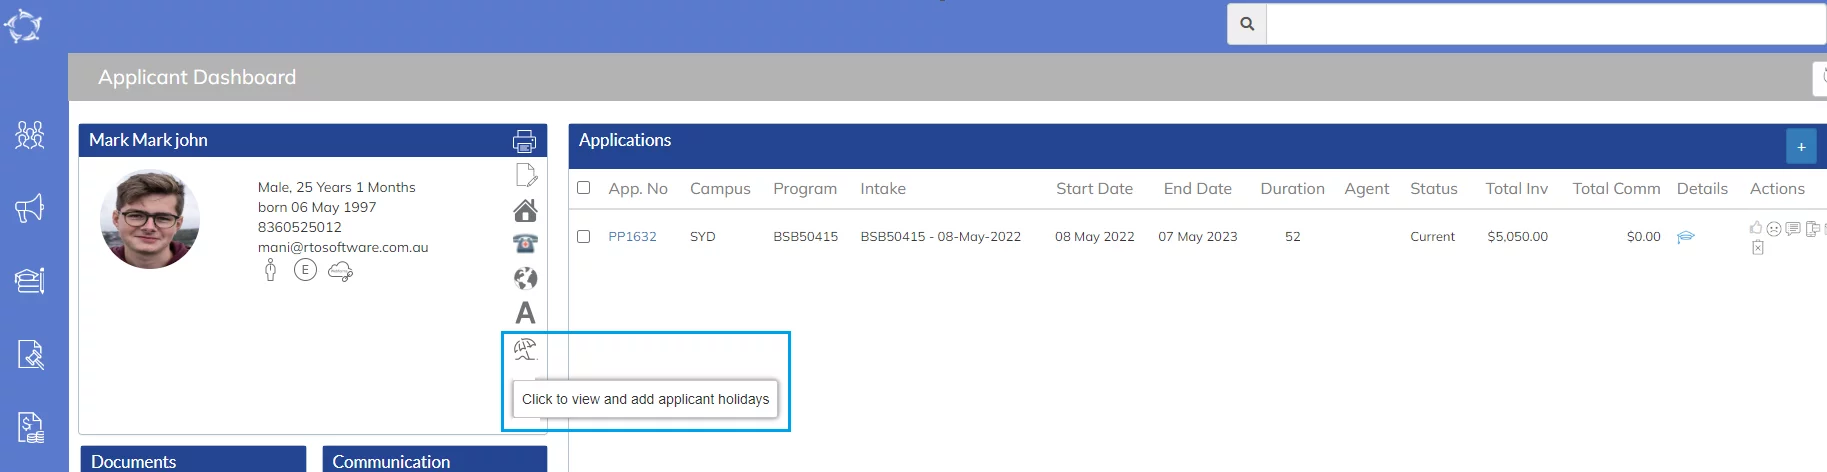
Also, on the Student Dashboard from the student summary tile, the user needs to click on the edit VSL student to update the TFN #, CHESSN # and other information related to the student and select the Save button.

Starters Listing Screen

This screen displays a list of all your starting students for a particular program within the date range selected in the Starters Tile on the main dashboard.

Filters/Parameters

The top half of the screen lets you filter your search for more targeted and specified results.
When you click on the link for a specific program code or on the total number count at the bottom of the Starters Tile, you will be redirected to the filters/parameters screen. The system will then open a new screen and populate it based on the parameters you select.

Click here to know more about the parameters


Listing Grid

This grid will display:
Student-specific information – under columns: Stud No, Student Name, Employer,
Enrolment-specific information – under columns: Enrol. No, Enrolment Type, Campus, Program, Intake/dates, Enrol. Status, Agent.

Selecting Students

Check the tick-boxes against specific students if you wish to send emails/SMS, create a contact log, print letters, or start enrolments in bulk. After selecting the students, select the required option from the burger menu and you are one step away from finishing a heap of work in one go.

If you wish to select all students at once, check the tick box beside the “Stud No” column.

Send SMS icon not visible!
If the “send SMS” icon does not appear under the Actions column, it means that the Mobile No. is missing for that particular student.

Icons – Click here to learn more about how to use these icons

Burger Menu – Click here to learn more about how to use the burger menu

The Previous/Future Program column

In this column, you can see all past and future enrollments of a student for all possible programs.
Note: If a student only has current enrollments, this column for that student will have no information.

Main Dashboard

history of changes

IMPORTANT – Staying informed about the latest developments in our software is vital for optimising your experience and maximising the benefits of using our system. To view the latest updates and modifications on the Main Dashboard, click on the History icon history of changes at the top-left corner of the screen. You will then gain access to a detailed log of all the recent changes made to the software.

The Main Dashboard is what you see when you log in, which is broken up into what we call “Tiles”. Each Tile contains different bits of information that you can further drill down on to see the details relating to that section. From the subsequent information screens, you will be able to send bulk emails and SMS to students. For example, you may wish to send an Orientation Pack to all the Starting students in the coming month, which you can do from the “Starters List” screen that you can access from the “Starters” tile on the Dashboard.

To know more, click on tiles listed below

Starters Tile

IMPORTANT -Staying informed about the latest developments in our software is vital for optimising your experience and maximising the benefits of using our system. To view the latest updates and modifications on the Starters Tile and Starters Listing Screen, click on the History icon history of changes , to the right of the breadcrumbs. To see the rules for the Starters Tile and to gain access to a detailed log of all the recent changes made to the screens, click on the Rules icon .

IMPORTANT: The system will recognize that a student has commenced their studies only when you mark their enrollment with the Started flag.

Understanding the Tile

To the right of the Program code . you will see two numbers with a “/” separator . The two numbers mean the following:

On the left – Number of student enrolments marked as “started”.
On the right – Total number of students who were supposed to start within the selected date range.

Where the two numbers do not match, their difference is the number of student enrolments who did not start. Using the example image for the program below, we can see that 72 (145-73) students did not start. This means that only 73 students out of 145 have been marked as “started”.

IMPORTANT: These numbers may not be accurate due to failure of the staff in flagging an enrolment as “started”. Make sure to update your student’s enrollment status so that the system can give you accurate counts.

Note

  • Do not count any enrolment that has been flagged as “Cancelled”.
  • If there is any enrolment within the selected date range for a program marked “inactive”, it will not be displayed in the tile.
  • Upon clicking on the count of started students against each program code, you will be redirected to the Starters Listing Screen for that particular program.
  • To download a CSV file of all the programs and their data, click on the CSV icon at the bottom of the tile.

Email Deliverability Issues?

Having difficulty with your emails being delivered to your students?

The fix is easy, you need a SPF record for your college’s domain (website)

What is SPF?

Sender Policy Framework (SPF) is used to authenticate the sender of an email. With an SPF record in place, Internet Service Providers can verify that a mail server is authorized to send email for a specific domain. An SPF record is a DNS TXT record containing a list of the IP addresses that are allowed to send email on behalf of your domain.

https://dmarcian.com/what-is-spf/

Still confused about SPF?

Please find below an excellent video explainer from YouTube
(if you would like a deep dive on the subject)


So what do you have to do?
Add an SPF record with our IP Addresses for your college’s website.

What are the steps to do that?

Please get in touch with your domain host.
Contact them via their ticketing system or email them.
Simply ask them to add a TXT entry below to your website’s DNS records.

v=spf1 ip4:221.121.139.60 ip4:27.50.74.67 ip4:27.50.74.68 ip4:118.127.57.139 ip4:118.127.57.141 ip4:43.250.204.60 ip4:43.242.69.134 ip4:43.242.69.132 ip4:43.242.69.131 -all

Important: If you already have an SPF record entry on your domain, you will have to add our IP addresses to the end of your existing TXT entry and make sure there is only one -all at the end of the entry.

VERY IMPORTANT: You MUST ONLY have one SPF entry per domain. Do not make a second entry as this will fail and will not be validated by the external email handlers.


Still having issues?

Have you already added an SPF record and it is still not working?!

the devil is in the detail… Please check the following –
  1. Double check the list of IP Addresses above. Make sure that all the IP addresses above are included. We have a number of servers that host our software and if you do not have all of them added, it could still fail.


  2. Very important: Notice in the SPF entry above the last bit of text in the entry is -all.
    It needs to be -all not ~all. If you have a ~ (tilde) instead of – (hyphen) your emails will still fail to be delivered and quite possibly go into SPAM.

    Why? Using a hyphen means you are specifying a hard fail SPF record and using a tilde means a soft fail SPF record. Here’s a great article on the subject (if you are nerdy or curious enough to read it).

    I will repeat: If your email is still not being delivered and going to the SPAM folder (which is as good as not being delivered), you need to use a hyphen instead of a tilde. Please get your old / existing SPF record edited to make sure that you are using a hyphen in the last part.

    We used to recommend using tilde many years ago (sorry about that!) but times have changed on the internet and only a hard fail SPF record is the best way to go nowadays.

  3. Only one SPF entry per domain. This has already been mentioned in this post but it cannot be reiterated enough. It is crucial that you DO NOT add a new SPF entry if you already have an existing one. Edit the existing one to include all our IP Addresses that have been listed in our entry example above.

Ok it’s done! We got the SPF record entered in our domain, now what? (I hear you ask)

Once it is done, you can check and make sure that the entry is visible on the internet by using this SPF validator tool.

example SPF record check entry

Just type your college’s domain name and click on SPF record lookup button.
If you see an entry with all our IP Addresses added in the SPF record then you are good to go.
All going well, your emails should now start getting delivered to your students and not bounce back nor go into SPAM. Hooray! Happy days!!!

Final Note: When you have the SPF entry done by your domain hosting provider, it may still take at least 8 to 48 hours for these entries to take effect and propagate across the Internet. If you want it done sooner, you can request your ISP to reduce the TTL (time to live) value temporarily to something ridiculous like 600 (which means 10 minutes) instead of the default of 28800 (which is 8 hours in seconds). After about a day or so, it wouldn’t matter what your TTL value is and it can be made as high as 86400 (which is how many seconds there are in a day). Sorry if this is too much information but we have encountered clients at times who need to get this done in an emergency and don’t have the luxury to wait 8 to 24 hours. This is an emergency workaround which may help in that situation.

Hope this helps and you are able to resolve your email sending issues.
Please feel free to contact our support team if you require further assistance and the issue is still not resolved.
Thank you and all the best!

How to manage your 2021 NCVER Student Data submission and errors in TEAMS

Below are the steps on how to manage your 2021 Student Data submissions for NCVER in TEAMS.

Part 1 – Before you even do an AVETMISS export from TEAMS do all these steps below

  1. Generate your Starters report – use the date range of 01/01/2021 to 31/12/2021 and look at all your VET starters and confirm that all that started have been flagged as started in TEAMS.

  2. Generate your Current Students report – use the date range of 01/01/2021 to 31/12/2021 and look at all the enrolments that started and/or finished and review the following data listed below (column heading names) in the report as it is all mandatory information that needs to be in your NAT files exported from TEAMS.

    • DOB – if this is missing you MUST update this against the student.

    • AVETMISS Student – if this says NO and the student’s enrolment is in a VET course/qualification then you need to go to the Student and select the AVETMISS tick box and SAVE. If you DO NOT do this the student’s enrolment data will NOT be in the NAT files.

    • Sex – this is the gender of the student and is mandatory, if it is empty you must update the student with their correct gender.

    • Status – this will identify either Not Started, Finished or Arrived. Week # of #. You need to confirm any that say Not Started (if you have already reviewed your starters report and fixed there, then you should not find any mistakes here. If there are some that did start and are showing as Not Started you MUST go and start their enrolments. For entries that have Arrived. Week # of # such as Arrived. Week 48 of 48 then check their enrolment end date and if it is in the past then you have NOT flagged the enrolment as finished and you MUST do this. You should also then follow the steps list in this email for Finalising a VET enrolment in TEAMS.

    • USI # – if you have enrolments in VET courses/qualifications and the USI is missing then you must urgently chase students up and get their USIs entered. Until you do this you will NOT have a successful submission.

    • Completed, Total No. of Units and No. of Units Successfully Completed – you need to compare these 3 columns of data together as follows:

      1. Completed = Full then the number in the columns for Total No. of Units and No. of Units Successfully Completed should be the same. If it isn’t then you need to review the results and fix them to successful results OR change the completed qual status from Full to either SoA or N/A.

      2. Completed = SOA then the number in the columns for Total No. of Units and No. of Units Successfully Completed should NOT be the same. If they are then either you need to change the completed qual status from SoA to Full or fix the results to match the SoA outcome.

      3. Overseas – if you are a 100% CRICOS VET college then this should say YES for all your students. Where you have ELICOS students as well or domestic students then you do need to evaluate this column even closer. For every student is on a Student VISA and enrolled in a VET course/qualification or set of competencies then you MUST make sure they are set as Overseas in two locations that are:

        • Student level (student entry screen)
        • Enrolment level (enrolment centre > Action > Edit AVETMISS > Overseas tick box must be set).

  3. Generate your Overdue Competencies/Modules with no Results report – this report is under the TEAMS > Student > Academic Reports menu. Use the date range of 01/01/2021 to 31/12/2021 and look at the list of all your VET enrolments in this report. This will show you, if you are using them the Competency/module Code and then the Start and End Date for them that is entered in the Enrolment Centre > Enrolment Subjects/Modules screen. If you have enrolments there with competency/module end dates in 2021 this means they have NO final outcome/result such as Competent, Not Yet Competent, Withdrawn, Credit Transfer, RPL Granted etc and it means you will get errors. This needs to be cleaned up by either:

    • Updating the final outcome for each competency/module OR

    • Updating the end date of the competency module to a 2022 end date. You can only do this if the enrolment end date is greater than 2021.


      CRITICAL – this must be fully cleaned up as this is one of the reasons you will get 1000’s of errors in your submission.

  4. Generate your Finishers report – use the date range 01/01/2021 to 31/12/2021 and look at all your VET enrolments in the report and review the following data columns to fix problems you see. They include:

    • Finished – if this is set to NO then you need to either flag the enrolment as finished for edit the enrolment and change the enrolment end date to a data greater than 2021.

    • Competencies Completed and Stage – if you have followed step two above for Generate your current students report and followed all of the steps completely then you would not need to look at this column of data. If you haven’t then it is worth reviewing these columns and following the same rules as outlined above.

      Note: you can also reconfirm that DOB and USIs are there for these students in this report.

  5. Once all the above steps are done and you have thoroughly cleaned up your data then finally look at the Qualifications Issued report – use the dates 01/01/2021 to 31/12/2021 you can find this report under TEAMS > Student > Academic Report 3 menu option.


    In the report, if you have followed the Finalising a VET enrolment in TEAMS process, then you will see all the Certificates (Full) and SoA’s that you have issued in 2021 or other specific calendar year. The data columns to look at are:

    • Qual Issued – it will show a Full or SoA and is based on what you selected for the completed status in the Enrolment Centre > right hand top section for summary information.

    • Parchment Number and Parchment Date – if this information is missing you MUST update the enrolment with this information. You need to open the enrolment in the Enrolment Centre and go to Academic menu button > Student Results.

Part 2 – do an AVETMISS export from TEAMS and submit your data to NCVER. When you get an error report we recommend the following:

  1. Always use the option to Export Details from AVS as it will give you a csv (excel) file with a list of all the errors in it.

2. Once you have downloaded/received the csv (you can open it in excel version if you like) you will see there is a column for File ID and it will show a NAT file number/name in it such as NAT00085 etc. The NAT files that TEAMS exports that you submit online are grouped as follows:


Your RTO information and what are the Training Locations that you deliver training of the competencies/modules for students

NAT00010
Training Organisation – this should only be a one line entry (for one RTO) and is your RTO ID and information from TGA.

NAT00020Training Organisation delivery location – this will be related to Training Locations (this is NOT campuses in TEAMS). In TEAMS you have campuses but for each campus there is one or many Training Locations and you MUST link at least one Training Location to the enrolment. If you do not do this you will get errors. This file lists all the training locations used against the enrolments in the NAT00120.

Your Qualifications/Courses and Competencies/Modules that you are delivering training in

NAT00030
Program – this lists all the qualifications/courses that are listed in the NAT00120 for the students studying in 2021

IMPORTANT: this is where you can get hundreds, sometimes thousands of errors (based on the number of enrolments in a course/qualification that are listed in the NAT00120) when you do not setup your qualifications/courses in TEAMS with the correct AVETMISS settings. For each student listed in the NAT00120 with a specific course/qualification (where there is a setting that is wrong/missing) that is how many times you will get the same error. So once you fix/add the correct setting for the course/qualification in TEAMS those specific errors will disappear for those hundreds or thousands of rows in your next export and submission. The logic is fix in one spot and it will fix many rows of data in the NAT00120. 

For example you have course 1 that has 3 different errors as it is missing 3 different AVETMISS settings in TEAMS. For that course in the NAT00120 you have 400 students listed, this means each setting is a different error so you will have 400 rows of errors for one setting and for all 3 settings you will have 1200 rows of errors. BUT once you go to that course in TEAMS and add those 3 settings and do your next export and submission all 1200 rows of errors will not be there. This is a general rule but is NOT always the case.


NAT00060Subject – this lists all the competencies/modules that are listed in the NAT00120 for the students and what their results are etc in 2021

IMPORTANT: this is where you can get hundreds, sometimes thousands of errors (based on the number of enrolments in a competency/module that are listed in the NAT00120) when you do not setup your qualifications/courses in TEAMS with the correct AVETMISS settings. For each student listed in the NAT00120 with a specific competency/module (where there is a setting that is wrong/missing) that is how many times you will get the same error. So once you fix/add the correct setting for the competency/module in TEAMS those specific errors will disappear for those hundreds or thousands of rows in your next export and submission. The logic is fix in one spot and it will fix many rows of data in the NAT00120.

For example you have module 10 that has 2 different errors as it is missing 2 different AVETMISS settings in TEAMS. For that module in the NAT00120 you have 700 students listed, this means each setting is a different error so you will have 700 rows of errors for one setting and for the 2 settings you will have 1400 rows of errors. BUT once you go to that module in TEAMS and add those 2 settings and do your next export and submission all 1400 rows of errors will not be there. This is a general rule but is NOT always the case.


Your students information – only students listed in the NAT00120 (with their student number) will be in these files

NAT00080
Client – this is the list of students and their basic information such as gender, dob etc

NAT00085Client Contact Details – this is the list of students and their address and contact information

NAT00090Disability – this file will only have data in it if you have set in TEAMS that a student has special needs

NAT00100Prior Educational Achievement – this will only have data in it if you have set in TEAMS > Enrolment Centre > Action > Edit AVETMISS that the student has Prior Education.


Training activity and outcomes for your students and their competency/modules

NAT00120
Training Activity – this file will list each student number and show all the relevant competency/module codes and information for them such as, but not limited to the following:

          a) Start and End date of the training activity – this is in the Enrolment Subject/Module screen in TEAMS

          b) Result for the competency/module – this includes Continuing Enrolment and Not Yet Started, not just final outcomes such as Competent, Not Yet Competent, Credit Transfer etc.

          c) Training Location

          d) Funding Source National ID

IMPORTANT: This file is where you will always get large volumes of errors that can be in the 1000’s and will have to do with not setting and following rules for your data in TEAMS correctly.

NAT00130Program Completed – this is a summary of all your students who completed their enrolments and if you issued them a qualification (Certificate) or statement of attainment (SoA) – it really should match your Qualifications Issued Register. This is and the NAT00120 is where NCVER gets the statistics from for the Completion counts for your RTO etc.

Recommendation – always start with the NAT00120 and the NAT00080 errors as generally speaking they will have the largest number of errors and will take the longest to clean up in TEAMS. If possible have more than one person managing error fixing in TEAMS so you can turn around the clean up and submissions quickly. It is not unusual for clients to have to do upwards of 6+ AVETMISS exports and submissions before they get a successful validation and submission completed. 

Finalising a VET enrolment in TEAMS

It isn’t as simple as setting your enrolments as finished in TEAMS. You need to update information such as:

  1. Final results for all the competencies/modules linked to the enrolment with correct result dates.
  1. Set the correct complete status to either Full (you issued the qualification/certificate for this enrolment to the student), SoA (you issued a Statement of Attainment for the enrolment to the student) or N/A (you issued nothing to the student at all).
  1. Parchment number and parchment issued date are entered for all enrolments
  1. Set and write the record of Results Issued = yes so the system writes the entry to the qualifications issued register in TEAMS
  1. Then set the enrolment as Finished.

How to setup FEE HELP in TEAMS

FEE HELP is a loan scheme that helps eligible students enrolled in a fee paying place to pay their tuition fees. There are two versions of FEE HELP that are:

VSL – VET Student Loans

HED – Higher Education Loan Program

No matter what version of FEE HELP you wish to manage in TEAMS; you may wish to manage both, there are a number of steps you must complete for the system to know that you wish to manage FEE HELP. These steps are as follows:

To setup FEE HELP in TEAMS you need to complete the following steps:

  • Typically if you have notified TEAMS support that you wish to use FEE HELP in TEAMS, they will have turned this on for you. If you do not see options in screens such as Programs, Subjects, UoS (Unit of Studies), Applicant, Application, Student & Enrolment for FEE HELP then it may not have been turned on. To do this you need to go to the Site Settings screen under the main menu of System Admin > Organisation > Site setting. If you do not have access to this, you must speak to someone at your college that does.

  • On the site setting screen there is a tick box called “Is Fee help Approved” which should be selected.
  • Once you turn on the Fee Help approved tick box, you then need to select what version you want to use and report on from TEAMS. The options are VET student loan or HigherED or select both if relevant.
  • Once you have selected SAVE, all the fields related to the FEE HELP version you selected will be visible on their respective screens.

    Once the above steps are completed you need to setup FEE HELP settings in the following screens:
  • Programs
  • Subjects OR
  • Unit of Studies (only if you are using them for a program that is for FEE HELP)

    A . Program

    From the main menu select the Academic Menu icon and then select the Programs icon where you will be taken to the list of Programs in TEAMS. Search and select the edit icon in the Action column for the program that you wish to setup and it will take you to the Program screen. In the Setting tab will be a field for FEE HELP Availability and there are radio buttons for:
  • VET Student loan (VSL)
  • Higher Ed FEE HELP
  • Neither

    As shown below:

IMPORTANT: A program can only be one of the FEE HELP options it cannot be both.

By default, the option of neither will be selected, select the option that you want and then SAVE the change.

After doing the above step you then need to update the FEE HELP settings for the program by following these steps:

  • Click on the burger menu and select the FEE HELP option.
  • The system will open a dialogue box (floating window) for FEE HELP Program settings as shown below:

You need to set the settings for the program and then select the SAVE button in the bottom right-hand corner of the screen.

That is all the settings you need to do for each of your FEE HELP programs, you then need to move on to setting up your Subjects and/or Unit of Studies, based on how you have setup your programs. Please speak to support for further assistance if you are unsure what level to set up.

B . Subjects

From the main menu select the Academic Menu icon and then select the Subject icon where you will be taken to the list of Subjects in TEAMS. Search and select the edit icon in the Action column for the Subject that you wish to set up and it will take you to the Subject screen. In the Details tab, there will be a field for FEE HELP Availability and there are radio buttons for:

  • VET Student loan (VSL)
  • Higher Ed FEE HELP
  • Neither

As shown below:

IMPORTANT: A subject can only be one of the FEE HELP options it cannot be both.

By default, the option of neither will be selected, select the option that you want and then SAVE the change.

After doing the above step you then need to update the FEE HELP settings for the Subject by following these steps:

  • . Click on the burger menu and select the FEE HELP option.
  • The system will open a dialogue box (floating window) for FEE HELP Subject settings as shown below:

You need to set the settings for the Subject and then select the SAVE button in the bottom right-hand corner of the screen.

  • Then go to the burger menu again to select the Funding Fee setup for the subject.

The system will take you to the Subject Funding fee setup screen. On the funding fee setup screen you can add multiple entries with the different combinations of Enrolment type/funding source code/state/delivery type by clicking on the Add button.

  • The system will open a dialogue box (floating window) for Subject Funding Fee setup settings as shown below:

You need to set the settings for the Subject and then click on SAVE button in the bottom right-hand corner of the screen.

C. Unit of studies

From the main menu select the Academic Menu icon and then select the Unit of Studies icon where you will be taken to the list of Unit of Studies in TEAMS. Search and select the edit icon in the Action column for the Unit of Studies that you wish to set up and it will take you to the Unit of Studies screen. In the Details tab, there will be a field for FEE HELP Availability and there are radio buttons for:

  • VET Student loan (VSL)
  • Higher Ed FEE HELP
  • Neither

As shown below:

IMPORTANT: A Unit of Studies can only be one of the FEE HELP options it cannot be both.

By default, the option of neither will be selected, select the option that you want and then SAVE the change.

After doing the above step you then need to update the FEE HELP settings for the Unit of Studies by following these steps:

  • Click on the burger menu and select the FEE HELP option.
  • The system will open a dialogue box (floating window) for FEE HELP Subject settings as shown below:

You need to set the settings for the unit of Studies and then select the SAVE button in the bottom right-hand corner of the screen.

  • Then go to the burger menu again and select the Funding Fee setup for the Unit of Studies.

The system will take you to the UoS Funding fee setup screen. On the funding fee setup screen you can add multiple entries with the different combinations of Enrolment type/funding source code/state/delivery type by clicking on the Add button.

  • . The system will open a dialogue box (floating window) for UoS Funding Fee setup settings as shown below:

You need to set the settings for the UoS Funding Fee Setup and then select the SAVE button in the bottom right-hand corner of the screen.

That is all the settings you need to do for each of your FEE HELP Programs, Subjects and Unit of Studies.

If you still have any queries, please do not hesitate to contact us via support@rtosoftware.com.au or 1300 85 05 85.

Important Links

Continuing Tile and Continuing Listing screen – History

Below is the list of all the changes that we have made on this screen. Please click on the individual link to view the change information.