New Invoice step 2

The new invoice step 2 is an invoice preview screen where you will be able to see the student invoices and agent invoices preview on the different tabs:

You can enter the Study period number in the SP No. field if you want to, if you will enter the student period No the system will automatically calculate the study period start date and end date.

Student Invoice tab:

Agent Invoice tab:

Once you will verify all the things are fine on the preview screen, you just need to click on the Finish button and the system will create the new invoice and take you to the final step.

Below I have explained the Print and the snd button:

This is the print icon from where you will be able to generate the created invoice, Once you will click on this button the template selection floating window will appear, you can choose the template from the dropdown and select the Generate button to generate the invoice.

By selecting the Send Button you will be able to send the created invoice via email to the student. Once you will select the send button the system will take you to the compose email screen. You can choose your email template and select the send button to send the email.

Note: Whatever template you will select the receipt merge field needs to be added to the template, only then the system will print the invoice in the email.

If you have any queries, please do not hesitate to contact us on 1300 85 05 85 or email us via support@rtosoftware.com.au

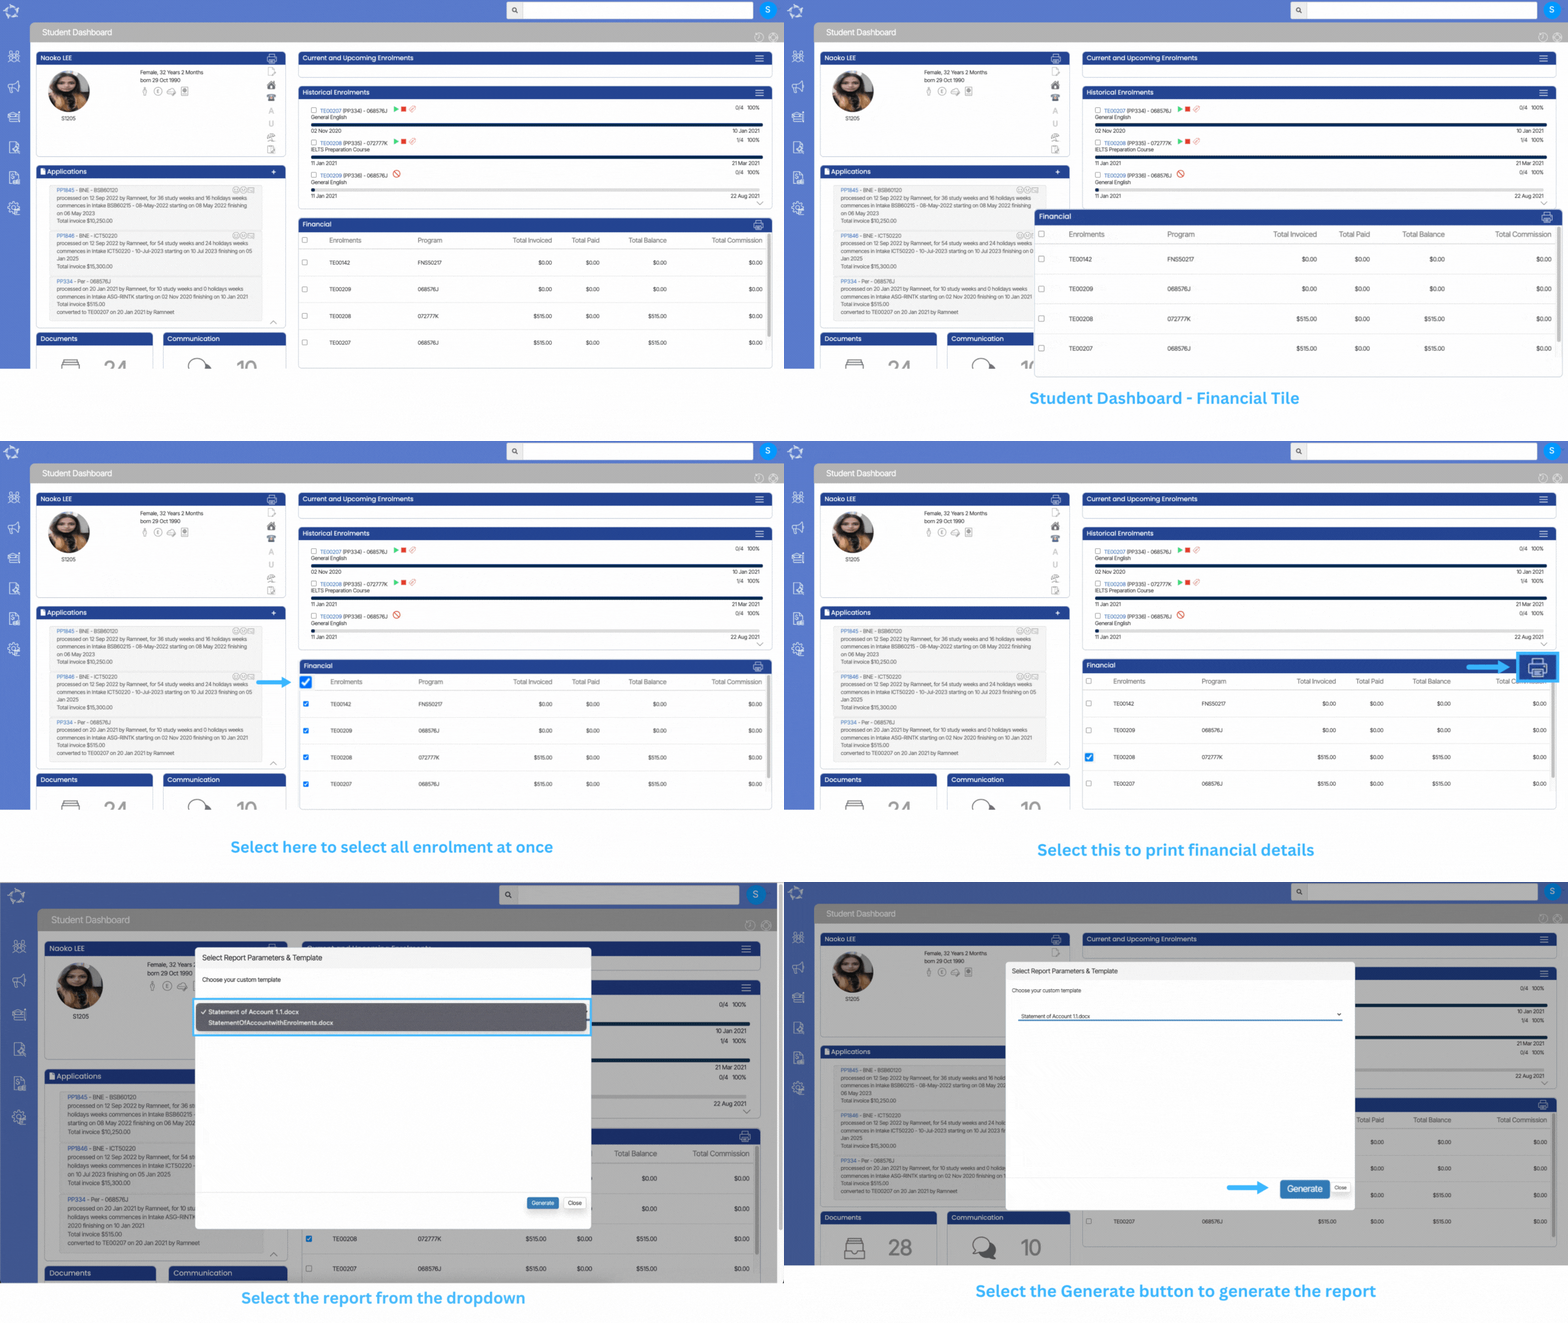
Student Dashboard > Financial Tile

The financial tile will show you the financial details for all the Current/upcoming and historical enrolments. You can see the enrolment number, program code, total invoiced amount, total paid amount, balance amount and total commission.

You can also generate the Student Statement of Account from the Print Icon.

After selecting the generate button the report will be visible on the report dashboard, from where you can download the report whenever you want.

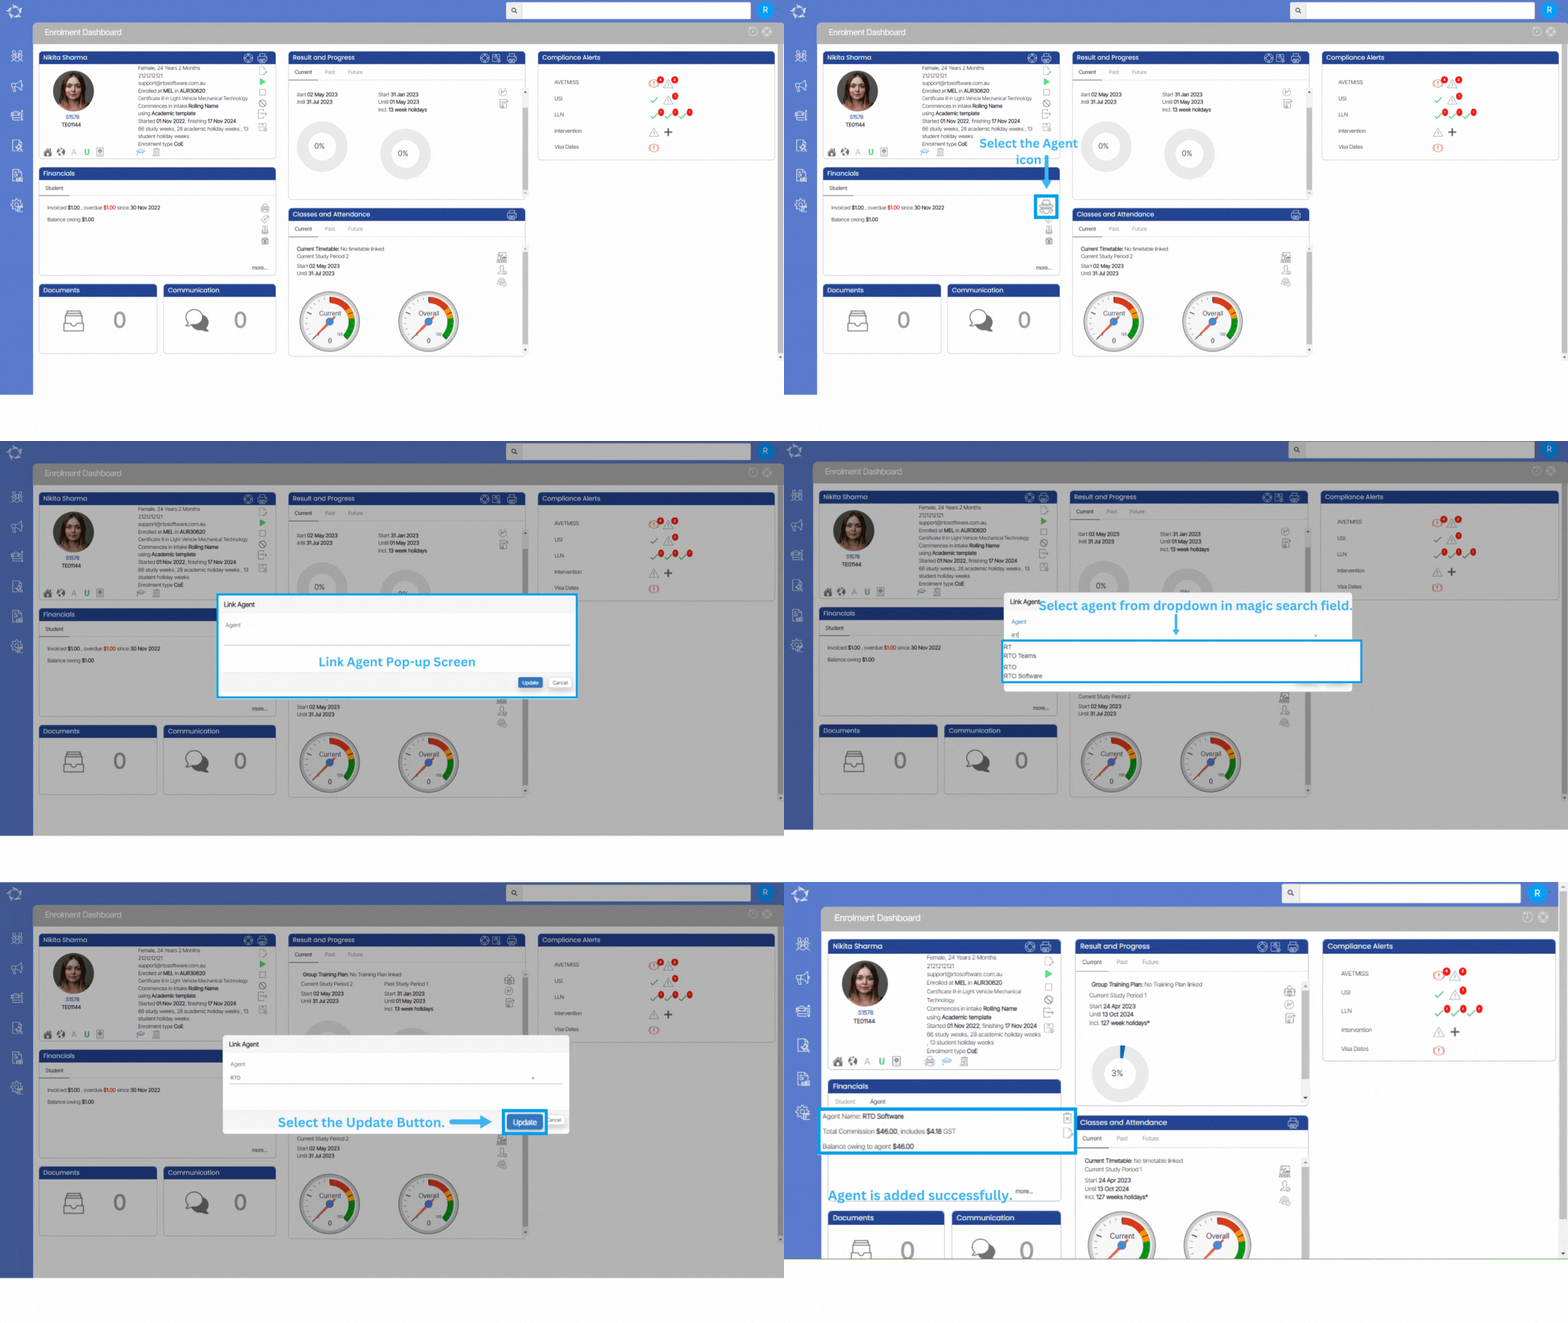
How do I link an Agent to an enrolment?

Main Dashboard > Enrolment Dashboard > Financial Tile

If the agent was not initially linked to the enrollment process, it is now possible to establish this connection directly from the enrollment dashboard. By utilizing the agent linking feature, you gain access to a comprehensive range of information and capabilities related to financial transactions. These functionalities empower you to efficiently handle financial transactions and ensure accuracy in financial records.

To link an agent with an enrollment, please follow the steps below:

  1. Access the Enrollment Dashboard.
  2. Navigate to the Financial tile, located directly below the enrollment student profile tile.
  3. Click on the agent icon within the student financial tile to open a pop-up window for agent linking.
  4. Utilize the magic search field within the pop-up to search for the desired agent. As you type, the search suggestions will display matching agents.
  5. Select the appropriate agent from the suggestions and click the update button. The screen will refresh, and the agent tab will appear in the financial tile.

The agent is linked but the commission is still not calculating for an enrolment

From the Enrolment Dashboard > Financials Tile > Agent tab it shows that there is no financials for the agent linked to the enrolment, this could be because the Agent is not set with Pay Commission.

To raise the agent commission the Pay Commission should be turned on and at least one commission template should be linked to the agent which is explained below.

  • Select the main menu icon for Marketing and then the icon for Agent. This will take you to the Agent Welcome List screen where you can search to find the Agent.
  • Enter the Agents code or name and select the Apply button. The system will search and display the agent and you then just need to select the Edit icon in the Actions column as highlighted below.
  • On the Agent entry screen select the tick box for Pay Commission as shown below:
  • After selecting the Pay Commission tick box, two new fields with drop downs will show for Default Commission Template and Optional Commission Templates.
  • You must select at least one Default Commission Template from the drop down for the system to calculate commission for the agent. You can only select one Default Commission template.
  • If the agent sometimes receives different commission percentages, you can always select other commission templates in the Optional Commission Template drop down. The system will allow you to select more than one from this list.

Now you need to go back to the enrolment dashboard, select the edit icon from the agent tab as shown below:

In the pop up window select the Update button as shown below. By doing this the system will refresh the screen and will have calculated and created, where relevant, the commission invoices for the enrolment.

Why isn’t the agent commission calculating?

There could be a number of reasons why the system is not calculating an agent’s commission invoices for an enrolment. The following posts will help you identify the reason.

How to search for a student with a Delta No

From the Student Search you now can search for a student using their Delta No which is also known in the system and in AVETMISS as the Client Identifier.

Note: Delta No’s are only used for funded students, there is no need to enter anything here if you are not a funded RTO who has purchasing contracts that require the Delta No.

  • If you want to search a student with the Delta No in TEAMS then it should be updated on the Student Dashboard > AVETMISS Icon > Edit Student screen as highlighted in the screen shot below:
  • So when you are on the Main Dashboard, you can search the student in the search bar with it’s Delta No and it will show the Student’s name and TEAMS Student Number as highlighted below:


New Merge field {Results}

In the system, we have introduced the new merge field called {Results} for the enrolment object. This merge field will be used in the email template body and it will print a table that will include the below columns:

  • Subject Code
  • Subject Name
  • Result
  • Result Date

This merge field will only work if you set the email template type to Enrolment from the dropdown as shown below:

Then select and add the new merge field (Result) from the Available field dropdown as highlighted below in the screenshot.

Note: It will print all the Subjects linked to the enrolment in the table and will show only final results. Where a subject has a progressive result of Not Yet Started or Continuing Enrolment, it will print in the table but the columns for result and result date will be empty.

As you can see in the below screenshot, the enrolment has Progressive and final results and results with it’s result dates. So when sending an email from the enrolment dashboard > Communication tile > Send an email, the system has only printed the subject’s code and name for the Progressive results (BSBCUS501 and BSBCMM401).

This how the table will show in the email.

You can also use this merge field from the main dashboard tiles to send emails in bulk, compose email part is the same as you use to do earlier you just need to select the email template in which the {Results} merge field has been added.