Current and Upcoming Enrolments

Student Dashboard > Current and Upcoming Enrolments Tile

Overview

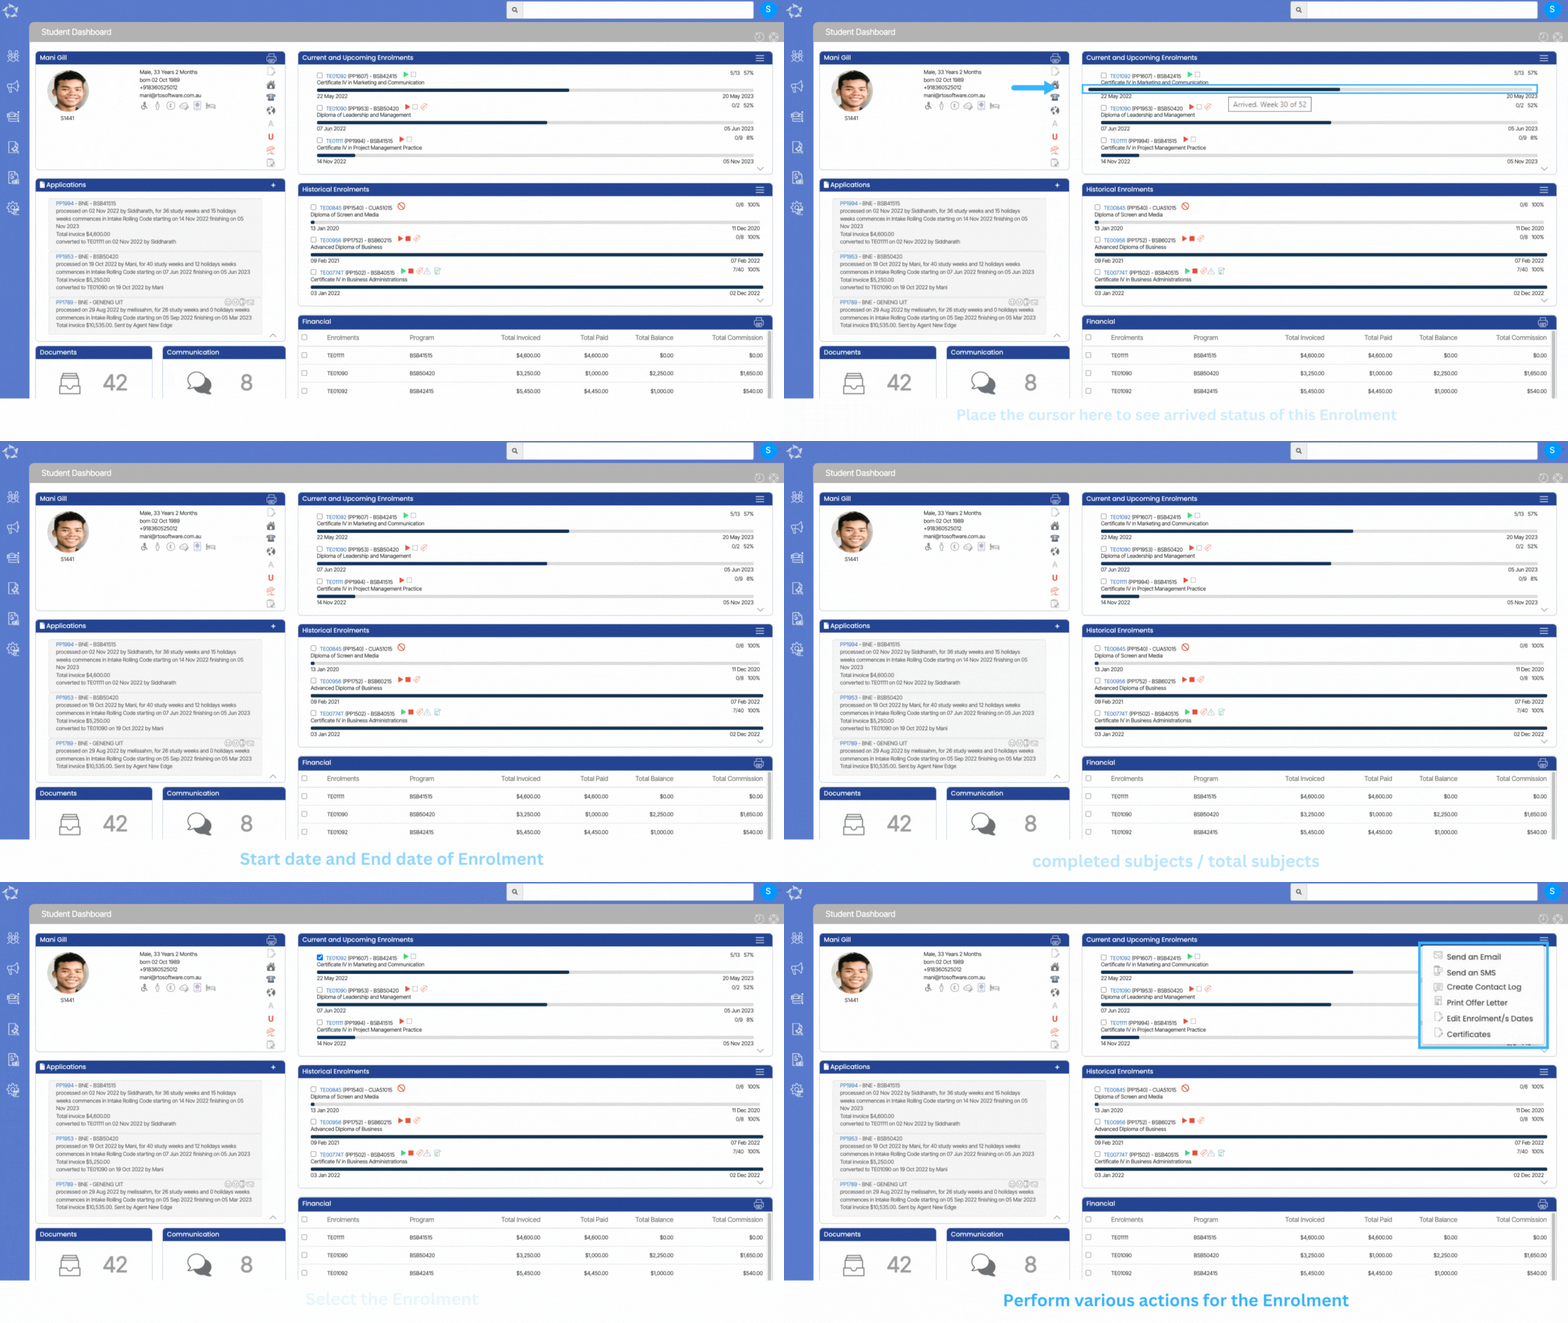
This tile will show you all the current and future enrolments of the students along with the basic details of the enrolment. With each enrolment listed in this tile, we are showing some basic details of the enrolments like enrolment start & end date whether the enrolment is not yet started, started, finished etc

IMPORTANT: It is not necessary that you will be seeing all the icons above the bar. It will only show the icons related to the enrolments.

For example, If there is no overdue fee for enrolment then you will not see the overdue fee icon.

To know more about the Current and Upcoming Tiles, please see below:

  • Once you place the cursor on the dark blue bar, the system will show you the arrived status of the enrolment in the tooltip that X number of weeks have been completed out of Y number of weeks.
  • The dates under the bar are the start date and the end date of the enrolment which will be visible for each enrolment listed in the Future and Upcoming enrolment tile. According to the arrived weeks, the system will calculate the enrolment completed percentage which is showing as 57% for the enrolment and also according to the count of successfully completed subjects, the system will show you the completed subjects / total subjects, for example, 5 subjects have been successfully completed out of a total of 13 subjects.
  • If a student has more than 3 active/current/upcoming enrolments then only 3 enrolments will be visible on the “Current and Upcoming Enrolments” rest of the enrolments will be hidden. To unhide the other enrolments you need to click on the highlighted arrow and the system will expand the tile and show you the other enrolments too.
  • Also, you will be able to see a burger menu on this tile so that you can easily send SMS, email, print offer letter and edit enrolment dates.

Select to know more about the Icons

Select to know more about the Burger Menu
Historical Enrolments

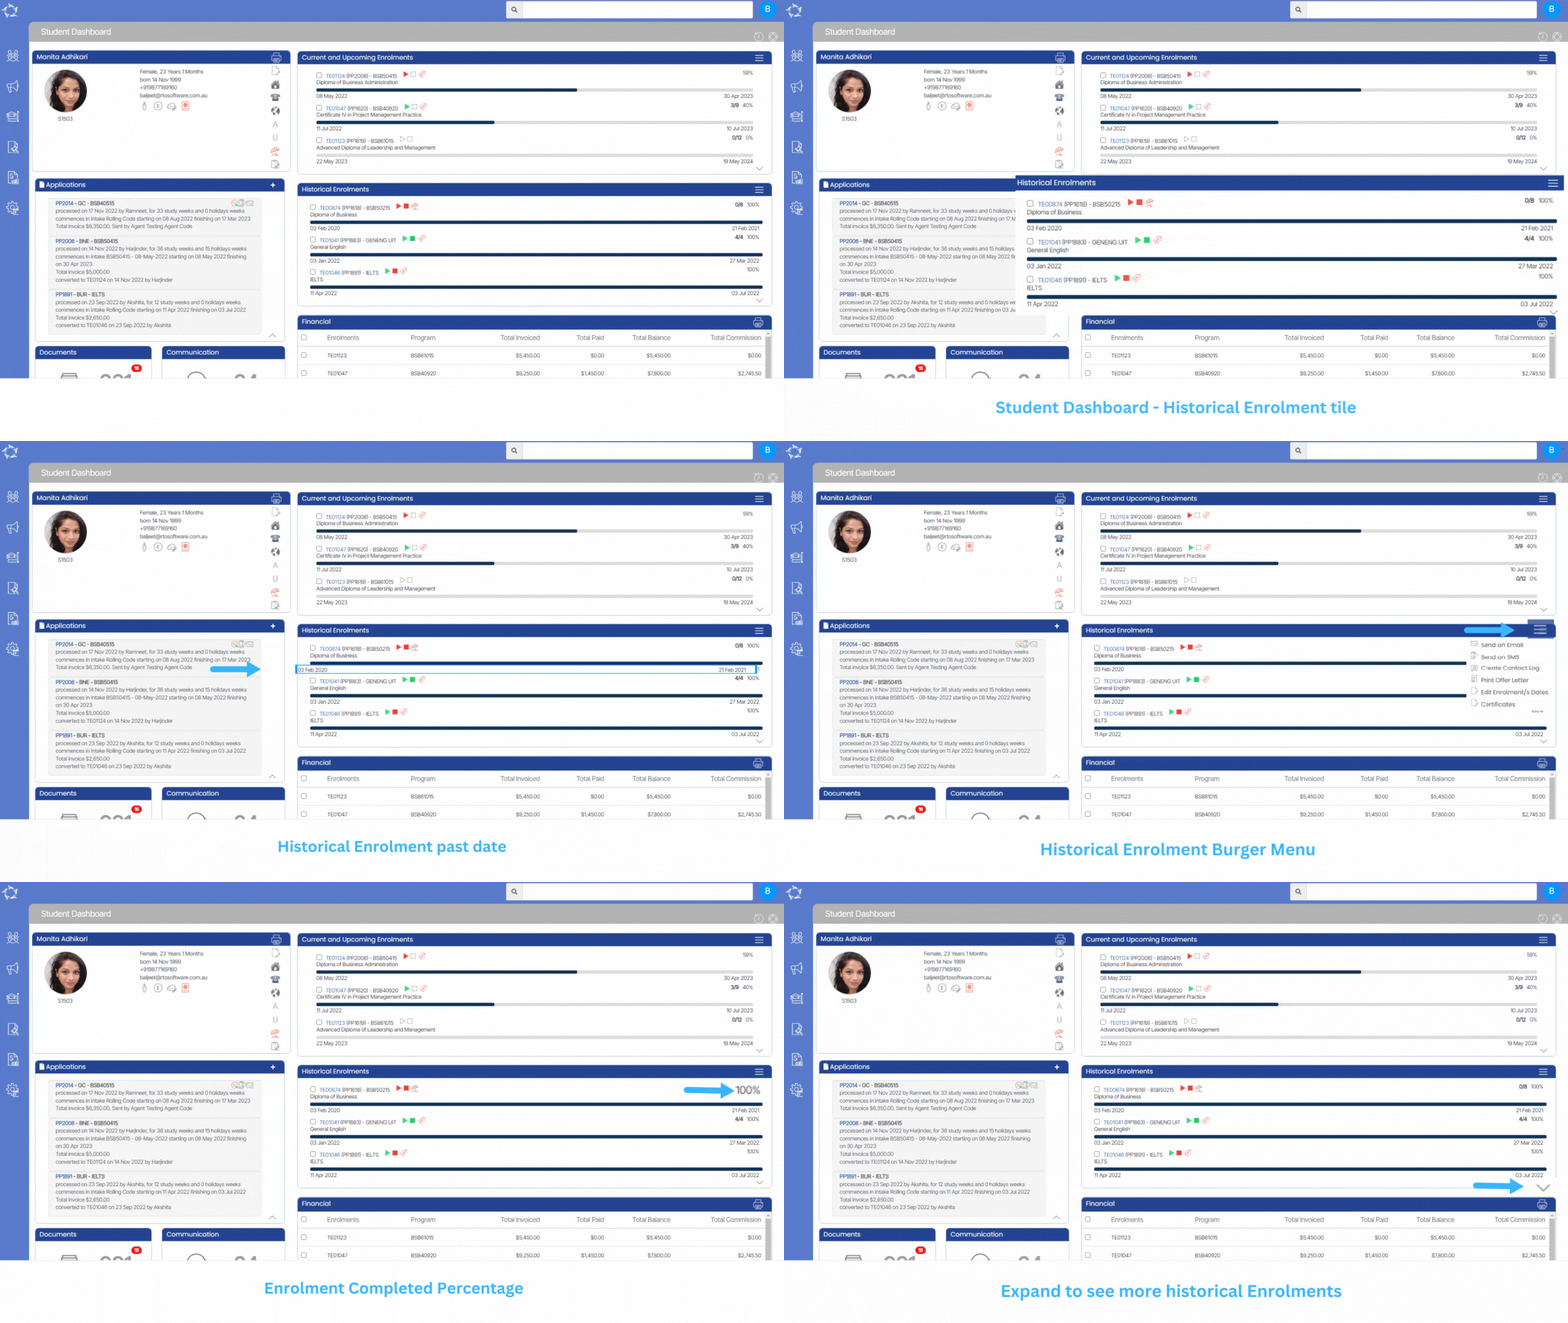
Student Dashboard > Historical Enrolments Tile

OVERVIEW

This tile will show you all the historical enrolments of the students along with the basic details of the enrolments. It will show you all the past enrolments whose end date is less than today’s date.

IMPORTANT: – It is not necessary that you will be seeing all the icons above the bar. It will show you only 3 historical enrolments. However, if you want to see more than 3 historical enrolments you need to click on the arrow placed at the right corner of the Historical Enrolment of the tile.

Select to know more about the Icons

Select to know more about the Burger Menu

To know about the Historical enrolments tile, please see below:

  • Once you place the cursor on the dark blue bar, the system will show you the past status of enrolment in the tooltip that X number of weeks have been completed out of Y number of weeks.

If the enrolment is flagged as started but not finished, then it will show you the Arrived. weeks x of Y.

If the enrolment is not flagged as started then the system will show you the status as Not Started.

If the enrolment is flagged as started and finished, then the system will show you the status as Finish

  • The dates under the bar are the start dates and end dates of enrolment which will be visible for each enrolment listed in the historical enrolment tile. According to the weeks, the system will calculate the enrolment completed percentage which is showing 100% for the enrolment and also according to the count of successfully completed subjects. The system will show you the completed subjects for example 3 subjects are completed out of a total of 9 subjects.
  • If a student has more than 3 enrolments then only 3 enrolments will be visible on the Historical Enrolment tile. The rest of the enrolments will be hidden. To unhide the other enrolments you need to click on the highlighted arrow and on the system will expand the tile to show you more historical enrolments.

Short Program Listing Screen

Main Dashboard > Short Program Tile > Short Program Listing screen

Overview

In this listing screen, we are showing the list of all the students who are enrolled in short programs. This list will show you the records according to the date range selected in the Short Program Tile on the dashboard.

For example, if you select This Month from the calendar dropdown in the Short Program Tile it will show you a list of all the students who have an enrolment; where the enrolment start and/or end dates falls within This Month.

If you want to get an actual total number of students in your college for This Month, you would set this calendar option in the Short Program tile as well as in the Continuing, Starters and Finishers tiles. If you then look at the totals for all four tiles and add them together, that will then be the total of all your students expected to be in your college This Month.

Important: This count is only relevant if you are using Short Programs in the system, if you don’t use them then your total student count in the college is only Continuing, Starters and Finishers counts total.

This screen is divided into two sections.

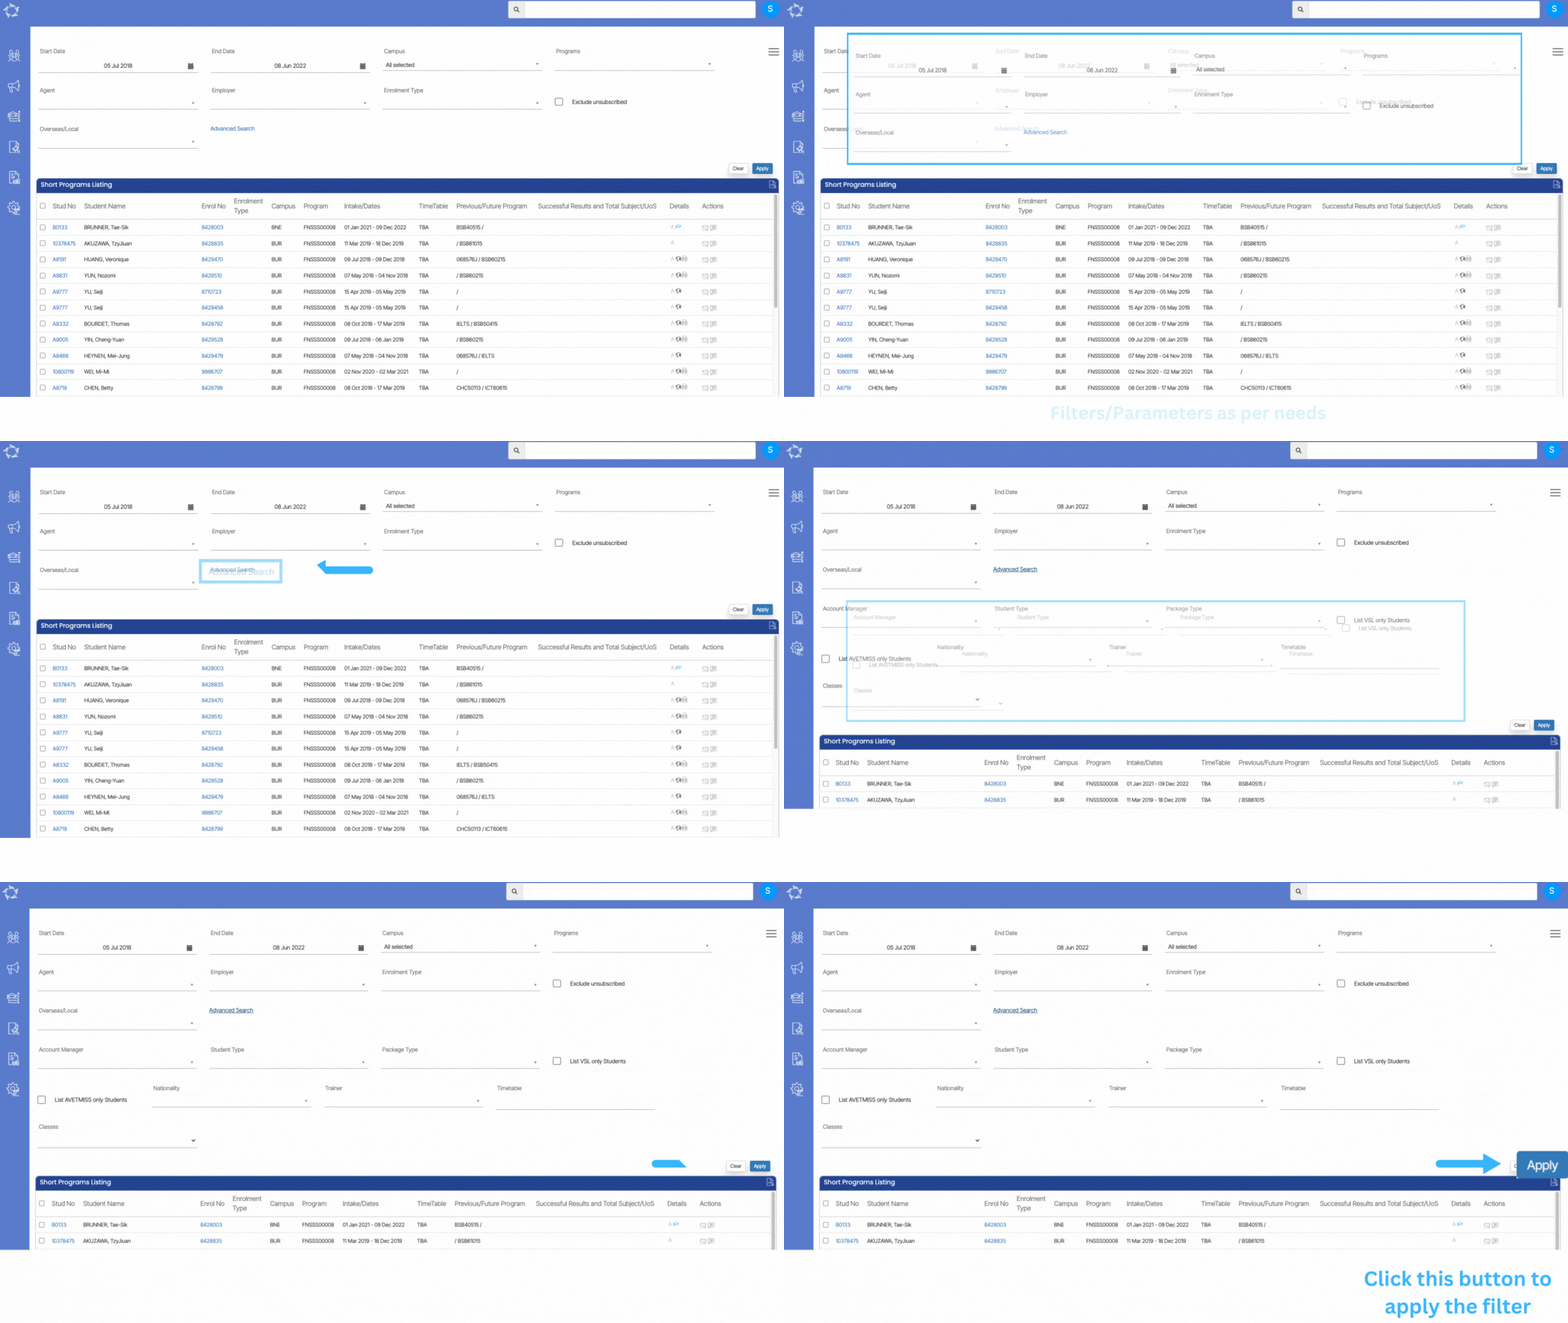
1) Filters/Parameters
2) Listing Grid

Filters/Parameters

To open this screen, you would have selected the link for a specific program code or at the bottom of the Short Program Tile you would have selected the link for the total number count. Based on what you selected the system will open the screen and populate the information in this section. For example, it will show you the start and end dates that were used in the tile as well as the program/s that were displayed or selected in the tile.

For an explanation on each filter and how the system will use it, please click here for more information.

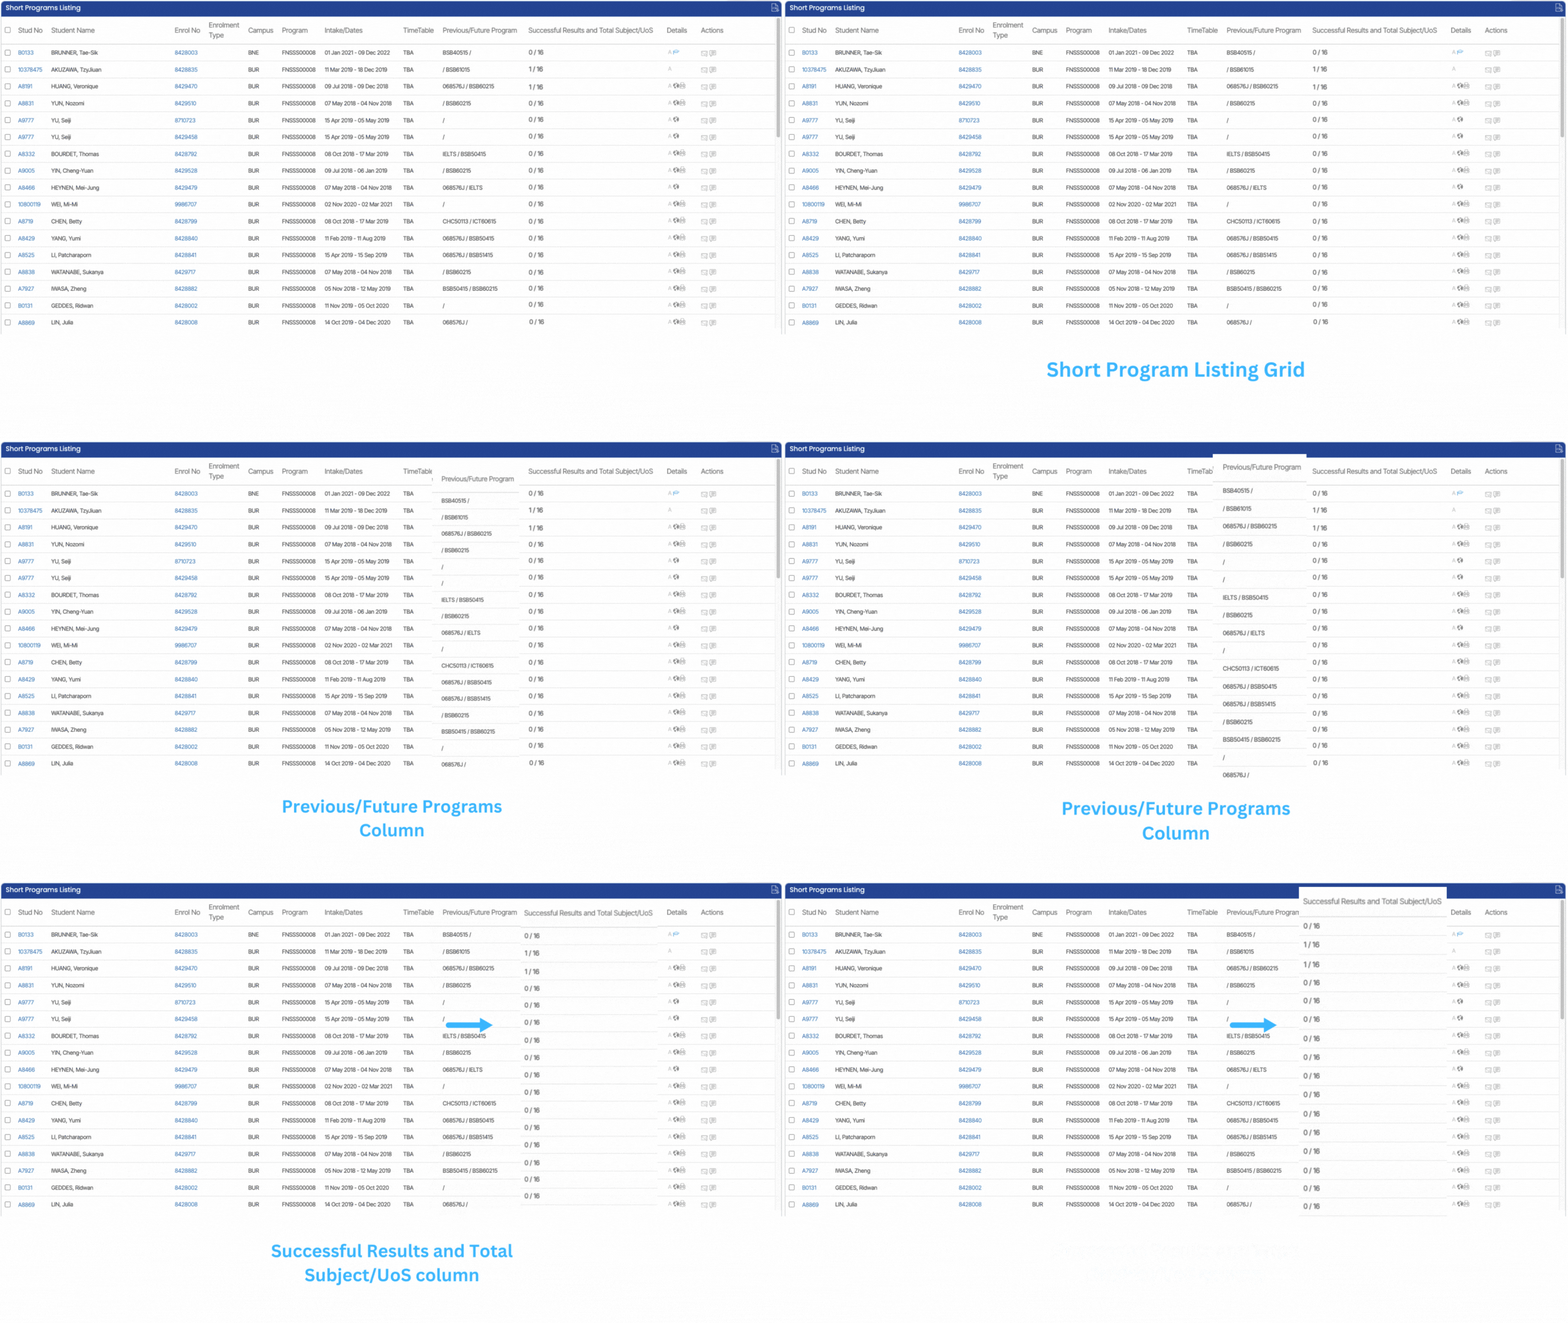
Listing Grid

The system will show you a summary of information for each continuing student enrolment that they are currently studying. The information that displays in the columns for this grid is generally standard information. However, please keep an eye out for any What’s New posts for this screen as this is where we would let you know of any new columns or changes to existing ones that we do.

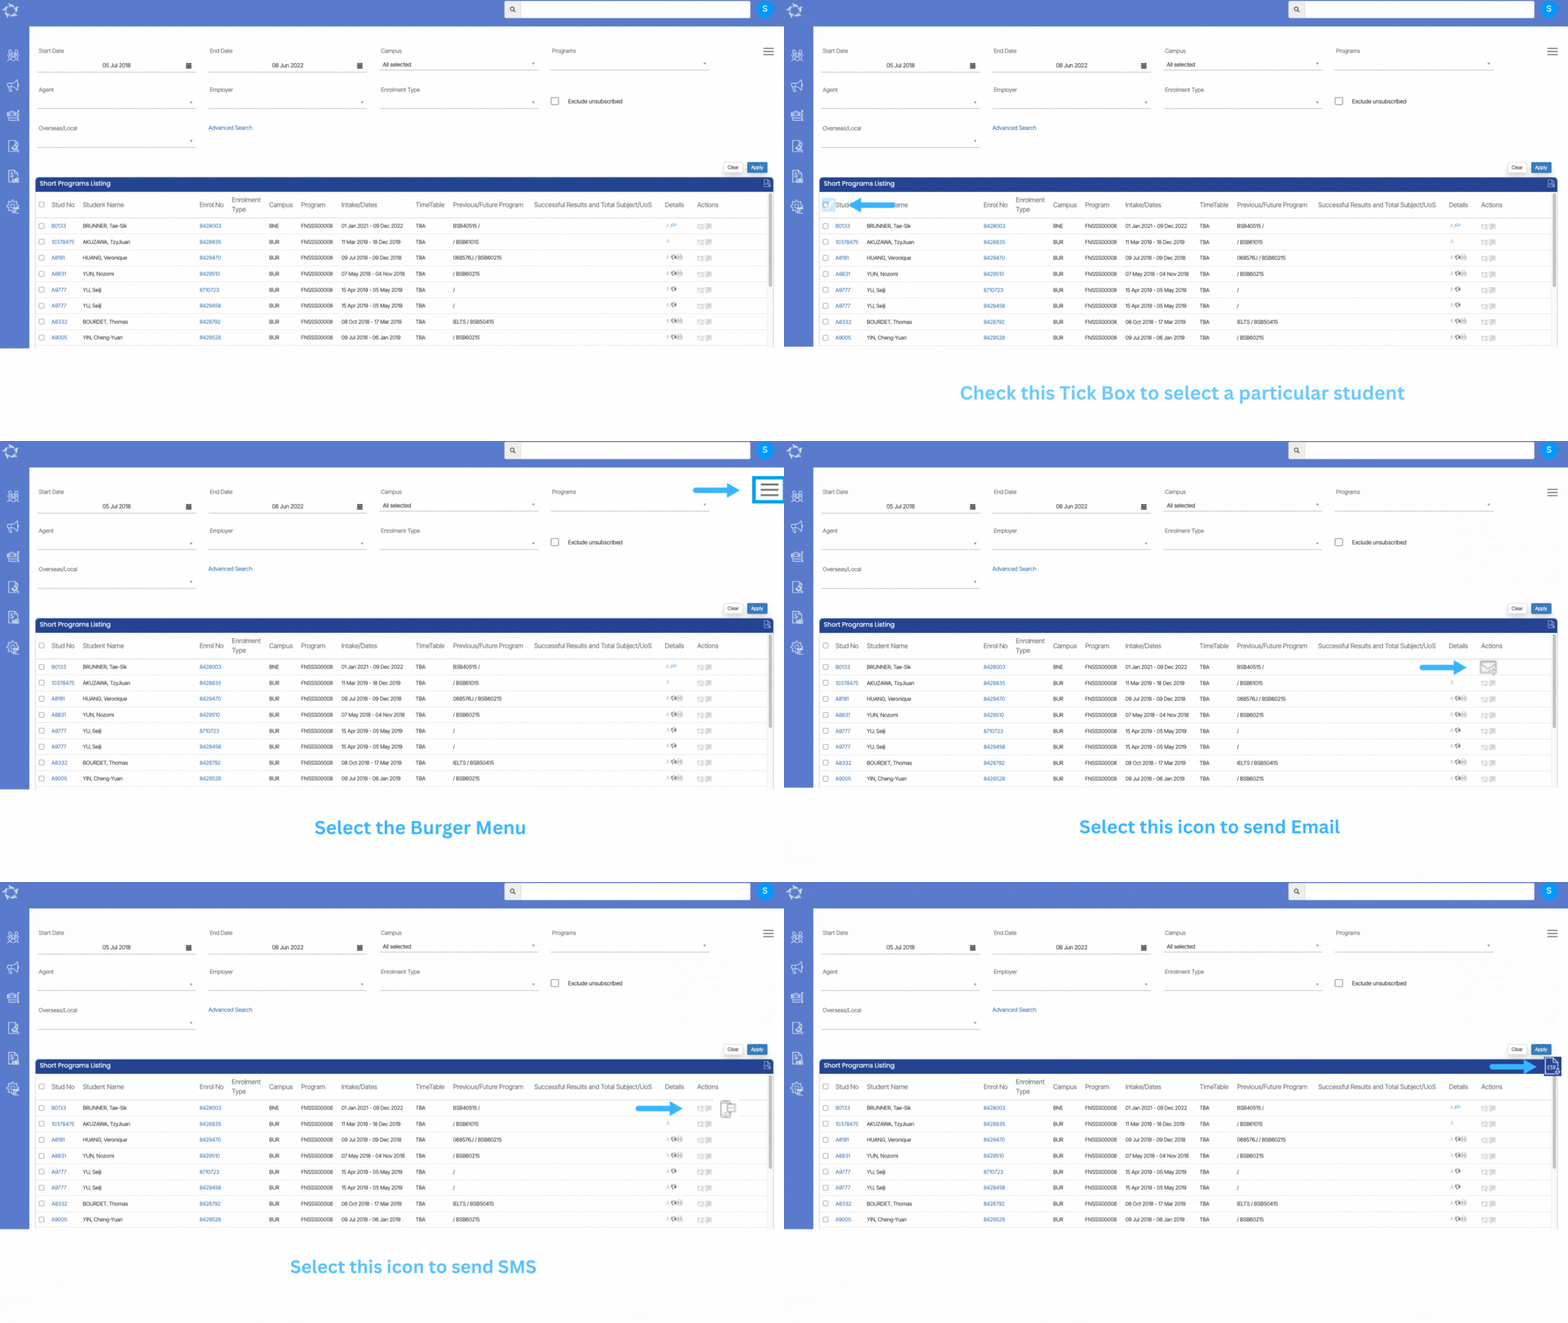
Actions

From the Action column, you will be able to do different actions for each agent listed. Please see the TEAMS Icons post for more information on each action and what you can do.

Select the Burger icon to learn more about how it works

There are a few columns in this grid that do need some explanation, those columns are as follows:

Previous/Future program Column

This allows you to see, for each student in the grid, if they have a future enrolment to commence after the current one or if prior to their current enrolment had they completed a previous one with you. If it is a previous enrolment you will see that program code to the left of the / and if it is a future enrolment you will see the program code to the right of the /. Where the student has no previous or future enrolments, only the current enrolment, then you would only see the / in the column for that student.

Successful Results and Total Subject/UoS column

This gives you a count of the total Subjects or UoS linked to the enrolment and how many have a successful result. The total count linked to the enrolment is on the right hand side of the / in the column and the total successful result count is on the left of it.

Short Program Tile

Dashboard > Short Program Tile

Overview

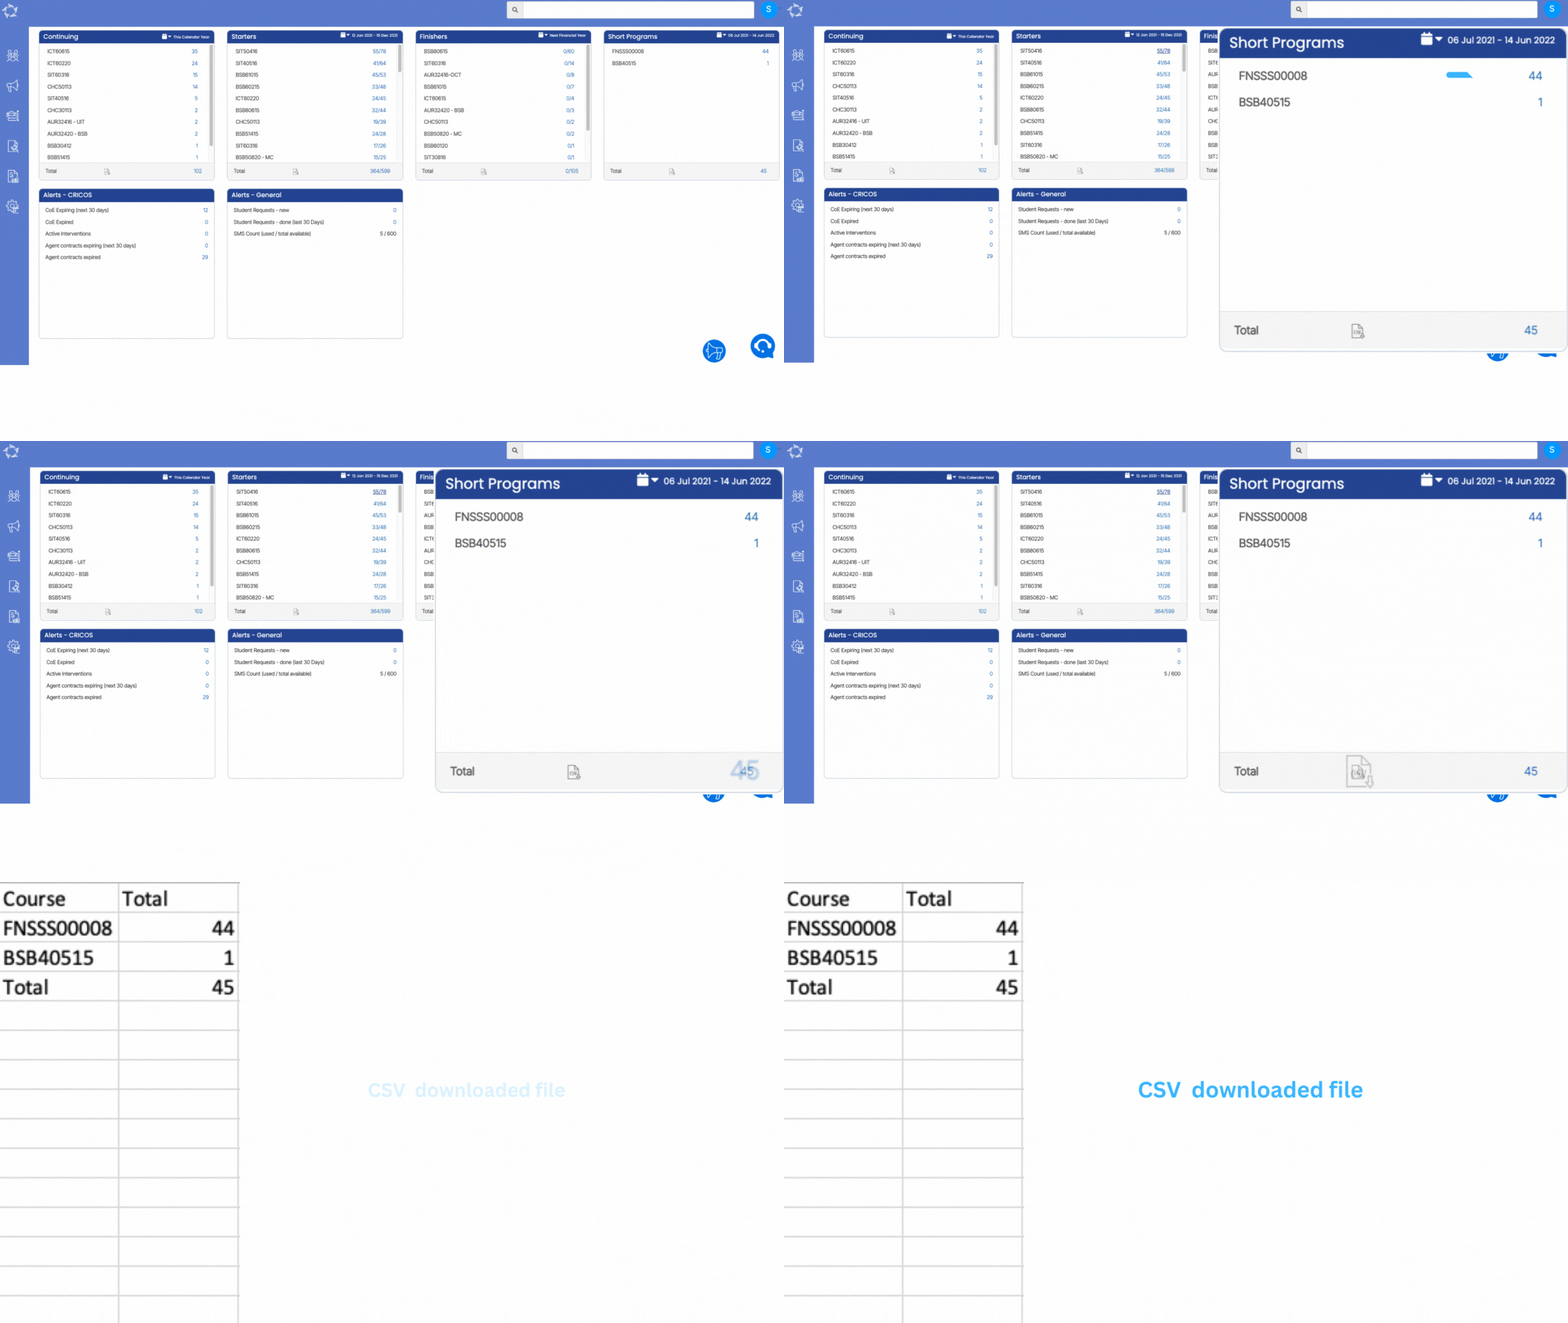
This tile allows you to view the list of students enrolled in a program setup as a short program, within the calendar selected date range on the tile. The enrolments counted for this tile is based on enrolments either to start, started or finished but not cancelled and where their enrolment start and/or end date is falling within the calendar date range selected.

Select the Calendar icon to learn more about how it works.

How to use it?

Each program has it’s own count of students. Each count is a hyperlink that will take you to the Short Program listing screen for that specific program.

At the bottom of the tile there is a total count for all programs which is also a link that opens the Short Programs list screen.

This listing screen also allows you to download the list of enrolments in the grid in a CSV format. To do this select the CSV icon in the top right-hand corner of the screen.

Reasons an enrolment is not in the AVETMISS export files

There are a few rules that will stop an enrolment from being exported in the AVETMISS export files which are listed below.

Firstly, there are two different types of AVETMISS exports in the system that are:

  1. National Export – this is to export files to submit to NCVER
  2. State Export – this allows you to select a specific State and the files will be exported to meet the state level rules for submission to that State


Reason’s that an enrolment will not be in the National Export

  1. The student is not flagged as AVETMISS. How to check this? Go to the student dashboard and select the Edit Student icon and see if the AVETMISS tick box is selected or not?

  2. Enrolment is not flagged as Include in National Export. How to check this? Open the Enrolment Dashboard and go to AVETMISS Settings and see if this is selected.

  3. Result dates for the subjects linked to the enrolment do not fall within the calendar year you selected for the export. How to check this? Open the Enrolment Dashboard > Results & Progress Tile > Training Plan and Results screen. Then look at each subject and its result date, if there are none within the calendar year you selected that is why and you may need to update the result date/s where needed. If you don’t remember or are unsure what calendar year you selected for the export, go to the main menu for Compliance > AVETMISS Export History screen. From the list, look for the last export you did and in the Filters column it will show you the calendar year you selected.

  4. Enrolment is flagged as Do not include in AVETMISS submission. How to check this? Open the Enrolment Dashboard and go to the Edit Enrolment and see if this is selected.

  5. Enrolment is not flagged as started. How to check this? Open the Enrolment Dashboard and in the Enrolment Profile tile see if the icon for Started is green or red? If it is red, then it is not started.

  6. Enrolment is flagged as cancelled. How to check this? Open the Enrolment Dashboard and in the Enrolment Profile tile see if the icon for Cancelled is grey or red? If it is red, then it is cancelled. IMPORTANT: this is the only setting that tells the system that the enrolment is cancelled. If you have an Enrolment Outcome that says cancelled, this is not considered by the system at all as cancelled.

Reason’s that an enrolment will not be in a State Export

  1. The student is not flagged as AVETMISS. How to check this? Go to the student dashboard and select the Edit Student icon and see if the AVETMISS tick box is selected or not?

  2. An incorrect state is selected on the enrolment AVETMISS screen. How to check this? Open the Enrolment Dashboard and go to AVETMISS Settings and see if there is a state selected for the State Training Authority field and is it the correct State?

  3. Result dates don’t fall under the export year parameters. How to check this? Open the Enrolment Dashboard > Results & Progress Tile > Training Plan and Results screen. Then look at each subject and its result date, if there are none within the calendar year you selected that is why and you may need to update the result date/s where needed. If you don’t remember or are unsure what calendar year you selected for the export, go to the main menu for Compliance > AVETMISS Export History screen. From the list, look for the last export you did and in the Filters column it will show you the date range you selected.

  4. Enrolment is flagged as Do not include in AVETMISS submission. How to check this? Open the Enrolment Dashboard and go to the Edit Enrolment and see if this is selected.

  5. Enrolment is not flagged as started. How to check this? Open the Enrolment Dashboard and in the Enrolment Profile tile see if the icon for Started is green or red? If it is red, then it is not started.

  6. Enrolment is flagged as cancelled. How to check this? Open the Enrolment Dashboard and in the Enrolment Profile tile see if the icon for Cancelled is grey or red? If it is red, then it is cancelled. IMPORTANT: this is the only setting that tells the system that the enrolment is cancelled. If you have an Enrolment Outcome that says cancelled, this is not considered by the system at all as cancelled.

Important: User Login and Security related changes

We have been introducing tightened security measures for all client sites and their users, to ensure their sites are secure.

For example, you can no longer use generic logins for multiple users to log into TEAMS. Each user must have a unique email address and mobile number.

Each user will now be forced to change their password and it will need to meet a new standard of password format for the system to save it. The new format will be along the same lines that most other online apps and software use which is that it will need to meet the following rules:
 
1. Must be at least 10 characters in length
2. Must have a mix of letters, numbers and special characters
3. Must have at least one letter that is in upper case

Every user’s password that is changed and saved will then be stored. Every 90 days, when you try to log in, you will be asked to change your password again. This is a mandatory requirement, you cannot choose not to change your password.

NOTE: It is important to know that no user will be allowed to re-use an already used password. This is standard practice and we want to ensure that your site remains secure.

Q&A – The program is not appearing on new application screen

Sometimes happen when you are creating the application, the program doesn’t appear in which you want to enrol the student. That means the program is not linked with the campus that you have selected. Follow the following steps to get the program link with the campus so that it will appear while the creating application:

  • Go to the Academic menu > campus.
  • Open the campus screen and edit the campus by selecting the edit icon from the action column.

  • Once you will be on the campus entry screen you need to select the “Linked Program” option from the burger menu as highlighted below:

  • After selecting the “Linked Program” option the system will open the “Linked Program” screen where the system will show you all the linked programs within the campus.
  • Now you need to select the “+Program” button and the system will show you a floating window.


  • On the “Campus – Program search” floating window search for the program in the program code fields and select it.

  • Once you will select the required program, then you need to select the active box to flag this program as active at the campus level.

  • Select the save button to finish the linking process of the program with the campus.

If you have any queries, please do not hesitate to contact us on 1300 85 05 85 or email us via support@rtosoftware.com.au

How to change your password

To change your password you need to do the following steps.

  • Login into TEAMS
  • Go to the account profile section as shown below and click on the profile dropdown.
  • Select the option for Edit my details.

  • Once you will select the “Edit my details” a floating window will appear in front of you.
  • On the floating window, enter the details as per the given fields on the password tab, hint text is also visible for all the fields.

  • Once you will update the details in all the fields on the Password tab, you just need to select the update button and the new password will get updated.
  • Now from now onwards you have to login into TEAMS with the new password.

NOTE: – New password or the current password should not be the same, otherwise the system will show you the below error message and will not let you save the password.

How do I link commission templates to an agent?

When the “Pay Commission” is turned on but the commission template is not linked with the agent, it can cause issues. This means that the system has enabled the commission calculation but it is not properly set up to assign commissions to specific agents

To link the agent commission template and raise the agent invoices, you can follow the following steps:

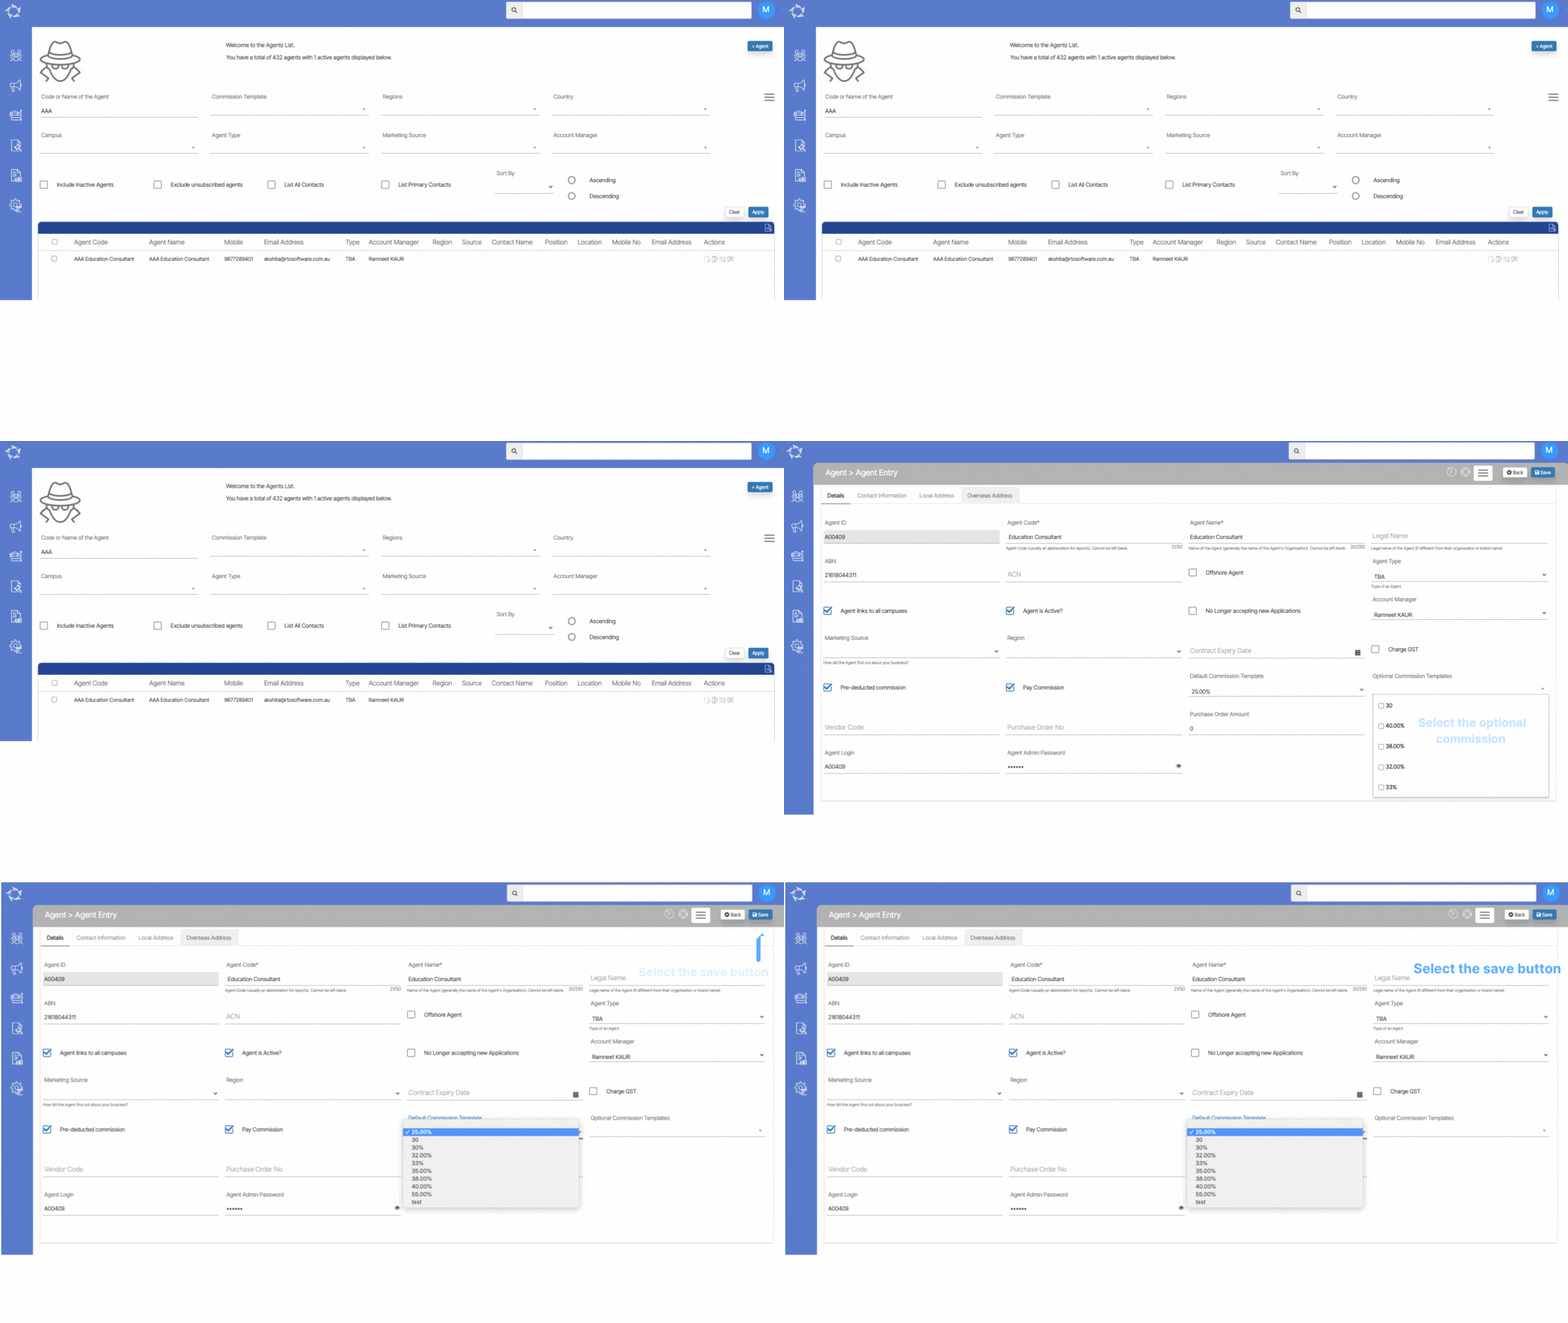
  • The first step is to select the main menu icon for Marketing, followed by selecting the icon for Agent. This action will direct the user to the Agent Welcome List screen. From there, the user can search for a specific agent by using the search bar or by scrolling through the list of agents displayed.
  • Once the user has accessed the Agent Welcome List screen, the next step is to select the agent by entering their code or name and clicking the Apply button. The system will then search for the agent and display the relevant information on the screen.
  • To edit the agent’s information, the user needs to locate the Edit icon in the Actions column of the agent’s record and select it.
  • When accessing the agent entry screen, it is possible to see whether the pay commission tick box is selected or not. However, it is important to note that the commission templates must also be selected in order for the system to properly calculate and allocate commissions. This can be done by using the “Default Commission Template” dropdown menu.
  • In addition to the “Default Commission Template” dropdown, there is also another dropdown menu available on the agent entry screen that allows the user to select optional commission templates. These templates are typically used when an agent is eligible for commissions based on multiple sales.
  • After selecting the appropriate commission template/s for the agent and making any necessary changes to their information, the next step is to click on the save button to save the changes.

Q&A – Pay commission is not turned on at fees level

Sometimes all the settings are correct but still, the agent commission invoices are not getting raised on the enrolment dashboard, then there is one more reason due to why the sysetm will not raise the agent invoices and that is the pay commission is not turned on at fee level.

To turn on the pay commission you need to follow the following steps:

  • Go to the Finance menu > Fee

  • The system will open the fee screen, from where you need to find out for which tuition fee you want to turn on the pay commission ( you can use the filters to search the fee).

  • Select the edit icon from the action column and the system will take you to the “Fee Entry screen” from where you can make changes.
  • On this screen, you just need to select the pay commission tick box and select the save button.

  • When the screen comes back after saving the changes, you need to go back to the enrolment dashboard and relink the agent by using the edit icon from agent tab.

If you have any queries, please do not hesitate to contact us on 1300 85 05 85 or email us via support@rtosoftware.com.au