The Academic menu icon provides access to various screens related to student academics. When you select this icon, you will be presented with a list of icons that allow you to navigate to different screens associated with academic information. These screens include setting up the campus, program structures, subjects, and the academic calendar.
Each of these icons represents a specific aspect of the academic system and enables you to manage and configure various academic-related functionalities. Whether it’s defining the campus layout, organising program structures, managing subjects and courses, or planning the academic calendar, these icons provide a convenient way to access and modify academic information within the system.
Upon selecting the icons from the main menu for Student Management, a comprehensive list of icons will be displayed, offering easy access to various screens and reports specifically designed for effectively managing your students on a day-to-day basis. These icons serve as shortcuts, providing efficient navigation to different sections where you can oversee and handle various aspects of student management. Whether it involves tracking attendance, managing Results, or generating reports, these icons offer a streamlined approach to efficiently carry out your student management tasks.
This update is a small update with no main changes to the front end of the system.
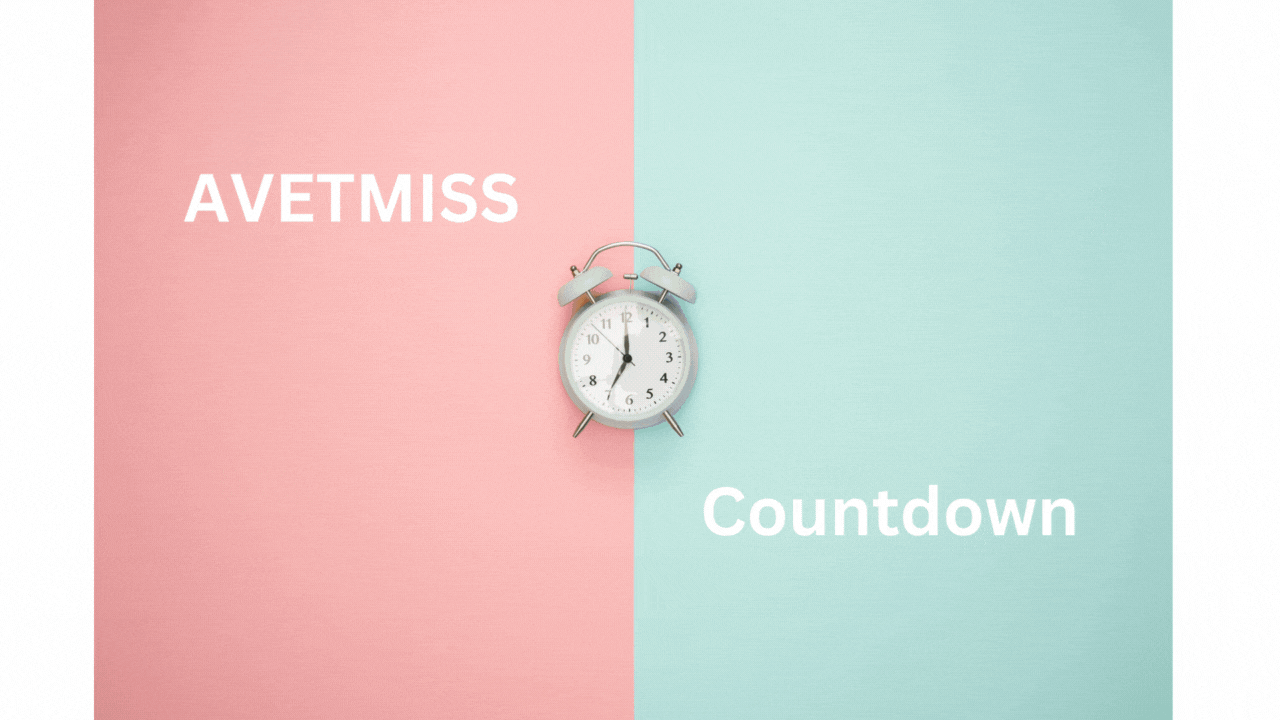
For your National AVETMISS 2022 student data submissions, did you know there are only 5 weeks left until the last day to have a successful data submission?
How are you going with your steps for reviewing and cleaning up your data?Please see the AVETMISS countdown section below for more information. If you would like to consider our Virtual Admin (VA) service to assist you with this review and cleanup, please contact our support staff for more information.
We have also introduced a new Q&A section to our What’s New summary. Here we will provide answers to the questions that are most frequently asked about TEAMS.
NCVER Annual Student Data Submission
Have you been maintaining and managing your student data this year in preparation for your annual student data submission? In this post, we walk through the first two steps of what you need to do in TEAMS.
We highly recommend you start these steps now, as these are critical to future steps where the larger volume of data is and where the biggest list of errors comes from.
Our mission is to build software that helps you do things more efficiently. Your input and engagement are vital in helping us improve our service and offerings for your college. We are always open to listening to your feedback.
Any questions, please feel free to reach out to us. We look forward to serving you to the best of our ability.
Please review the changes and if you would like further clarification, please contact our Support team.
A big thank you to so many of you who have been actively participating in helping us bring these new improvements to life.
Next update is due onThursday, 9th February 2023
Note: Please alert other team members within your college if the changes outlined above affect their role or department.
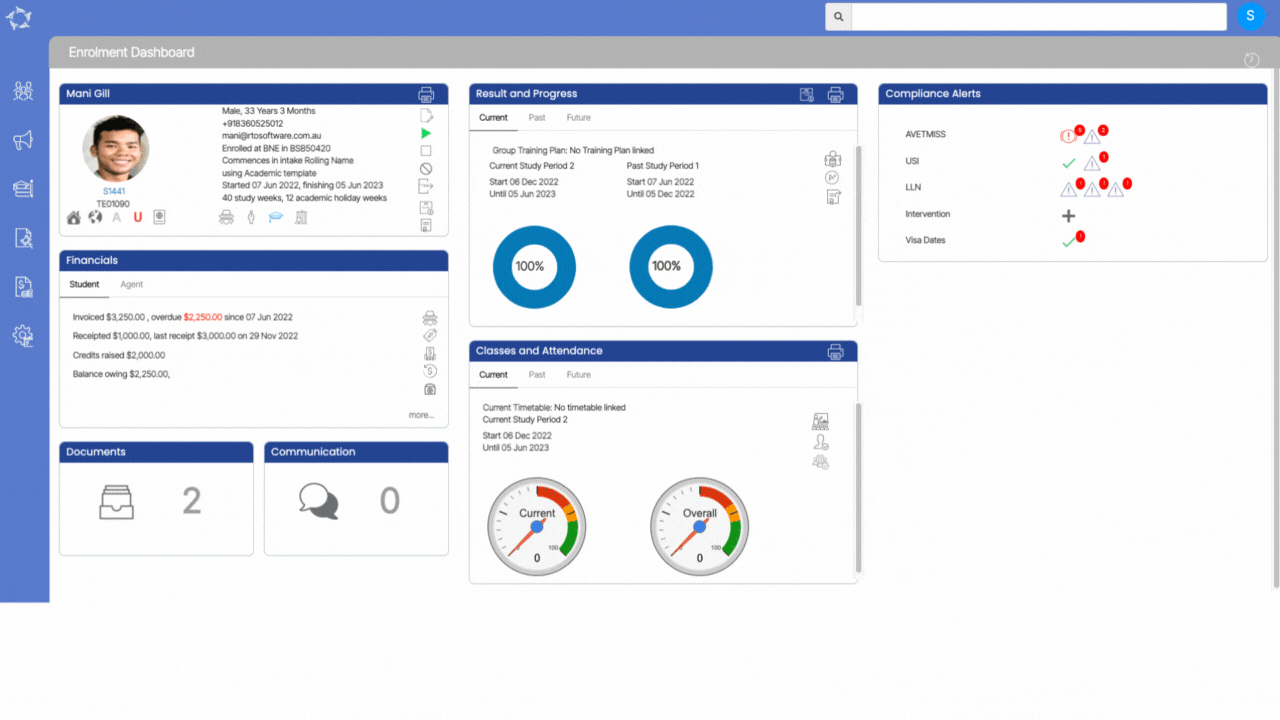
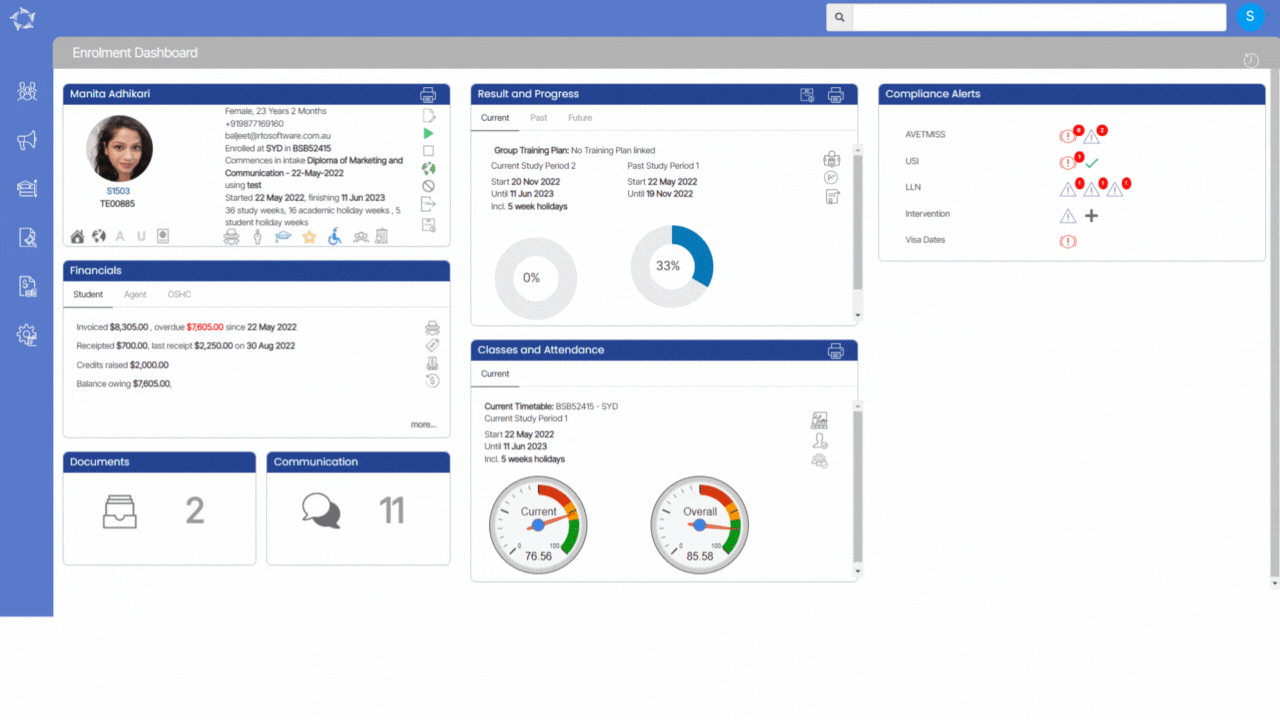
This tile provides an overview of a student’s progress in their course of study, based on their study periods. This tile offers a variety of functionalities, such as navigation to the training plan and result screen, as well as the ability to transition the enrolment to a new program. Additionally, all certificate reports, training plans, and student performance reports are generated from this tile. This allows for a comprehensive view of the student’s progress and achievements, making it easier to monitor their performance and make informed decisions about their future studies.
Tabs
Current – This tab provides you with students’ current status in their training plan. It displays the name of the group training plan the student is enrolled in, as well as their current and past study period dates. Additionally, the tab shows the student’s course progress percentage, giving a clear indication of how much of the course they have completed so far.
Past – This tab provides information on a student’s completed study periods. It displays the start and end dates of each past study period, allowing for easy reference and tracking of progress over time. Additionally, the tab shows the student’s course progress percentage for each past study period, giving a clear indication of how much of the course they completed during that time frame.
Future – This tab provides information on a student’s upcoming study periods. It displays the start and end dates of each future study period
Course Progress Dial
This dial will display the percentage of the course progress of the particular study periods. For example, if there are 4 subjects falling in the date range of the study period and 4 of them have successful results against them. Then the course progress will be calculated as (4/4)*100 i.e. total successful subjects falling in the study period divided by total subjects multiplied by 100.
Enrolment Dashboard > Result and Progress Tile > Training Plan and Results icon
This screen is all about the subjects linked to the enrolment, their start and end date, results and result date. This screen is visually distributed in 2 sections where you can edit the dates, and results, link the trainers, mark the assessments and many more.
The first section of the screen will show you three different areas where you can see Academic information, Current timetable, Student Progress and Qualification Information.
Academic Information
This section gives you the summary of the enrolment i.e. in which campus and course the student is enrolled. Also, it displays the enrolment start date and end date.
Apart from the summary of the enrolment, this section also gives information related to how the system is populating the subject dates. You can also change the subject’s dates by updating them using enrolment dates, academic templates, group training plans, and course definitions.
Current Timetable and Student Progress
This section will display the information related to the current timetable, and total classes. Also, the total subjects, successful, are yet to be completed and not counted due to CT, RPL, and RCG. Other than you can select Level Attained by selecting the icon next to the text.
Qualification Information
This section will display the information related to the parchment number and parchment date. Also, it will display whether the result is issued and the status of commencement and completion. You can also update the qualification information (such as Parchment number, Completed, etc) by selecting the icon.
In the second section of the screen, it will show you the Subjects, their dates and result dates. You can add new subjects from the + icon, and you can inactive or delete the subject.
Results Section
This section will display everything about the results. where you can edit the dates, and results, link the trainers, mark the assessments, and many more. You can also delete subjects, inactive subjects.
You will be presented with the Current tab, Inactive Tab and Deleted Tab.
Current tab – This tab will show you all the current subjects that are linked to the enrolment.
Inactive tab – This tab will show you all the inactive subjects that you have marked inactive from the current tab. Please note that you have the flexibility to mark the subjects as active from the active icon or you can delete the inactive subject from the delete icon.
Deleted tab – Whether you have deleted the subjects from the inactive tab or the current tab, those subjects will appear in the deleted tab. You can also restore the deleted subjects from the restore icon.
IMPORTANT – If you have removed the subject from the current tab and want to bring it back, restoring it will place it back in the current tab. However, if you have marked a subject as inactive, deleting it from the inactive tab won’t immediately return it to the current tab. Instead, it goes to the inactive tab, and you need to mark it as active again for it to appear in the current tab.
We have made some of the latest changes in the Transition Student Screen. This screen can be found under Enrolment Dashboard > Result and Progress Tile > Transition Enrolment icon.
Below are the steps that you need to follow when you do a Transition.
Enter the date of transition. Basically when the transition took place. It can or cannot be the same as the current date.
Select the program in which you are going to transit the student’s enrolment.
By default, the tick box for Mark old subjects as in-active will be selected. It’s vital that you do not untick this tick box so that the system can link the correct subjects with the enrolment according to the new program code in which you are going to move the student’s enrolment.
Select the button for Load Subjects.
Upon selecting the button, the system will refresh the screen and give you a summary of all the old and new units.
IMPORTANT – If the transition date for a student is 01 July 2022 and today is 11 July 2022, then update 01 July 2022 as the transition date.
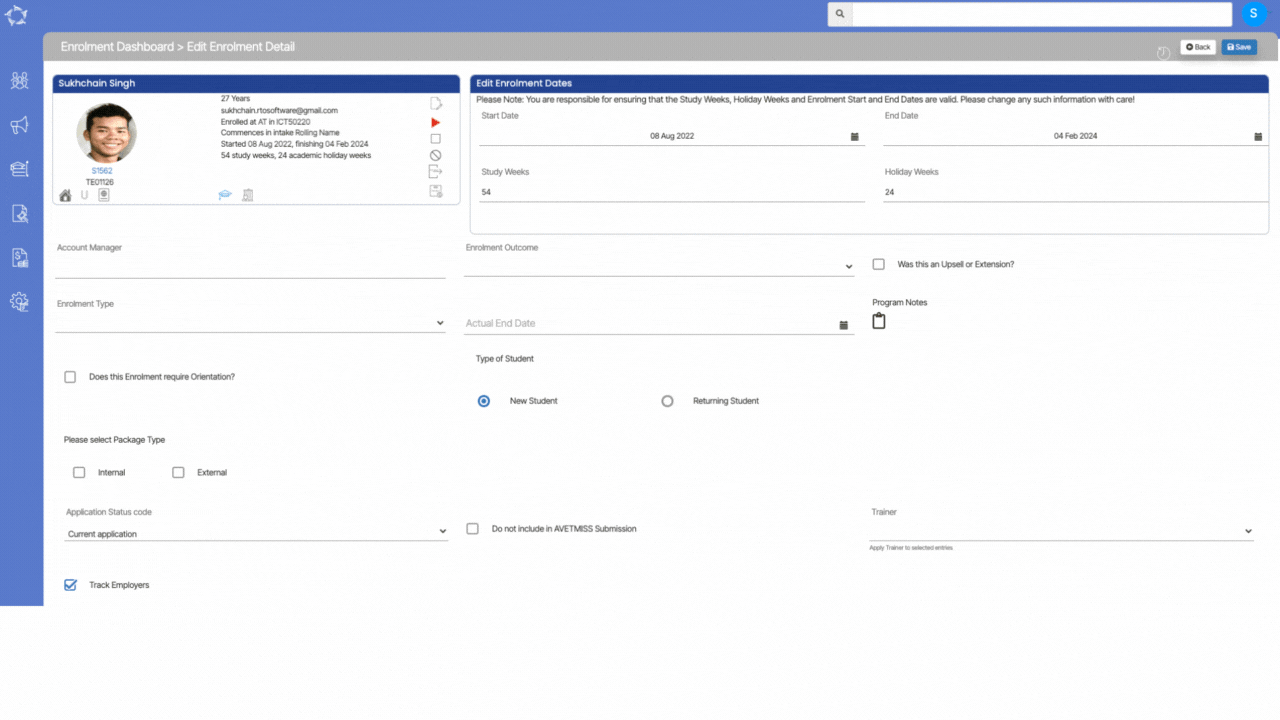
This screen will show two tiles (enrolment summary tile where you can only view the information and edit enrolment dates where you can add and edit specific information for the enrolment such as Enrolment Start and End dates, study weeks and Holiday Weeks) and other fields related to the enrolment.
Note: You are responsible for ensuring that the study weeks, holiday weeks and enrolment dates are valid. Please change any such information with care.
Each field in the screen above is explained in more detail below.
Column
Explanation
Start Date
You can edit the start date of enrolment.
End Date
Select the new end date of enrolment here if you want to change it.
Study Weeks
If you are editing the enrolment dates then you must change the study weeks as well.
Holiday Weeks
You must change the holiday weeks if you are changing the enrolment dates.
Account Manager
This is a magic search field and you can search and select the account manager.
Enrolment Outcome
This is a User Code in TEAMS and one can create an enrolment outcome in TEAMS from the User Code screen.
Was this an Upsell or Extension ?
This is a tick box, If the enrolment is upsell or extension then you can select this tick box.
Application Type
This is a User Code in TEAMS and one can create an enrolment outcome in TEAMS from the User Code screen.
Actual End Date
If a student fails to complete the course by the proposed end date then you can update the actual end date in this field.
Program Notes
You can enter the notes for the program here.
Does this Enrolment require Orientation?
If the enrolment has any orientation you can select this option and can add the orientation date in the next field.
This is a User Code in TEAMS and one can create an enrolment outcome in TEAMS from the User Code screen.
Application status code
This is a TCSI field. By default, the system will show the current application in this field. You can change it to Application withdrawn by applicant option if needed.
Do not include in AVETMISS Submission
If you do not want to include the enrolment in AVETMISS Submission you can select this option.
Trainer
You can select the trainer which you want to link with the enrolment from the dropdown. If there is no trainer linked with the subjects, then the system will link this trainer to all the subjects on the Training Plan and Result screen.
Track Employers
To track your employer, you can select this option.
This tile has three different types of information that are:
Summary information for the enrolment, such as campus, program code, start and end date etc.
Vertical icons that allow you to do transactions against the enrolment or navigate to other screens.
Horizontal icons that identify specific information linked to the enrolment such as the agent, employer, account manager etc.
Enrolment Summary Information
The summary information you will see in this tile will relate to the student and enrolment. The information specific to the student that is displayed includes:
Student number – this is the number directly under the student picture
Student picture, if uploaded the picture
The student’s gender and age
Mobile number
Email address – This is the primary email address linked to the student
You can put your mouse over the icon and a tooltip will show any address added.
Overseas Information
A tooltip will show the passport number, passport expiry date and the international phone number of the student.
New Student
This flag is a marketing specific one that you can set in the application process or at the Edit Enrolment level. It is used in reports to identify a new student with their first enrolment (new) at your college or a returning one. If the enrolment is set as new it will show the icon in blue and if the enrolment is set as returning the icon will show in red.
AVETMISS Information
If the student is flagged as an AVETMISS student then it will show in grey. If however, the student is not set as an AVETMISS student but has an enrolment that has a VET program or subject in it, it will show in red.
It will open the edit CoE details screen. Click on the icon to know more.
Agent
This icon will display the linked agent’s name in the tooltip.
Account Manager
It will display the name of the account manager linked with the enrolment.
USI
This Icon will display the USI status of the student in the tooltip i.e. whether the student has no USI (black icon) and if the USI is verified( green icon) OR not (red icon).
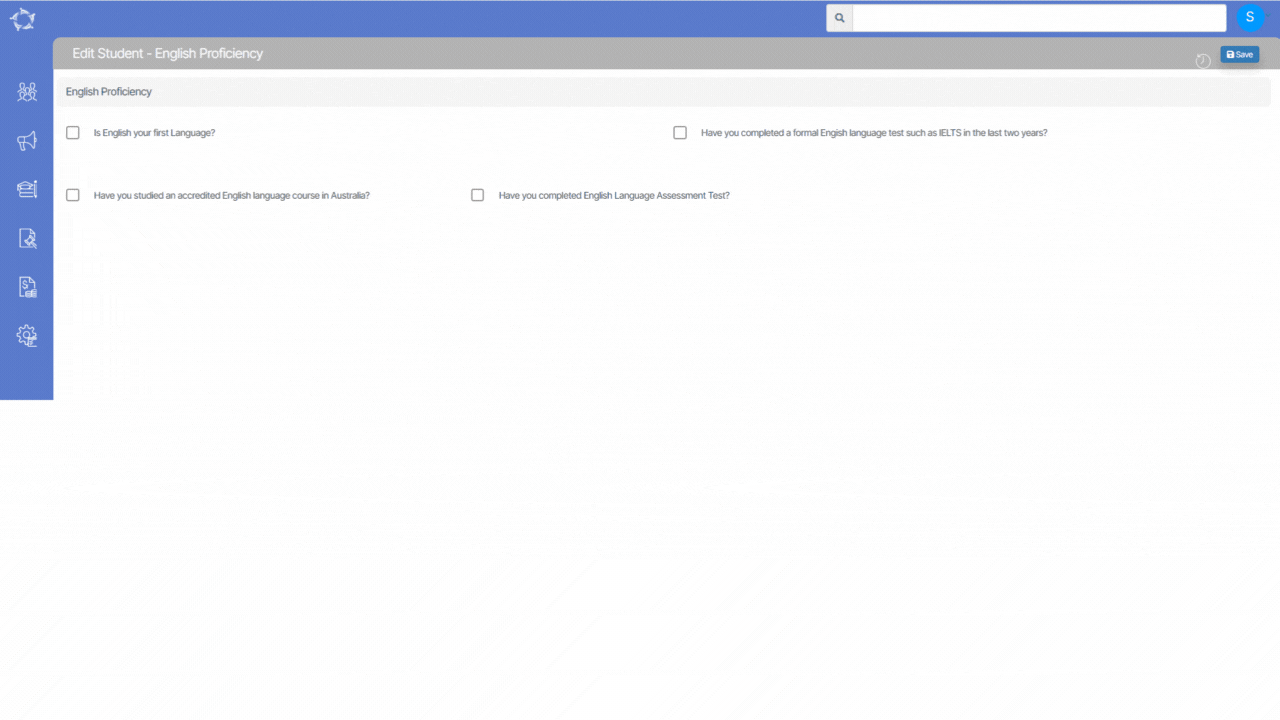
English Language Proficiency is the ability of Students to use the English language to make and communicate meaning in spoken and written contexts while completing their program of study.
This screen will allow you to update the English Proficiency level of the Applicants/students. You can add English Proficiency from the Applicant Profile Tile and Student Profile Tile.
Note: You cannot edit the English proficiency at the applicant level once it is converted to a student. However, you can edit the English proficiency details at the student level.
Fields
Explanation of Fields
Is English your first Language
If the English language is the birth language of the student, then select this tick box
Have you completed a formal English language test such as IELTS in the last two years
By selecting this tick box the system will show 3 different fields related to the IELTS. You can enter the location where the IELTS test is conducted, enter the bands of the IELTS and enter the IELTS result date here.
Have you studied an accredited English language course in Australia
If the student has studied the English course in Australia, kindly select this tick box and the system will ask for the name of the provider and the course name.
Have you completed English Language Assessment Test
If the student has completed the English Language Assessment Test, then select this tick box and the system will ask for the type of the test. If the test was conducted online, select the online option otherwise select paper based. Also, the system will show two fields that ask for the score of the test and the date of the test conducted.