Bulk Class Allocation Step 1

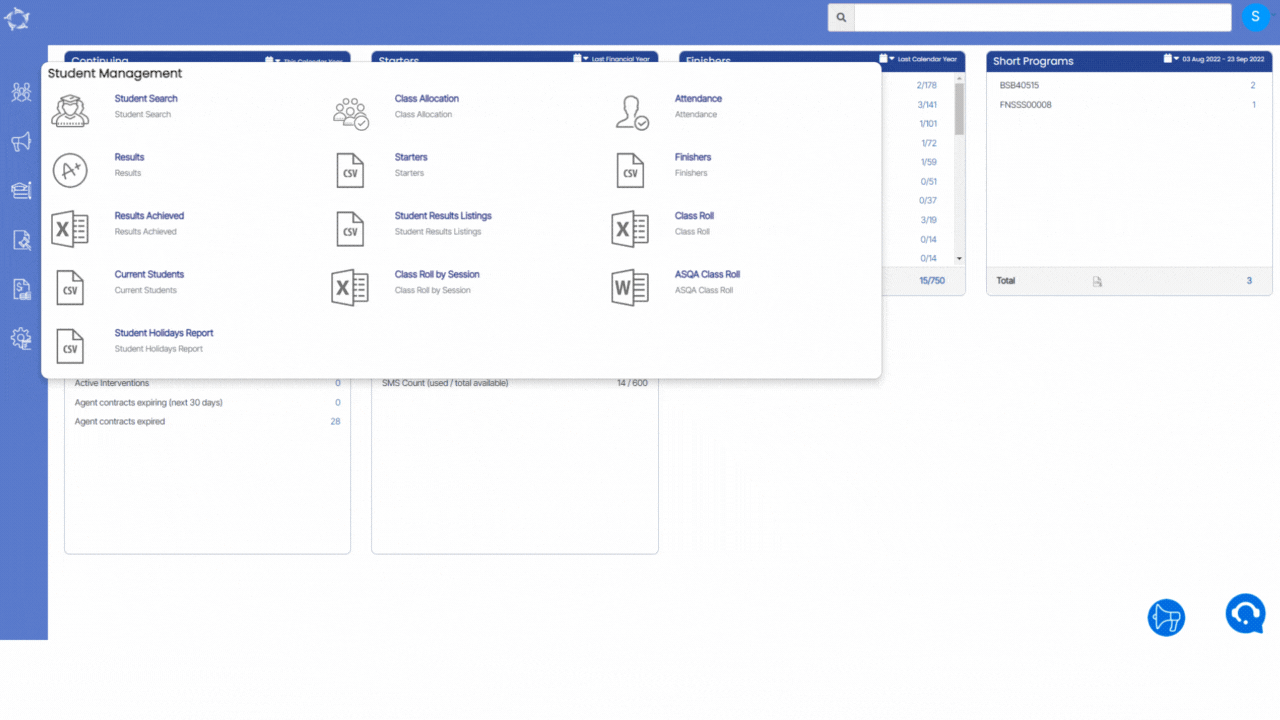
Main Dashboard > Student Management > Class Allocation

history of changes

IMPORTANT – We believe that staying informed about the latest developments in our software is vital for optimising your experience and maximising the benefits of using our system. To view the latest updates and modifications on the Bulk Class Allocation Step 1 and Step 2, we kindly request you to navigate to the History icon history of changes showing above. By selecting this icon, you will gain access to a detailed log of all the recent changes made to the software.

This screen provides a convenient way to allocate classes to students’ enrolments in bulk, which can save time and simplify the process of managing student schedules. The screen is divided into two sections where you can apply filters to make the allocation process more efficient.

Section 1

Start Date of Class Allocation – The “Start Date of Class Allocation” is mandatory and refers to the date when students will begin their studies in the classes that are being allocated. This could be the first day of the term or semester when classes are scheduled to commence. For instance, if the academic term begins on March 1st, then this would be the appropriate start date for class allocation.

Timetable code or name – This field is mandatory and requires you to select the timetable that contains the classes you want to allocate to students. It’s important to ensure that the correct timetable is selected to avoid any confusion or errors when allocating classes to students. By choosing the appropriate timetable, students can be assigned to the correct classes and attend them at the scheduled times.

Section 2

In this section, you select the filters for the system to use, to search and find the relevant student enrolments you wish to allocate to classes.

Campus – Selecting the correct campus is important to ensure that classes are allocated to the appropriate location. For example, if you have multiple campuses, you would need to select the correct campus where the classes are scheduled to take place.

Search & Allocate based on – There are three radio buttons for this field.

  • Programs – When you select this option, the system will display three different fields: “Search Programs,” “Intakes,” and “Group Training Plans.” These fields allow you to filter classes based on the specific program, intake, or group training plan that students are enrolled in. By updating the information in these fields as required, you can allocate classes to the appropriate students and ensure that they are enrolled in the correct program, intake, or training plan.
  • Subjects – When you select this option, the system will display a field where you can search for Subjects. This option can be helpful if you need to allocate classes for a particular subject.
  • Unit of Studies – When you select this option, the system will display a field where you can search units of studies. This option can be helpful if you need to allocate classes for a particular unit.

Enrolments to Include – This is a dropdown menu that allows you to select between two options: “Current” and “To Start Enrolments.” Selecting Current will filter the search results to display classes that are currently ongoing or in progress and selecting To Start Enrolments will filter the search results to display classes that have not yet started but are scheduled to start in the future.

Enrolment Type – The enrolment type dropdown menu typically includes options such as “CoE” (Confirmation of Enrolment), “Non-CoE” (Non-Confirmation of Enrolment), “VSL” (VET Student Loan), and other relevant enrolment types.

Once you have selected the relevant filters, you can select the Next button to proceed to the next screen. The system may take some time to process the selected filters and load the results.

Bulk Results Screen

Main Dashboard > Student Management > Results

On the Results screen, you can bulk mark results for any subjects or units of study that are linked to enrolments. This means that instead of marking each result individually, you can mark them all at once. It’s a handy feature that can save you a lot of time and effort.

Steps to use this screen

  • To select whether you want to mark results for subjects or units of studies, you can select the radio buttons provided. These buttons are typically located on the Results screen, and they allow you to choose between marking results for individual subjects or for entire units of study. Simply select the button that corresponds to your preferred option, and you’ll be able to proceed with marking results for the relevant subjects or units of study.
  • Select the Campus and Program from the drop-down as these are mandatory fields. These fields are often mandatory, meaning that you cannot proceed until you have selected an option from each of them.
  • To select a date range for enrolments, you will typically need to specify both a start date and an end date. This is often a mandatory field, meaning that you cannot proceed until you have provided this information. Once you have selected your preferred date range, the system will show you all enrolments that fall within that time period. This is a useful feature that can help you quickly and easily locate the information you need.
  • To select a timetable and classes, you will typically need to choose these from the drop-down menus provided. This will allow you to specify the specific timetable and classes that you are interested in. It’s important to choose the correct timetable and classes, as this will ensure that you are viewing the correct information and that your queries or requests can be processed accurately.
  • If you select the “Show Only Current Student” tick box, the system will only display enrolments that are currently active or current in the system.
  • The “Subject/UoS” field will typically display a list of all the subjects or units of study that are linked to the program you have selected. This will allow you to mark the results for each subject individually, one by one. By selecting the relevant subject from the list, you can then proceed to mark the results for that subject specifically.
  • In addition to selecting the campus, program, date range, timetable, and classes, you may also have the option to choose the intake and group training plan from the drop-down menus. The intake typically refers to the specific period of time during which a group of students commence their studies

Note: It’s important to note that if you do not select all of the mandatory fields, including Campus, Program, Enrolments between, and Subjects/UoS, the system will not display any records of enrolments. This is because these fields are required to filter and display the relevant data, and the system needs all of this information to be able to generate the results you are looking for. Make sure that you have selected all of the necessary fields before attempting to access or view enrolment records, to avoid any errors or issues.

  • After you have selected all the desired filters and fields, you will need to select the “Show Records” button to load all the enrolments that match your selected filters. This will typically generate a list of enrolment records that meet your selected criteria, allowing you to review and manage the data as needed. The “Show Records” button is an important final step in the process, as it triggers the system to retrieve and display the relevant data for you.
  • Once you have generated the list of enrolment records that match your selected filters, you will need to select the relevant enrolments by selecting the tick boxes next to them. After selecting the enrolments you want to update, you can then choose the desired Result/Outcome from the drop-down menu and specify the Result date. You may also have the option to add any relevant notes or comments using the Notes icon or field. Once you have made all the necessary changes and updates, you can then select the “Save” button to store the updated data in the system.

After you have selected all of the relevant parameters and fields, and updated the enrolment records as needed, the system will refresh the screen and update the results in the Enrolments grid. Additionally, the updated results should also be reflected in the Enrolment Dashboard > Training Plan and Results.

What’s New – 23rd Feb 2023

Welcome to the latest update for TEAMS

This update includes the addition of new merge fields, namely Campus Program CRICOS code and Program CRICOS Name.

IMPORTANT – How is your progress going with reviewing and cleaning up your data? If you are submitting your National AVETMISS 2022 student data, please note that there are only five days left until the deadline for successful data submission.

NCVER Annual Student Data Submission

Have you successfully validated and finalised your submission for 2022 student data? If not, can we help you?

If you are having any issues with errors that you don’t understand, please email the error list and NAT files to support@rtosoftware.com.au and then call support on 1300 85 05 85 and they will help you. The support staff must have the error list and NAT files to be able to assist you.

If for some reason you have not commenced your submissions, you have only 5 business days left to finalise your data submission with NCVER. If you are not sure where to start or what to do please select read more and it will walk you through the steps. If you need help contact our support staff urgently.

Email Template Screen – New Merge Fields

We have added new merge fields for Campus Program CRICOS code and Program CRICOS Name for customising the enrolments Email Template.

When you’re creating an email template for enrolments, you can now use these merge fields to automatically fill in the Program CRICOS code and campus program CRICOS code into the email.

Q&A

Do you have a TEAMS question?

Make a list of your questions, send them to our support teams and we will send you the answer and add them to our fortnightly update.

Select the read more button as here are some questions we get asked and then answers on how to do them in TEAMS.

Our mission is to build software that helps you do things more efficiently. Your input and engagement are vital in helping us improve our service and offerings for your college. We are always open to listening to your feedback.

Any questions, please feel free to reach out to us. We look forward to serving you to the best of our ability.

Please review the changes and if you would like further clarification, please contact our Support team.

A big thank you to so many of you who have been actively participating in helping us bring these new improvements to life.

Next update is due on Thursday, 9th March 2023

Note: Please alert other team members within your college if the changes outlined above affect their role or department.

Thank you for taking the time to read this post.

Student Search

The Student search screen allows you to search for an individual student or multiple student with different parameters.

How do these filters work?

  • Campus – If you want to search multiple students for a specific campus then you can select the desired campus from the Campus drop down and select Apply button and it will load all the students in the grid which are linked with the selected campus.
  • Student Number – If you want to search for a specific student then you can simply add the student’s number in the student’s number field and select the Apply button and it will pull out the student under the grid.
  • First Name and Last Name If you type in the First and Last name of the student in the relevant field, then the system will pull out all the students accordingly in the grid.
  • Preferred Name For this field, if you have updated the student’s preferred name at the student level (student entry screen) then only you can add and search the student’s preferred name in the Preferred Name field.
  • DOB – This field will fetch all the students who have similar Date of Birth.
  • Mobile Number – If you want to search a student with their mobile number then you need to add mobile number in the mobile number field and select Apply button and which will show you the student in the grid
  • Email Address – If you want to search for a specific student with his/her email address then you need to add the student’s email address in the email address field and select Apply button.

Marketing Reports

Below is a list of all the reports available under this Marketing menu in the system. You can see the name of the report with either an icon that has the letters CSV in it or an MS Excel icon. Generally, all reports in the system generate a CSV (Comma-separated Values). There will be times when a report generates to Excel, primarily as it requires a page break in it which you can’t do in CSV, however in this menu there are no Excel reports.

Each report listed below is a link to a post where you can understand the report, its parameters and to view an example of the report.

Marketing

Main Dashboard > Marketing Menu

When accessing the Marketing section from the main menu, you will be presented with a selection of icons that serve as shortcuts to various screens and reports related to marketing activities. These icons enable easy navigation to different sections where you can perform tasks such as managing applications, handling inquiries, and processing agent transactions on a daily basis.

Marketing Dashboard

System Admin

Main Dashboard > System Admin Menu

When accessing the System Admin section from the main menu, you will be presented with a list of icons that grant you access to various screens associated with the setup and configuration of templates, users, employers, account managers, and other system-level functions. This section is specifically designed to facilitate the management and customisation of the system according to your specific requirements.

By selecting the appropriate icons, you can navigate to the respective screens where you can perform tasks such as creating and modifying templates, managing user accounts and permissions, configuring employer settings, assigning account managers, and leveraging automation features. These icons include:

Notification Template

WebForms

Quiz

Question Bank

Automated Action

Automated System Actions

New Enquiry

Main Dashboard > Student Management > New Enquiry Sub-Menu

Overview

This screen allows you to enter enquiries (new leads) so you can track communication and the progression of discussions with them. Based on the type of college you will determine what type of enquiry you are entering. There are three enquiry types that are –

  • Student – This option would be used by any college type.
  • Agent – This option is typically used by CRICOS colleges to track their marketing of potential new agents.
  • Employer – This option is typically used by domestic funded or fee-for-service (FFS) colleges, to track their marketing of potential new employers as a source of training their staff.

What’s New – 09 Feb 2023

Welcome to the latest update for TEAMS

Some key changes made in this update are:

  • New radio buttons introduced on the Public Holidays screen
  • New Icons and Columns introduced on the Traininer Welcome screen
  • Agent Portal now has a new Commission Due Tile

IMPORTANT – How are you going with your steps for reviewing and cleaning up your data? Please see the AVETMISS countdown section below for more information. If you would like to consider our Virtual Admin (VA) service to assist you with this review and cleanup, please contact our support staff for more information.

We have also introduced a new Q&A section to our What’s New summary. Here we will provide answers to the questions that are most frequently asked about TEAMS.

NCVER Annual Student Data Submission

Have you maintained and managed your student data this year in preparation for your annual student data submission? In this post, we walk through the first two steps of what you need to do in TEAMS.

We highly recommend you start these steps now, as these are critical to future steps where the larger volume of data is and where the biggest list of errors comes from.

Public Holidays – New Radio Buttons (National or State)

We have added two new radio buttons (National and State) on the Public Holidays Screen in the system. By using these radio buttons, you will be able to manage the National level and State level holidays for your RTO.

Trainers Welcome Screen – New Icons and columns

We have added new icons Link Subjects and Link programs under the actions column on the Trainer Welcome Screen. You will also be able to new columns Total Programs and Total Subjects in the grid.

Agent Portal – Commission Due Tile

We have introduced a new Commission Due tile in the Agent Portal. This tile will give you the details about the agent commission which is due for the students.

Q&A

Do you have a TEAMS question?

Make a list of your questions, send them to our support teams and we will send you the answer and add them to our fortnightly update.

Select the read more button as here are some questions we get asked and then answers on how to do them in TEAMS.

Our mission is to build software that helps you do things more efficiently. Your input and engagement are vital in helping us improve our service and offerings for your college. We are always open to listening to your feedback.

Any questions, please feel free to reach out to us. We look forward to serving you to the best of our ability.

Please review the changes and if you would like further clarification, please contact our Support team.

A big thank you to so many of you who have been actively participating in helping us bring these new improvements to life.

Next update is due on Thursday, 23rd February 2023

Note: Please alert other team members within your college if the changes outlined above affect their role or department.

Thank you for taking the time to read this post.

Starters Report Filters

The Starters Report filters have two tabs General and Advance and the below table will show you Filters with their explanation.

General FiltersExplanation
Report Start & End DatesThe system will always look at enrolment start dates only to find enrolments between the date range.
CampusIf you have multiple campus then you can generate this report by selecting multiple campuses.
ProgramThis is a magic search field and you can search and select multiple Programs.
Enrolments to IncludeThis field has three radio buttons and you can select any of them one at a time. For example:
Show only Started – If you select this, it will only show you started students.
Show only to Start – It will show you students that are about to start.
Both – by selecting both the report will print Started and to start students.
Show only Overseas studentsBy selecting this tick box, the report will print overseas students only.
Include Cancelled EnrolmentsThe system will only consider enrolments with start dates within the specified report period that have been canceled using the cancel enrolment function. It will not include enrolment outcomes marked as canceled for this purpose.
Include ApplicationsThe system will always display enrolments in the report. If you choose this option, it will also include applications with a current status and an application start date within the specified report period.
Group ByPlease see TEAMS Basics
Sort ByPlease see TEAMS Basics
Asc and DescPlease see TEAMS Basics
Advance FiltersExplanation
Timetable and ClassesThis is magic search field and you can search and select multiple timetables.
Print class names for enrolments in report?To see the class names associated with enrolments in the report, select the tick box. Please note that generating the report may take longer because an enrolment can be linked to multiple classes, and the system will list all class names for each enrolment.
Enrolment TypeThis is a user code in TEAMS and one can create the user code in TEAMS as you required. You can select multiple enrolment type from the dropdown.
Enrolment OutcomeIf you have setup the enrolment outcome on the User Code screen then it will appear under this dropdown.
Visa TypesSelect the Visa type from the dropdown.
AgentSearch and select multiple Agents in this field.
EmployerSearch and select multiple Employer in this field.
Account ManagerSelect multiple Account Manager from the dropdown.
CountrySelect multiple Campus from the dropdown.
NationalitySelect multiple Nationality from the dropdown.
Marketing SourceSelect multiple Marketing Source from the dropdown.
Level Of StudentSelect multiple Level Of Student from the dropdown.

Click on the “Print” icon to generate the report. After clicking on it, the system will direct you towards the report dashboard screen. You can see the report status over there if it’s generated or not. Once it’s generated, download the report.