Edit USI

Student Dashboard > Student Profile Tile > USI Icon

A USI is your individual education number for life. It also gives you an online record of your vocational education and training (VET) undertaken in Australia.

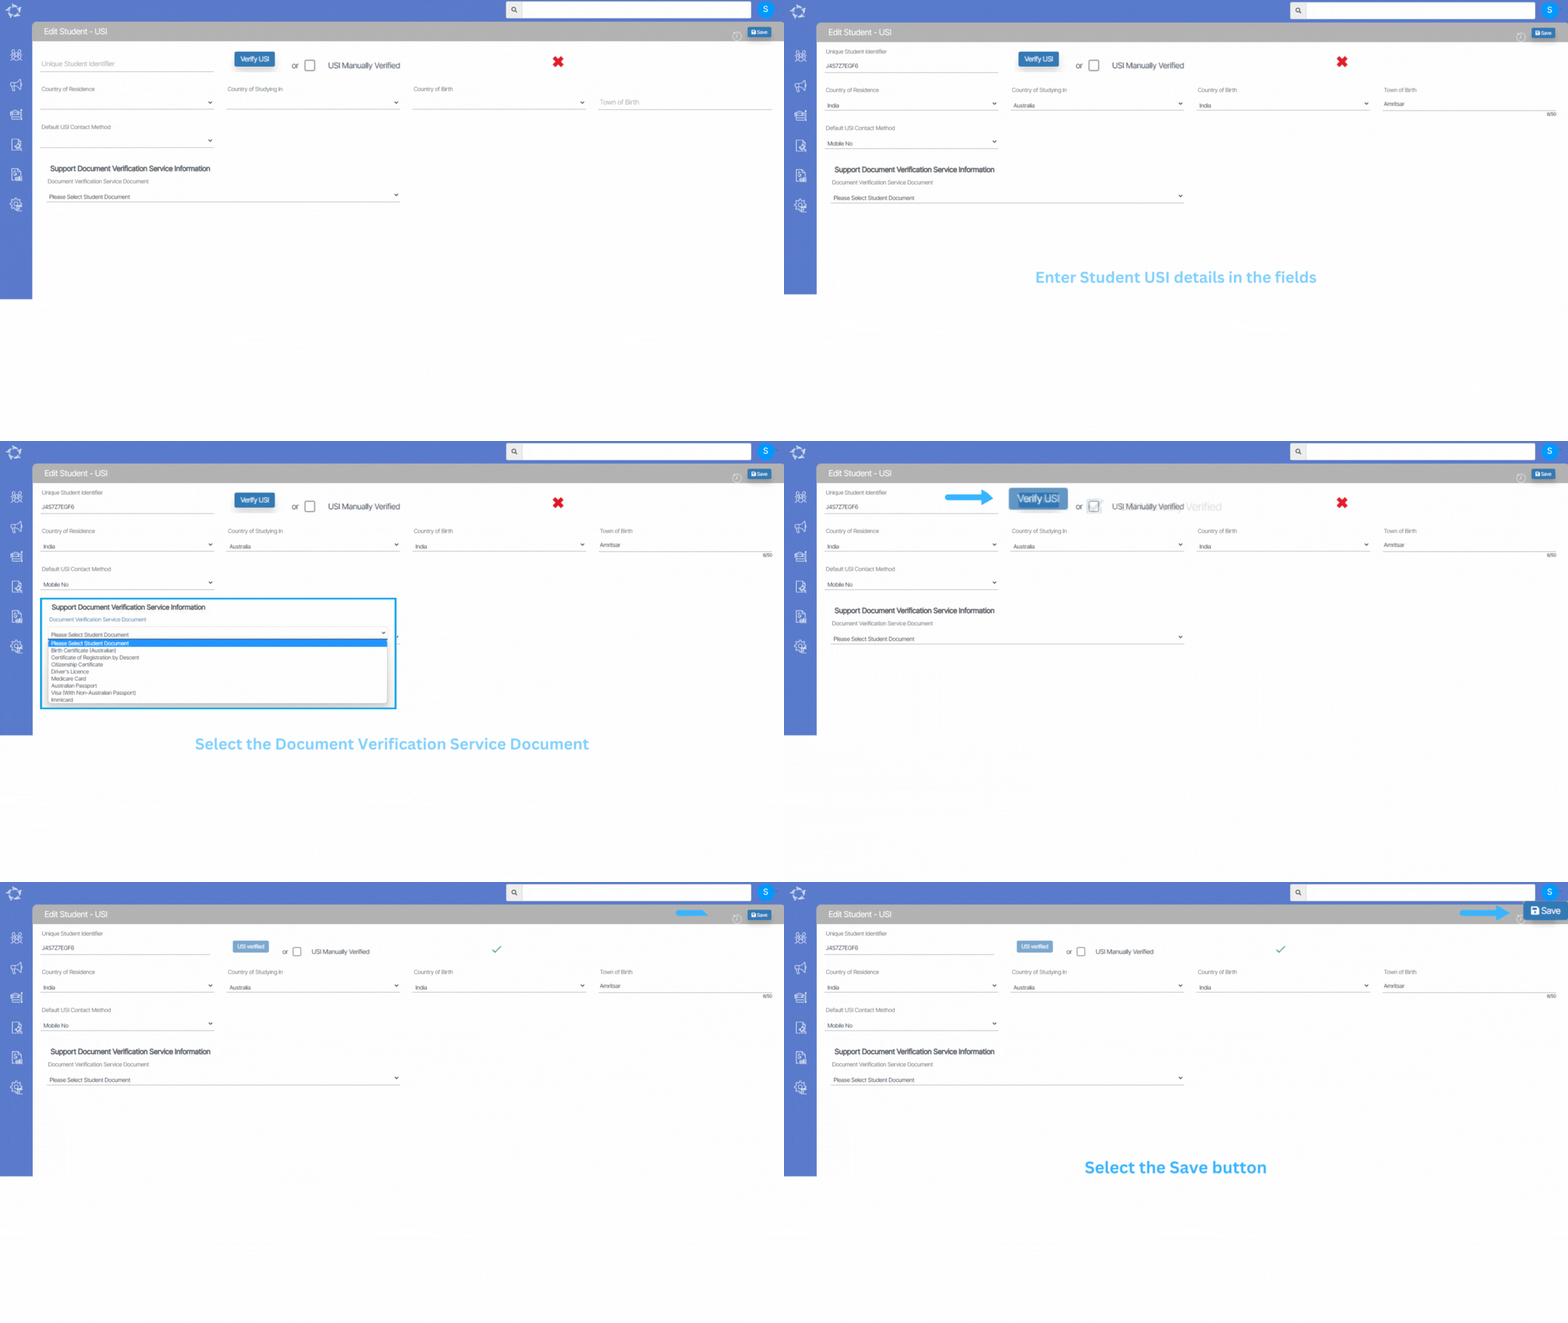
This screen will allow you to log the request to create USI and then verify it.

Note – When you select the Create USI button, the request gets sent to https://www.usi.gov.au/ and you can check the status of the USI on the USI Request screen.

If you already have a USI number then update it in the Unique Student Identifier field, also you need to update all the USI-related fields and then hit the save button. Once you select the Save button, the screen will refresh and will show you Verify button and Use Manually Verified tick box.

Note: Verify USI – When you select this button, the request gets sent to the https://www.usi.gov.au/providers/verify-student-usi site and you can check the status of the USI from the USI request screen in the system.

Use Manually Verified – You can select this tick box if you already have verified the USI from the https://www.usi.gov.au/providers/verify-student-usi site.

Select here to know mandatory details to verify USI.

Once it is verified, the Verify USI button will change to USI verified button and the red cross icon will change into a green tick.
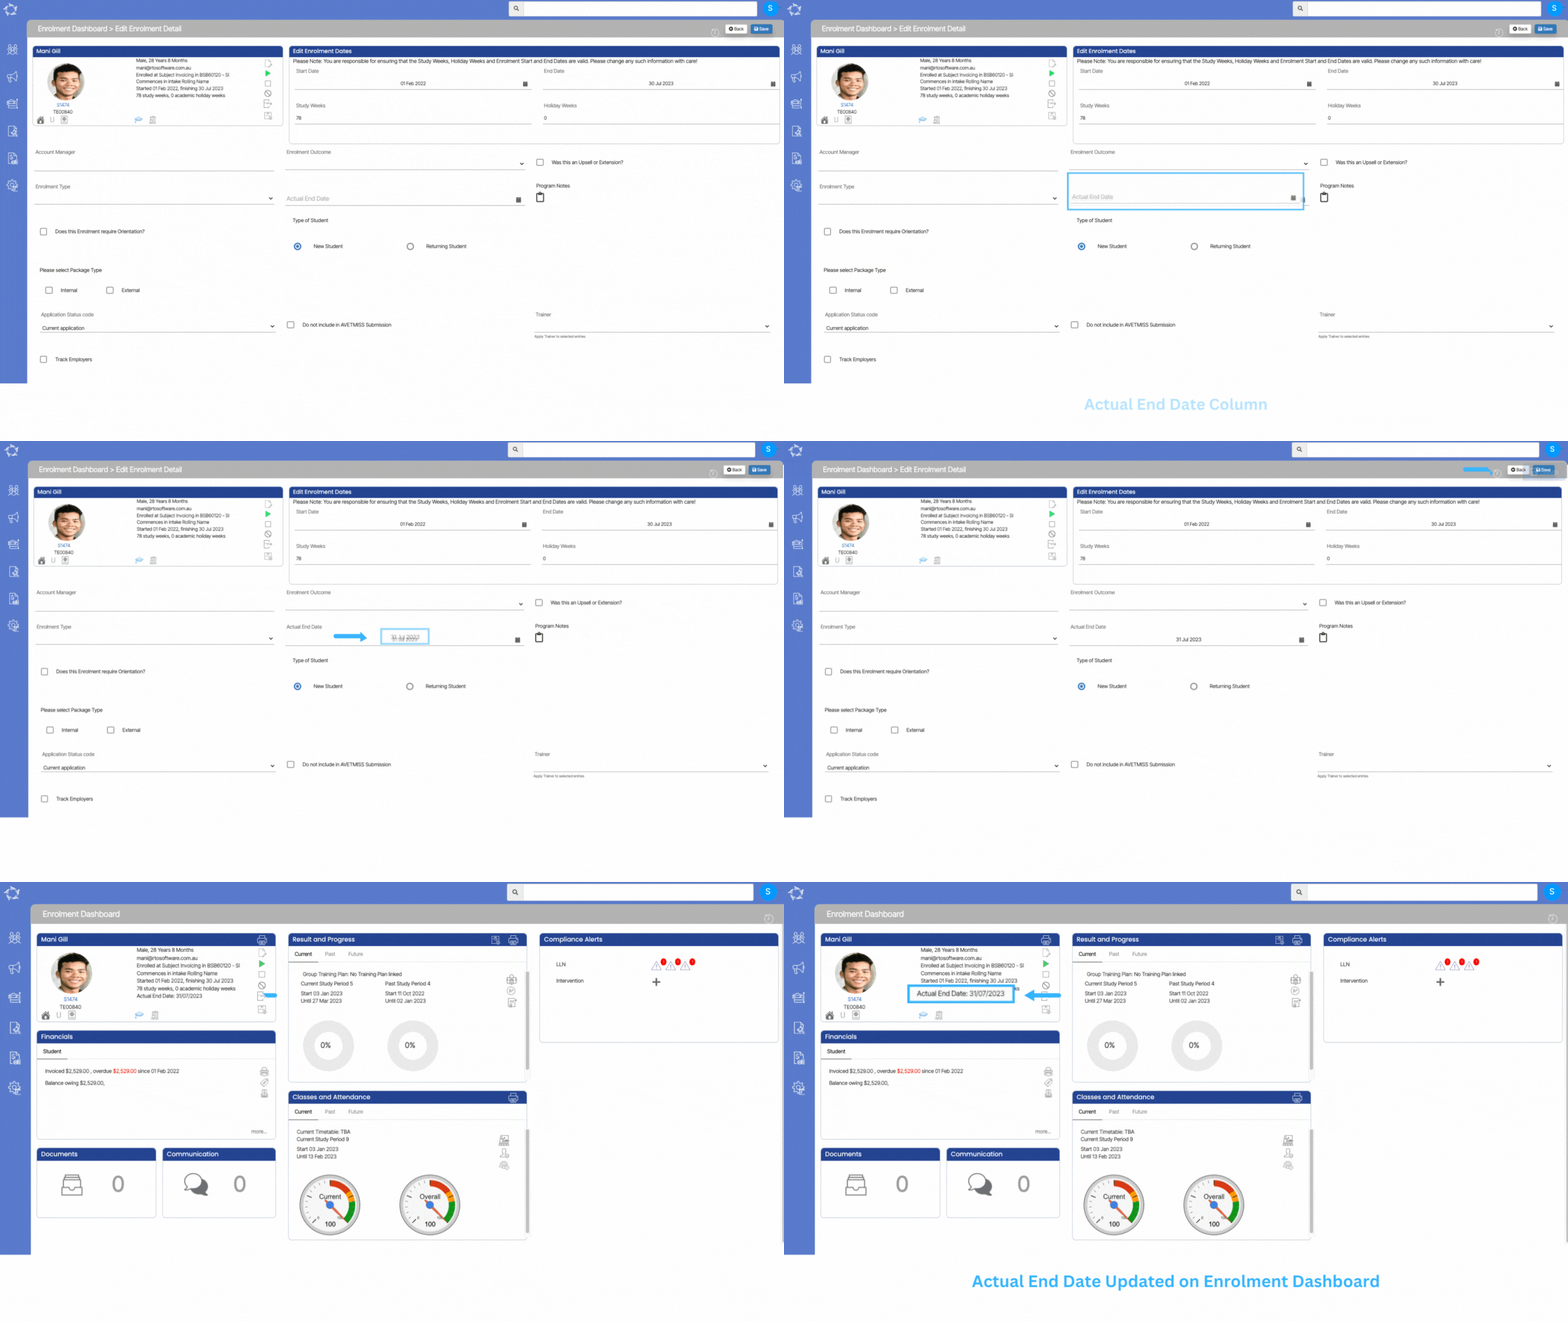
Edit Enrolment – New Actual End Date Field

We have added a new field in the system called Actual End Date in the Edit Enrolment screen. The Actual End date is just the data entry field and it is not going to calculate the duration for you for the enrolment. This is just for the purpose to see the date when a student actually finished the study.

So, when you update and save the Actual End date in the edit enrolment screen, it will get populated on the profile section on the Enrolment Dashboard as you can see below:

IMPORTANT: It’s the Enrolment End Date that is being used in the AVETMISS reporting, not the Actual End Date. If you want the system to use the actual end date in AVETMISS reporting, please update the actual end date in the enrolment end date field.

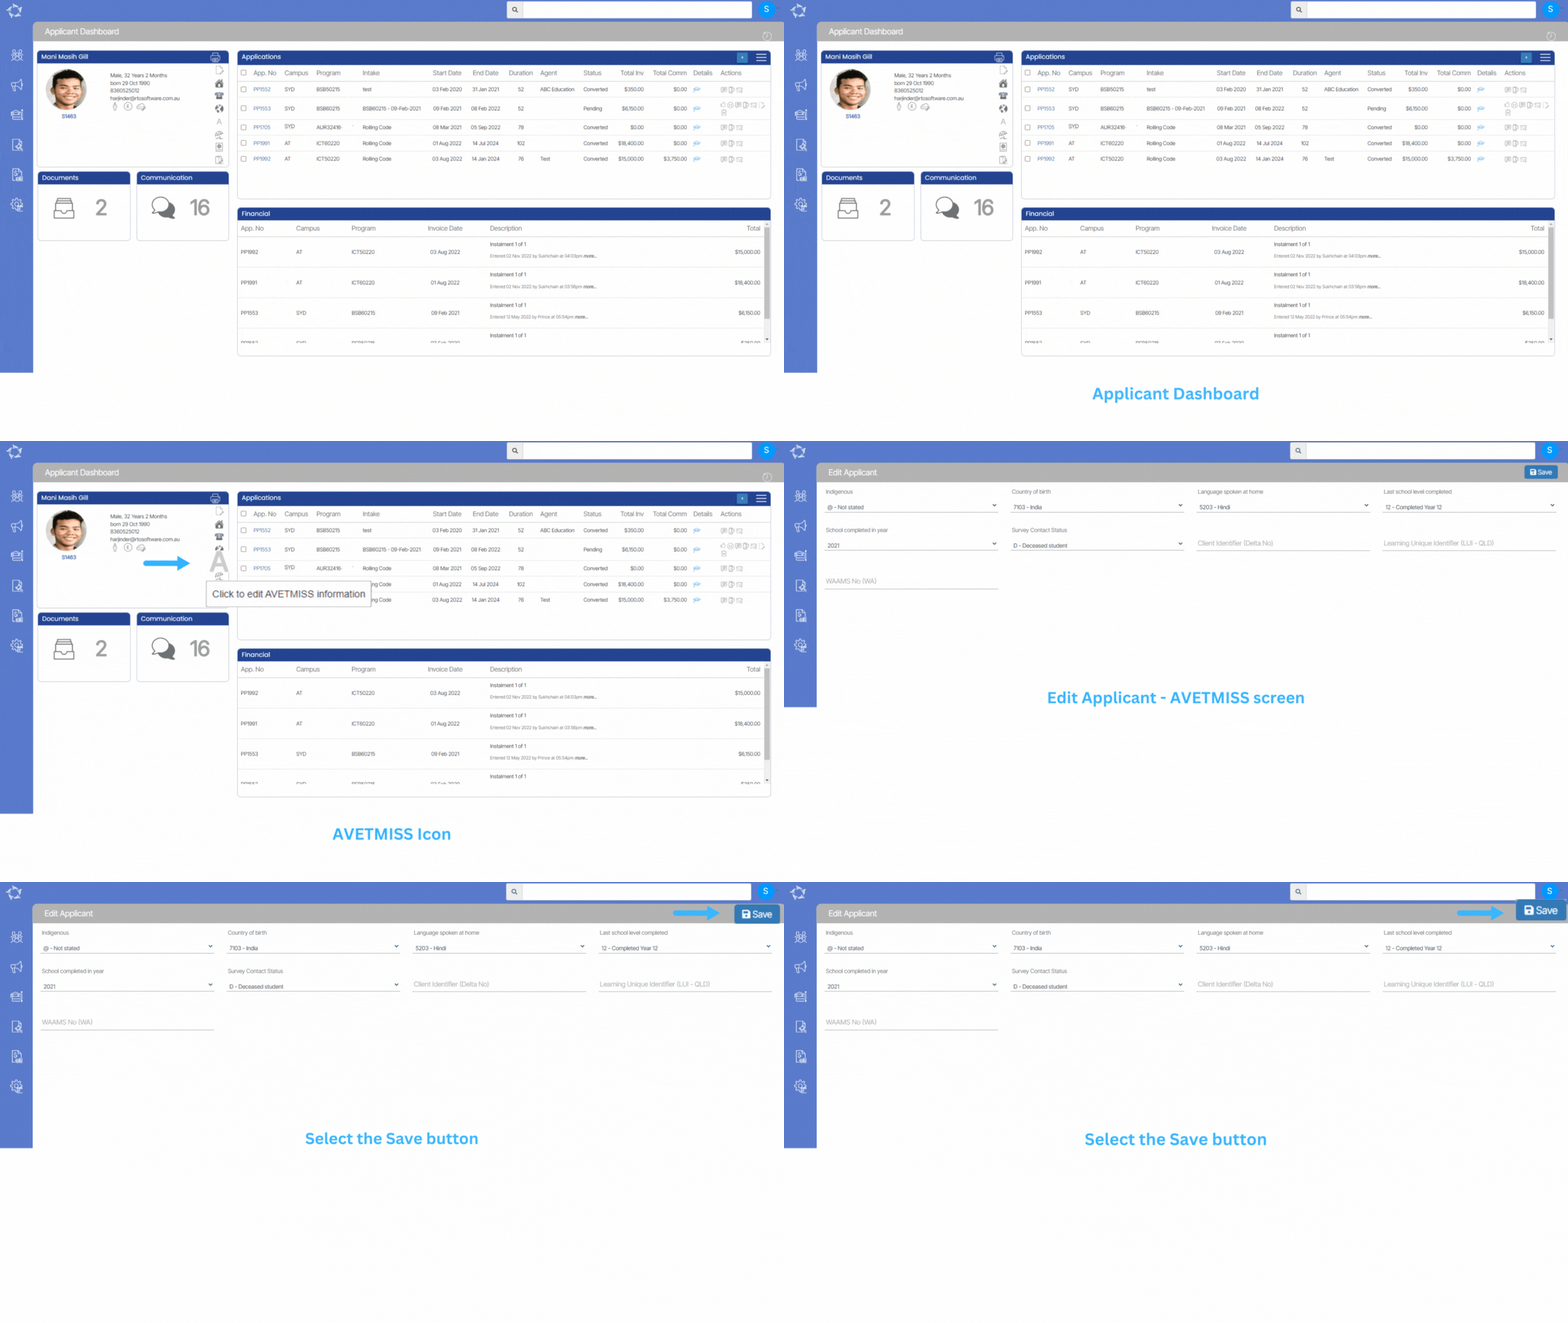
Edit AVETMISS – Applicant

Applicant Dashboard > Applicant Profile Tile > AVETMISS Icon

The first thing to know is that AVETMISS stands for the Australian Vocational Education and Training Management Information Statistical Standard. It is the national data standard that ensures consistent and accurate capture and reporting of Vocational Education and Training (VET) information about students.

The below screen allows you to add/edit the AVETMISS information of a applicant. Some of the fields are very important in the AVETMISS submissions. For example, if you do not select the survey contact status, you will get errors in NCVER submissions. We will recommend you to enter all the AVETMISS fields to avoid compliance issues.

IMPORTANT – Once the application is converted from the applicant to a student then you won’t be able to add/edit any details at the applicant level. However, you can do the changes from the Student Profile Tile.

Note – On this screen, you will see dropdowns for the fields and these dropdowns are user codes in TEAMS. Please select here o know more about User Code.

Explanation of the Fields

ColumnExplanation
IndigenousIt is a UserCode dropdown field where you can select the indigenous status of the applicant.
Country of BirthSelect the country of an applicant.
Language spoken at homeSelect the language that the applicant speaks at home.
Last school level completedYou need to select the last school level completed year.
School completed in yearSelect the completed year of the school.
Survey Contact StatusIt is a UserCode dropdown field used to update the survey contact status of the applicant.
Client Identifier (Delta No)In this field, you can enter the Delta number of an applicant.
Learning Unique Identifier (LUI – QLD)It is a 10 digit learner unique identifier number used to log in learning account.
WAAMS No (WA)In this field, you can enter the WAAMS number of the applicant

Conditions – Applicant and Student

Applicant/Student conditions are the prerequisite conditions where a student has to full fill the requirements before continuing their study. The conditions can be applied at the applicant level from the Applicant Dashboard > Applicant Profile Tile and student level from the Student Dashboard > Student Profile Tile

For example – An IELTS score of 6.0 or equivalent is required for entry into this program. The document(s) must be provided within the X number of days from the date of the offer letter to make this offer valid.

Note: Student condition is a user code and if you want to add student conditions to the system then you need to go to the user codes screen in TEAMS.

IMPORTANT – Once the application is converted to a student then you won’t be able to add/edit any details at the applicant level. However, you can do the changes from the edit student screen.

How to Add Conditions

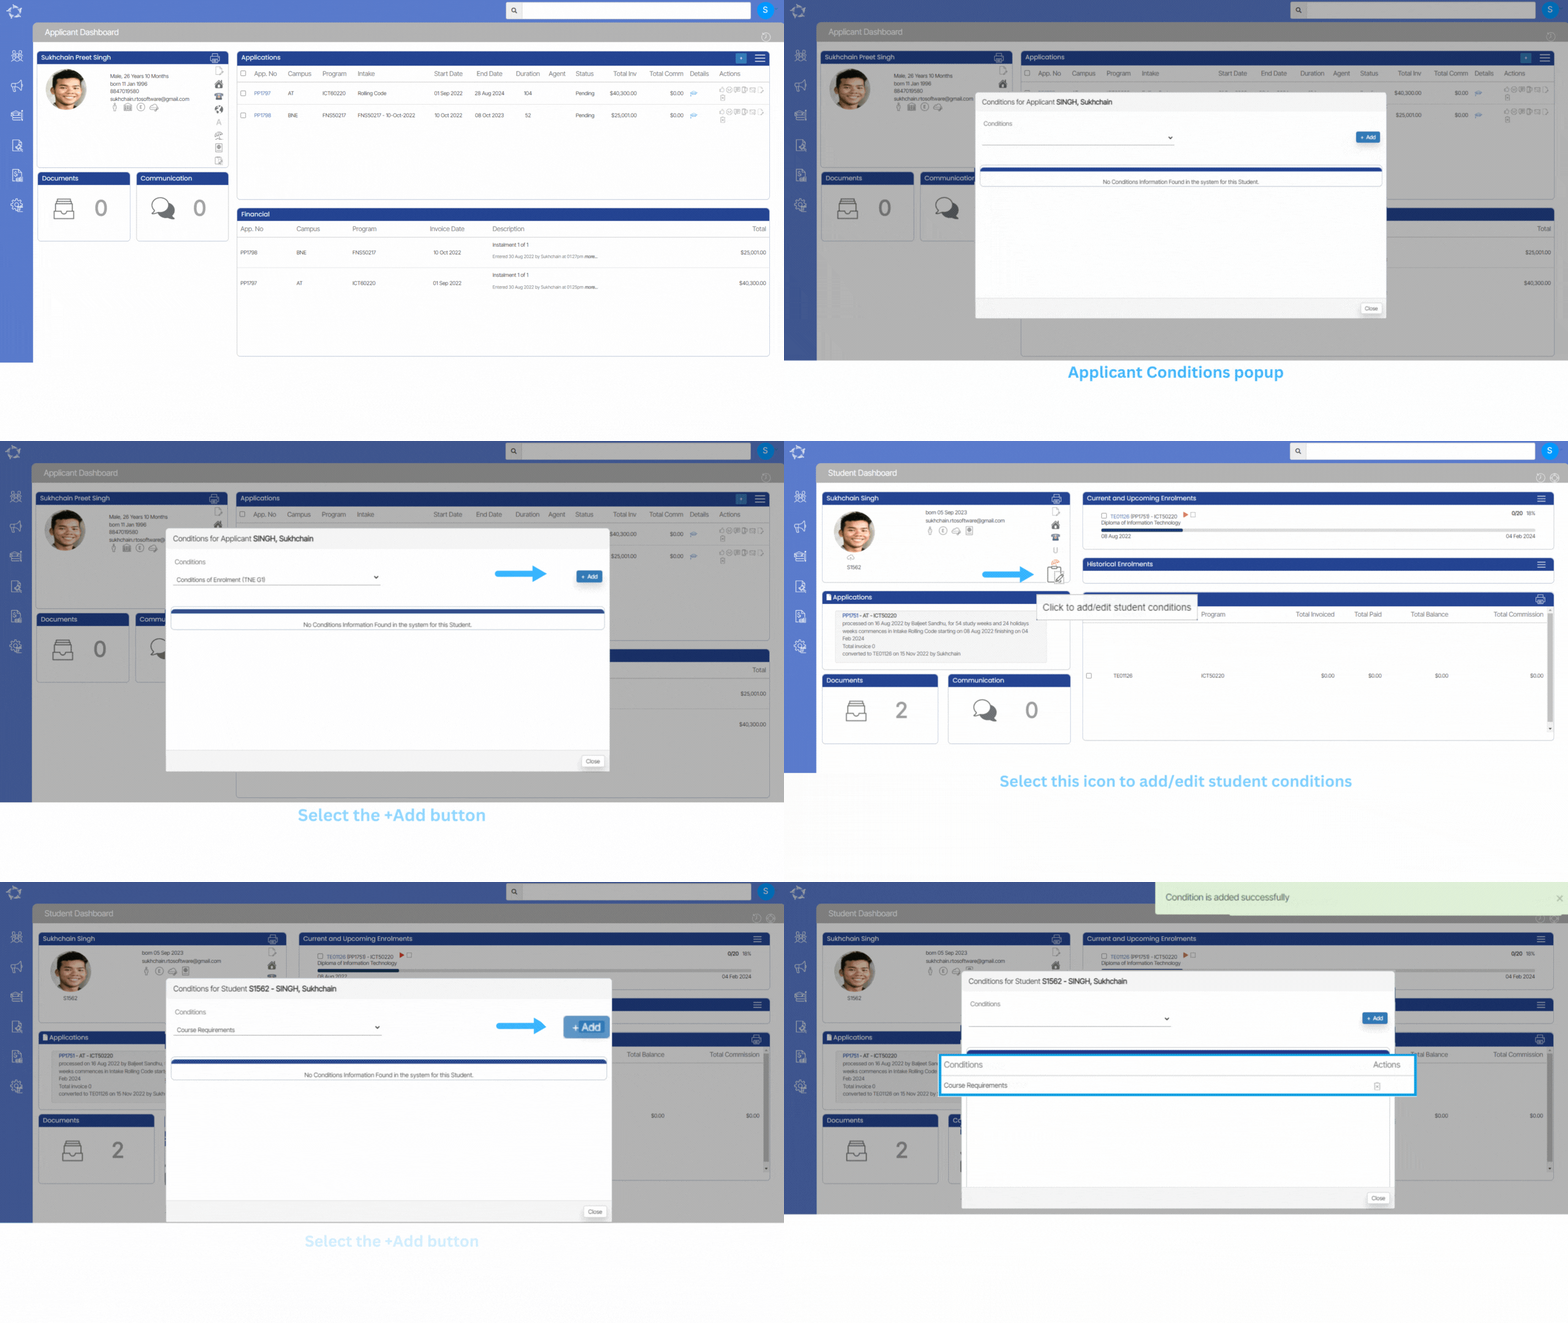
  • You can add conditions by selecting the Applicant/Student conditions icon from the Applicant/Student profile tiles as shown below:
  • Once you selected the icon, the screen will show a popup window and you can select the conditions from the dropdown and select the +Add button.
  • Upon selecting the +Add button, the condition will show up in the grid on the same window and also you will see a pop message in green on top of the screen (condition is added successfully).

After adding the conditions, the conditions icon will turn in red which will show you a tooltip saying view applicant conditions on the applicant Applicant Profile Tile and view student conditions on the Student Profile Tile.

Attendance Hours Report Filters

Below are the filters and their explanations for the Attendance Hours Report.

General FiltersExplanations
Report Start DateSelect the Start Date from where you want to start calculating the attendance for the enrolment
Report End DateSelect the Date when you want to finish calculating the attendance for the enrolment.
Enrolments to includeIt let you choose current enrolments or finished enrolments. (By default both the tick boxes will be ticked). You can select/unselect as you required.
CampusIf you have multiple campuses then this dropdown will show more than one campus. You can select the campus/es as you need.
ProgramThis is a magic search and multi-select field and you can search for multiple Programs by typing the Program Code.
Sort BySort by is used to group students in the report according to the selected option in Sort by for e.g – Student No & Enrolment No, Program and Student Name.
Asc/DescSelect the Ascending or Descending radio button.

Select the “Print” Icon to generate the report. After selecting it, the system will direct you to the report dashboard screen. You can see the report status over there if it’s generated or not. Once it’s generated, download the report.

Visa/CoE Information – Enrolment Dashboard

Enrolment Dashboard > Enrolment Profile Tile > Visa and/or CoE Information Icon

history of changes

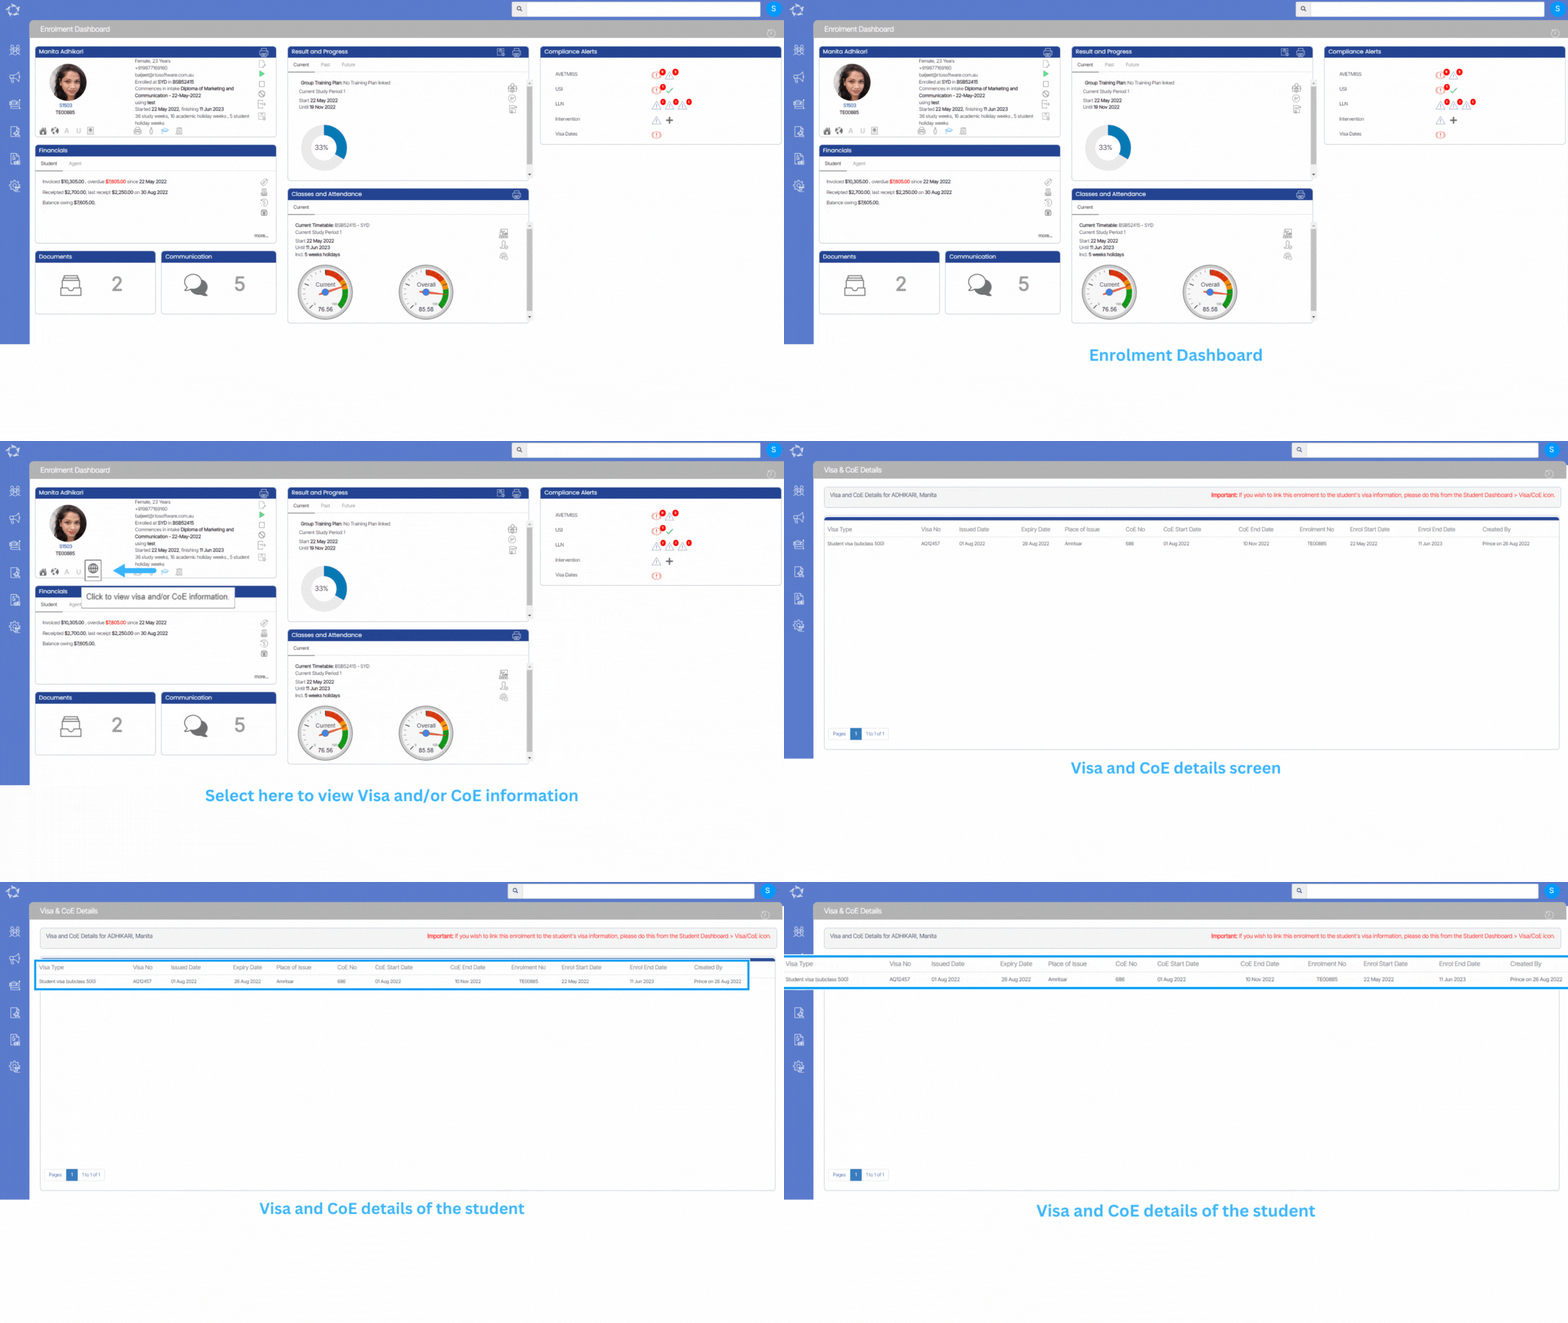
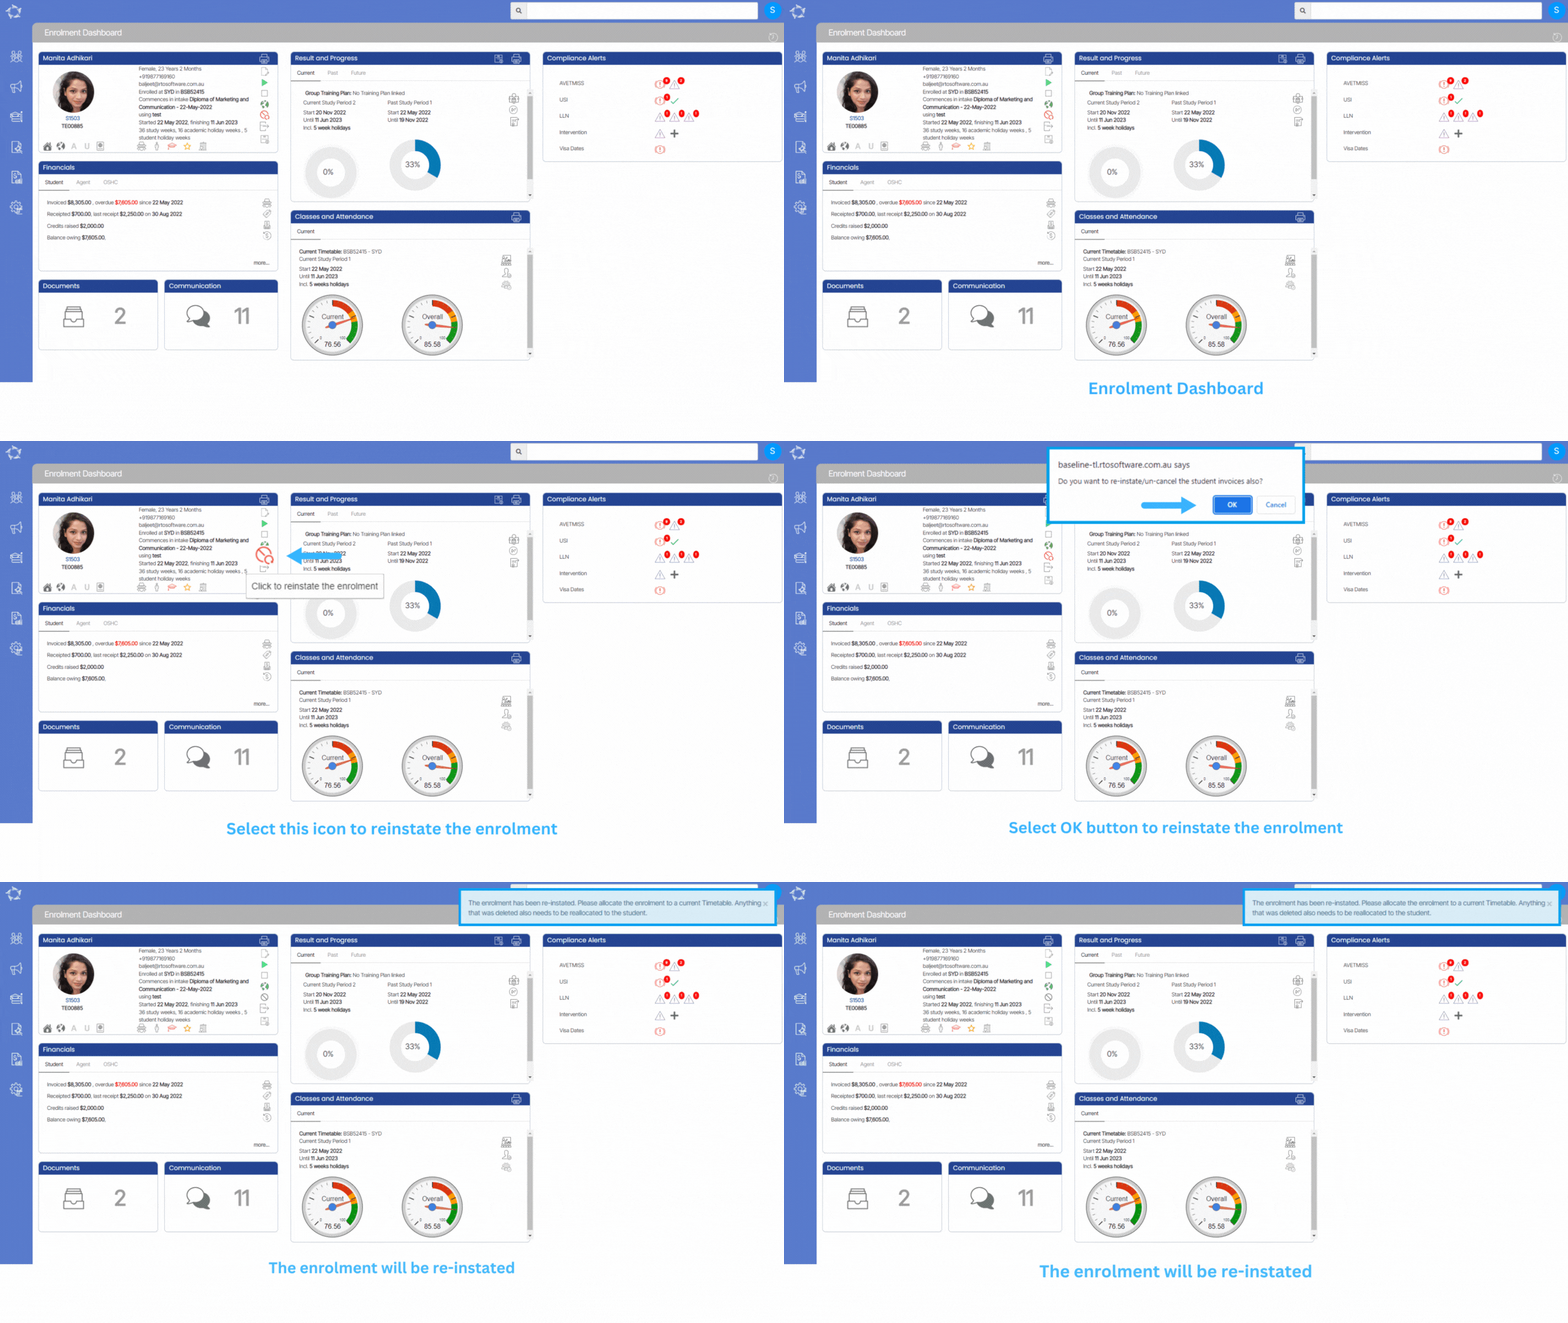
This Screen will allow you to view the Visa/CoE information of the student and enrolment. If you wish to link the enrolment to the student visa information then you need to go to the Student Dashboard > Visa/CoE information screen.

Note: You won’t be able to edit/add Visa/CoE at the enrolment level.

When you select this icon on the Enrolment Dashboard, it will take you to the View Visa/CoE details screen where you can view the Visa and/or CoE information for the enrolment.
How to Re-Instate an Enrolment in TL?

Enrolment Dashboard > Enrolment Profile Tile > Re-Instate Icon

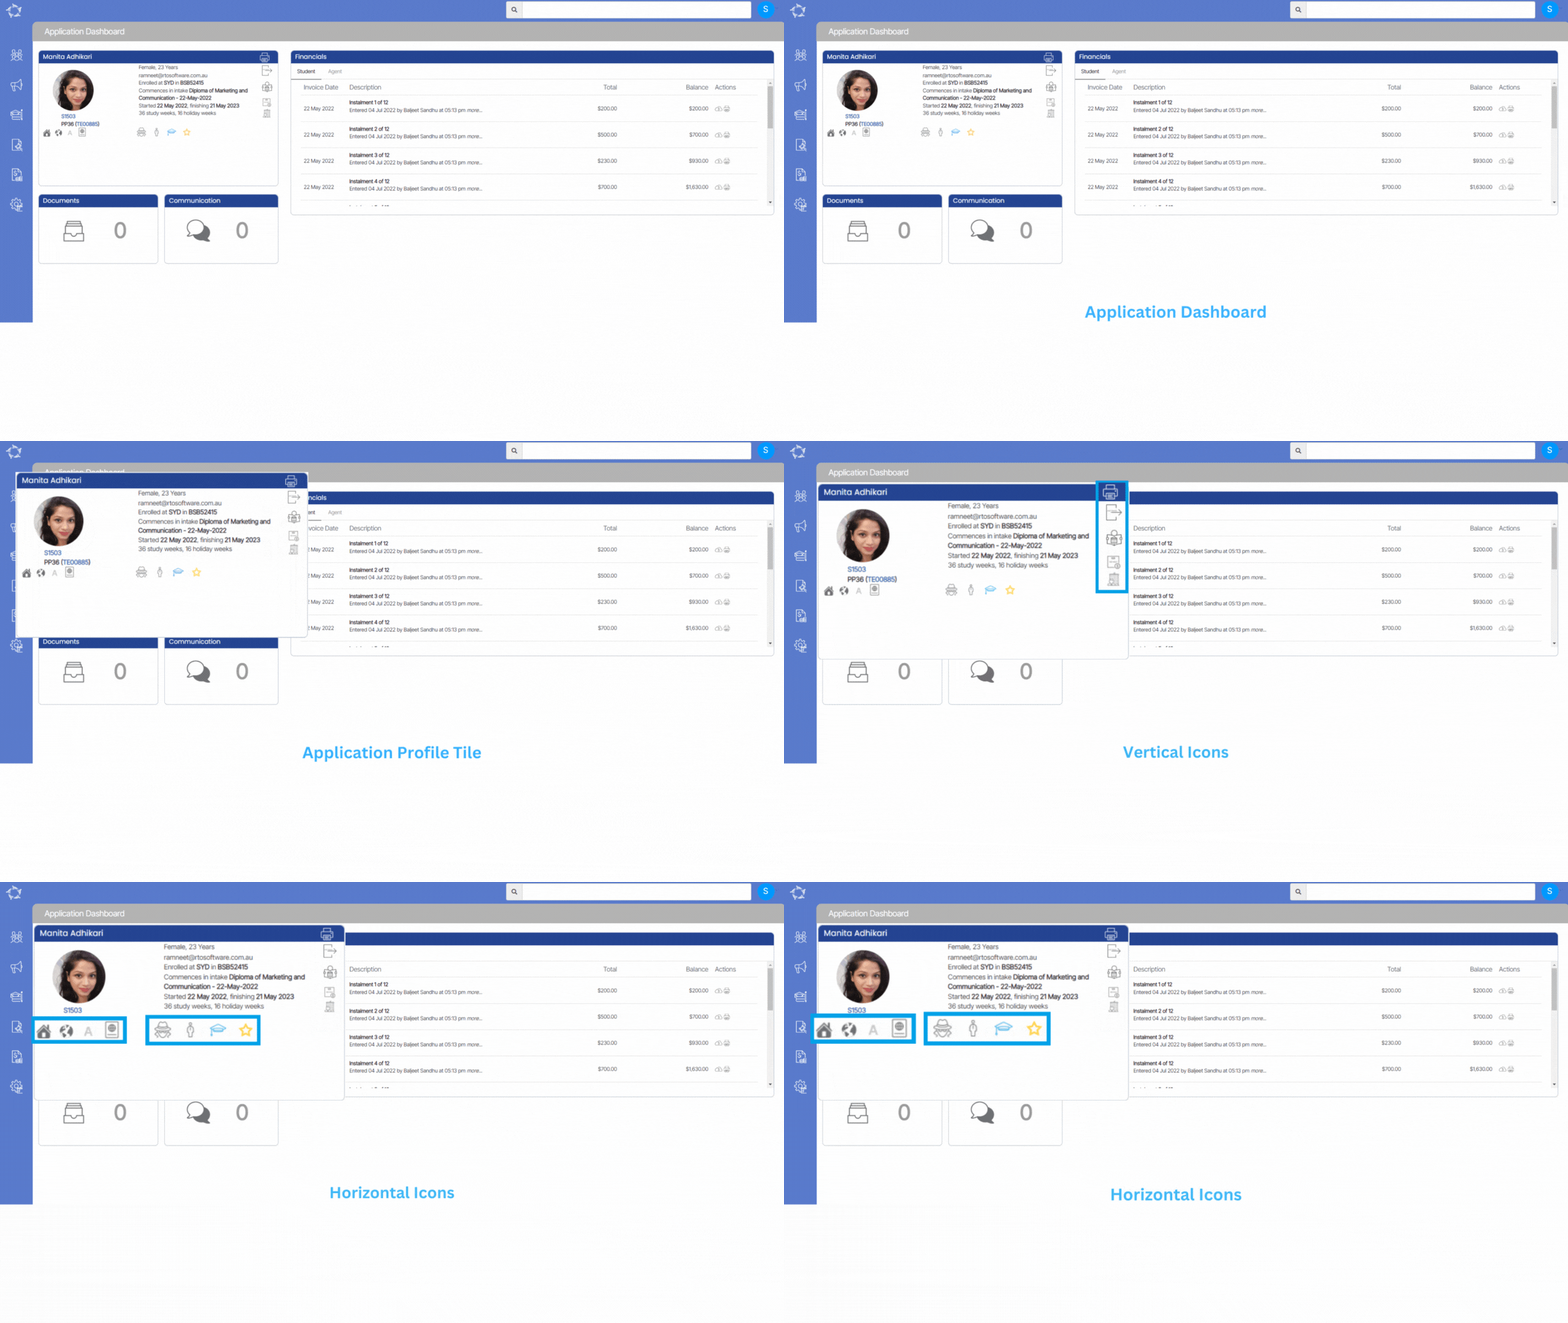
Follow the Below Steps to Re-Instate an enrolment:

  • To Re-Instate an enrolment mean to un-cancel the enrolment. You can do this by clicking on the Re-Instate icon.
  • After clicking on this, a pop-up message will appear on your screen asking you about un-canceling the linked invoices to the enrolment.
  • If you want that all the linked invoices with this enrolment are also re-instated then click on OK, otherwise click on Cancel. A message will appear on your screen confirming the re-instate of an enrolment.

IMPORTANT: If you click OK, then the system will reinstate all the canceled invoices linked to that enrolment not only those canceled during canceling enrolment.

Application Profile Tile

Application Dashboard > Application Profile Tile

This tile will show you the basic information about the applicant. You can update and edit the AVETMISS settings, Group Training Plans, FEE-HELP, and Employer Tracking, and many more fields related to the application.

Note – In the horizontal icons, Some of them Address, Overseas information, AVETMISS Student, etc. have tooltips and once you move the cursor on the icon, it will show you the information about the icon. To know more about the tooltip icons you can see the information on the Applicant Profile Tile and Student Profile Tiles.

Also, once the application is converted to enrolment, you cannot make any changes from the application dashboard. However, you can make changes from the Enrolment Dashboard.

Vertical Icons

Horizontal Icons

Address

Overseas Information

AVETMISS Student

Delivery Mode/Pre Dominant Identifiers

This screen will show you the enrolments that have Pre-dominant Delivery Mode missing for the subjects. To update the Delivery Mode, you need to follow the below steps:

For updating the Delivery Mode, you need to follow the below steps:

  • Go TEAMS > Enrolment Centre > Academic Tab > Student Result Screen > Delivery Type (2018)
  • Enter the correct number and Pre-dominant delivery mode and Save.

Include In National Export

This error occurs when the enrolment is a VET enrolment and it is not selected as Include in National Export at the enrolment level. If you want the enrolment to be reported to NCVER then must follow the below steps:

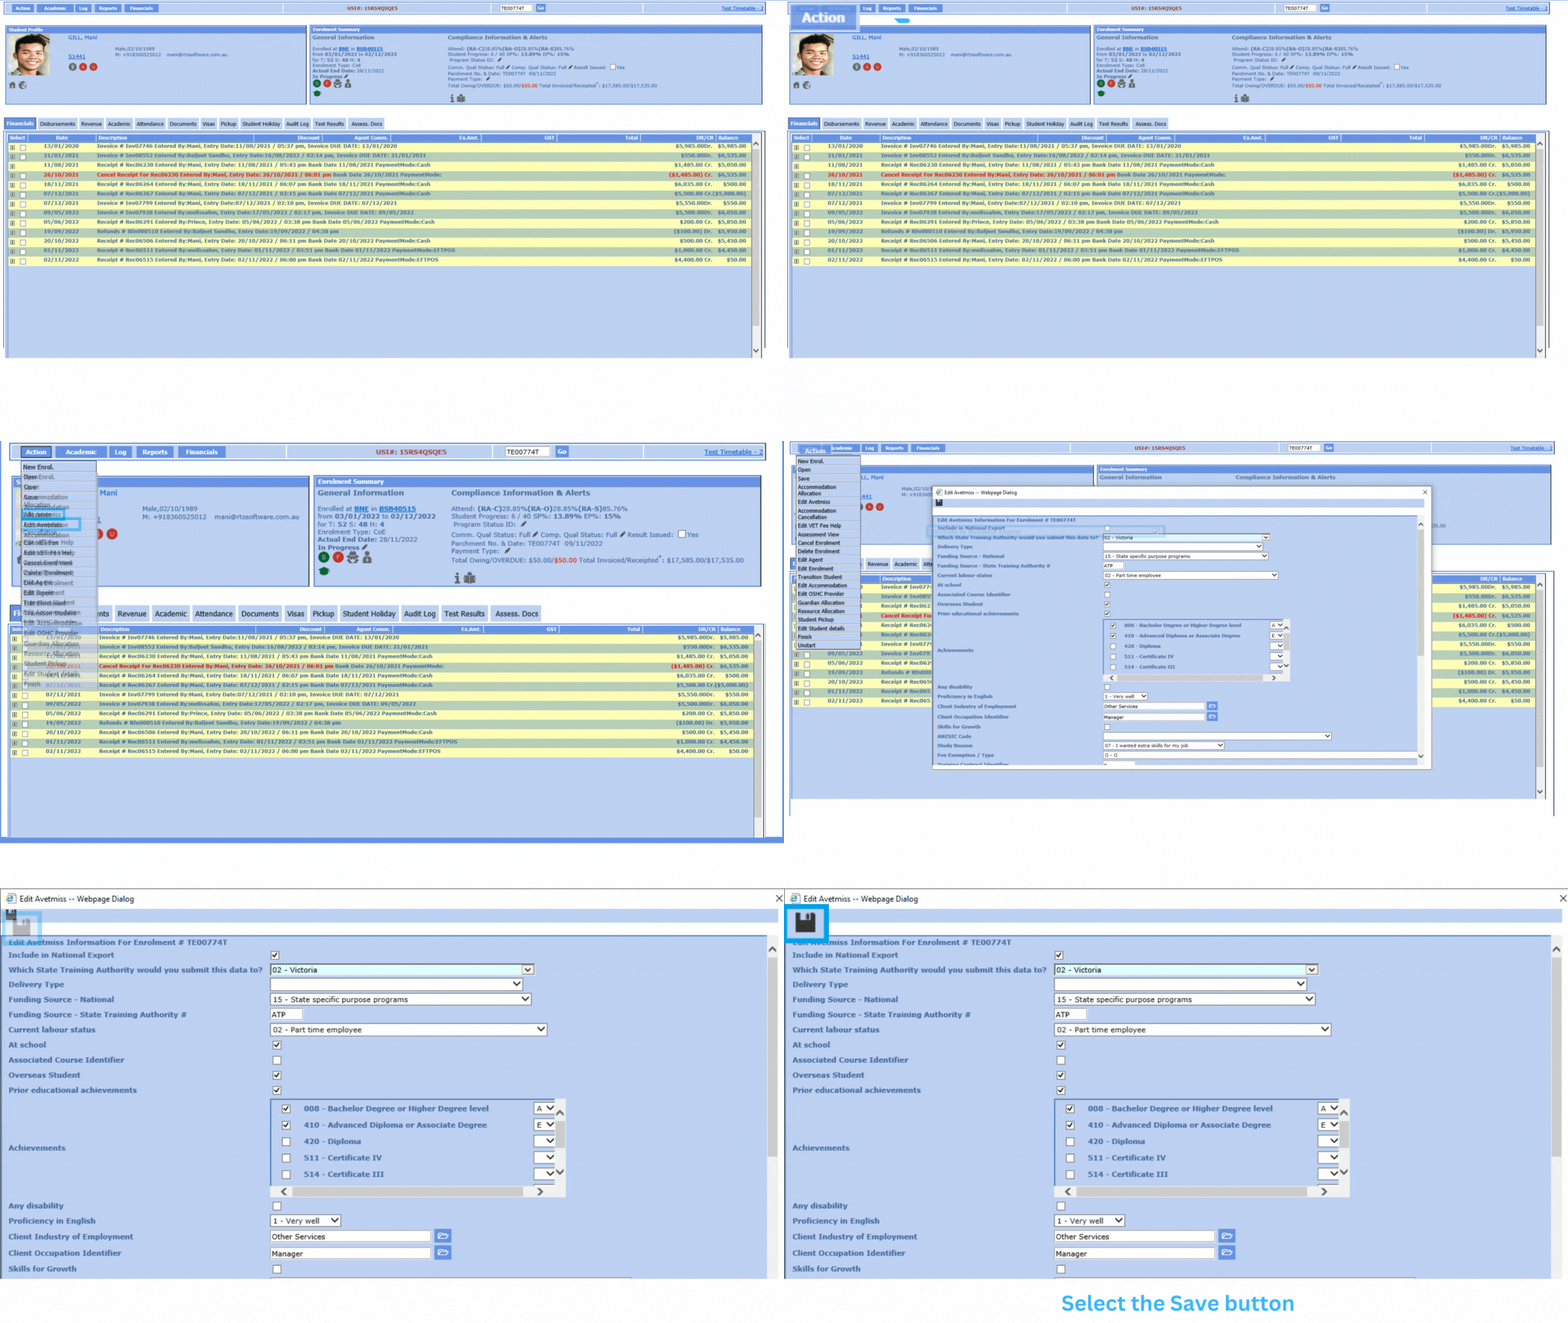
  • Go To TEAMS > Enrolment Centre > Actions Tab > Edit AVETMISS Screen.
  • Select the Include in National Export tick box and then save.