Student Requests – New

Select the ‘Student Requests – New’ option from the ‘Alerts – General’ tile on the main dashboard. This hyperlink serves as a centralised hub for managing Student Requests. It displays a listing grid containing all newly submitted requests, offering a range of flexible actions for each entry. You can conveniently view request details, add notes, initiate the processing of requests, decline them if necessary, or download request documents.

Additionally, the screen provides a dedicated Manage Requests Documents Button for efficient management of requested documents. For added convenience, a CSV report can be downloaded, providing a comprehensive overview of the requested data.

Student Request Done (last 30 Days)

The Student Requests Done (Last 30 Days) screen focuses on requests that have been submitted and successfully processed within the preceding 30 days. This screen is designed with a clear division into two main sections: filters and the grid.

Within the filters section, you are empowered to refine your view by selecting a specific date range. The dropdown menus for Campus and Request Type offer further customisation, allowing you to narrow down the displayed information based on these criteria.

Additionally, a page limit option is available to streamline the presentation of requests. If there are more than 100 requests distributed across different pages, you can choose a page limit to consolidate all requests onto a single page. The grid then dynamically displays the requests according to the selected filters, and for those wishing to delve deeper, the view icon provides detailed student request Notes. You can also manage documents from the Manage Request Documents buttons.

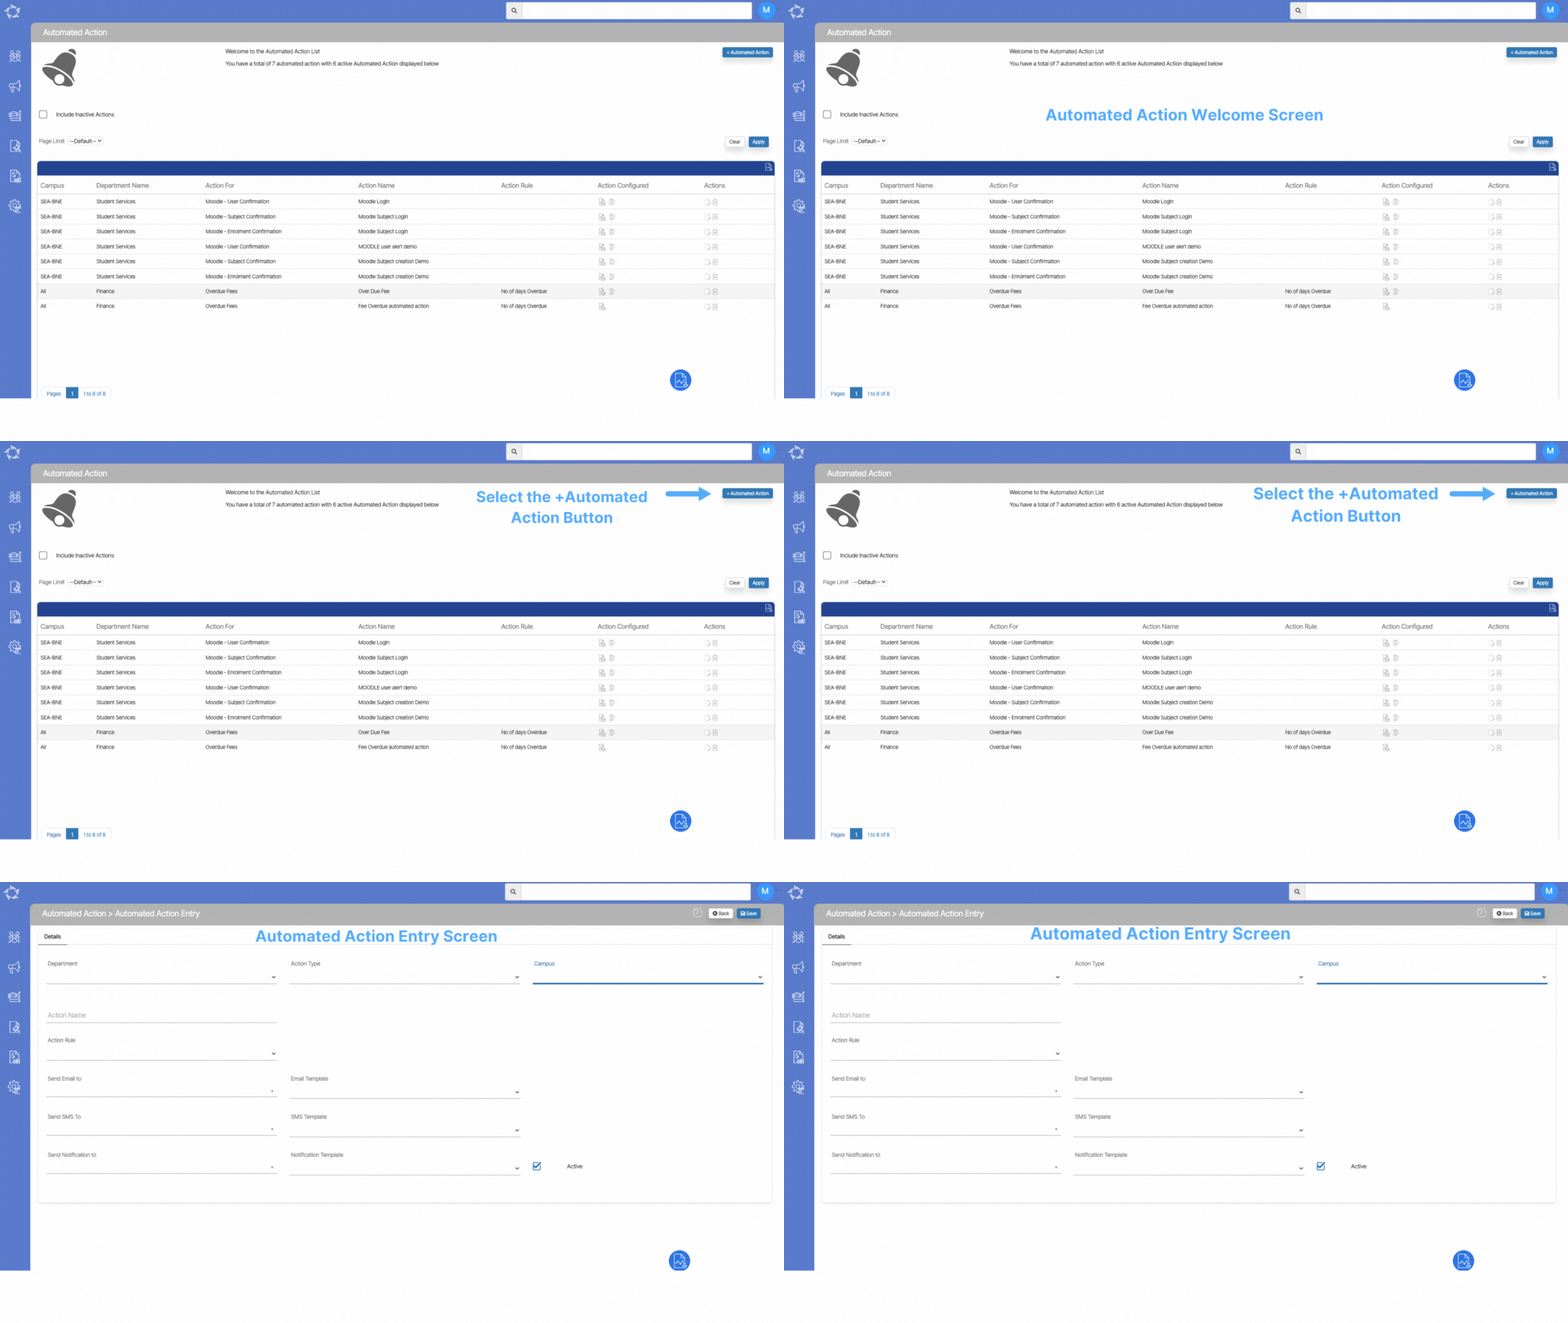
Automated Action Entry Screen

The automated entry screen provides the capability to send emails based on the setup such as overdue emails, reminder emails, and orientation emails.

It’s important to note that for these actions and alerts to become fully functional, they must be activated from the backend. To initiate the setup process, please reach out to our support team, who will ensure the proper activation of these features.

Please note that the dropdown on this is user code and one can create them from the User Code Screen in the System.

FiltersExplanation
DepartmentSelect the department from the dropdown, it can be financed, academic, student services etc
Action TypeBased on the department selected, the Action Type dropdown will show you the list in the dropdown.
CampusIf you have multiple campuses, this will show you a list of all the campuses in the dropdown and you can select one campus at a time.
Action NameYou can type in the Action Name as you require.
Action RuleIf you have any action rule created in TEAMS, please select it from the dropdown.
Send Email ToSelect the desired email sent to (Agent, user or student) option from the dropdown.
Email TemplateSelect the email template that you wish to set up for the Automated Action
Email UsersSelect the user name from the dropdown (this name will be visible as from in the email)
Send SMS ToSelect the desired SMS sent to (Agent, user or student) option from the dropdown.
SMS TemplateSelect the SMS template that you wish to set up for the Automated Action
Send Notification ToThe selected object from the dropdown will receive the notification.
Notification TemplateIf you have created any notification template, it will appear here.
ActiveSelecting the Active tick box will make the automated action active.

Student Request Forms Workflow and Management

In the student request forms workflow and management process, you need to see the below steps.

Firstly, you need to start by creating a request within TEAMS. For instance, if you generate a request form like Apply For Holidays and upload it as a PDF document within TEAMS and save it. Once the request form is updated in TEAMS, it becomes accessible on the Make a Request screen within the Student Portal.

When a student selects their program, they can view the available request forms, including “Apply For Holidays.” Upon choosing this specific request, they will be presented with a download option, enabling them to retrieve the PDF document you have uploaded in TEAMS for this request.

After downloading, students can fill out the document and re-upload it, ensuring that the format remains in PDF. Upon the completion and submission of a request, it will appear as a Pending Request in the grid on the student portal.

These pending requests are displayed on the Student Request New Listing Screen within TEAMS, presented in the form of tiles. This visual representation enhances the visibility and accessibility of pending requests, making it easier for you to track and manage the request status. It’s a convenient and organised way to monitor the progress and status of student requests within the system. You can Approve, decline, download, view or create contact logs for the request.

Once the request is approved or declined by you the same status will be updated on the Student Portal for that particular request.

Please see the below tabs to understand the request form process in TEAMS and the Student Portal

As mentioned above, when you are on the Manage Request Document screen and you want to create a new request form then you need to see the below steps:

  • Go to Main Dashboard > Alerts General Tile and select the Student Request New hyperlink.
  • You will be directed to the Student Requests screen
  • Select the Manage Requests Documents button on the right hand side of the screen and the system will open another screen namely Manage Requests documents.
  • Select the +Add button above the grid on the right side and when you select it a popup window will appear on the same screen
  • You will see a Request Type dropdown. (this dropdown is a user code and if you wish to create a user code related to your Request Type, please contact our support team and they will guide you to understand, how you can create a User Code in TEAMS).
  • After selecting the Request Type, please select the Upload Documents button to upload the request form related to the selected request type. Please note that the documents that you are uploading are in PDF format only.
  • Additionally, you can add the Notes in the Notes Box for your forms and save them.

IMPORTANT – if you upload multiple documents while creating a request form, the system will create two different entries in the grid for that specific request type.

Now, when students initiate a new request by selecting the Make a Request Icon and upon selecting the program from the dropdown, they will immediately see the Request Types and grid displaying essential information of all the requests as the Request Type, Request Date, and Request Status for the specific program they have chosen.

Additionally, we have added a new feature that allows the students to select any request on the screen and after selecting any request, the grid will show them all the related requests history and status. They can download the request forms and fill it out. When the request form is filled out by the student, they can upload it back into the system.

Please note, that if you have already submitted a request for any request type then you won’t be able to upload any documents for that specific request type. Also, its worth noting that the upload functionality is designed exclusively for PDF documents.

Automatic Student Email Creation – New Functionality

We have introduced a new feature in our system that automates the creation of student email addresses, using the college Domain Name, when applications are converted into student records.

This functionality operates in three distinct ways:

1. If the primary email address is updated, the domain email will be automatically reflected in the secondary email address field.

2. In cases where both the primary and secondary email addresses have already been populated at the application level, the system will seamlessly update the additional email address field with the student’s domain email upon conversion.

3. When all email fields, including primary, secondary, and additional, are already filled, the domain email will replace the additional email address.

For example, take Prince Sharma with a student number S1234, his automatic secondary email will be S1234@rtoteams.com.au.

IMPORTANT – It is essential to configure the new System Setting and Campus level setting, specifically the Domain Name:

1. Updating the domain name on the Site Setting screen ensures that this functionality applies to all applicants and students within TEAMS.

2. Furthermore, for organisations with multiple campuses, there is a separate domain name setting within the Campus Entry > Settings Tab screen, allowing customisation of domain names for students enrolled in different campuses.

Please note that the domain name should be entered following the “@” symbol without any spaces, for instance, @rtoteams.com.au. This improvement simplifies the management of student email addresses and ensures uniformity within the college domain.

Improvements in Cancel Receipt functionality

The receipt functionality on the student financial screen has recently undergone some minor changes.

With these improvements, when a receipt is cancelled, it will no longer display any icons in the Actions column for that particular receipt. Instead, the cancelled receipt entry will be highlighted in a distinct red maroon colour, clearly indicating its cancellation status. These changes ensure that cancelled receipts are readily identifiable.

Certificate Report – New Enrolment Start Date and End Date Long Format Merge Fields

We have made a new addition namely a new merge field Enrolment Start Date Long Format and Enrolment End Date Long Format to our Certificate Report.

This enhancement now allows the certificate report to display the enrolment start date and enrolment end date in a long format. This means that when generating certificates, you can now include long format enrolment dates (for example – 23 October 2023 – 23 October 2024), providing comprehensive and detailed information on enrolment.

Bulk Exclusion of Subjects from AVETMISS Submission

A convenient new bulk feature has been introduced in TEAMS; Exclude Subjects from AVETMISS Icon, which is now accessible in the Subjects AVETMISS settings tab within the Enrolment AVETMISS settings screen.

This feature makes it easier for you to exclude particular subjects for AVETMISS submissions. With this feature, you can select multiple subjects by selecting the corresponding checkboxes and then proceed to use the Exclude Subjects from AVETMISS Icon to effectively exclude the selected subjects from the AVETMISS submissions.

New Functionality – Cancel Multiple Invoices in Bulk

A new feature has been introduced to enhance the Student Financial Detail screen, streamlining the process of cancelling multiple invoices in bulk. This functionality introduces checkboxes alongside an invoice cancel icon within the grid.

To cancel multiple invoices for a particular enrolment, you can now easily select the checkboxes corresponding to the invoices you wish to cancel. Once the desired invoices are selected, clicking on the cancel invoice icon will initiate the cancellation process. You will then be prompted to provide a cancellation reason, and upon selection and saving, the chosen invoices will be cancelled efficiently.

Enhanced Visa Type Tracking

We have introduced a seamless process for managing visa details in the system. When entering a New Prospect, you can now specify the Visa Type from the Prospect Entry screen. As you progress, these visa type-related details will automatically populate in the ‘Visa Details’ screen of both the ‘Applicant Dashboard’ and ‘Application Dashboard.’

These details will continue to be accessible and editable as applications are approved and converted into enrolments. You have the flexibility to modify these visa details at both the Applicant(before converting) and student levels to suit your specific needs.