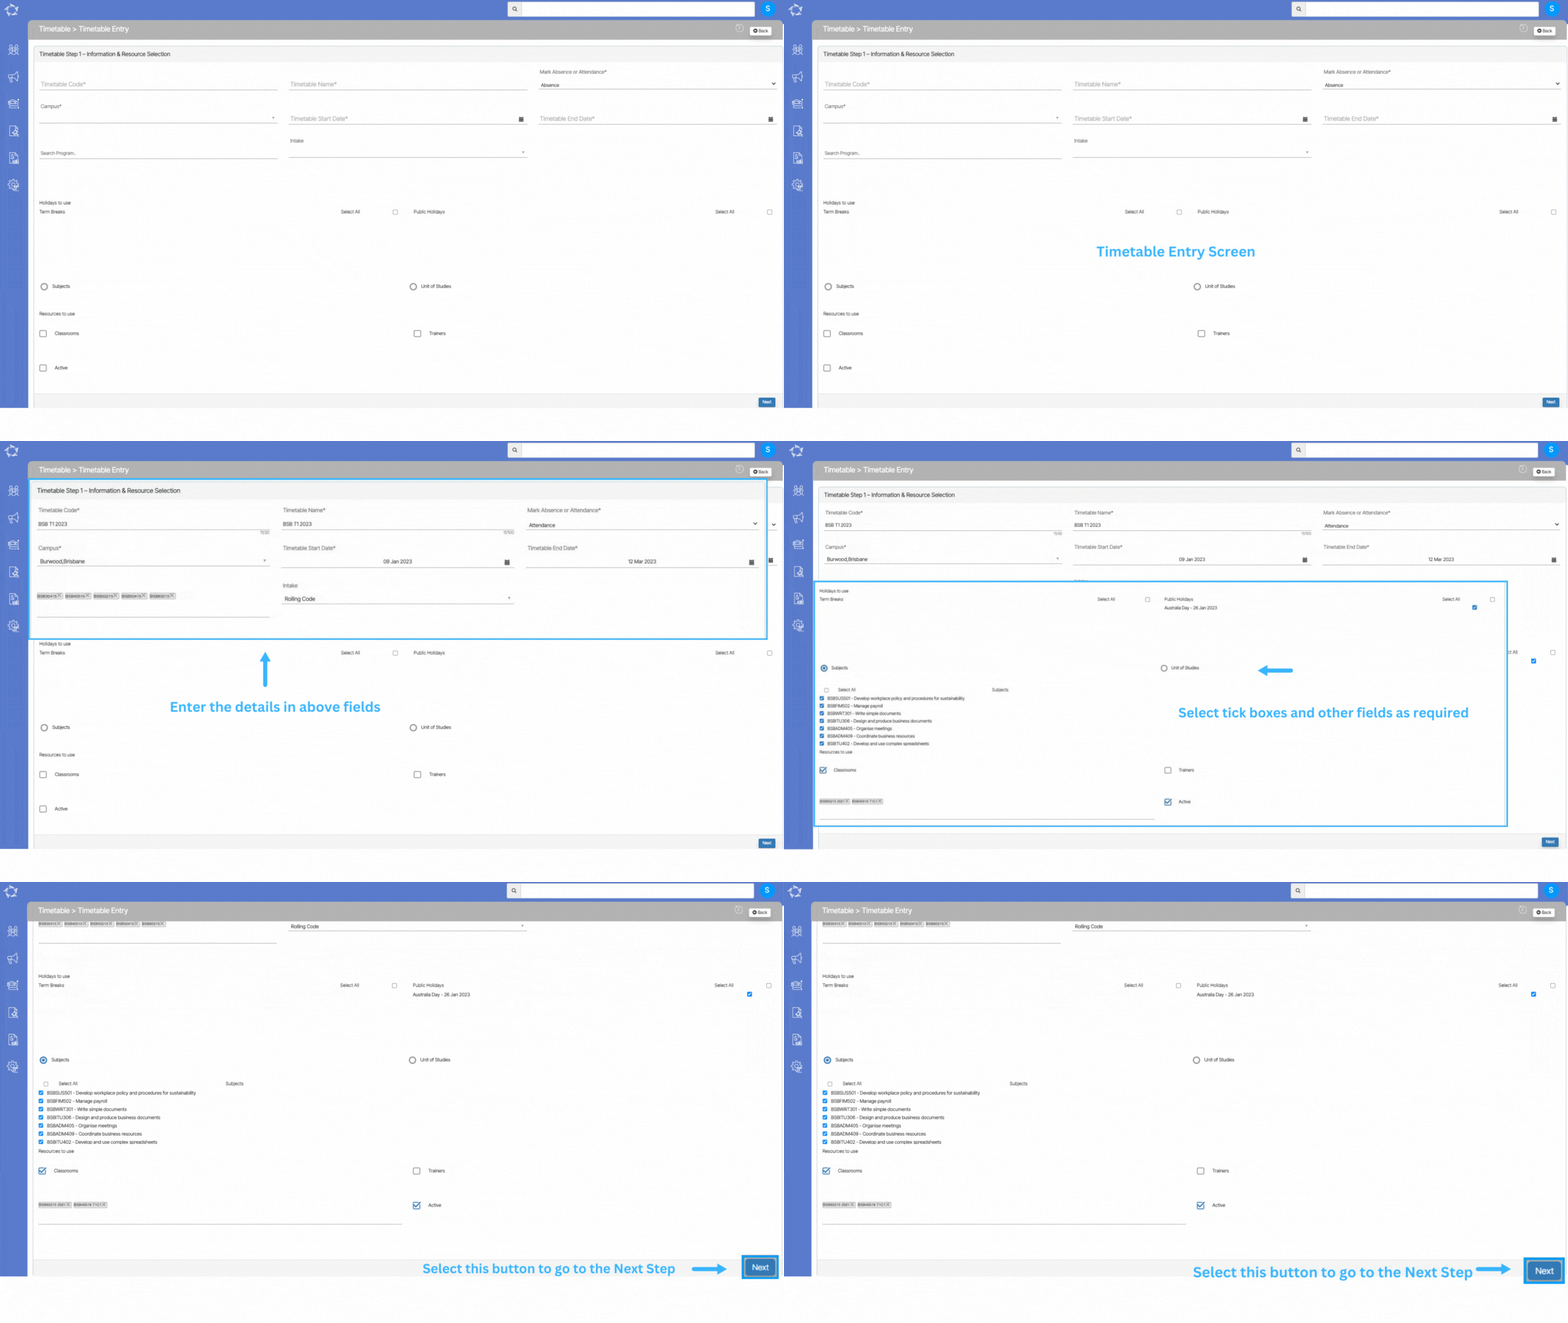
Main Dashboard > Academics menu > Timetable Button > Timetable Entry Screen
To create a new timetable using the Timetable entry screen, you’ll need to follow a few steps. First, you’ll need to open the Timetable entry screen, which can typically be accessed through a +Timetable button on the Timetable Welcome Screen.
Once you’re on the Timetable entry screen, you’ll need to input the relevant information for the timetable, such as the Timetable Code, Timetable Name, and date range. You may also need to assign specific resources, Subjects, and Trainers. Once you’ve input all the necessary information, you can select the next button.

An explanation of the fields and filters is as below:
| Fields | Explanations |
|---|---|
| Timetable Code and Timetable Name | When creating a new timetable using the Timetable entry screen, you’ll need to select a Timetable Code and Timetable Name. While these can be anything based on your preference, it’s recommended to use the Program Code for the Timetable Code so that it’s easy to allocate students to the timetable based on the Program Name. |
| Mark Absence or Attendance | If you are required to mark attendance or absence for an individual in a system, you will see a drop-down menu with two options. You can select either “Absence” or “Attendance” depending on your needs. If you need to mark someone as absent, then you should select the “Absence” option. If you need to mark someone as present, then you should select the “Attendance” option. |
| Campus | If you are creating a timetable that involves multiple campuses, you will likely be given a drop-down menu with a list of campus options. This drop-down menu allows you to select the appropriate campus or multiple campuses, depending on your needs. |
| Timetable Start and End Date | When creating a timetable, you may be asked to specify a date range during which the timetable will be active. This date range typically refers to the period of time for which the timetable is applicable, such as a semester or academic year. |
| Search Program | You may need to link specific programs or courses to the timetable to ensure that they are included in the schedule. You can use a search field to search for the relevant program and then link it to the timetable. |
| Intake | When linking a program to a timetable, you may need to select a specific intake that is associated with the program or course. To do this, you can use a dropdown menu that is typically located within the search program field. Once you have searched for a program, the dropdown menu will display all of the available intakes that are linked to that program. You can then select one or multiple intakes from the dropdown menu to link with the timetable. |
| Holiday to use Term Break | To include term breaks in the timetable, you may be given the option to select an “All” tick box. This tick box allows you to indicate that you want to include all term breaks in the schedule, rather than selecting each break individually. |
| Public Holidays | You can include public holidays in the schedule. To do this, you may be given the option to select a tick box that allows you to add public holidays to the timetable. |
| Subjects and Unit of Studies | You may also need to link specific subjects or units of study to the timetable. To do this, you may be given the option to select a radio button that corresponds to the subjects or units of study you want to include in the timetable. Once you have selected the radio button, the system will load a list of subjects or units of study that are associated with that radio button. You can then select one or multiple tick boxes for the subjects or units of study you want to include in the timetable. |
| Classrooms and Trainers | You need to include specific classrooms and teachers as resources for the classes. To do this, you may be given the option to select tick boxes that correspond to the classrooms and teachers you want to include in the timetable. Once you have selected the tick box, the system will display magic search fields on the screen. You can then use these fields to search for and select multiple classrooms and trainers to include in the timetable. |
| Active | You need to activate the timetable in order to make it live and visible to others. To do this, you can select a tick box that corresponds to activating the timetable. Once you have selected this tick box, the timetable will become active and visible to others who have access to it. |
If you have any queries, please do not hesitate to contact us on 1300 85 05 85 or email us on support@rtosoftware.com.au
