XERO Integration

TEAMS can be integrated with XERO for your students and agents financials. To start the integration, an initial setup is required with the assistance of our technical team. Below are our requirements to start the integration:

  • You need to provide us with a list of your charts of accounts from XERO.
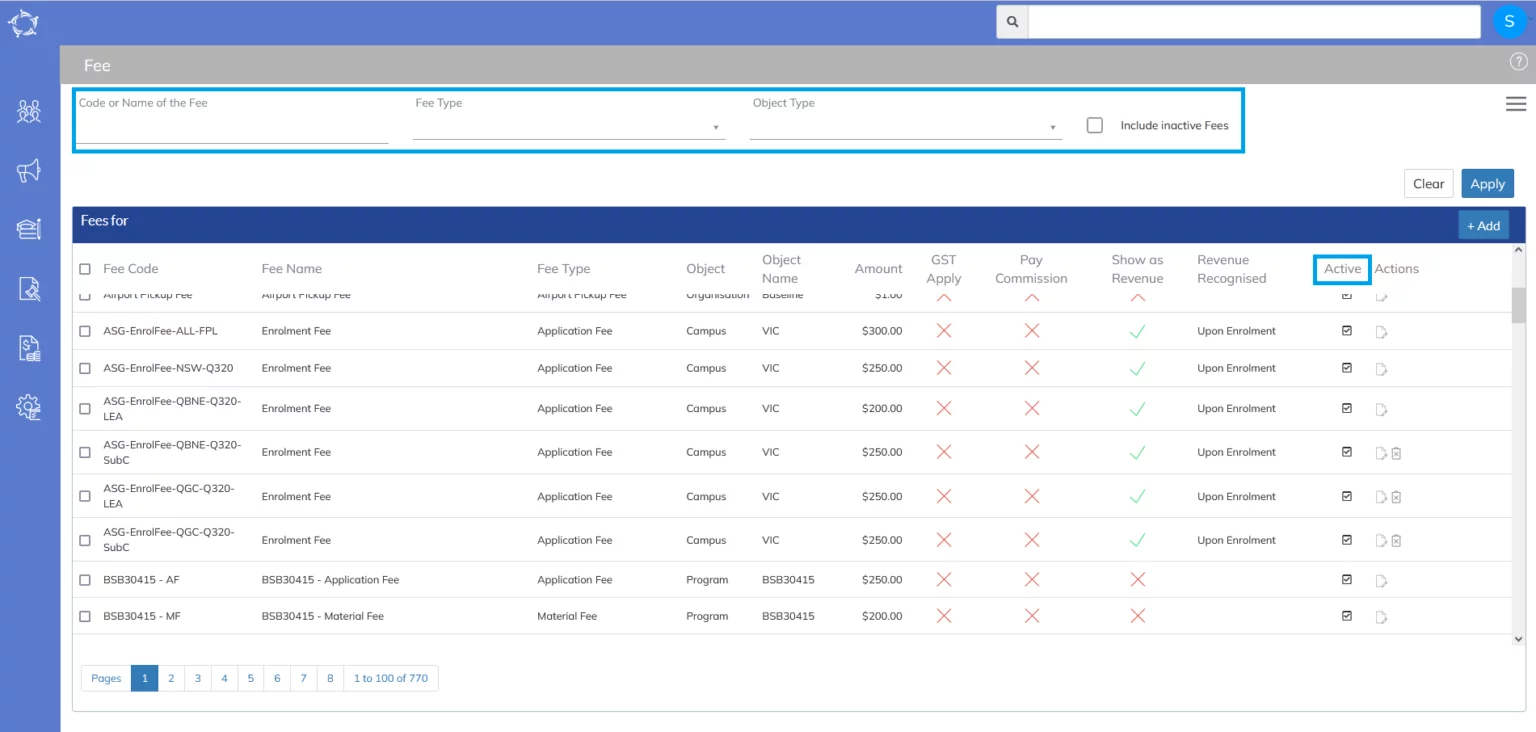
  • We will provide you with a list of mapped TEAMS fees along with your chart of account codes.

NOTE – Your approval is a crucial step in this process. This is because any incorrectly mapped fees with an inaccurate chart of accounts codes will be pushed to XERO with the incorrect code. To prevent such issues, it is essential to carefully review and approve the provided list. Nevertheless, we are happy to offer you the list of all TEAMS fees, giving you the option to conduct the mapping independently.

  • You need to provide us with your bank account details.
  • A XERO login for us with some admin permissions.

Our technical team will update the XERO chart of accounts codes with each fee entry in TEAMS along with the bank accounts.

What can you expect from this integration?

  1. Students’ contacts will be created in XERO.
  2. Your students’ invoices will be pushed to XERO out of TEAMS.
  3. Any payment entered in TEAMS for the student’s invoice will be pushed to XERO.
  4. Your agents’ commission invoices will be pushed to XERO out of TEAMS.
  5. Your agents’ pre-deducted and post-paid commissions payments entered in TEAMS will be pushed to XERO.
  6. Any modifications made to an invoice within TEAMS will automatically reflect in XERO. This includes changes to the due date or invoice amount, ensuring consistent updates in both systems.

When will a contact and their invoices be pushed to XERO?

Once you start a student’s enrolment in TEAMS, the XERO API will create the contact for that student in XERO along with the student’s invoices.

Click here to learn on how to start a student’s enrolment into TEAMS.

To start enrolments in bulk, follow this post.

Even without starting a student’s enrolment if you record a receipt in TEAMS, it will then be pushed to XERO automatically. This is for those students who are future starters and have paid their first initial deposit.

Click here to learn on how to record a receipt into TEAMS.

To see a contact, you can use any of the below highlighted paths in XERO:

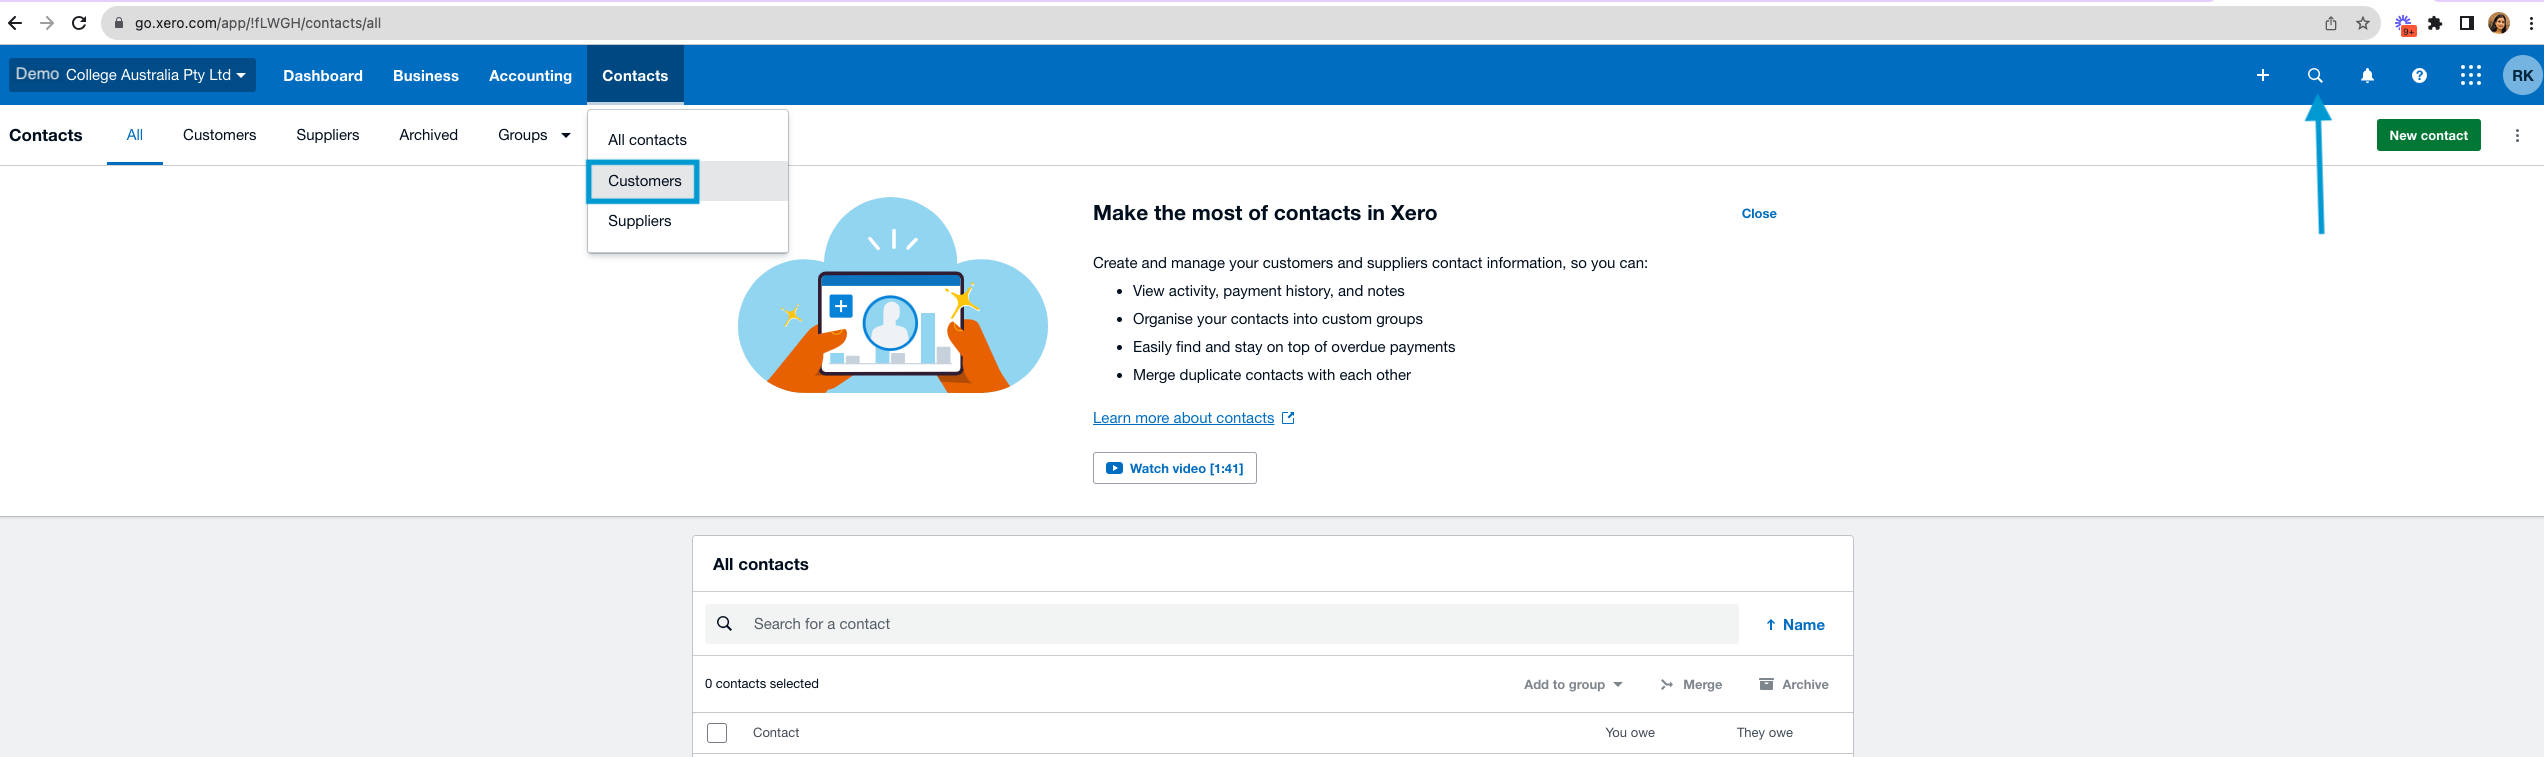
How will a contact with TEAMS Invoices look in XERO?

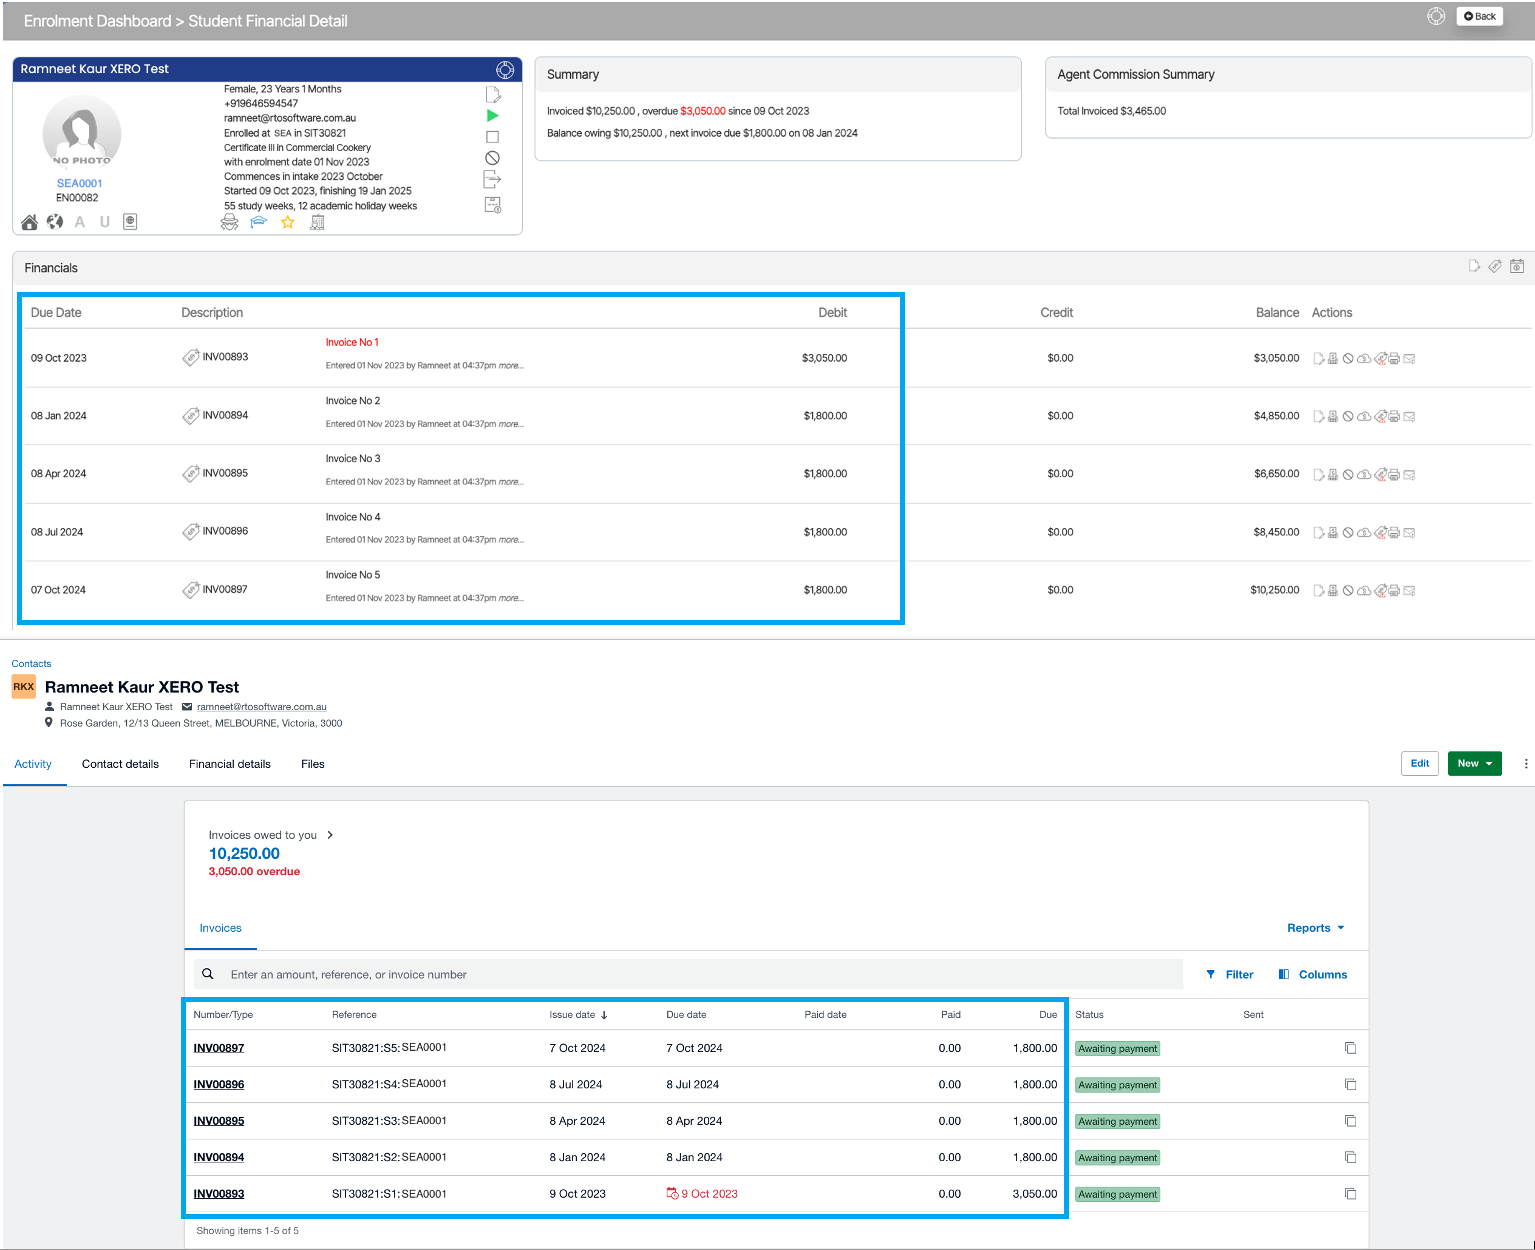
In the above TEAMS and XERO’s screenshot, you can see that all of your TEAMS invoices will be there in XERO. Once you start recording payments for the student in TEAMS, it will start pushing those payments into XERO too, and you can see that under the Paid Date and Paid column.

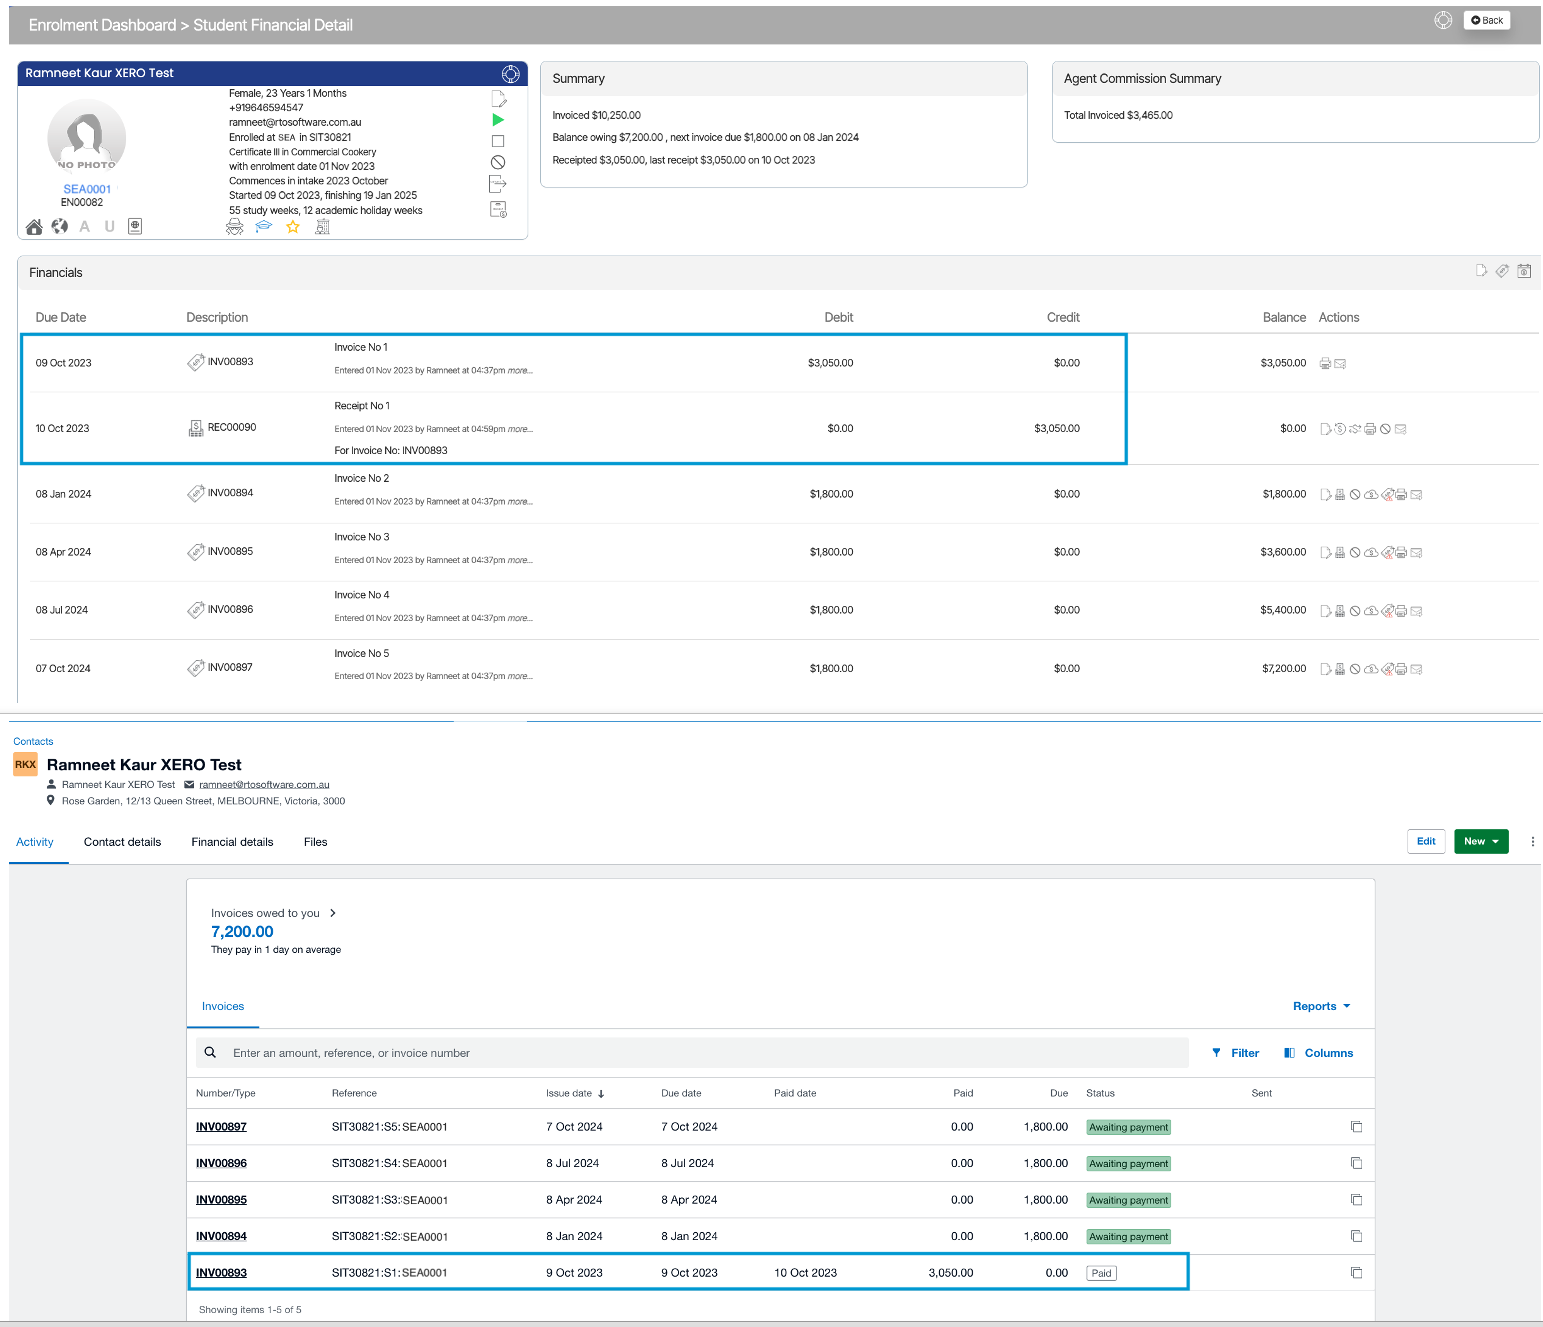
The reference column shows the program code, instalment number, and student number.

So this is how your individual invoice will look, and if the payment has been recorded in TEAMS, it will also show you the payment.

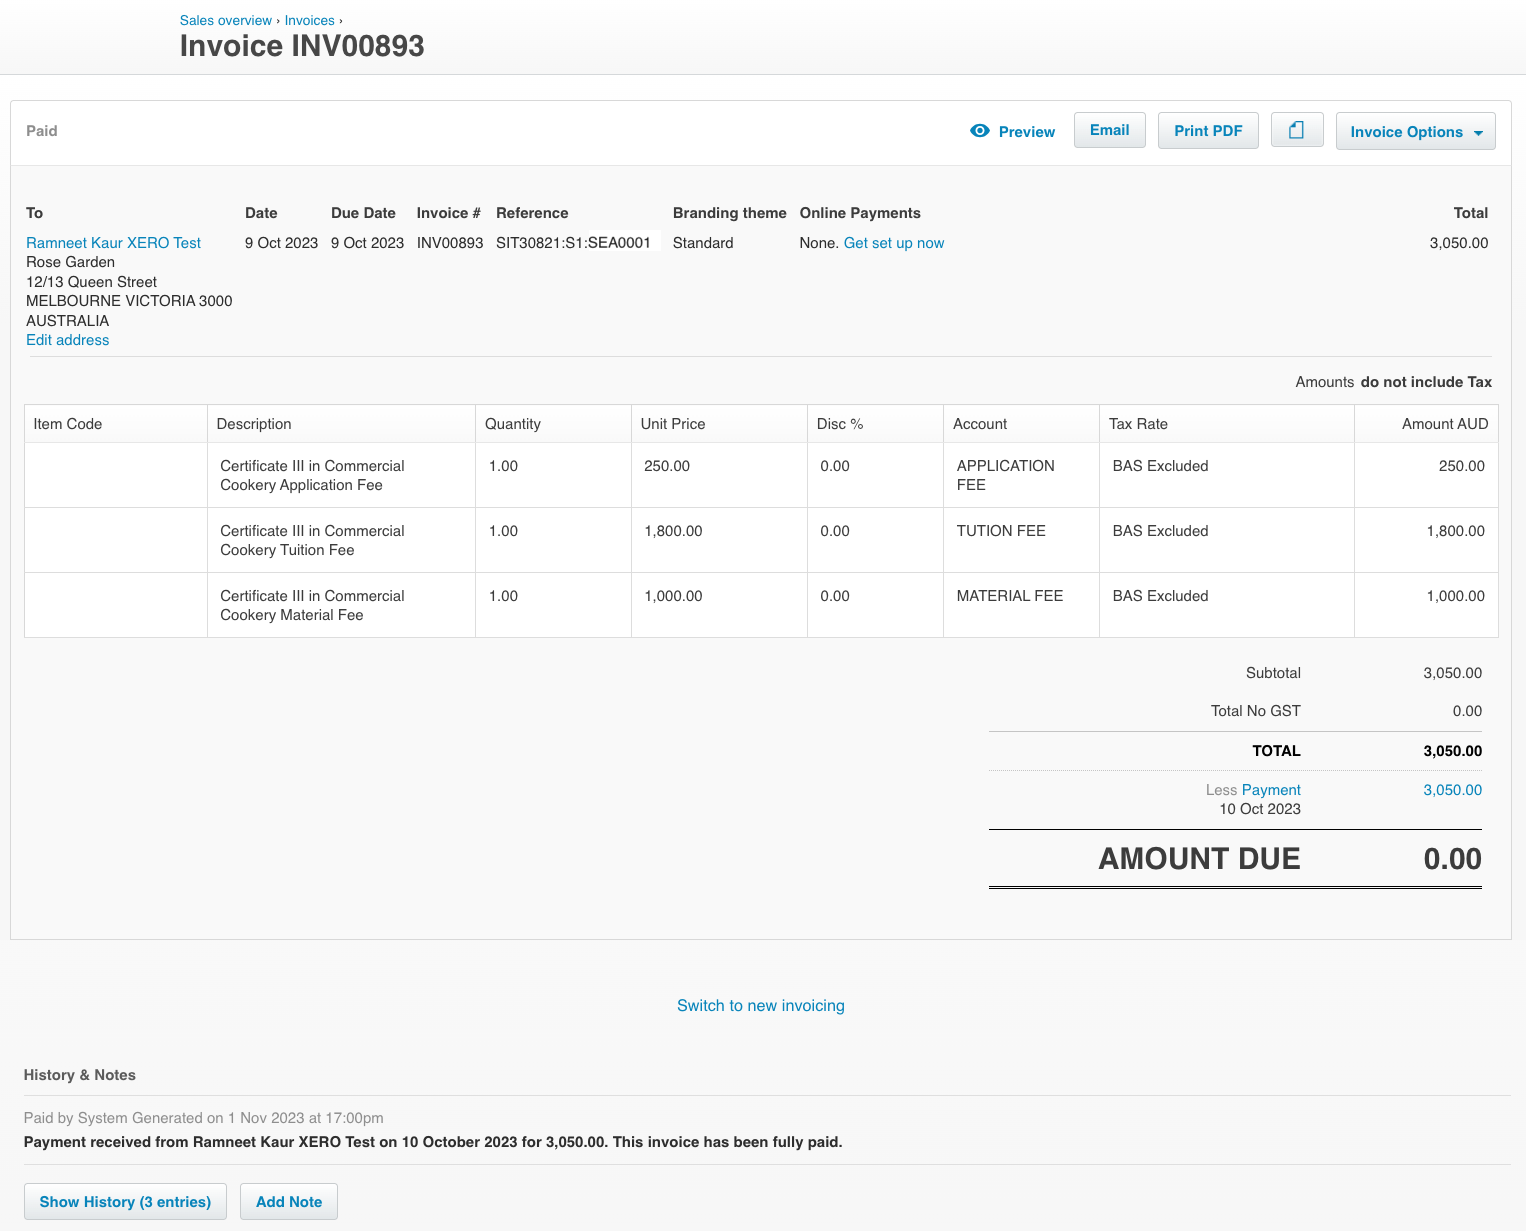
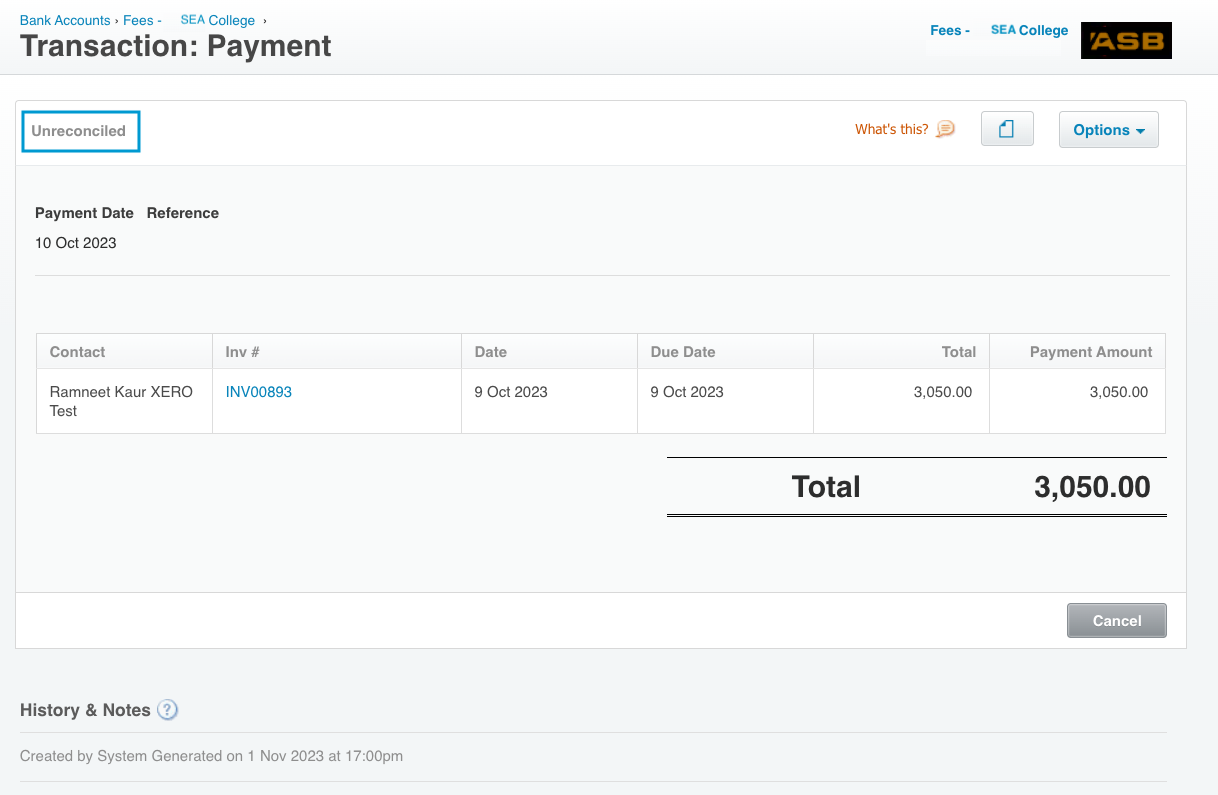
Upon clicking on the payment’s link, you will notice the unreconcile label because this integration can only push the payments for you; however, you manually have to reconcile them.

For reconciliation, the bank account panel on your dashboard shows how many bank statement lines have been imported and need to be reconciled. If there is no number to display, it indicates there are no bank statement lines to reconcile.

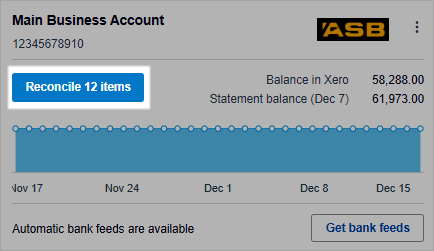
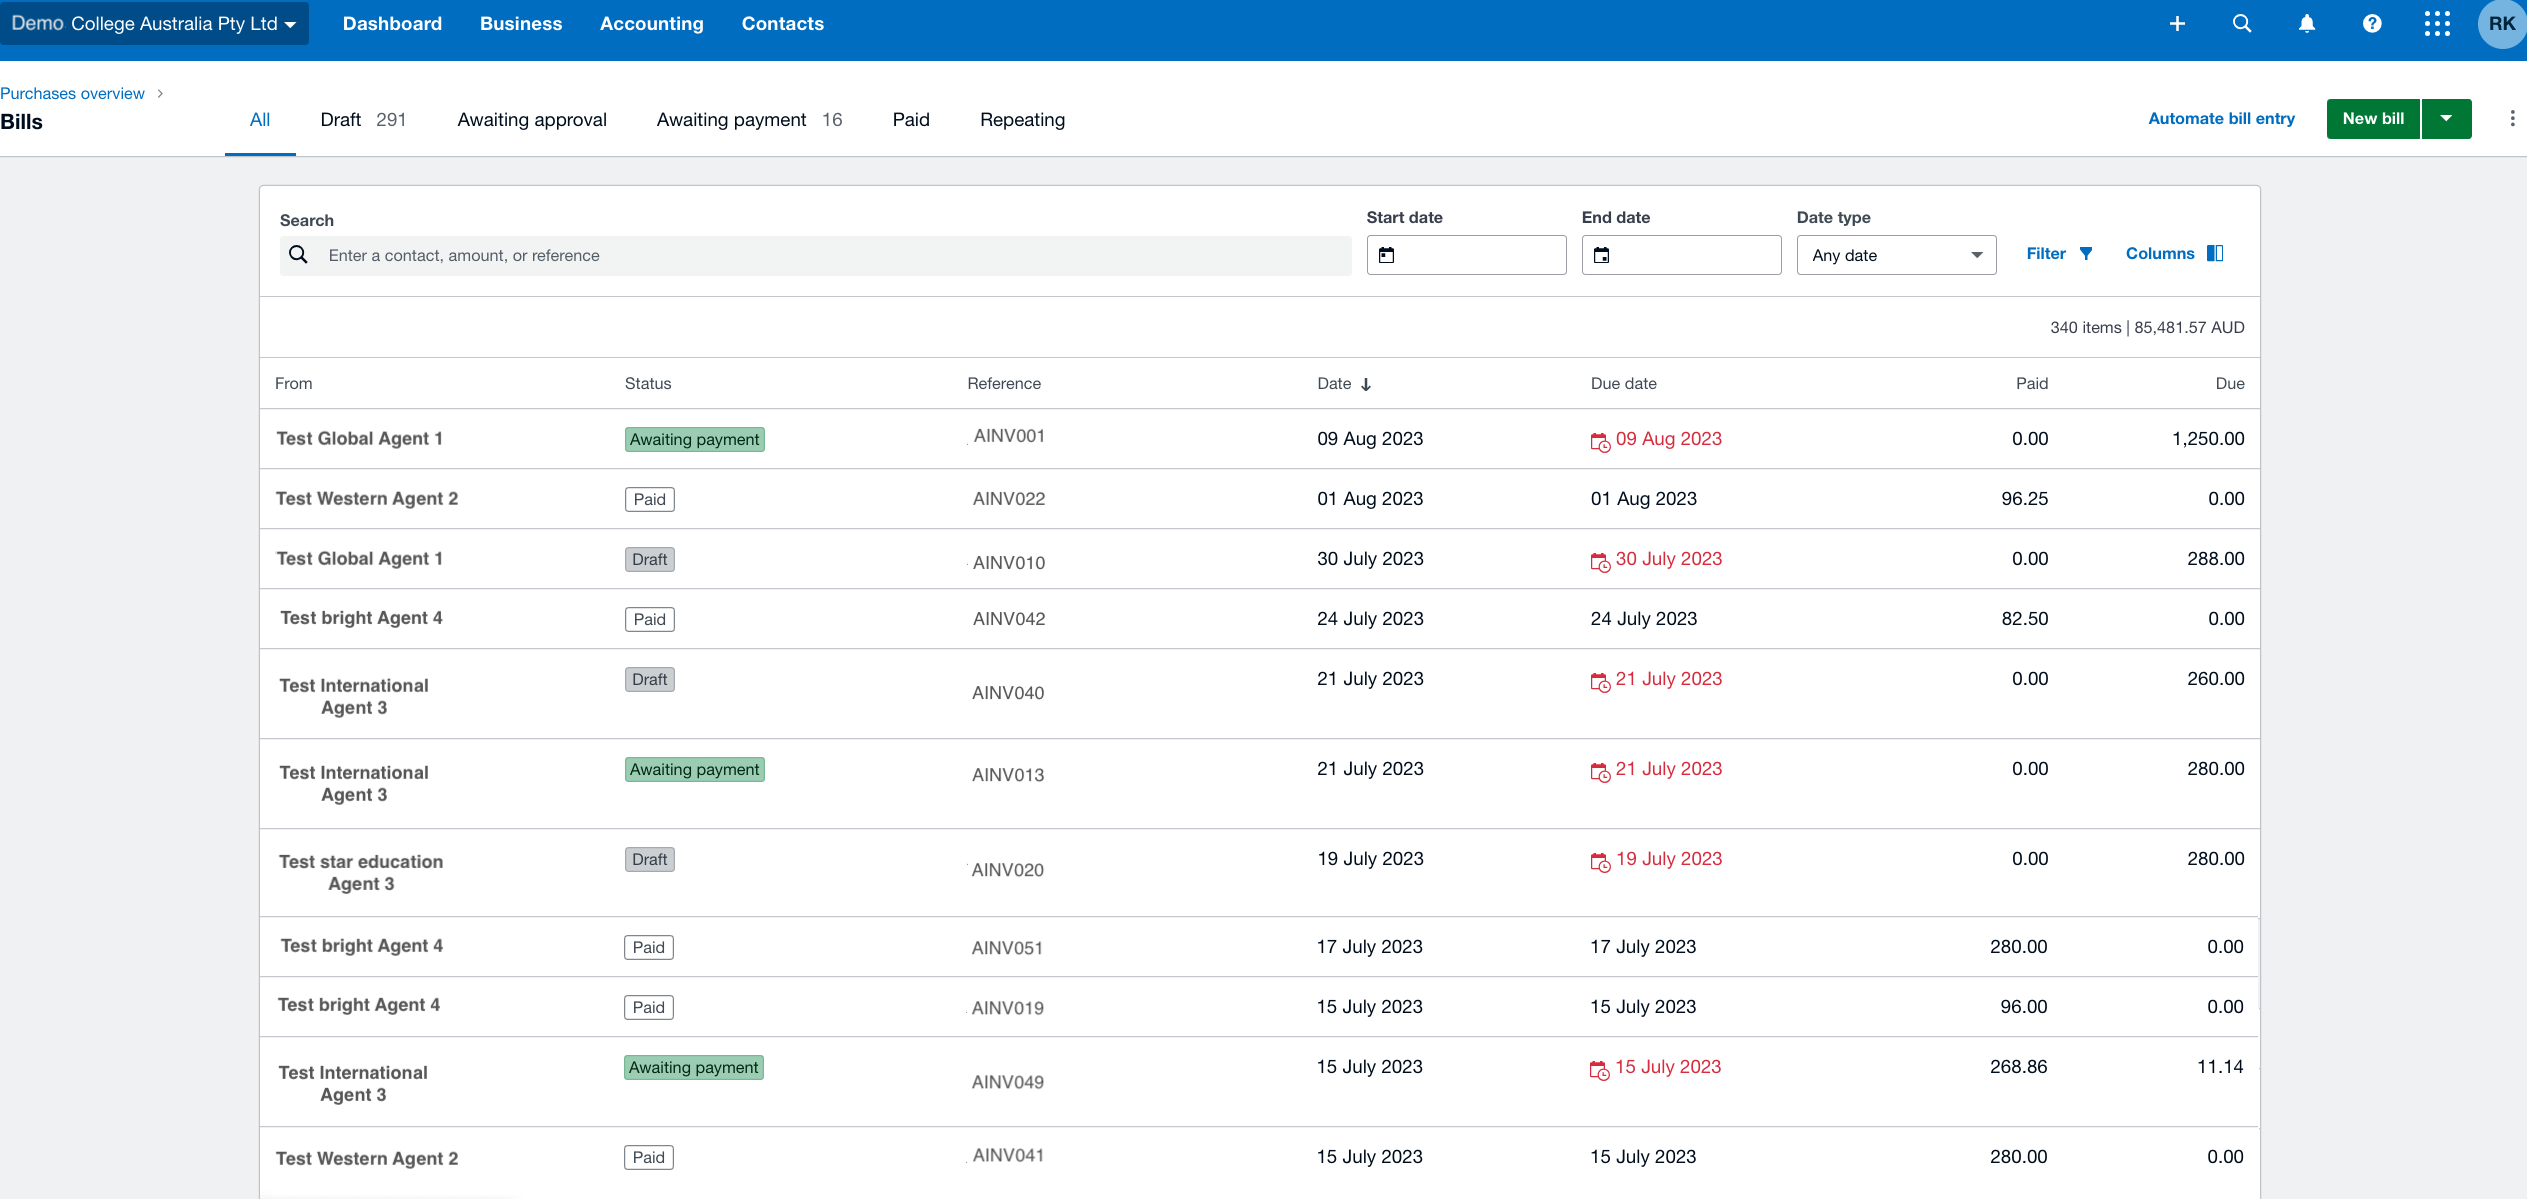
You can simply click on the count and then reconcile all of your payments. Similarly, your agent commission invoices will also be pushed to XERO along with their payments and you can check them by going to Business > Bills to Pay.

Your Bills to Pay will be considered drafts, and once you record any commission in TEAMS, it will then be approved and paid in XERO for you.

Here’s how our system seamlessly integrates with XERO: It automates transactions, eliminating the need for you to manually enter the same data on both platforms

Coming soon

  1. Canceled invoices in TEAMS will be voided in XERO automatically. Right now, you have to do it on both platforms.
  2. Negative invoices i.e. credit notes entered in TEAMS will automatically be pushed to XERO. Right now, you have to do it on both platforms.

Uploading Invoices in Document Log

We have introduced a new change for uploading Invoices in the Document tile on the Enrolment Dashboard.

When you generate any invoice from the student financial screen and once the invoice gets generated, it will auto upload the generated invoice in the document log.

Student Finacial Details screen

Enrolment Dashboard > Document Screen

If you have any queries, please do not hesitate to contact us on 1300 85 05 85 or email us via support@rtosoftware.com.au

Q&A – Pay commission is not turned on at fees level

Sometimes all the settings are correct but still, the agent commission invoices are not getting raised on the enrolment dashboard, then there is one more reason due to why the sysetm will not raise the agent invoices and that is the pay commission is not turned on at fee level.

To turn on the pay commission you need to follow the following steps:

  • Go to the Finance menu > Fee

  • The system will open the fee screen, from where you need to find out for which tuition fee you want to turn on the pay commission ( you can use the filters to search the fee).

  • Select the edit icon from the action column and the system will take you to the “Fee Entry screen” from where you can make changes.
  • On this screen, you just need to select the pay commission tick box and select the save button.

  • When the screen comes back after saving the changes, you need to go back to the enrolment dashboard and relink the agent by using the edit icon from agent tab.

If you have any queries, please do not hesitate to contact us on 1300 85 05 85 or email us via support@rtosoftware.com.au

How to edit Subject Invoices?

Application Level

To edit the subject’s invoices, you need to go to the Application Dashboard > Financials Tile > Actions column > Edit icon as shown below in the screenshot:

  • Once you have selected the edit icon, the system will take you to the Application Dashboard – Edit Invoice screen, where you can edit the subject’s invoice by selecting the edit icon from the Invoice details tile as shown below:
  • By selecting the edit option, you can edit the fees in the Fee Selection tile and then select Add button and Save as highlighted below:

Enrolment Level

  • The user can also edit the subject’s invoice from the edit icon on the Enrolment Dashboard > Student Financial Details screen as shown below:
  • By selecting the edit icon, the system will take you to the Enrolment Dashboard > Edit Invoice screen and there you can edit the invoice and Save it as shown below:

If you have any queries, please do not hesitate to contact us on 1300 85 05 85 or email us via support@rtosoftware.com.au

How to setup FEE HELP in TEAMS

FEE HELP is a loan scheme that helps eligible students enrolled in a fee paying place to pay their tuition fees. There are two versions of FEE HELP that are:

VSL – VET Student Loans

HED – Higher Education Loan Program

No matter what version of FEE HELP you wish to manage in TEAMS; you may wish to manage both, there are a number of steps you must complete for the system to know that you wish to manage FEE HELP. These steps are as follows:

To setup FEE HELP in TEAMS you need to complete the following steps:

  • Typically if you have notified TEAMS support that you wish to use FEE HELP in TEAMS, they will have turned this on for you. If you do not see options in screens such as Programs, Subjects, UoS (Unit of Studies), Applicant, Application, Student & Enrolment for FEE HELP then it may not have been turned on. To do this you need to go to the Site Settings screen under the main menu of System Admin > Organisation > Site setting. If you do not have access to this, you must speak to someone at your college that does.

  • On the site setting screen there is a tick box called “Is Fee help Approved” which should be selected.
  • Once you turn on the Fee Help approved tick box, you then need to select what version you want to use and report on from TEAMS. The options are VET student loan or HigherED or select both if relevant.
  • Once you have selected SAVE, all the fields related to the FEE HELP version you selected will be visible on their respective screens.

    Once the above steps are completed you need to setup FEE HELP settings in the following screens:
  • Programs
  • Subjects OR
  • Unit of Studies (only if you are using them for a program that is for FEE HELP)

    A . Program

    From the main menu select the Academic Menu icon and then select the Programs icon where you will be taken to the list of Programs in TEAMS. Search and select the edit icon in the Action column for the program that you wish to setup and it will take you to the Program screen. In the Setting tab will be a field for FEE HELP Availability and there are radio buttons for:
  • VET Student loan (VSL)
  • Higher Ed FEE HELP
  • Neither

    As shown below:

IMPORTANT: A program can only be one of the FEE HELP options it cannot be both.

By default, the option of neither will be selected, select the option that you want and then SAVE the change.

After doing the above step you then need to update the FEE HELP settings for the program by following these steps:

  • Click on the burger menu and select the FEE HELP option.
  • The system will open a dialogue box (floating window) for FEE HELP Program settings as shown below:

You need to set the settings for the program and then select the SAVE button in the bottom right-hand corner of the screen.

That is all the settings you need to do for each of your FEE HELP programs, you then need to move on to setting up your Subjects and/or Unit of Studies, based on how you have setup your programs. Please speak to support for further assistance if you are unsure what level to set up.

B . Subjects

From the main menu select the Academic Menu icon and then select the Subject icon where you will be taken to the list of Subjects in TEAMS. Search and select the edit icon in the Action column for the Subject that you wish to set up and it will take you to the Subject screen. In the Details tab, there will be a field for FEE HELP Availability and there are radio buttons for:

  • VET Student loan (VSL)
  • Higher Ed FEE HELP
  • Neither

As shown below:

IMPORTANT: A subject can only be one of the FEE HELP options it cannot be both.

By default, the option of neither will be selected, select the option that you want and then SAVE the change.

After doing the above step you then need to update the FEE HELP settings for the Subject by following these steps:

  • . Click on the burger menu and select the FEE HELP option.
  • The system will open a dialogue box (floating window) for FEE HELP Subject settings as shown below:

You need to set the settings for the Subject and then select the SAVE button in the bottom right-hand corner of the screen.

  • Then go to the burger menu again to select the Funding Fee setup for the subject.

The system will take you to the Subject Funding fee setup screen. On the funding fee setup screen you can add multiple entries with the different combinations of Enrolment type/funding source code/state/delivery type by clicking on the Add button.

  • The system will open a dialogue box (floating window) for Subject Funding Fee setup settings as shown below:

You need to set the settings for the Subject and then click on SAVE button in the bottom right-hand corner of the screen.

C. Unit of studies

From the main menu select the Academic Menu icon and then select the Unit of Studies icon where you will be taken to the list of Unit of Studies in TEAMS. Search and select the edit icon in the Action column for the Unit of Studies that you wish to set up and it will take you to the Unit of Studies screen. In the Details tab, there will be a field for FEE HELP Availability and there are radio buttons for:

  • VET Student loan (VSL)
  • Higher Ed FEE HELP
  • Neither

As shown below:

IMPORTANT: A Unit of Studies can only be one of the FEE HELP options it cannot be both.

By default, the option of neither will be selected, select the option that you want and then SAVE the change.

After doing the above step you then need to update the FEE HELP settings for the Unit of Studies by following these steps:

  • Click on the burger menu and select the FEE HELP option.
  • The system will open a dialogue box (floating window) for FEE HELP Subject settings as shown below:

You need to set the settings for the unit of Studies and then select the SAVE button in the bottom right-hand corner of the screen.

  • Then go to the burger menu again and select the Funding Fee setup for the Unit of Studies.

The system will take you to the UoS Funding fee setup screen. On the funding fee setup screen you can add multiple entries with the different combinations of Enrolment type/funding source code/state/delivery type by clicking on the Add button.

  • . The system will open a dialogue box (floating window) for UoS Funding Fee setup settings as shown below:

You need to set the settings for the UoS Funding Fee Setup and then select the SAVE button in the bottom right-hand corner of the screen.

That is all the settings you need to do for each of your FEE HELP Programs, Subjects and Unit of Studies.

If you still have any queries, please do not hesitate to contact us via support@rtosoftware.com.au or 1300 85 05 85.

Important Links